@robgrz What is Carbide cutting to help you align? I’m a little confused. Is the positive of the notch getting put onto my design by CC at the Tile mark? If so, why do I need a notch on Tile 1 — since the notch will be cut relative to wherever I zero my work…no?
OK…so this doesn’t make sense to me…I think this is an unnecessary restriction if CC places the positive of the notch…
The dimple is a known location in absolutes, right? So if CC were to put the positive at tileheight-units over x-zero, when I locate my workpiece so that the positive that CC placed is nested in the dimple, CC immediately knows the absolute position of the next tile’s x-zero, based on it’s knowledge of where the dimple is…yes?
EDIT: THis is also why I don’t need to register the dimple on tile 1 — because if CC places the positive relative to MY x-ZERO, tile 2 will automatically have it’s positive in the right place when relocated. Tile 1’s x-zero and tile 2+'s x-zero will be different.
@robgrz Are you trying to solve this problem without modifying CM?
That’s important to know so I don’t include a “Know the absolute location of the notch” function.
I like this concept. Tiling is a mix of art and science. Your approach minimizes the potential for human error, while still being very flexible and simple to implement.
I’m looking for the most generic solution possible, and then we’ll see what CC can do to help, and CM as a last resort. It’s also possible we’d make jigs to make this easier and more foolproof.
CC is cutting a the purple path into the current tile so that it will align with the fence when you index it forward. It only needs to cut deep enough into the sheet to create a straight edge, and the alignment feature (the dimple).
The notch you cut in tile 1, will be used to align tile 2. The initial position for tile 1 would require some level of accuracy, but it would be forgiving, within reason.
2 Likes
Sorry Rob, I just don’t get it. I have a “dimple” which is a concave shape (a semi-circular hole) in my fence, yes? Then is CC going to cut the positive of that dimple (a bump out) into my piece, so that it can jigsaw puzzle into the fence hole? I’m not sure I understand it.
Yes, that’s exactly the idea.
Got it. Wouldn’t it be easier to cut the dimple into the workpiece and have the fence have the positive? This way, the length of the fence is not needed to be known and CC doesn’t have to cut away anything other than the dimple. And then the design works for any length tiling
Doesn’t that dimple prevent you from having a 3rd or 4th tile or will the fence be short enough that the dimple on previous sections will not be in the way?
wouldn’t the bulge out thing from the work be like a tab, that you can remove later…
… if it was cut INTO the work that wouldn’t work so well
Either way, you’re losing a margin of your piece to the vertical space used by the tabs…either CC is going to cut away the indent (my suggestion and preference) or cut away the fence length except for the indent.
In the design, I would treat that vertical space as a margin - and not use it at all. I’d be losing a VERY small footprint (compared to the width of the newest machines) of material.
No…I don’t think so. Basically, the dimple would be cut out of the workpiece ABOVE the tile, so that the n+1th tile dimple is cut with the nth tile content. Then you slide the work down, the dimple engages, and the previous dimple is nowhere near the cutting area.
I’m going to draw some diagrams…this is getting too complicated without concrete examples.
Ah. For some dumb reason my brain was pushing the workpiece the opposite direction which makes no sense I guess. Feed from back to front, not the other way. Gotcha.
@robgrz Thinking overnight about this some more…I think I’ve got it: I deleted my post from last night, as this one is accurate. Also, sorry for all the edits…I’m trying to be as clear as possible and I’m writing this at 4 in the morning…
Here’s the setup:
The fence has a bump out…
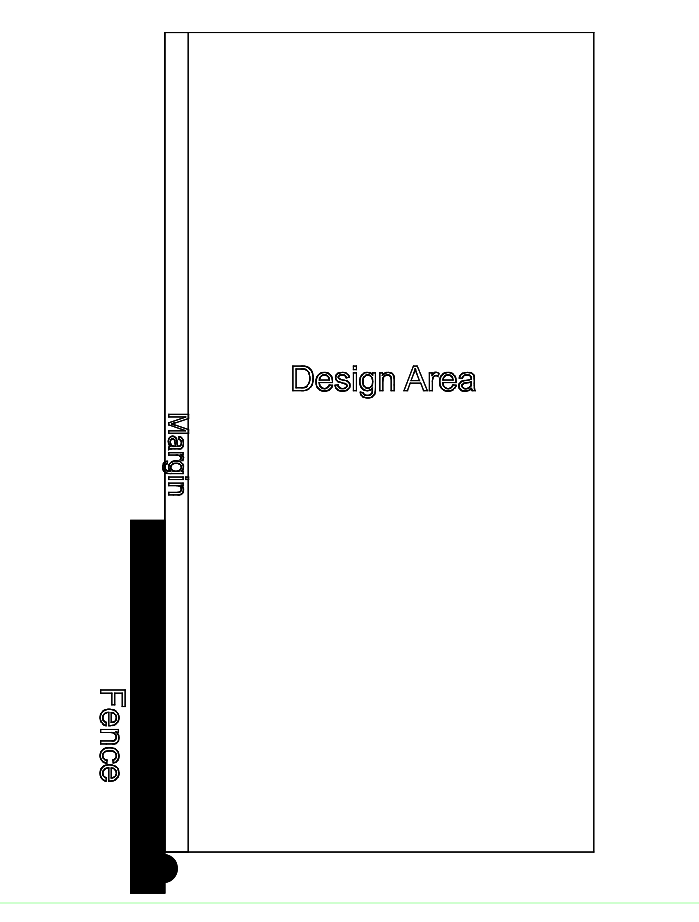
The workspace design “reserves” a margin which will be used by CC to place dimples (you can actually still use the margin space within your design, see my last note in this post).
The fence’s bump out needs to be located a known distance BELOW the cutting space (PROJECT Y0) of the Shapeoko.
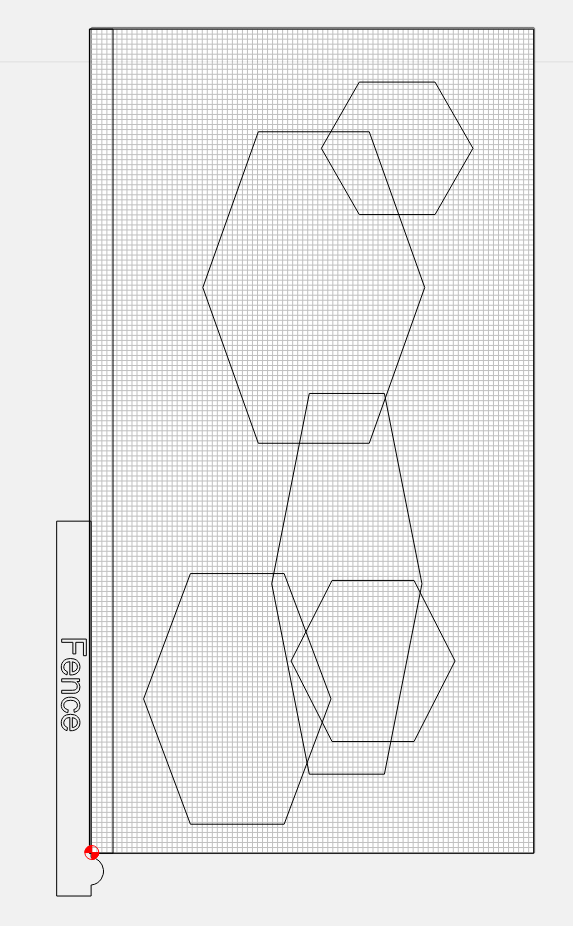
Then you can layout your design:
Then, when you tell CC that you want to use Tiling - it places the dimples in the margins so that they are located the known distance BELOW the overlap of the NEXT tile’s overlap area:

NOTE: The dimple is placed the known distance BELOW the Y0 of the NEXT tile’s OVERLAP…so that it can be cut in the current tile, but then is registered on the bump out below the PROJECT Y0 so it won’t be cut again (and chew up the fence’s bump out)…
Here’s how it would go:
When you’re cutting tile 1, you DON’T Register the piece on the bump out of the fence. You bottom the piece ABOVE the fence bump out (at your project’s Y0) - when you’re cutting Tile 1, the dimple for Tile 2 is within the space of Tile 1 (in the margin) and gets cut:

Then, when you’re cutting Tile 2, Tile 3’s dimple is within tile 2’s space and will be cut:

NOTE: When positioned on the dimple, Tile 2’s overlap area will START at Project Y0…so the fence registers BELOW the cutting area, the overlap can be cut, the dimple will not be re-cut (and ruin the fence), and TIle 3’s dimple is within the cutting area and can be cut.

Then, when you’re cutting Tile 2+ the same thing happens until you hit the top of the design and no dimple is necessary:

I think this works.
The “magic” is that CC knows the overlap area and tile length and can therefore locate the dimples at precisely the known distance below the Y value of the overlap area - so that it sits below PROJECT Y0 when registered.
[EDIT] Last note: You are “reserving” the Margin area within your design…but you COULD still design in the margin area - as long as you know where your tiling is going to happen - and avoid designing over the dimples. For Example:

I think this solution solves a few problems:
- CC is locating the dimples - and can do so precisely with knowledge of the tile length and overlap settings
- You would not need to change the fence position or size, based on tile length or overlap settings
- By having the bump out on the fence, there is minimal disruption to your design area. The dimples are the only additional geometry being cut…and you can design around them if you need to use the full-width of the Shapeoko
- It’s going to be relatively easy to position the fence, because it’s located directly below PROJECT Y0 (where you zero your work) — OR —
- Carbide could create the fence and sell it (or give it away to PRO customers) - the fence could have a ZERO POINT on it…so that if you ZERO your job on that point, you guarantee that CC would know the precise distance from Zero to the bump - and take that into consideration when calculating placement of the dimples. Additionally, the bump out would be a known and consistent shape - the exact geometry that CC would be adding when creating “dimples”
2 Likes
That sounds like an excellent plan. I wish I could think that clearly at 4am (or even 4pm for that matter).
You guys are going to make me want to move my machine away from the wall.
1 Like
That sounds/looks right, except for two minor points if my understanding is correct:
- the dimple will be in the overlap area, EDIT: at least partially — my inclination would be half in, half-out
- a thin section of the material is supposed to be the stock area and will be cut away to afford a known registration edge
If it’s done correctly, the dimple will always be located BELOW the overlap area. The location of the bottom left of the dimple would be: Tile Y0 - Overlap - known distance to bump in the fence - height of the dimple. That will position the dimple the known distance under the bottom of the overlap area.
Not sure what that thin section is…? [EDIT] I would plan on running the edge of my workpiece along the fence…nothing needs to be cut away
Edited my reply above.
I’m pretty sure Rob said that he wanted the edge of the material machined as part of the tiling operation to ensure that it was in-line w/ machine motion — I agree that an option to not do so for folks w/ perfectly prepared stock would be nice to have.
Got it. I think it’s not necessary…and when you do machine the edge, you then have the restriction of having to adjust the fence for tile height and overlap values…whereas, if you just rely on your stock prep, there is no need to be particularly finicky about initial placement or edges and the fence is made once, forever.