Question… you can design a CNC machine with hundreds of pieces. You say it’s built “in house”. You continually improve the operational software. Support is second to none. An entire machine can be shipped within days… so why the hell does it take years to get touch plates? I mean really, a piece of metal and youcan not get them to your customers? C’mon guys, get with it!
Jeff
I’m curious as to what’s in these touch plates that make them so magical?
In essence, a touchplate is a piece of metal and wire that used to complete a circuit.
I don’t have a shapeoko, so don’t know exactly how they’re wired up or configured. But I would image there has to be a way to make one with a piece of aluminum plate and a couple wires with alligator clips.
Or is there some kind of necessary electronics embedded in the shapeoko that prevents a homebrew solution?
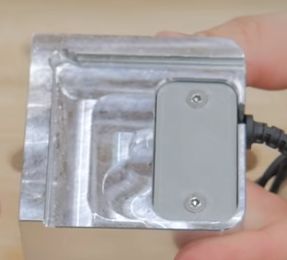
The Probe is an intricate piece of aluminum which has to be precisely machined — not sure what the QC process or reject rate is. Check in w/ @Jorge and crew.
One can use just a piece of metal as documented at: https://wiki.shapeoko.com/index.php/Touch_Plate — the dimensions of the Probe have been published previously for folks who want to make their own.
The electronics provide a power and test indicator and at least in theory make the Probe more responsive/accurate — I really like the power indicator feature, and the test has kept me from damaging the Probe because of a lost/forgotten connection.
I like it better than my Triquetra 3 Axis Touch Plate that’s for sure.
We are hoping to have the Probes back in stocky early in April, possibly earlier.
wow, $79 for a simple aluminum touch block and connector?
He’s even charging $20 for his “g-code generator”. $20 to for a few basic gcode commands??
…I think I need to start a little side business. 
I hope you have a few full boxes of fairy dust to sprinkle on the ones you make, because it seems like this in short supply and is one of the key ingredients to creating these fantastical CNC accoutrements in volume, hence the small volume production woes. 
The Aluminum is milled in house I’m guessing the little controller boards are outsources and is probably what takes the longest also the plastic cover is 3d printed which I feel like is the worst option for a production item.
fun fact the probe fits perfectly inside the brim of my cell phone case. https://imgur.com/jK9yA2b
Hi,
Does anyone have the proper 2 pin connector for the circuit board? Part number?
Thanks,
Should be discussed at: https://wiki.shapeoko.com/index.php/Shapeoko_3#Connectors or https://wiki.shapeoko.com/index.php/Home/Limit_Switches#Shapeoko_3
I don’t have the Carbide probe but I do have the Triquetra probe, it has taken me a while to figure it out but I am starting to have better results with it. Only took 2 1/2 months. For a lot of stuff I still use the post it note method.
Understand your frustration. If you are open to alternatives. @Luke (A.K.A Luke) has developed a touch probe that rivals Carbide’s touch probe. See link to the product page below.
YES! It’s been months, and when I’ve talked to them they always say there is a batch coming soon.
If they don’t want to revenue, open source the plans and let the community build their own.
The plans are open sourced. The dimensions are in the wiki. I made one myself a few weeks ago and have been using it since.
The mechanical side of it is documented — I don’t think the electronics are — probably easy enough to work out, and might even be obvious enough that the electronics requirements would qualify as documentation.
Right, you don’t need a light to change color. I just have an RCA cable going to the board to connect it there and the other end has a banana plug going into a hole and a alligator clip to connect to my endmill.
The led is the best part imo
I was able to snag one last fall and I’ve loved having it. Two things that would make it better for me.
-
Software Update 1: More immediate response to “Cancel” (really this is an across the board comment for the program). I assume there’s an issue with the need to buffer code for optimal CNC performance that’s causing the current delay. Maybe there’s no good workaround.
-
Software Update 2: When calling the Probe function, require a continuity check before allowing the probe function to commence. About 5% of the time I have an “Oh Crap!” moment right after pushing “Probe” where I realize I haven’t attached the alligator clip. Yes, this is “idiot user error,” but a relatively simple code change could potentially save big bucks if bust something.
-
Thinner “shelf” for XY probing. I find myself working with a lot veneer-thickness pieces that are thinner than the shelf on the bottom of the probe. I’ve also found it to be a little bit tippy with the 2-edge bottom when using it on a flat surface. As a result, I can’t use the probe for about half of the work I do because of material thickness or stability issues.
-
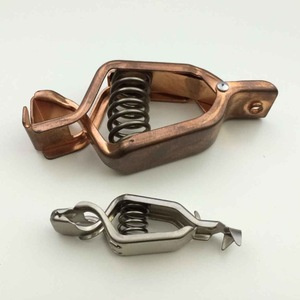
Use a clip that will hold onto a cylinder. The clip provided readily slips off a 1/4" shaft of something like a V-Carve bit (this already accounted for one instance of ramming the cutter down into the probe block). I replaced mine with a clip like this and have 100% piece of mind now.

I agree there should be more probes out there, also because I sell holders for the probe and need more customers (ah ah shameless advertisement, forgive me guys!
 ).
).
I also agree with Erin on all counts, in particular it occurred to me the that clips snappe off the fat bits in the middle of the the zeroing operation!! I’m thinking of replacing the alligator clip with a magnet…
Just thinking outside the box here, but have you tried just flipping the touch probe upside down (after you tap it against the tool to verify LED blinkage) and probing into the shoulder? Thickness is thickness, so it shouldn’t matter whether the shoulder is up or down, right? (Obviously, this is for probing Z only, probing XY separately and right side up.)

As for point two, I always tap the probe block against the tool as a required step in my personal probing procedure. I don’t consider it a downside that it’s a human-factor requirement, as that means that it works universally no matter what G-code sender I’m using at the time. (I had to add UGS to my world when I added a laser to my machine.)
Now, for point four, I really ought to get some nice spring clips like those (i.e. ones that can grip a 1/4" cylinder securely). The included alligator clip has effectively zero chance of holding on the 1/4" carbide blank I use for probing Z when I’m using the laser. I have a small neodymium magnet stuck to a shelf leg next to the machine, and stick the alligator clip to that when I’m not using it, so my workaround is just to pull that magnet off the leg and let it hold the clip to the collett instead. That works, but a nice spring clip would feel more secure. (And since I don’t need to change anything, just clip the spring clip to the tool and the alligator clip to the spring clip, I really ought to stop by the hardware store on the way home.)