Hi All,
I seem to be having issues modeling round shapes either as what I’d think of as grooves or speed bumps. I’m having the same issue whether I’m adding or substracting material.
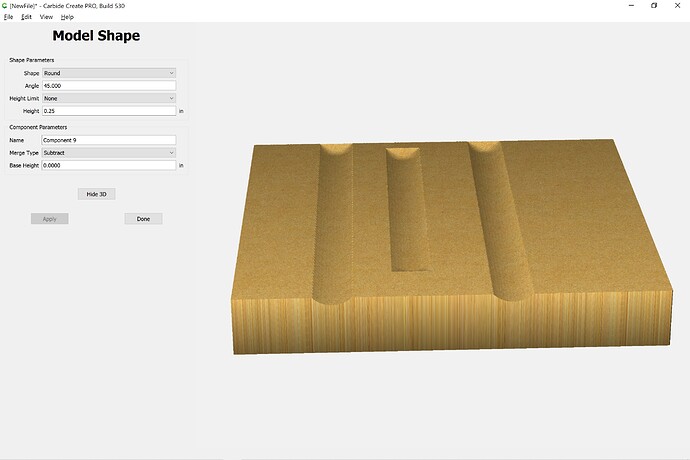
The problem comes in at the edge of material, seemingly only at the top edge of the piece as it sits in the design window. The top end of the shape will taper up (or down) to the surface of the material while the bottom is cut off flat. I know I’m not describing it well, so maybe some pictures will help. (Well… A picture… new users can only upload one media piece on a post)
My test design has 3 rectangles to show 3 different examples… the left rectangle is full length of the material, the middle one is inside the material and the right one is extended an inch over each end of the material.
There’s a square encompassing the entire workpiece that I modeled as a flat surface to create the 3d block.
When I model the 3 rectangles as round shapes, this is what I get:
You’ll notice that the top end of the left and right grooves don’t go all the way through the edge of the material, they’re tapered off and end at that edge. I suppose that’s not super surprising, but what’s odd is the bottom end of the grooves go all the way through the edge of the material. This is actually what I started out trying to achieve… I was trying to make grooves in the sides of a cigar ash tray.
If I do the same exercise except with the add merge type I get the same results.
Oddly, if I do the grooves horizontally on the work piece they go all the way through the edge of the material like what happens with the bottom edge in the vertical orientation. It just seems like the top edge is acting differently… I’m not sure if that’s right or wrong behavior, just different.
I have found that I can artificially extend the material work piece dimensions vertically to overcome the taper, the tool path just cuts air and I’ve essentially just tricked the job into doing what I want it to do.
I’m sure I’m missing something or not doing something correctly, but I’ve not been able to find what it is… any (relevant) ideas what I’m doing wrong? (I’m fine with sarcastic ideas, too of course)
c2d file attached as well.
Sorry for the length of post and thanks for any help!
cc_3d_model_test_1.c2d (210.9 KB)
