Trying to cut simple basic shapes

Hello all, 1st timer here, thanks so much in advance!

I got my XL 4 months ago and still have not had a successful cut :disappointed:. I did have to stop trying/fiddling during the holidays so I could fulfill my orders, so it has not been a solid 4 months of frustrations.

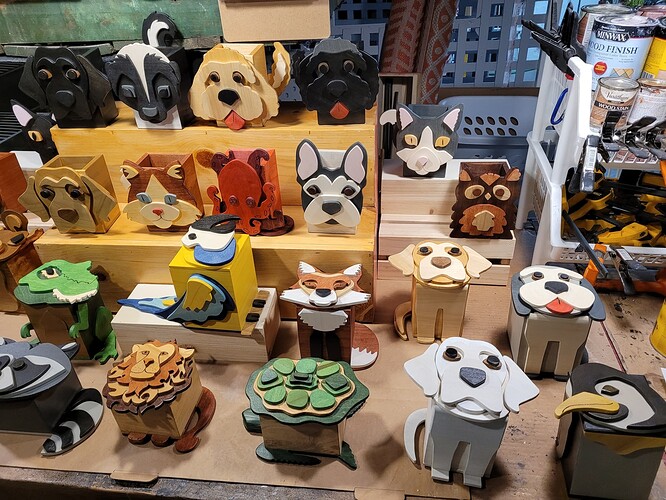
I am trying to use the machine in what I believe is its most basic task. I just want to cut out basic shapes. I make animal-shaped boxes and have been doing it all by hand, but with product demand, I got this XL to assist me. Here are some of my boxes. Just simple basic shapes:


or check out my website: beastieboxes.com

I have been in communication with the Carbide staff and they have helped me some, but I am still stumbling, and thinking this is supposed to be a precision machine, I shouldn’t be having so much trouble. Hopefully some of you can guide me in the right direction? I would really appreciate it!

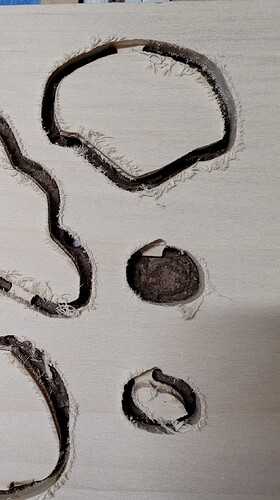
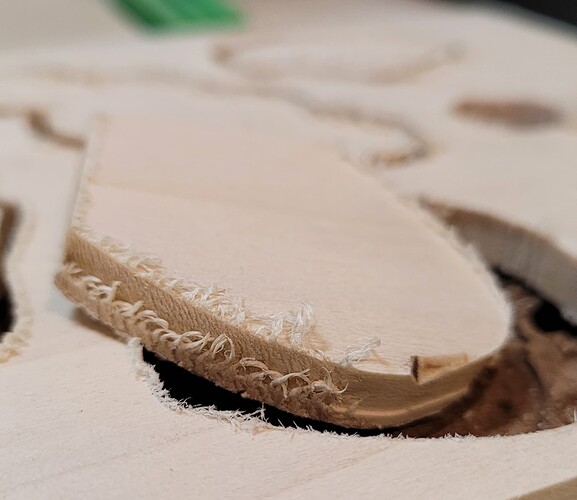
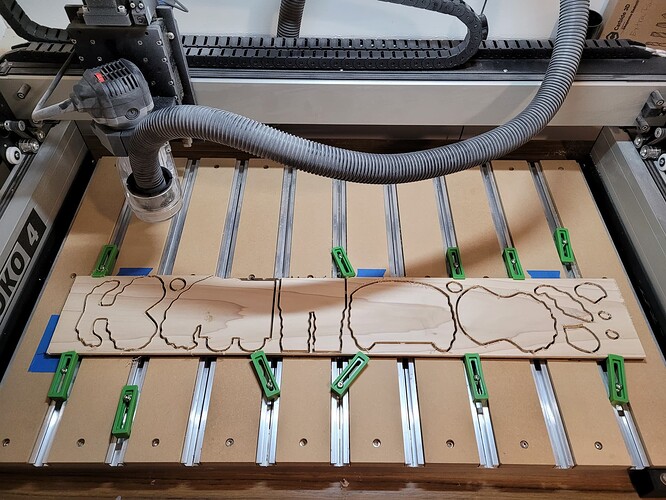
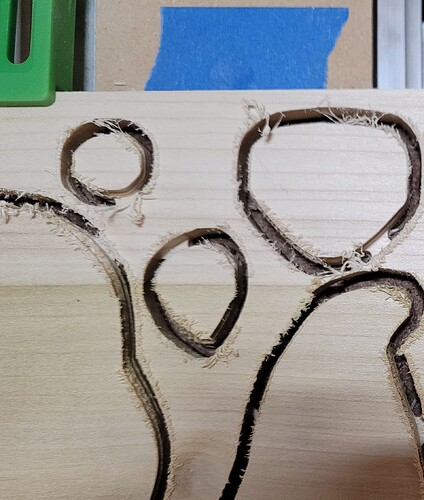
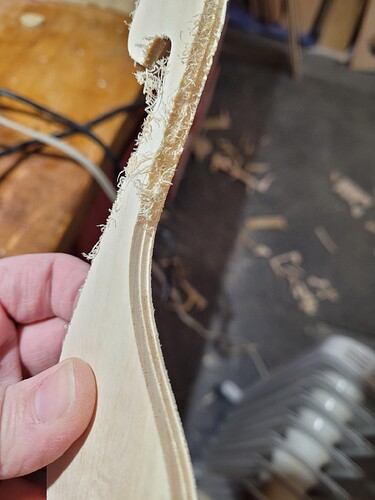
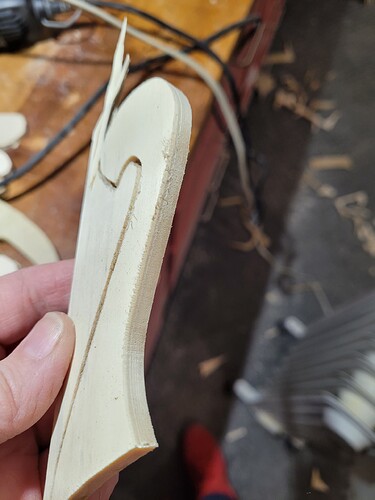
My main problem currently is that I am getting consistently wonky shapes (same ugly shapes made over and over) and the edges are far from smooth (CNC does 3 passes). Please see pics: the 2 ovals 'eye’s are supposed to be matching perfect circles. The ‘nose’ above it should be symmetrical. The fuzzy edges speak for them selves.

I have tried making the files in different ways. But I start with scanned hand-drawn stencils:

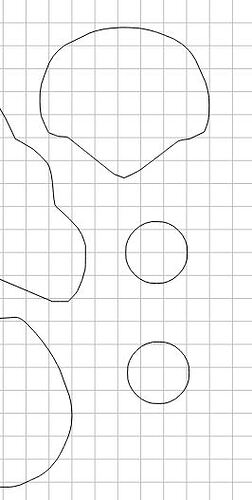
Then I use Photoshop (I know Illustrator would be better, but I don’ t have it. If I need it, I will get it, please advise) to layout the shapes & then create paths. Then I use an online converter to make SVG files, & send to the CNC. I have also tried importing the file into Carbide Create to trace the image, and I get the same results. The files I send to the CNC look good to my eye?

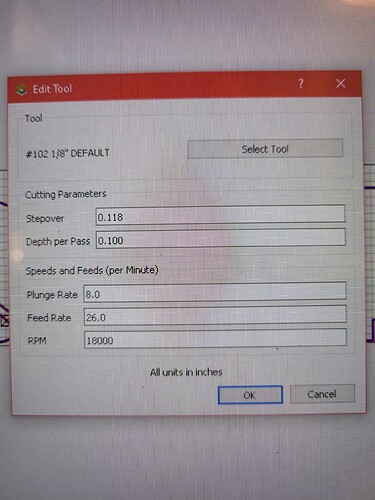
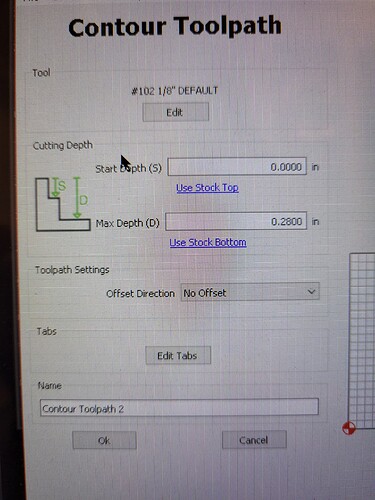
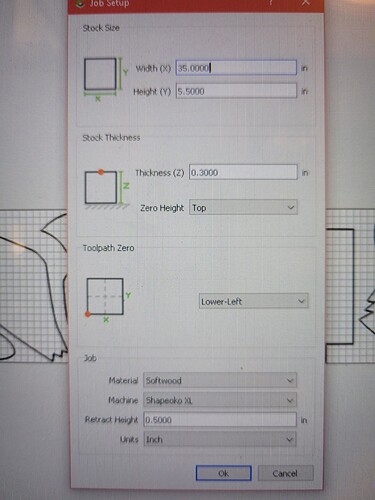
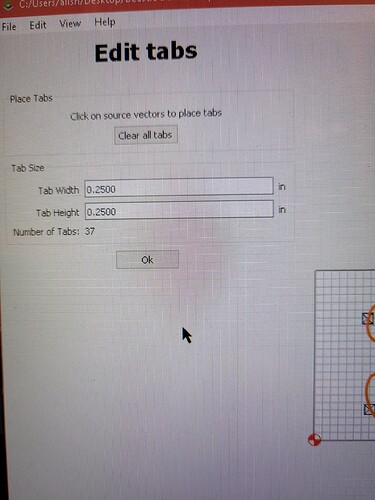
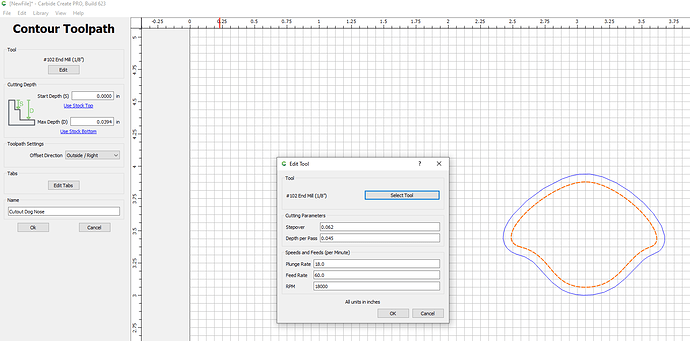
I am using soft 1/4" aspen and poplar boards. Here are pics of the parameters I have plugged into the CNC:


I recently got the #112 .0625" Flat Cutter endmill to experiment with, but have not tried it yet.

I hope I am doing something really obviously silly and someone can point it out to me :upside_down_face: I welcome any and all suggestions/comments. THANK YOU!!!
-alisha
1 Like

Oops, I forgot that I made these changes, which helped different probs:
Thickness .28
max depth .27
Tab height .150

Is the machine mechanically sound? Esp. belt tension and the pulley set screws?

I’d suggest adding geometry around your shapes and cutting as a pocket down to tab depth or the penultimate pass — where possible avoid slotting and add geometry and cut as a pocket

Thanks so much for your response!

Could the same irregular shape be made, over and over, with an ‘unsound’ machine?

I am sorry, but I don’t know what ‘add geometry’ means, nor do I know ‘slotting’ (even tried to google it). I have previously tried to read the post you attached, even sent it to my dad, and we just don’t understand it. I am just trying to cut circles, how hard can it be?

Please see:

If that doesn’t help, post one of the files you are having difficulty with and we will walk through it step by step with you.

Here is where I would start (just a suggestion). If a (designed) circle is not being cut as a circle, I can think of two possible reasons.

  1. The Shapeoko is not moving correctly, which means the problem has nothing to do with force and cutting.
  2. When cutting (too fast) the force of the bit running through the material is too great and causing the belts/gears to slip.

I would start by confirming the Shapeoko is moving correctly. Did you do the tutorial first step where you taped a marker to the Shapeoko and ran the job where it drew the Shapeoko name/logo? This is a good test to see if the Shapeoko is moving correctly without having to worry about too much back-force (aka the belt/gear slipping). It’s a good first step that I think will point us in the right direction of where to go next.

By the way… the “Beastie Boxes” are VERY creative.

– Follow Up –

Once you have confirmed the Shapeoko is moving correctly (via the drawing test), let’s look at your Carbide 3D design and toolpaths. From your pictures I think I see some things that could be causing the problems.

To cut out objects in Carbide Create (like the dog nose) the 1/8 bit (like the standard #102) will make several passes along the perimeter, stepping down a little each time until it reaches the bottom.

I compared the stock/suggested settings to your toolpath settings and I think this might be causing the problem.

The “Depth per Pass” is suggested to be 0.045, where you have 0.100. Your settings could be fine, but as a start I would go back to the default (soft wood) settings.

The “Speeds and Feeds (per Minute)” are controlled by the Shapeoko… EXCEPT The RPM (18000) is NOT controlled via software, that is something you have to do. Make sure the red dial on your router is on the “3” setting.

I would also change the Contour Toolpath “Offset Direction” to “Outside”. This is telling the bit to cut outside the lines instead of directly on the line. Since the tool/bit is 1/8 wide this will make the dog nose be the exact size you designed rather than 1/16 smaller (due to the bit size).

Regarding the cut-quality, this usually isn’t part of the “just getting started” discussion but I have learned that when working with wood I GREATLY prefer working with “down cutting” bits rather than “up cutting” bits. Don’t want to send you down that rabbit-hole yet but it makes cuts in wood much cleaner. AND it makes work holding much easier, especially when you are cutting out objects as the bit is pushing your material down rather than pulling it up.

And I agree with @kelaa regarding the extra material. It’s really easy to underestimate the amount of force the cutting bit is applying to the material. Not only in the X and Y direction but also the Z (up/down) direction.

2 Likes

I just have two comments:

26 inches per minute at 18000 RPM seems very slow feed rate and low chip load. I do a lot of SPF right now, and I also can get a lot of fuzz when routing across the grain at 45 ish degree angles. I think this is exacerbated by cutting too little per cut. I think when you are cutting too little, the wood is can get pushed away and you can’t break the fibers. When you are talking a larger cut, I feel it is better because the bit can cut deeper and tear out a more complete chip rather than “mashing the surface”. After you work out your mechanical setup per the other posts’ suggestions, I would guess 2-3X your current inches per minute would be more appropriate.

I see you are very efficient for material, but I wonder if you are a bit too lean in terms of extra material around your pieces. Is it just clamps only or is there tape underneath? I know you have tabs so the workpieces don’t detach completely, but I’d imagine the whole thing is a bit floppy when the cuts have made it to significant depth.

1 Like

Aspen and Poplar are very soft woods and tend to splinter when you cut them. I found that covering the job with Tyvek House Wrap tape tends to give a much cleaner cut. I have also used the product below with good results.

One more thing to consider. I use 3/4 PVC board for a lot of my projects. I love it. It cuts clean and is easy to work with. They do sell it in 1/4 thickness in 4 x 8 sheets which may be what your using…

https://www.homedepot.com/p/1-4-in-x-48-in-x-96-in-White-PVC-Panel-204496/205533723.

1 Like

Check your pulleys. Make sure the pulleys are tight on the stepper motor shafts, and that one set screw is over the flat part of the motor shaft.

If the X Axis pulley was loose enough to move, but not yet loose enough to spin all the way around, it would produce results very much like what you are seeing.

Another test - with the power on, everything should be ‘locked’ in place by the stepper motors. Try to move things around and see where the slop is.

1 Like

Thanks so much for your suggestions, everyone!!

@WillAdams
This article helped explain, thank you.
But still, what is slotting?
What applications would adding geometry be an appropriate for? Both examples in the article are for rounding hard edges.

@ColdCoffee
I had actually skipped the Hello World pen tutorial, but I just did it just now, and it ran through just fine.
I made the toolpath suggestions you offered. And the RPM control had slipped to 4, so I reduced that.
I did not change the offset direction to outside, because I accounted for this when creating my file in photoshop. But it’s good to know, so I don’t have to make that adjustment on the front end anymore!

@kelaa
Thanks for the explanations about speeds, I did raise it to 60.
I do use double stick tape on the bottom of my board in addition to the clamps, so those suckers aren’t moving at all :blush:

baricl
Thanks for the Vinyl suggestion, I hadnt though of that at all! The PVC is a nice suggestion also, but I stain all of my shapes lots of bright colors, so it really needs to be wood.

@mhotchin
I wiggled everything around and there was a good amount of ‘slop’. Specifically the right side X Axis. So I tightened that pully.

With these adjustments, things were definitely better, but the same problems still persisted: Wonky shapes and fuzzy edges. But now it seems to be only the small pieces that are misshapen, the larger pieces straightened up. Is this a situation for the ‘adding geometry’?

And the edges, although better, still showed all three passes making them fuzzy all the way down, so the suggestion of a vinyl layer on top wouldn’t help the next 2 passes, I suspect. Would the ‘down cutting’ bit address this?

Again, I really appreciate all of this feedback! THANK YOU!


Slotting is cutting a slot as narrow as the endmill.

Adding geometry is appropriate any time one wants to cut as a pocket rather than as a contour.

A downcut endmill would definitely help in getting clean top edges. What is surprising is that you get fuzzies all the way from top to bottom (upcut endmills typically leave tearout on top edges but provide clean bottom edges, and conversely for downcut endmills). I wonder if the endmill you are using is worn out ? Using a new downcut endmill would probably answer that question.

Tearout shouldn’t be as bad as this, but you will also get some. One approach to clean it up is to run a second contour pass at full depth (i.e. keep the contour cuts you have, with the tabs, duplicate that toolpath, and edit it to set a depth per pass corresponding to the full stock thickness. When you run that second pass, theoretically it should not cut anything since the first toolpath already went all the way down, but in reality it will shave off the remaining fuzzies from the sides.

1 Like

As a newbie myself, I see issues with the mechanics of your machine. Something is not right as others have said.

I found that sometimes larger bits cut cleaner. Try a 1/4 bit and do an outside cut on all your designs. This may eliminate some of the fuzzies.

Hi @Julien, thanks for your thoughts.

I purchased the started pack endmills from Carbide 5 months ago. It has a #251 .25" downcut endmill in it, so I will give that a try. But should the #102 .125" Flat Endmill be worn out already, after very limited and sporadic use, through soft wood?

Also thanks for the suggestion of a ‘clean up run’, and I see how this could help, but it doesn’t diagnose/address the problem, eps if you acknowledge that the tearout should not be this bad.

So I was thinking the CNC makes 3 passes, and you can clearly see all 3 passes with the fuzzies. In order for this to happen wouldn’t the endmill have to move a tad bit outward each pass in order for it not to keep hitting the same depth wall as it laps around? or for it to be crooked? IDK, just spitballing here…

@Zman suggests something more is wrong with the machine. Is there another test or diagnostic I could do to rule stuff out?

Thanks again

Probably not, if it has not been “abused” (i.e. using incorrect feeds and speeds, for example going to slow is one way to prematurely dull a tool). I just wanted to rule out one possibility, this is not it then.

Hard to tell from the pictures: do the fuzzies really match the passes, or do them happen to match the plywood layers ?

Actually it’s a good hunch, I did not want to mention it to not confuse the matter more, but a severely out of tram router may also leave marks at each depth pass. I’m not sure it could explain so much tearout, but it’s a good thing to tram your router anyway (check out Winston’s YouTube videos)

Curious to see what the outcome of the downcut test will be.

1 Like

@Julien
I am not using plywood, i am using solid poplar, so the 3 rings of fuzzies are definitely from the passes.
I’ll check out the Tram router video and update after the downcut test later tonight.
thanks again

Obviously not, sorry. Somehow I overlooked the mention to poplar and got confused by the last pic :man_facepalming:

Also, if the fuzzies look the same all around the part perimeter, it’s probably not tramming.

So, it’s all fixed. Hard to believe, it’ been so long.

I changed from the .125" endmill to the .25" downcut endmill, changing NOTHING else, and the result was beautiful: Smooth edges, symmetrical shapes. Couldn’t believe it, so I did it again with matching results. Then I tried my new .0625" normal endmill and also got beautiful results. So there must have been something wrong with the .125" endmill I had been using all along, right? But it looks fine to the eye, no distortions, no gouges. So I tried to replicate the ugly cuts with the same .125" but got beautiful cuts here too.

Can you explain this, please? For 4 months, since day 1, I have had consistently wonky shapes and seriously fuzzy edges (with each pass), and had numerous emails and phone calls with the carbide team. How can I avoid this again, if I don’t know what happened?

Don’t get me wrong, I’m excited it’s fixed but a little flabbergasted at the mundaneness of the solution, ya know? I’m kinda holding by breath…

Really appreciate your help.

@Julien
@WillAdams
Further developments:
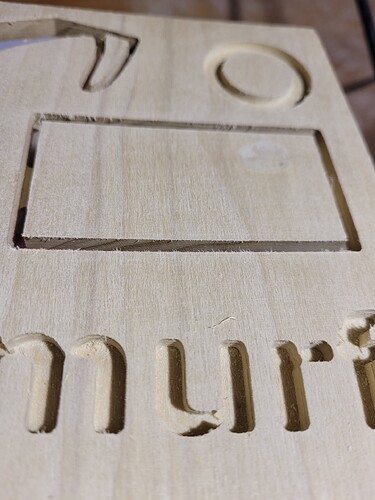
After making 3 good cuts with 3 different endmills yesterday (including the suspect 1/8) I started today with a basic shape/text test with the same1/8 and it looks fine, contours and pockets:

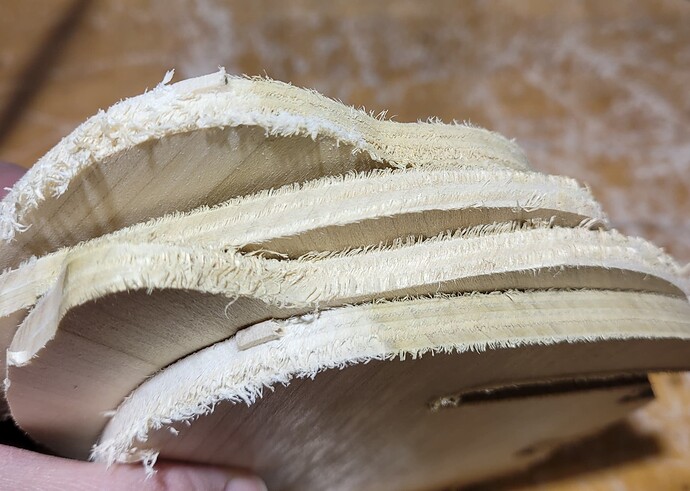
Believing the prob was over at lonoooog last, I returned to my actual project, using all of the same parameters, same 1/8 endmill, same everything from the test above, & the damn fuzzy edges are back! You can clearly see how it is stepping out with every lap:

Then I changed the endmill again to the 1/16 and got this nice edge:

Please, please, please…what is going on? I am just stuck. 4-5 months of lost time, lost product, lost hope & still not there…
thanks.