I’ll try to explain, but I’m not a good teacher so if I miss something or am unclear please ask questions
The geometry I’m going to use as example would be a simple square in carbide create; more complicated geometries all work the same but for the explanation, simpler is better. In the pictures below I’m going to look at it from the side of the wood, so “up down” is the Z axis and “left right” is the X axis; I’m going to ignore the Y axis entirely and assume that I’m looking at this somewhere in the middle of the square.
if you look at this from the side, the stock would look like this:

The two red circles denote where we have drawn the square in Carbide Create.
The total height of the stock here is 0.25"
now if we go cut this with a V bit (yellow in the picture) and cut 0.2" deep using a normal advanced vcarve path and cut the inside of our square, it will look like this:
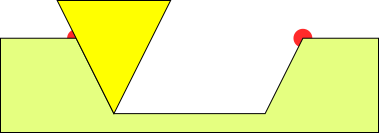
Now we’re going to the plug side of things. We flip horizonal (but hey it’s a square)
If we were to cut an advanced vcarve path on the outside of this square, it would then look like this:
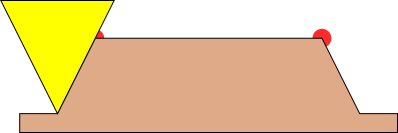
Again the red circles are where the lines of the square are.
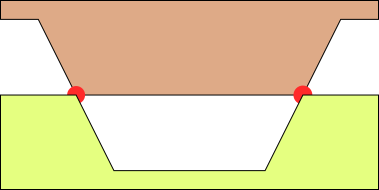
This is not going to fit… the widest part of the base and the smallest part of the plug are the same size:
Now, the magic. We’re going to lower the bit 0.1"
Color wise the stock would then look like

where I’ve made the top 0.1" of the stock pink and the bottom 0.15" the same brown as before for the plug.
Now if we do the cut, the result will look like this… and key is the pink colored part of the wood. This is the part of the wood that will go into the base.
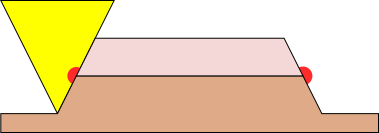
This is the key drawing. The red circles still denote the design in carbide create, and the red circle in this diagram will match up exactly with the red circles in the base diagram. The geometry in the pink part of the wood is the key, this will taper “inverse”, e.g. go narrower relative to these red circles, and that will make them fit into the base!
If you flip this around, and I’ve added the base back in it will look like this:
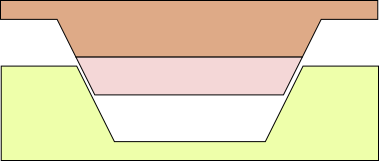
a perfect fit! and there’s room below for glue to go