No popping sounds so far. The unit is running nicely and smoothly. No issues so far. I am impressed.
I will post pics after this is done.
No popping sounds so far. The unit is running nicely and smoothly. No issues so far. I am impressed.
I will post pics after this is done.
Good to hear you are getting this sorted out. I’m not into 3D printing yet …
You will be, they have Mahogany colored filament!! ![]()
Here is the very first print off of this 3D printer. Took a long time and didnt come out so well. But I do realize there are some more settings I need to adjust, but I am printing and that is a great step towards a good end result.
So, this is supposed to be a braided looking deer. The antlers are supposed to be completely smooth and have three points per antler. So, what was I doing wrong? I have looked through the settings in PrusaSlicer and changed a few things but seems what was changed wouldn’t affect the print quality of this design. I am not sure what to change.
Your first model is quite detailed.
Good time to try the benchmark STL file. Maybe boring, but known handling.
I would bet it uses less material.
I actually think there might be something wrong with the extruder of this machine. The print quality sucks on even these designs that are supposed to be smooth. I am trying another print on a triangle stand that I would use to put under material that would be either painted or polycoated for finishes that go over onto the edges of the boards. Anyways, the sides of the print is supposed to be completely smooth and my results are jagged lumpy edges all along the sides.
Agree with Jim, need to print a Benchy (miniature tug boat). Printable, Thingverse or Makers World should have plenty of free versions to download and print out. This is a bench mark print, this allows better diagnosis of the print quality and should give direction to what the issues may be.
The other issue could be wet filament. Even though it’s brand new it could need to be dried out some. Different filaments and machines handle moisture differently.
Is your filament spool on a holder that allows smooth action for the extruder?
I should look for the miniature tug boat to print? I don’t mind trying. As for my filament, I dont have a stand for it. The lady didn’t send one with it. I figured I would make one soon enough when I get a chance to do so. For now the spool was just laying on the table behind the machine so the machine could unwind it as needed. I will build a holder that will allow me to put more then one spool on above the machine. I think this will solve two issues right off the bat. One issue fixed would be easy flow of the spool right down to the extruder feeder. Two, the warmth from the machine will help with keeping moisture out of the spools.
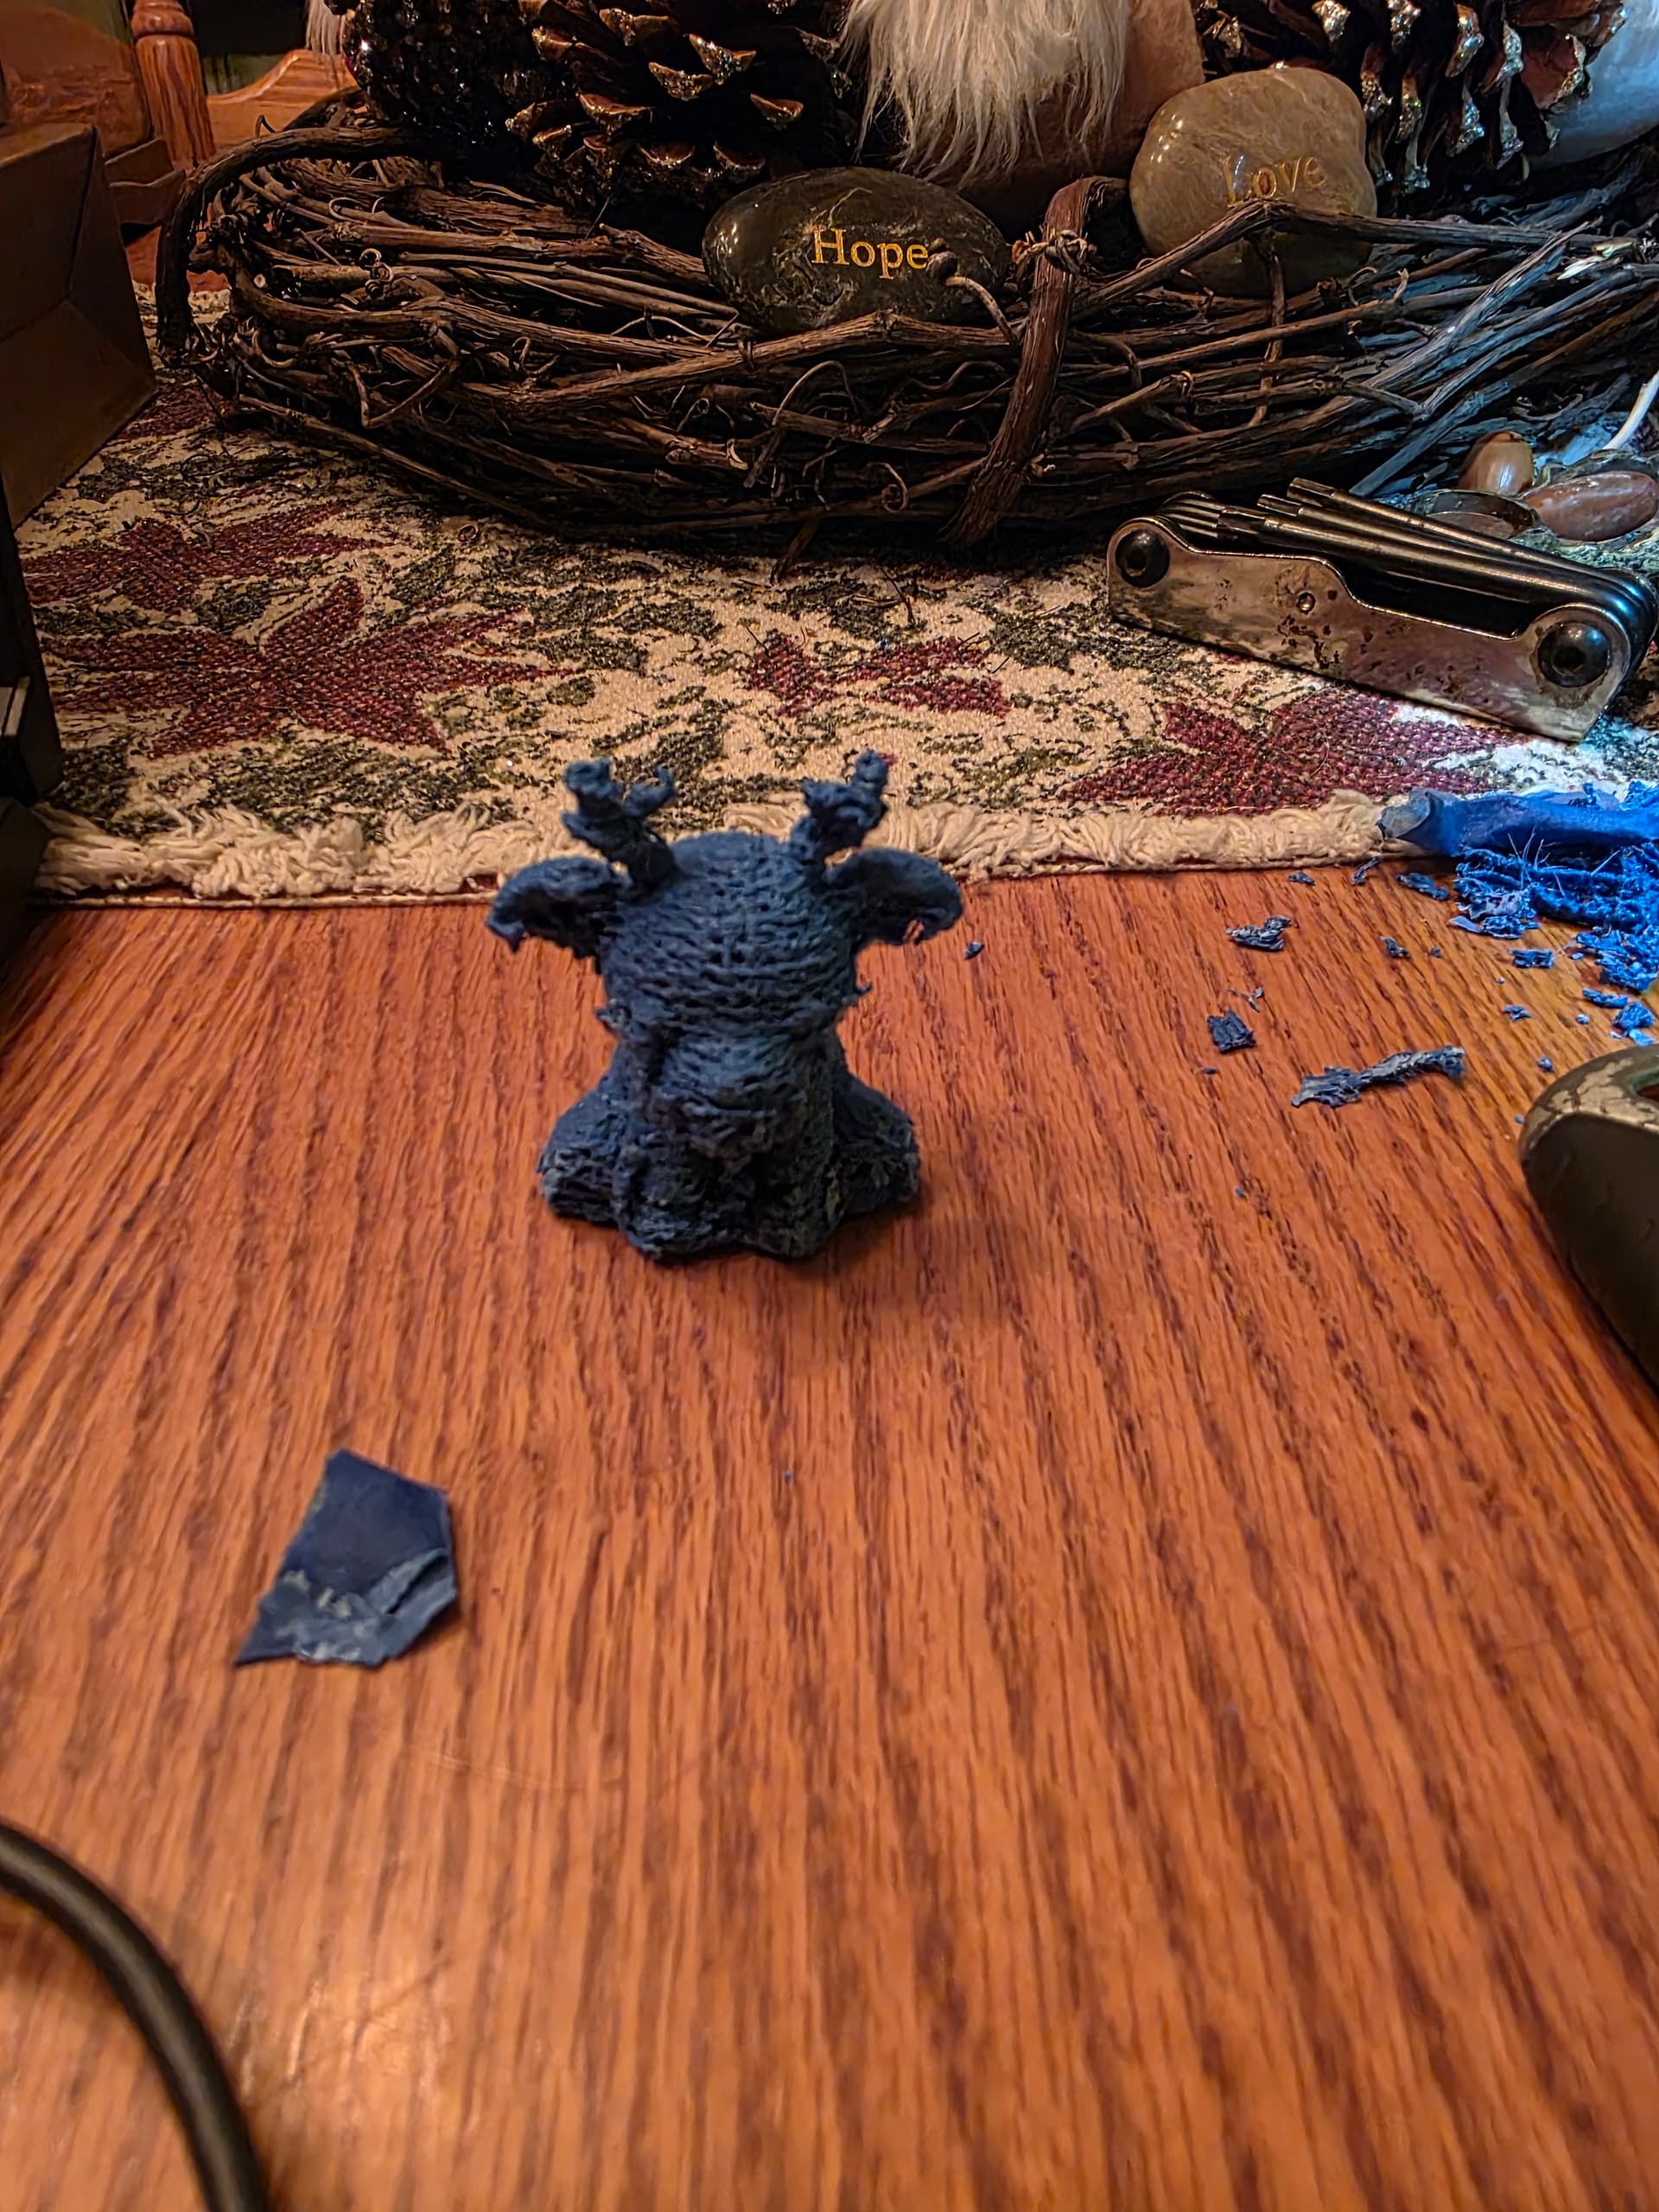
I still don’t know enough about the machine and programs to know what truly is wrong here. The print yesterday was so rough looking in some places and even the supports that were printed were so hard to get off that I couldn’t remove them completely off the print. Plus, I ended up breaking the bottom off the deer trying to remove it from the table and also broke the neck a bit in the back.
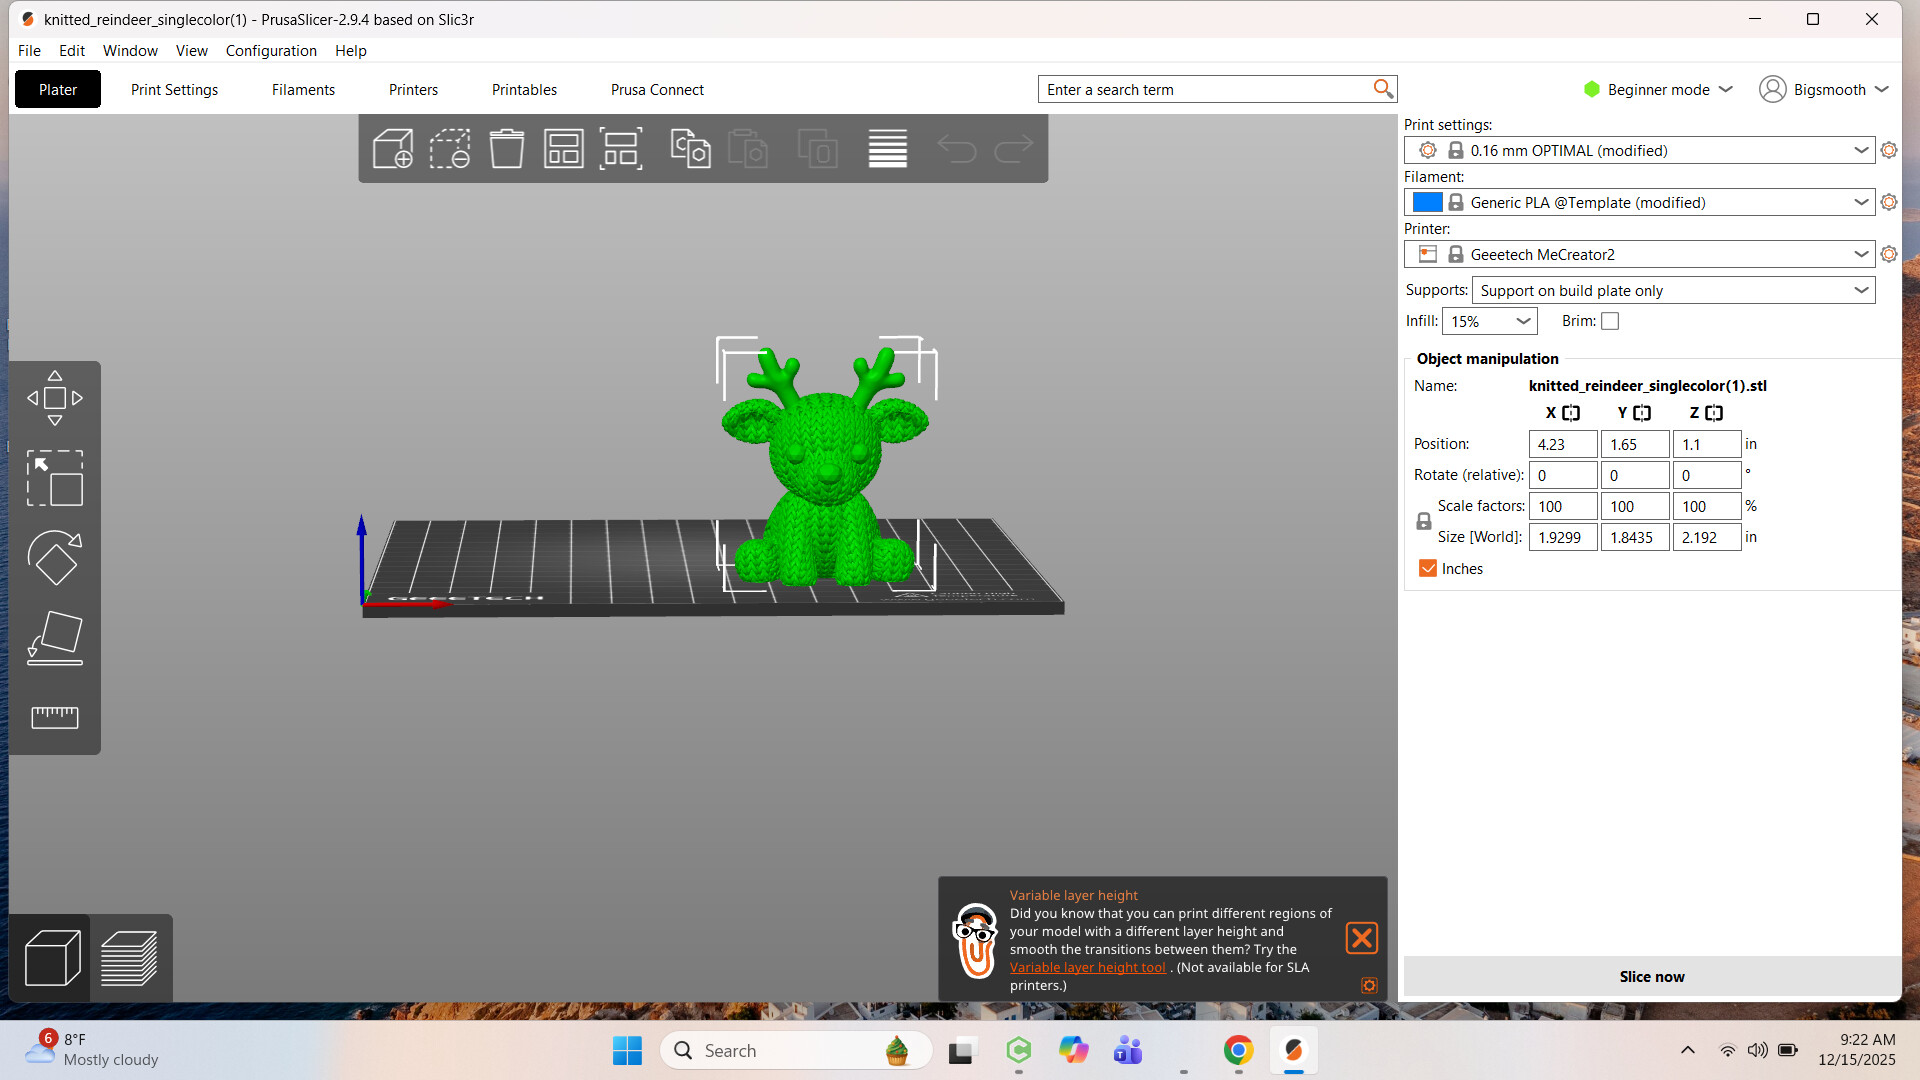
This is what the print was supposed to look like.
EDIT: I see you said a spool holder was not provided.
Is there not a spool holder that comes with the machine? Sometimes it is hung off the side of the machine? If the spool provides resistance when feeding it could cause the extruder to not print consistently. You could make simple holder for it to allow it to unwind the filament easily. Or you could manually unroll the spool to ensure the extruder is not have it to pull too hard. It would only take a few minutes to see if the print is the same.
Printing the benchy allows a known standard to be used for diagnosis for the printer characteristics.
Yeah, the lady didn’t give me the spool holder. I am not concerned because I will make something for sure to hold the spools and to have hardly no resistance to it. I was pulling the filament off the spool as the machine printed, this way the machine wouldn’t have issues with the filament.
I think the main reason I am having issues with the print quality is I am running the extruder too fast across the surface. The filament is coming out, but it is coming out too slow for as fast as the machine is moving across the surface. The inside cross sections inside the prints are all blotchy clusters that have no real form. They also tend to pull up sometimes and get pushed around inside the printed area as the machine prints the filler mesh.
I have also noticed that the extruder tip picks up filament and it cakes to the side of it causing a bit of a grab on any part that is stringy. I think that I still have a lot to learn on these machines. do all prints usually take a really long time to 3D print? That deer print took almost 4 hours to print even at as fast as it was printing. The print quality sucked for most of it, or maybe it was the supports that were there that made it bad.
Each file is different for the total time for printing. It depends on the nozzle size, amount of infill you have, the type of infill your using and ultimately the actual design of the machine. I can usually speed up the time by reducing the infill, this also reduces the strength of the print. But for most items the infill can be reduced to improve print time.
Run a few tests and change the speed, run it slower first to confirm your thoughts.
The other issue could be the cooling fan is not working properly? It is designed to cool off the filament once out of the nozzle so it solidifies (or at least solidify it enough to not deform when the next layer is printed) prior to the next layer is printed on top of it.
There is supposed to be a support grid inside this triangle area for structual support without printing this thing completely solid. The edge/side is supposed to be smooth as well. The inside looks like a jobbled mess of filament that has no structure in design whatsoever. So, not having this machine come out of a box brand new and the settings be set and then running a test design, I am clueless to know if my extruder is messed up or what. I know I have said this before and not having any clue as to what to test, how to test it, and what should be changed, uts the same as to trying to run the Shapeoko 5 Pro with a design not knowing how or what any of the program does. I will continue to research more and more about this stuff. Hell, I may even end up buying a new machine so I can get it straight out of the box with a chance to test print something without issues.
I just dont want to be putting a bunch of money into this area of creation and design if it is going to cost me a ton of money for something that I dont know if it is an issue with what I am doing or if it is a problem with the machine. I am trusting that the machine has no issues with it as a used machine, but that could be naive of me to do so.
I’ve built a couple of 3d printers from kits, and modified a couple of prebuilts. It’s fun to tinker, but after a while it gets tiresome when you just want to print something now, and not have to fiddle with bed leveling and calibration. I bought Bambu lab’s X1 carbohn, with the AMS, and also using their slicer, it’s been pretty much flawless. The money saved from not wasting filament on ruined prints offsets the price of the machine.
I’m wondering if it would benefit to remove the extruder and clean it out. Have you tried to get some answers on the Prussia or geeetech forum? You may get a simple answer there.
It should be using the parameters from the slicer print file.
So I have been 3D printing for years now. It looks to me like you are under extruding. This could be from a clog in the extruder or from printing at too low a temp or from having the extruder motor’s steps per millimeter configured incorrectly.
First thing you should do is verify that you are actually using the correct print profile for the material you are printing with. I cannot tell you how many times I have accidently tried to print PETG with PLA settings. PETG prints at 245C. PLA prints at 215C. It is an easy mistake to make.
Second you should do a manual “cold” retraction. To do this you want to heat the hotend to a temperature where the filament is getting soft but not melted. For PLA this is between 130 to 150 degrees C. Next hold onto the filament firmly and release the tensioner on the extruder. Pull the filament out of the extruder. It should come with a reasonable amount of force. If it feels like you are going to break something stop and raise the temp a bit. There should be a blob of semi melted plastic on the end of the filament. Cut this off and reinsert the filament. If there is any debris in the hot end it should come out with that blob.
Next you should verify that when you tell your 3D printer to print 50mm of filament it actually extrudes 50mm. To do so you should get a pair of digital calipers. The cheap ones will do just fine for this. If you are in the US look at Harbor Freight. Home Depot also sells them but they are more expensive. You can also get them from Amazon but that takes time. Once you have those take them a set them to 60mm and lock them at that length. Go to where the filament enters the extruder and measure 60mm from a fixed point and mark the filament with the calipers. You might need to use a sharpie to make the mark visible. Next go into the printer control software. Heat the hotend up to the proper melting temperature for the filament you are using. Once there tell the printer to extrude 50mm of filament. Once it finishes extruding measure the filament from that fixed point to your mark. If your extruder is configured correctly it should be exactly 10mm. If it is more than 10mm then you are under extruding. If it is less than 10mm you are over extruding. You need to calculate the percentage off it is and then go into your printers firmware and adjust the steps per millimeter. I will give you an example of how to figure this out.
Lets say you told it to extruder 50mm but you measured 15mm to your mark. This means that the printer only extruded 45mm. Take 50 and divide my 45 to get 1.111. Next go into your firmware configuration and find the extruder steps per mm. Lets say that it is currently set to 900 steps per mm. Multiply 900 by 1.111 to get 1000. Change the steps per mm in the firmware to 1000 and save the config. Depending on your printers firmware you may need to recompile things or just restart the printer for that change to take effect.
You may need to repeat this test a few times to get the extruder dialed in.
I will also say that you should print 20mm test cubes before moving onto things like Benchy or other cool prints. Test cubes do not take long, they do not use much filament, and they still give you a lot of usable feedback as to what is happening.
I thank you for your input. This is going to be a big help in a direction I had a filling I needed to go and wasn’t sure how to go about doing it. Checking and cleaning the head and extruder is a great idea and testing for push quantity is a great idea, and you explained it well enough for me to understand what needs to be checked and how. Maybe I can figure this out on this machine and get it up and actually running. I will work on it the next few days and give an update as to what is up.
Ok, so I finally got to pull the head off and check it. I found there wasn’t any blockage in the extruder, but the tip was a bit messed up. I had to file the burrs off the head. Once the head was smooth from all burrs, I cleaned the tip of any shavings that may have been there. Then I slightly polished the tip and got it all put back together. I did the test of the filament of measuring 60mm and marking it. I then had the machine extrude 50mm.
The first time it was off pretty good and I figured that maybe there was some other metal in the tip from filing and cleaning. I then ran the test again. I came out with a measurement of around 8.5mm. Then I tested again and the next test yielded almost 10mm. I ran the test again and it came out at 9.9mm. So, it seemed that the machine was pushing the correct amount of filament out of the extruder. Then I went ahead and started the program of Benchy. I figured that everyone ran this as a test model, so I ran it.
I am seeing inside the support area, or grid area, of Benchy is the same as the area of the triangle from my earlier post. The outside of Benchy is also still rough looking. It isn’t as rough as the triangle was, but is still rough some, and one side of the print is also hairy and even rougher. If this thing will not produce good prints then I will not look into it any further. I give up on it and look to buy a new machine from a manufacturer. At least at that point I will get a warranty with the machine for awhile and most of these machines come preassembled and ready to print right out of the box.
I should have just added the extra $150 towards the purchase of a new machine and that would have been so much better. I have had a bad experience now with 3D printers and might be hard to even decide to want to purchase on again.