Vers.by touch probe and the Nomad

Hi all,

I wanted to share some progress that I’ve made in integrating the vers.by WLR wireless touch probe into my Nomad workflow, including some documentation about what I’ve changed and various thoughts about the probe itself.

Anyhow, money up front, discussion after: it works, but needs support in the tools to be as useful as it can be. If you want details, read on.

I got wind of vers.by and their CNC probe business through this post by @DanStory in the Nomad forum. I’d become passable at using a traditional edge finder to zero my work on the Nomad, but as this is the first electronic touch probe I’ve seen that fits in the Nomad’s spindle, I had to give it a shot. The idea that I could use this for XYZ probing, in addition to neat tricks like centering on a hole or boss, gave me all the motivation I really needed to order one and tinker with it.

I have not used a real Renishaw probe, so I don’t know how one would compare to this device, but the cost difference is significant (~$250 shipped for this) and I suspect it would’ve taken me much longer to get moving with a Renishaw.

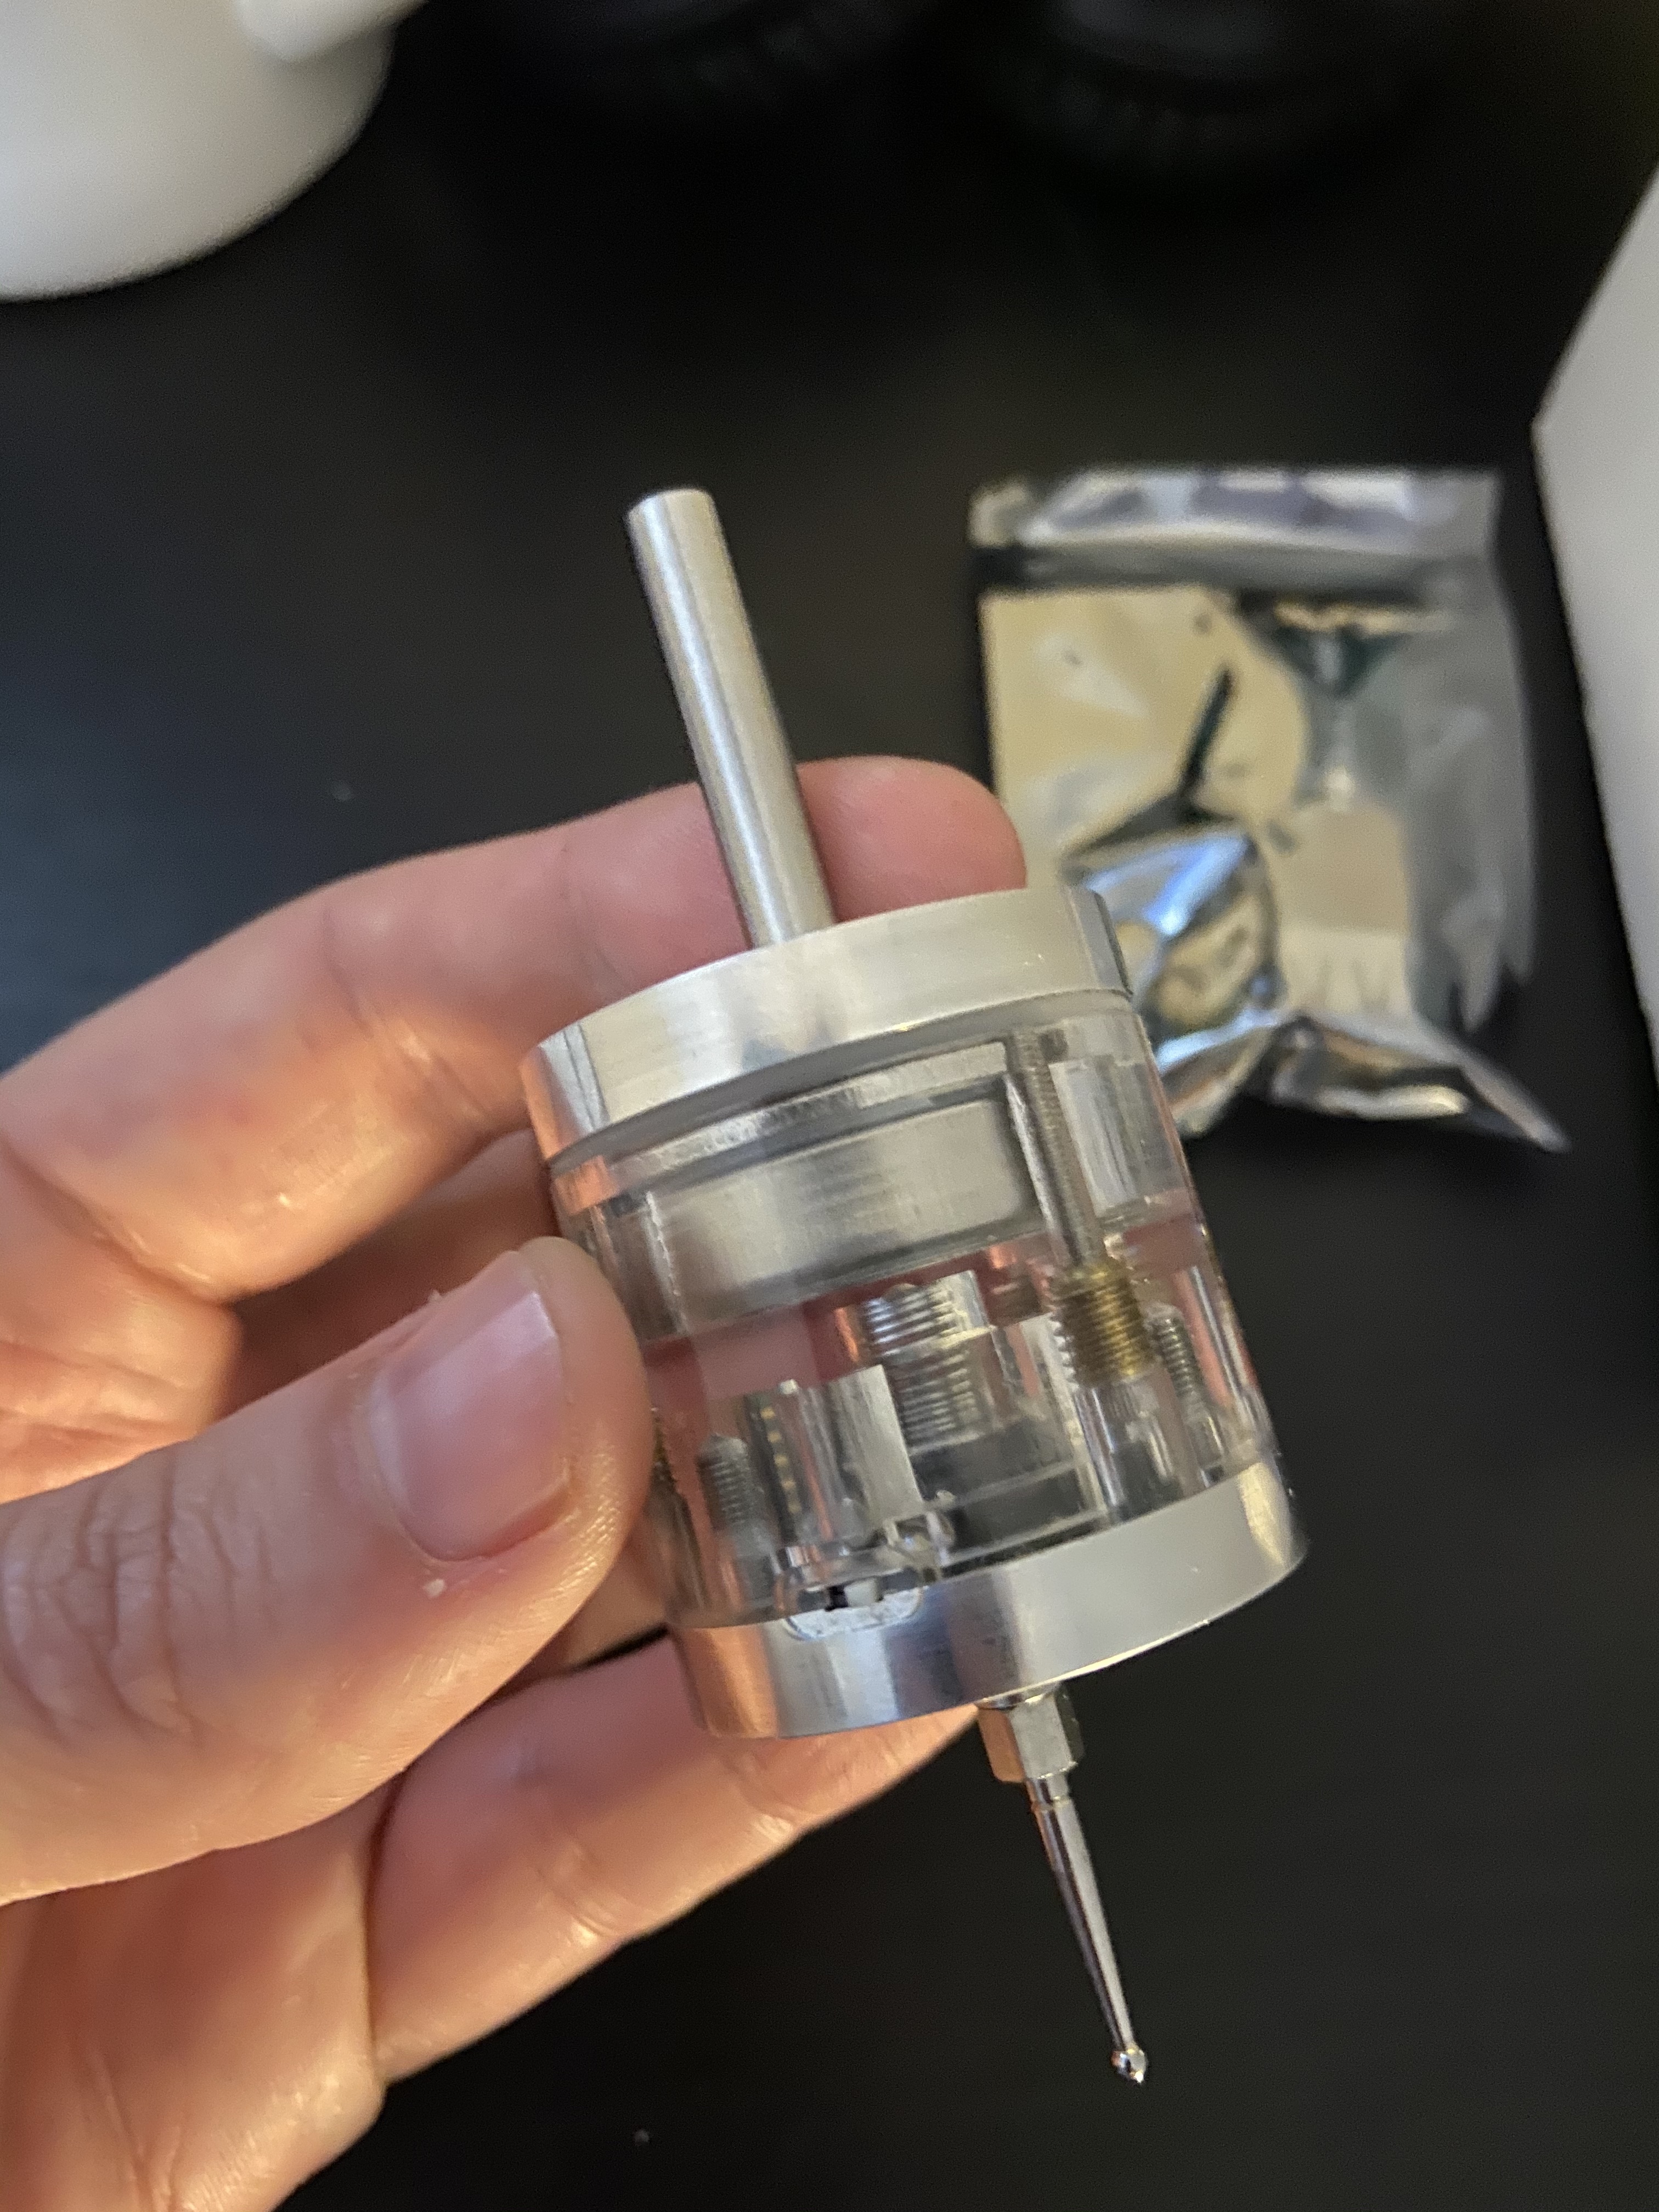
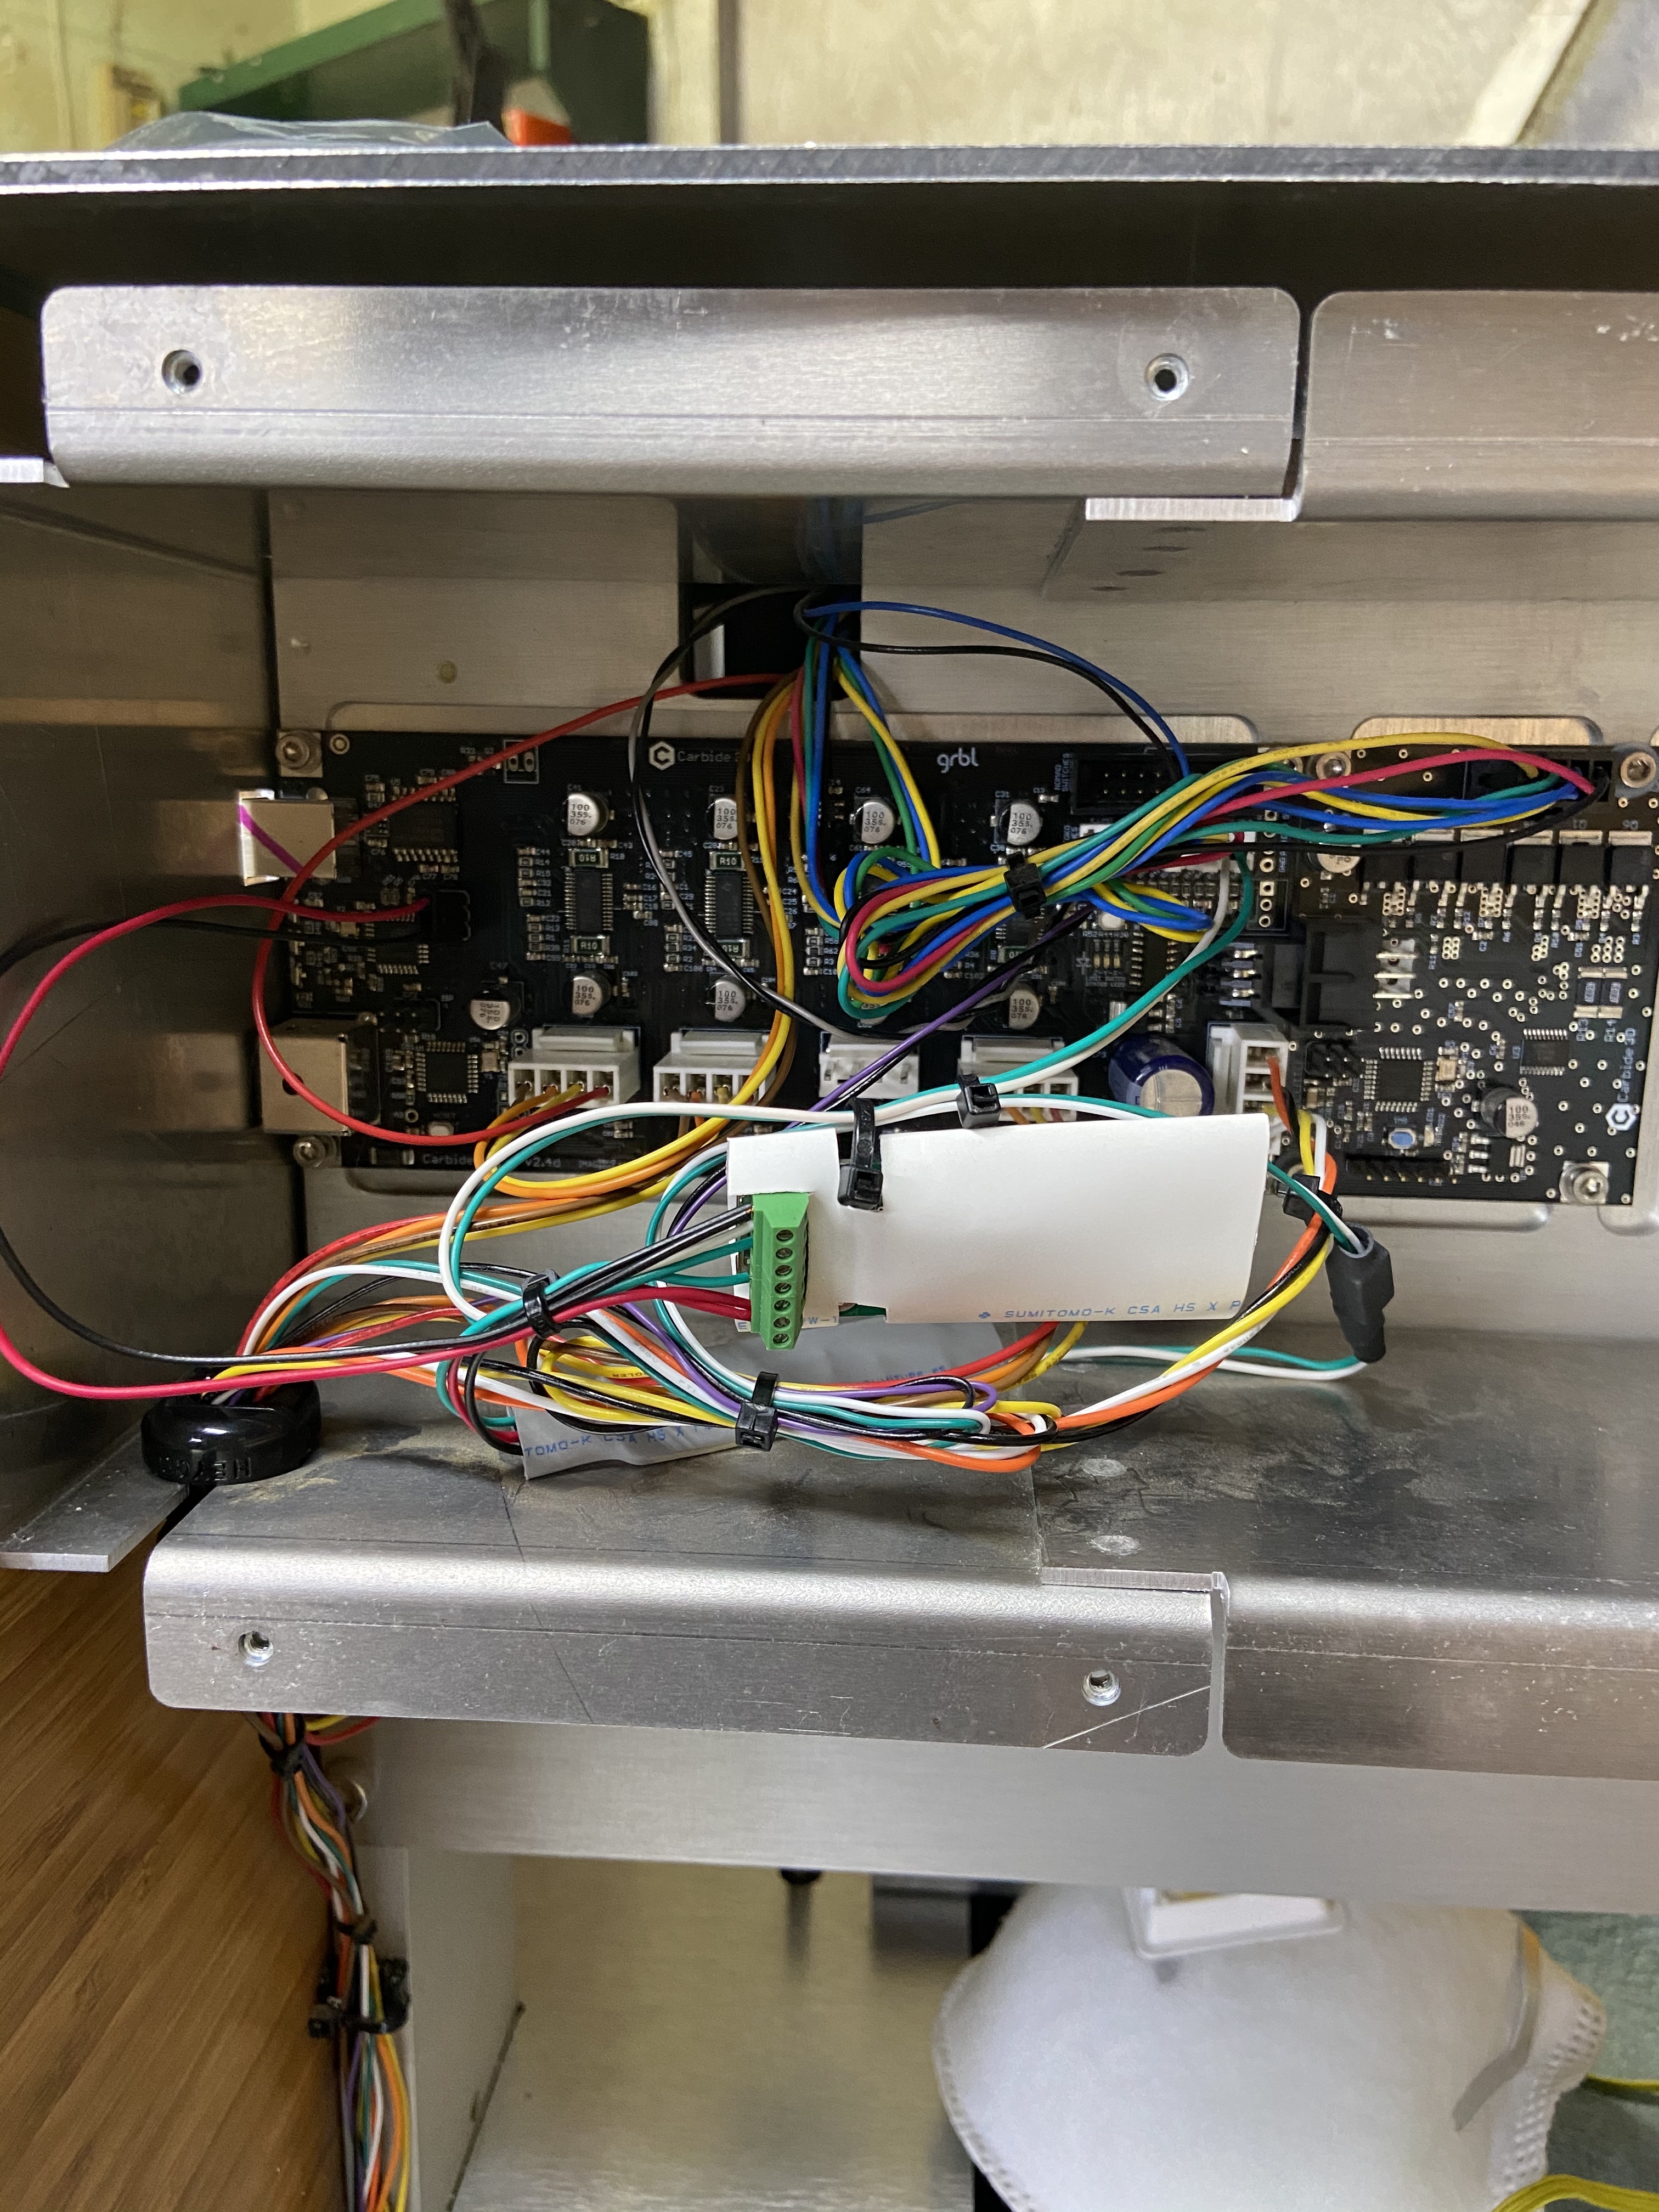
Integrating the probe into the Nomad’s electronics was fairly simple, though it required the creation of a junk-box wiring harness. The receiver for the probe draws power from the +5V present on the Nomad’s control board, and hooks directly into the machine’s probe input. The switch input from the tool length probe is passed through the receiver, allowing the use of either or both. The tool length probe can be used to measure the length of the Vers.by probe.

I had to bang together a quick adapter circuit to convert the NO switch output from the tool probe to the NC input the receiver expects, but this only required a single resistor and NPN transistor.

Wiring done, I protected everything as well as I thought it needed (heat shrink tubing and zip ties mostly), then buttoned it all up in the Nomad’s electronics compartment.

For gcode senders, I stick to CNCjs as it’s fairly turn-key and works under linux. I tested the setup with a G38.2 probe command, and it successfully found the side of an unsecured hunk of Renshape.

I don’t have a convenient way to share videos at the moment, but the one I have isn’t terribly impressive anyway. Using manual gcode commands, I can G38.2 probe in all three axes. Accuracy and repeatability are both seem acceptable, but I won’t know exactly how good they are until I’ve gathered more data.

This leads me to why I don’t have a more impressive video to share: as much as I like CNCjs, its probe support is extremely basic. It can only do single-axis probing, so more complex operations become multi-step processes, the details of which are left to the reader to work out.

What this really needs to sing is software support for multi-axis probing. I could see this added as either a widget in CNCjs (to replace the existing probe widget), or as an enhancement to Fusion’s grbl post processor to support probe operations. I’m halfway to a working grbl post, but it’s definitely in need of additional work before I’d consider sharing it. For now I’m content using the grbl console and issuing the G38.2 commands interactively.

Some additional notes follow.

Good stuff first:

  • Vers has reasonably-complete docs published on their website, and everything I needed I eventually found in their user guide.
  • Probe accuracy and repeatability seem good. Two probe cycles against the fixed jaw of my vise landed in the same spot +/- 0.01mm, but I haven’t trimmed the probe for concentricity yet out of laziness, and haven’t generated more data than that simple spot check (also out of laziness).
  • Battery life is excellent. I’ve had the probe for about three weeks now and have used it a half dozen times in anger, and it’s still on the charge it arrived with.
  • The receiver board’s got a little buzzer on it, so I get an audio indication of when the probe is tripped. Bonus, since the tool probe output is now routed through the receiver, I get an audio indication of when it’s tripped too.
  • The receiver can be integrated without permanent changes to the machine. If I wanted to remove it for any reason, I’d just have to cut some heat-shrink and swap some connectors.

Less-good stuff:

  • Delivery from Belarus took a while. COVID restrictions meant they weren’t able to ship for about 5 weeks, which was a bummer but outside anyone’s control.
  • Some of the user guide looks to’ve been translated from Russian, meaning that there are quite a few rough edges. That said, it was all comprehensible enough to get its point across.
  • Powering on the machine now requires me to at least turn the probe on and off to initialize the receiver board. This isn’t a huge deal, since on power-up the buzzer goes off to remind me to do exactly this, but it’s an additional step that I didn’t have to take before.

I’ll update this forum post when I’ve arrived at a setup that can do slightly better than the single-axis probing cycles it’s doing now.

13 Likes

Anything here you like?

Been a while since I’ve added one, but I’ve got a couple rattling around asking to be added.

2 Likes

Nice! Been eyeing that probe for awhile. Very interested to see your results! How easy it to adjust the probe tip in?

If Carbide Motion had user set probe offsets there’s no reason we couldn’t use one of these as well.

1 Like

Great work! Hows the Z clearance on the probe? Ca ln you clear the maximum working height?

Oh absolutely. You helped so much with the tool length sensor macro, I used it as my starting point to implement probing in the Fusion grbl post. My plan was to do XY, XYZ, hole, and boss. After that at a stretch would be less common measurements and those that look more useful for inspection than homing. Stuff like channel width and angle measurement. If I end up getting anywhere with this, would you mind if I used your macros as reference material? I’d be happy to contribute it back as a pull request.

On paper it’s easy; there are three adjustment screws on the bottom face of the probe. You sneak a dial test indicator up to the probe stylus while it’s installed and rotate the spindle. Adjust screws until you’re happy with concentricity. That said, I haven’t gotten to this part yet. Out of the box I wasn’t appalled by its repeatability and nothing I’ve done recently has really needed it, so I haven’t bothered just yet.

Unfortunately that’s one drawback. The thing is 92mm long making it around 0.8" longer overall than a mechanical edge finder. If you’re feeling hemmed in by an edge finder, this’ll definitely be worse. I’ll measure just how much clearance is left tomorrow and give you some numbers.

2 Likes

I have one of these and must say they are pretty great for the money. I have actually had it in the draw for around a year and only hooked it up in the last month.

I will throw this out there. Digitising probes are very good, but when it comes to getting the most of them you really need to have a ATC unit, this is down to how they sit in the collect, they are not designed to be removed then re-inserted and will need to be calibrated more frequently.

Mine is hooked up to a unit with a ATC and the accuracy is impressive.

4 Likes

Glad to see someone else going down this route!

+1 for the limited probe support being super annoying. I ended up buying a 3D-FInder and that poor probe support was one of the reasons to swap out Carbide Motion for an Eding-CNC controller. The 3D-Finder has custom software for Eding-CNC for calibration and measurements (e.g. hole diameters) to make life much easier.

On paper it’s easy; there are three adjustment screws on the bottom face of the probe. You sneak a dial test indicator up to the probe stylus while it’s installed and rotate the spindle. Adjust screws until you’re happy with concentricity. That said, I haven’t gotten to this part yet. Out of the box I wasn’t appalled by its repeatability and nothing I’ve done recently has really needed it, so I haven’t bothered just yet.

Make sure you mark the alignment of the probe in the collet. If you rotate it when you put it back in the alilgnment can go out by a bit.

You can also do some compenation in software with a test ring.

Unfortunately that’s one drawback. The thing is 92mm long making it around 0.8" longer overall than a mechanical edge finder. If you’re feeling hemmed in by an edge finder, this’ll definitely be worse. I’ll measure just how much clearance is left tomorrow and give you some numbers.

That was a big draw of the 3D-Finder for me. Collet to probe tip is 75mm, making it ~15mm longer than the Fisher Machine edge finders.

The downside is that the 3D-Finder is quite wide and overlaps with the plate on the bottom of the Z-axis by a little bit, so I need to machine a new one to replace it.

2 Likes

We’ve got an XY (not up yet), XYZ, hole (maybe you can help test accuracy). Is the “boss” just for cylinders?
Not looking for credit or anything, just enjoy problem solving and helping. Happy to help if I can!

2 Likes

I will also mention it’s worth using the sleep settings on these. If you don’t the battery will fail in around a week and you will need to take the battery out if you don’t have the rechargeable version.

1 Like

Collet to probe tip for this one is actually a bit shorter - 63mm according to the dimensions on the Vers.by webpage. At this point though it’s a bit of splitting hairs - these probes in general are kinda lengthy so making a big deal out of 1cm or so seems a little trifling.

Yea, I’m up for it! Testing the hole macro for accuracy sounds like a great weekend project. For bosses, I was thinking just a basic cylinder. Initially I figured that this was mostly just the same workflow as measuring a hole, but after I reasoned it out I realized it’s a little more complicated than that. Definitely a nice-to-have, but nothing I’d hold my breath for.

I’m curious what your use case looks like. For me, the probe spends most of its time switched off entirely. I only switch it on to initialize the receiver after initial power-up, then I turn it off after I’ve done whatever probing I need. Do you just leave the probe switched on, and rely on the sleep modes to conserve power?

1 Like

At this point though it’s a bit of splitting hairs - these probes in general are kinda lengthy so making a big deal out of 1cm or so seems a little trifling.

Normally I might agree but given the Nomad’s 76mm travel on the Z-axis, every little bit counts. 10mm is a ~15% difference in range.

2 Likes

Fun fact

Nomad GRBL defaults spec 100mm Z travel.

2 Likes

@Luke so when are we getting an ATC for the SO3 so we can use probe? =)

2 Likes

:slight_smile: Good question and something I have spent a while looking at. A Shapeoko ATC is a very cool idea but really needs to be well thought out. As standard GRBL doesn’t support any kind of ATC function, there are no dedicated outputs, no stored tool offsets, no function around tool carriages. It also requires a ATC spindle of some variety, a bunch of inputs/outputs for safety and likely air or another kind of pneumatic device to drive the tool changer. All in there is a significant gap in hardware and software which needs to be closed.

I have installed a couple of ATC units now and the average cost for these is around $3000 per unit unit when you consider a decent ATC unit, VFD, tooling/collects, air requirements, possible hardware around a tool holder and the driver hardware. Even if we could do it for half the cost, would be a chunky step up. I’m sure there is appeal but it might be limited to a select group of users.

With the recent-ish introduction of BitSetter it seems that what might be a little more appealing is the ability to quickly change tool, re-probe the tool and continue the job?

5 Likes

Yeah, a big appeal to a Mafell spindle for me is their quick tool change variant:

if it were available in a 110V variant I’d probably break down and buy one.

EDIT: Since that time, this tool has been discontinued, but a speed control version is available:

Ultimately, I did buy one:

3 Likes

This topic was automatically closed 30 days after the last reply. New replies are no longer allowed.