tons of double side tape, it’s not the work holding… if i stop the cut 50% of the way through (its a 45lbs piece of stock) it has the same tooling marks as a through cut.
I don’t have the enough material to create additional roughing slots, but I also don’t think it’s that as the tooling is the same where I cut a letter that bumpped up against another letter and essentially had a totally open slot.
right you could hear what was either bad chip evacuation or the acrylic chipping out during roughing but with .02 A&R and the nice slow 24"/min on the finishing passes i think we should b e okay right?
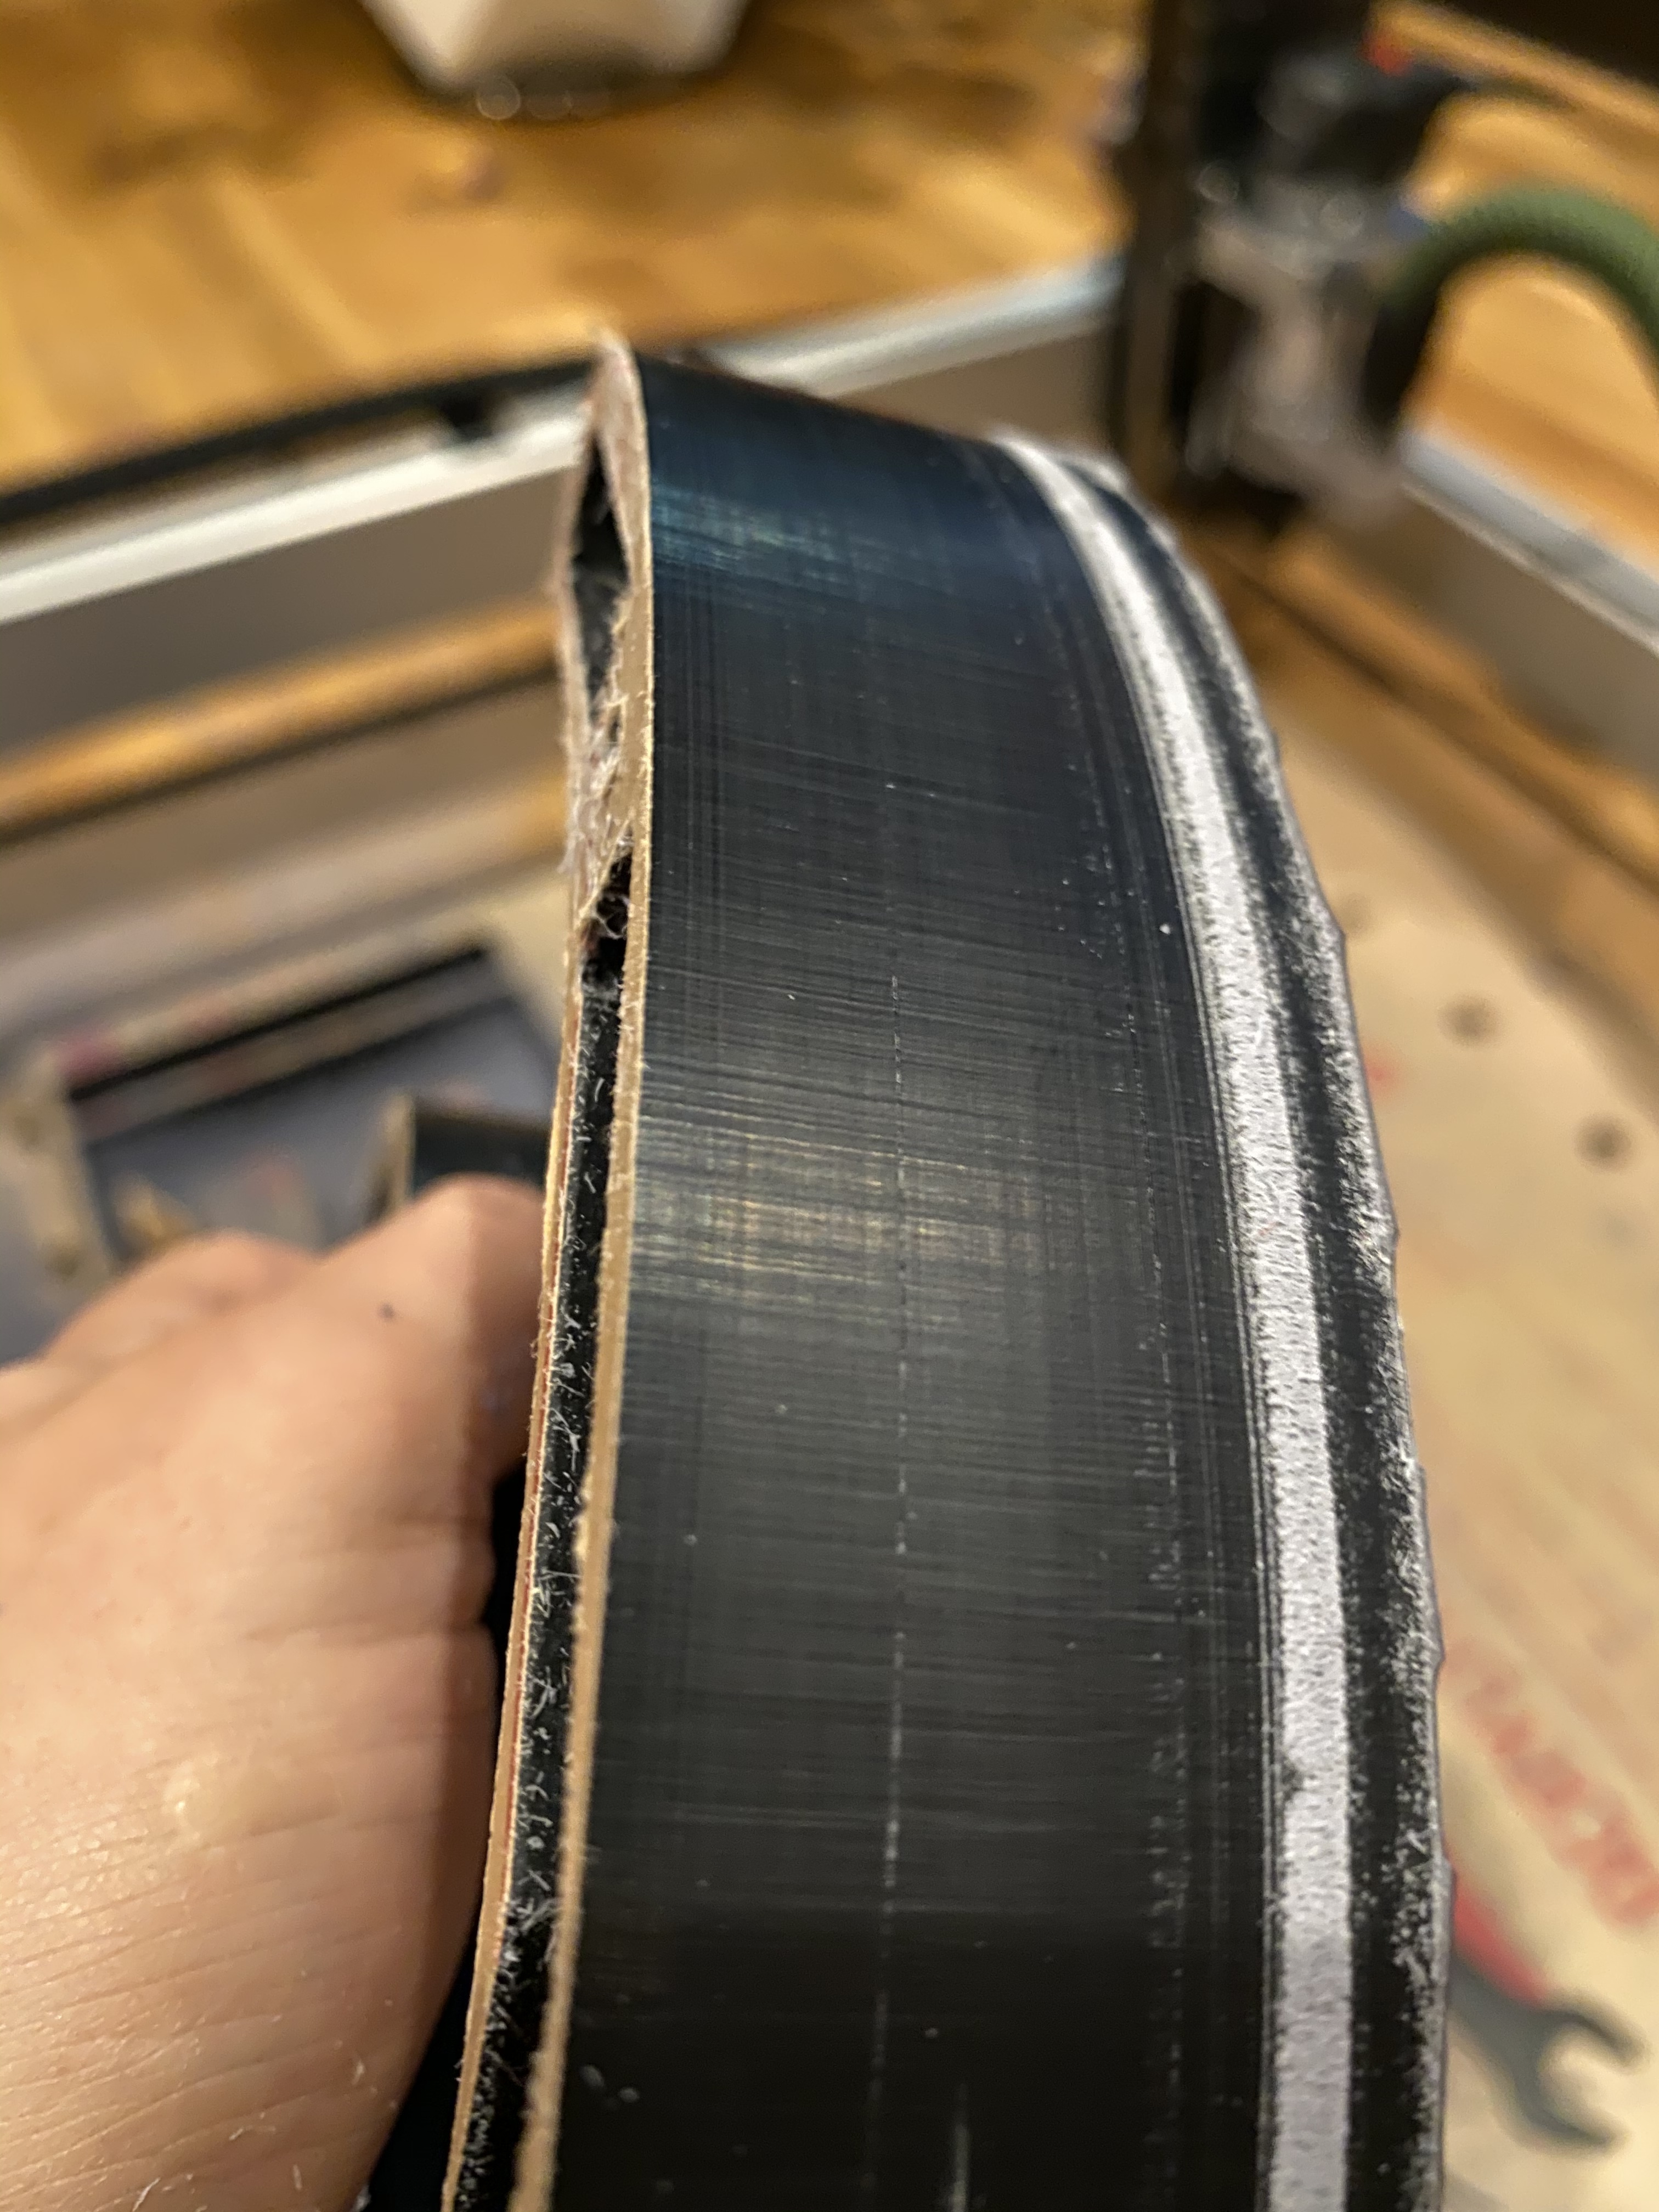
Setting 6 on C3D router for all Toolpaths. On the right of the cut you see bad chip evacuation melting now that the RPMs are turned up. I’m thinking that a 1.5” down cut o-flute was a bad idea. I might just get the upcut version and cut the scrap off of my stock to see if it does the same.
If anyone is local to the DMV area and would like to try I have plenty of scraps.
I’m going to caulk this up to Bad chip evacuation caused by the 1.5” down cut oflute bit and slotting operations subsequently causing chattering & vibration.
I’ll try to update this thread if I get the upcut version and another opportunity to cut this stock.
I would concur with that guess. The other thing I have seen is cutting it on a grate so the chips and fall. But an up cut or compression should work. My only concern with up cut is work holding…Only one way to find out. Make more scraps
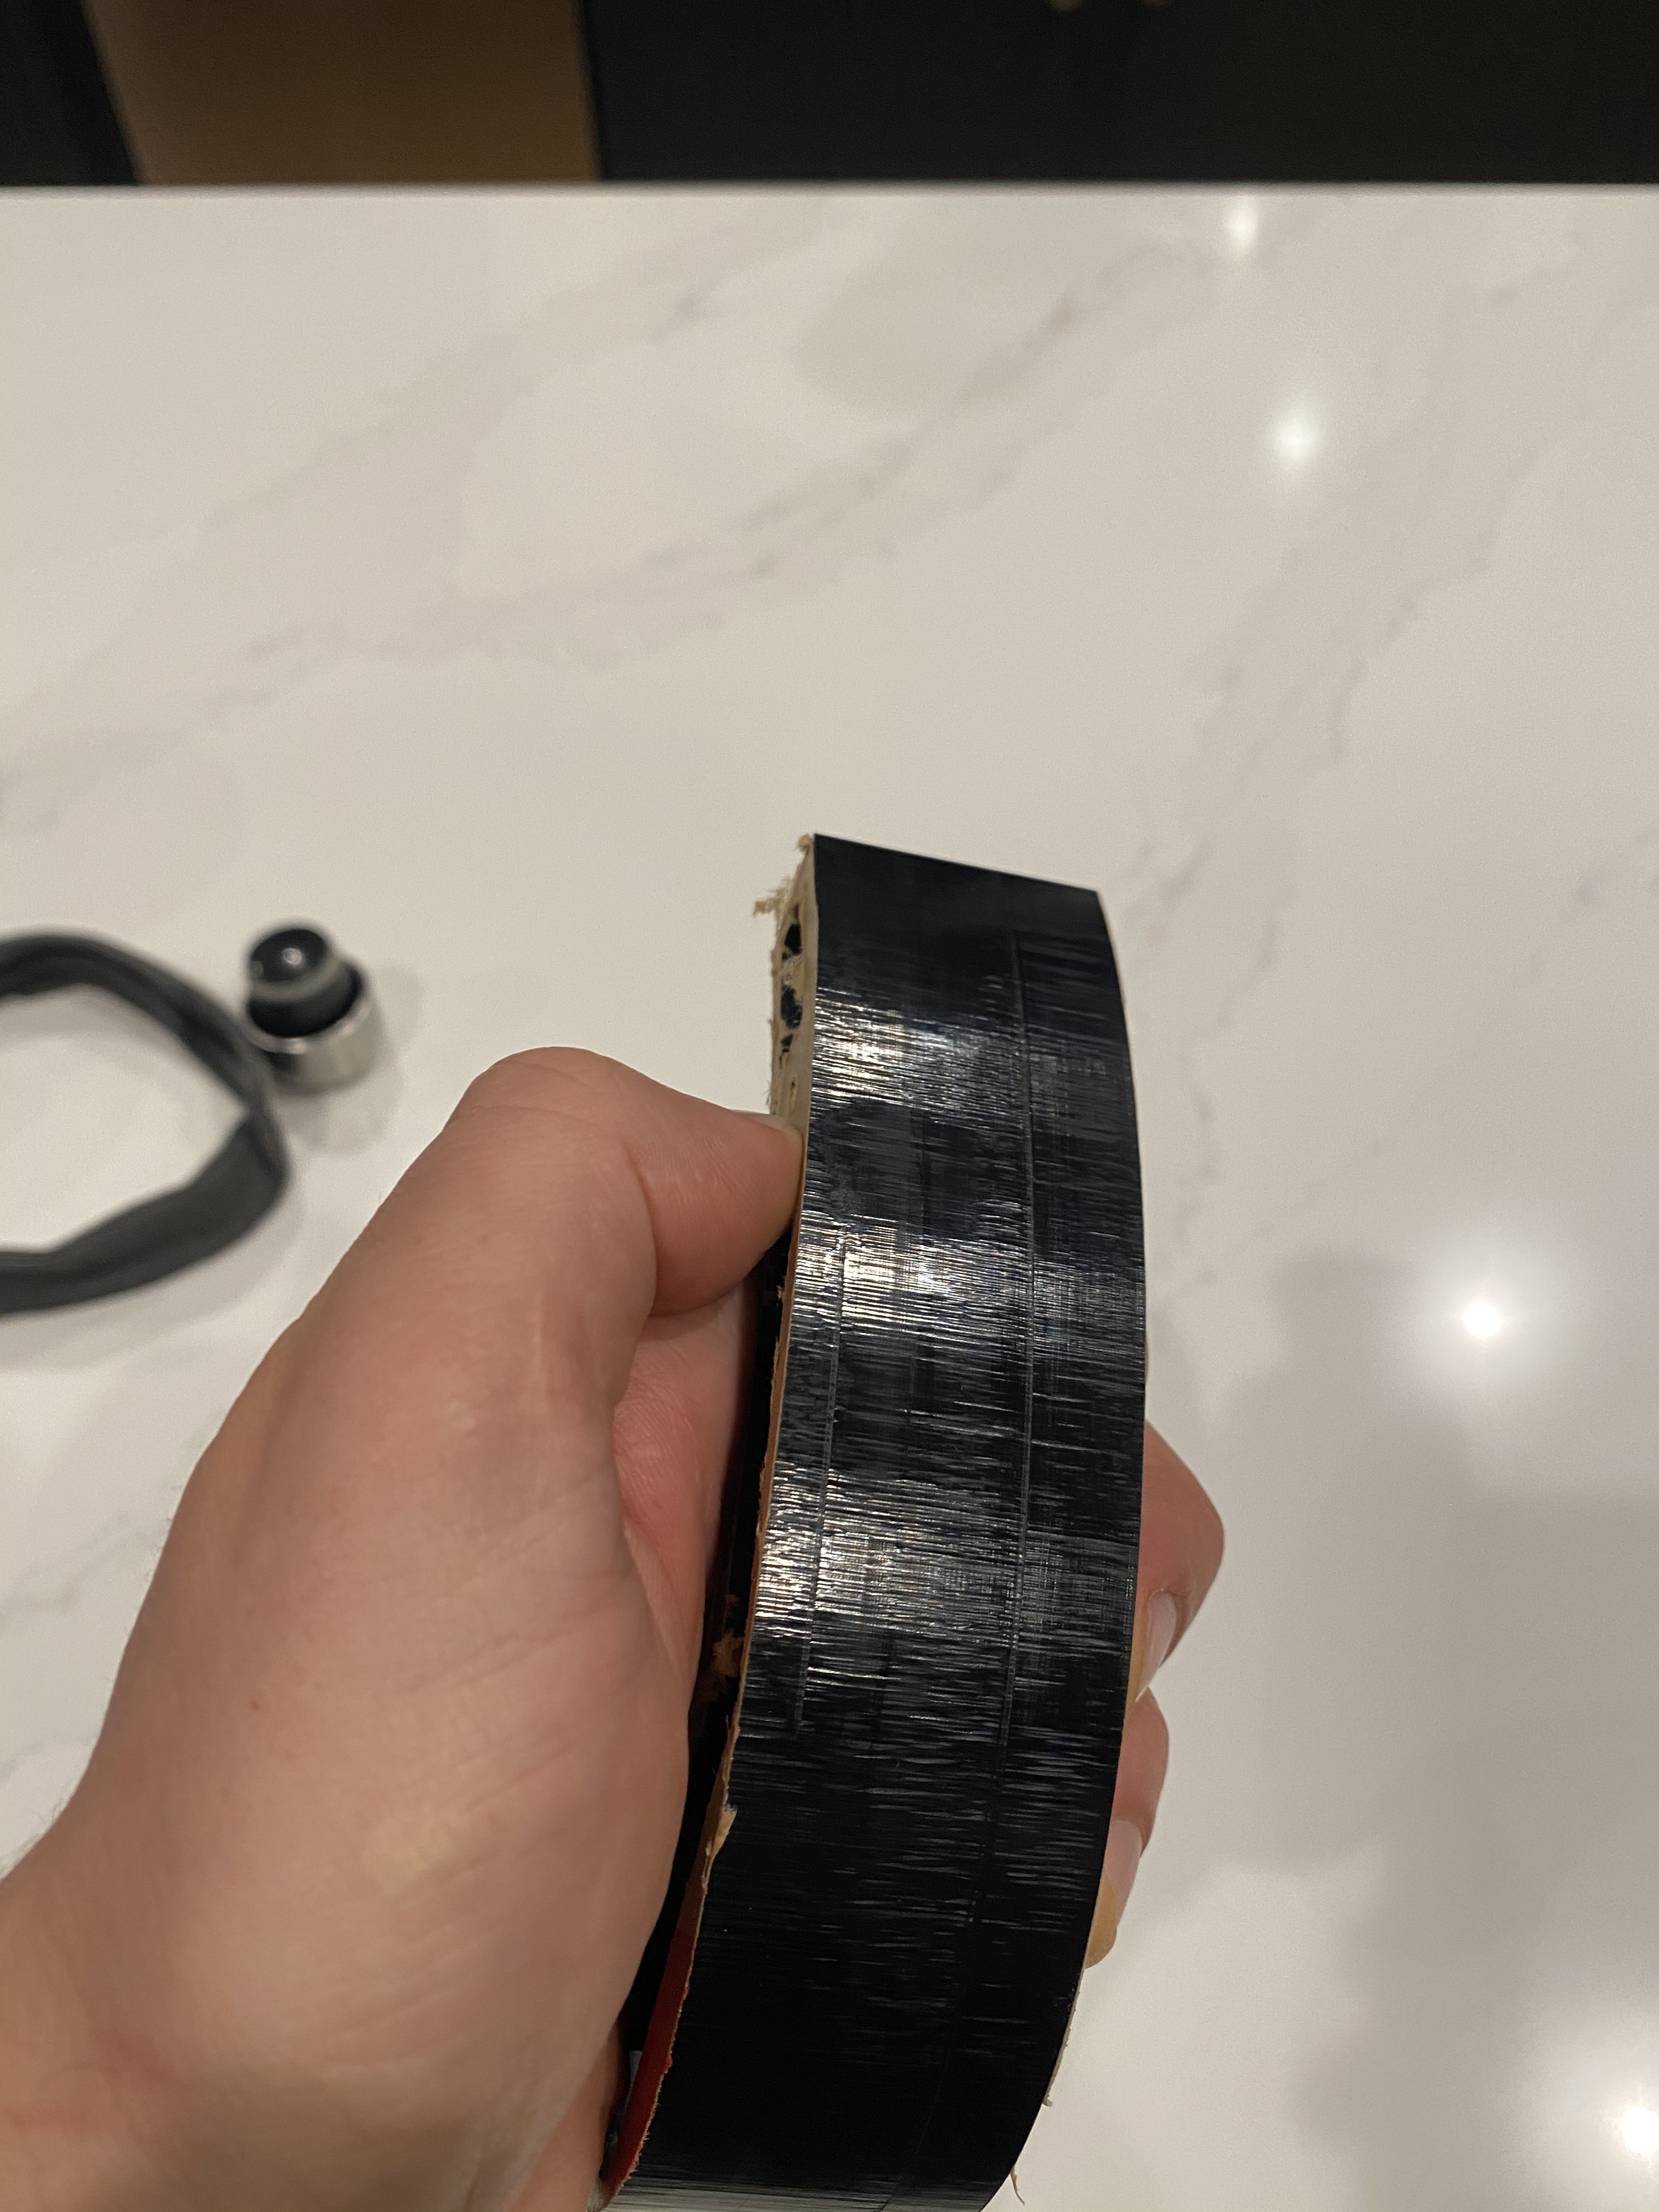
So I couldn’t let sleeping dogs lie on this… I bought the upcut version of the same unicorn bit I originally used. And the results are much improved. It’s getting closer to that “mirror” finish that the bit advertises, but not quite there yet…
This was using @Vince.Fab 's suggestions of a .02 STL Roughing, Followed by a .005 Rampped Finishing, Followed by a Full Depth of Cut finishing pass. Any thoughts/suggestions based on what you see? RPM was set to 3 on the C3D router so around 17-18k.
EDIT I realize that this probably doesn’t look much better in photos then the pervious cuts, but I can assure you that it FEELs a-lot better and the visual shock your seeing is between achieving a mirror in certain spots, but not in others.
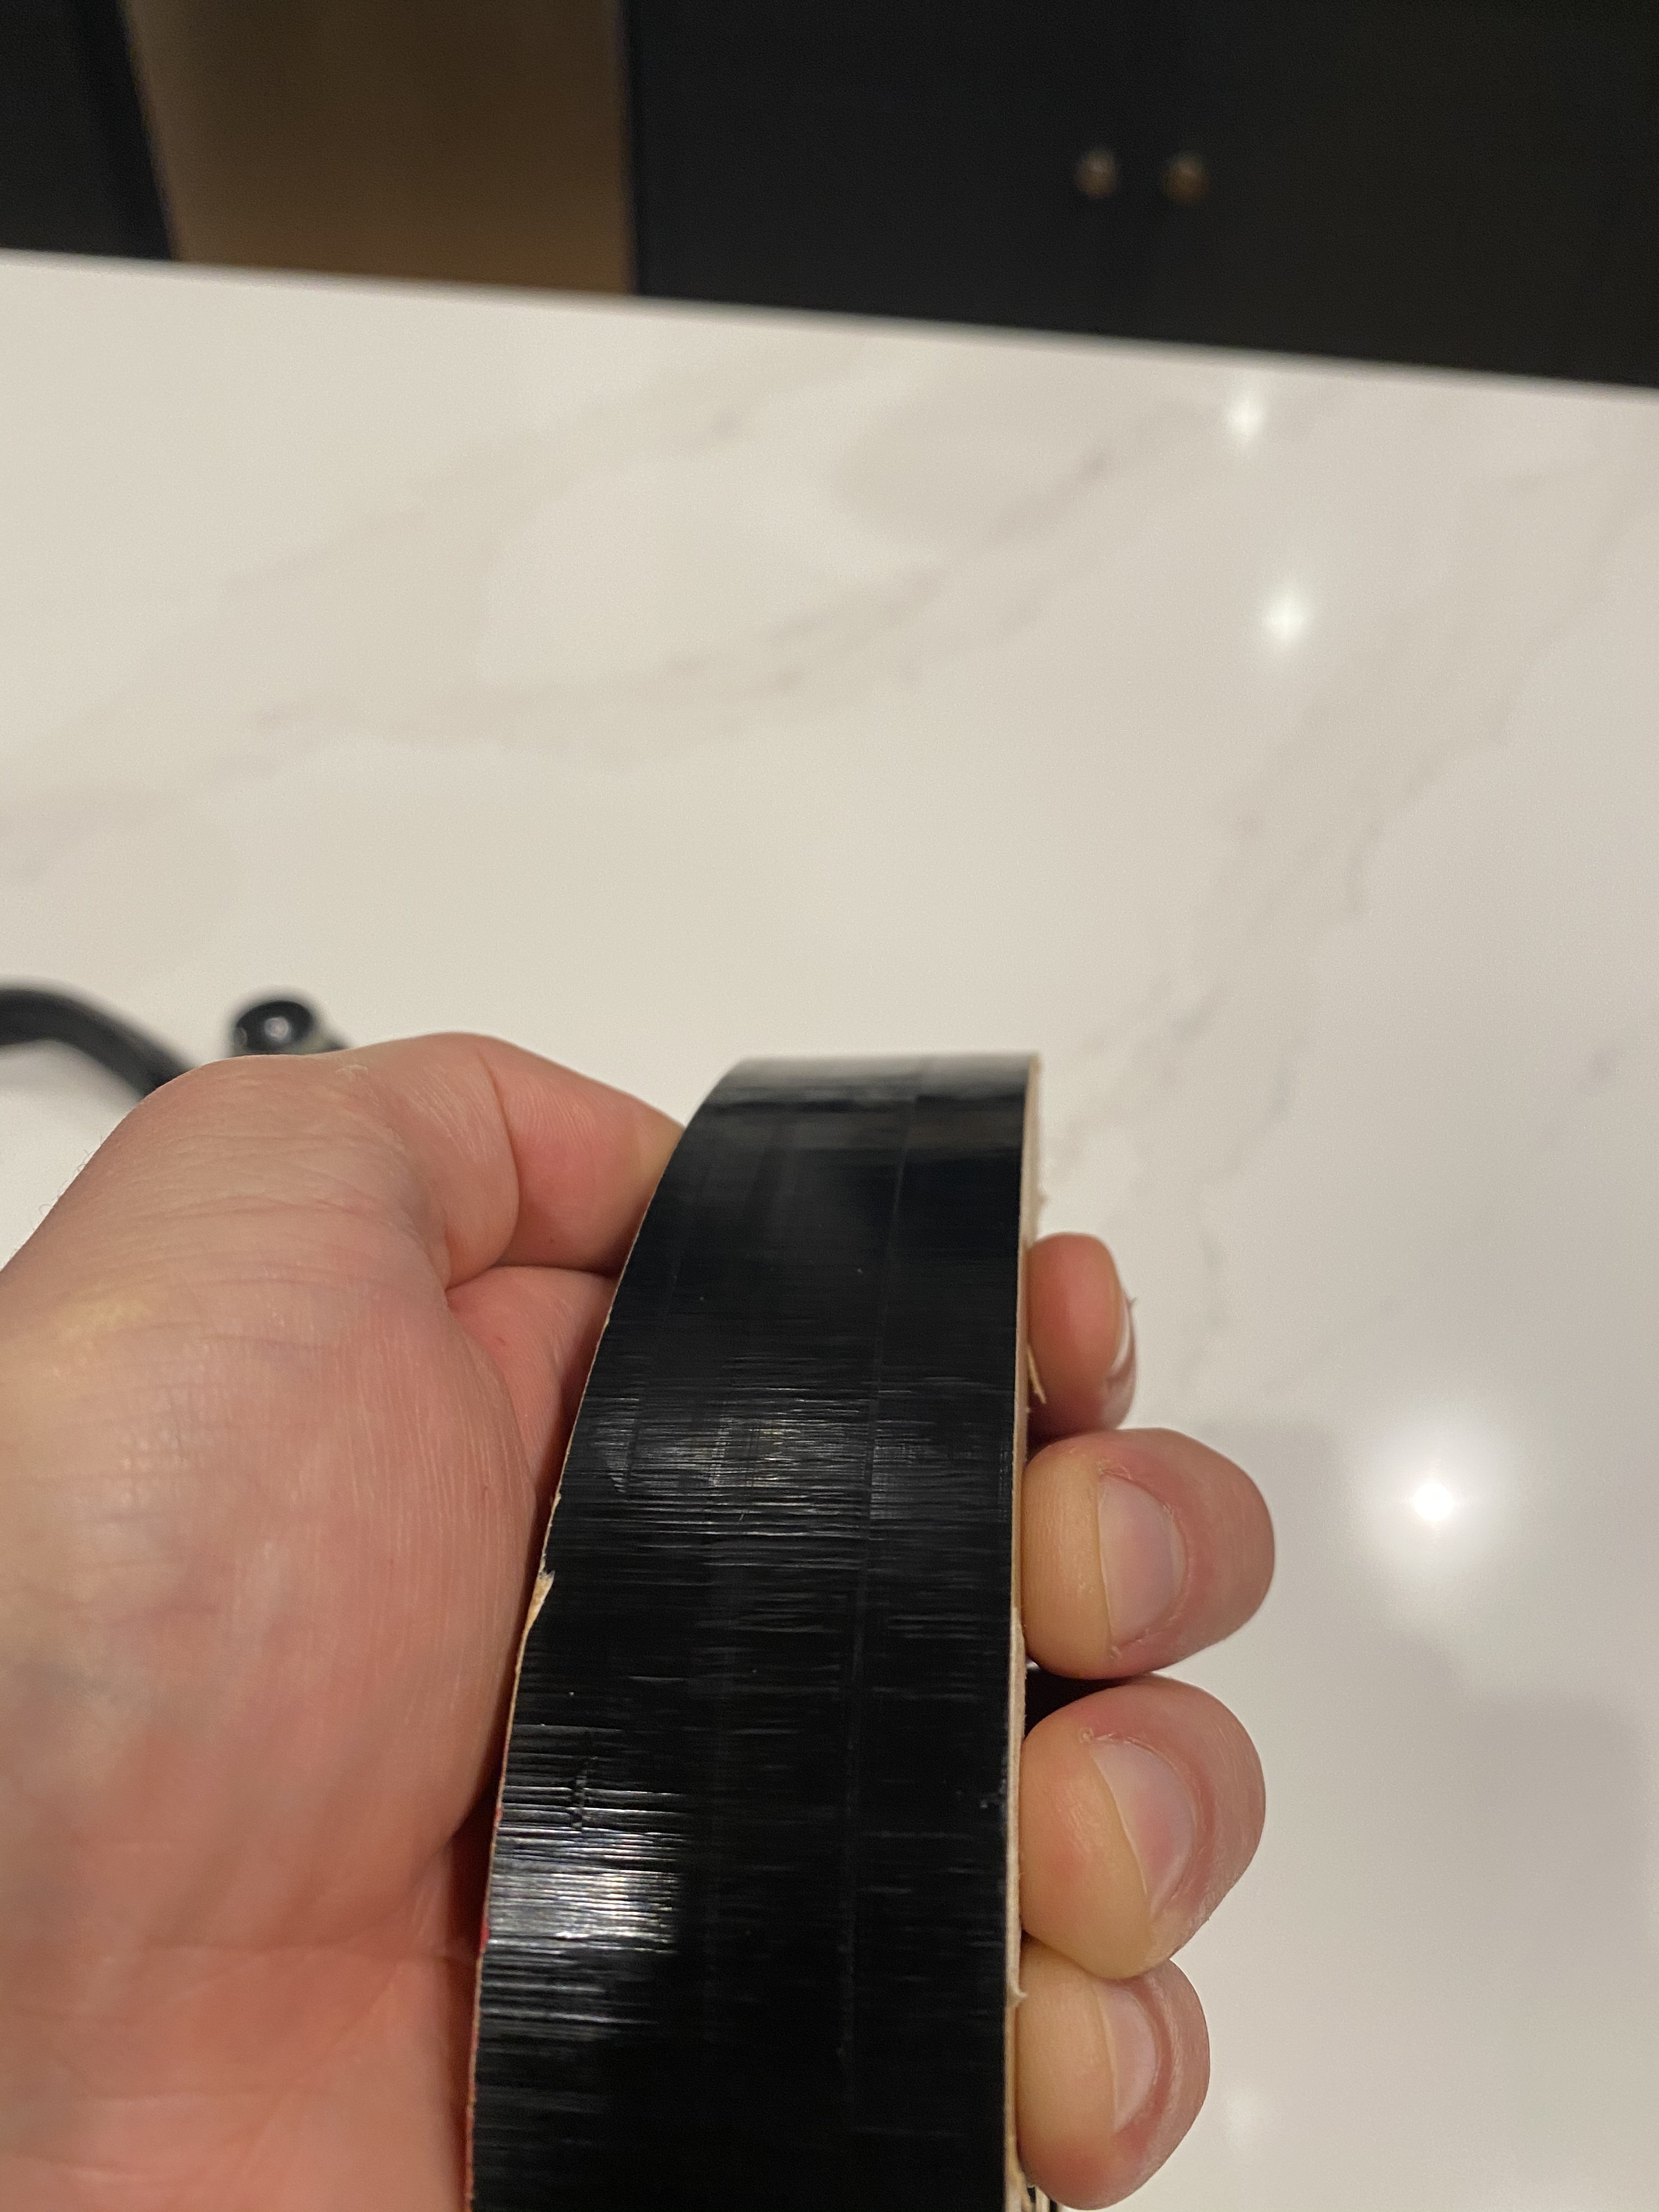
How does it sound as it’s making that finishing cut? Ideally it should sound like it’s doing little or no work on that. The surface suggests there’s still some movement in the bit as it’s cutting.
There still seem to be persistent horizontal lines in the cut edge, that’s a new cutter so that’s presumably not chipped teeth. Does the finishing pass at full depth actually shave the full surface or are those marks left from deflection during a previous cut?
Is this an outside edge or one wall of a deep slot when the finishing cut is made?
In my limited cutting in acrylic and other plastics I’ve found the main trick to be keeping the feed speeds high and taking more, lighter cuts at a too fast to melt feed rate.
Oh, also, are you running ‘repeat finishing pass’ on that final full depth pass?
The one thing I did not try (yet) in my eternal quest for smooth curves in acrylic, is using heavy cutting oil as recommended by @Centrelinein this post.
Worth a shot ?
Also, thank you, I learned a new saying! (“not letting sleeping dogs lie on this”)
It’s hard to tell given that its mostly inside of a slot, but I lean toward full surface because the chips are long and and fine almost like hair.
Its mostly in a slot, but this letter had some outside edges on the stock, it didn’t make a difference in the cut visually.
No, on the FDOC it’s just one pass no repeats.
To eliminate the possibility of bit deflection on roughing… Do you think I should try something like a .04 STL roughing, followed by .02 STL Ramped Finishing, then 2 FDOCs one with .005 to leave then a final final?
Re: cutting oil… well I did just get a job to do 8 more of those 12’ signs… so … maybe.
I cut acrylic with my machine, primarily Black .5" cell cast, but a solid mix of bigger and smaller stuff as well. I’ve struggled to achieve the same finish as the shops I contract with, but have somewhat resigned to settling for less at this point. I am using a standard belt Z, which has quite a bit of flex at the endmill. Recently ordered a HDZ in hopes of some incremental improvement in rigidity.
Anyway, I have cut a few large test panels into a honeycomb pattern, using different chip loads, WOC, DOC, corner comp, and strategies in each cell. When it comes to dialing these things in, I am no Vince(I am always hoping he’ll get on a acrylic kick), but my experimentations have had me abandon full depth finishing passes. My feeling is that the machine lacks the rigidity to make the full DOC with the required WOC. With my .25" 1F tooling, I am currently using a minimum stepover of .04 on acrylic for my finishing operations, this A) gives me sufficient lead out room, and B) seems to provide a sufficient minimal load/bite for the plastic specific endmill. After roughing operation to create the slot, I use a separate finishing operation, I believe my template is set at .004" feed per tooth, .04" doc, .04"woc, with ramp, 0,0 finishing pass, no lead-in, lead out at 45degree within the confines of the slot.
Probably far from optimal, but its simple enough for my baked brain to remember. Everything I do gets a quick sand with 320 or so before it goes to the router table for radius, then I sand to beyond 1K before using a big Baldor polisher. I never use a torch, as the finish and potential material stress, is not acceptable to me.
HDZ and a .02 FDOC finishing pass does not work in 1.5" acrylic, but the ramp doesn’t seem to struggle until it gets deeper than .75" so you might be in luck there.
I can give this a shot… so basically 2 operations? Roughing with .04 to leave and then a Finishing Operation with a .04" ramped stepdown?
Exactly, that is what I am currently using for commercial products, as I like to avoid lead in’s on the acrylic for any finish surface. Lead outs are mandatory. As mentioned this is probably not optimized, and will also be quite dependent on your endmills geometry. The shallow DOC does make for easy chip evac with my dust collection, and being in a clean shop with no enclosure by choice, I prefer not to use my airblast unless required. Cleanliness in exchange for a time penalty.
I’ve already processed my sheets of .5" for the current project, but will be running a 4x8’ sheet of .25" black cell cast material through the machine today. Though it wont be as telling, I’ll try to remember to snap a couple pic’s of the finish.
I feel I get a better finish than I do with a typical wood template and router table. The latter, though generally smoother and more uniform, often produces what I call subtractions… more difficult to remove in black acrylic that is to receive a very high polish. I consider the mild artifacts(excluding lead-in/lack of lead-out imperfections) of the CNC to be additions, easily removed by the necessary post process procedures. But I would not call it a “router finish”. The machine shops I use to do the bulk of my work use very large, very powerful machines. And while they use the identical tooling in so far as manufacture, material, and geometry, they do all of the profile work with decidedly larger diameter versions. Their “router finish” is just that, smooth, uniform, and completely suitable for low grade matte finish, or immediate glue up if that is your use case. Having spent some time acquiring advice from them, all very happy to help me play around, my take away way was that they do not put the kind of effort into programing that we might have to. There is seemingly a variety of reasons to purchase a $200k Onsrud machine.
It’s also worth noting, that regardless of the finish you achieve on the linier portions of your model, the resolution of the machine will show on your arc cuts to some degree. Also, I run my router at 18k, as I don’t have software speed control. A compromise. I’d run faster for profile cuts and such, but appreciate the slower machine speed for the micro engraving/chamfer mills I often use, boring, and adaptive operations. All of which are quite small in terms of machining area.
1 Like
Griff
(Well crap, my hypometric precursor device is blown…)
34
Following this thread as I’m considering some acrylic work, zero experience at present.
I wonder if a larger diameter mill might help? I know your router doesn’t have that option but maybe @Julien with his 2.2kw spindle could give it a try? Maybe he has already?
Running a larger diameter cutter would provide a superior result. My suppliers and contract shops run a typical minimum of 3/8" unless constrained by the model. And based on tooling marks, generally much larger. Being that my models often have a tight interior corner radii, I suspect they use the smaller tooling to avoid an unnecessary tool change when surface finish is not critical. If there was one reason for me to switch to a spindle, this would be it. I don’t care about the sound, and I like that the router is “simple” and available even down the street on my small island.
Griff, based on your skills, I suspect you will show us all a thing or two. I am looking forward to it.
I suspect that this is likely to be the limiting factor, I’ve been doing lots of tests on machine deflection and rigidity and they all support the view that cuts with low depth and lots of width work fine whilst cuts with large depth and thin width are not what the machine likes to do.
There’s plenty of other evidence from folks like Vince supporting the shallow and wide works result, which is partly why I started looking for causes.
So to get to that full 1.5" depth on the acrylic it’s quite likely that sneaking down a few mm at a time with a ramp in and lead out is the way to go.
This is the wall finish I get on 6061T6 with a single flute 6mm cutter using 3.5mm step downs, ramp down, lead out, 0.2mm stepover in each of two finishing passes after the roughing. If the machine can hold still enough for Aluminium it should be able to do acrylic. This is straight off the machine with no hand finishing at all.
Similar to the Acrylic I found that keeping the feed rate up, as well as chip evacuation was key. If I was slotting I’d be running a wider slot than the cutter to make sure I had enough room to get the chips clear of the slot.
EDIT - XXL with HDZ, you’d do better on an SO3 with HDZ
This could be key, might be worth taking a picture after each cut to see how it progresses. If you’ve got deflection on the roughing cuts that marks down to a depth below the finishing cut it won’t matter how good the finishing pass is.
I also forgot that Acrylic needs a minimum cut sorry.
Maybe, I’d try the pictures of an exposed edge after roughing, first and second finishing cut first and see what you can see.
One point of regular thought for me, at least regarding say something like aluminum vs plastic milling, is uninterestingly enough, plasticity. It is my unfounded assumption that a plastic, such as Acrylic, has a higher propensity to deform via cutter. This would assumedly interact with machine rigidity. This unscientific and baseless assumption has lead me to increase my minimum stepover in a attempt to achieve a superior finish, despite being, to me, generally counter intuitive.
Interesting, I’d only worried about it being brittle when pushed and melting if I moved too slow. If the workpiece is held down well it shouldn’t move that much.
As for the cutting dynamics that’s out of my depth and I’d be asking somebody like @spargeltarzan if they had thoughts on this?