What did you cut on your Shapeoko/ Nomad today?

Yes, Walnut! My favorite wood. Here’s what that slab became:

16 Likes

Since I’m attempting to make jewelry, still practicing, I decided to try my hand at jewelry box making too.

As is generally the case for me when I attempt to scratch build something the first effort is mostly about how NOT to accomplish the project.

In any event, this is what I’ve come up with. Design in F360. Joinery, excepting the 45 degree cuts for box and top, accomplished with HDM. Copper “MoonCat’s” and copper feet also HDM. Lastly are brass hinges, WIP, also on the HDM.


A few firsts for me: First jewelry box, first cutting of stopped dadoes on 1/8” thick stock, first attempt at brass hinges. First use of soft jaws.

Learnings: pay more attention to proportions, I just don’t like the finished box. The drawer in the bottom, the “bulk” overall just don’t appeal. The top should be at least an inch thick rather then 1/2”. Also remember past learnings like verifying the flatness of a surface destined for engraving, reference the crushed stone inlay on the bottom of the lid, a bit thin in the lower left.

That said, can’t wait to build another!

31 Likes

Gorgeous! I also really like the turquoise epoxy filler you used!

Do you care to share the file for this project? I could make some serious brownie points. Thanks

2 Likes

A few posts up you’ll see an example of some of my recent work. Using what I learned with that project I hope to turn out a few jewelry boxes, music boxes etc.
These little endeavors require hardware, my preference is to use nice hardware. Unfortunately, nice hardware is also expensive hardware.

A case in point SR-638 Side Rail Hinge | Brusso Hardware. Ouch, plus tax, plus shipping, triple ouch. Reading the description I see “milled from…”, hmmmm, I have a CNC, I can do that.

Well, after a ridiculous amount of time and try’s, I did it! Inordinately proud of myself. Certainly a pretty simple little job for a real machinist but, you gotta start somewhere.

17 Likes

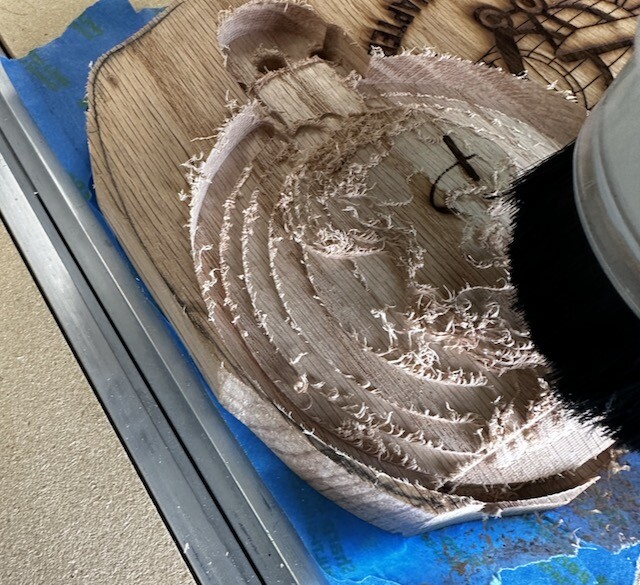
Tried new V7 Build 3D features. Still could use some upgrades but overall came out nice. Still very workflow intensive but import feature love it. Hope to see more 3D upgrades in future.

Doesn’t look like much in beginning LOL

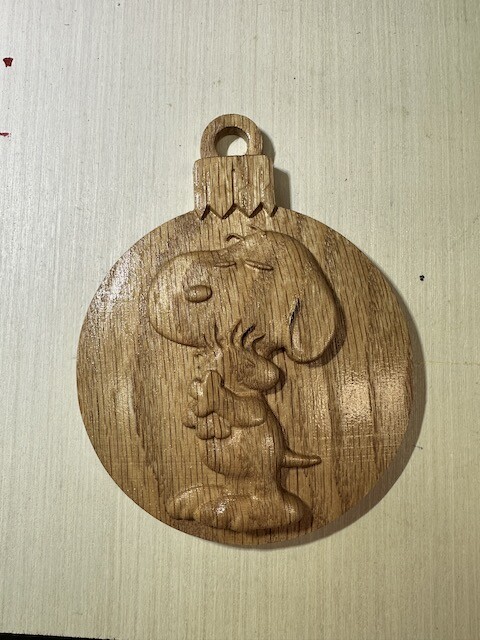
But came out very nice. 3/4" Oak/1mm Taper ball bit.

19 Likes

My first MDF sign. Learned tons in the process, mostly the painting part.

13 Likes

@Dennyboy I added the .dxf project files/sketches to the post above.

Finished up some epoxy projects this week! KC flag for my son and epoxy/ash charcuterie board for local youth football team.

20220921_231040-ANIMATION

14 Likes

A redesign of an Instructable concept but done exclusively using CNC …

24 Likes

This concept would be cool if the gap in the ring could rotate 360 degrees.

That’s brilliant- I think I have to make that for my bedside tables

QQ:
How big were the circles, what plywood did you use, what finish

Love to see the design file

This was only a prototype to lock in the design using threaded rod from top to bottom. The finish was tung oil after which I applied a few layers spray-on poly. I’m working on a version with solid wood using a smooth rod and nylon inserts for smoother operation. You’re welcome to my file but it’s in Vcarve format.

1 Like

The wings rotate 90 degrees in each direction.

IMG_0355

4 Likes

Love to see the vertric vcarve format

Your prototype looks good. How tall and big around is your prototype and what is your target size for your eventual project?

One other question about our Edison light bulb. Is it a regular tungsten or is it an LED? My concern about a tungsten light would be heat buildup inside so if it is maybe a vent in the top? If it is LED have you measured the heat buildup from the LED. Some LED are quite cool to the touch but some get hot.

Not positive, but it looks very much like this LED bulb here.

1 Like

Let me preface by saying your design is great, I was just saying a variant would be cool as well.

I sometimes do not convey my exact meaning. What I meant by rotate 360 degrees is in the following example. I hope this helps.

This allows the ring gap to move 360 degrees. A slight variation from the original.
:wink:

What holds the whole thing together? In his, the pivot point / hinge is also the structure that holds it together.

Either on the inside or outside rod(s) can be used to hold a cap on the top. Just like the said hinge.

Please understand, I am not challenging his design, just an alternative design for functionality. Food for thought to spark other projects.

1 Like