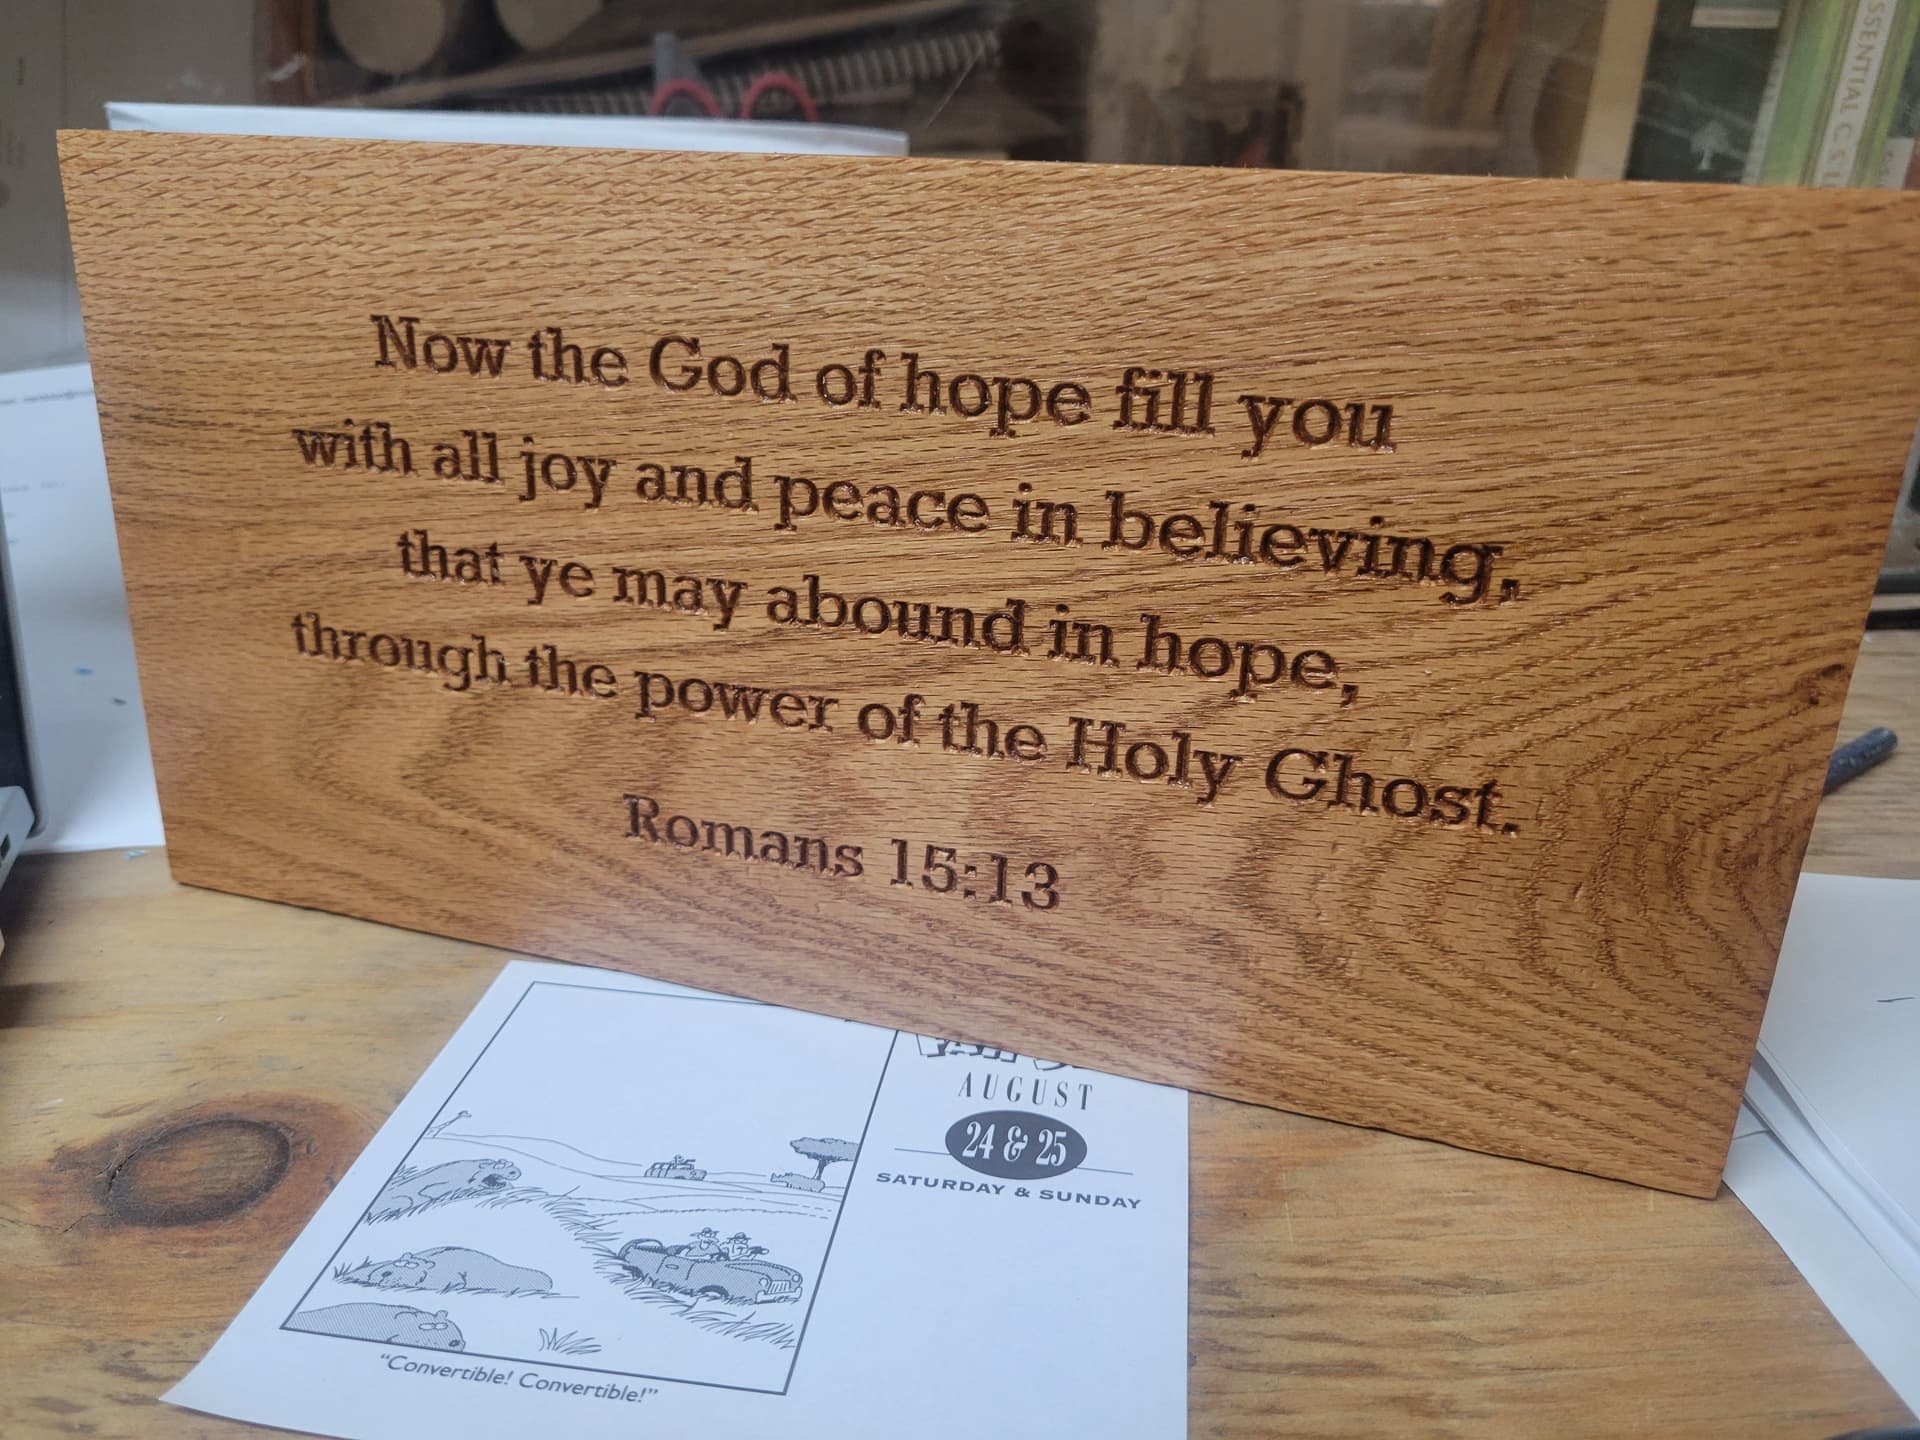
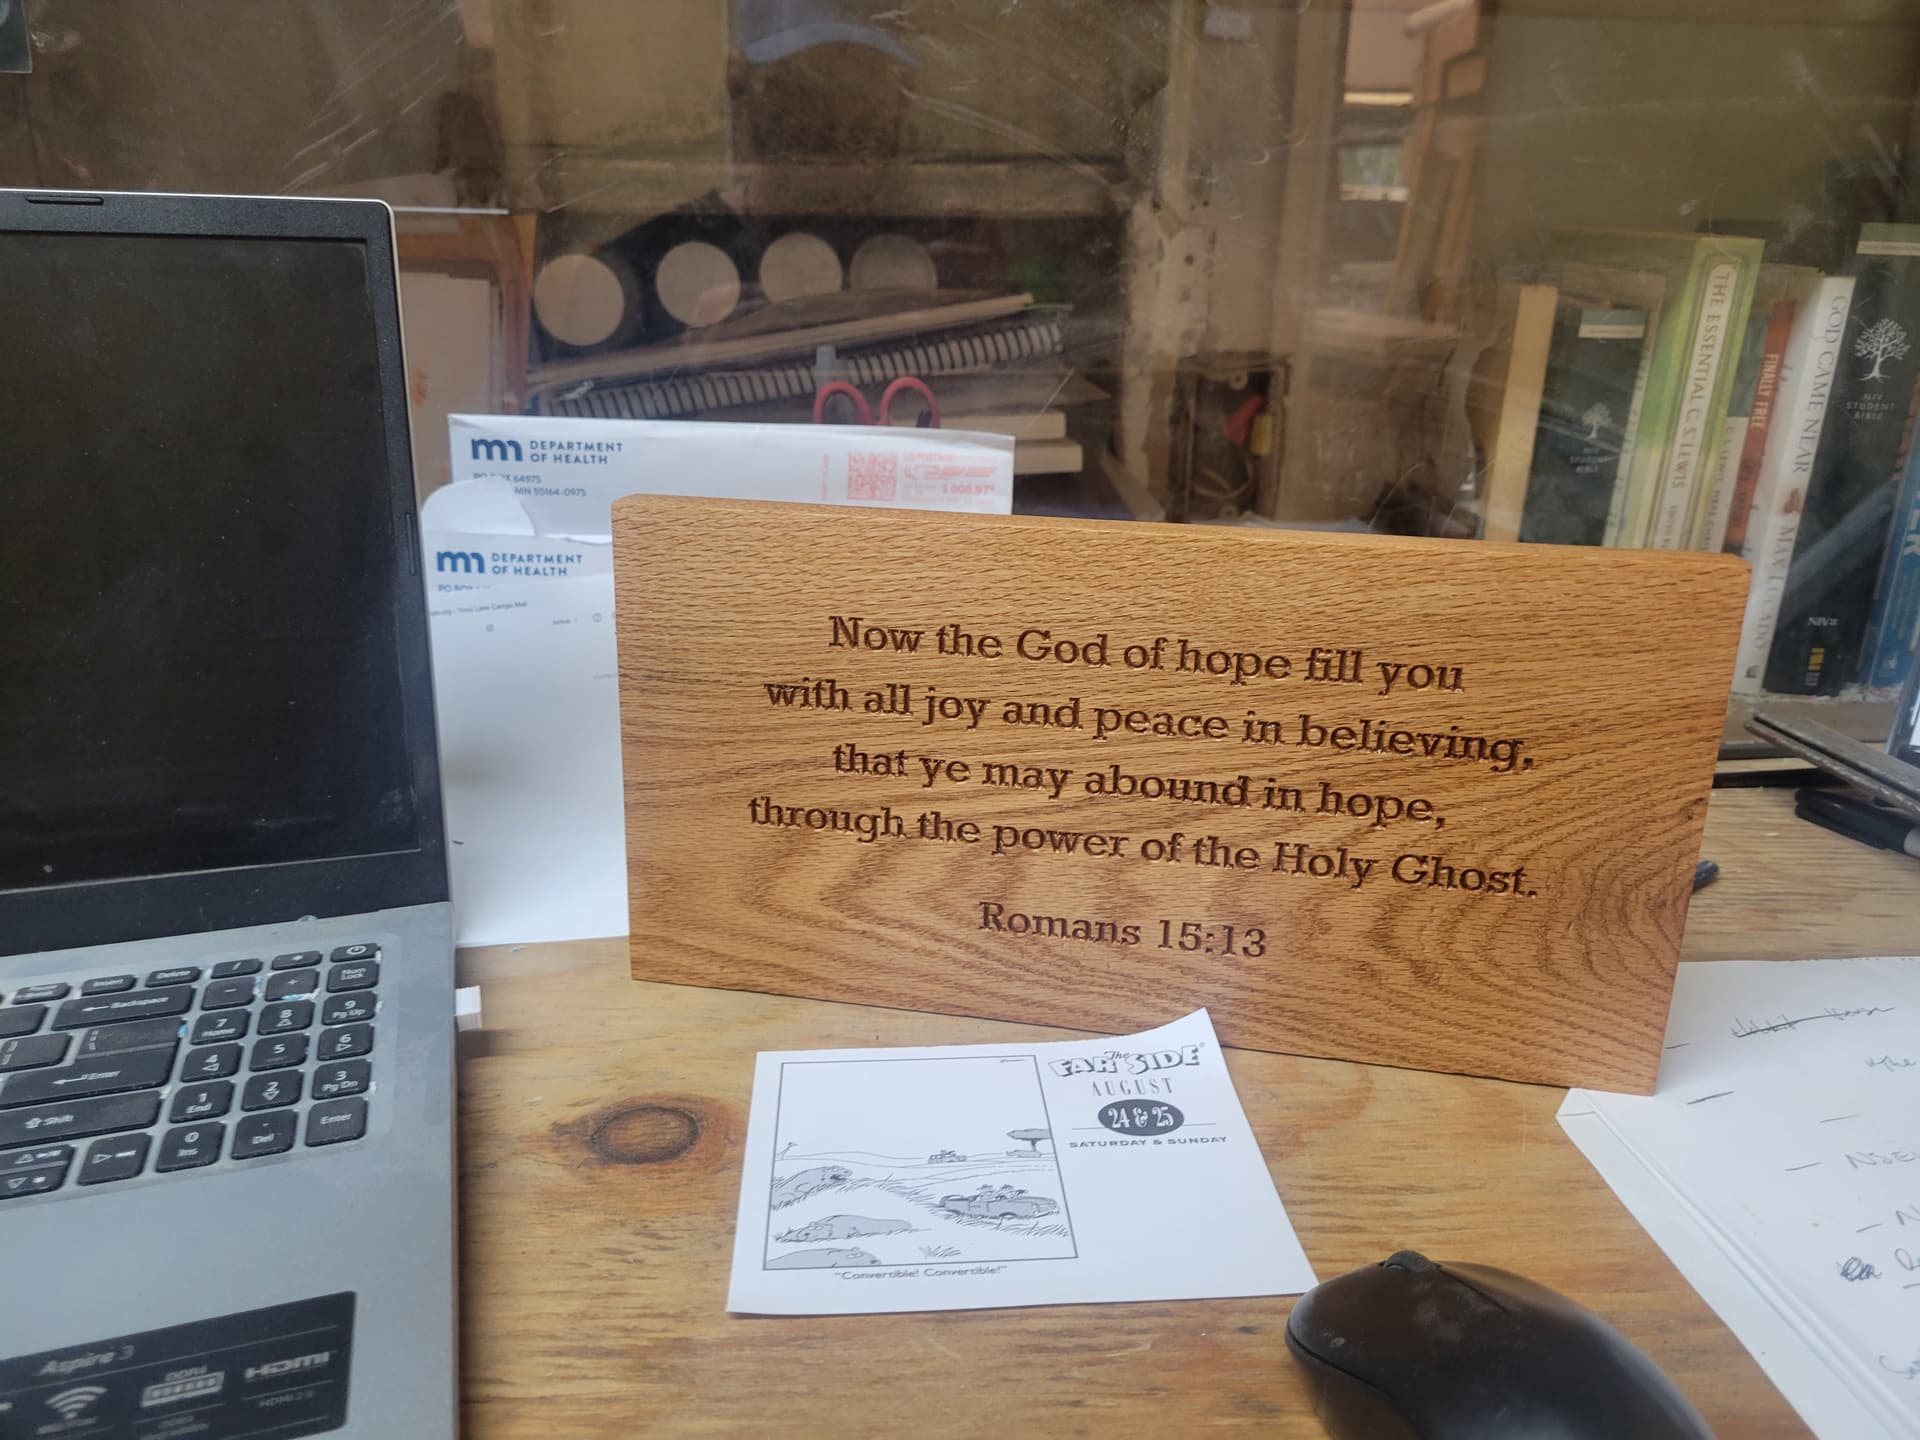
Quick gift. Super easy.
20 Likes
I have that same router table embedded in one of the older Ridgid table saws with the granite table. I love it. Great choice and adaptation.
You have your plate finished but for others that might see this in the future Jessem has a good pdf that gives you the dimensions on most common routers. I have used this pdf to make custom router plates for my Veritas slabbing jig for a Porter Cable 7519 and a Frued FT2000E.
I could have measured it but having the pdf made the measurements easy because it reduces the mistakes you could make while trying to make the measurement.
03100_-_Rout-R-Plate_Manual.pdf (2.1 MB)
3 Likes
The problem with putting the router in the tablesaw wing is I would have to find another place to put all the crap that accumulates there when I need to use the router.
It’s tough enough getting room to slide the fence over for a wide cut.
2 Likes
I created a sign for a friend’s nursery.
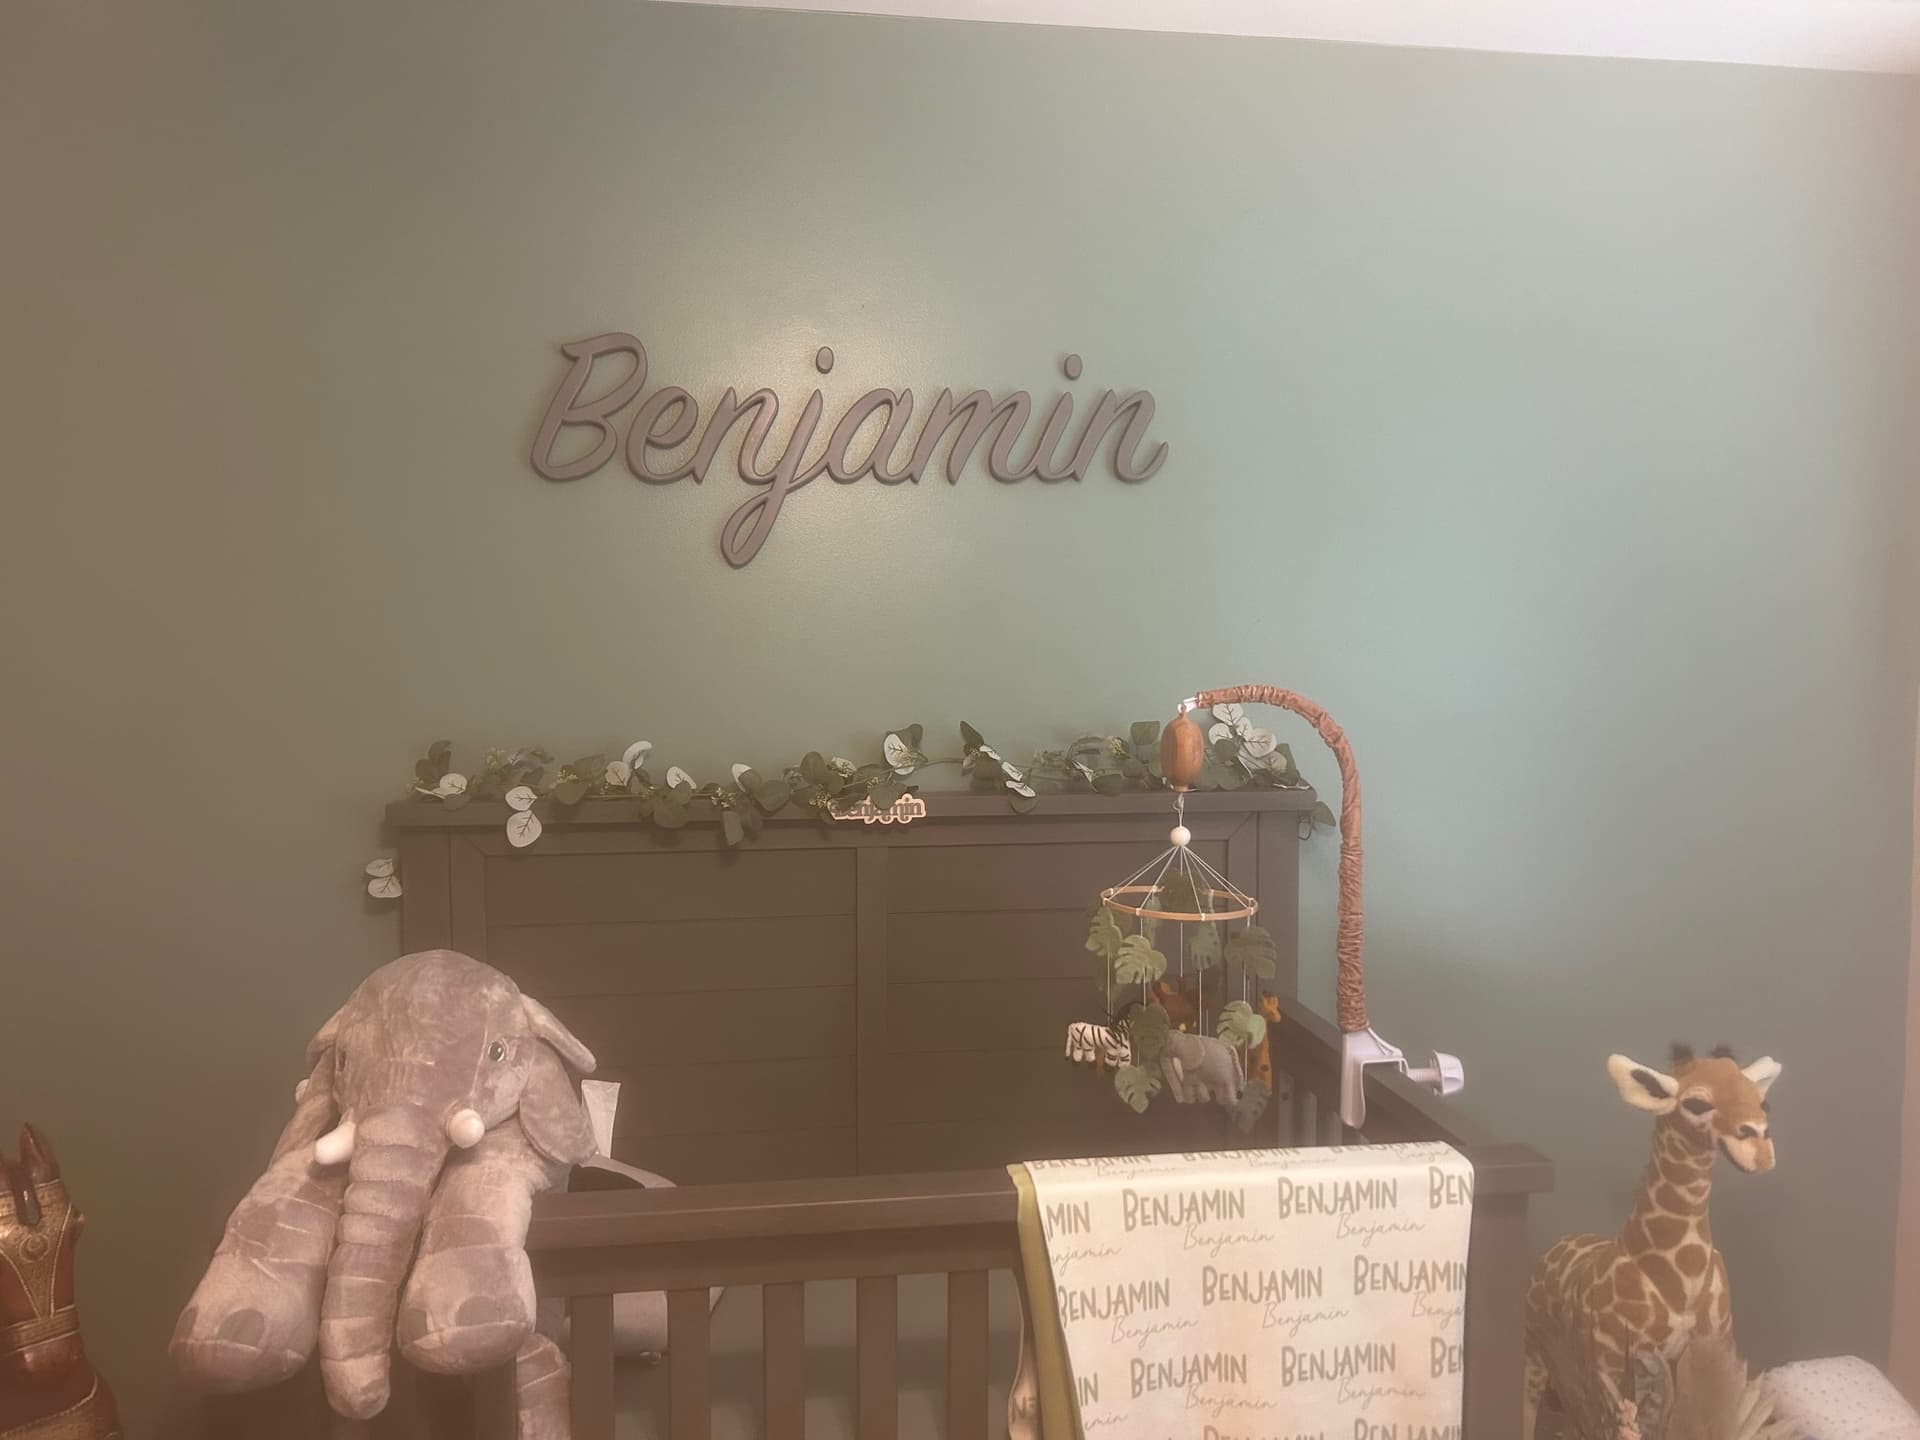
It is made out of a piece of poplar that was 11.25 wide and then painted grey. The overall length was 41.5" so I had to tile it. Since the B pokes up and the j pokes down I needed to shift the B down on the material for cutting to get the letter height I wanted. This was doable since the B is not connected.
Before shifting it down I made a copy and flipped it to place keyholes on the back. This way, when mounted it would all line up properly. The B got 2 in spots so it wouldn’t rotate and then there were 4 more scattered along the length. I am sure 2 would have worked just fine.
Due to the shape of the letters I could not put the keyhole slots easily measured distances apart. So, I got a piece of 1/8" mdf and trimmed it to size and then used the same vectors from the keyholes to make small holed in the board. This one I was able to slant on the bed so I didn’t have to tile.
When I gave it to my friend I told her to level the mdf on the wall and then use a pencil through the holes to mark the location. She put in screws and placed the sign. The dots over the j and the i were too small for keyhole slots. I put double sided woodworking tape and told her to wing it. This mounting template took a little more work but made it super easy for her to install.
I suggested if she wanted a raised look for a shadow she could back the screws out a little and put some spacers in.
22 Likes
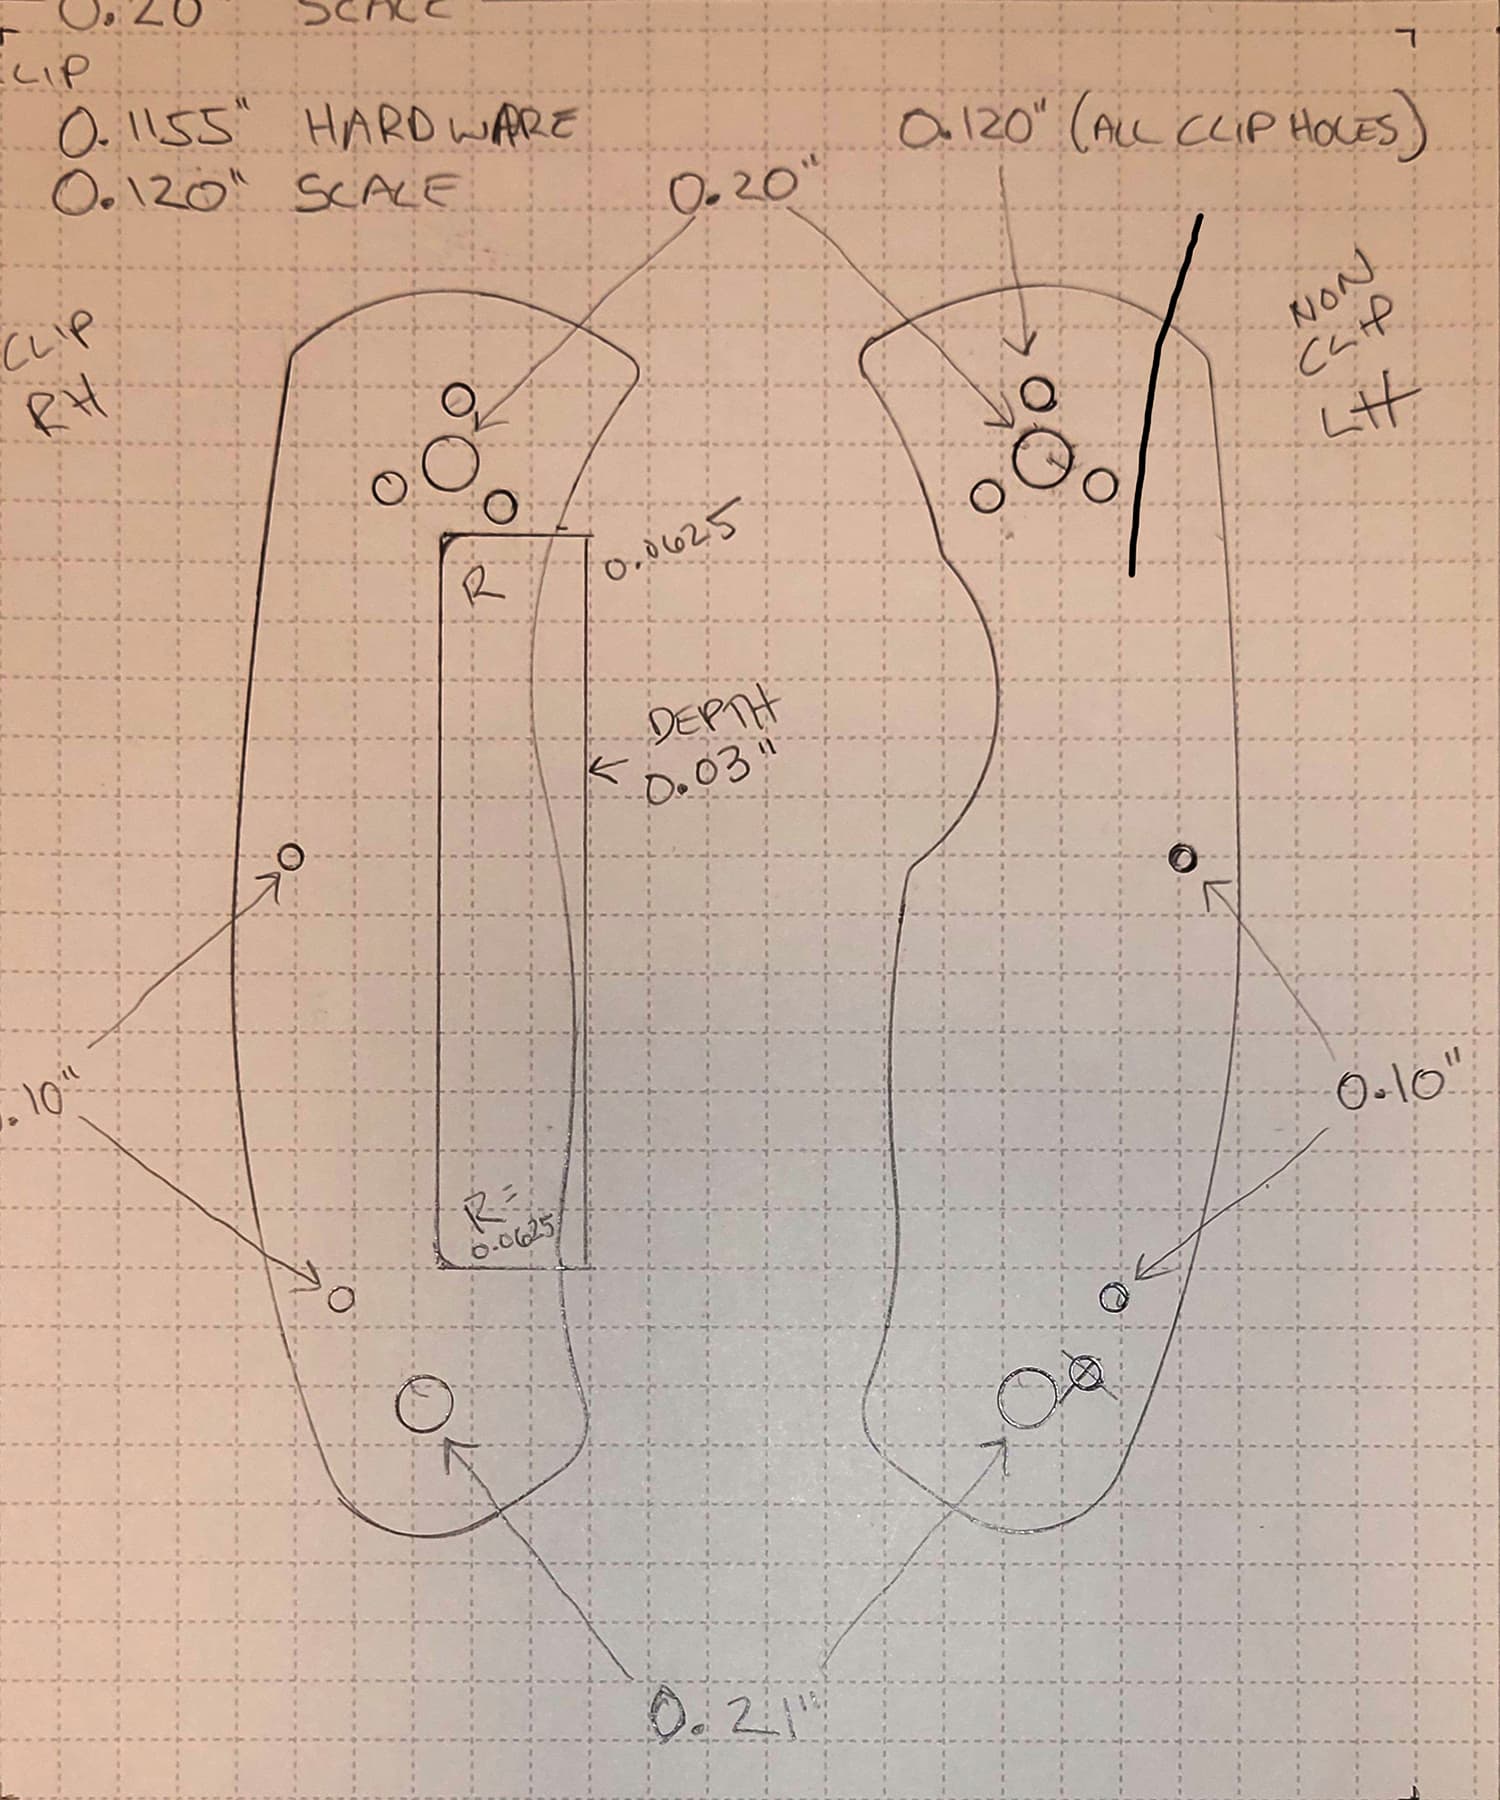
I’ve been doing some scales for Some of my Spyderco knives.
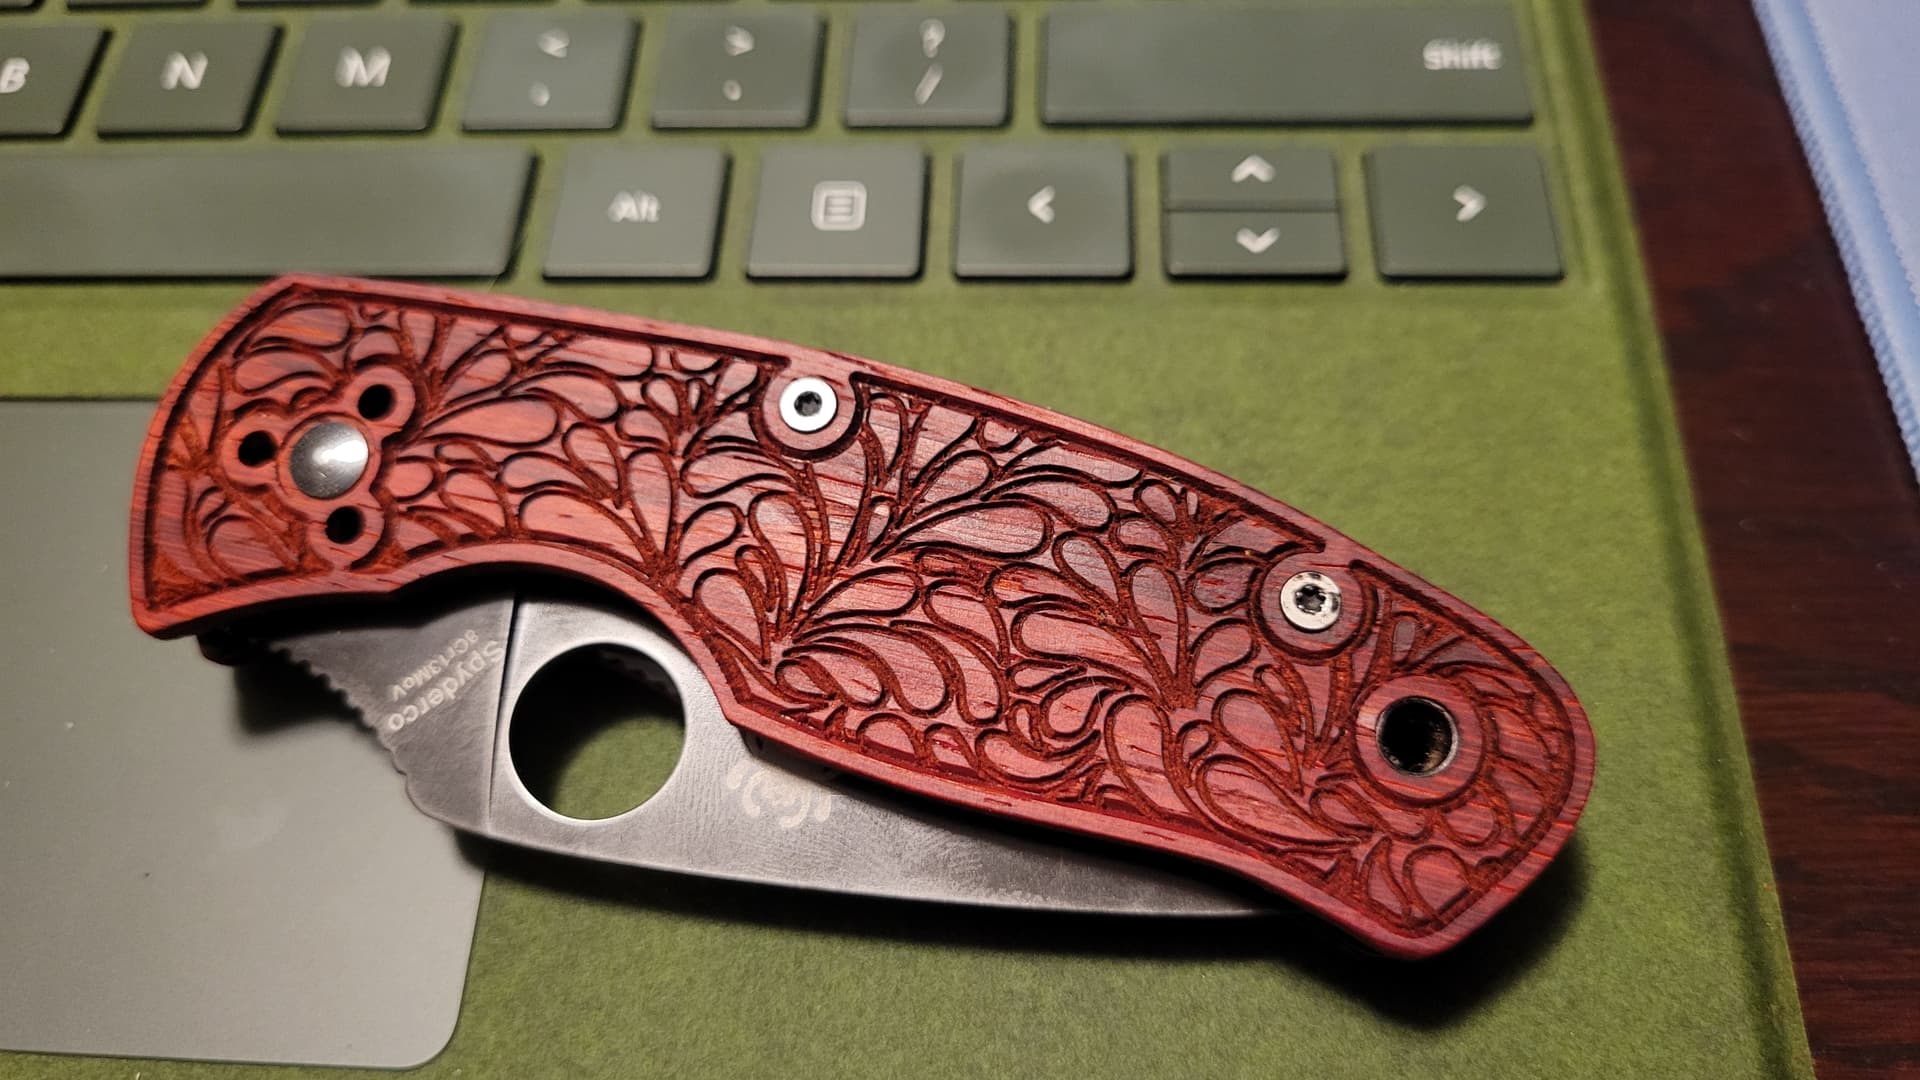
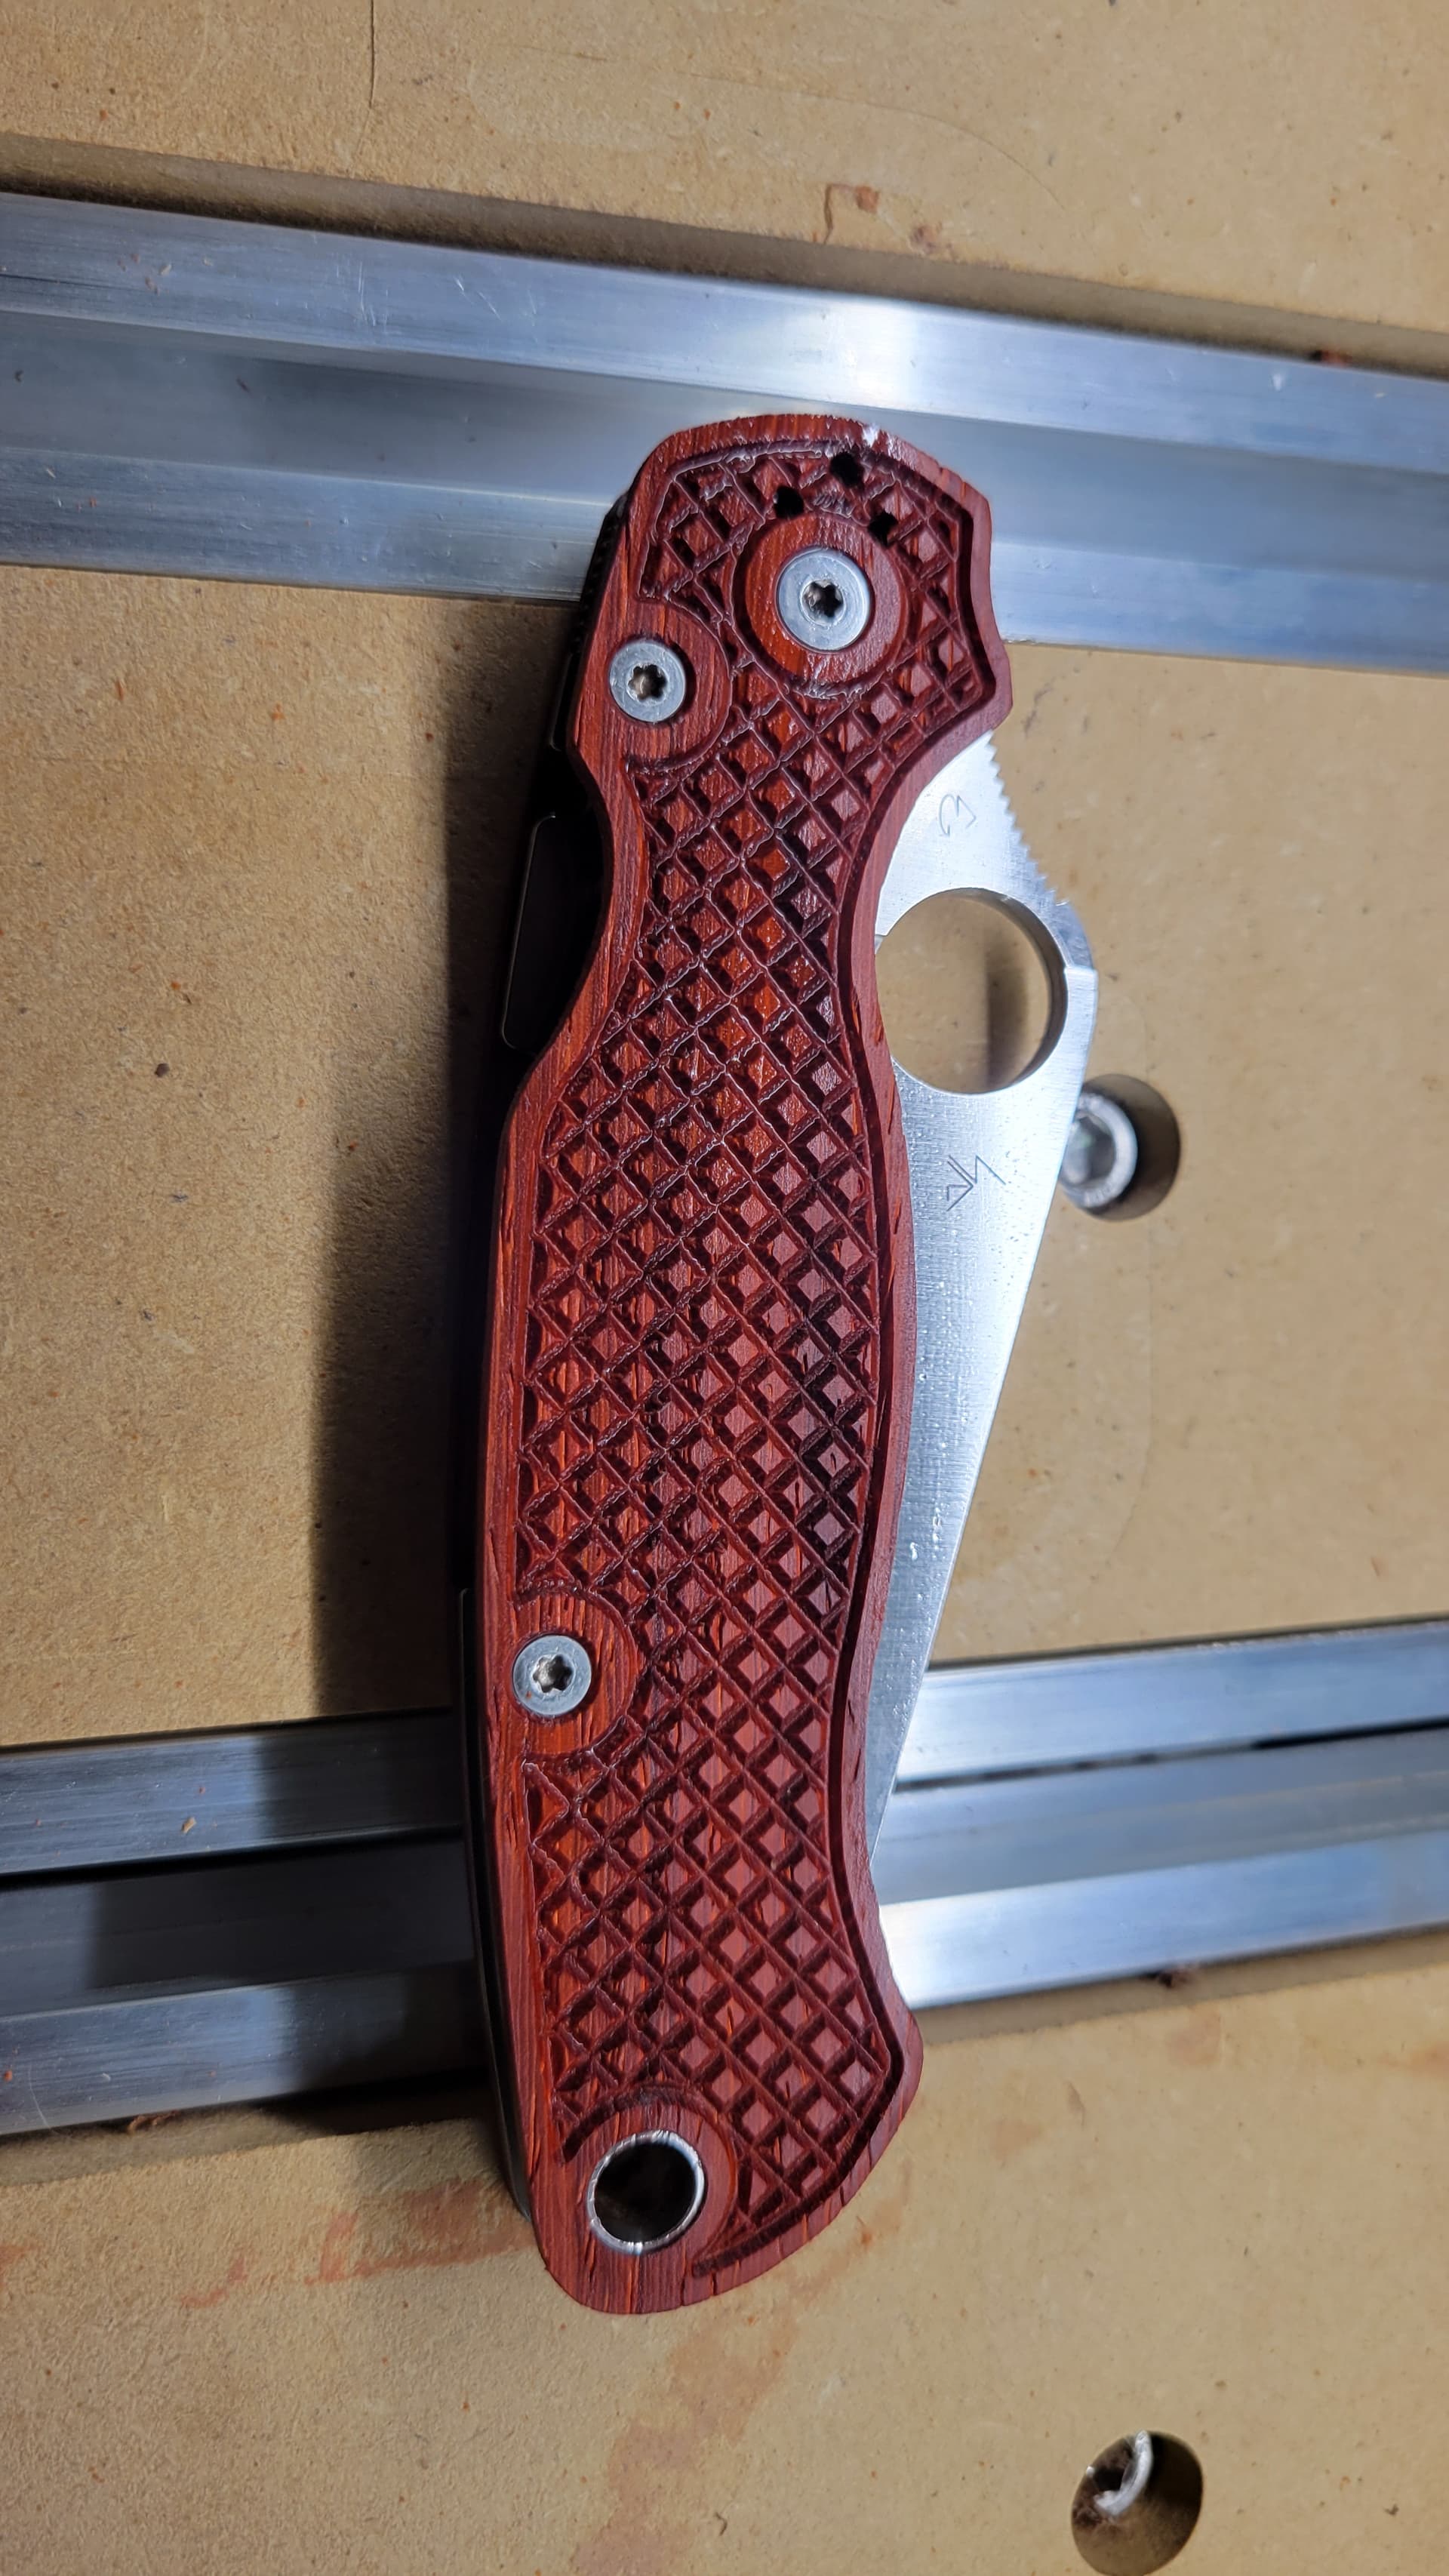
The padauk carves so nicely! Minimal cleanup and no finishing. I think its my favorite wood to work with.
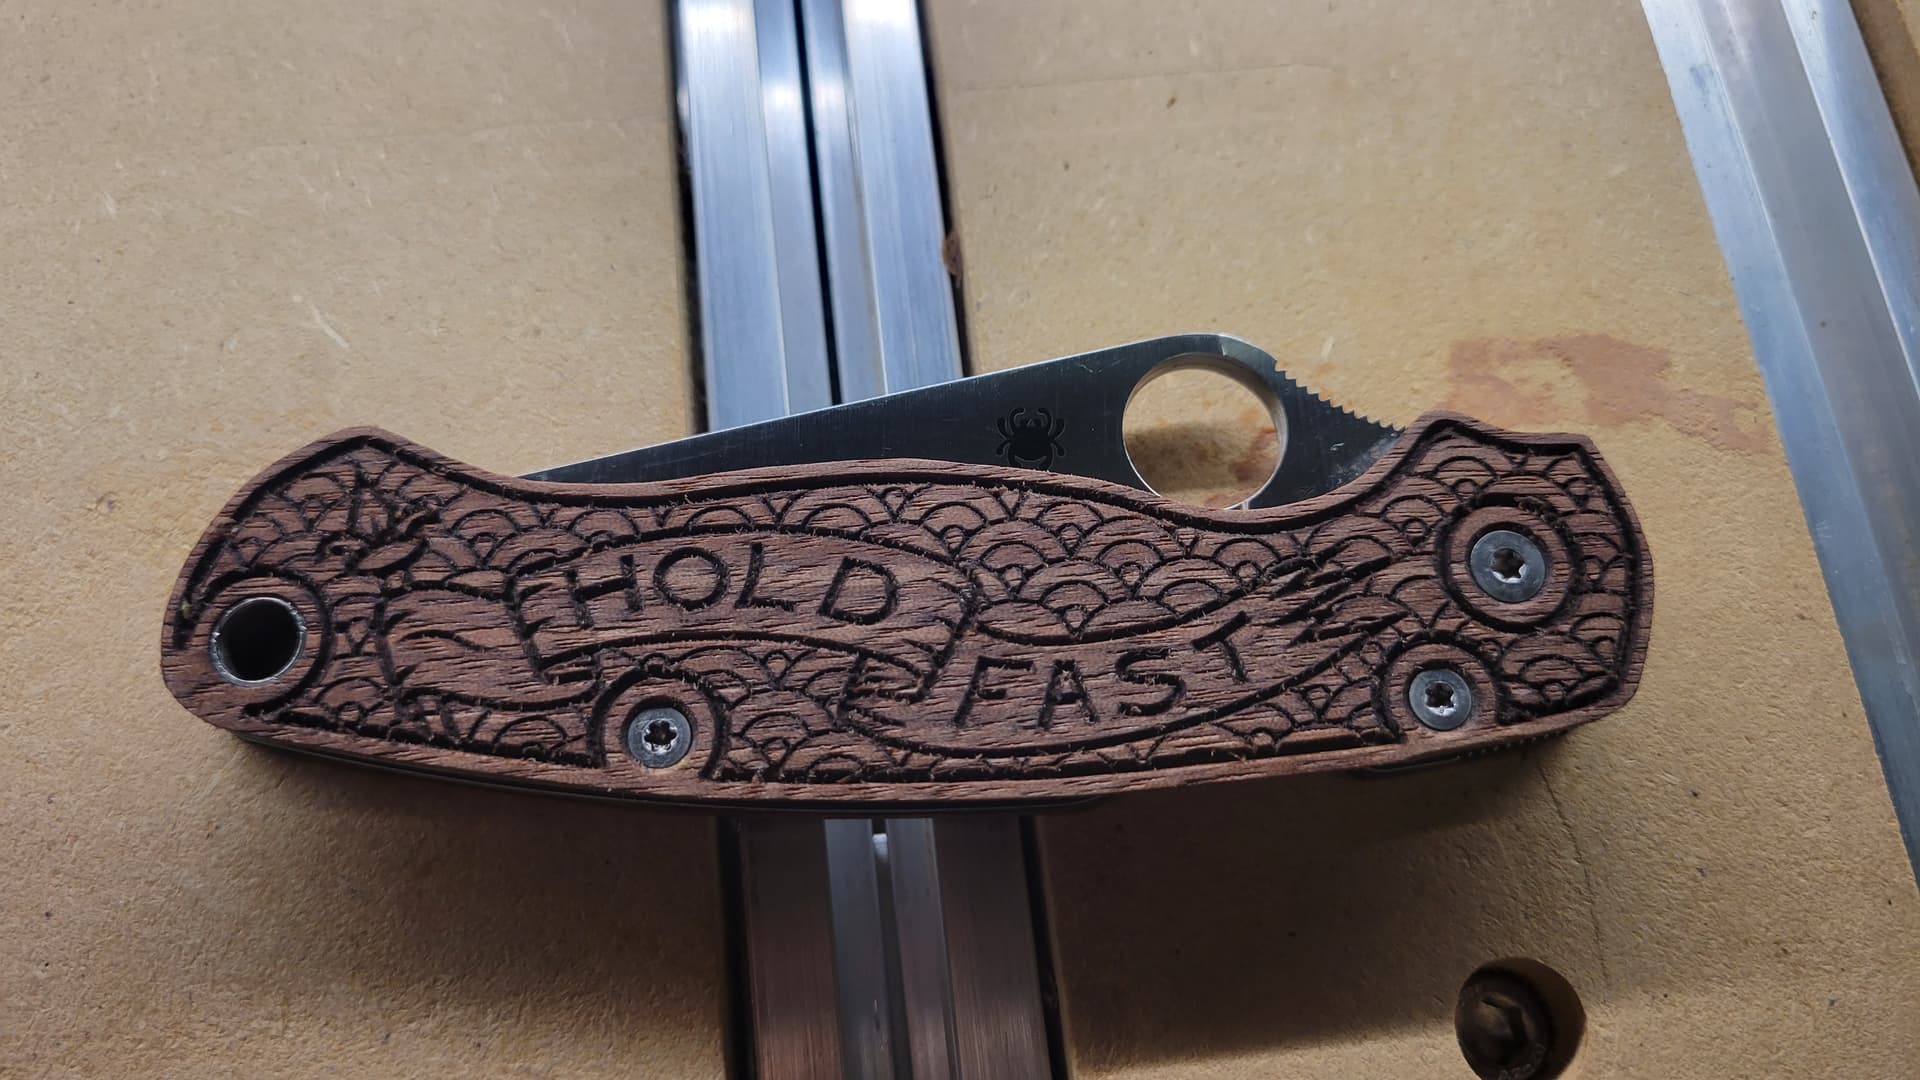
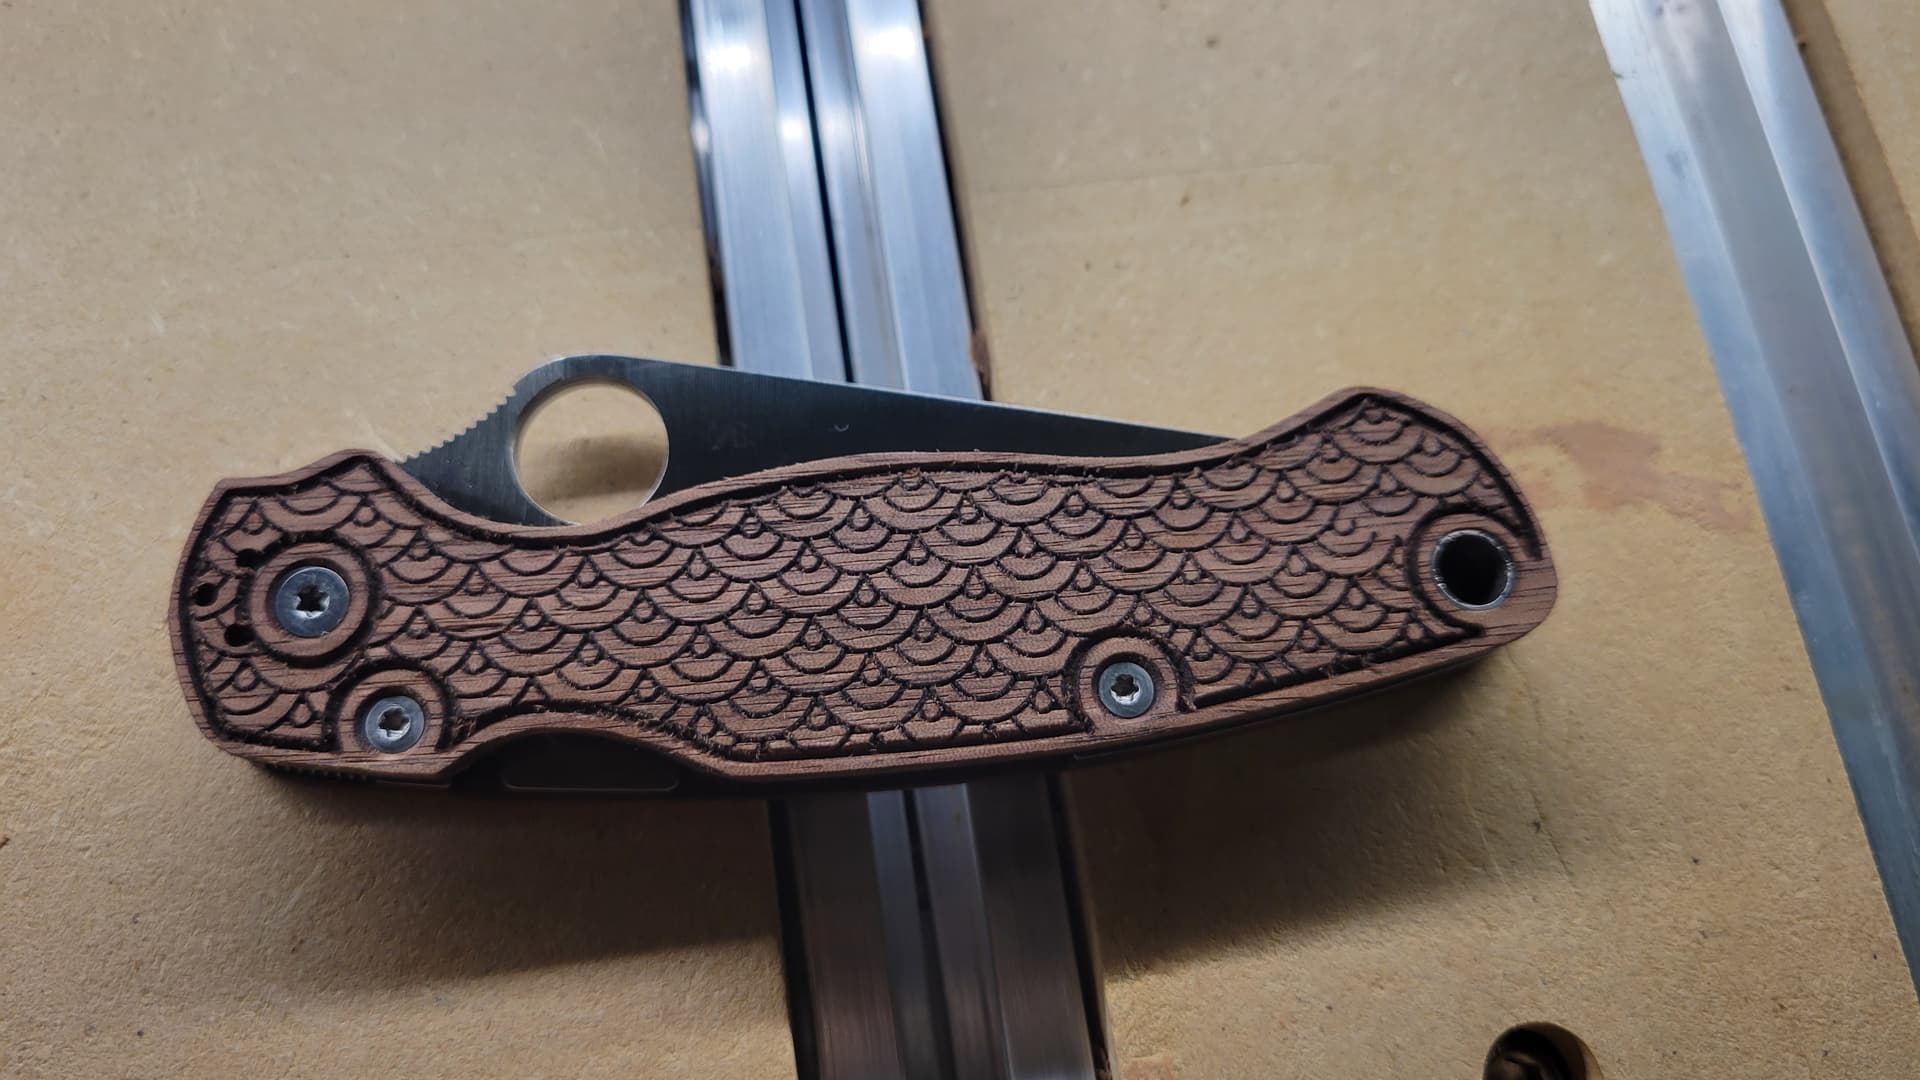
Walnut looks good too, but required more finish work. Lots of “fuzzies”.
Up next: An inlay, inside of an inlay, inside of an inlay!
24 Likes
Those knife scales are very nice. How did you get the knife scale turned into an svg. Did you scan them or are there drawings on the internet?
I love Spiderco knives. I have had this one in my pocket for the last 30 years. It would have been longer but one just like it is some where in Illinois in a bar chair.
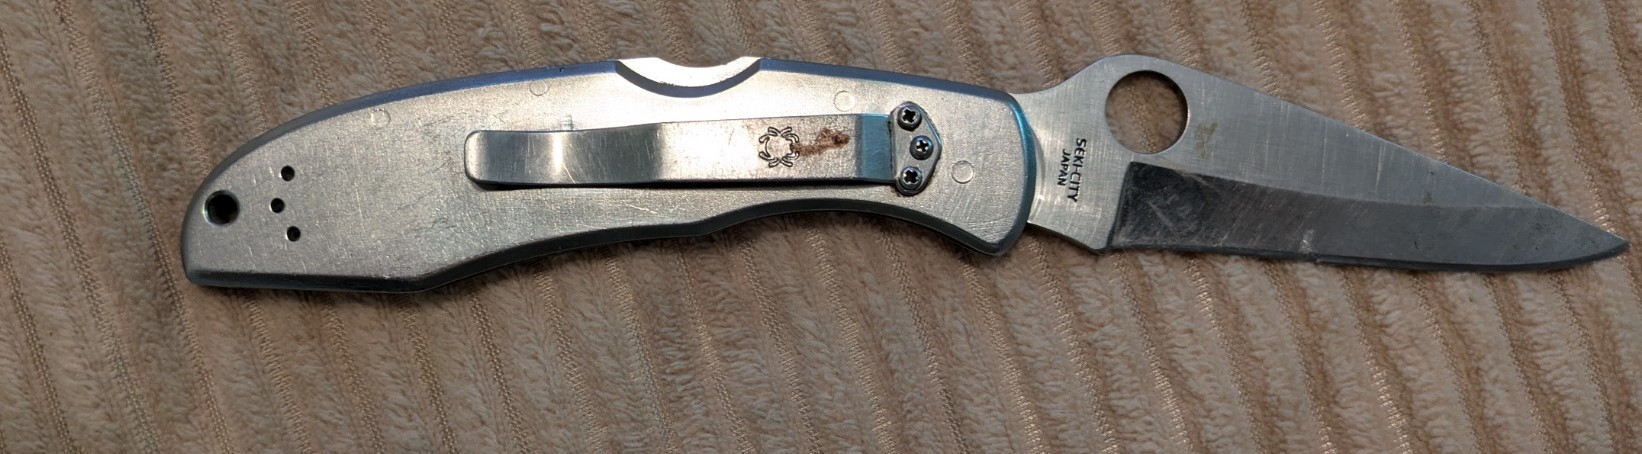
This knife is my long skinny sharp finger. This knife has defended me against thousands of malicious boxes over the years. I have ripped the heart out of many a plastic bag.
My grandson likes the knives with the pins to open but personally I hate those type of knives. They hurt my thumb. With the big hole in the Spiderco I can have my knife open almost immediately when it comes out of my pocket.
How do you remove the scales on the Spiderco knives you are showing. Are they the ones that have the plastic scales to start with? On my Police Model I think the “scales” are part of the actual knife.
When my daughter was about 10 years old I gave her first knife. Around here everyone has a knife including old ladies and little girls.
3 Likes
One technique for that is:
1 Like
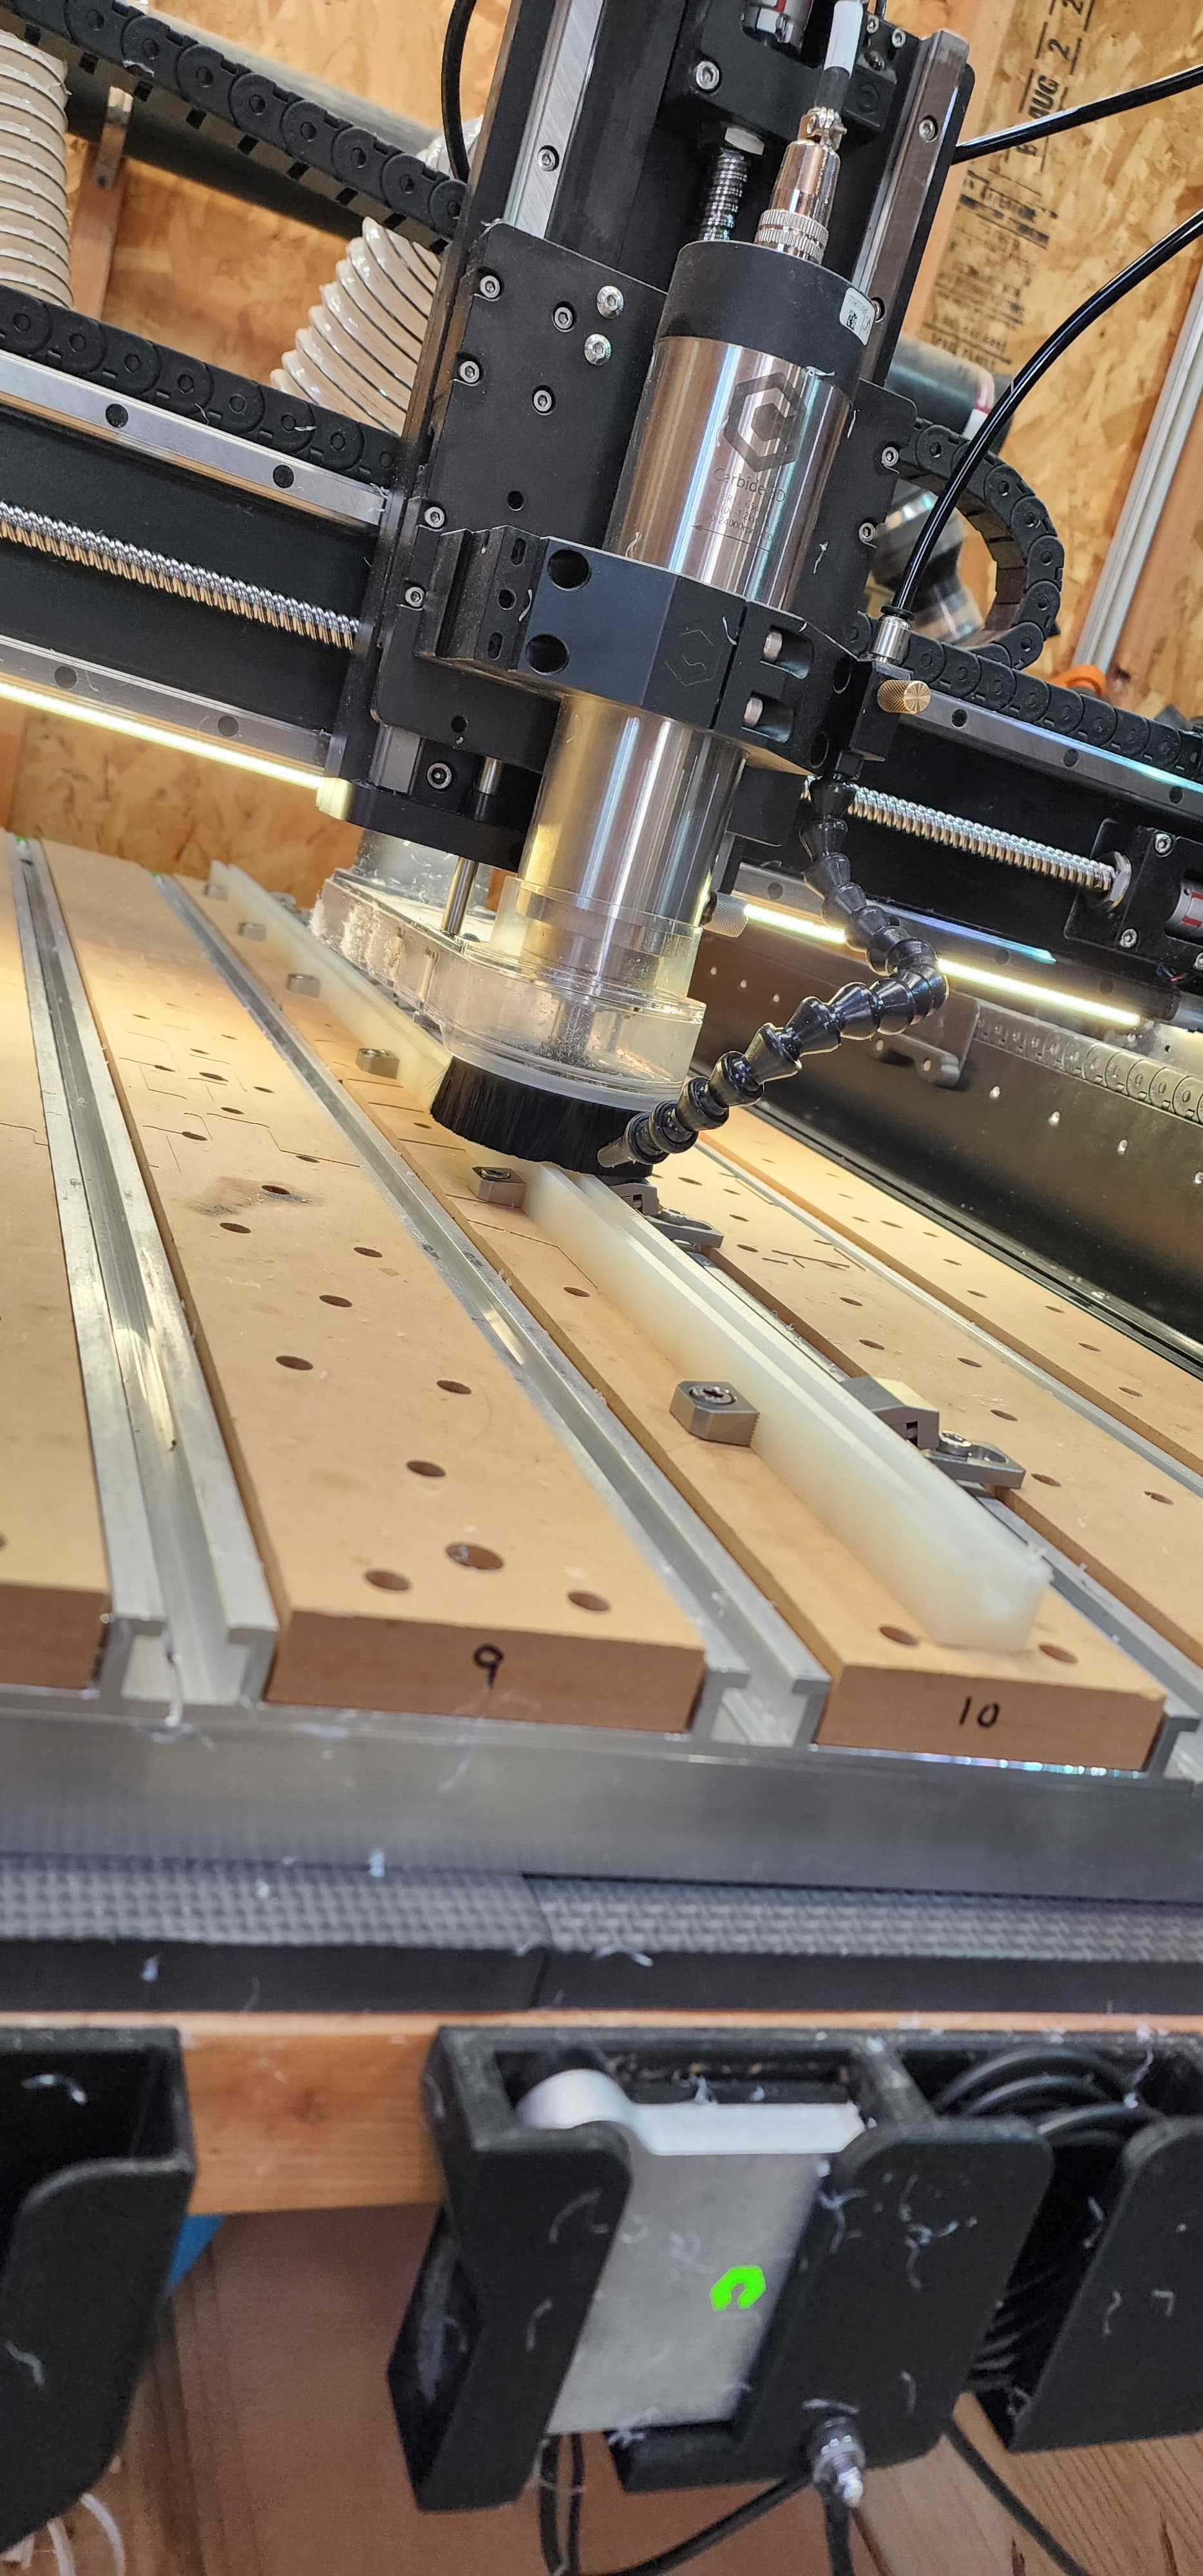
I’ll take the award for weirdest cuts of the day. Part of a guillotine style gate so tigers can check each other out and maybe mate at the zoo.
16 Likes
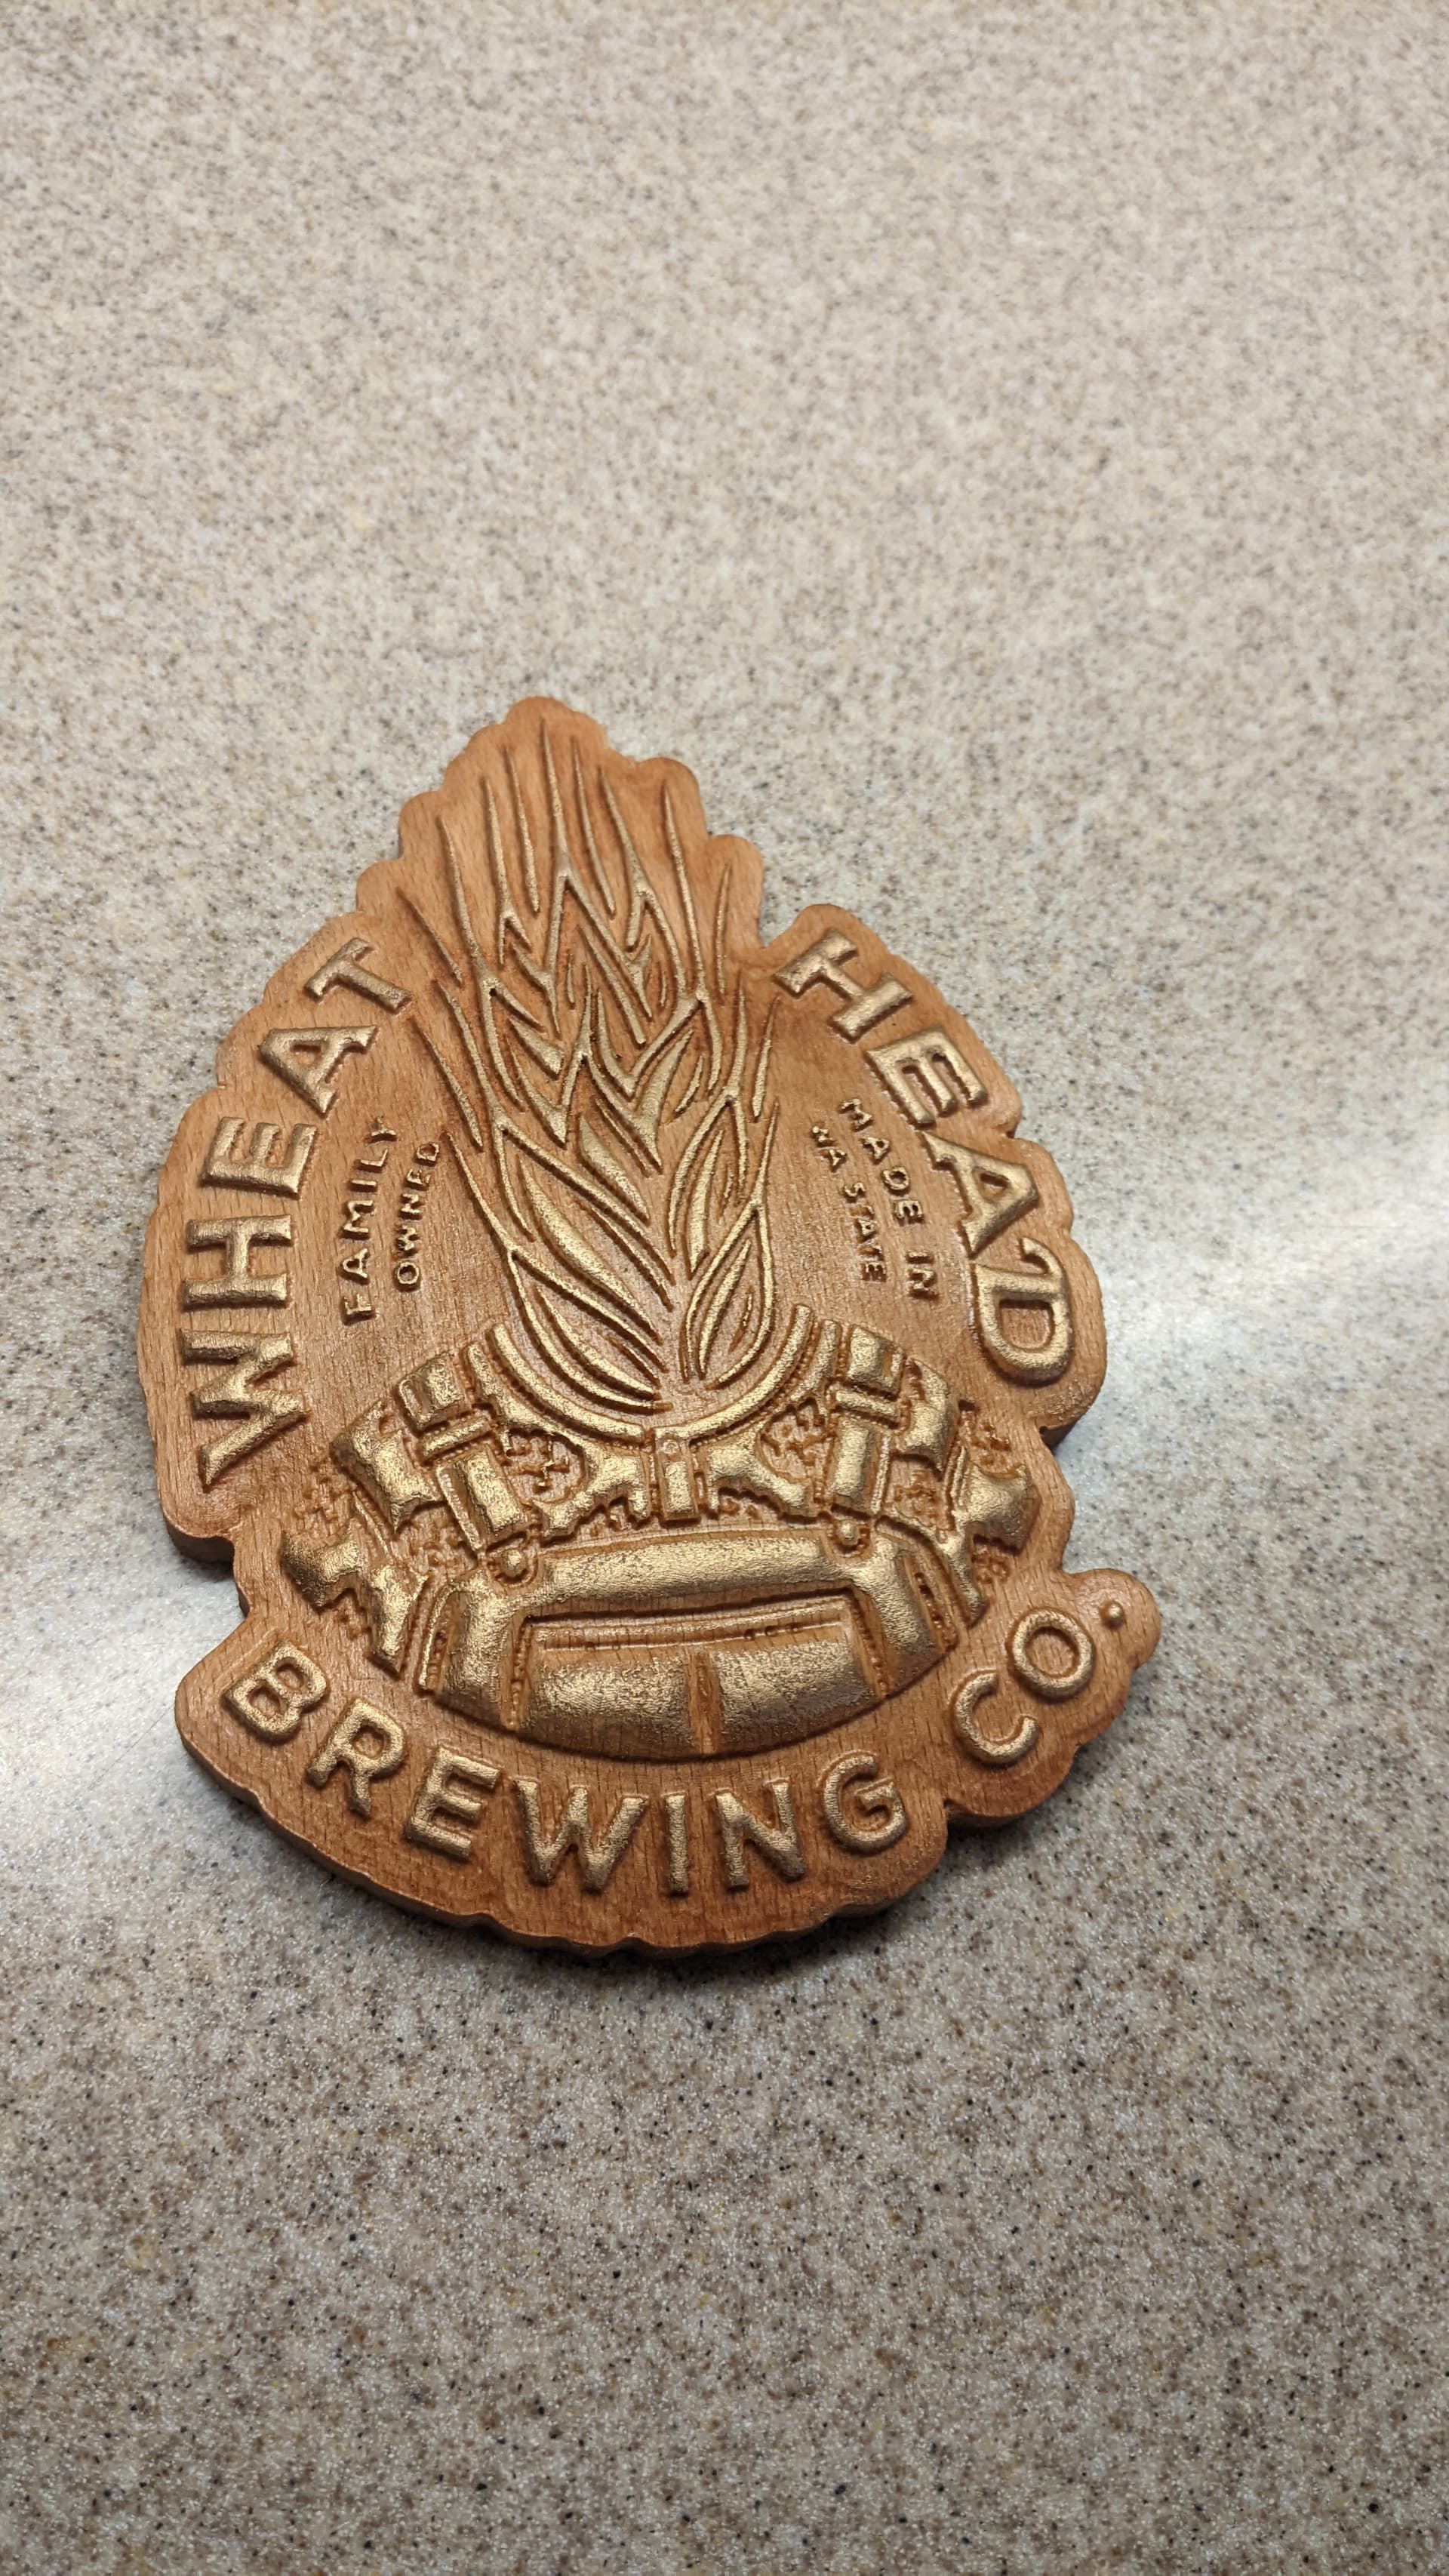
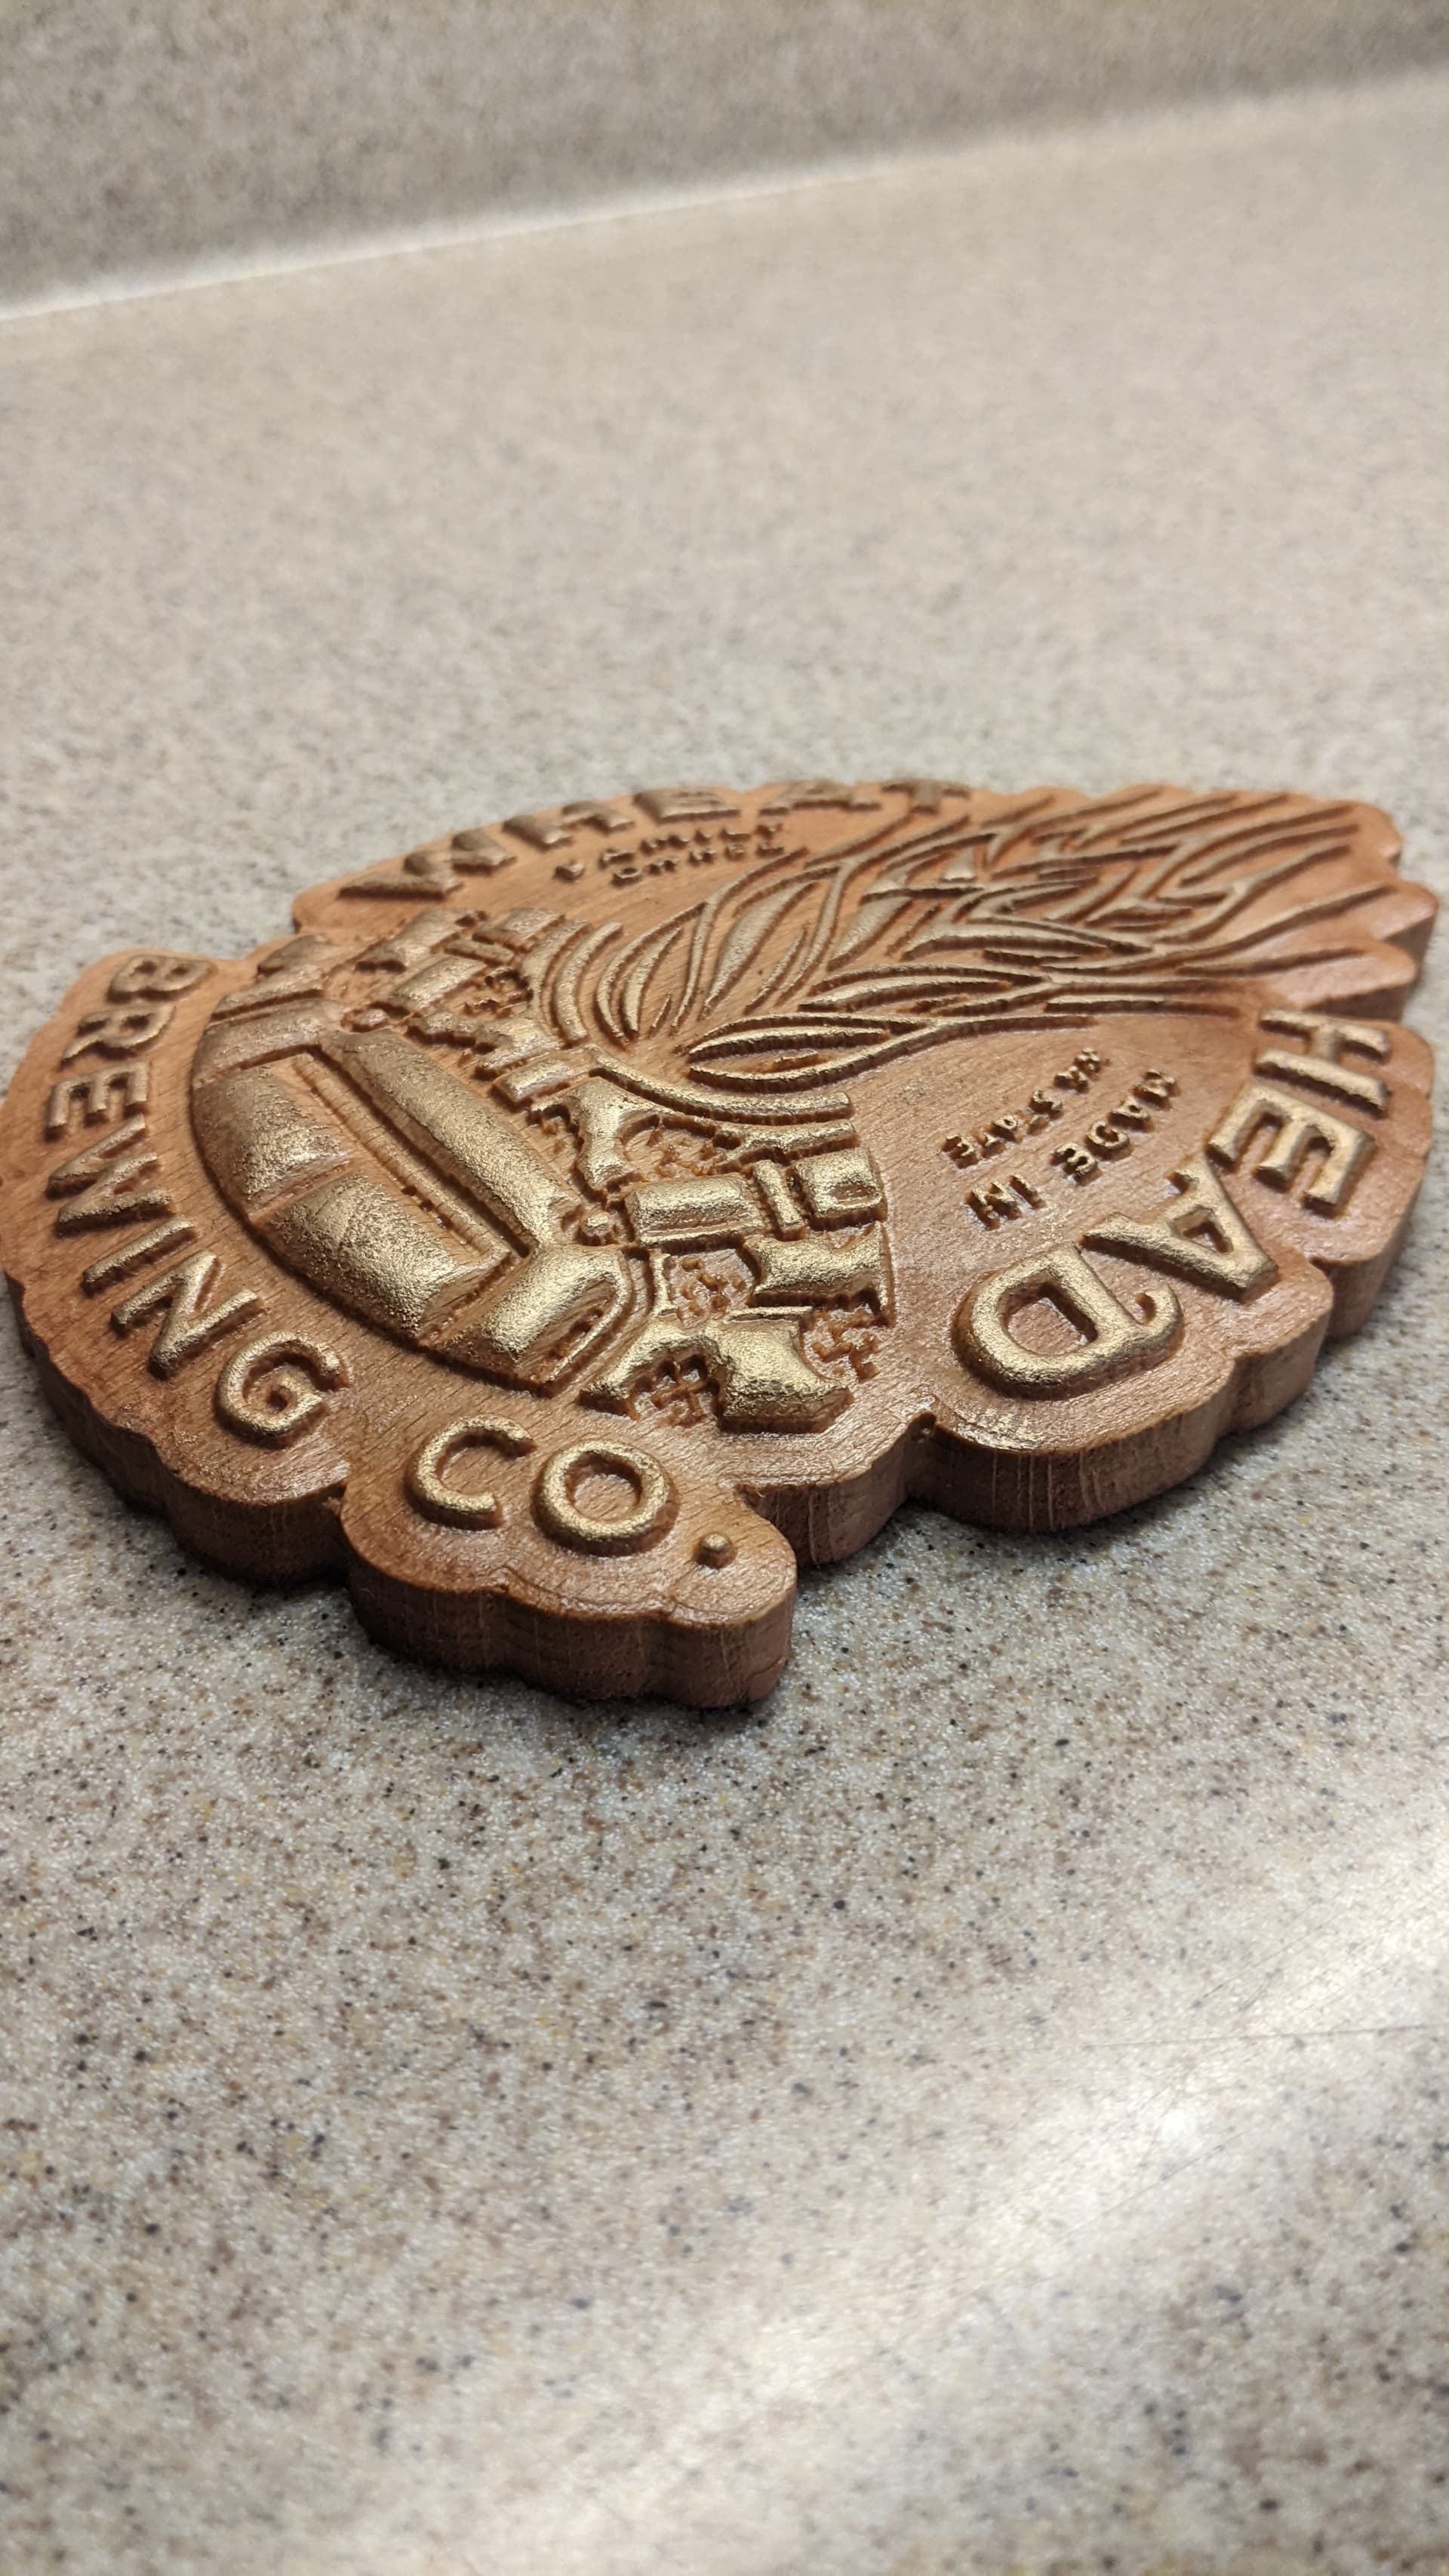
I made this piece using the logo of a local brewery. I’m hoping to share this with them to get some business from them. Beech wood. Vectric aspire software. Rub and buff gold applied with latex glove.
25 Likes
Looks great.
The one unsolicited prototype sign I did for a business didn’t get me any business although they hung it on their wall and put my cards nearby.
Good luck.
2 Likes
Thanks man! This is something I think I can sell. I’m fortunate that my place of work is a distributor for Spyderco, and my boss has agreed to sell me knives at a few points above wholesale. Got a bit more experimenting to do to get everything 100%, but feel I’m close to a final product.
The two knives I used had scales that are screwed on. One started with plastic (probably Delrin) the other micarta. They are fastened on with Trox head screws. So I simply removed all the fasteners, I stripped one screw head in the process but was able to source replacements.
Once I had the scales off I placed them on graph paper and simply traced the outside with a very fine mechanical pencil. For the various fastener holes I would trace those too, but also measure them with my calipers and make notes of the hole ID and fastener OD.
At first I tried to scan the image but it came out slightly distorted. So I taped the graph paper to a flat surface and took a photo with my phone, slightly off angle. I then opened that image in photoshop and used the skew tool to get the image square, using the squares on the graph paper as a guide. Save that as a JPG.
Then I opened it in CC as a back ground image and scaled it until it fit within the work space. I even made a grid of boxes in CC the same size as the graph paper squares to be sure the scale was correct.
Then its just a matter of drawing with the curve tool for the outline and circle tool for the fastener holes and counter sinks. Once I have a “blank” scale in CC its off to the S5P for a test cut. On both knives I had to go back into CC to make some adjustments on hole placement and the overall outline. Now I have “blanks” for both the Para 2 and Persistence knives and can just add any pattern I want.
That Spyderco you have is not a great candidate for this as the scales are part of the knife body.
This is one of the background images I used:
3 Likes

Very nice write up. After reading your original post I went to the Spiderco website and they were having some sales. I bought 4 knives to give as Christmas Presents. It is a little early for Christmas presents but by buying early I am not rushed during the actual season.
I bought the following:
Quantity Product (SKU) Unit Price Total
1 byrd Cara Cara 2 FRN - Black - PlainEdge (BY03PBK2) $42.40 $42.40
1 byrd Flight Stainless Steel Handle - PlainEdge (BY05P)&nbs $47.88 $47.88
1 Robin 2 Lightweight Wharncliffe - PlainEdge (BY10PBKWC2)&n $36.12 $36.12
1 Meadowlark 2 Lightweight Wharncliffe - PlainEdge (BY04PBKW $39.90 $39.90
I have not looked at Spiderco knives in a while I some of their knives go up to $800.00. Wow.
Impressive, in more ways than one!
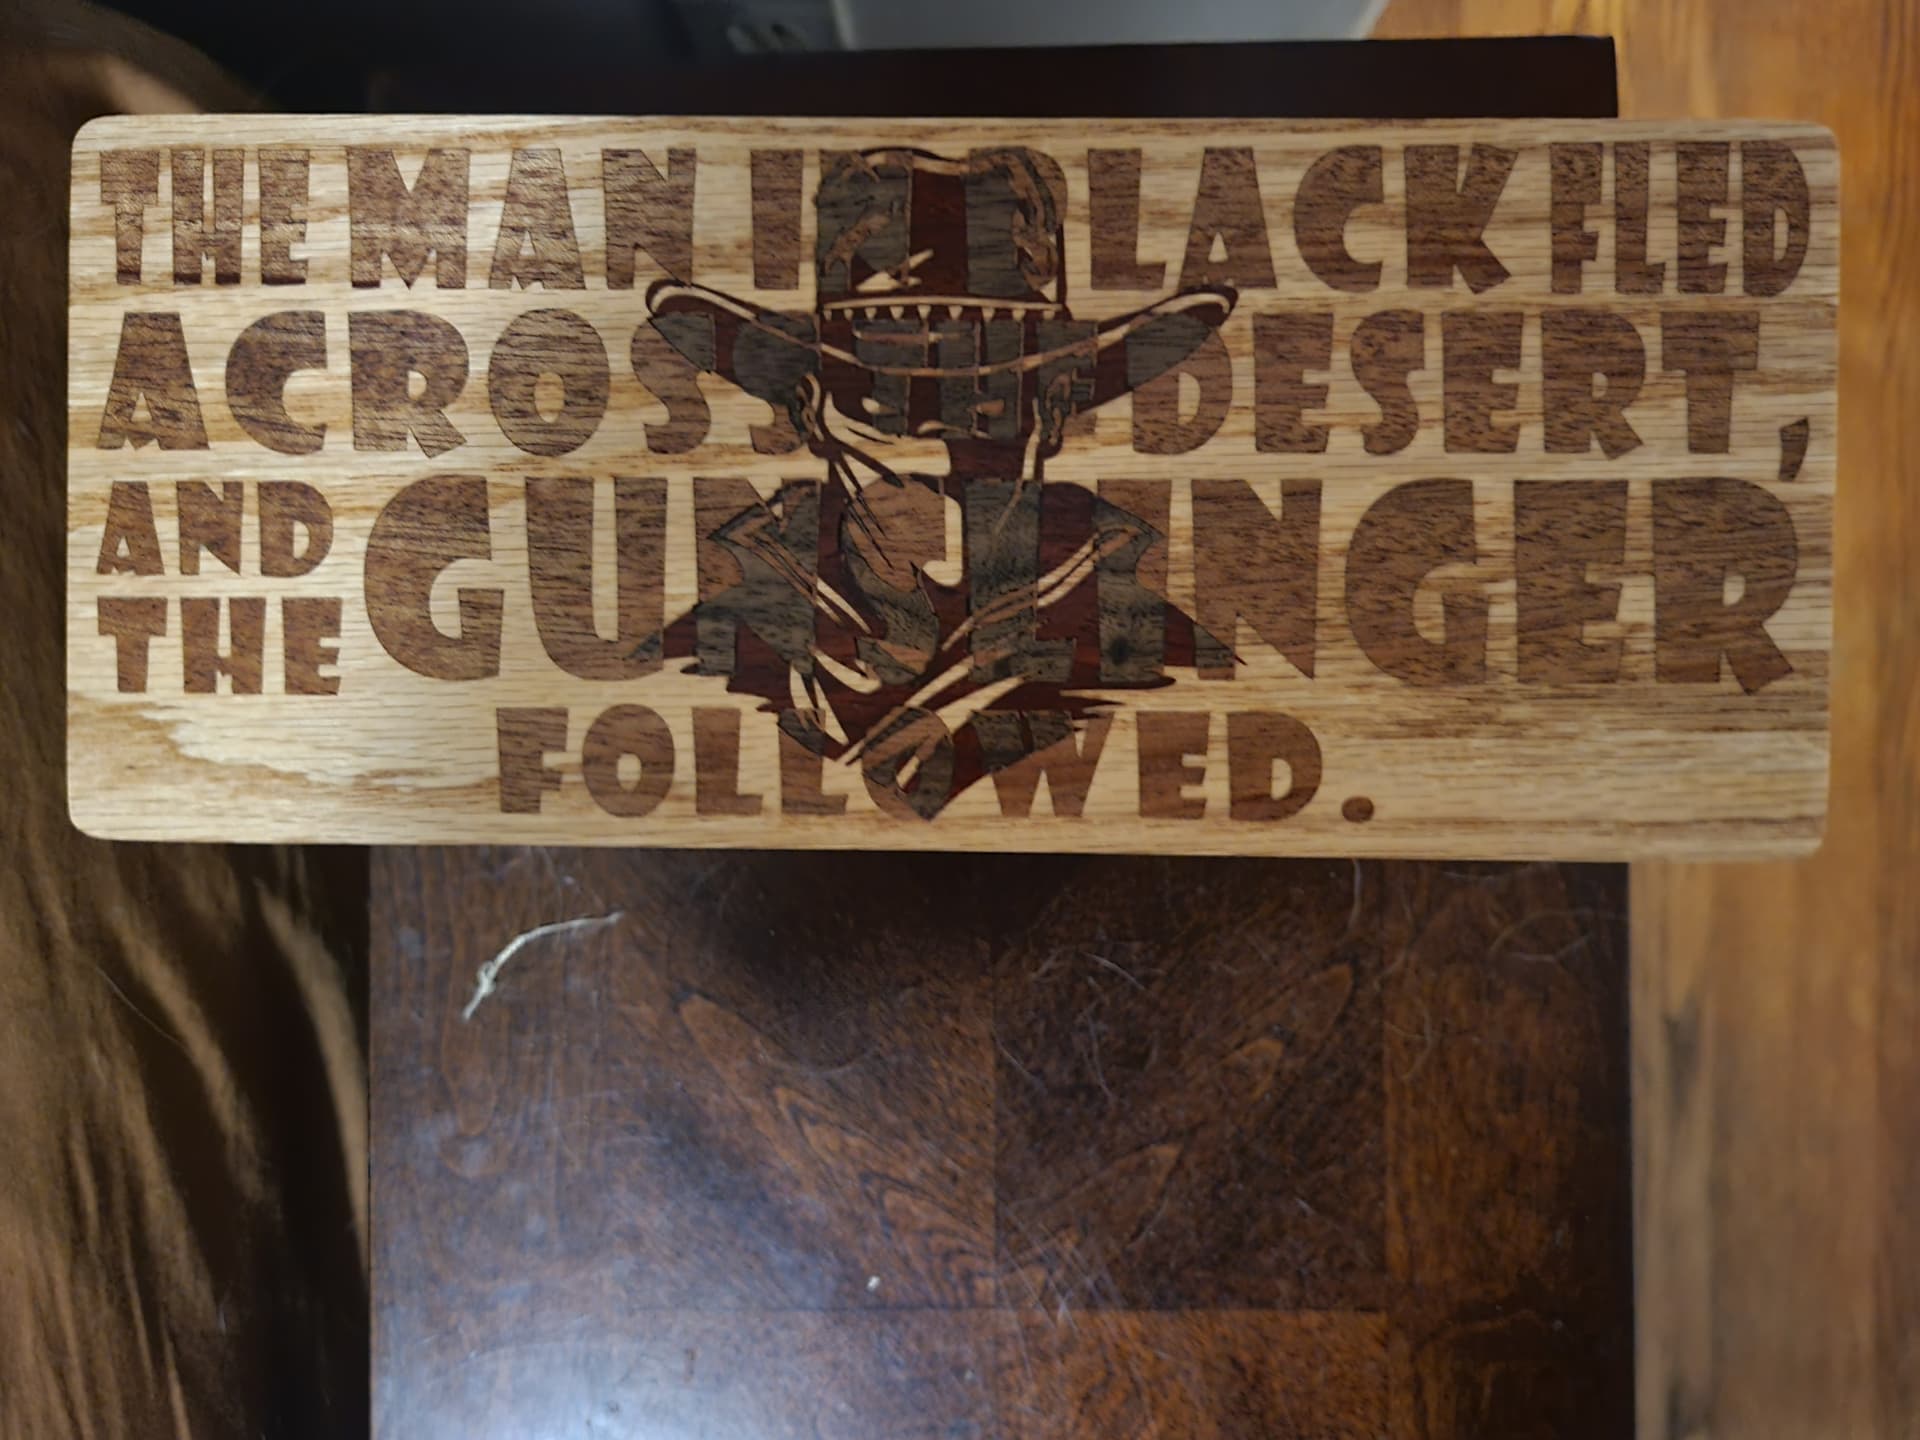
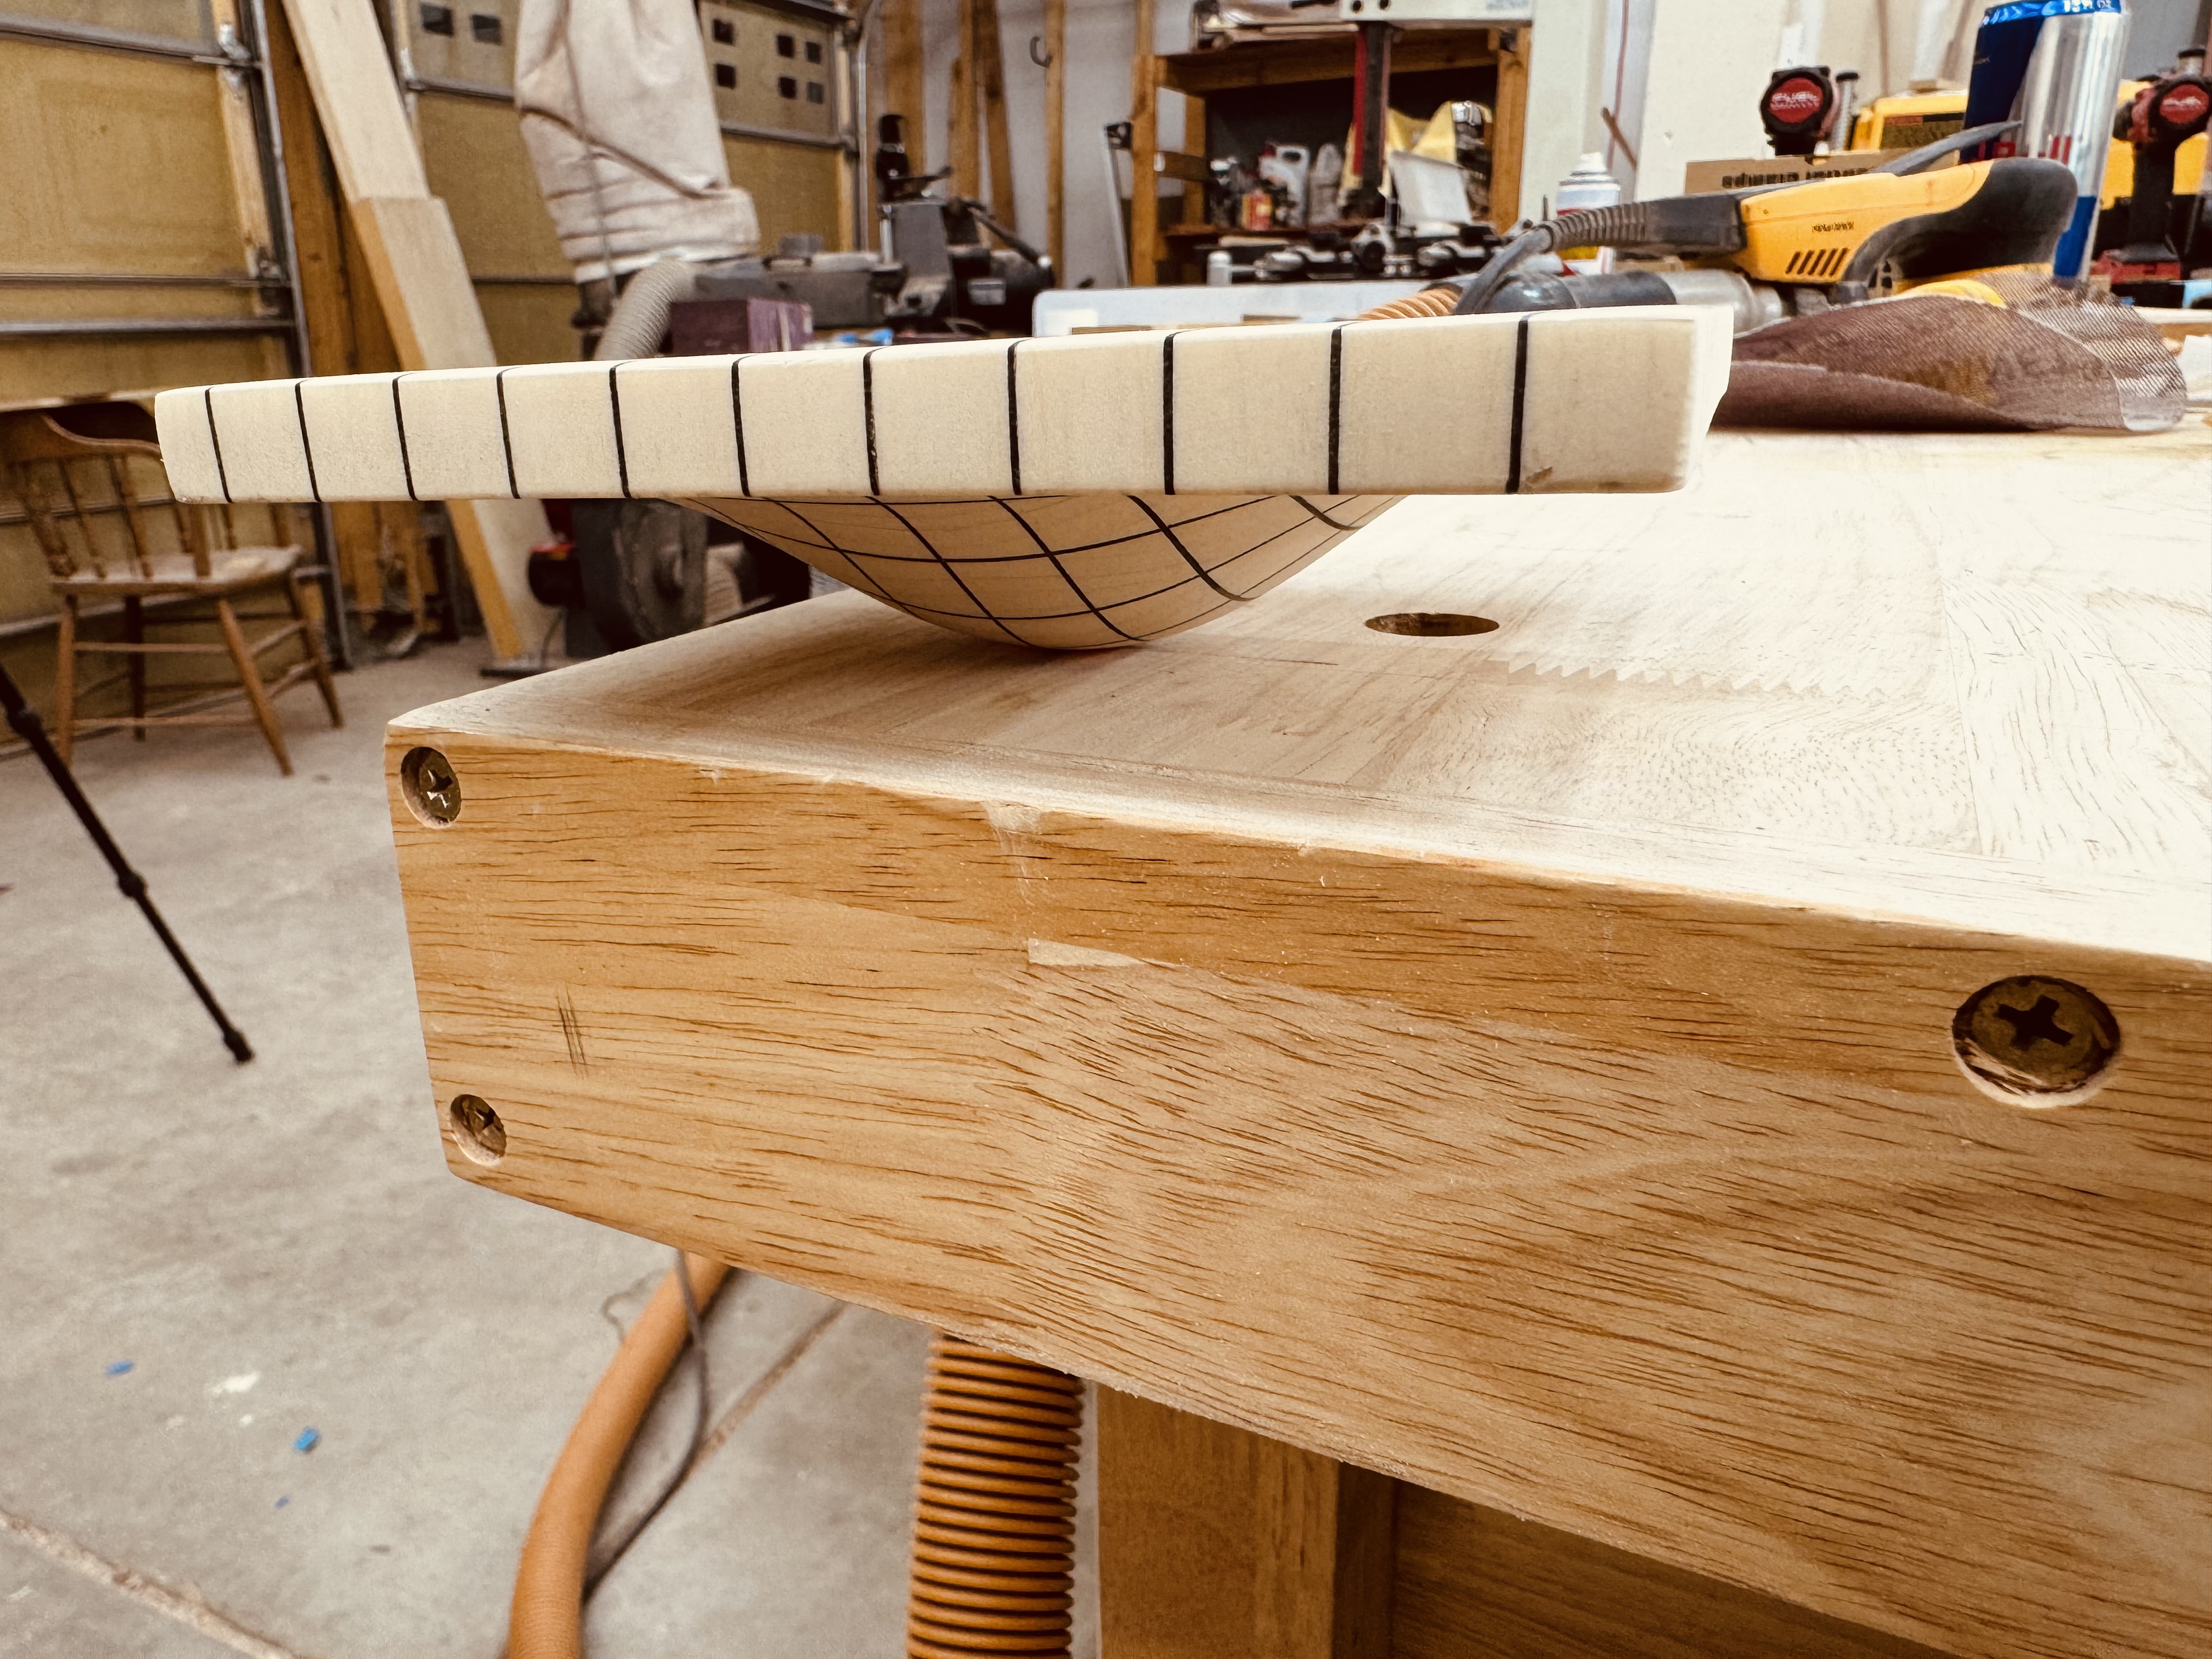
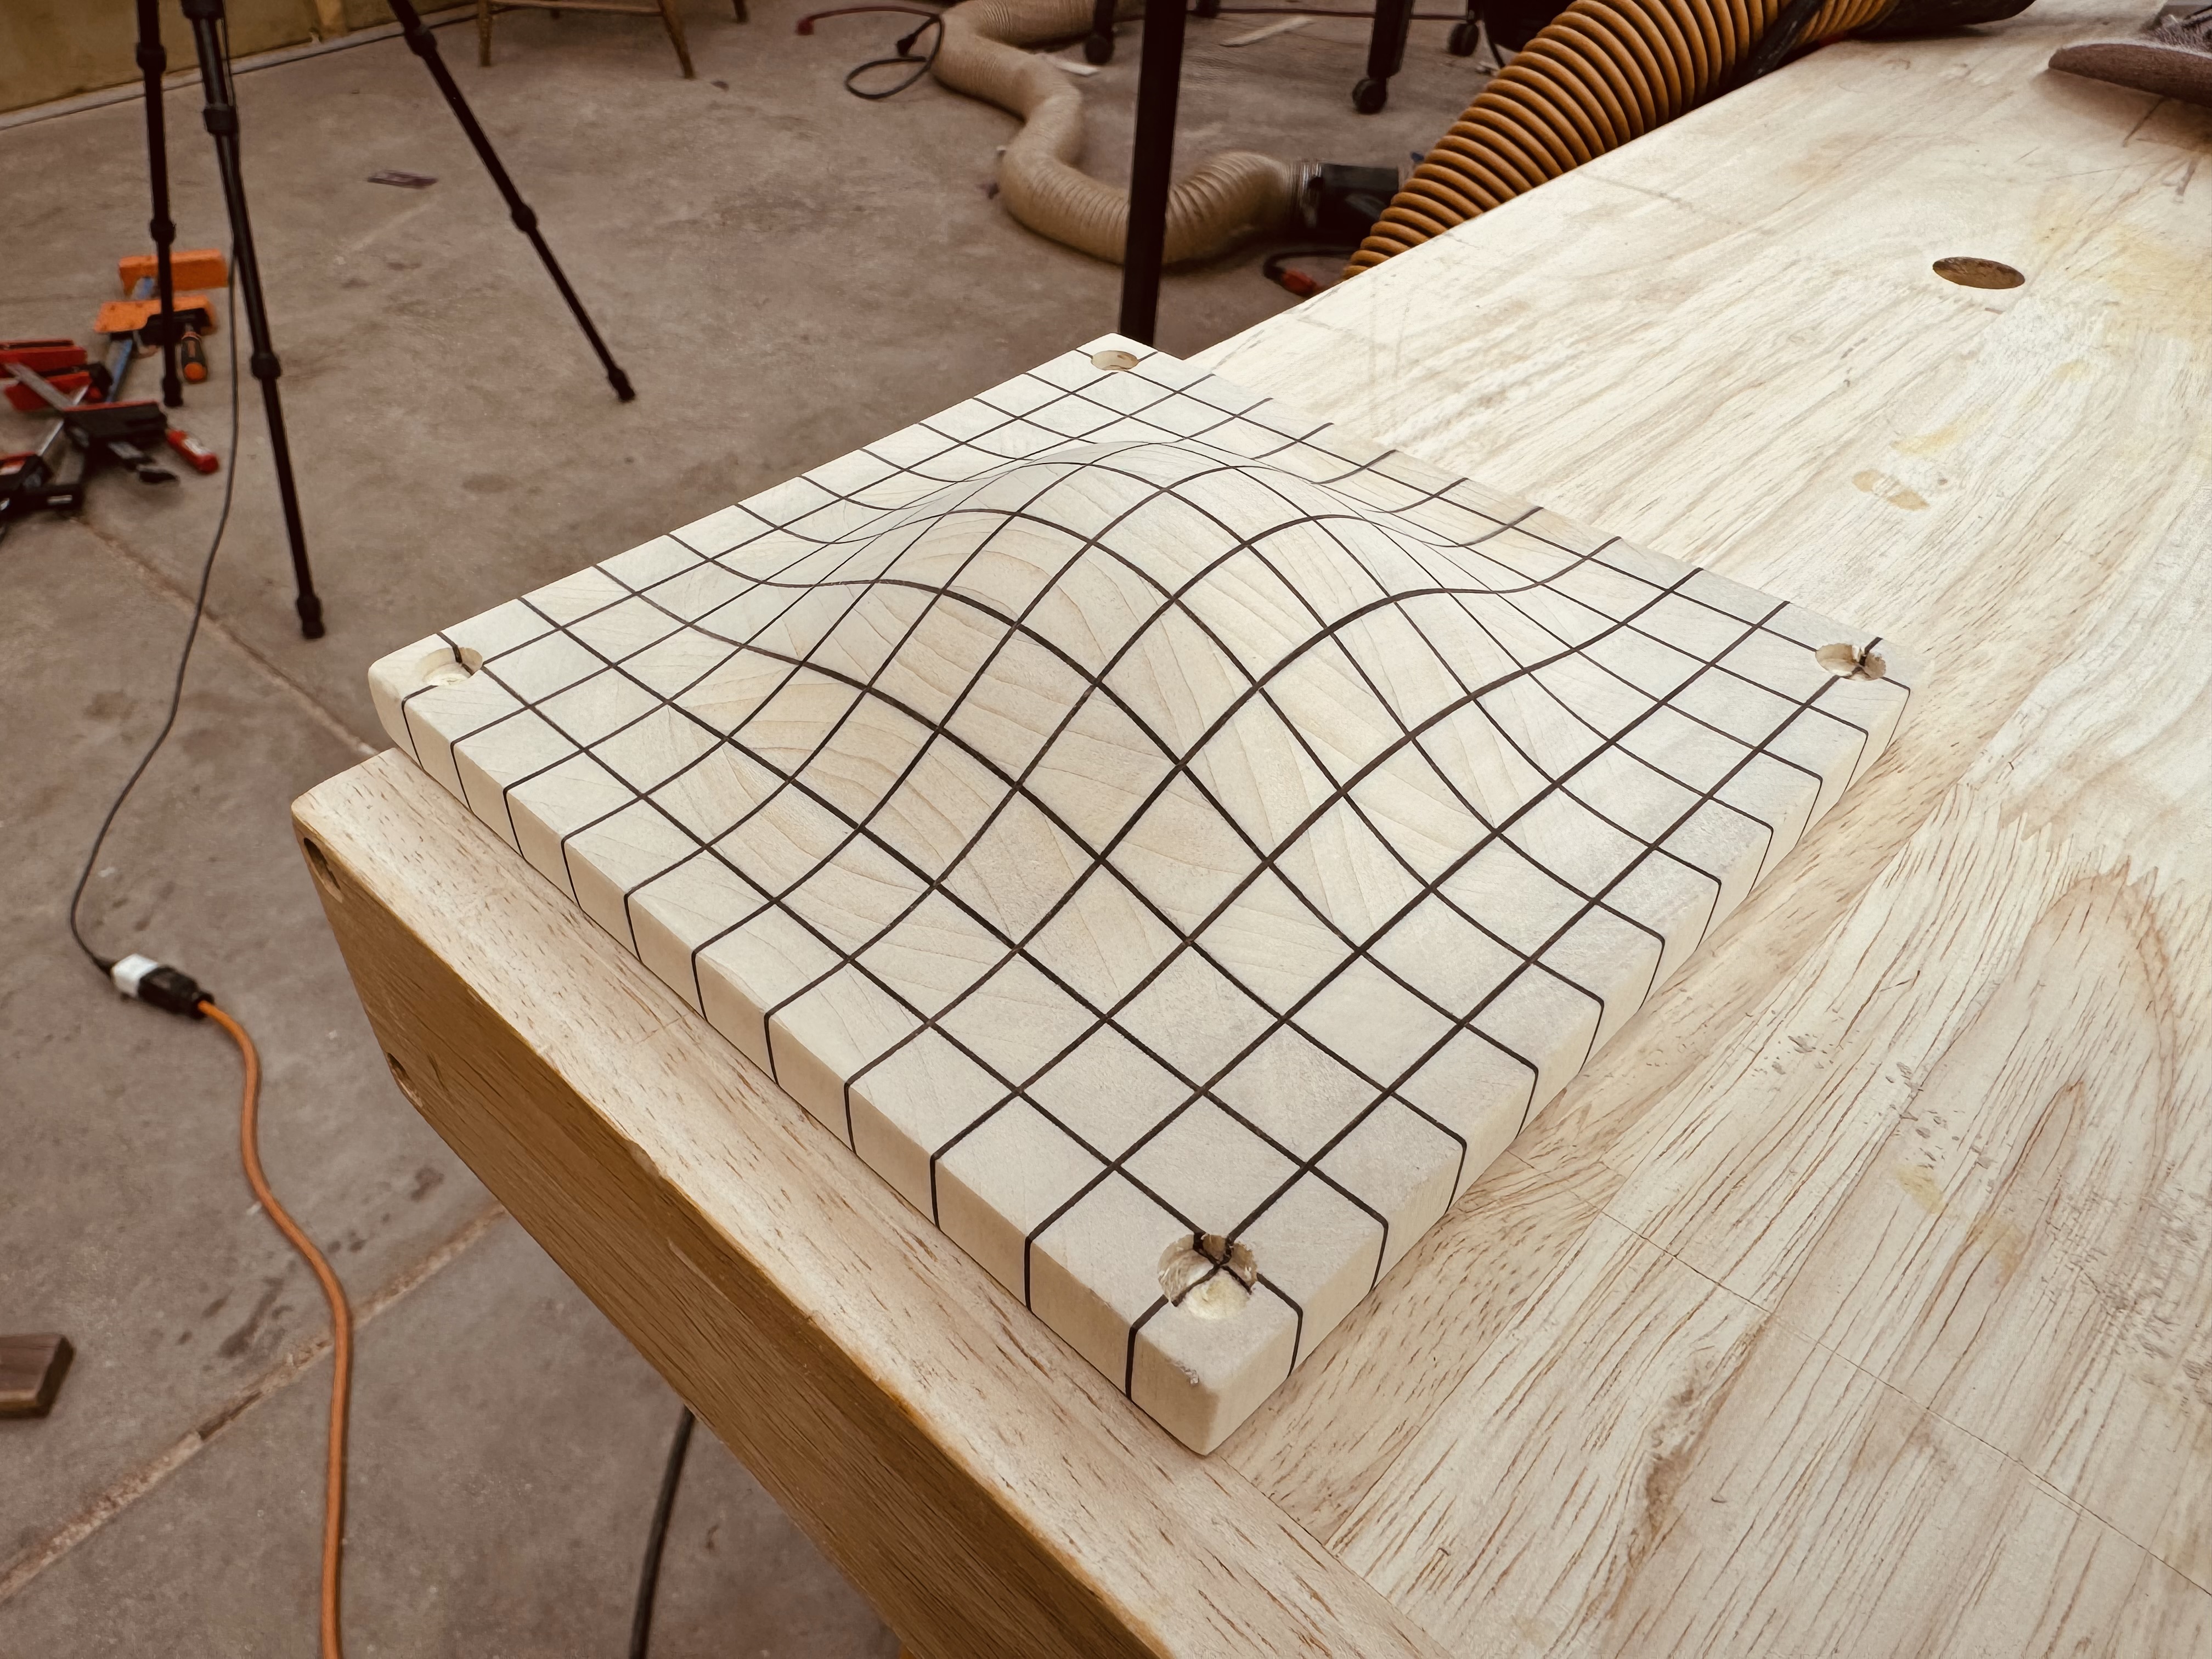
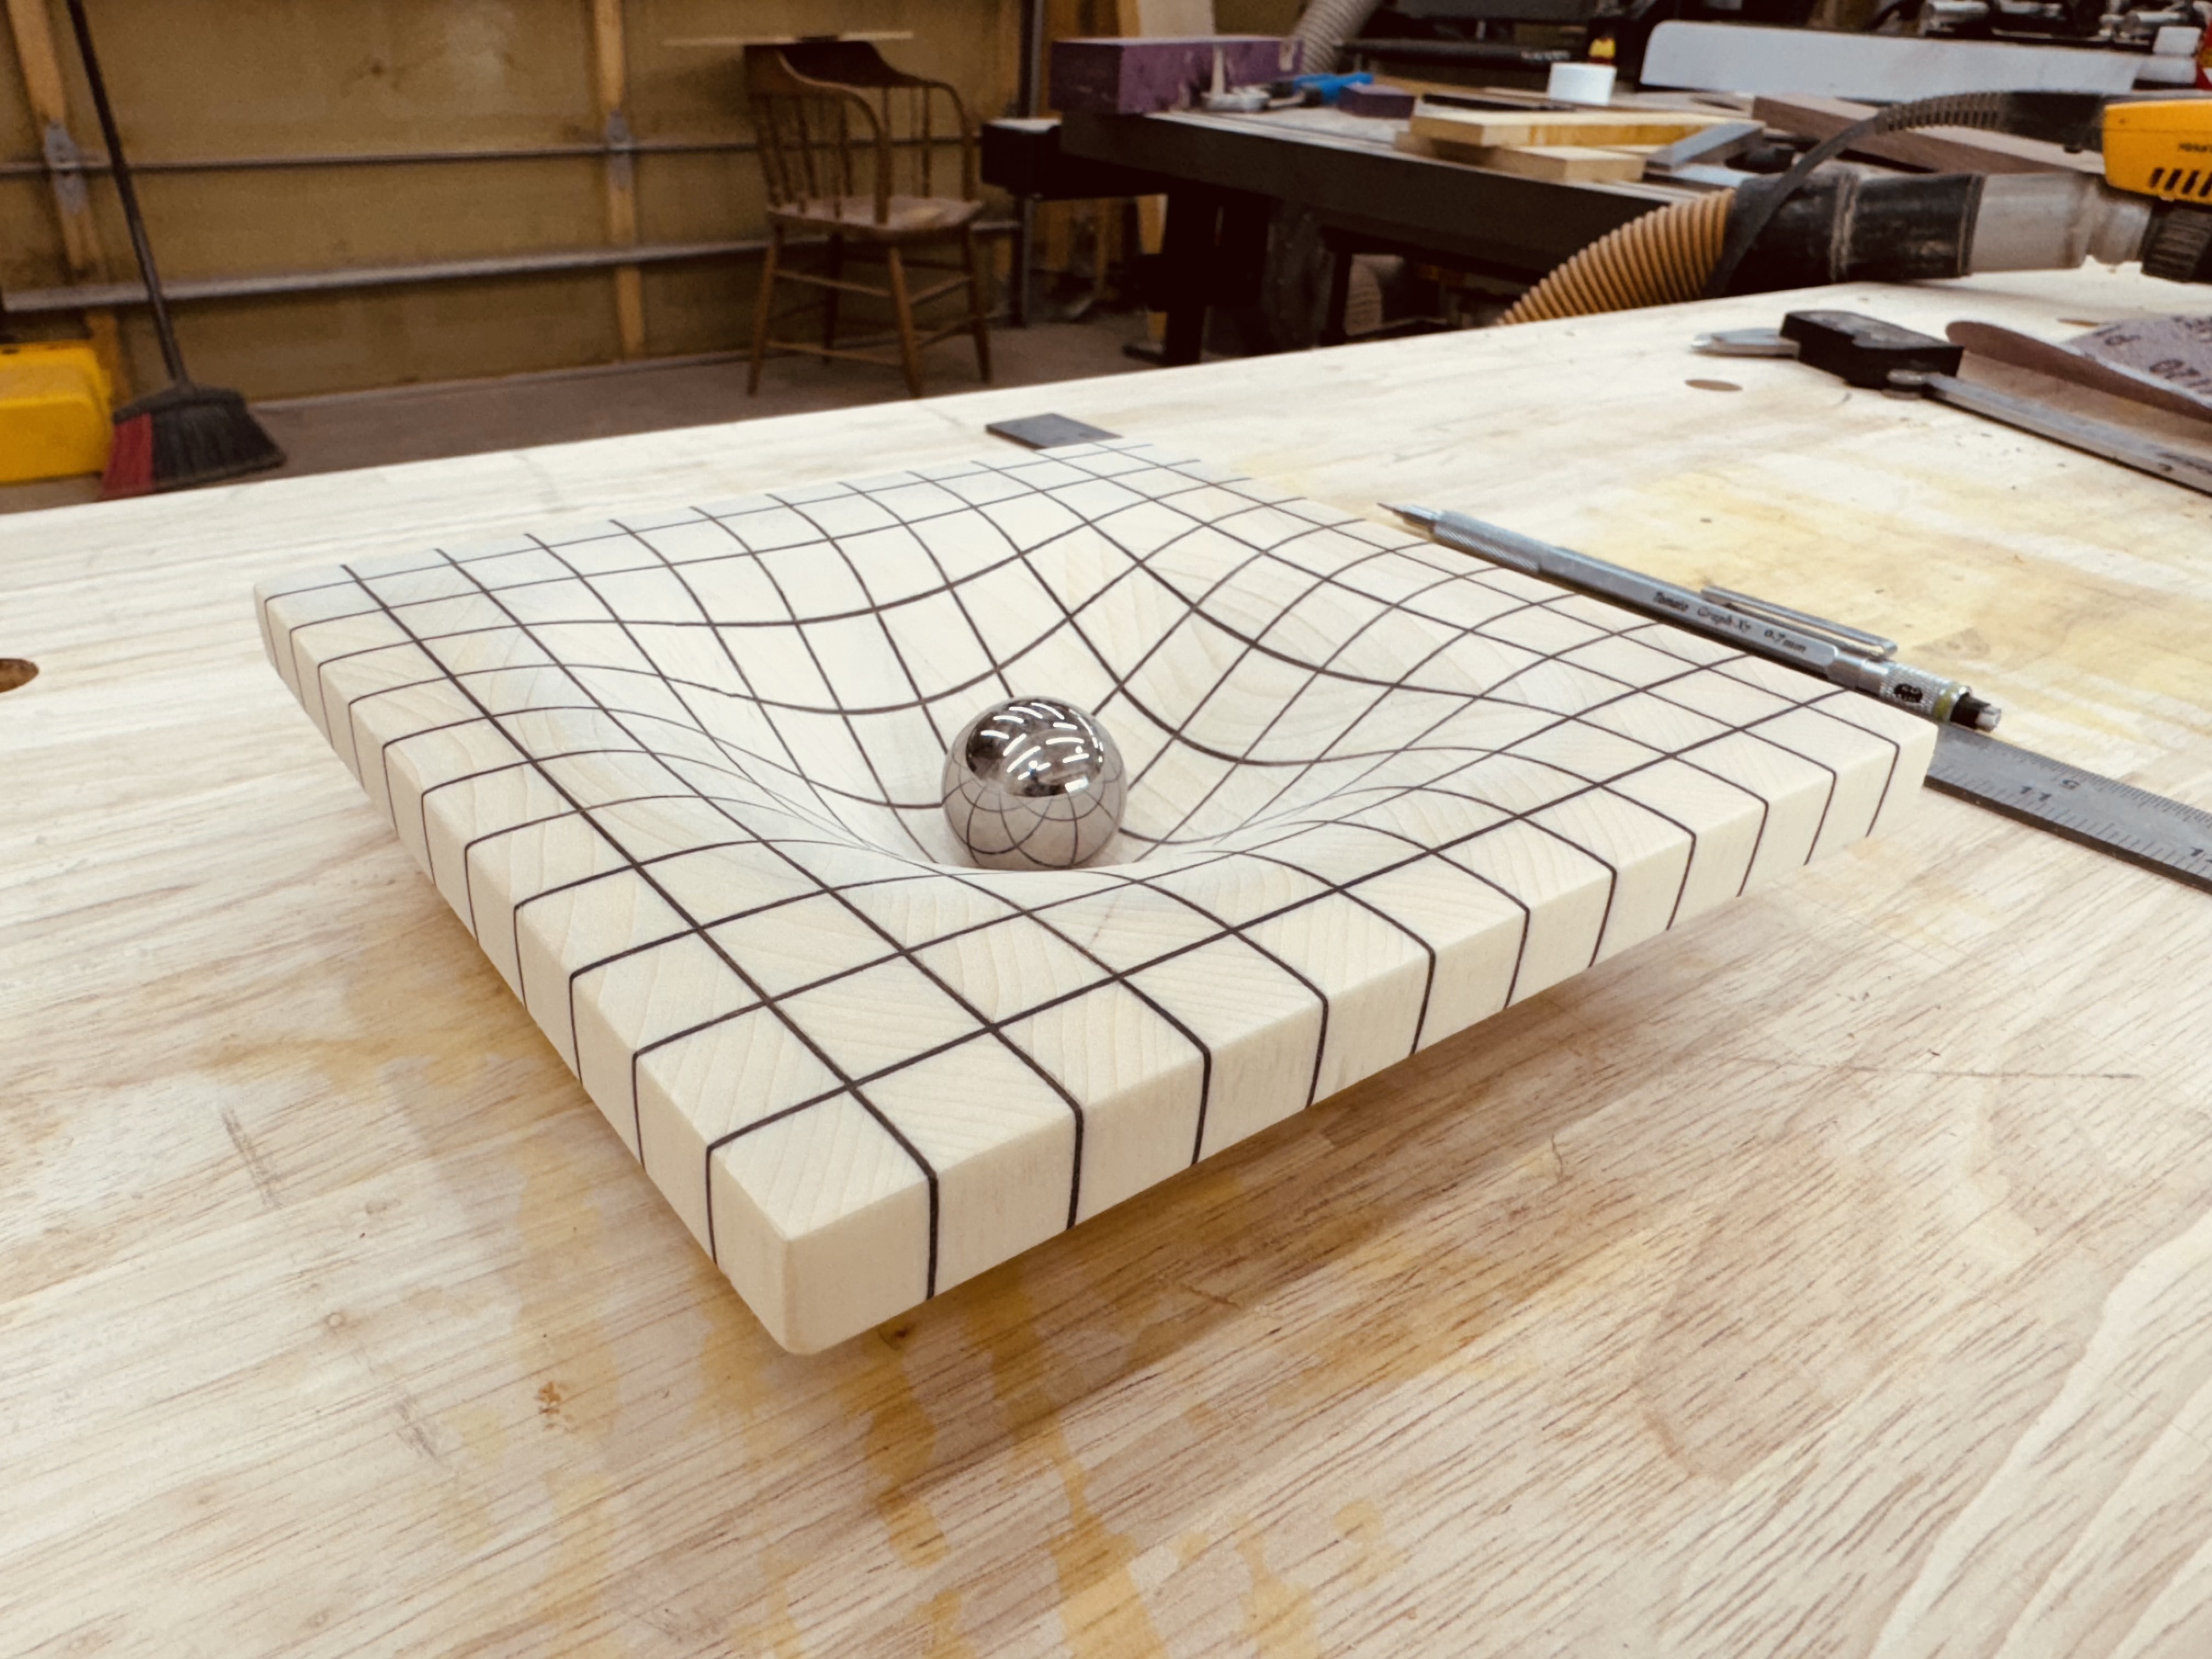
Sort of the 3D version of an inlaid board I made a while back.
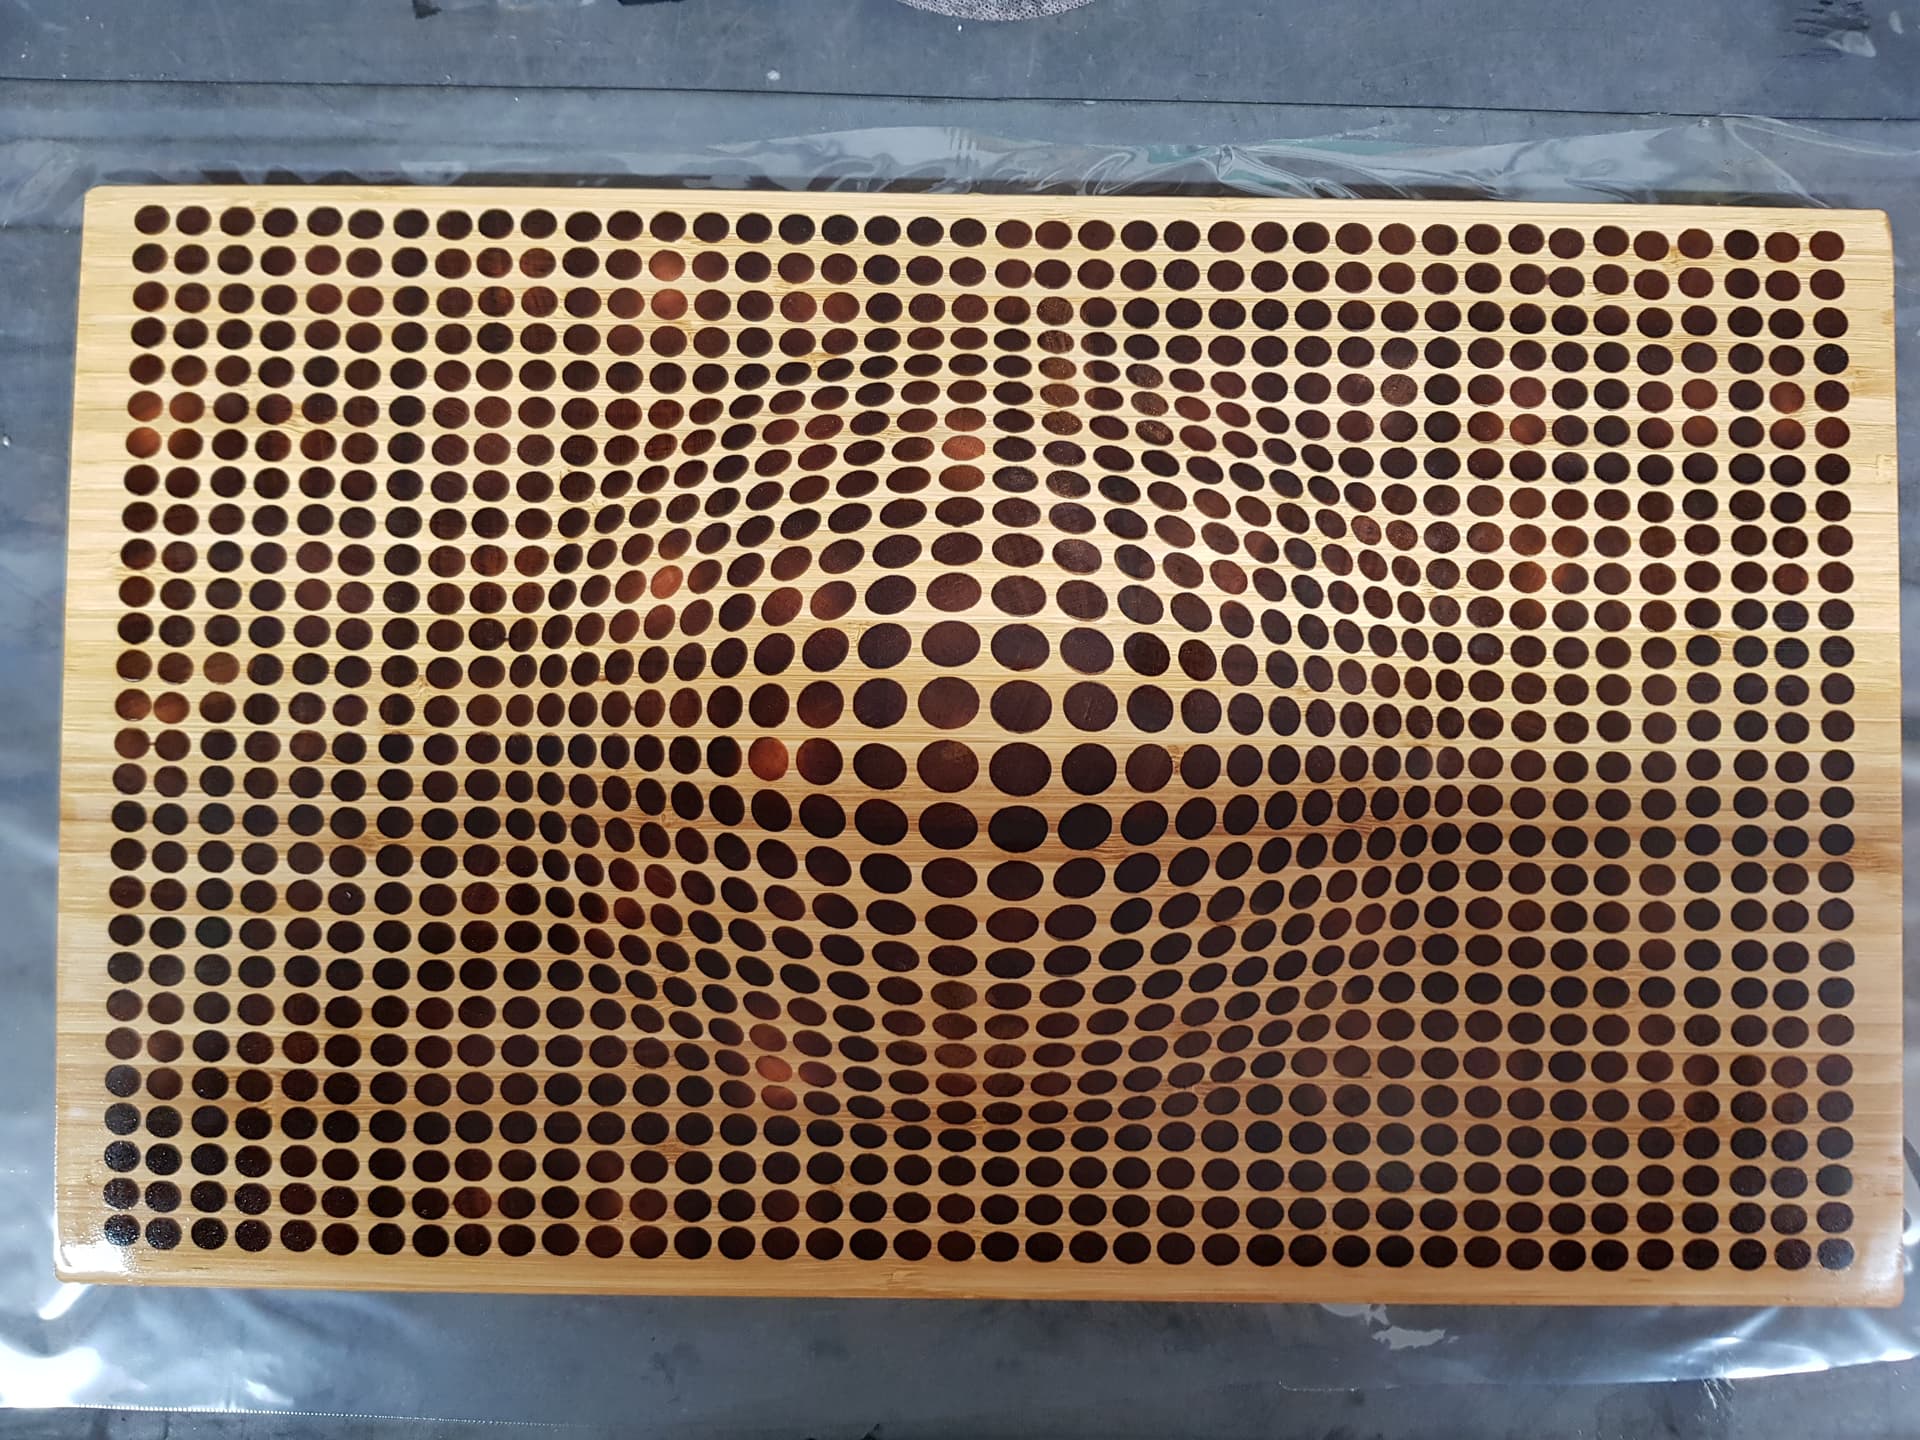
What were the dimensions of the original stock? It looks about 200 x 200 x100?
16 Likes
@Quantock Thanks!
It ended up being 6.25” x 6.25” x .5”
I am so going to steal that fantastic project idea, it speaks to the physics nerd in me.
Ages ago I had experimented with using a combination of CNC and laser for a vaguely similar effect but never had the motivation to turn that into an actual decoration piece.
Cutting alternating stripes of contrasting woods looks so much better
13 Likes
I hate it when space time folds while I am machining something. So many cutting boards thrown out due to 4th dimensional warping.
6 Likes
That right there is reason enough to get CC Pro! Very Cool. Don’t suppose you’re willing to share the file?
2 Likes
Isn’t it something how tech changes. I just read through your detailed write-up on your laser cut profile. Super ingenuous to make your laser to work to get the effect you wanted.
Now…lasers machines have the ability to map any surface, to a certain degree slope, and automatically builds a mesh of that profile for the laser to maintain its focal point. Pretty cool stuff.
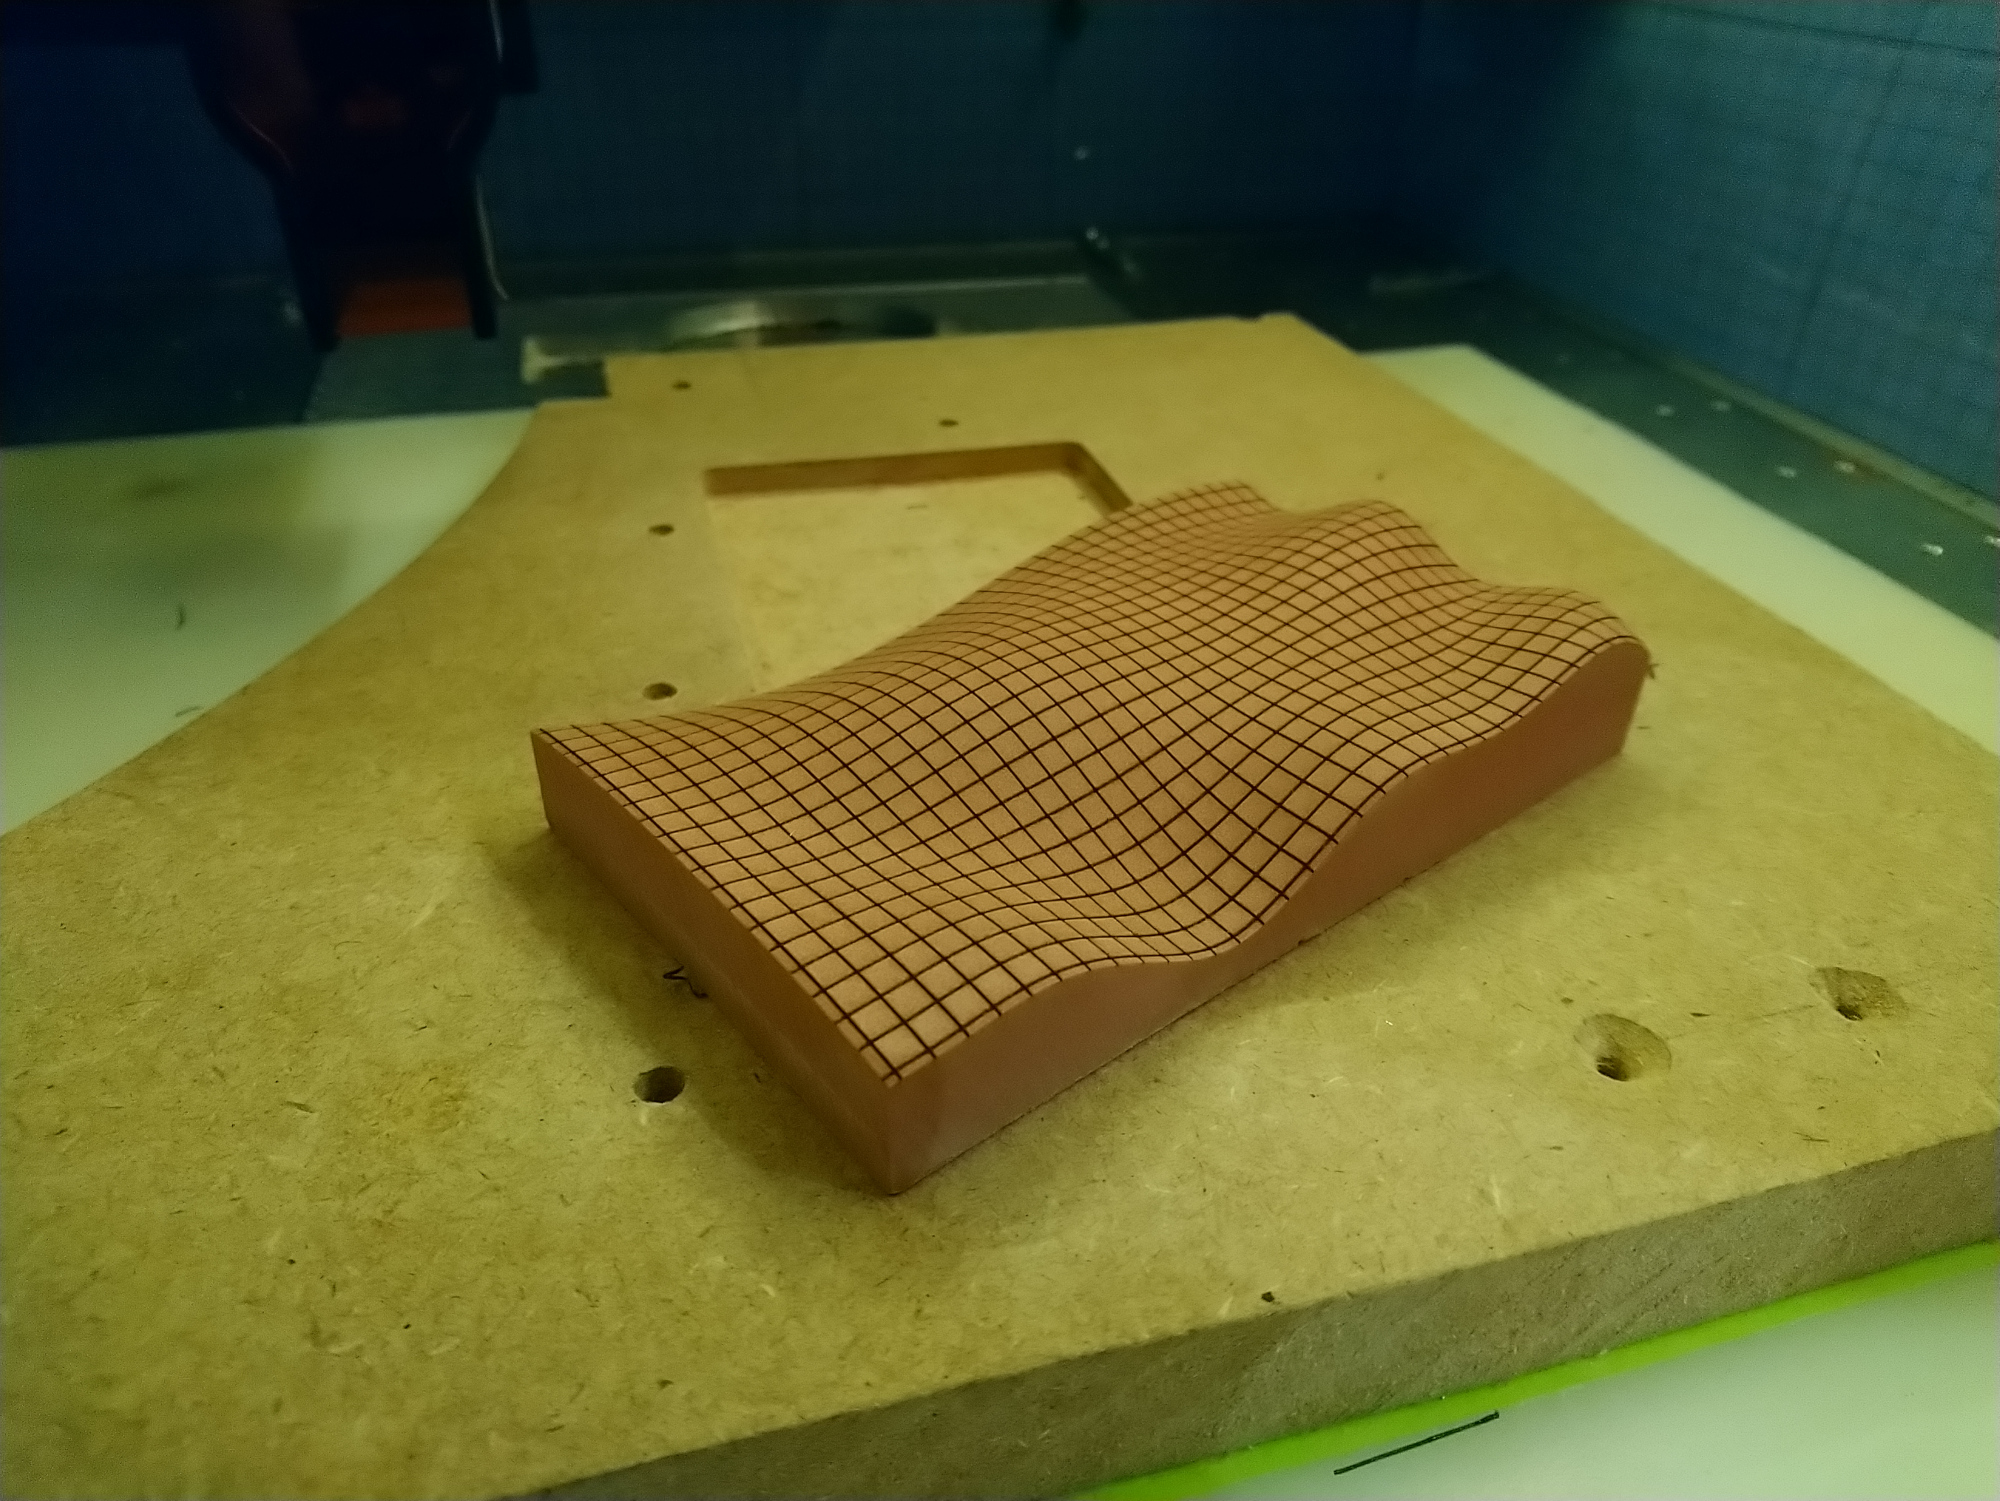
The thing I like the most about the model I made, is something you can’t really see, but in its overall thickness.
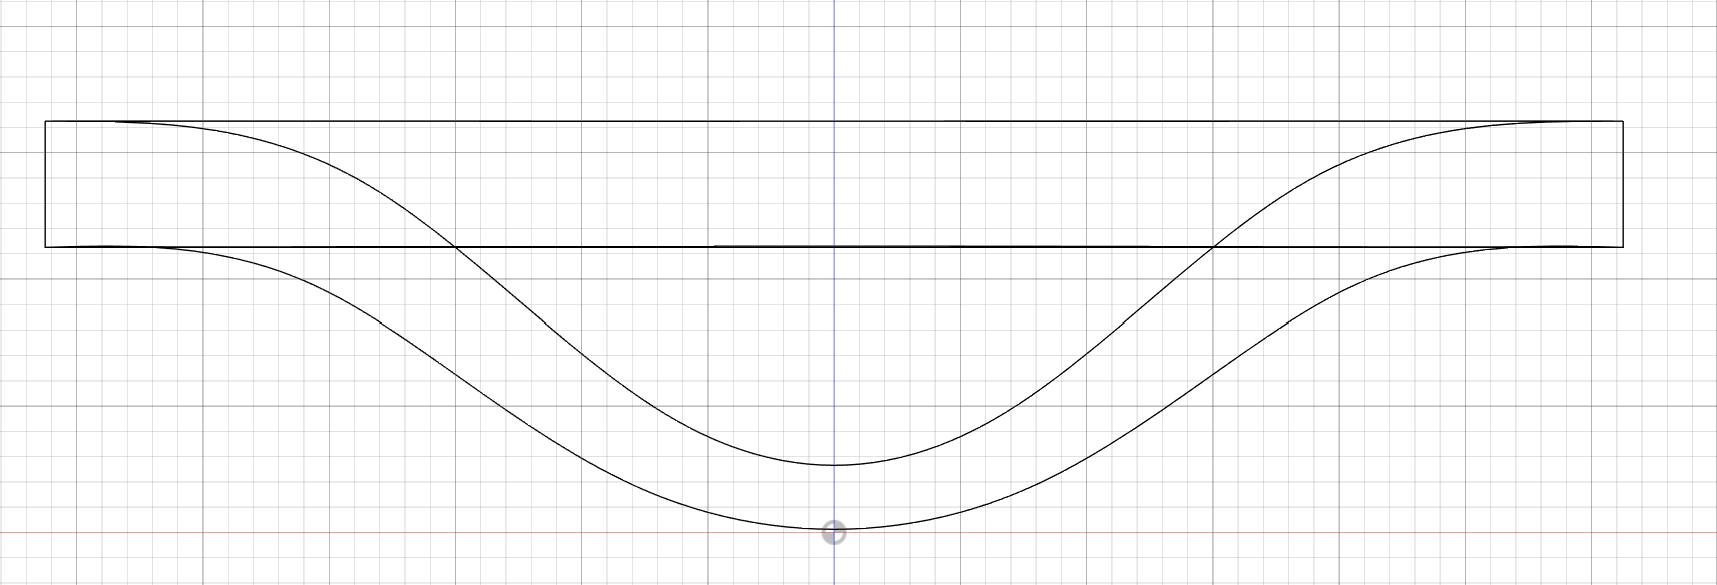
As the ball bearing is pushing down on the material, the material stretches down ![]() I thought that was a pretty cool little feature of the design. The top thickness is .5, with the bottom of the curve is under 1/4 to an 1/8th.
I thought that was a pretty cool little feature of the design. The top thickness is .5, with the bottom of the curve is under 1/4 to an 1/8th.
@ScottsdaleSteve I’m cleaning up the file this morning, getting ready to do the build video and hopefully post later this afternoon. Will be available on my Patreon.
The file has 3 diffrent options
Option 1 is the using veneer and doing multiple glue-ups for the grid pattern. I chose that option
Option 2, using a V Carve Strategy to paint the lines on the mapped surface
Option 3, using a laser with that mapping capability to paint the lines
Only downside for options 2 and 3, you do not get those fancy lines on the sides, unless you really get creative.
Cheers
5 Likes