Very nice.
Does it generate a lot of dust?
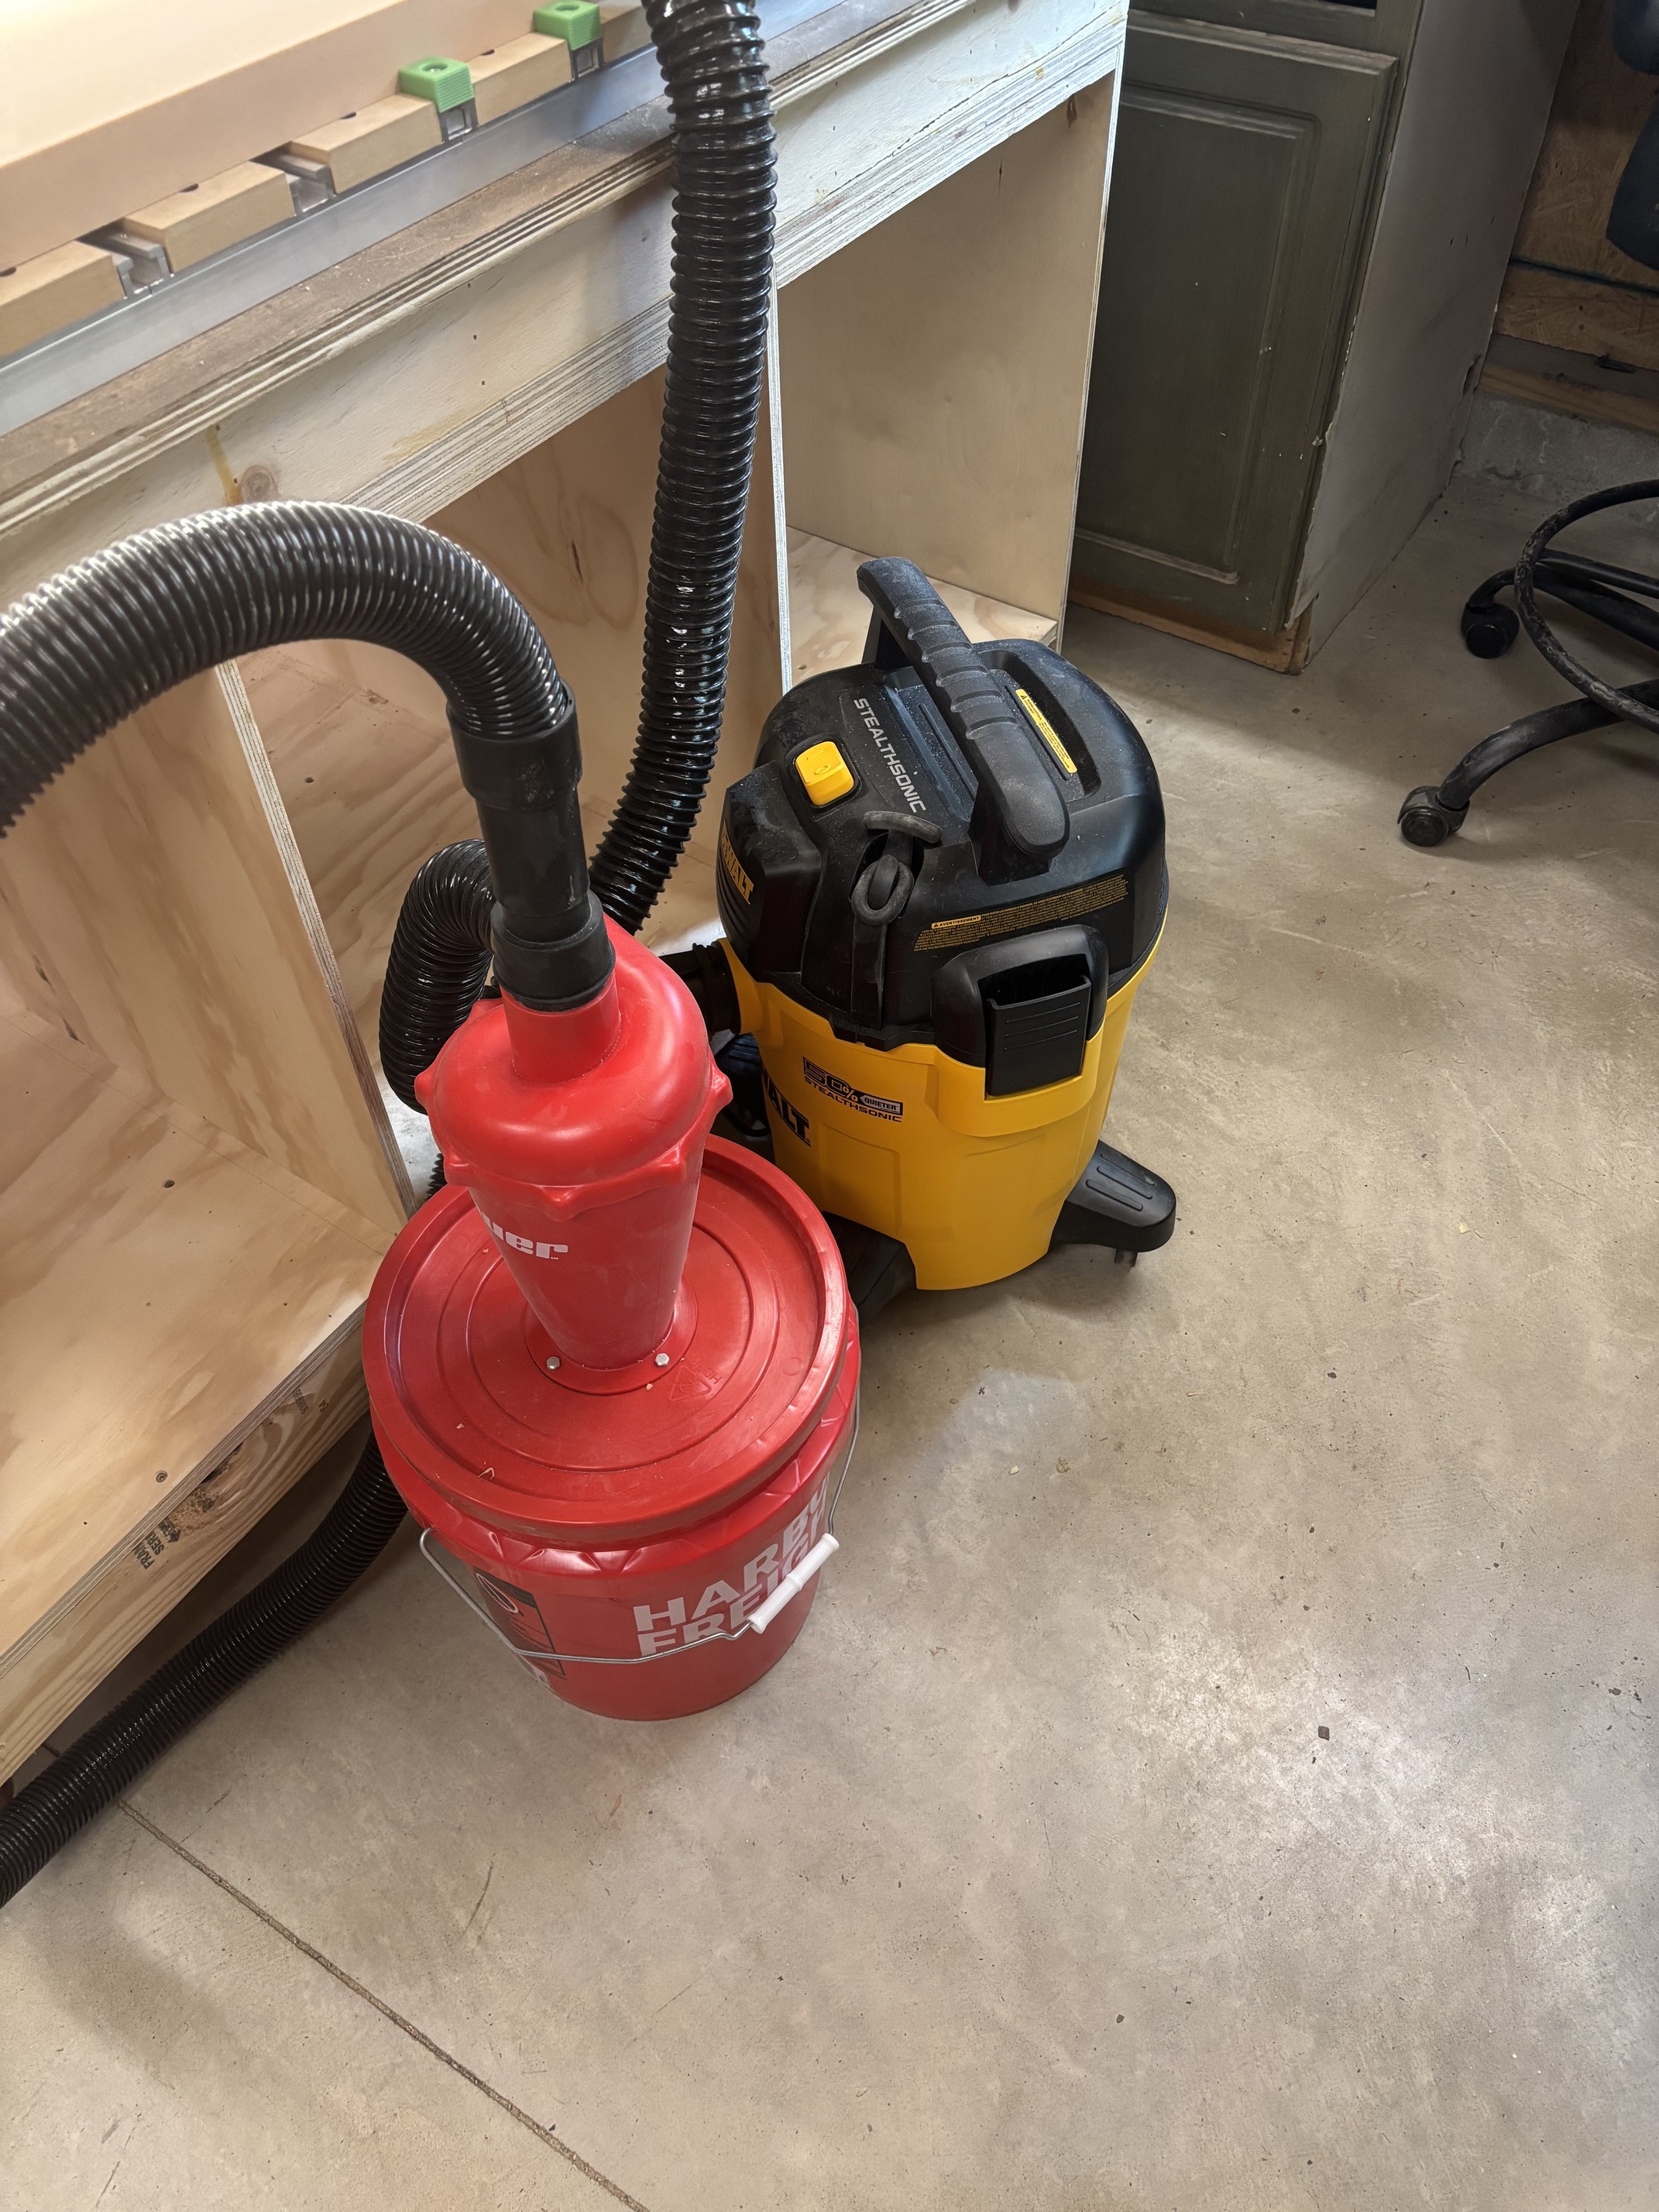
It can but my small Harbor Freight cyclone and 6 gal Dewalt Stealthsonic vacuum collect just as much of the dust as if it’s wood.
2 Likes
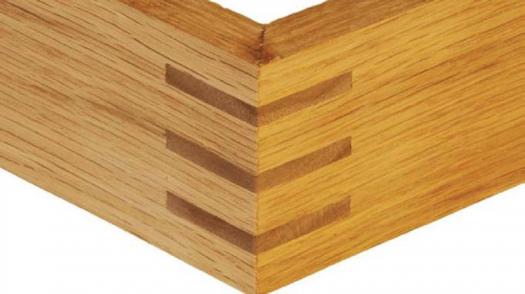
Exactly. Strongest joint? Not really. But the sides are glued to the plywood bottom so should stay together.
People always debate over miters needing reinforcement or not. End grain does not form as strong of a joint as flat grain to flat grain. I have made a lot of jewelry boxes with miters and always made internal splines. Jewelry boxes get handled and are subject to being dropped. However any box dropped with any construction may shatter if dropped . It is hard to put internal splines in but perpendicular splines are relatively simple and add a decorative element.
7 Likes
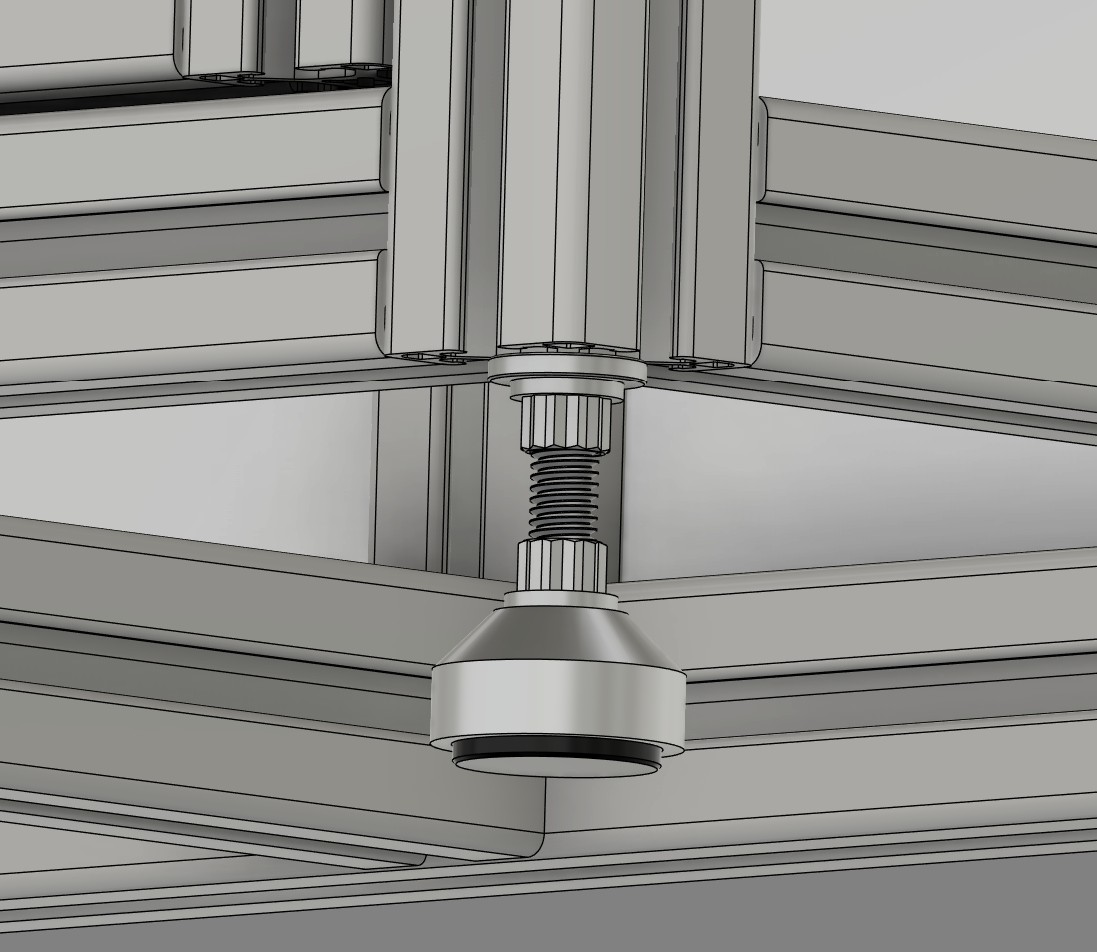
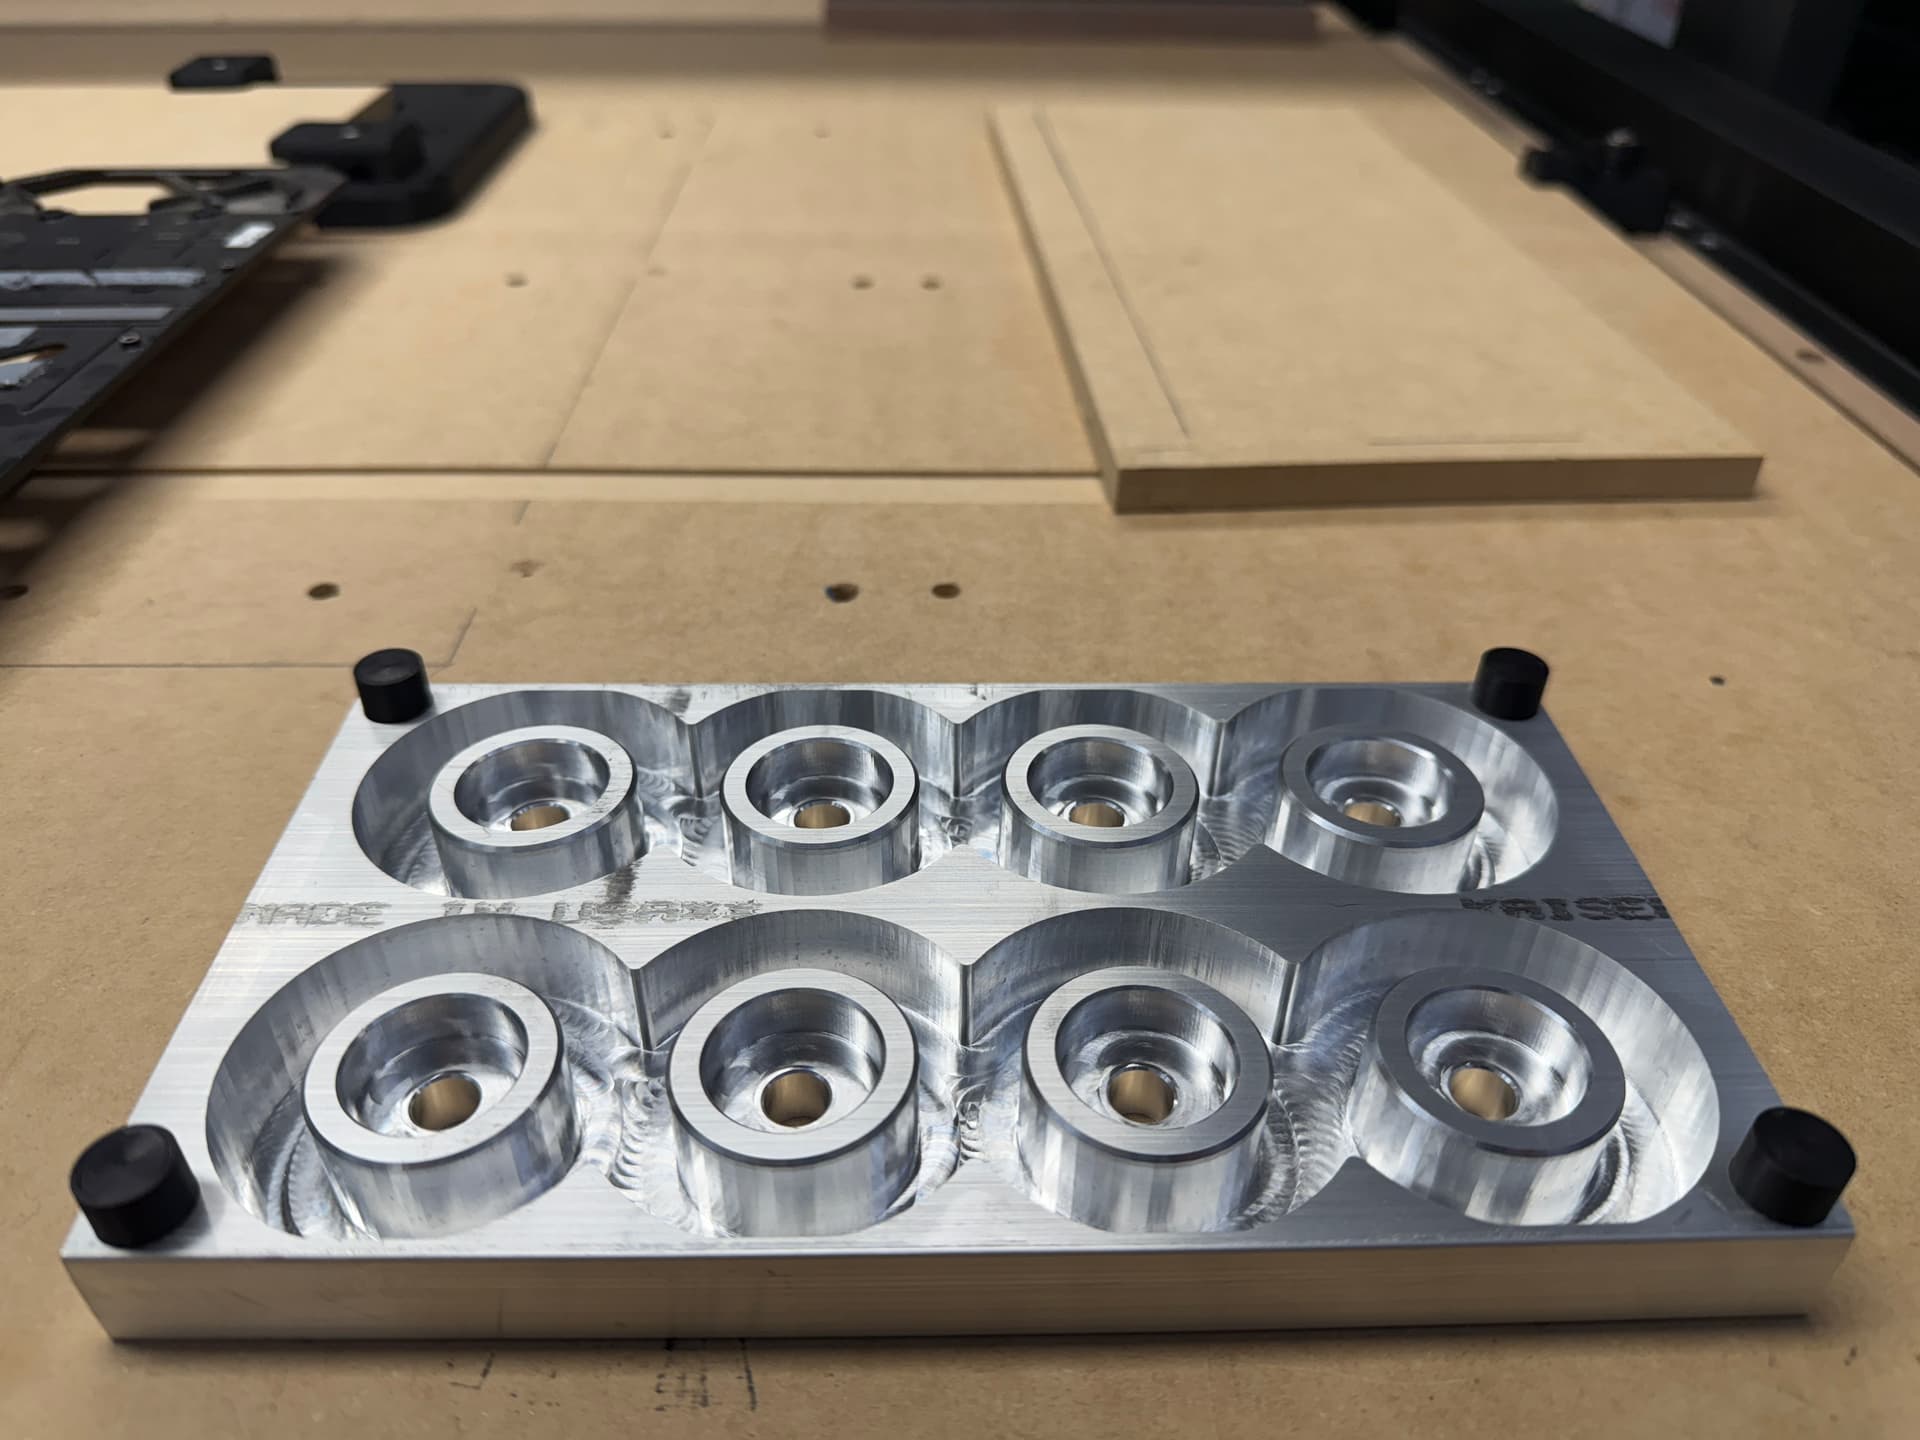
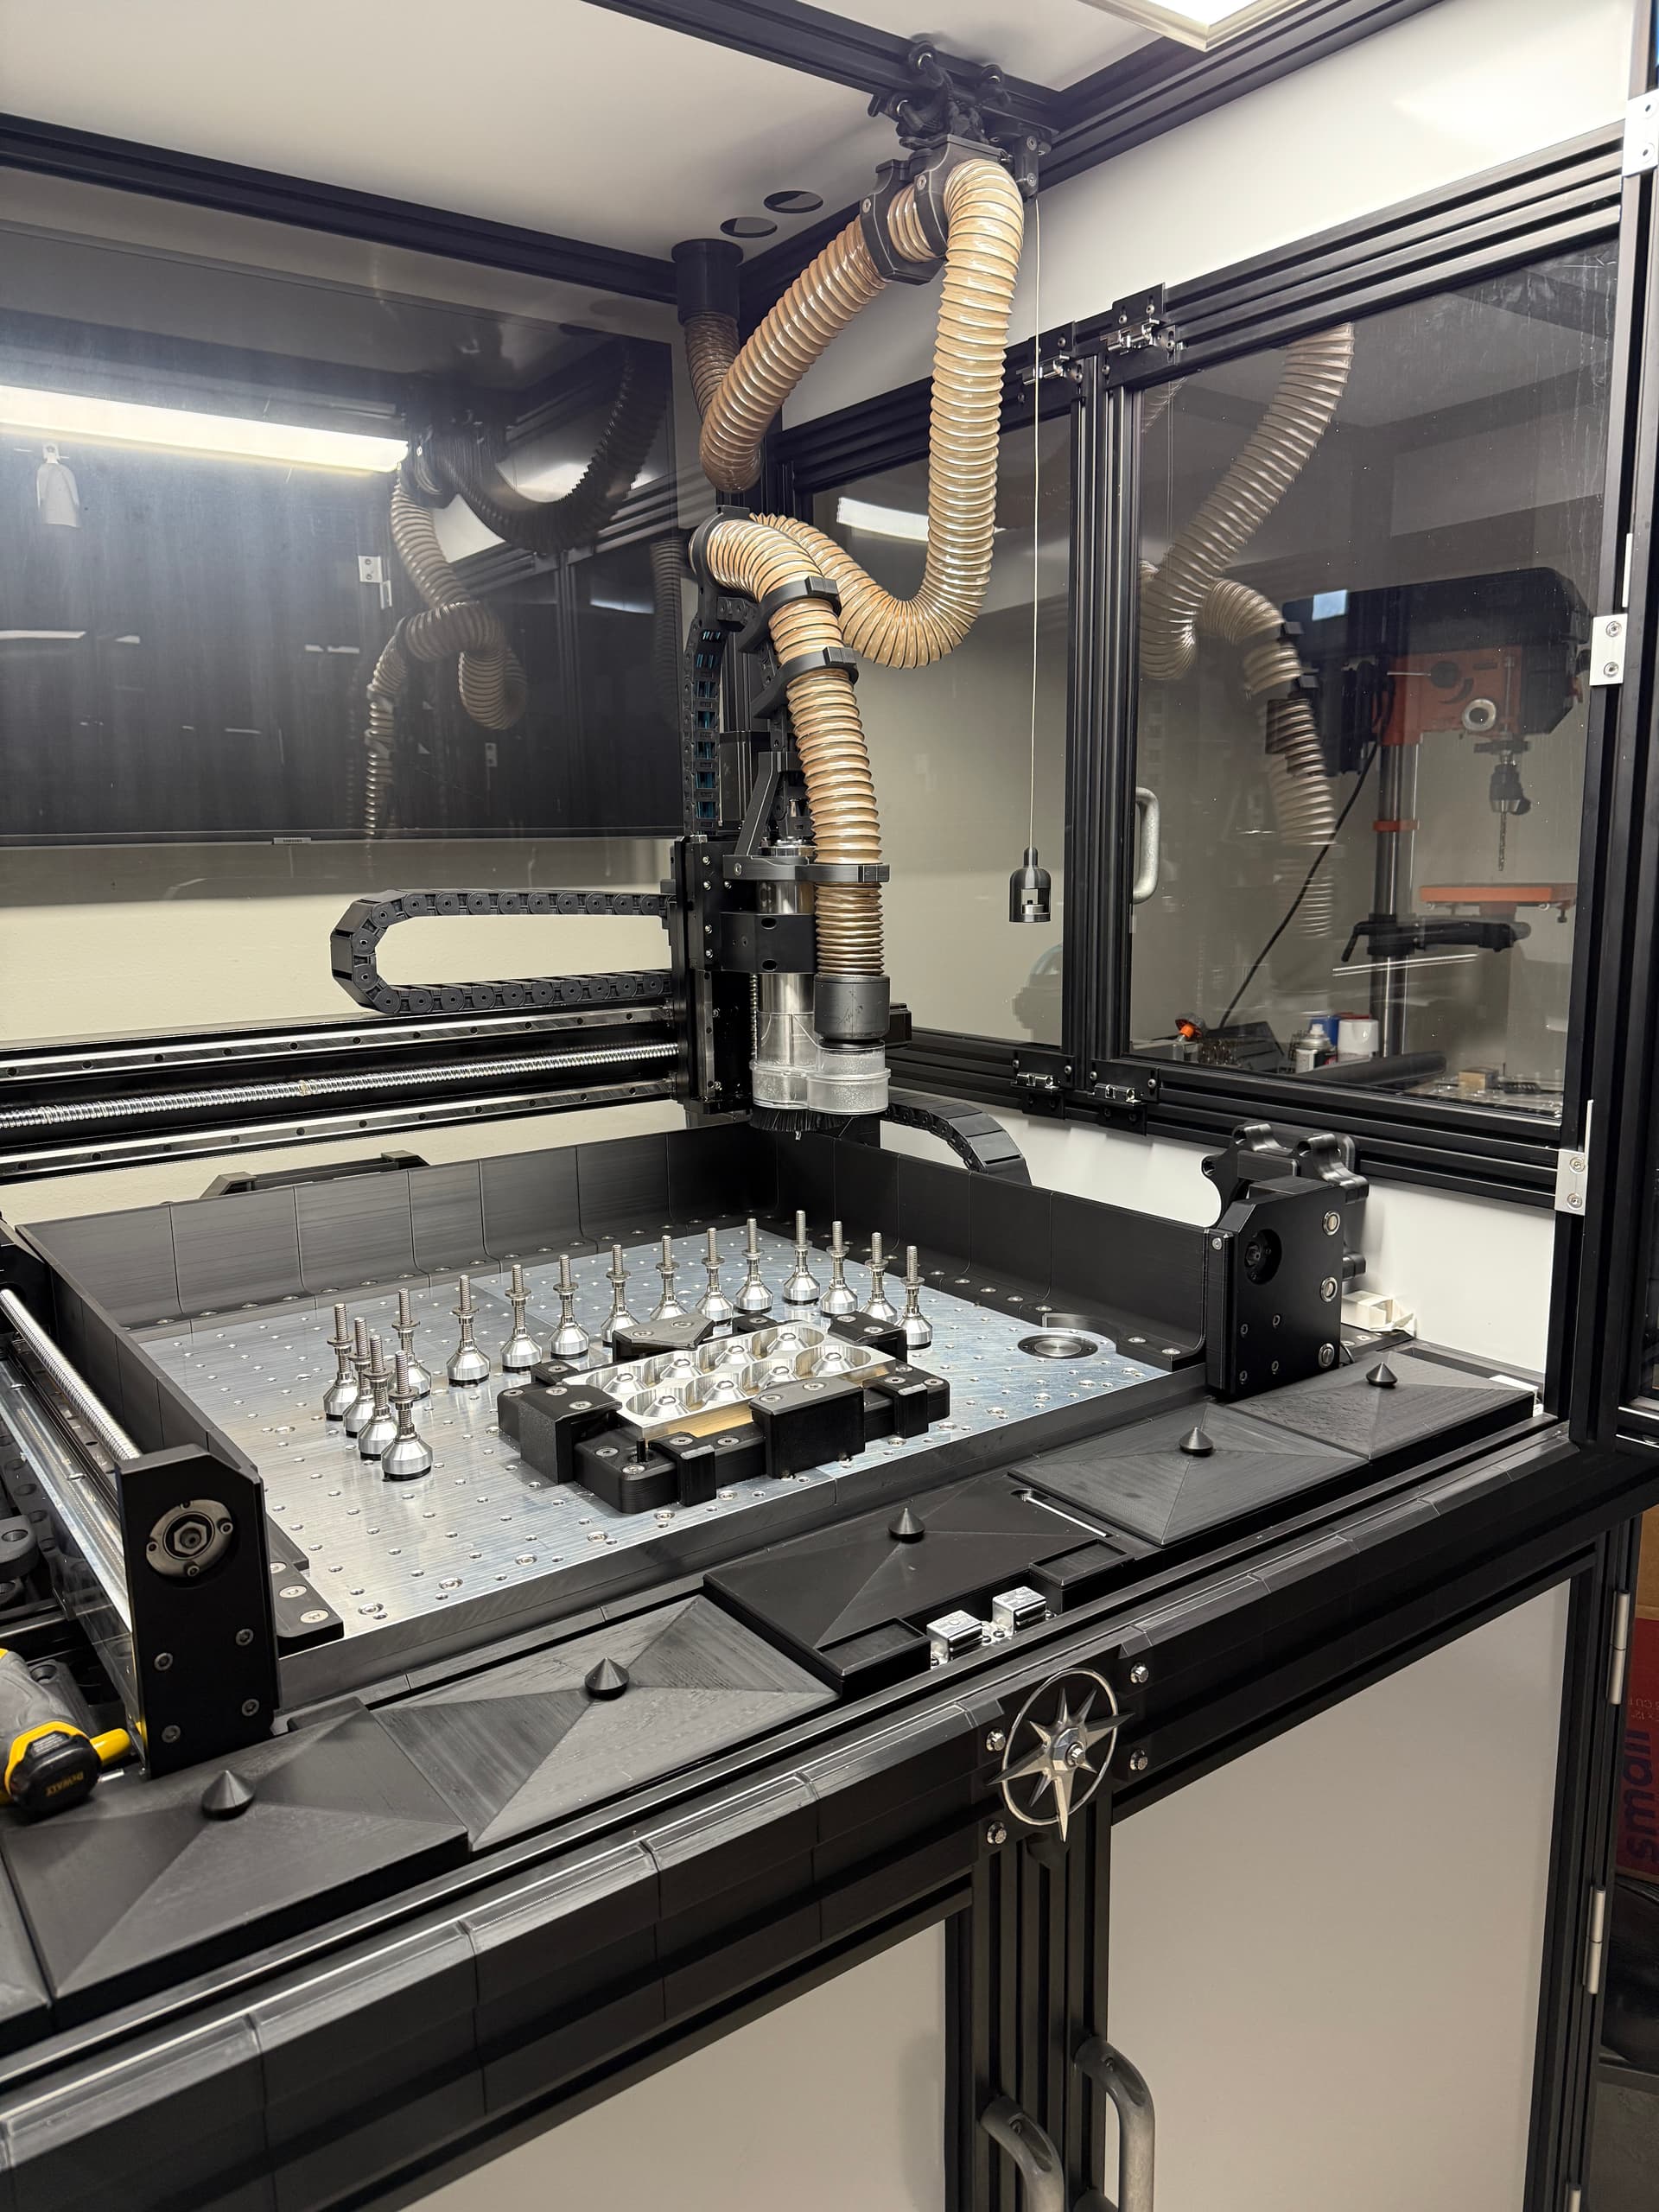
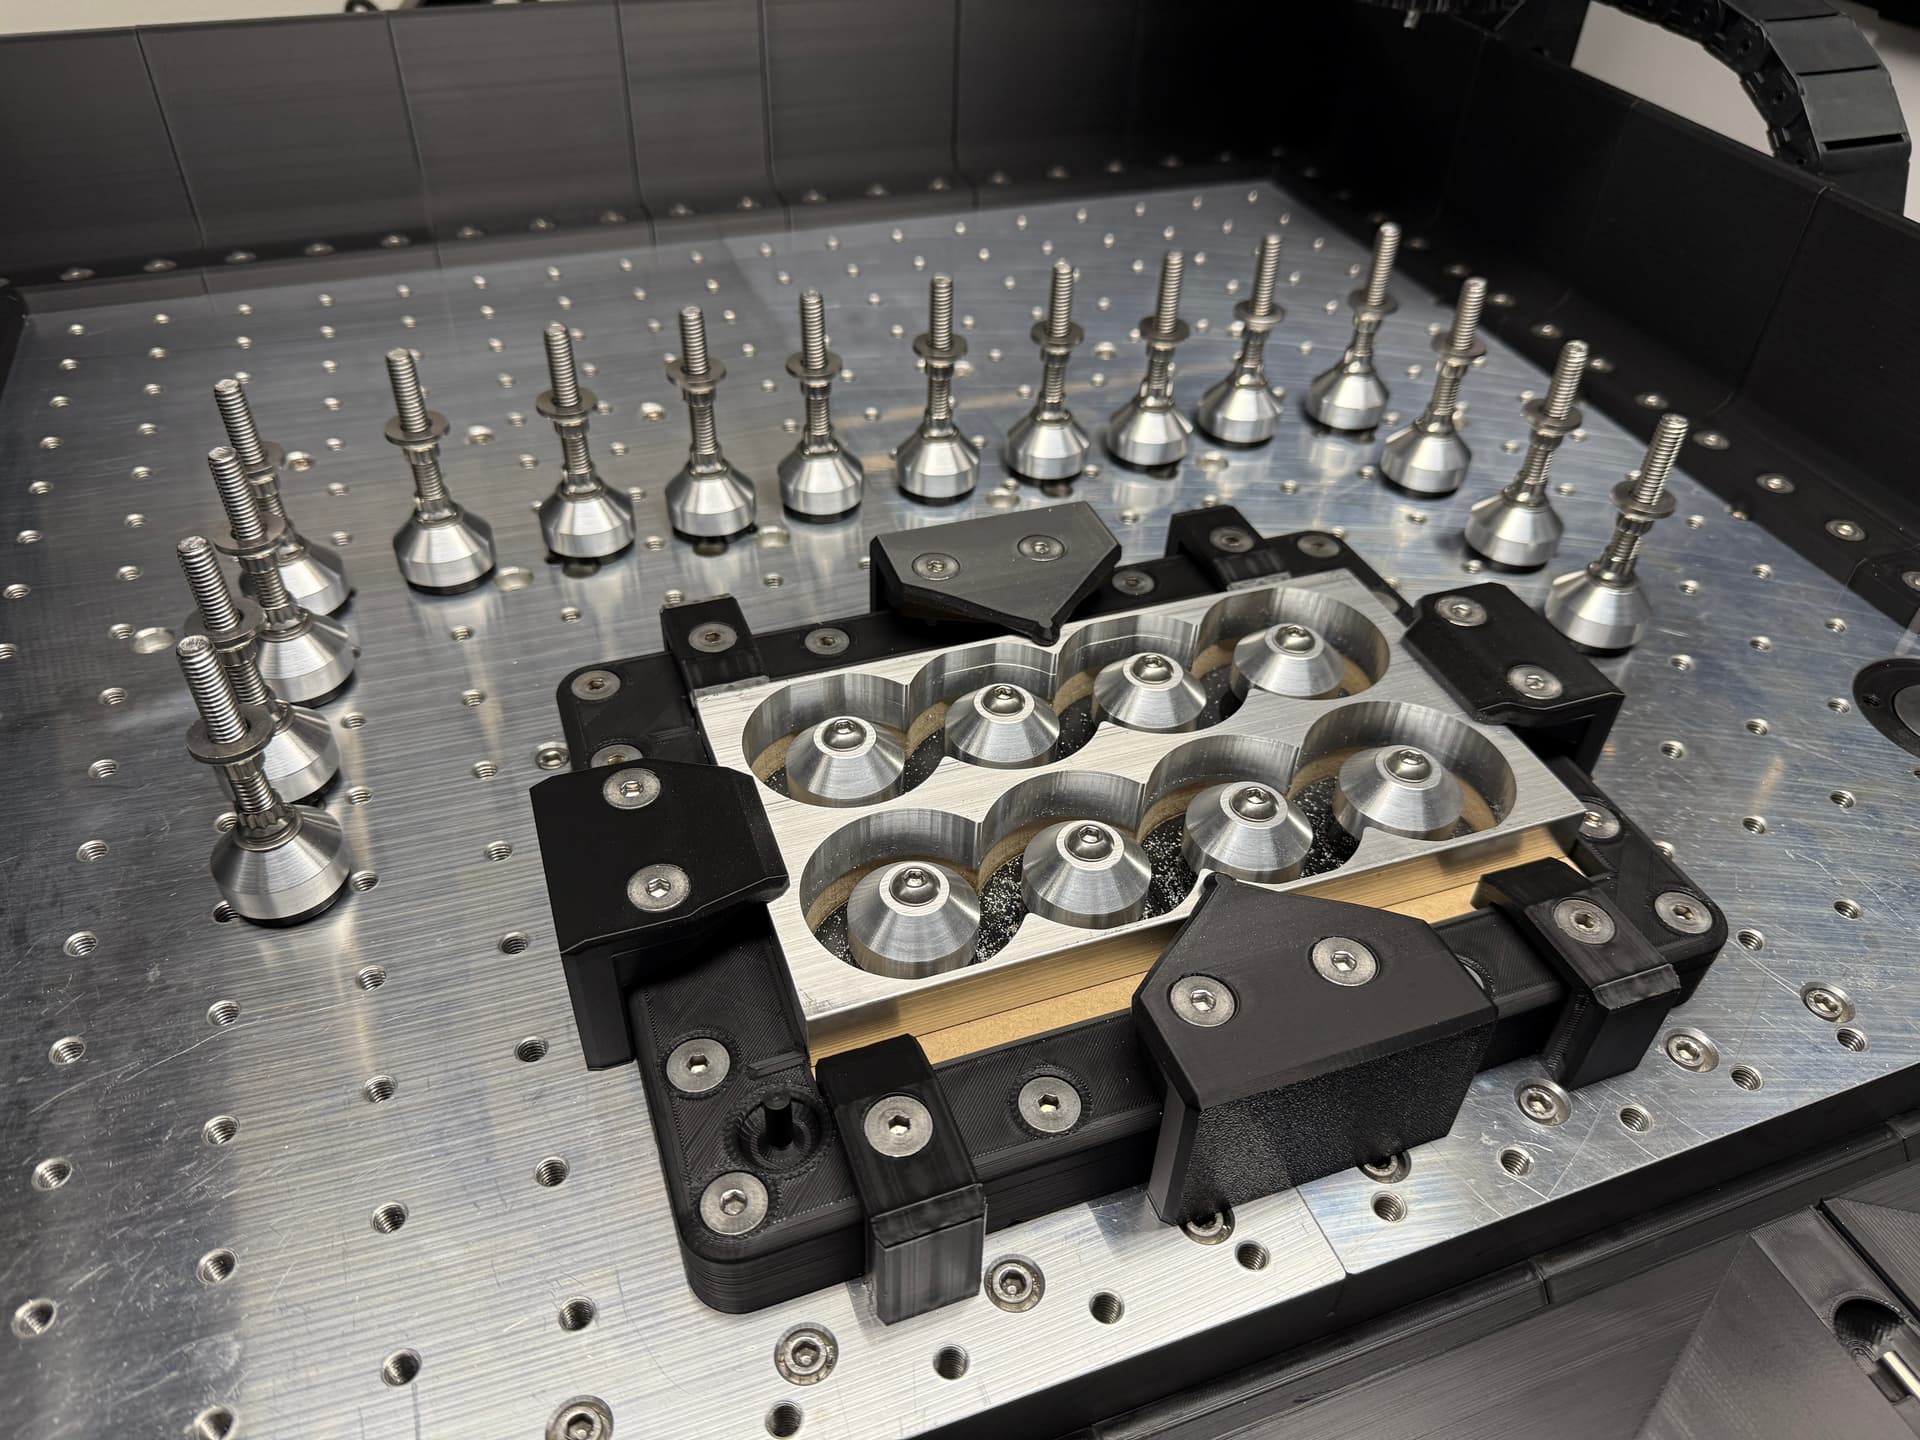
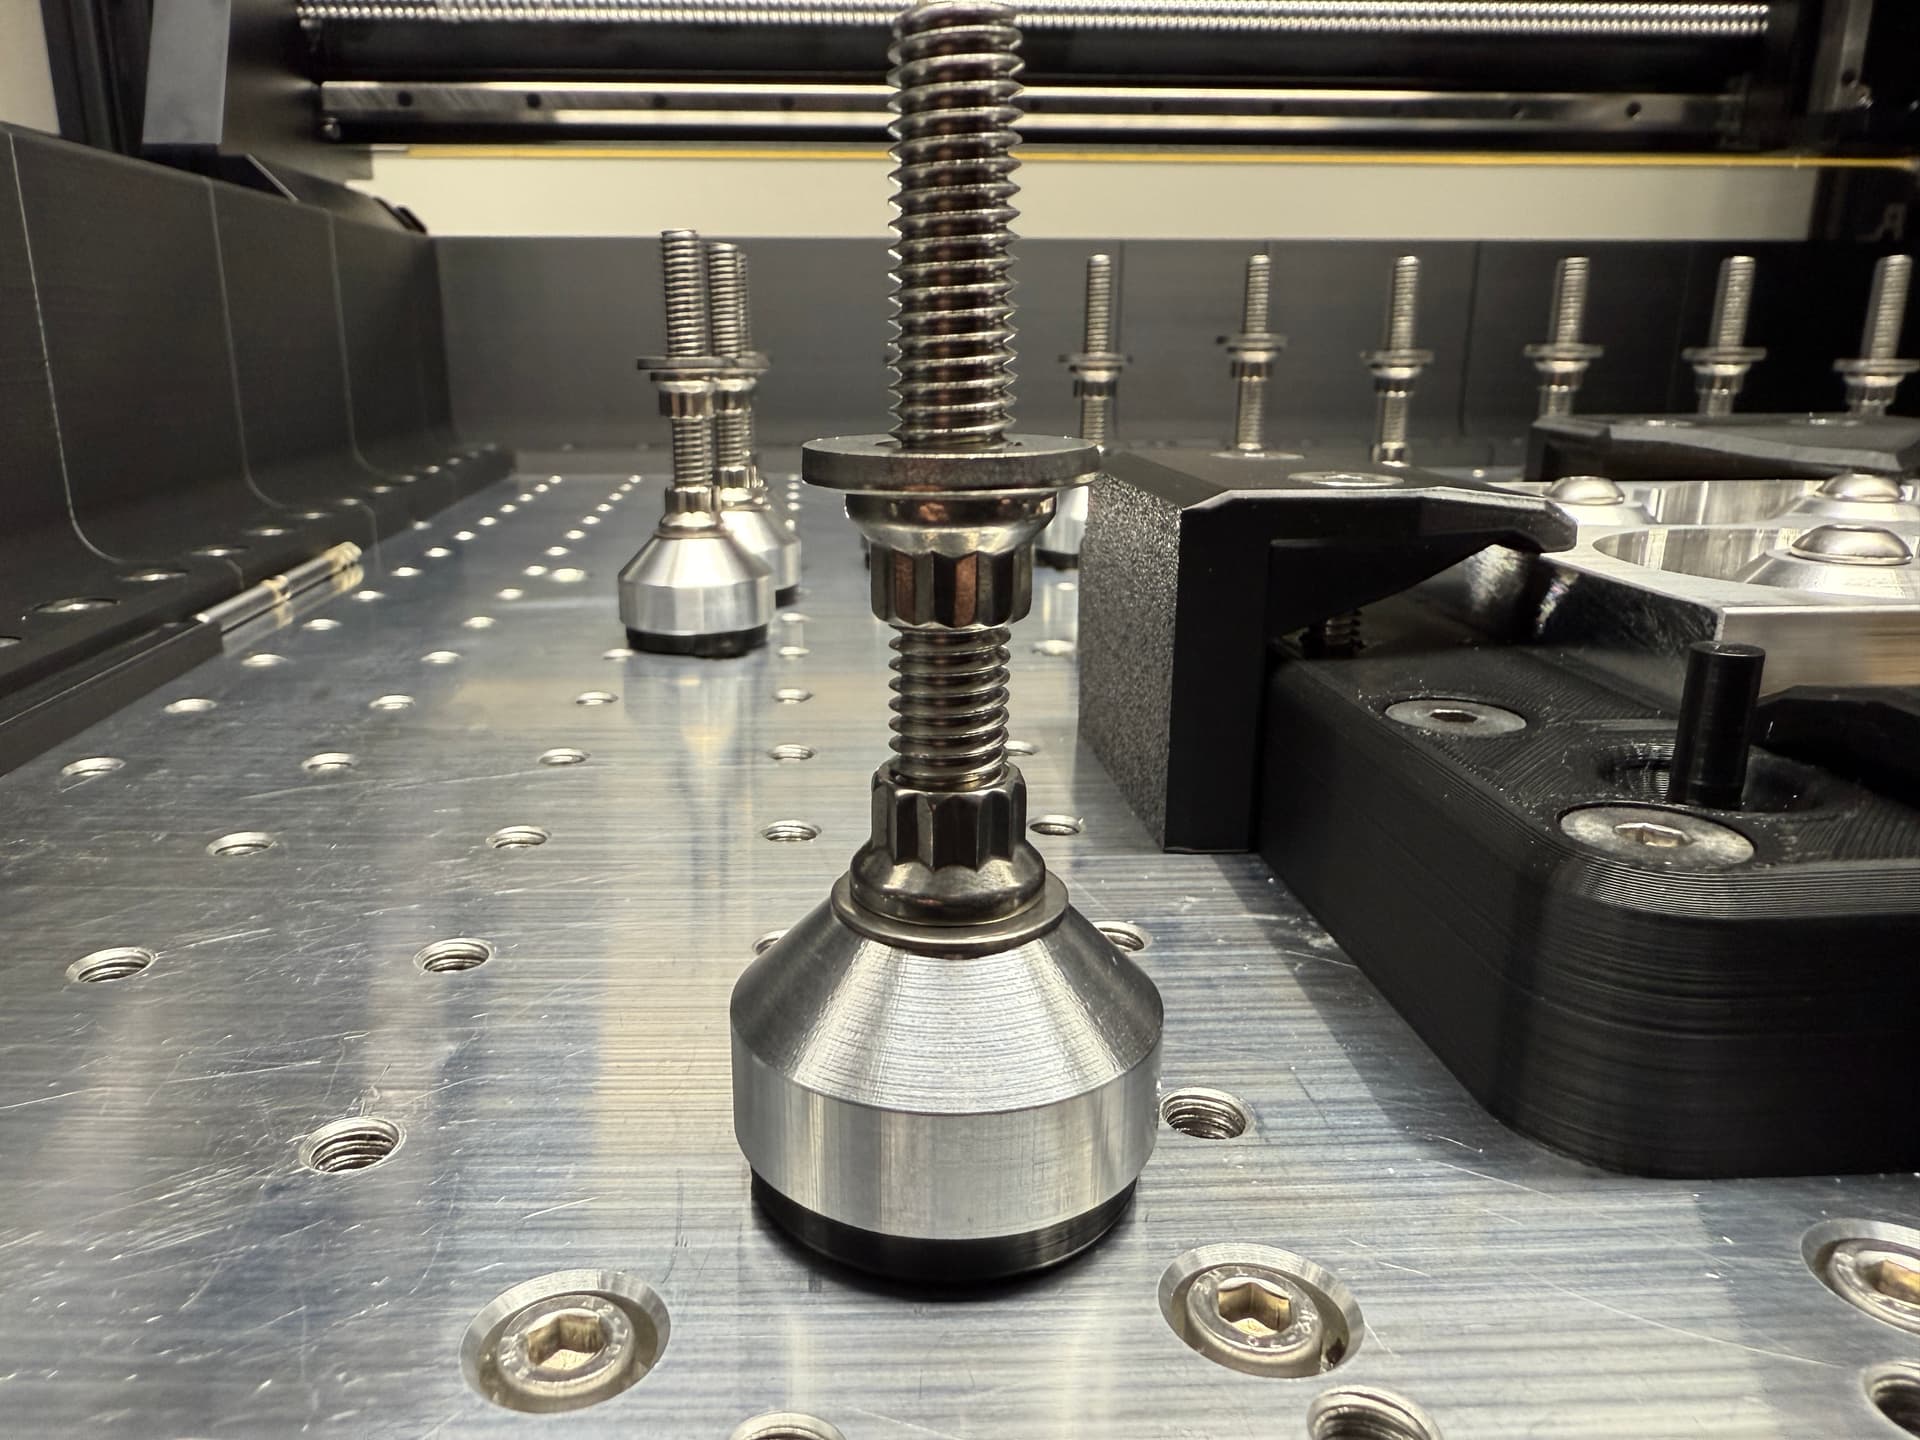
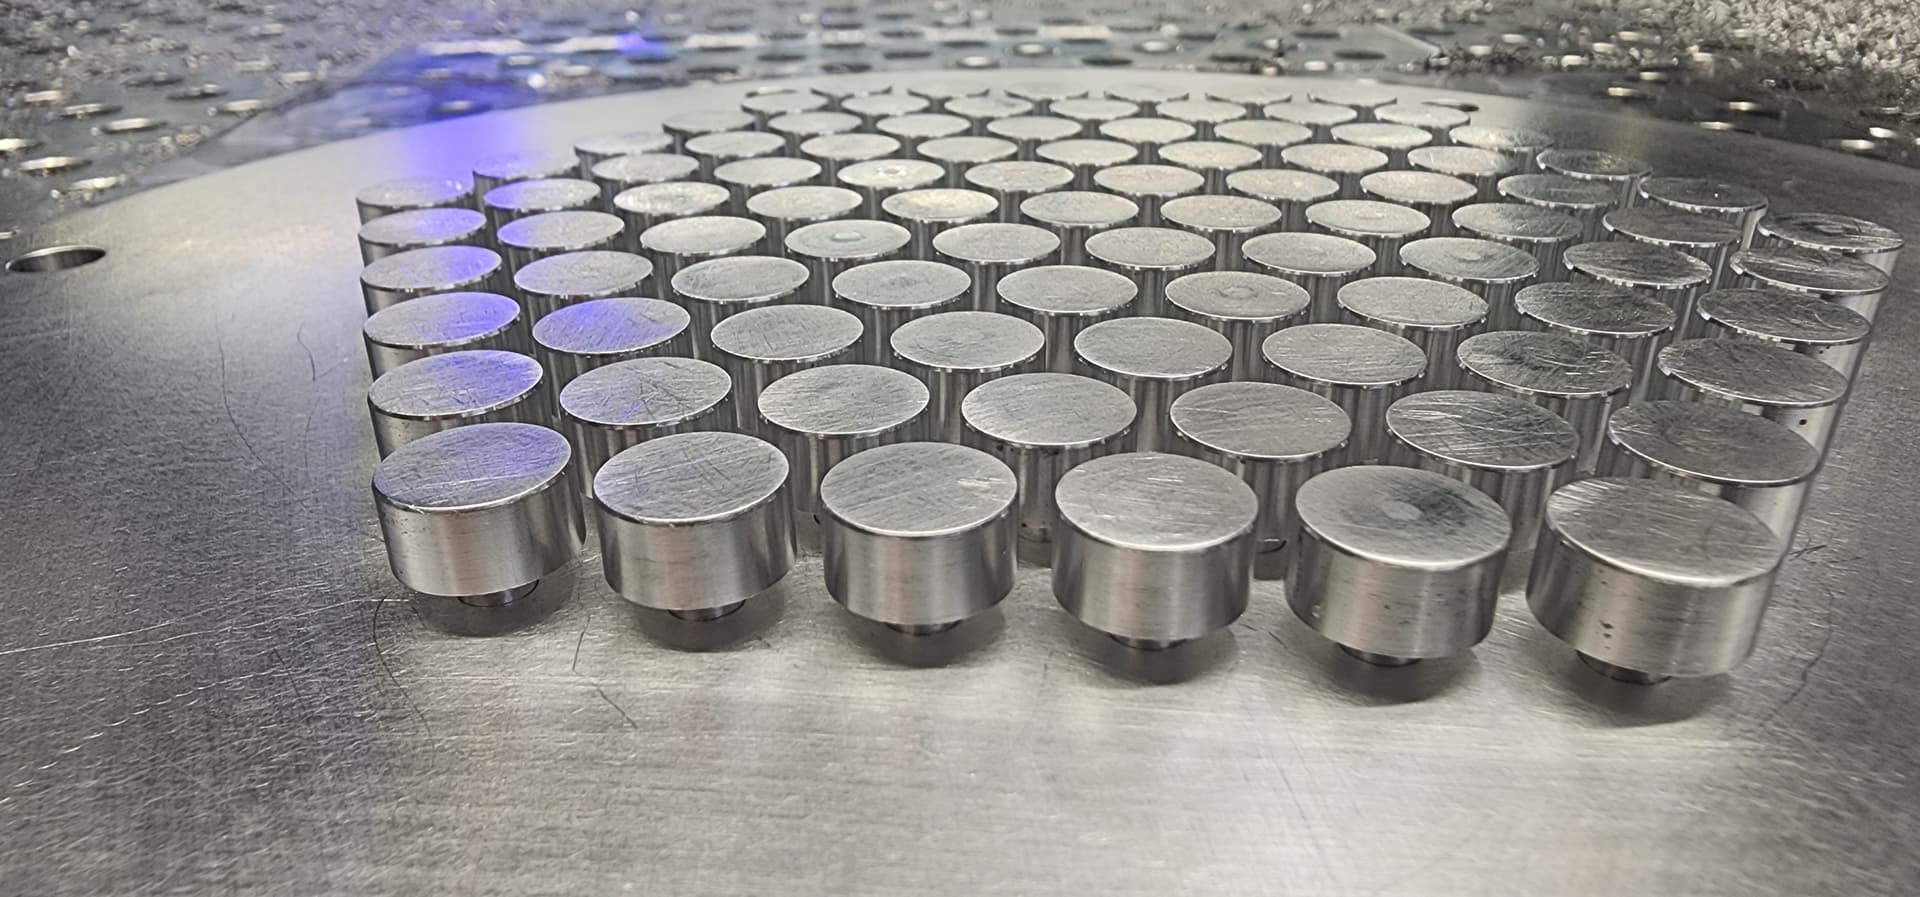
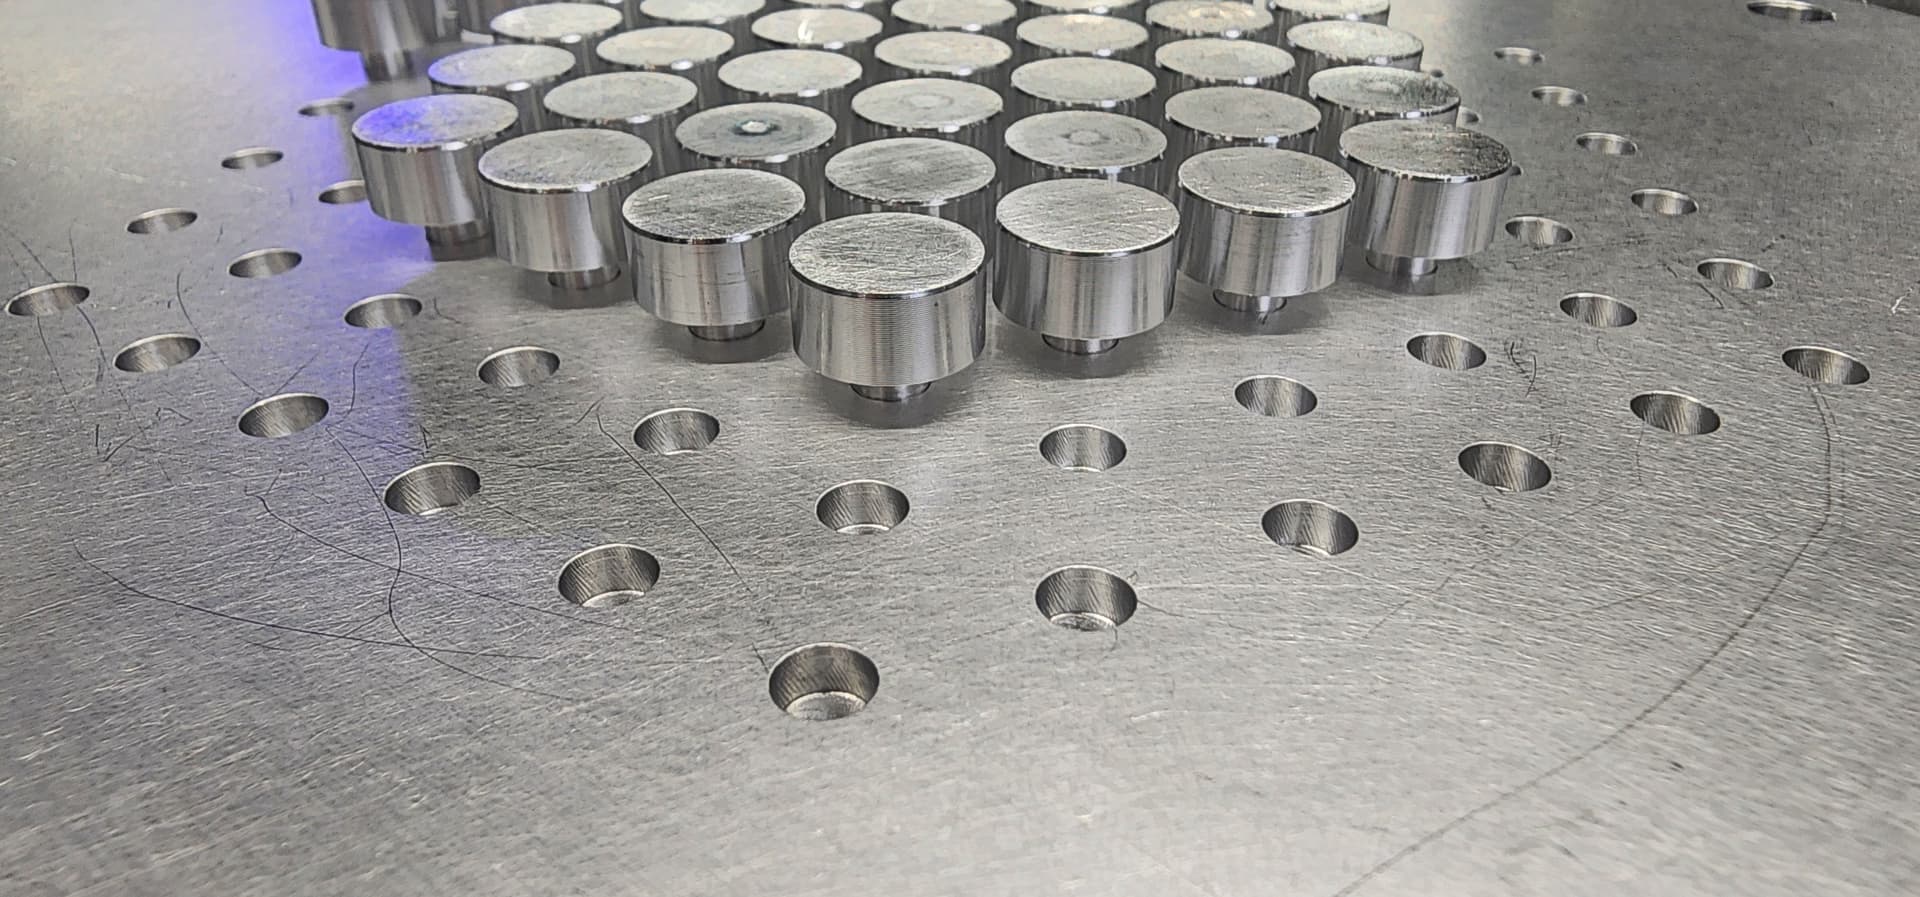
Building a 8020 desk and need to attach leveling feet to the base. The issue I had was in order to place different sections up against each other, the feet have to be smaller then the extrusion width, 1.5" I am using. Could not find any quality metal cup feet this small, and decided to make my own.
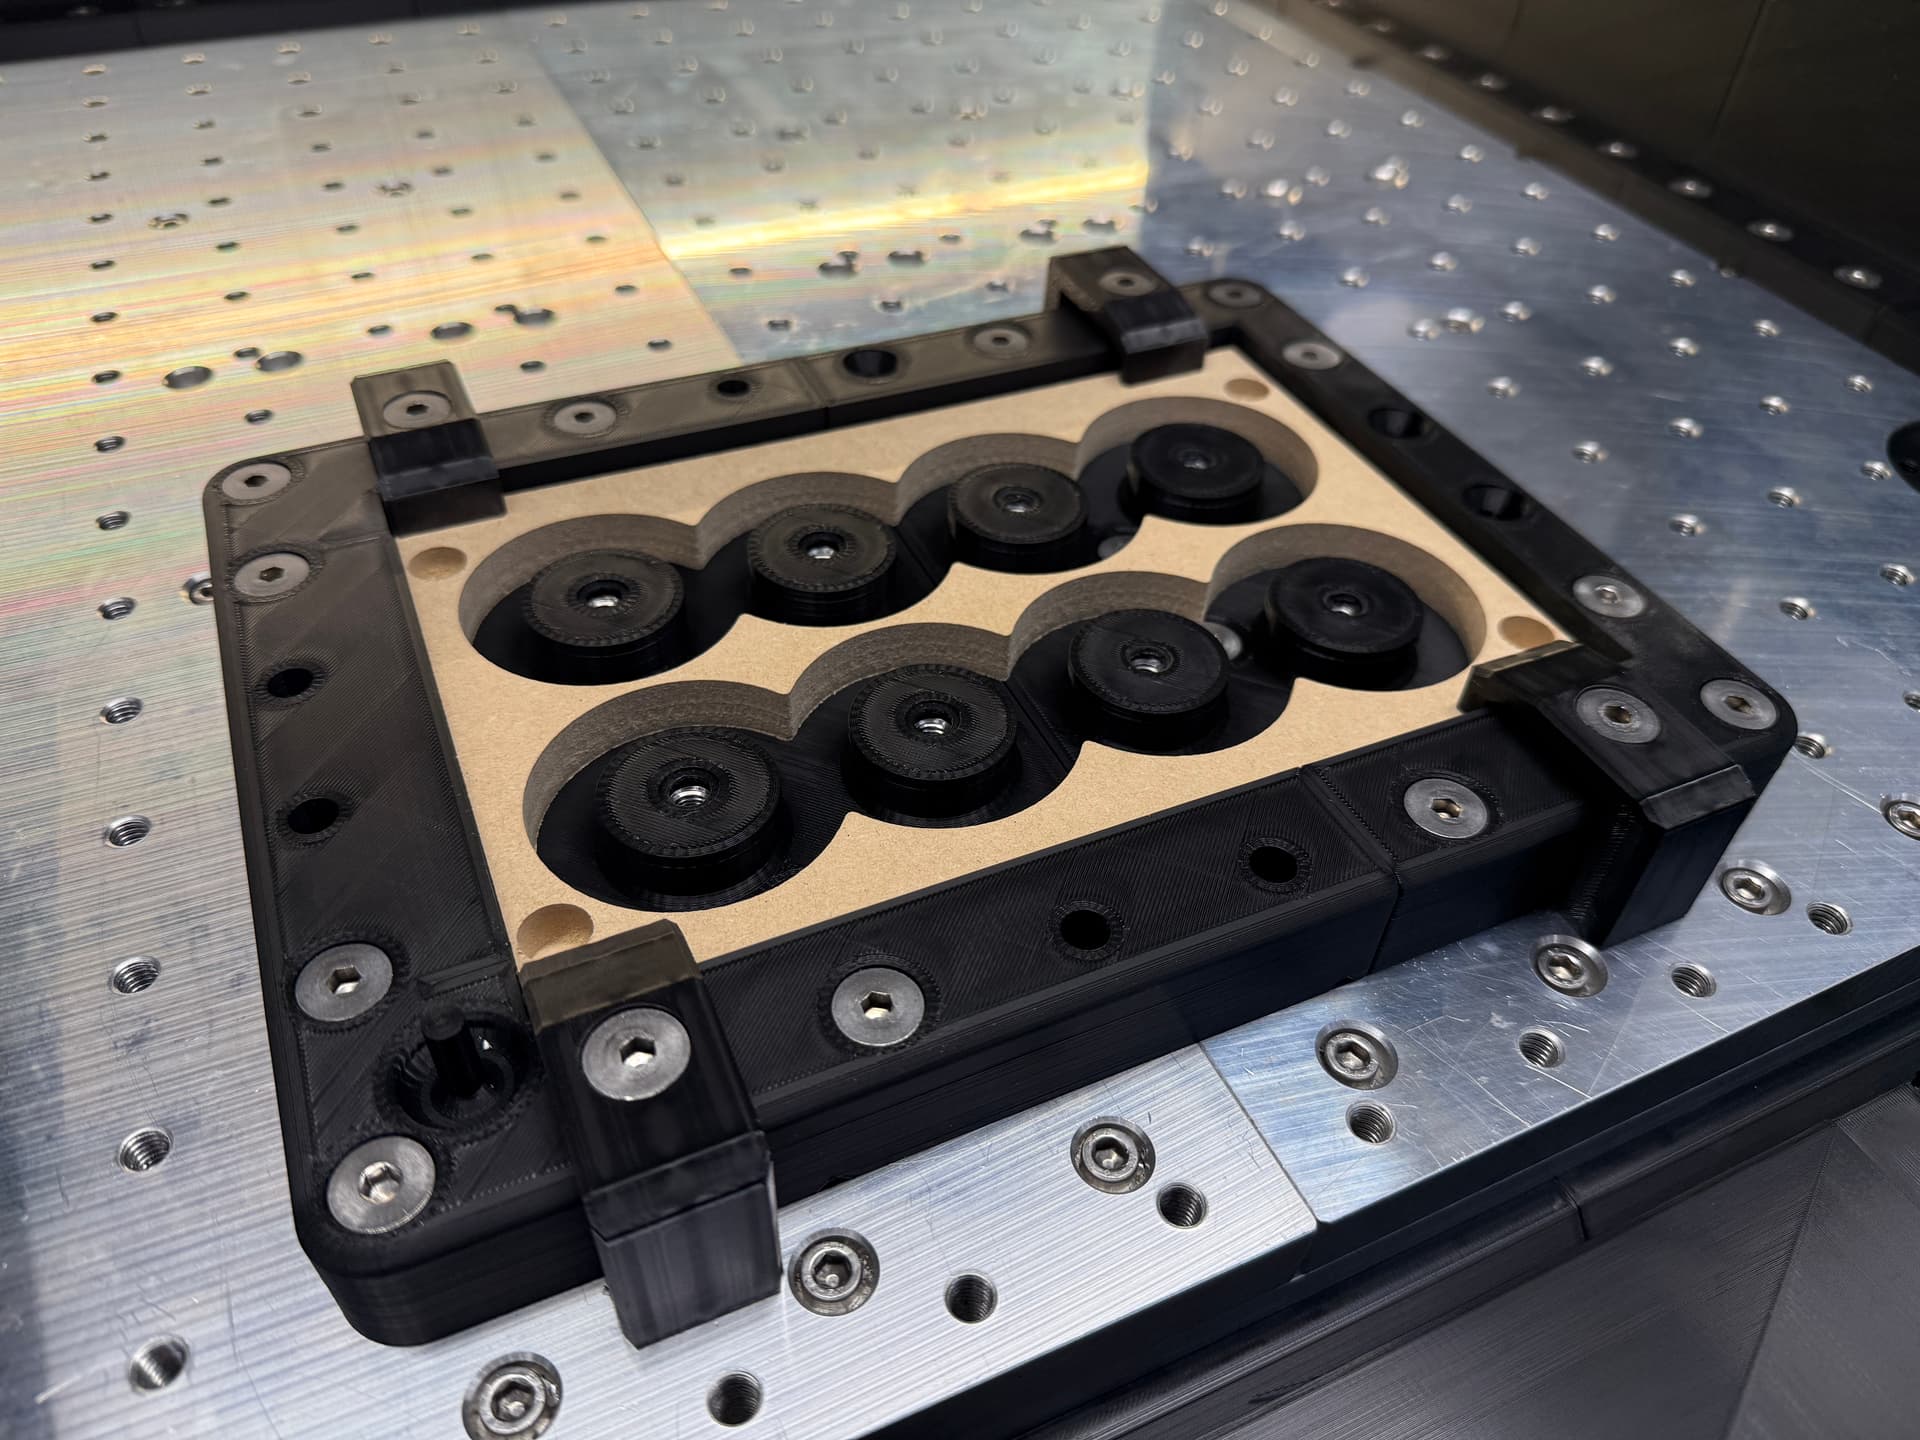
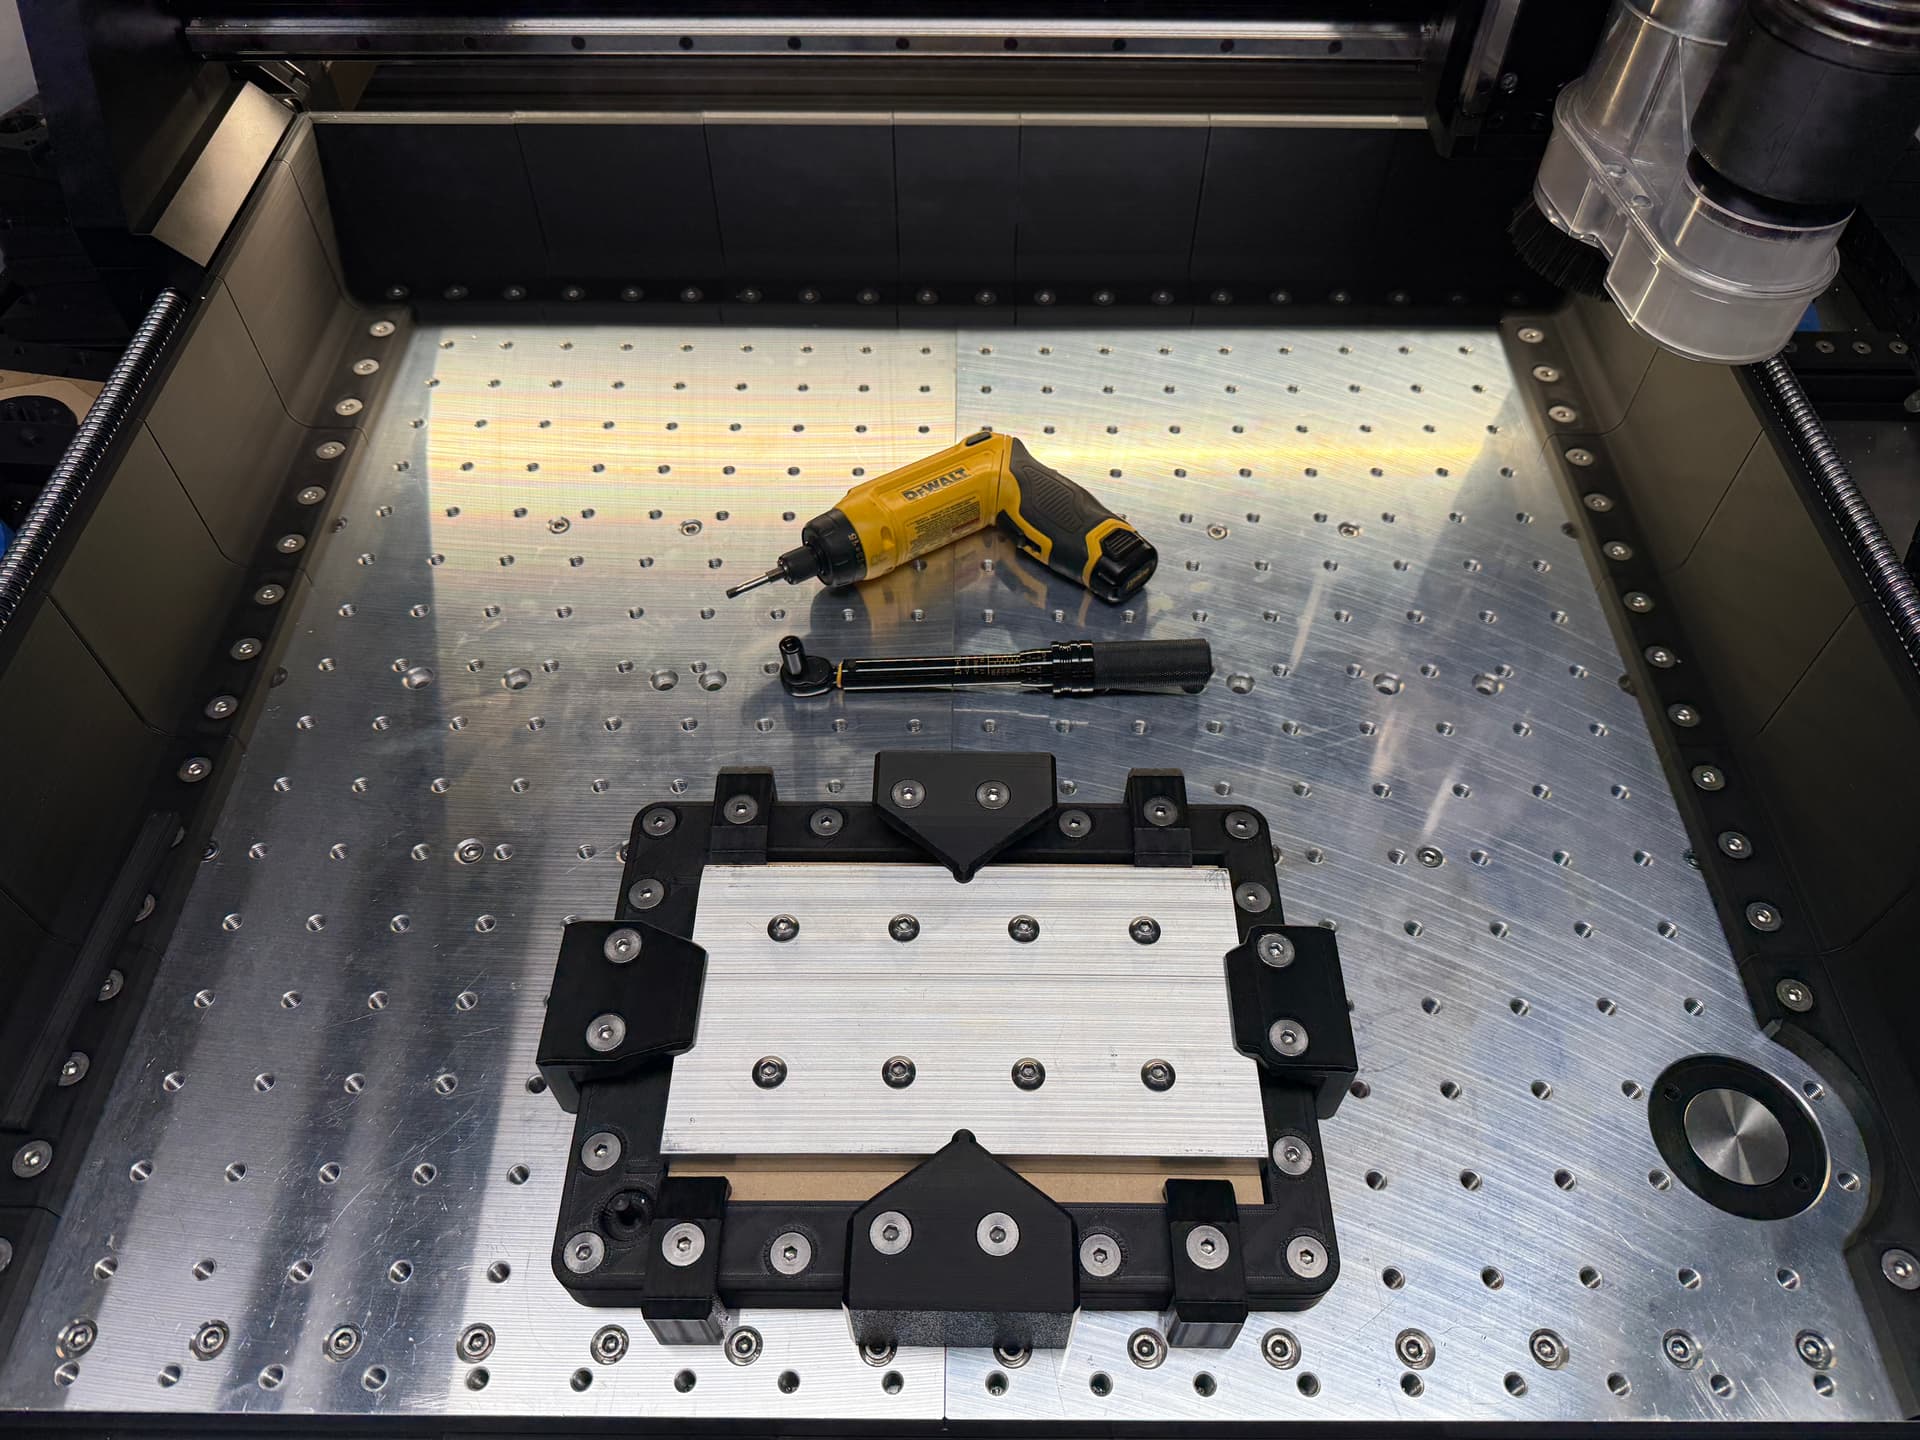
This required a 2 sided operation, I have designed some fixtures like this before so a quick edit on a old model in Fusion 360 and I built a fixture for carving 8 at a time, using 3/4" thick 5" x 9" 6061. This fixture has embedded 3/8" square nuts in the posts, I am able to tighten a 5/6" button head till the wrench bends with no print failures, using 50 percent infill and honeycomb with 5 layers. One set of clamps hold the MDF for cutting pins, the other set holds the aluminum flat bar in place for the initial cut and then when flipped and pinned. This way the smaller clamps keep the MDF in place when the aluminum is removed.
The feet use 3/8"x16 316 Stainless bolts with ARP washers and 12 point nuts. I 3D printed the base of the feet, they are snug enough to slide on and off with some force, but wont fall out.
Wanted to point out a few things I have learned. These 2 sided operations really rely on precise location using pins. I used to struggle cutting test holes in whatever material I was using for my 1/2" steel pins, trying to get a perfect fit. A loose pin fit always end up with a slight layer shift. I found that 3D printing locating pins to fit your holes is a much easier process then cutting your holes to fit your pins. you can make one side different from the other if you have to, dual size pins, just as long as they are a ultra tight fit with no wiggle to get perfect no layer mark, 2 sided carves.
Have to say my Bambu X1 printers are so precise and so fast, you can basically make a new set of pins if needed on the fly in 5 minutes.
I carved the top side down to .03 from the floor, just enough to keep it in one piece, so when I flip it and tighten the back side with the button heads, the aluminum flexes enough to make a strong enough clamp on the cup so when the floor is cut away they do not get loose.
Anyway, love the HDM! What a great machine. Doing .001 finishing passes with visible results. Machine polished with stunning surface finishes.

25 Likes
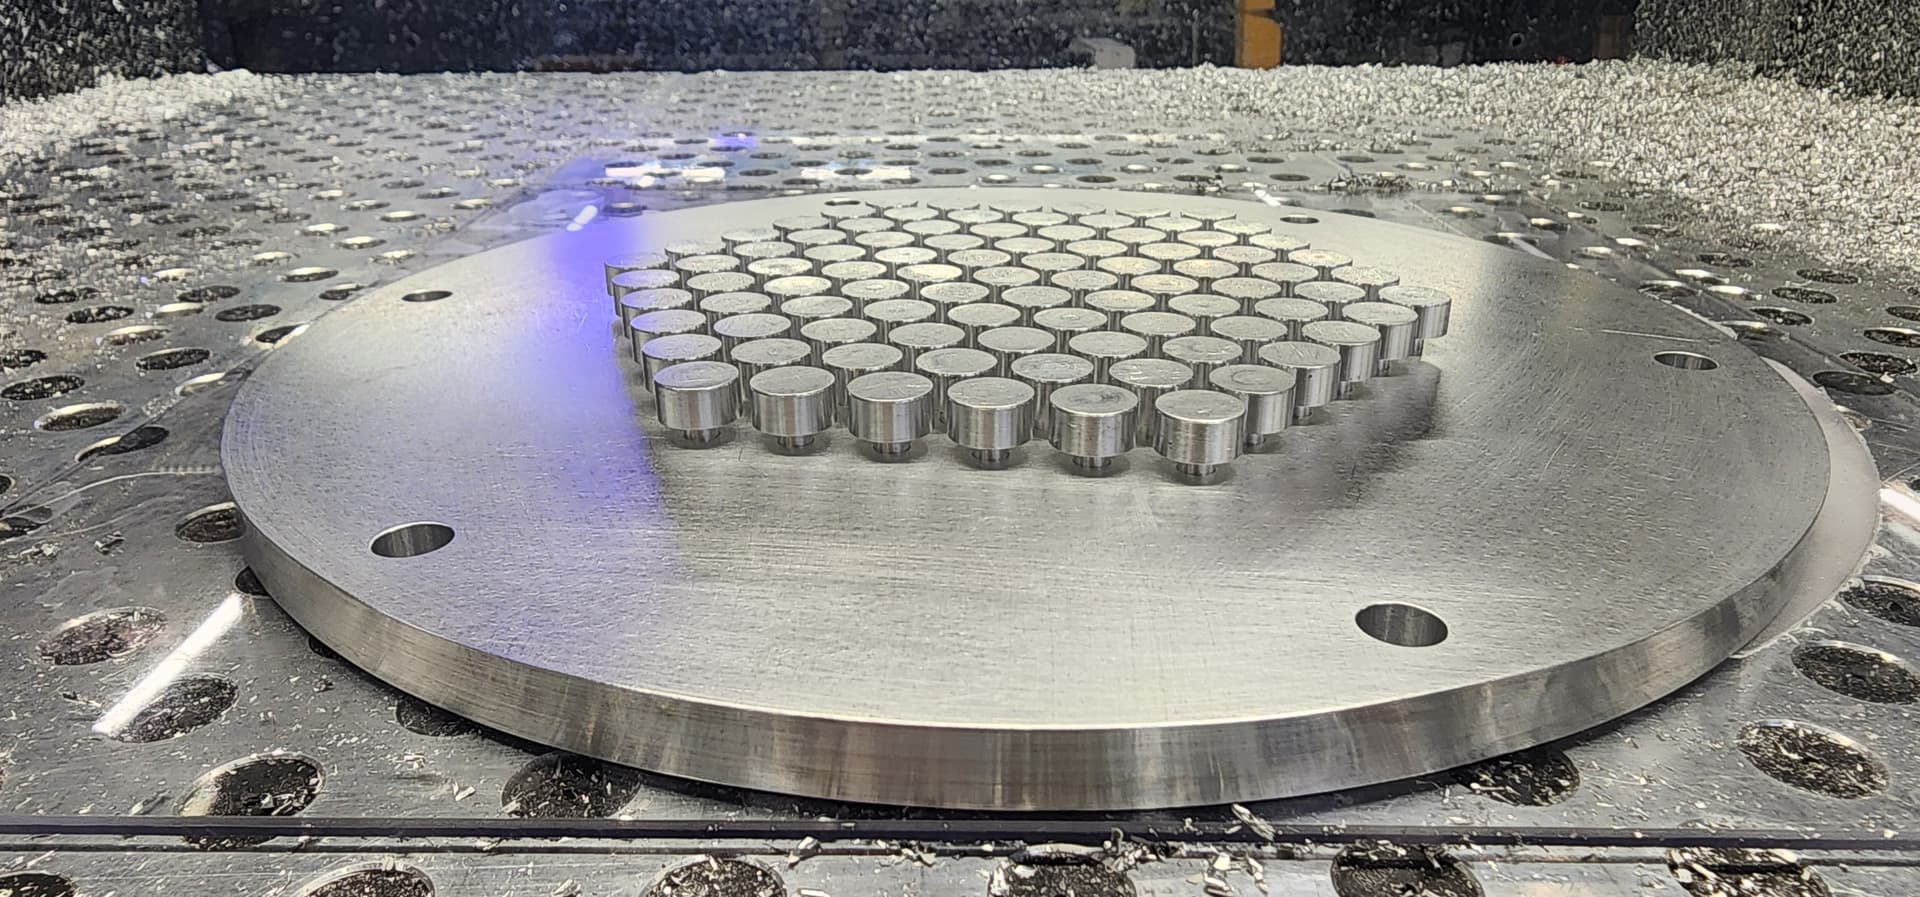
Latest project that used the HDM for a research project at the University I work at. It machined the 7000 series mic6 plate. The holes were within 0.0005" (0.12mm) of nominal and completely consistent. The pins were done on our Tormach turret lathe to the same tolerance. Then pressed into the plate holes with threadlocker.
20 Likes
Very nice looking work, Josh. .0005" is .013mm though–don’t short yourself any decimal points! ![]()
What kind of theadlock did you use? Even the really thin Loctite 609 cylindrical bonder wants a .002" bond line. Or did you just let the locker squeeze out and surface-cure at the interface?
Edited… thanks for pointing that out. ![]()
They are a tight enough press-fit I had to use an arbor press to install them. So likely not enough for a good bond with the LocTite 242 we used. It was as much to fill any potential gaps as anything. The researchers were really concerned about the pins having a much contact as possible. They even computer modeled having LocTite in any gaps. I actually had to dial in how much I used and where I put it so it could even squeeze out at all and not having them sit taller due to hydraulic forces keeping them from bottoming out. ![]() I then rinsed any squeeze-out away with isopropyl alcohol.
I then rinsed any squeeze-out away with isopropyl alcohol.
2 Likes
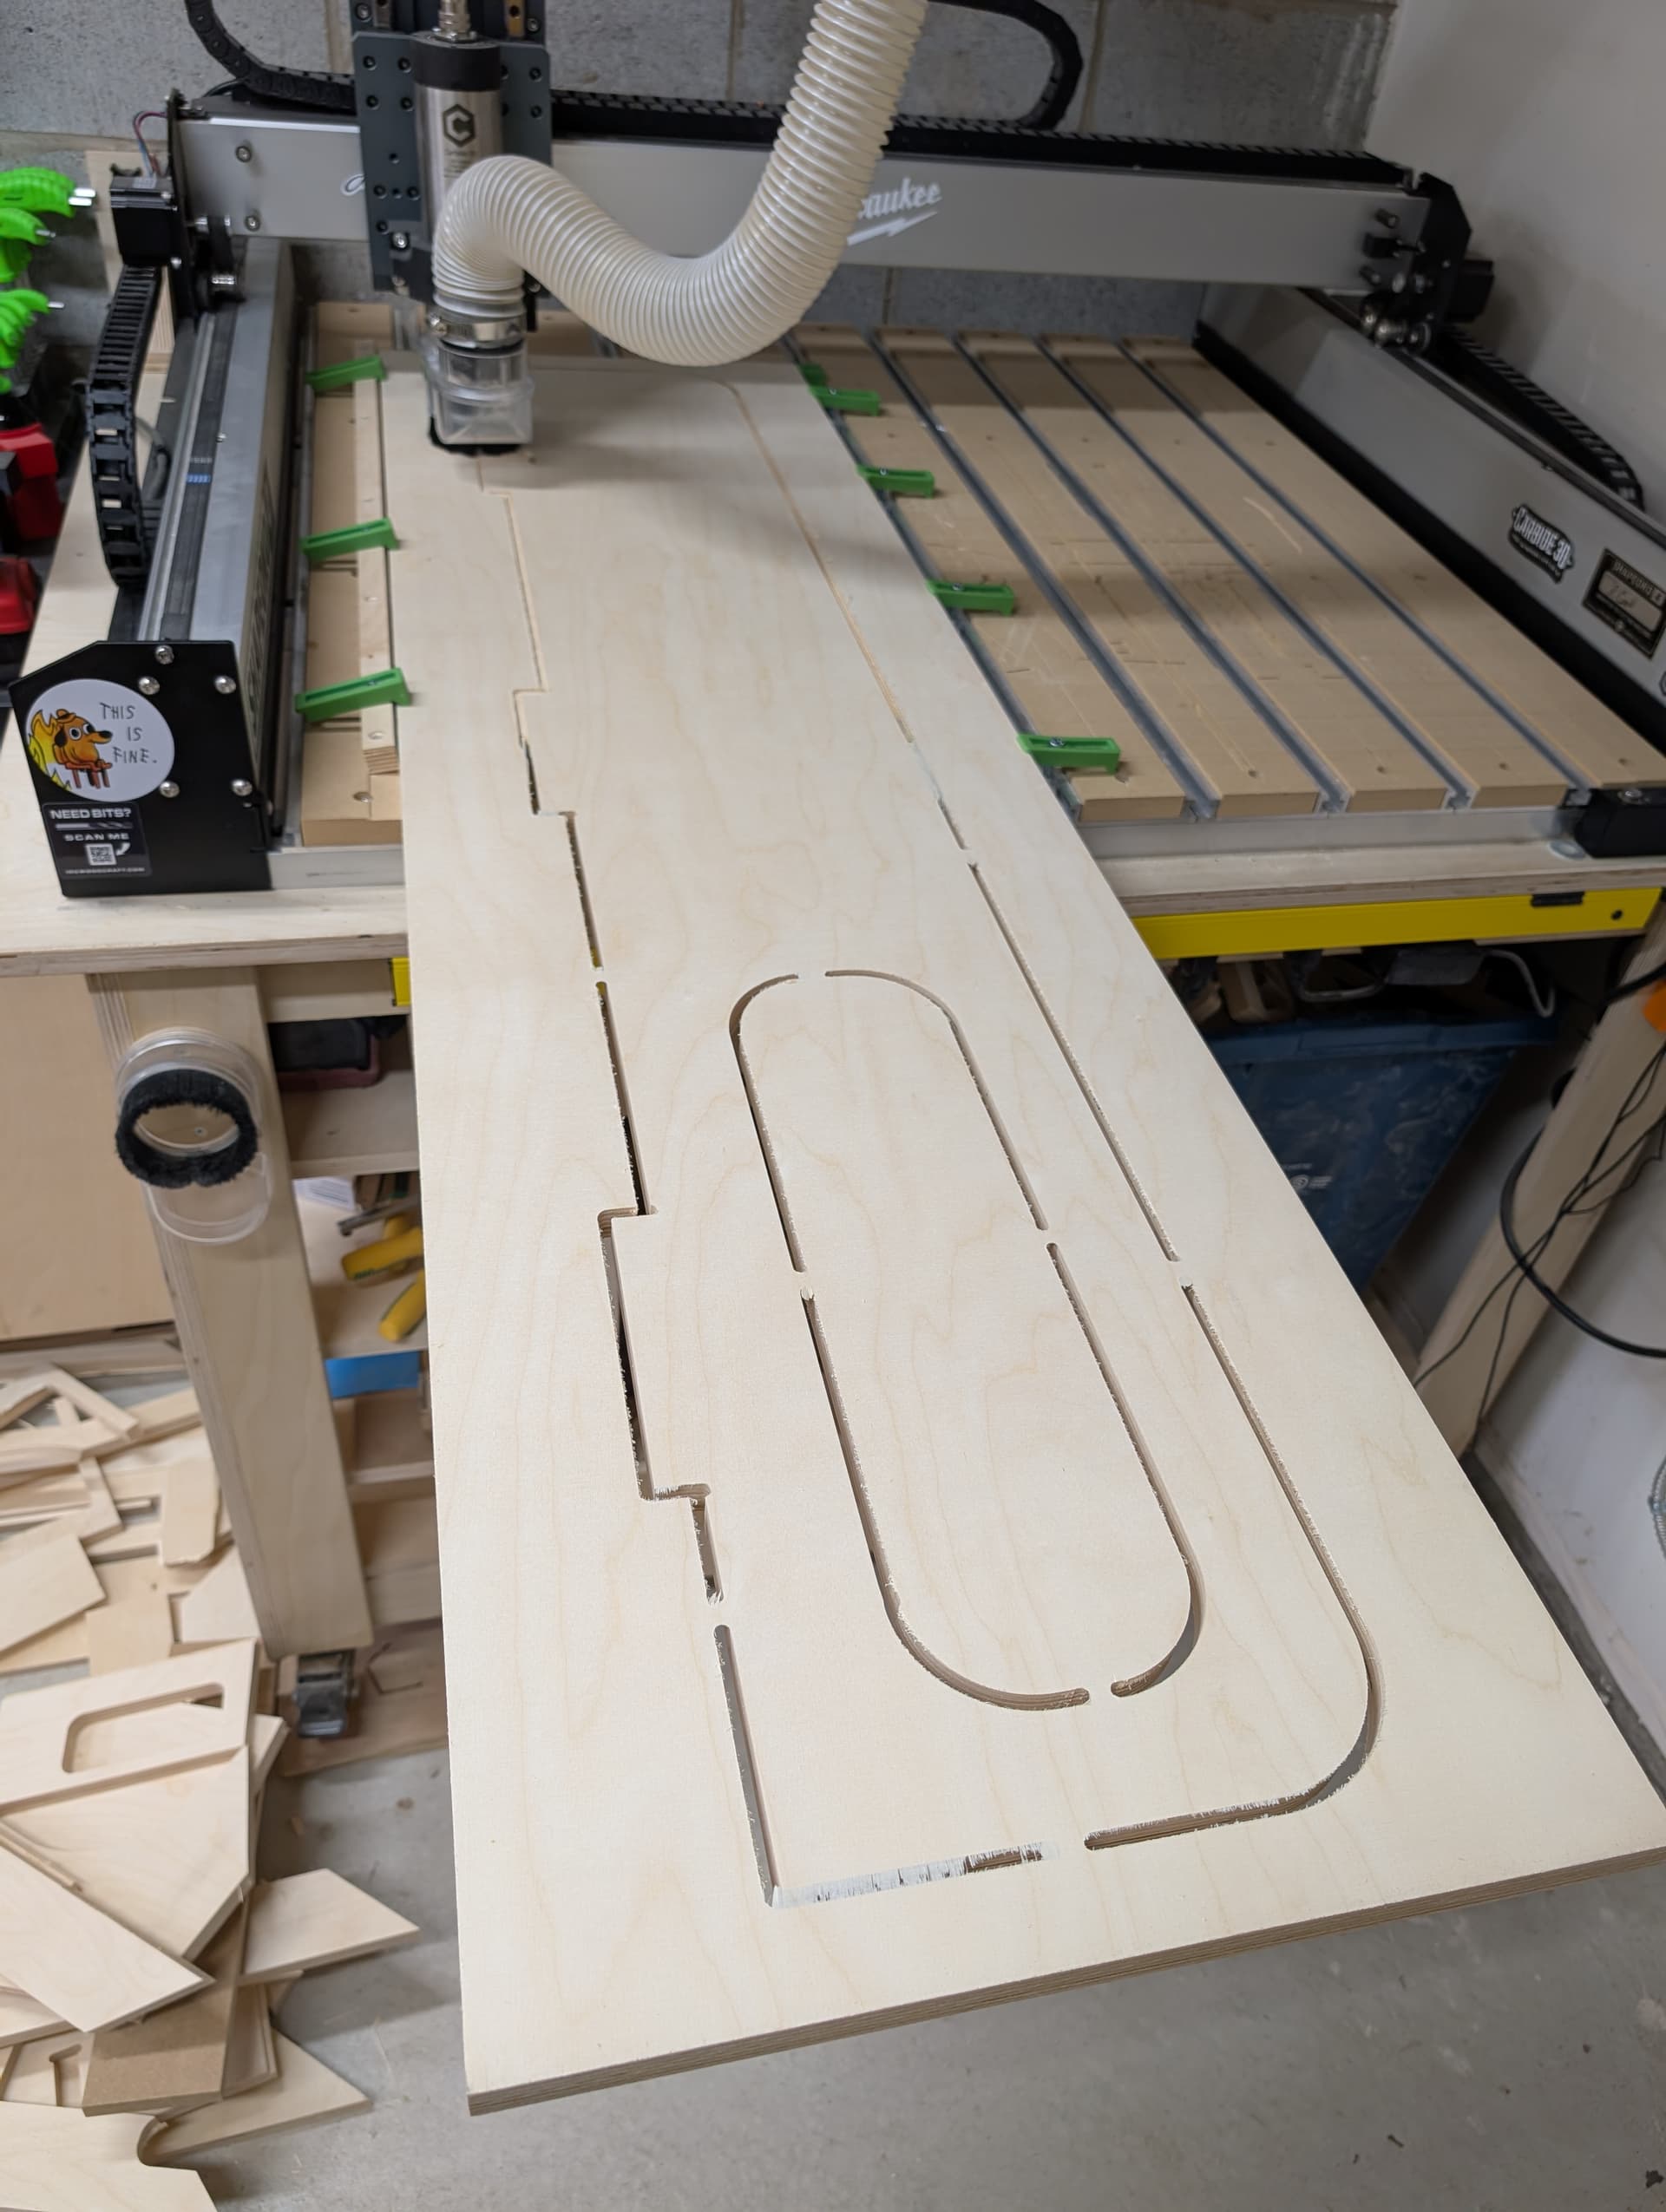
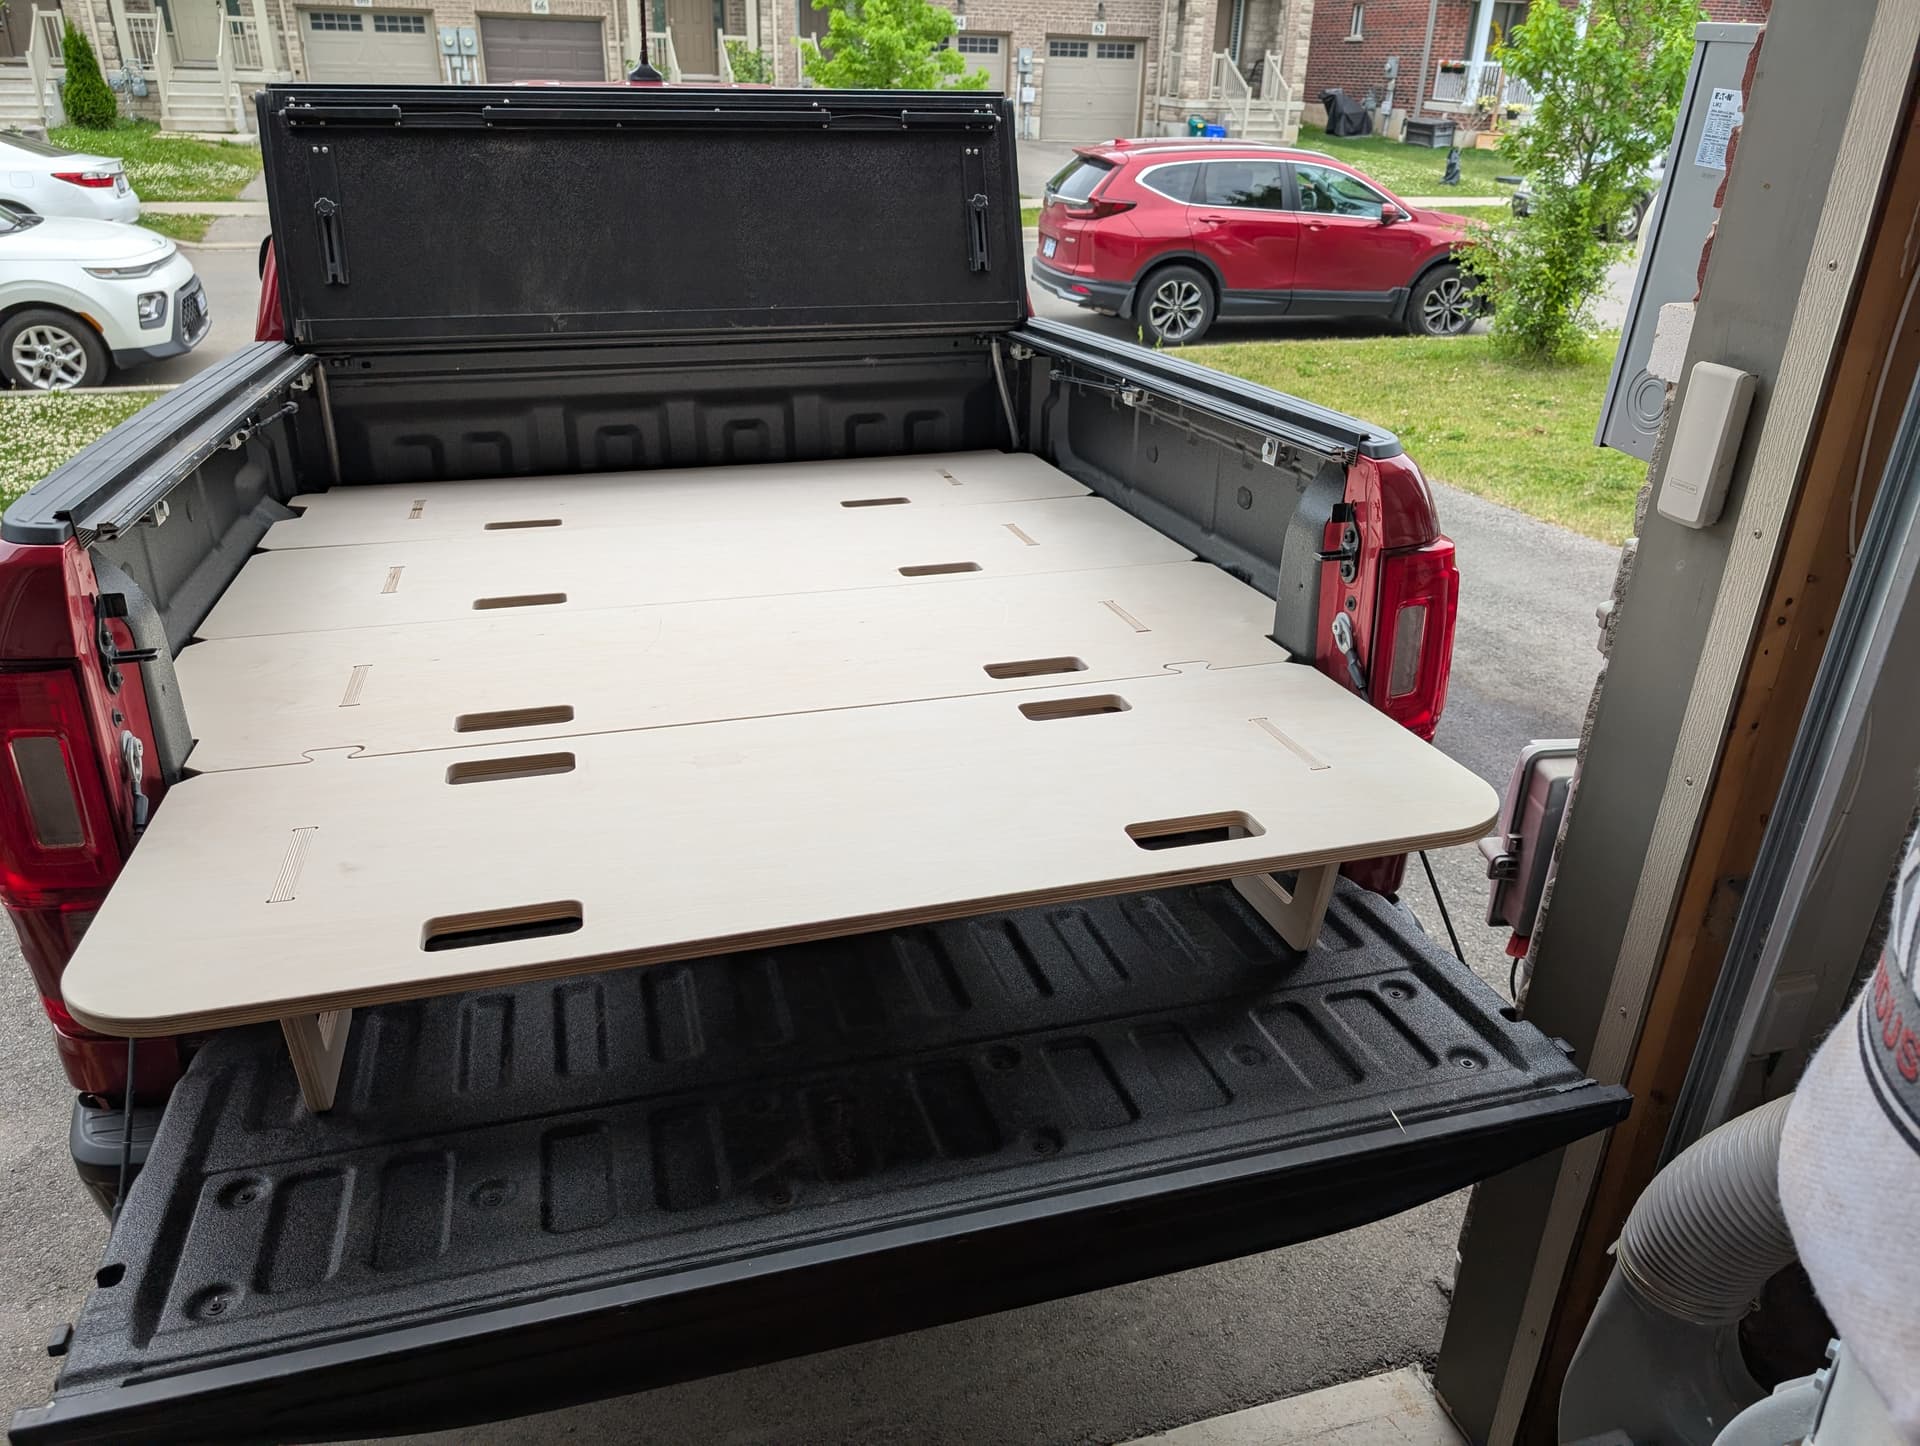
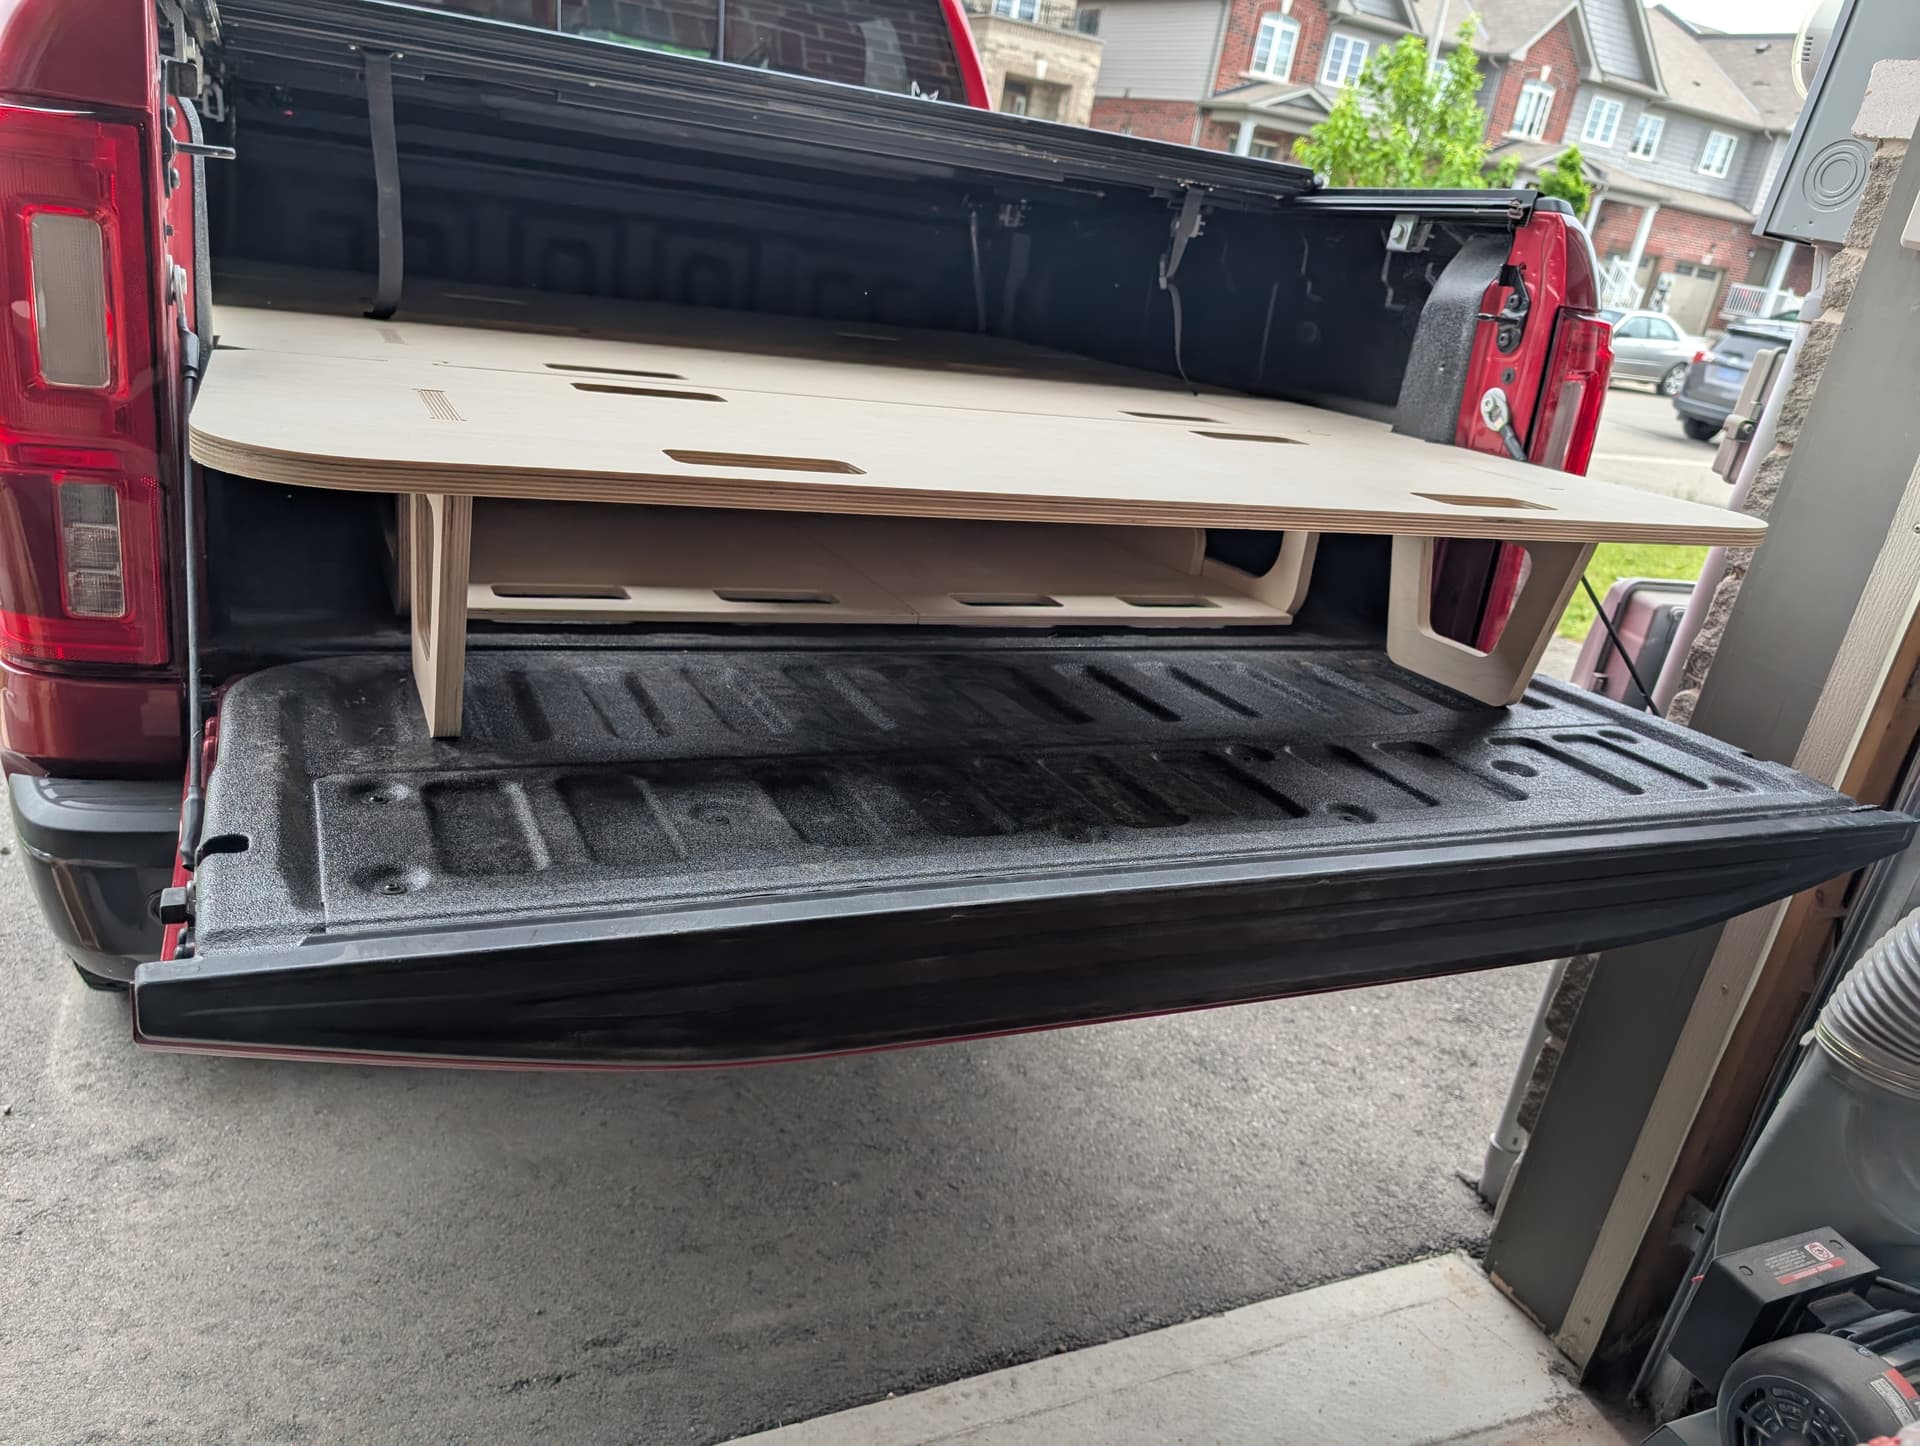
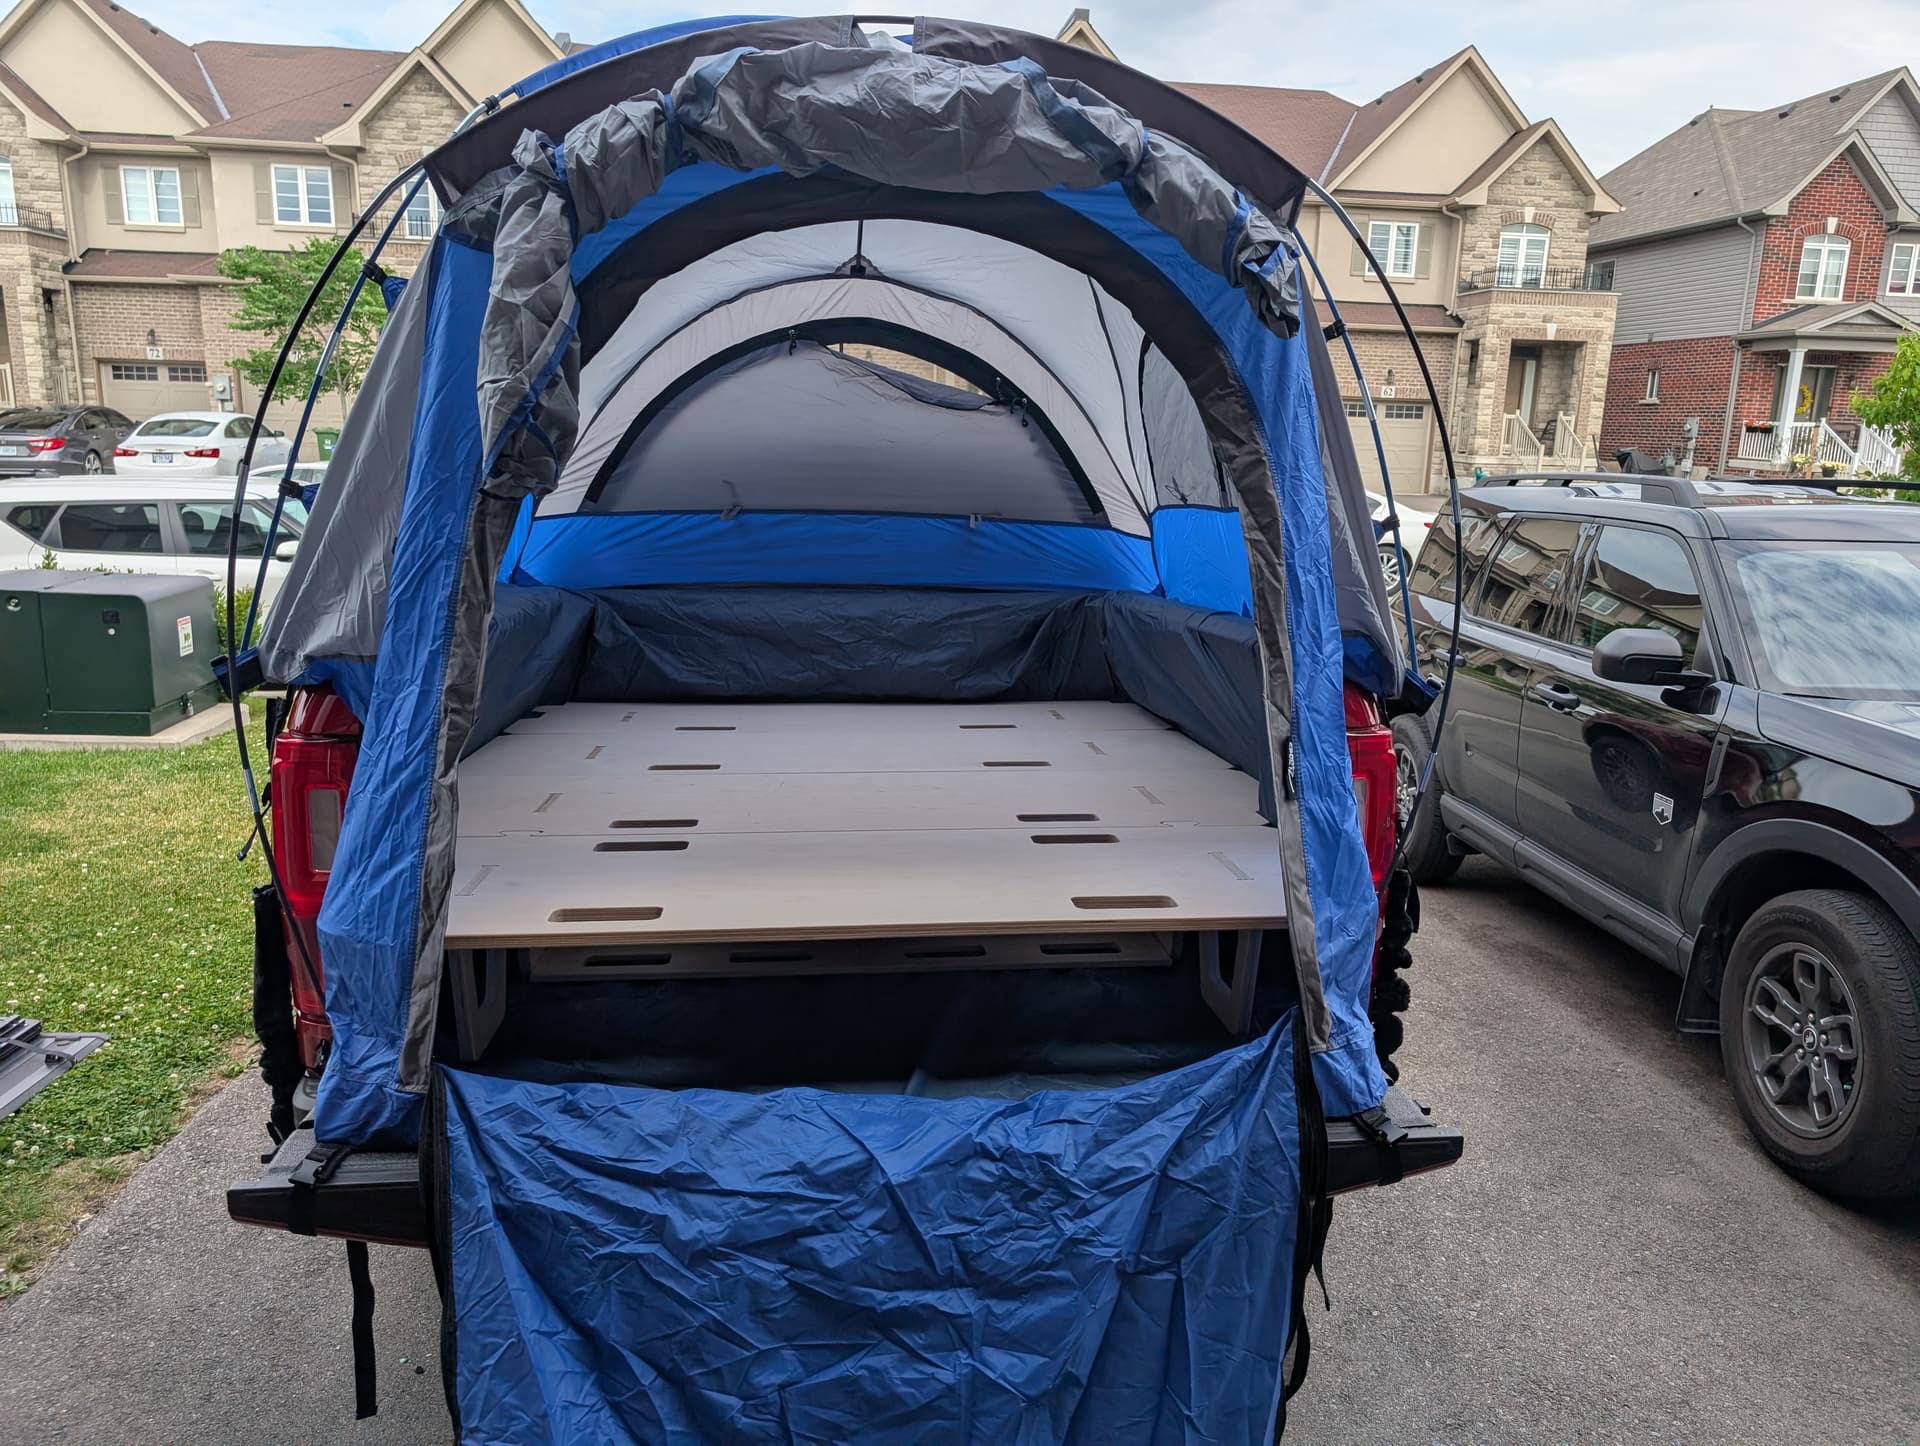
Made myself a sleeping platform to fit a double mattress in my truck tent with pull out storage. It flat packs for easy in/out, no hardware or tools required. I 100% copied a design from a company that makes these in the US, but to have it shipped here to Canada would cost me around 1700 landed. So I cloned it and fit it to my truck. All Baltic Birch, very rigid, easily supports far more than the truck’s payload. I have less than 400 CAD invested.
21 Likes
That thing is sick, nice job ![]()
The 400 dollars comment made me chuckle. Statements like that always lead to a clarification with friends and family along the lines of “I can do it for $400, if you want to do it you’ll also need a couple thousand in infrastructure and a decent bit of experience under your belt.” ![]()
4 Likes
You’re only saving money doing it yourself if you’ve already lost money getting ready to do it.
6 Likes
My wife got me the Oneida dust deputy with clear bucket for Father’s Day. When replacing the HF cyclone and Lowe’s bucket I had it on I realized that I had the input and output hoses reversed on the cyclone. I’m sure it wasn’t that way when I set it up not sure how long it was that way. Still worked pretty well.
I resisted paying for the Oneida clear bucket but now that I have it I really like it. Not o my can you see through it but it’s crush “proof”.
My most recent project was cutting the ubiquitous welcome sign to put in front of our AirBNB. It was in material that was already primed. It was interesting to see the various strata lines in the dust in the bucket. It was a tiling job so white on the bottom then natural and then white and natural again for the second tile. I was surprised how much the bucket filled from this one job.
5 Likes
I’m always amazed to travel back in time when dumping the dust collector bin……You can name the projects by layers of different material.
4 Likes
That sounds like a microwave-related thing. I’m dealing with the same kind of thing on one project at work. Tiny dielectric thicknesses can alter microwave resonant frequencies etc. etc. Yeah, and even having air-release grooves would affect things…
Are you sure you added the zero on the right measurement…?
2 Likes
I think I added two. ![]() should be half a thou.
should be half a thou.
I agree with you about the layers. Recently I planned a lot of maple flooring that came from a gym that was built in 1925. I filled up my Onieda cyclone and it when it fills up it starts filling up my Jet dust collector bag. I filled up the Onieda bucket and then filled up my dust collector bag in short order. Plus I had some dark layers in there as well. Your dust collector is a time machine log of sorts.
2 Likes
I finally got around to cutting the rivet holes for this picture frame.
The couple in the photo do a great job painting old London clay roof tiles. Unfortunately for them the wind blew over their display stand and a couple were broken. I bought a complete one and they let me have this broken one which I have just mended using the Japanese “Kintsugi” technique.
The picture and frame is a thankyou gift.

14 Likes
That is some beautiful wood!!
2 Likes
Nice carpentry, the grain in the wood is fantastic!
1 Like
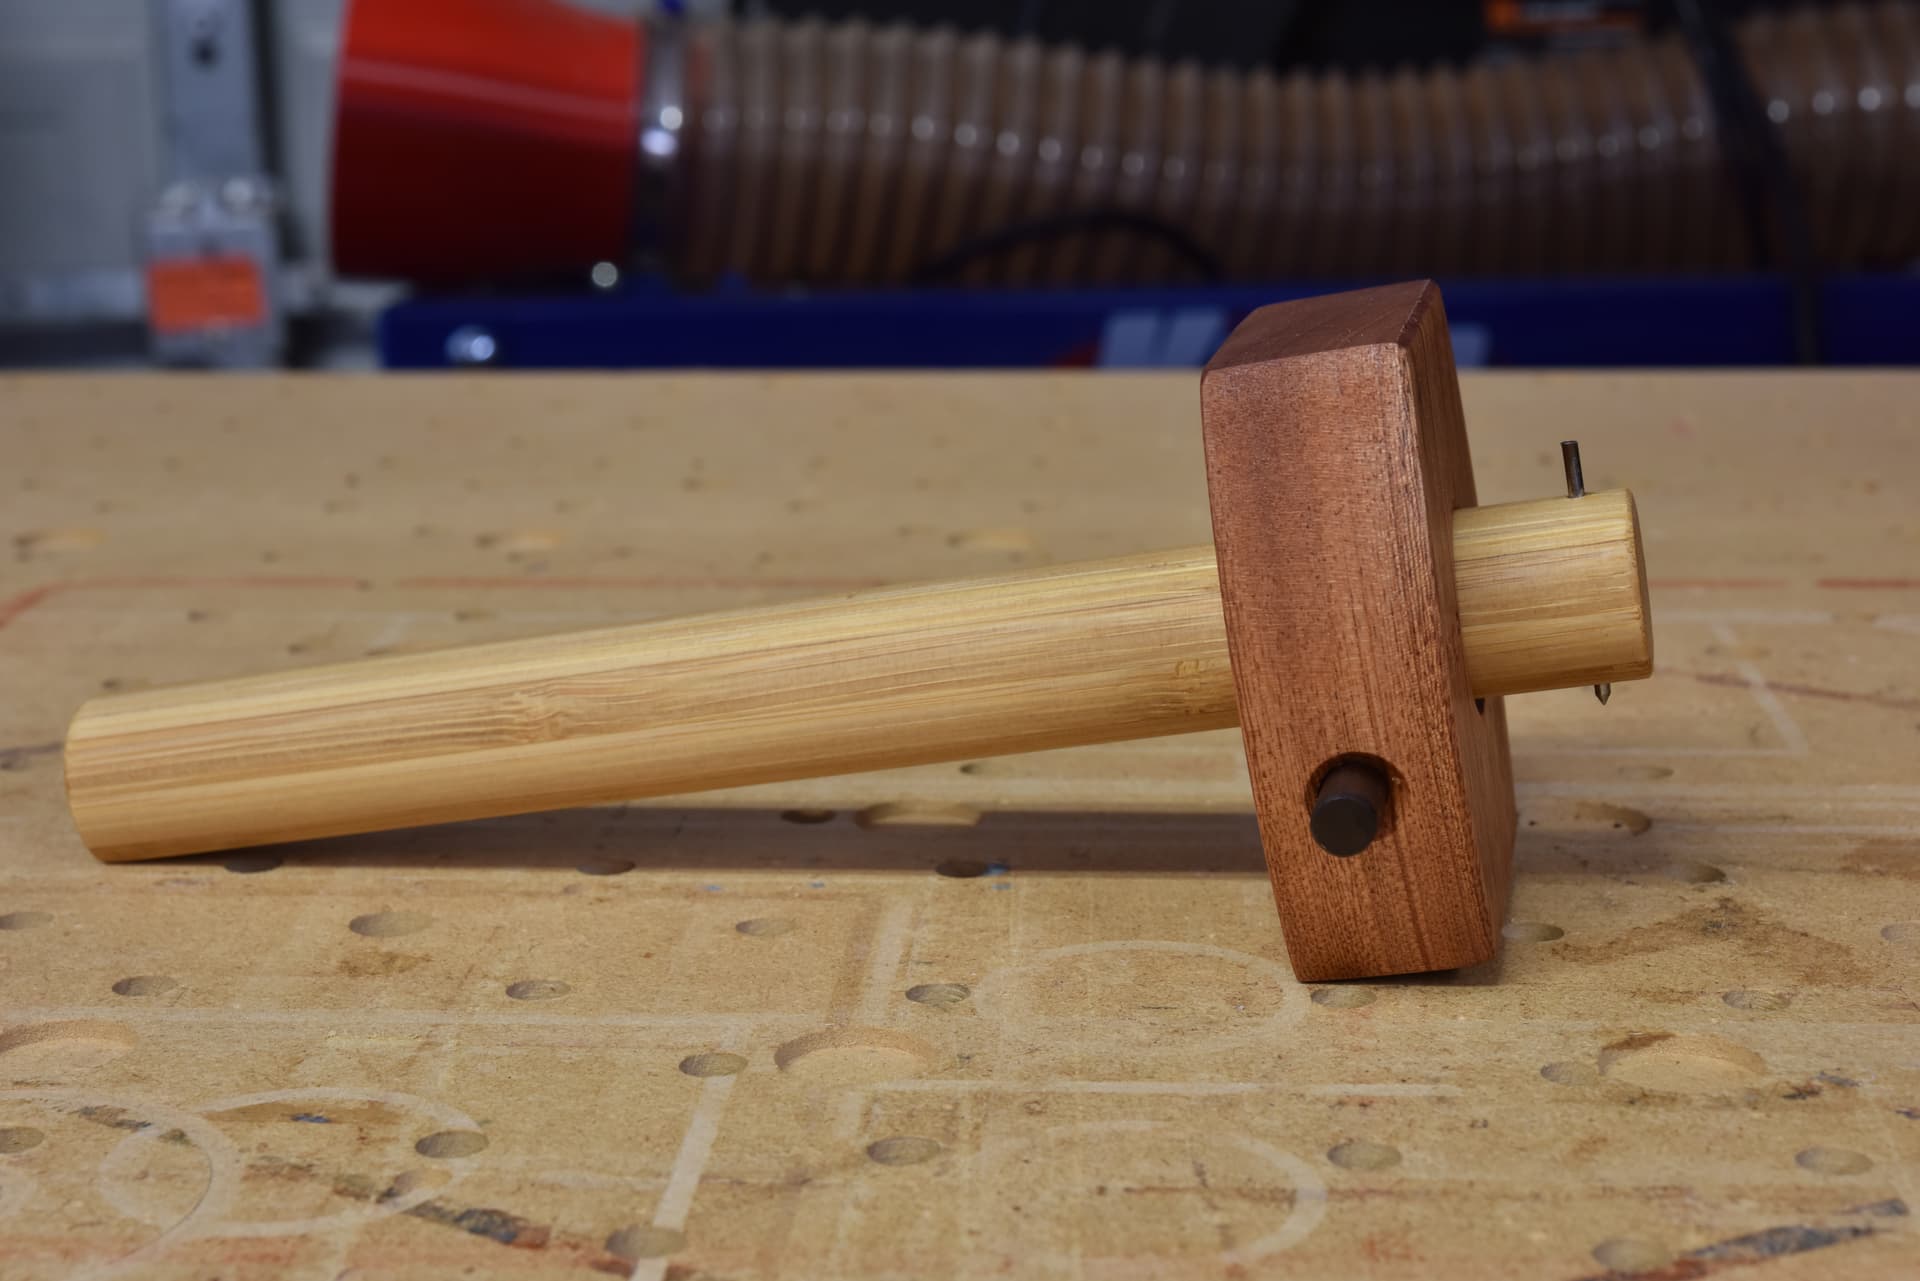
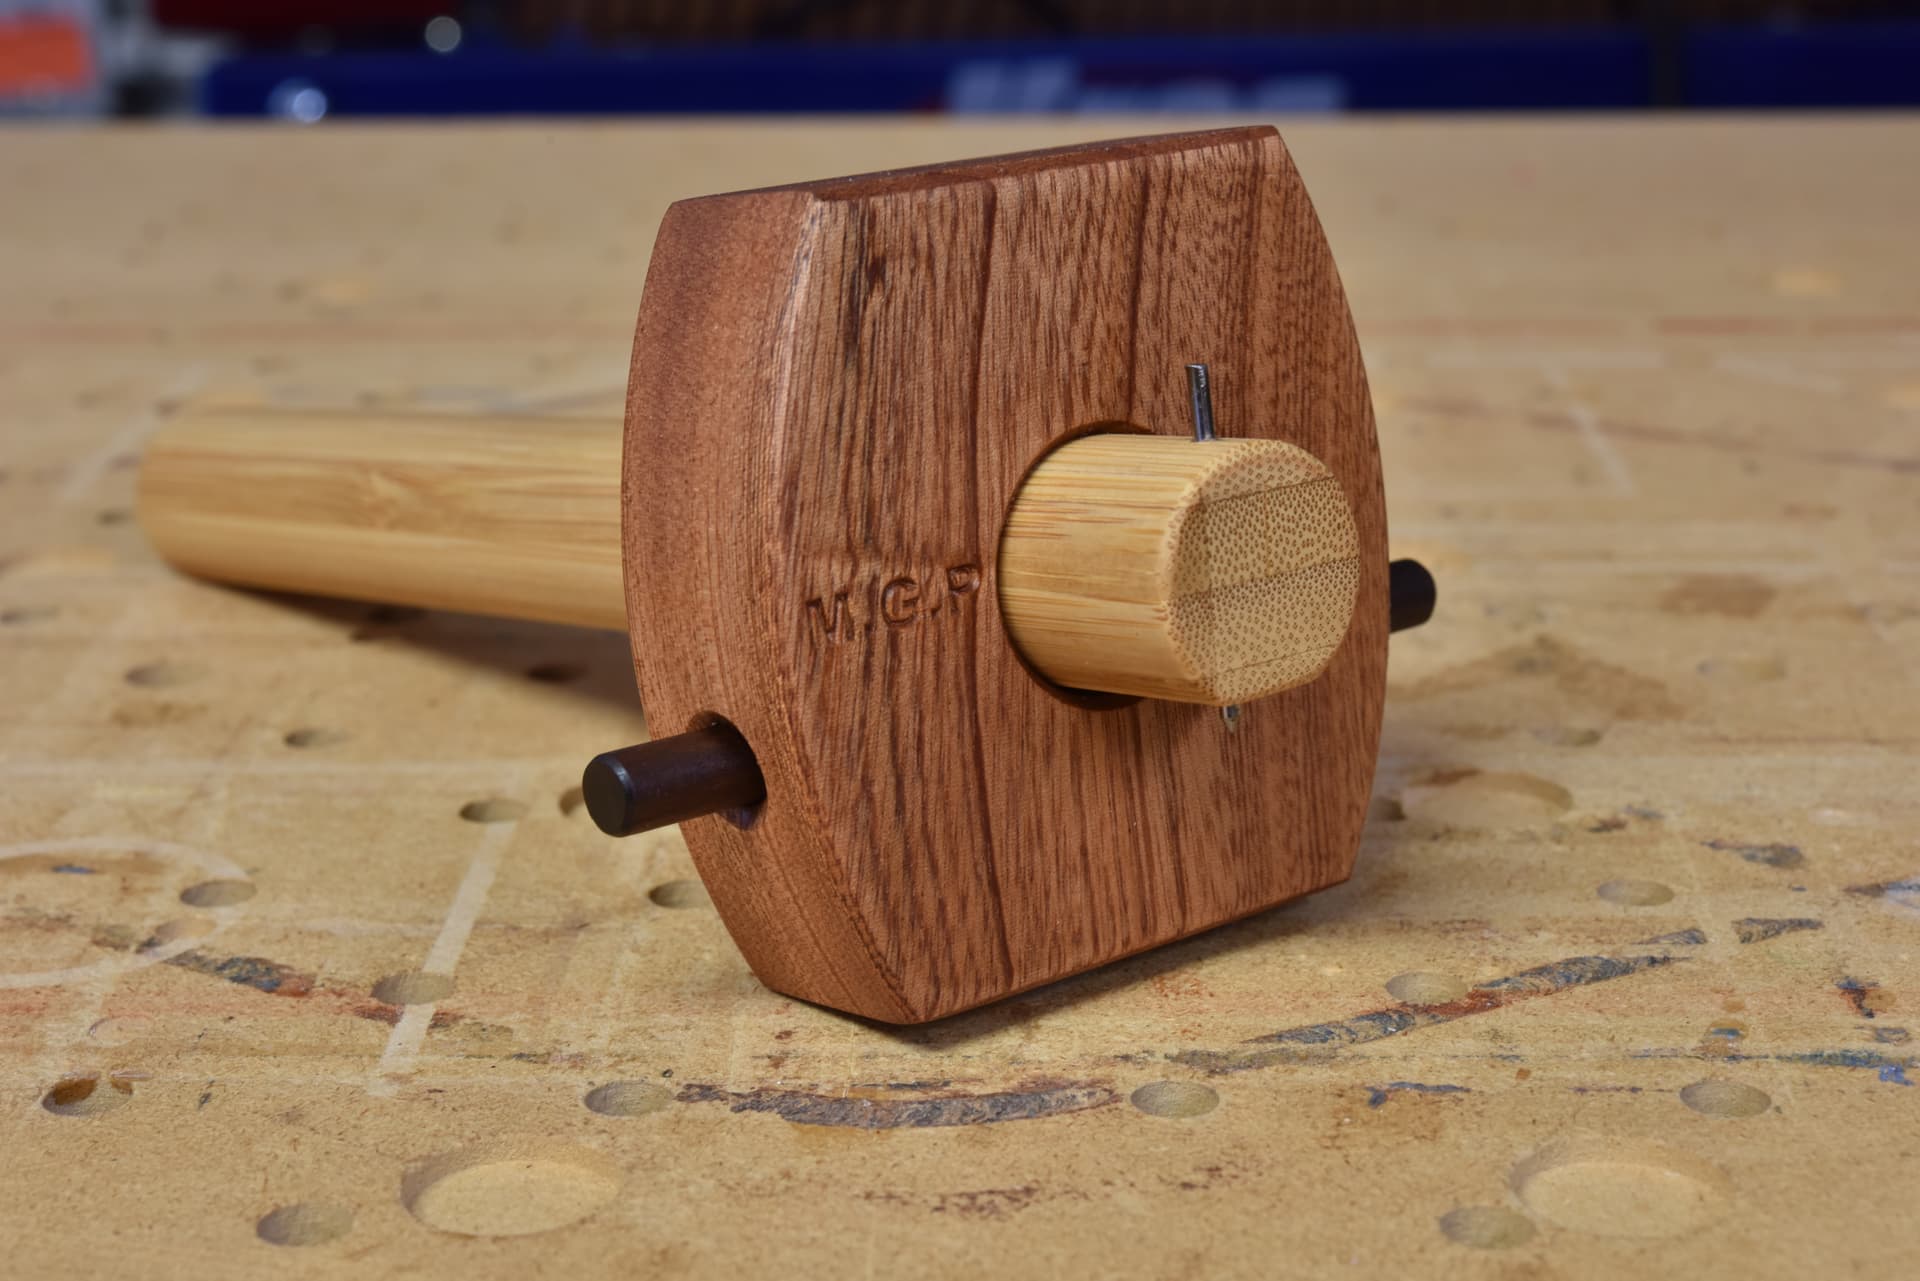
Made a traditional wooden marking gauge that works better than pretty much anything you can buy. I have one of those brass ones with the round cutter and it works great for some things, but the traditional style is better for some applications. The inspiration came from Paul Sellers and Rex Krueger, both of which have instructional videos on how to make them. The Rex Krueger version is the closest to mine, so I recommend you watch his video to show how to finish it and how it works. Instead of a nail, I used a piece of 2mm stainless rod sharpened on my bench grinder and the hole cut in the dowel with a 1.8mm drill bit for a snug hammered in fit instead of the way Rex did it. The base is made from a 1" thick piece of sapele. The large dowel is made from a 1"x12" bamboo dowel cut down to 8.5". I particularly like how easy it was to plane the bamboo and it’s very stable, but any 1" dowel will work. The small dowel is a piece of 8mm walnut dowel. I cut the base piece large enough to make two of them.
The first challenge and order of business was to drill a 8mm hole through the thing lengthwise. Since I was doing two at once I didn’t have an 8mm drill bit long enough, but I did have a 6" 1/4" drill bit which wasn’t long enough either, but established a pilot hole I used to finish with the 8mm bit once everything was cut. You want to drill the center of this hole as close to 1" from the bottom as you can and in the center of the width of the base material. A 6" drill bit will go all the way through the first one and mostly through the 2nd. I did this on my drill press as it needs to be drilled straight through, but I had to use a hand drill to finish as my drill press doesn’t have enough throw to utilize a 6" drill bit. This would all be easier if you just do one at a time, but the CNC part makes it easy to do two at once.
For the large dowel I made some test cuts for the hole to make sure the dowel slides in and out easily. Since the finished bases are 78x78mm, the hole goes exactly in the center for each one.
The first machining operation was to use an 8mm up cut bit to level and smooth the surface in a raster pattern with the grain. This part was completely optional, but I love this bit as it produces a very smooth surface and works great as a surfacing bit for small pieces.
I used a 90 degree V bit to chamfer everything on the top side and carve my initials into the piece, which is somewhat traditional. The rest is cut out with a 1/4" down cut bit.
I finished this as Rex describes by hand planing one side of the large dowel flat, installing the pin, and using a chisel to carve the indention in the small dowel. I suggest planing until the flat is about 1/2" wide which worked out pretty well. After that it was just a matter of adding chamfers to the other side with a block plane and some sandpaper, finish sanding everything, and applying a good coat of boiled linseed oil.
The file is provided if you have Vcarve Pro. If not the piece for the base I used is 164x78mm by about 1" thick. It would be easy enough to create the file from scratch as it’s just two 78x78mm blocks with a curve on two sides and a hole in the middle. As previously mentioned if you want to make just one at a time instead of two it makes the project a bit easier. It is nice to have two as you can set them to different measurements.
The thing works as well as Rex’s and it’s a pleasure to use. It offers a one handed operation all of the old Stanley and English versions lack so it’s much easier and faster to adjust precisely.
Marking gauge base Vcarve Pro 12.5.zip (98.7 KB)
14 Likes