Which end mill? that’s great, I was going to experiment a bit with this. I wonder how it changes with chunky cork vs finer grain cork.
This from Oliver Tool (formerly Drillman1) on eBay.
6 Likes
I second @Griff in his recommendation of drillman1 / Oliver tool company bits. I have purchased hundreds of bits from there and they are all good to go.
7 Likes
Finished up a gift for the holidays today, still drying. Cherry with maple inlay. Was my first inlay project which turned out much better fit than anticipated. Added some Laser work.
12 Likes
Mike - I was totally inspired by your example. Made for a good bday gift; I ran out of time to fancify [sic] the repurposed plastic though.
12 Likes
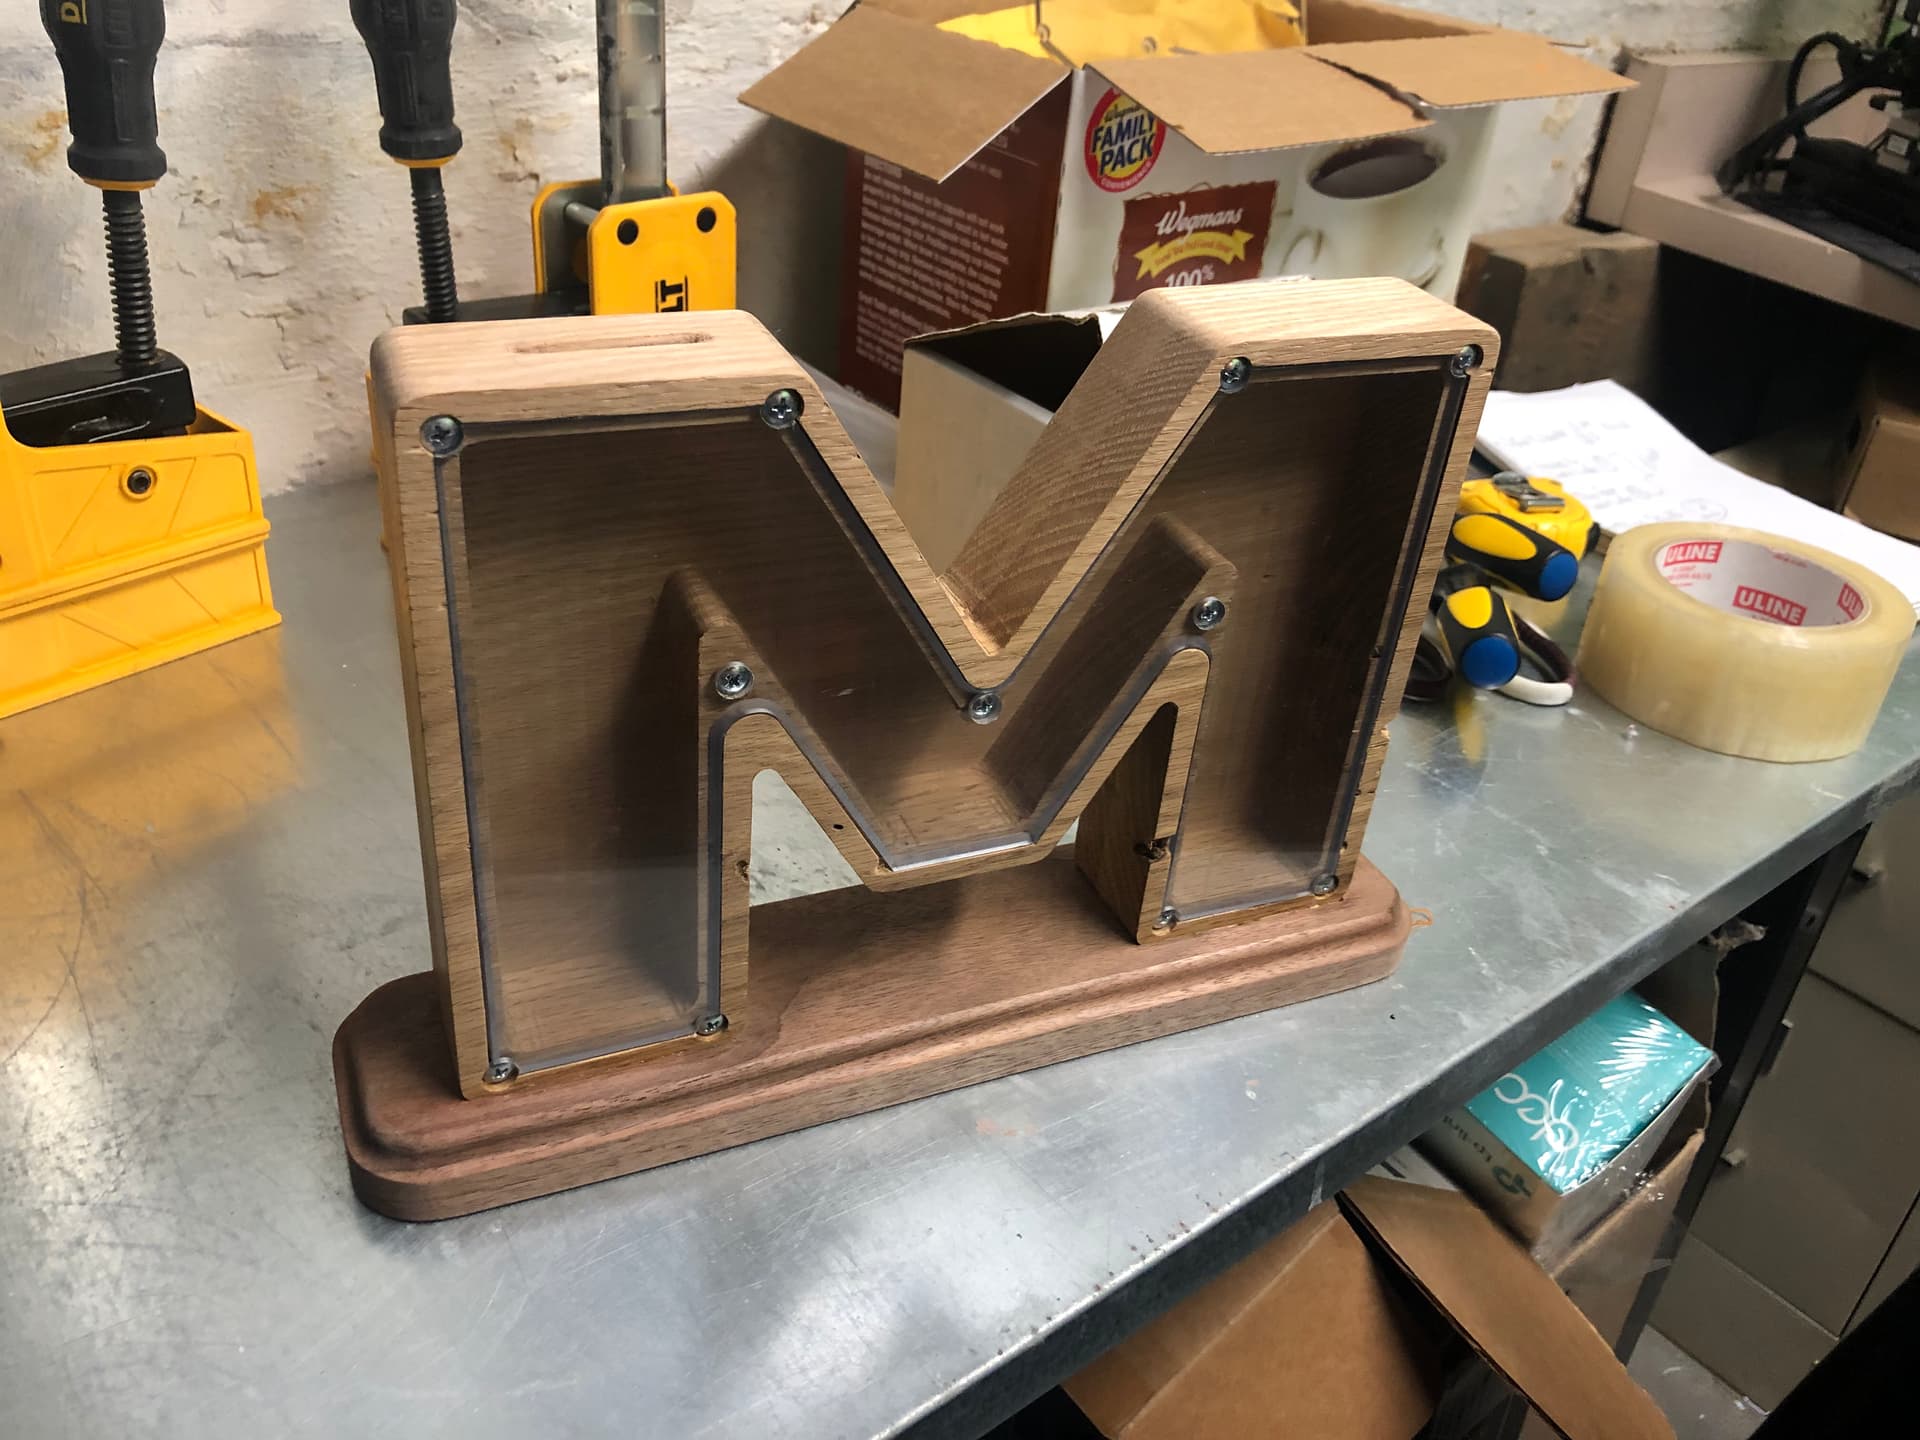
Looks great! Yeah I wish I would have made the slot a little bigger to accept the occasssional folded up bill which the wife thought of afterwards. They fit but can’t make the bend of the letter very well cause there isn’t much play.
1 Like
Brian, what I like about the letter “M” is that you can tip the coins over to the far leg and make the bank look full and depleted at the same time! Both good for encouraging savings. +1
That goes for @hkyswim Mike’s original, too! +1
2 Likes
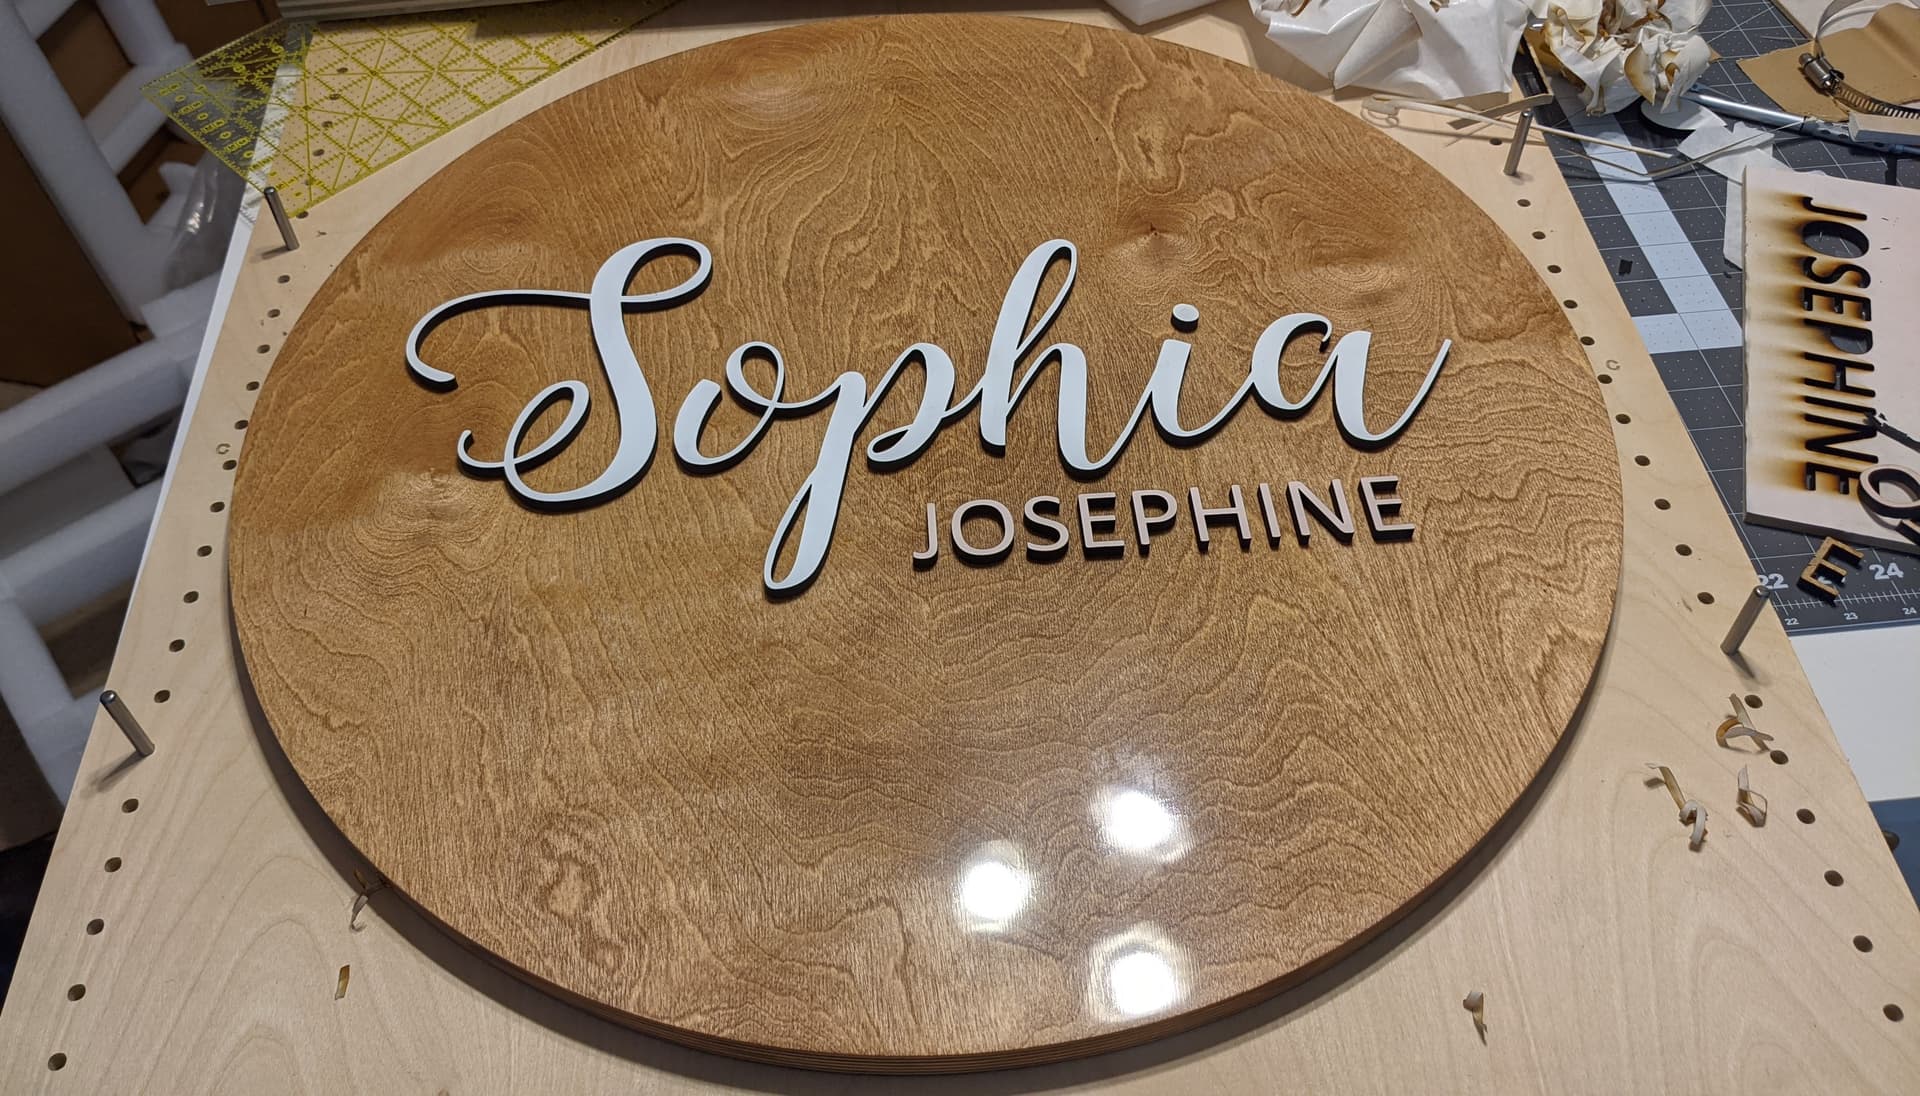
I made a nursery sign using both Shapeoko Pro and a laser. A lot of experimentation on workflow to try to find an efficient process, but I like how it finally turned out. This is a gift for a family friend, but my goal was to develop a process so they could be mass produced.
The round was done completely on the Shapeoko Pro. It has key holes on the back for hanging. I finished it using lacquer, and polished the top to a mirror like finish. Edges were buffed with steel wool.
Letters were made by painting a sheet of mdf, and then cutting it out with a laser. There’s no additional processing left after the laser, which makes it very efficient.
I also made an alignment jig that you can see it on. It makes it super easy to perfectly align the letters. I have a template that you reference off the pegs. The template has a relief cut on the backside so as you adhere the letters to the round, there’s no risk of the template also getting adhered. It also allows you to pivot the template off instead of trying to pull straight up without accidentally breaking the letters.
28 Likes
Spectacular finish quality… 
1 Like
Well, not technically a cut… but how about the entire text of the Tao Te Ching on 32 by 32 inch gatorboard in multiple color markers? (Sharpie for scale)
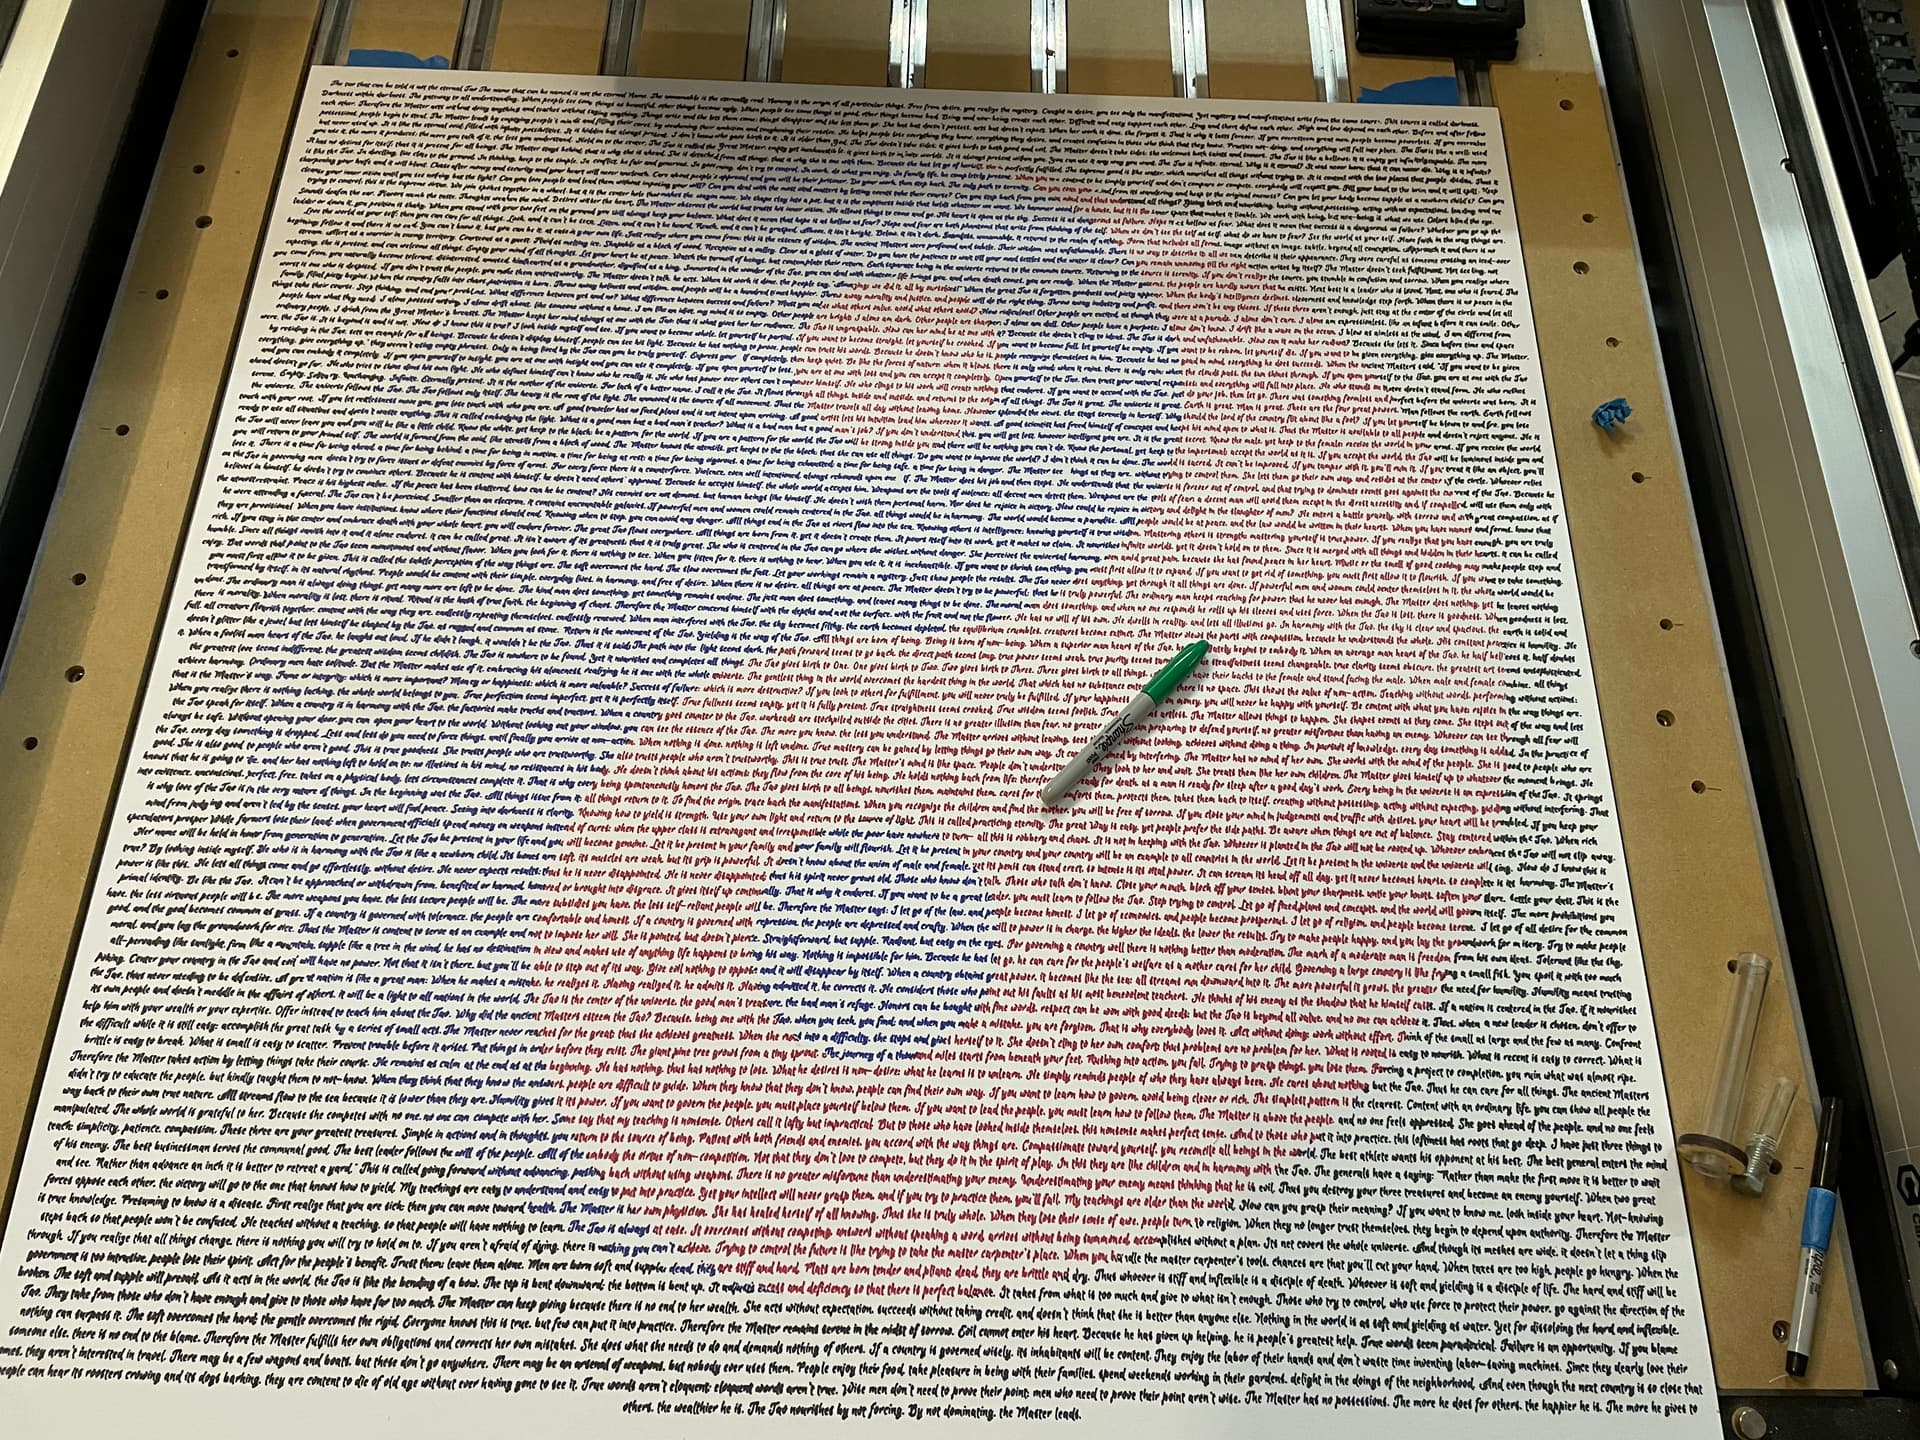
Here’s a close view:
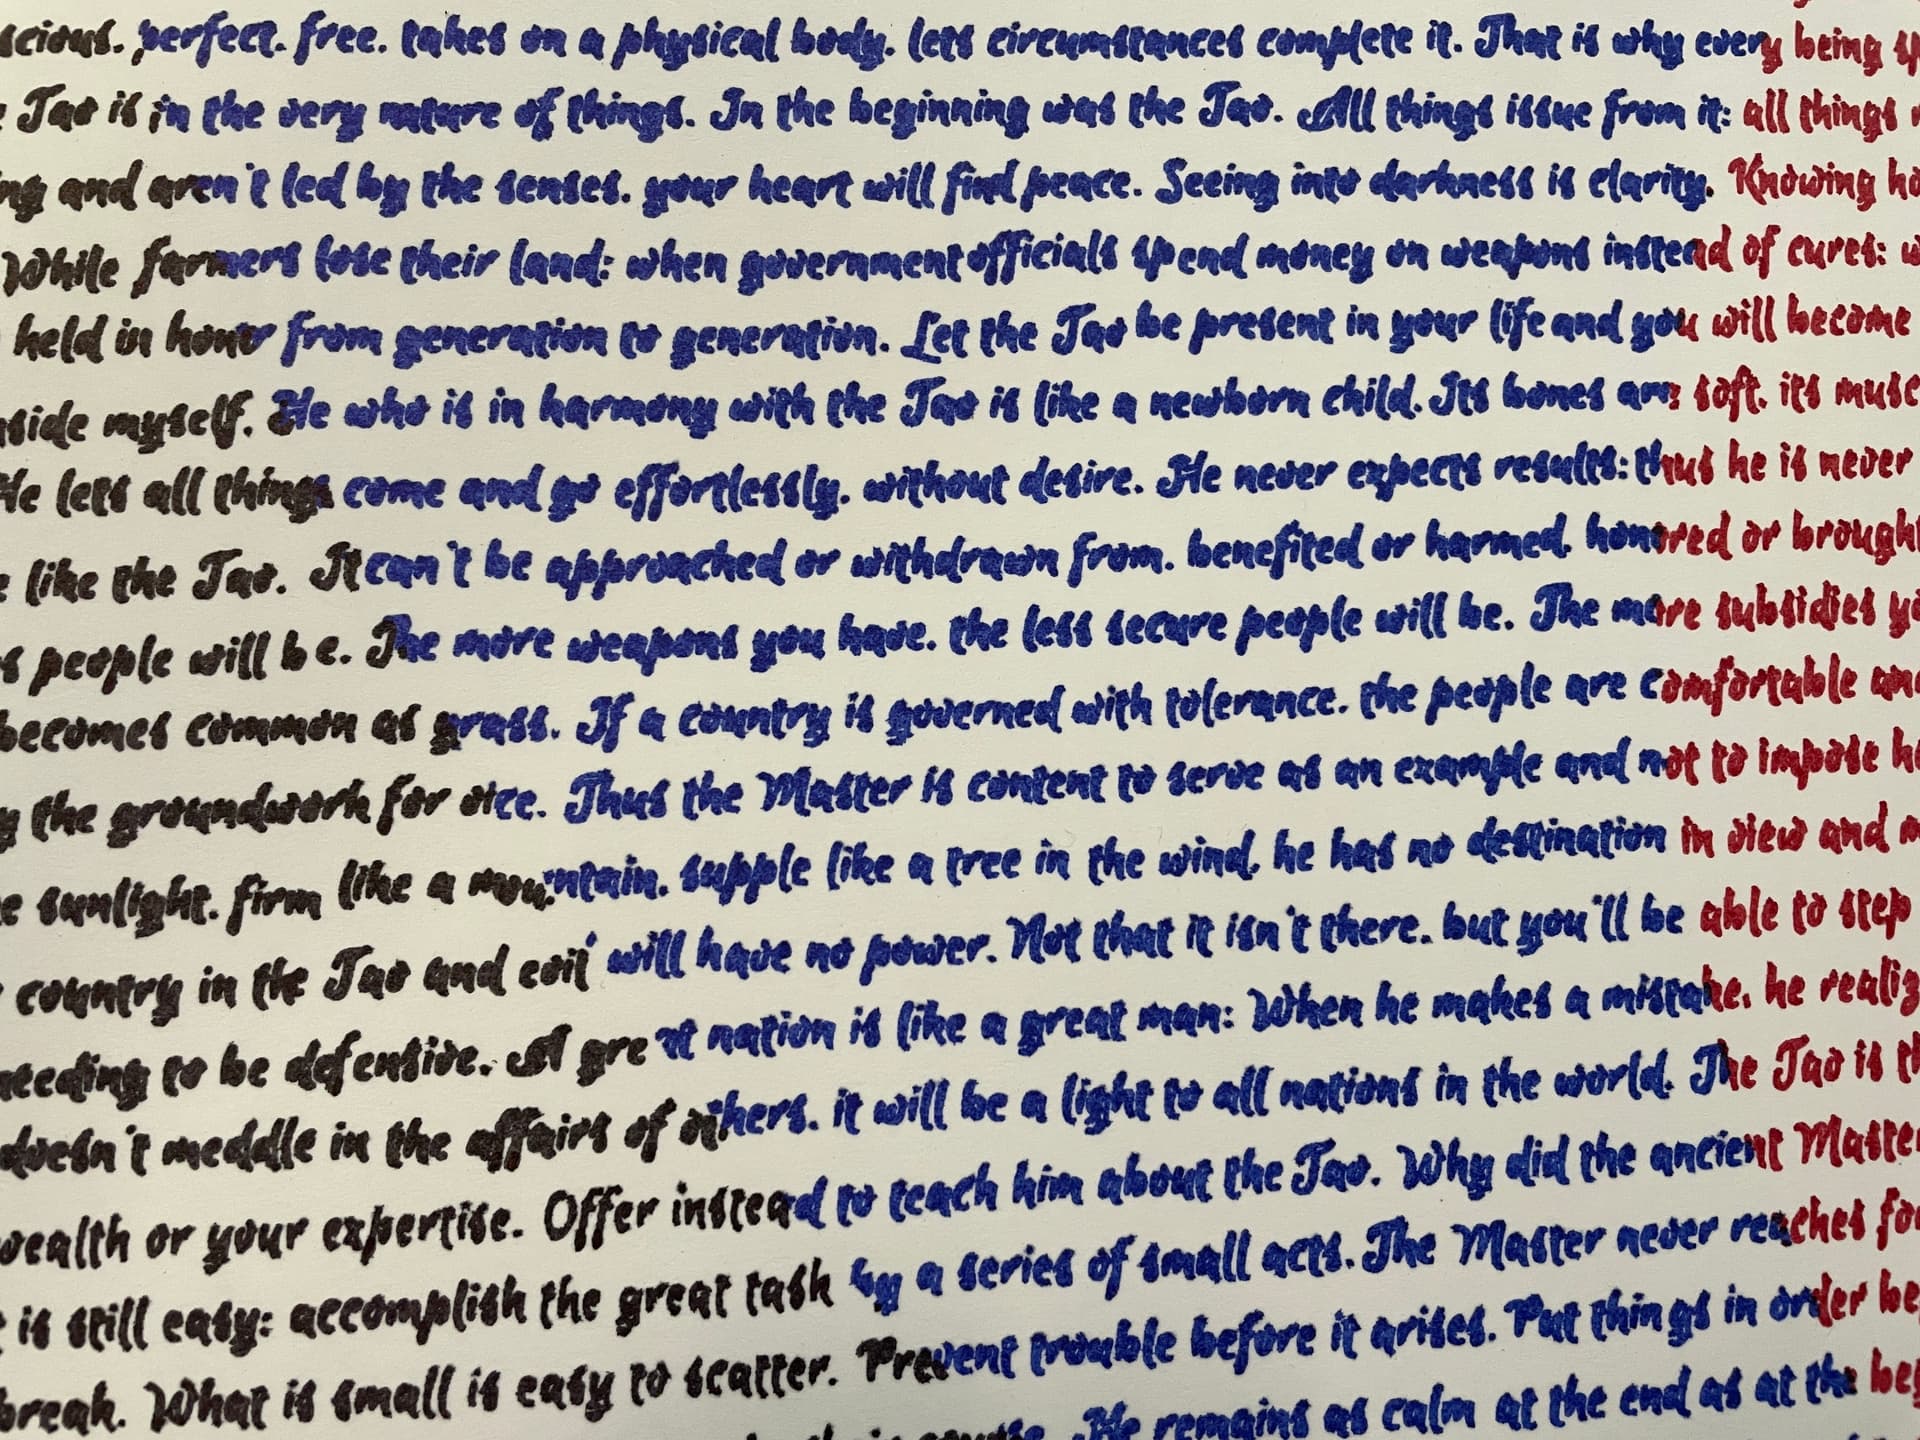
It’s 36,266 characters in total and took about 12 hours total. I had to break it across several files to keep Carbide Create from curling up it’s toes and dying. It was basically done in multi-hour blocks with each color; first red, then blue then black.
Note to self: Single stroke font next time.
32 Likes
Amen. twenty characters.
3 Likes
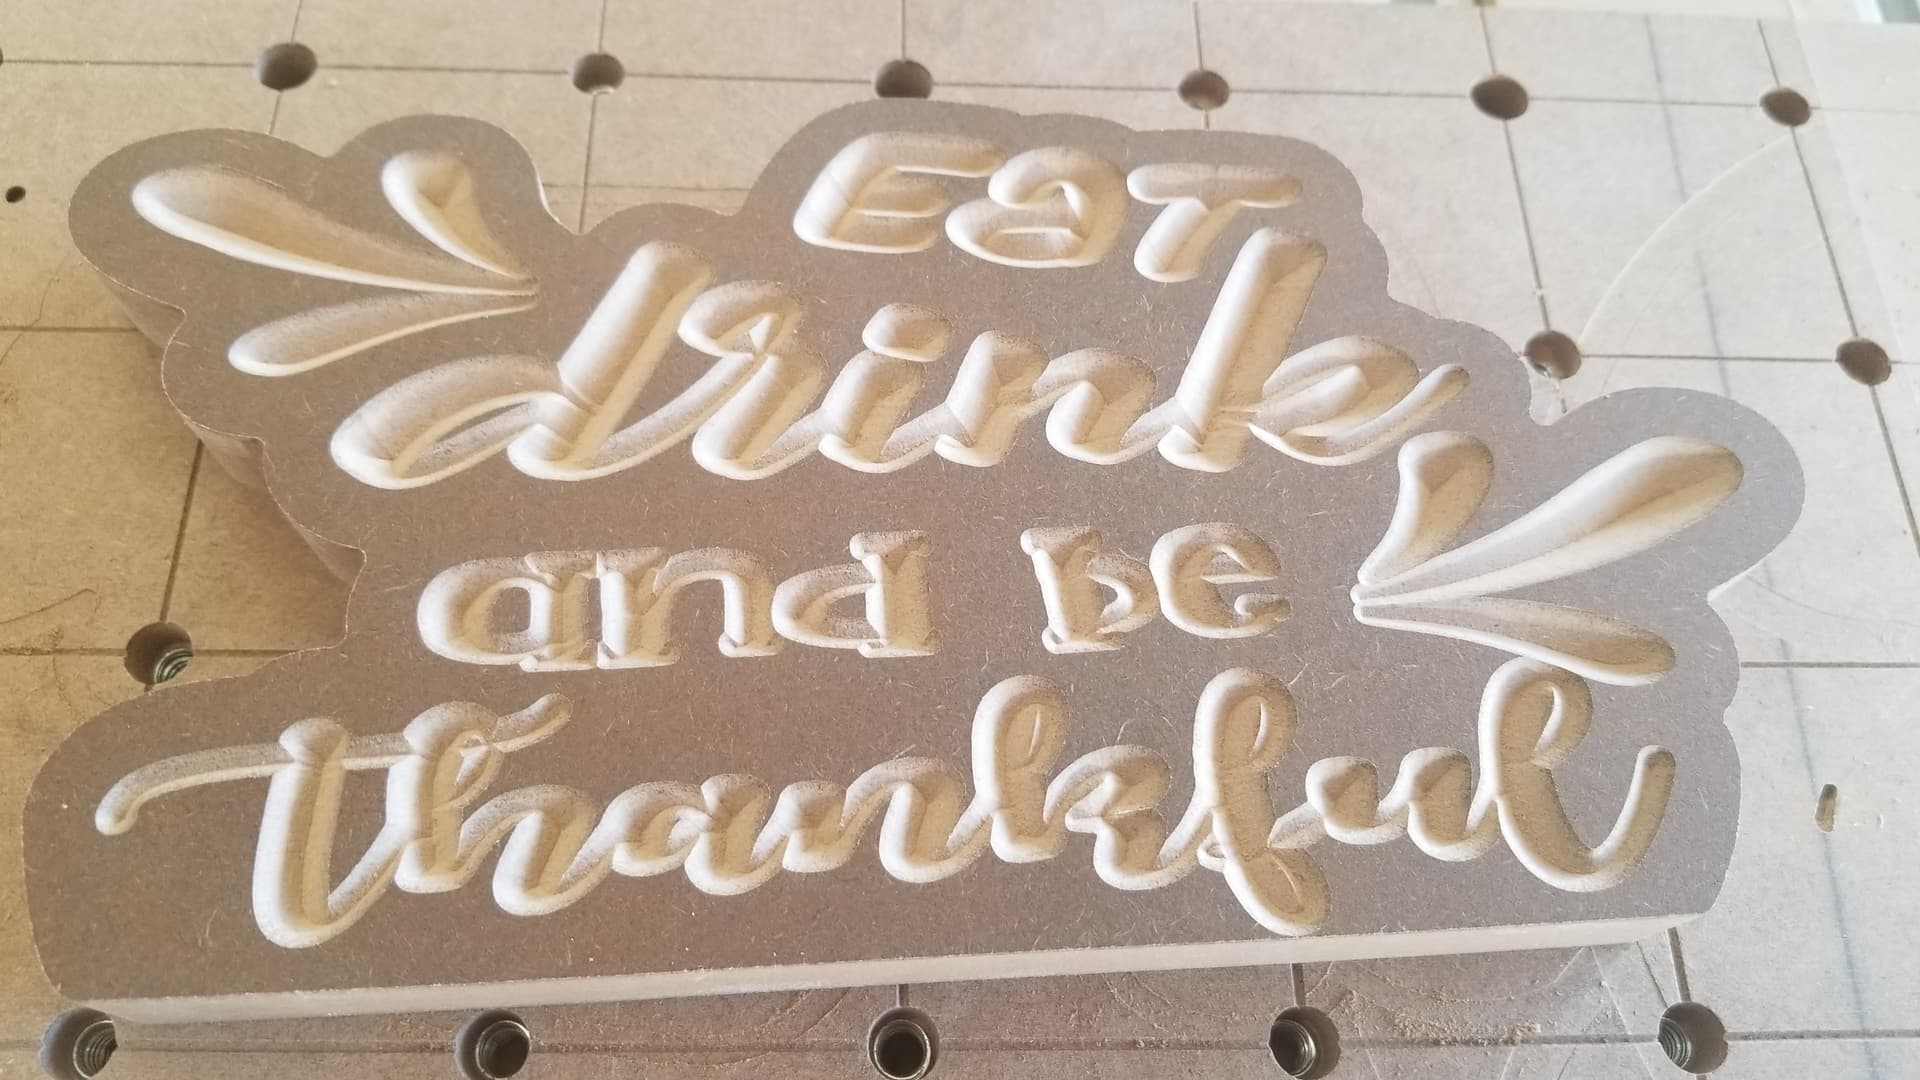
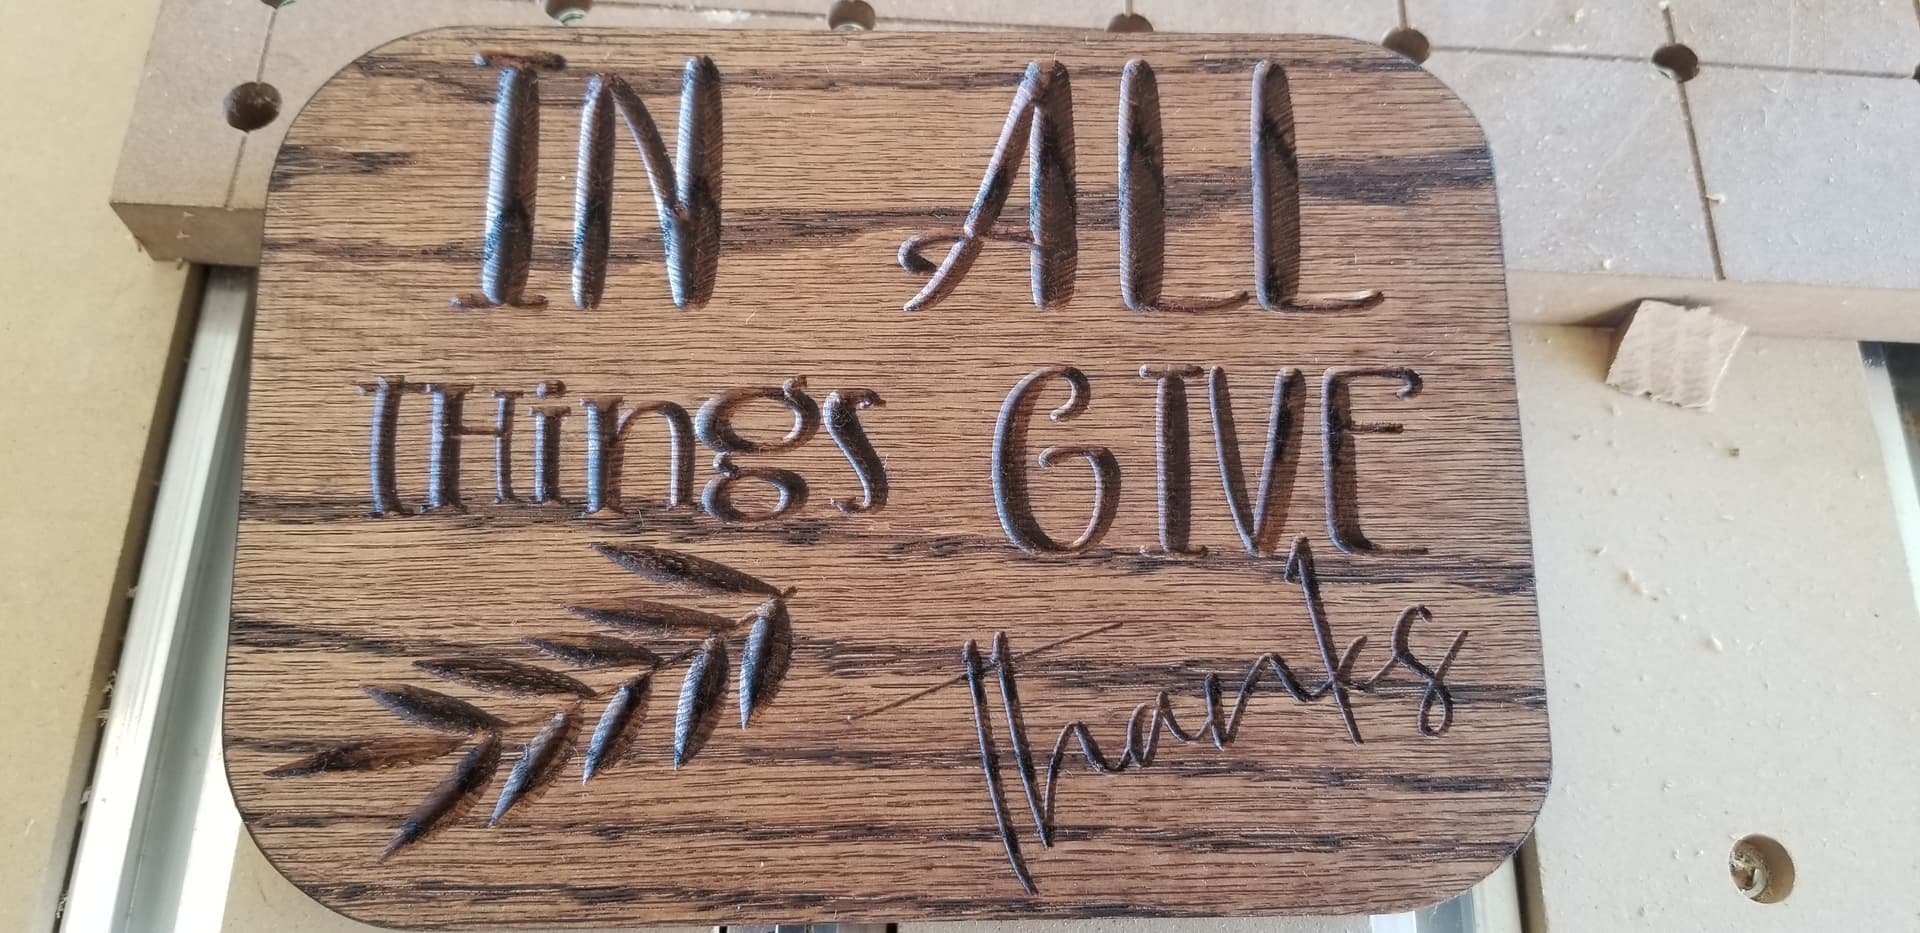
Made out of poplar and laser engraved the back, was a gift to friends.
All carved with 60degree V bit.
Shellacked the surface then I used clear contact paper over the top, carved and then hand painted and removed the paper and cleaned up with light sanding.
12 Likes
Peter, This looks really nice! Good job. I hope to be able to do something this nice on my Shapeoko. Can you tell me more about the ‘clear contact paper’? And also, what do you think caused the slight bleeding of the green paint on the right side? (if that is what I am seeing).
The clear contact paper was from Walmart, it was something like $6 for a 18" X 15’ roll.
Not sure I am sold on the stuff, it like anything has it’s place in the workflow.
I put a layer of shellac down first with the intention to stop any “bleeding” from the paint, the green for some reason went out under the contact paper and bled into the wood.
If I had kept sanding to remove the green I would have undercut my engrave.
I painted this with a stick I shaved down to get into the grooves, was a bit time consuming but with a brush the edges of the plastic contact paper would cover up the lines.
Doing this again I would use a different product. Not sure, maybe some vinyl tape. I already used painters tape and it failed badly.
This was only my 3rd project, been having trouble just getting my new pro xxl machine to a running state.
Thanks for the kinds words
Pete
3 Likes
The adhesive shelf paper is EasyLiner brand. The key to using it is to use a J roller for the adhesive to get a good bond. Just using your hand wont get good adhesion. Some use a heat gun to warm it up and then use the J roller. I also use oramask but the EasyLiner is cheaper and for me just as effective.
Paint/epoxy bleeding can always happen. However sealing with dewaxed shellac helps prevent the paint from bleeding into the pores/straws of the wood. Two coats are better than one and shellac sands off easily.
2 Likes
nice work, what type of wood did you use in here?
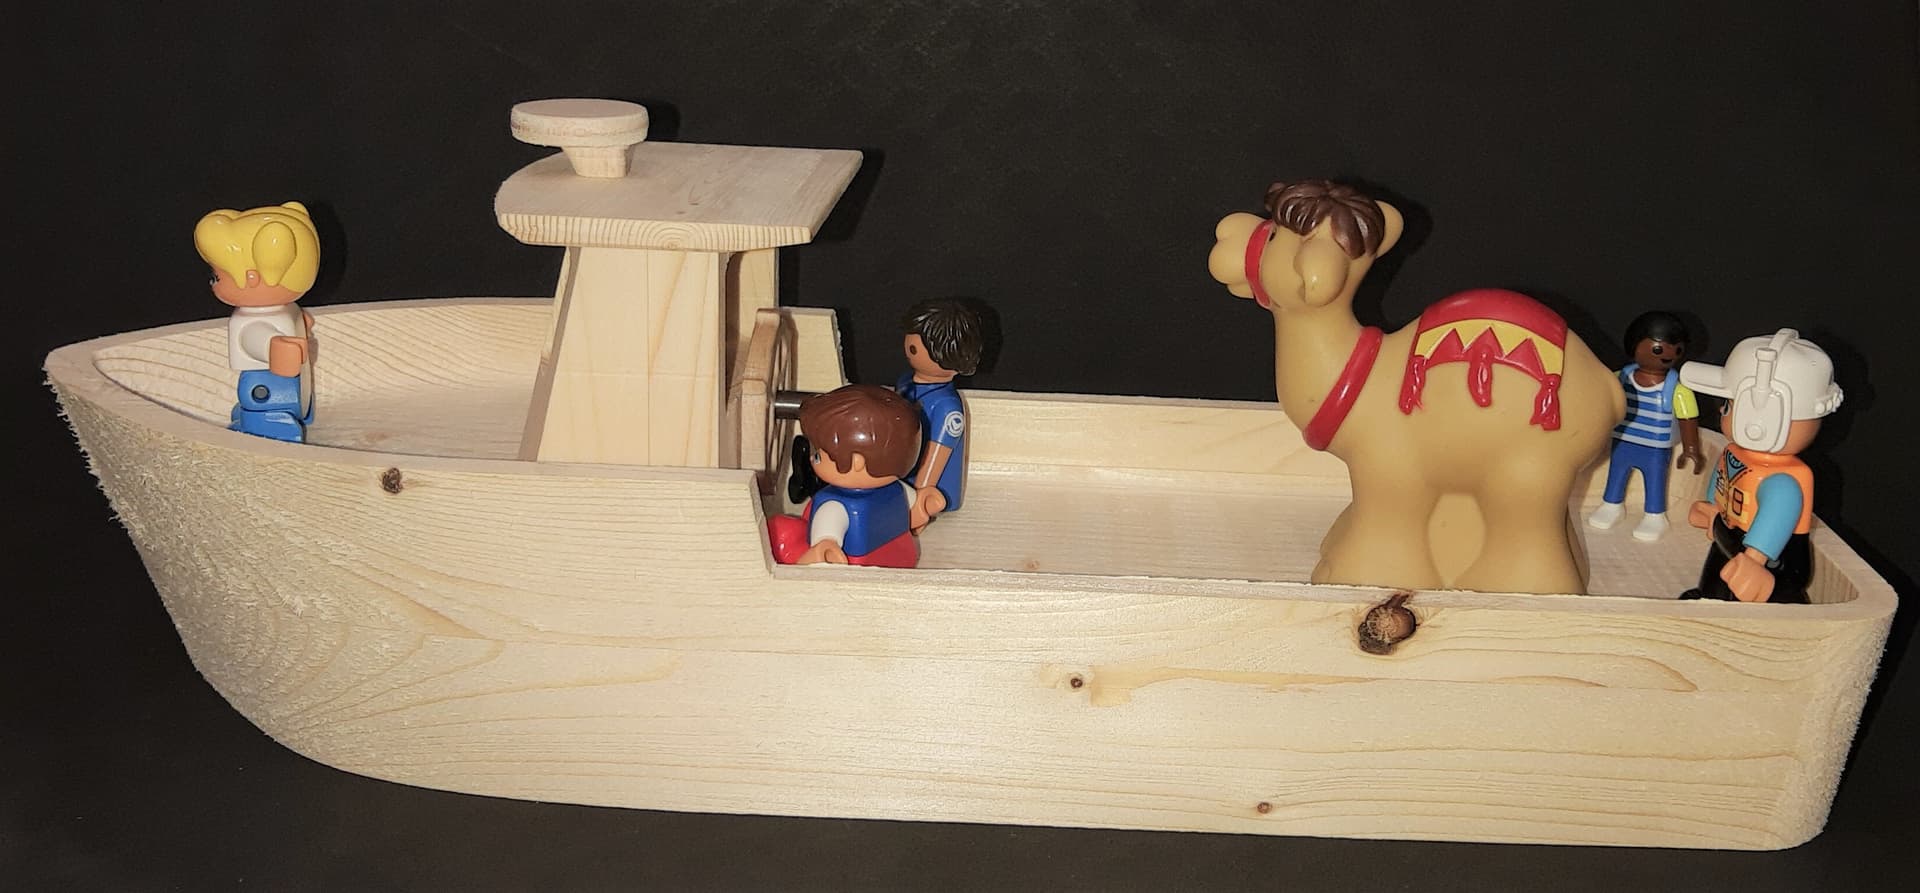
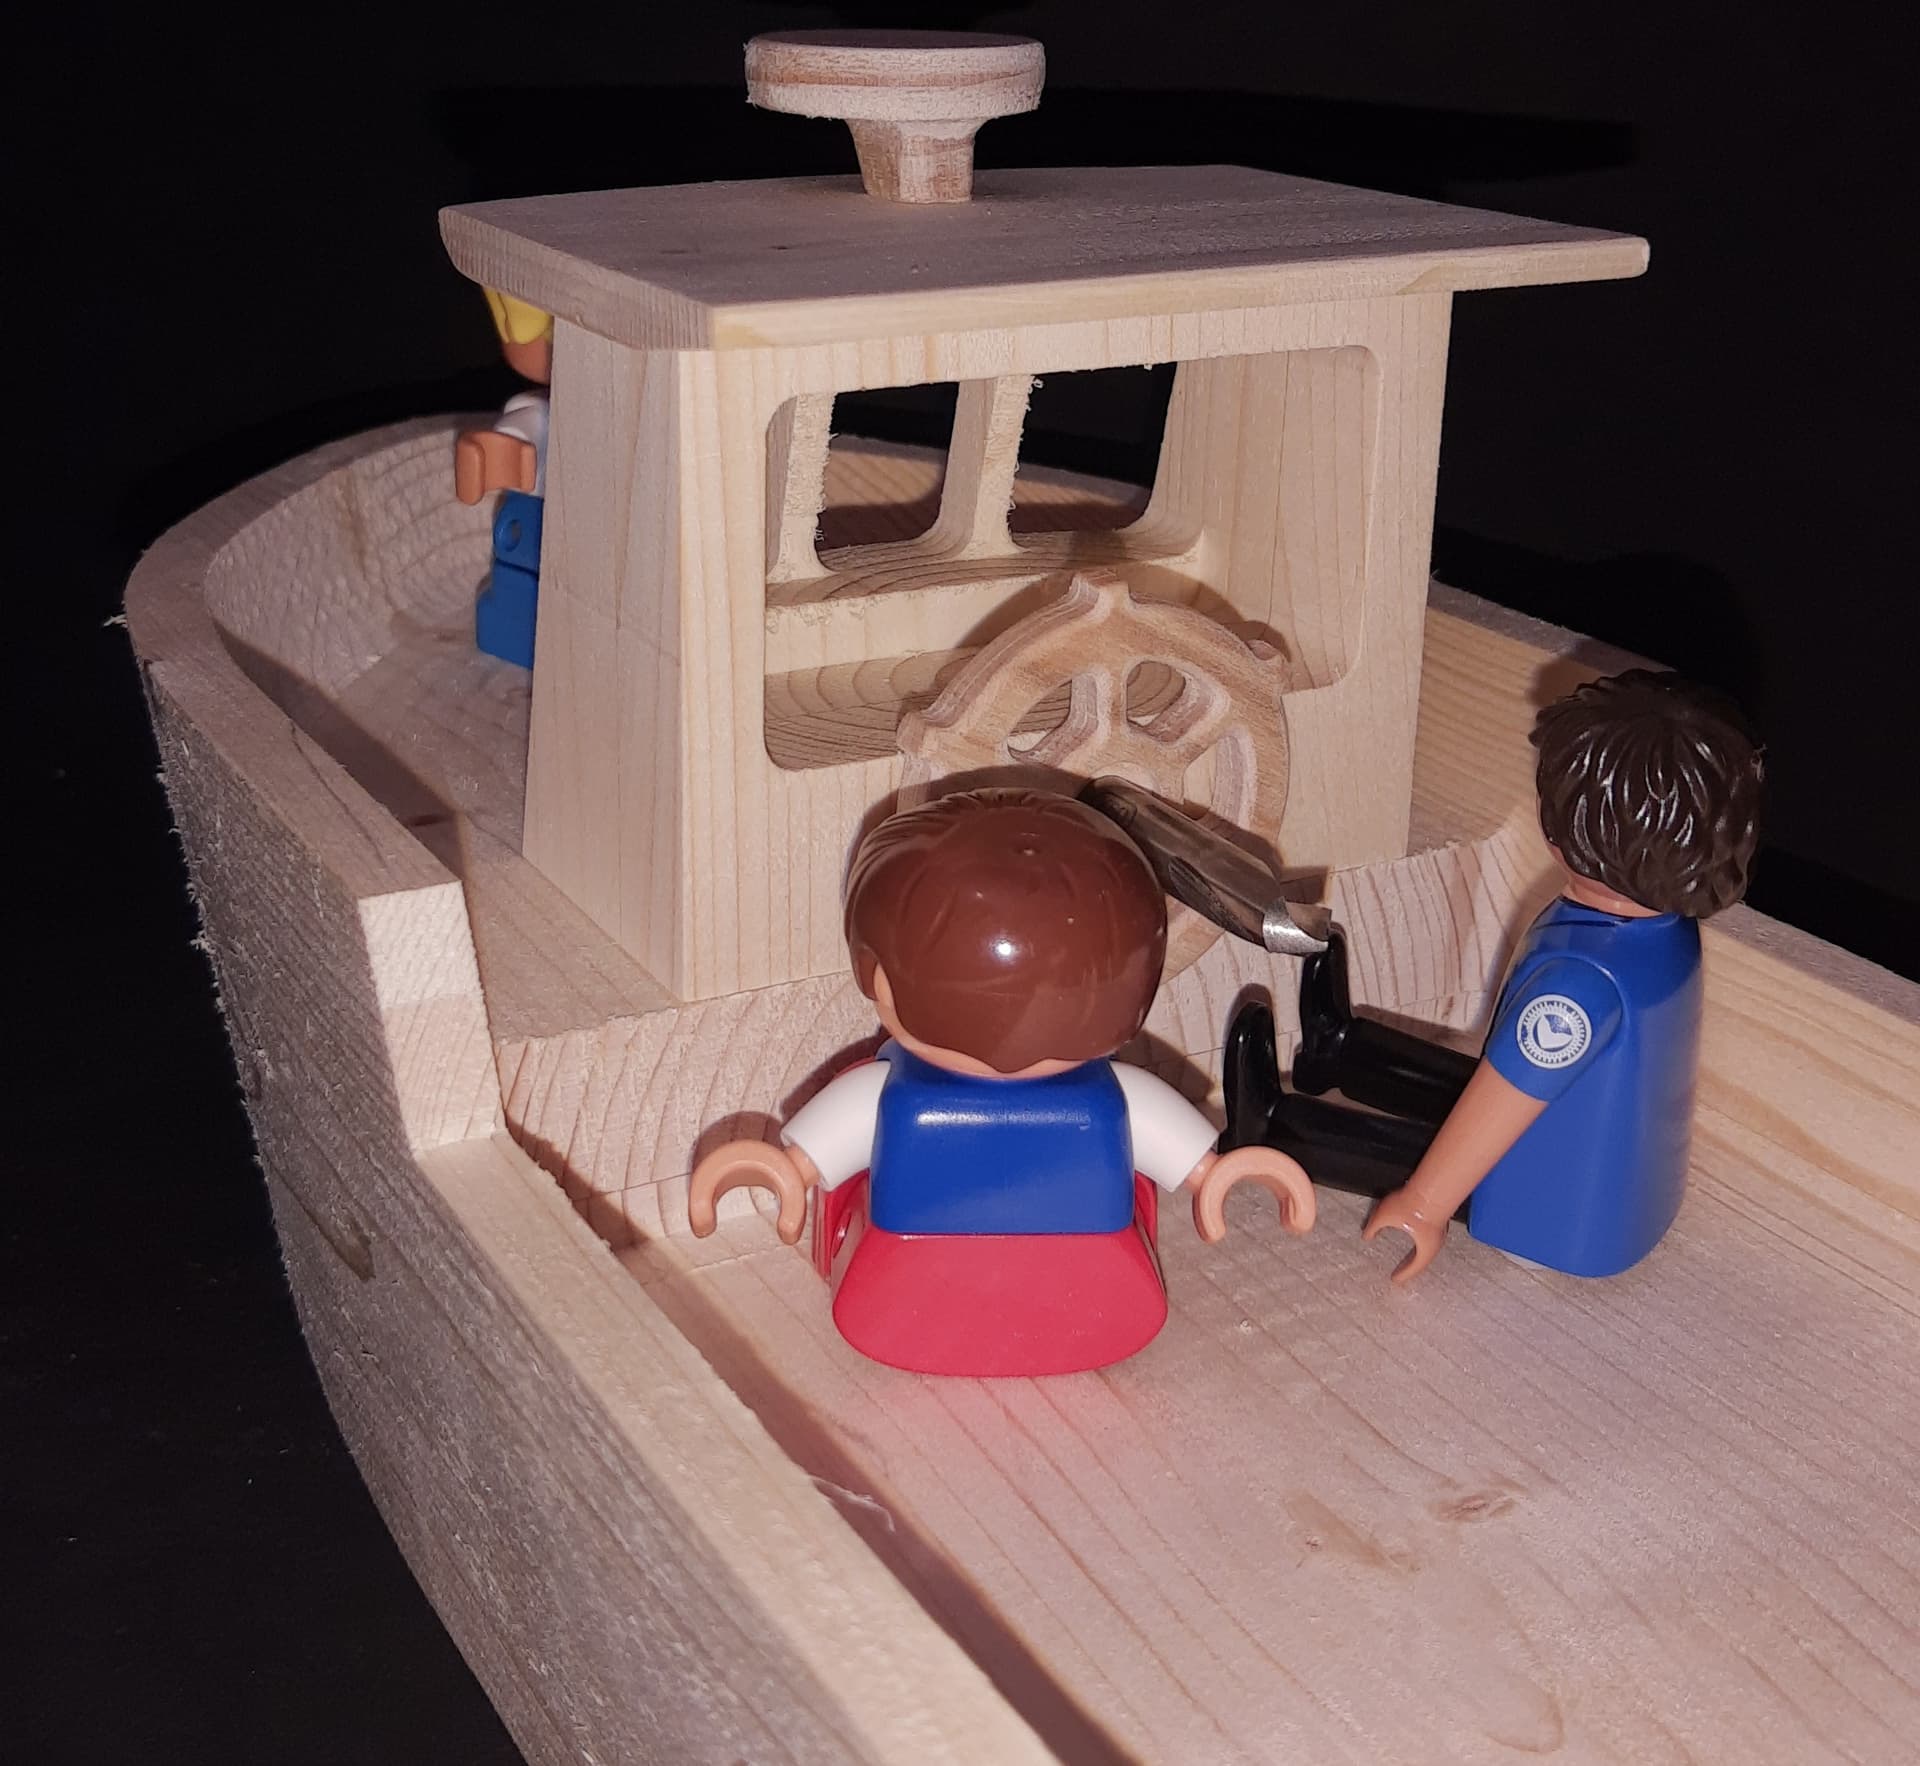
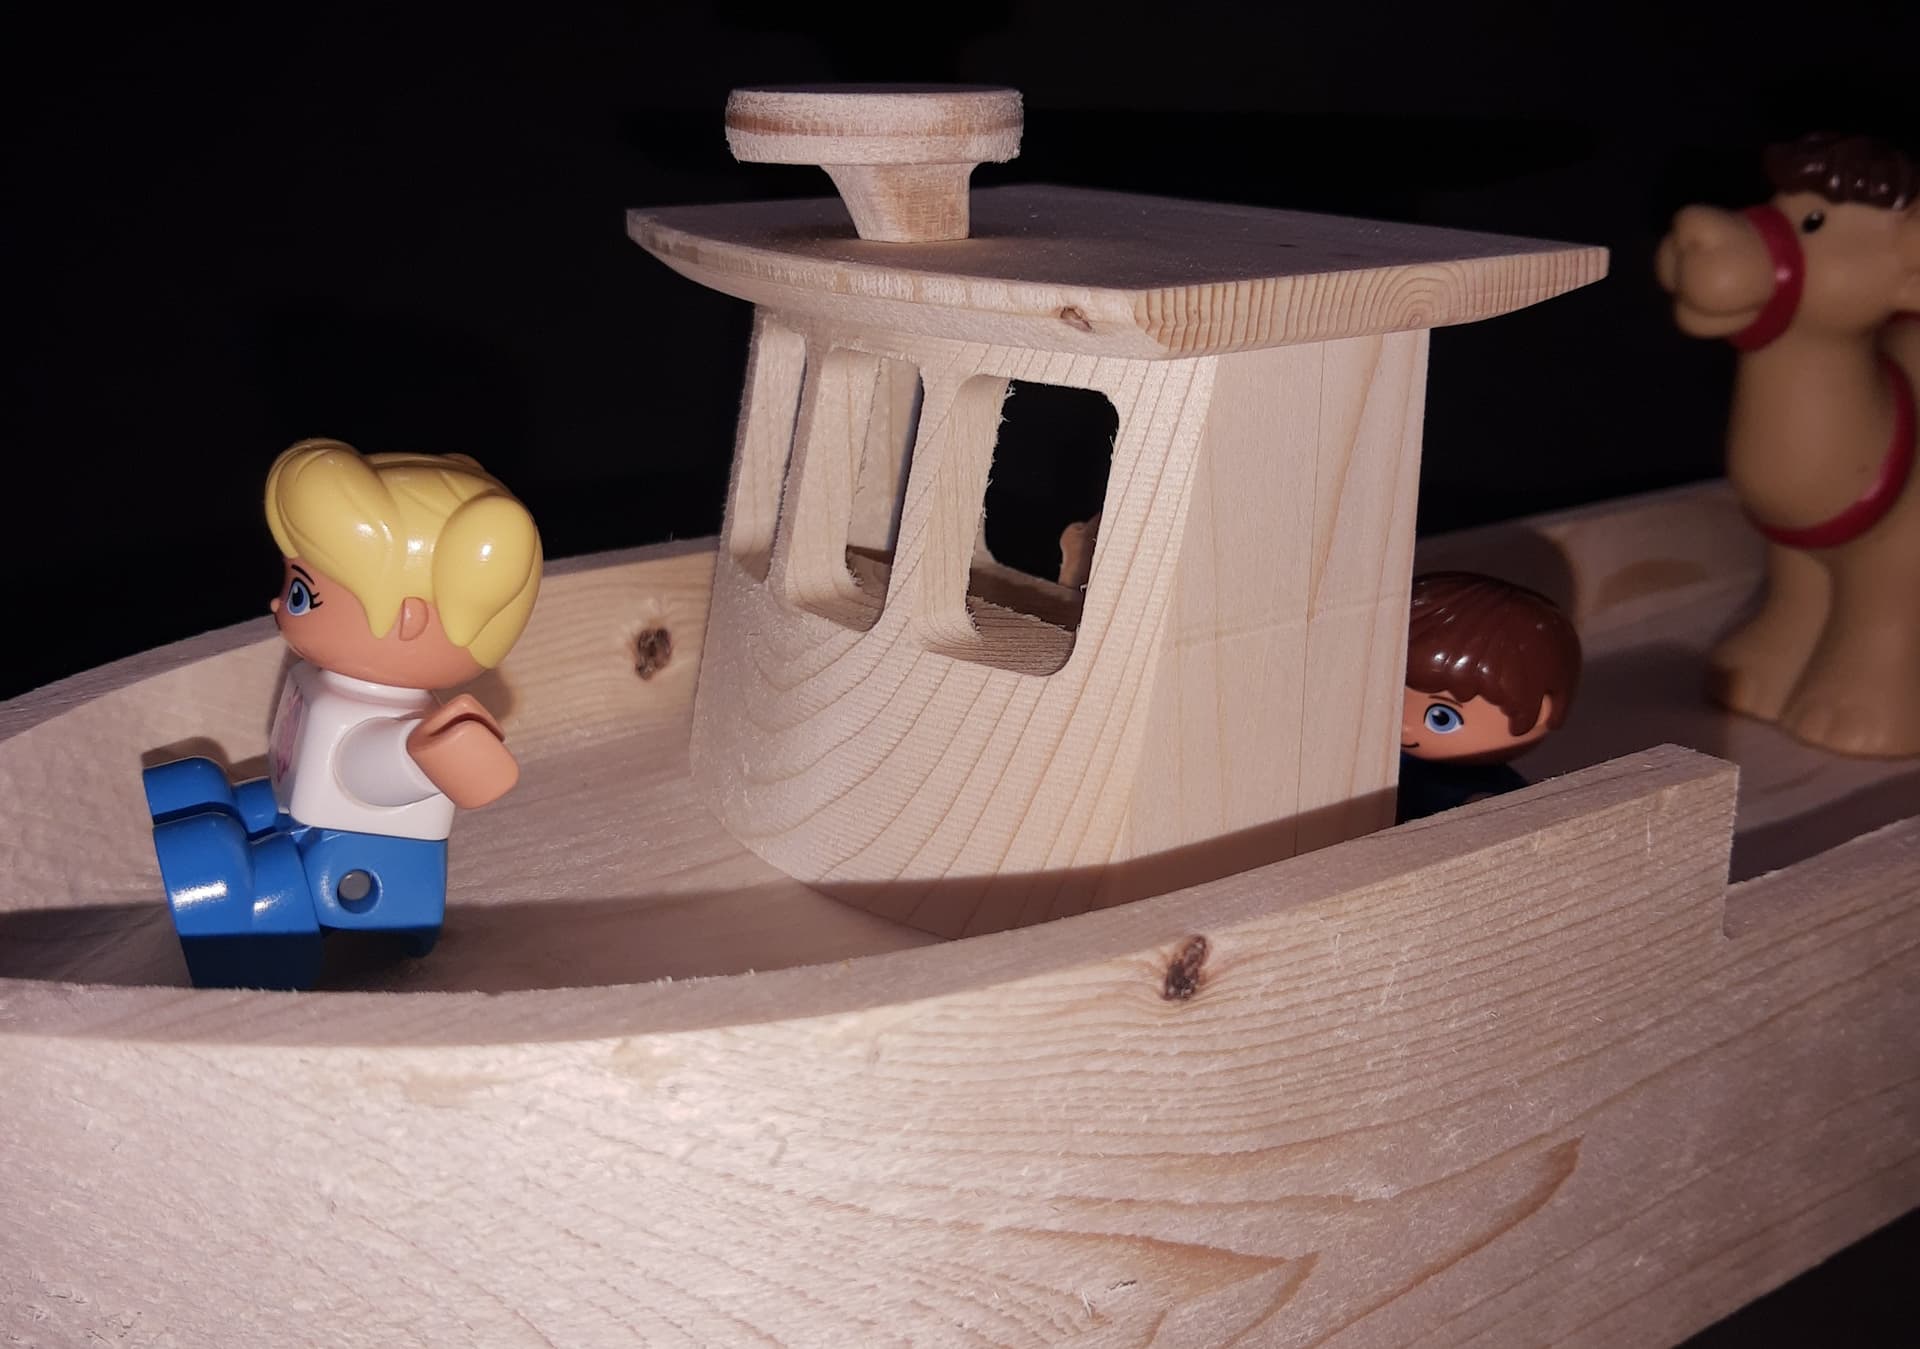
I ended up making a smaller wheelhouse just to leave the boat with more deck space. This will be the end of the Shapeoko’s contribution to this project. I’ll use my Taig lathe to turn an axle for the helm and find some dowel to connect the wheelhouse to the hull. Then it’s on to sanding and painting. My child is already asking for a pirate ship, so that’ll be the next project.
22 Likes
It was made with baltic birch plywood. Honestly it was a huge pain to make it look good, and I’m having a hard time finding it now. Last time I went to Rockler, they had no 3/4" plywood. I need to start talking to some lumber dealers near me to figure out sourcing. I honestly may switch over to HD maple plywood.
I went through several prototypes, but this is the process I landed on. Sand to 220, oil based pre-stain conditioner, oil based gel stain (cherry wood on this sign), sanding sealer, 220 sand smooth, 3 coats of water based lacquer, sand at 800 (remove imperfections), 1000, 1200, and finally polish with chemical guys V32 on wool pad. I need to experiment further to see if I can optimize the process, but the whole thing goes pretty quickly as long as you have the right equipment.
1 Like
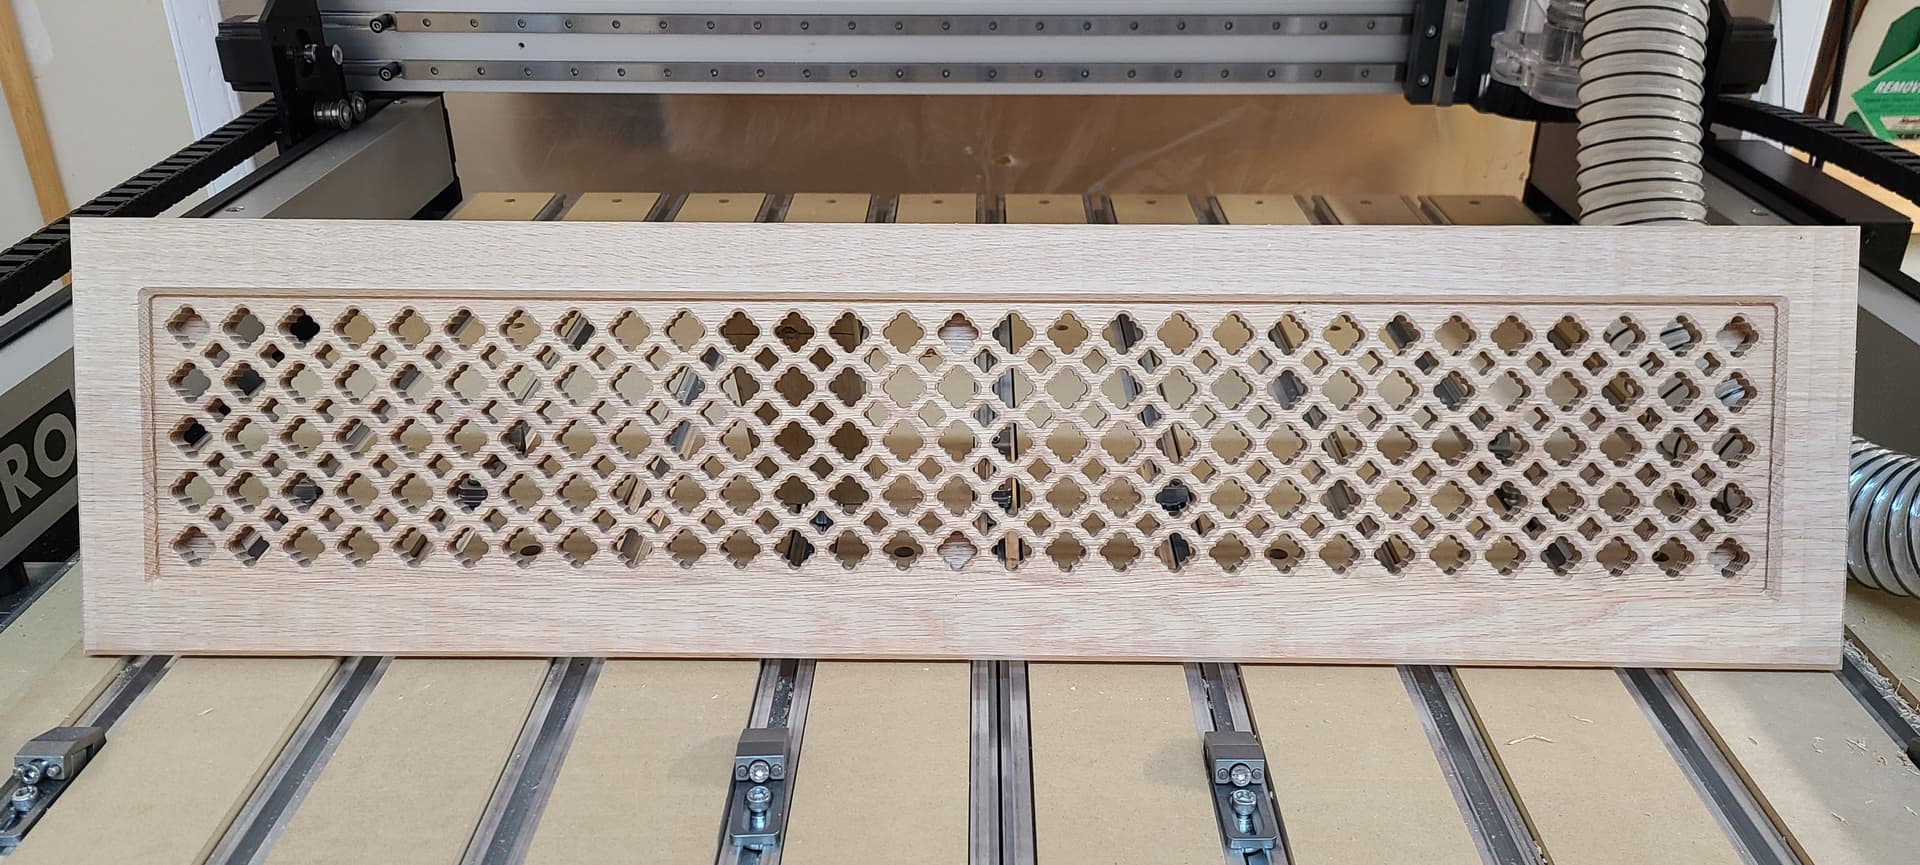
Took a few sessions over a few days to get this one done but here’s a wall grate for an air return (32" x 8") that I made out of an oak staircase tread I picked up at the local hardware store. I’m going to hide the screws to mount this to the wall inside of 6 of the holes cut into the grate as I did not want any screws in the outer frame like the cheaper plastic ones have. To finish I’ll either stain it to match some floating shelves nearby or just go with white to match the baseboard.
Front View
Back View

31 Likes