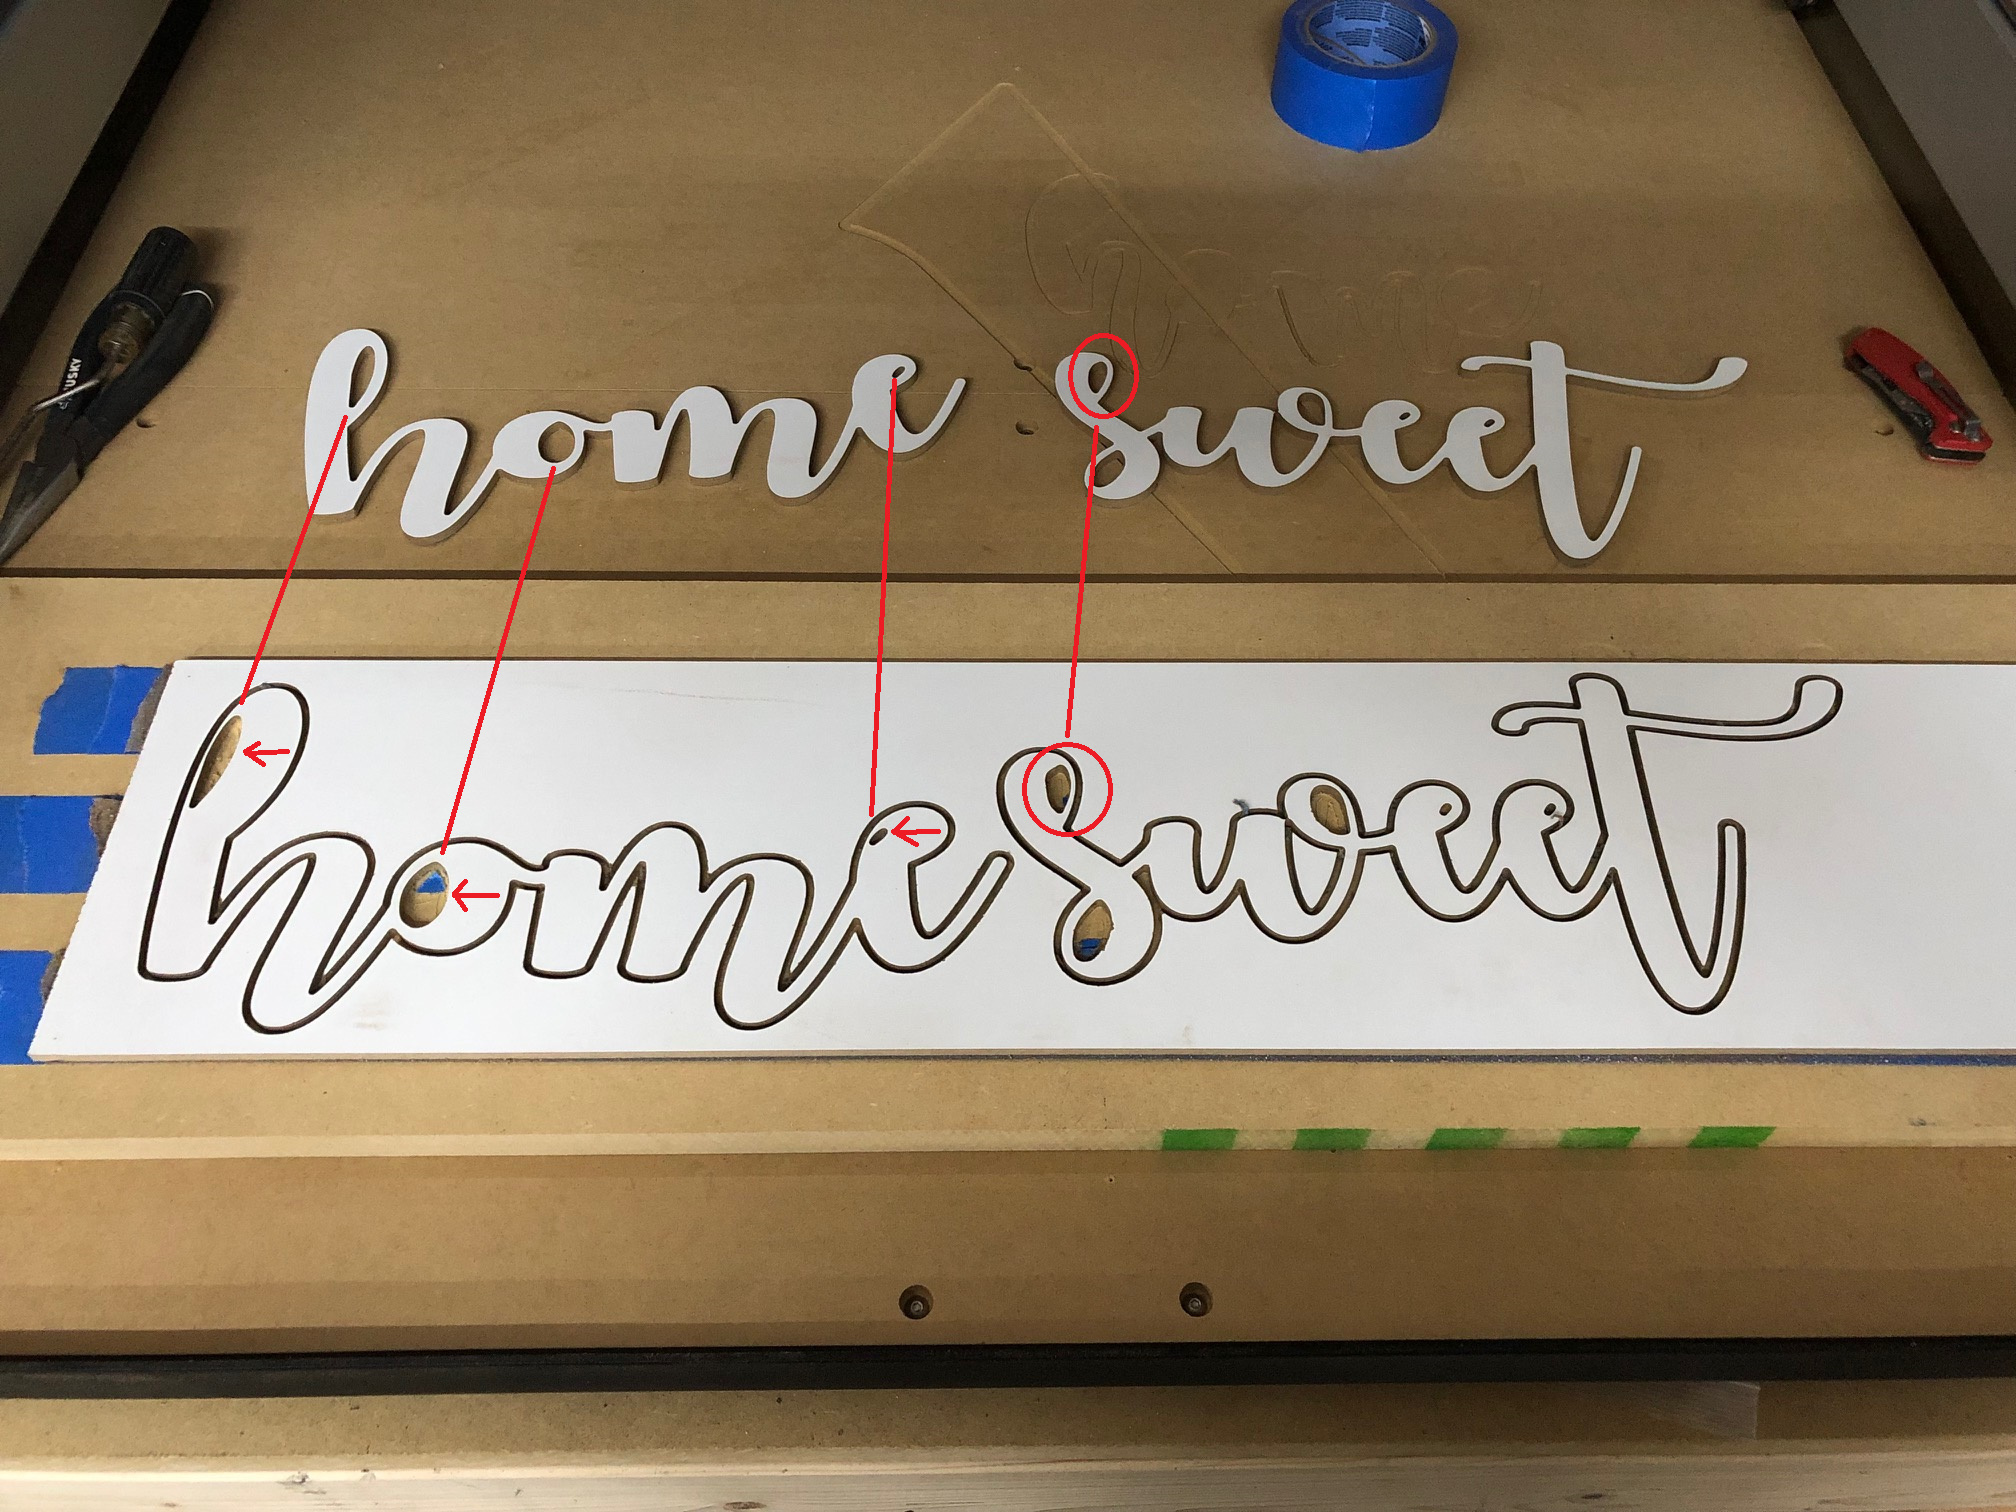
Now I know from a little research that signs and especially trendy signs envoke a faint taste of bile in the back of our throats but I was asked by a friend to supply 3 CNC cut phrases “home sweet home” so I obliged. I am new to CNC but research heavily and do not give up easily. I have 2 completely successful projects done that turned out great. They were both quite a bit more complicated than cutting 2D letters out of 1/4" laminated MDF. Here is the problem, I’m guessing carbide motion is not sending the G Code appropriately as several tries have turned out in disaster from depth of cut to overlapping words that are not set up that way in Carbide Create. I am at my wits end with this software. I have wasted a lot of material on this project. Here is the latest screw up by the software:
The holes in the fonts were last to be cut because tool paths cannot be edited on fonts but as you can see the first run of the G Code was beautiful, the second made me want to throw my laptop! I reloaded a fresh piece of material after the first was done, confirmed zero with my probe and ran the same exact program. Can someone please advise me? Thank You!
This can be frustrating at times, however I doubt Carbide Motion is the real culprit here. Carbide Motion (or any other G-code sender for that matter) is not doing any fancy stuff to the G-code, it just reads it line by line and sends it to the machine, so that cannot alter toolpaths e.g. depth of cut. Chances are this is something mechanical (a Z-belt being every so slightly under-tensioned?) or linked to the Zeroing/probing or a variation in actual material thickness from run to run.
Since the job cuts fine in some instances and bad in others, the G-code itself is correct
looking at your picture, it seems to me that some serious mechnical shifting occurred between the first toolpath (letters cutout) and the last toolpath (pocketing the inside of letters), see the holes of the h, o , and e letters, all shifted by about the same amount to the left of where they should be:
Also it seems like the hole in the S is much more irregular in the failed cut than on the good one.
To me, that seems to point to a loose X-belt (for the shifted holes) and a possible loose Z-belt (for the too shallow depth of cut)
Maybe double check this (guitar-string-tight belts + measure your MDF stock with a caliper) ?
Maybe also share your feeds and speeds, unless you are positive that they are correct for cutting 1/4" MDF?
Speed is about 3.5 on the new carbide router 12k ish? Feed is 40 in/min with plunge rate at 15 in/minute. I was present the whole time for the cut. I didn’t notice any jumping or anything out of the ordinary. A little chatter on the last holes cut on the “sweet” which was cut just before the “home” holes. Both outlines were done before the letter holes. I will double check belt tension. Steep learning curves with these machines lol. This was the least of the issues I have encountered with the letters. Thanks for the insight!
Mmmh. That chatter sound on the last holes of “sweet” does line up with the possibility of a shift for the remaining holes.
3.5 on the Makita router is about 20.000RPM, not sure on the Carbide router (that apparently has slightly different RPM mapping) but it must be in the same ballpark. Were you using a 3-flute 1/4 endmill ? If so, I would probably feed twice as fast (80ipm), but also shallower. I also assume you were using a 1/4" depth of cut, i.e. a single pass to cut the profile & holes ? If so, a very simple test you can do is reduce that depth of cut by half, rerun a few cuts (it will take a bit longer of course), and see if you get more repeatable (and good) results.
Just for reference, 3.5 in the Carbide Compact Router is about 21k rpm. I measured 3@ 18,250 and 4@ 25,440, so I’m guessing 3.5 will be right about in the middle of those.
What size and type of bit are you using? There have been a lot of discussions on feeds and speeds on the forum and based on those I’m trying to come up with some reasonable numbers for my stock XXL.
For what it’s worth, I (like multiple generations of CNC hobbyists before me) went through this process of trying to make sense of this feeds & speeds thing, you can check out the feeds and speeds chapter in my ebook for inspiration, and then improve it and share your findings here with everyone !
Also a common and less noisy/obvious culprit for what you’re seeing can be the pulleys spinning on the stepper motor shafts due to loose set-screws, or if the set-screws are not aligned with the flats on the shaft. It’s a pain but (if you haven’t already) check all of them, even remove and put Loctite on the set-screws to keep them tight.
A lot of people (myself included) have binned many jobs because of either loose belts or loose stepper pulleys.
Edit - in my opinion, your speeds and feeds may not be right on the money, but they aren’t far enough out to make a correctly set up(I.e. belts and pulleys) machine skip
Hi Jason, you say
“The holes in the fonts were last to be cut because tool paths cannot be edited on fonts”
They can be edited in Carbide Create to solve this problem… Winston Moy shows how to do this in this video at around 1 to 2 mins in to it.
It also looks to me that you have mechanical problems - belt slippage or a loose x-axis drive pulley is likely. CC and CM are quite capable for this type of project and are very reliable/repeatable.
I’ve had this very same thing happen to me several times. The holes all shift by the same amount one direction. I never did figure out why. Hasn’t happened in quite some time but I’m still nervous anytime I’m cutting on an expensive piece of wood lol.
I was using a 2 flute 1/8” Endmill with a depth of pass at .07 and max depth of .257, 4 passes total to creep up on the final through cut and not stress the material too much.
I was pretty meticulous about tightening everything on the Z carriage and put the included blue locktite where specified. I only have about 12 hours on the machine but I guess it wouldn’t hurt to check again.
ok at least this is not a feeds and speeds issue then.
what about that material thickness ? you could measure with a caliper the thickness of the correct letters, versus the thickess of the material in that failed.
regarding that X slip, maybe you could try pushing the X/Z gantry to the left manually while the machine is turned on (steppers locked), and see if it moves at all. It if does, it would give a hint that the set screws are not tight or not correctly placed (flat notch on the shaft)
Concerning the belt tightness, the installation instructions states not to make them too tight or risk premature ware. I’ve priced belts and they’re reasonable. Would it make sense to get them pulled “guitar string” tight and forego the ware risk? I’m thinking that might be the culprit.
This warning also got me, I initially under tightened. Especially since those belt clips make it hard to tighten it just right. My very personal criteria is, if you move the gantry to one side, pick the belt in the middle, and that you can slide your pinky underneath, it’s not tight enough.
Guitar string tight is the keyword (though not immensely helpful if you never played guitar)
EDIT: obviously, you should still be moderate in the amount of additional tightening you apply, I would hate to have you snap a belt or bend a motor shaft. But as far as I can tell, this warning in the instructions is so scary that people tend to undertighten. I wish there was a more precise way to measure belt tension…but the pinky trick has been working fine for me for a long time.
Julien,
Yes, it’s your threads that I’ve been following to figure out feeds and speeds. I’ve seen you mention your ebook previously, but this is the first time I’ve had a chance to look at it. The section I looked at briefly looks really informative. I’ll give a more thorough read later. Thanks for the link.
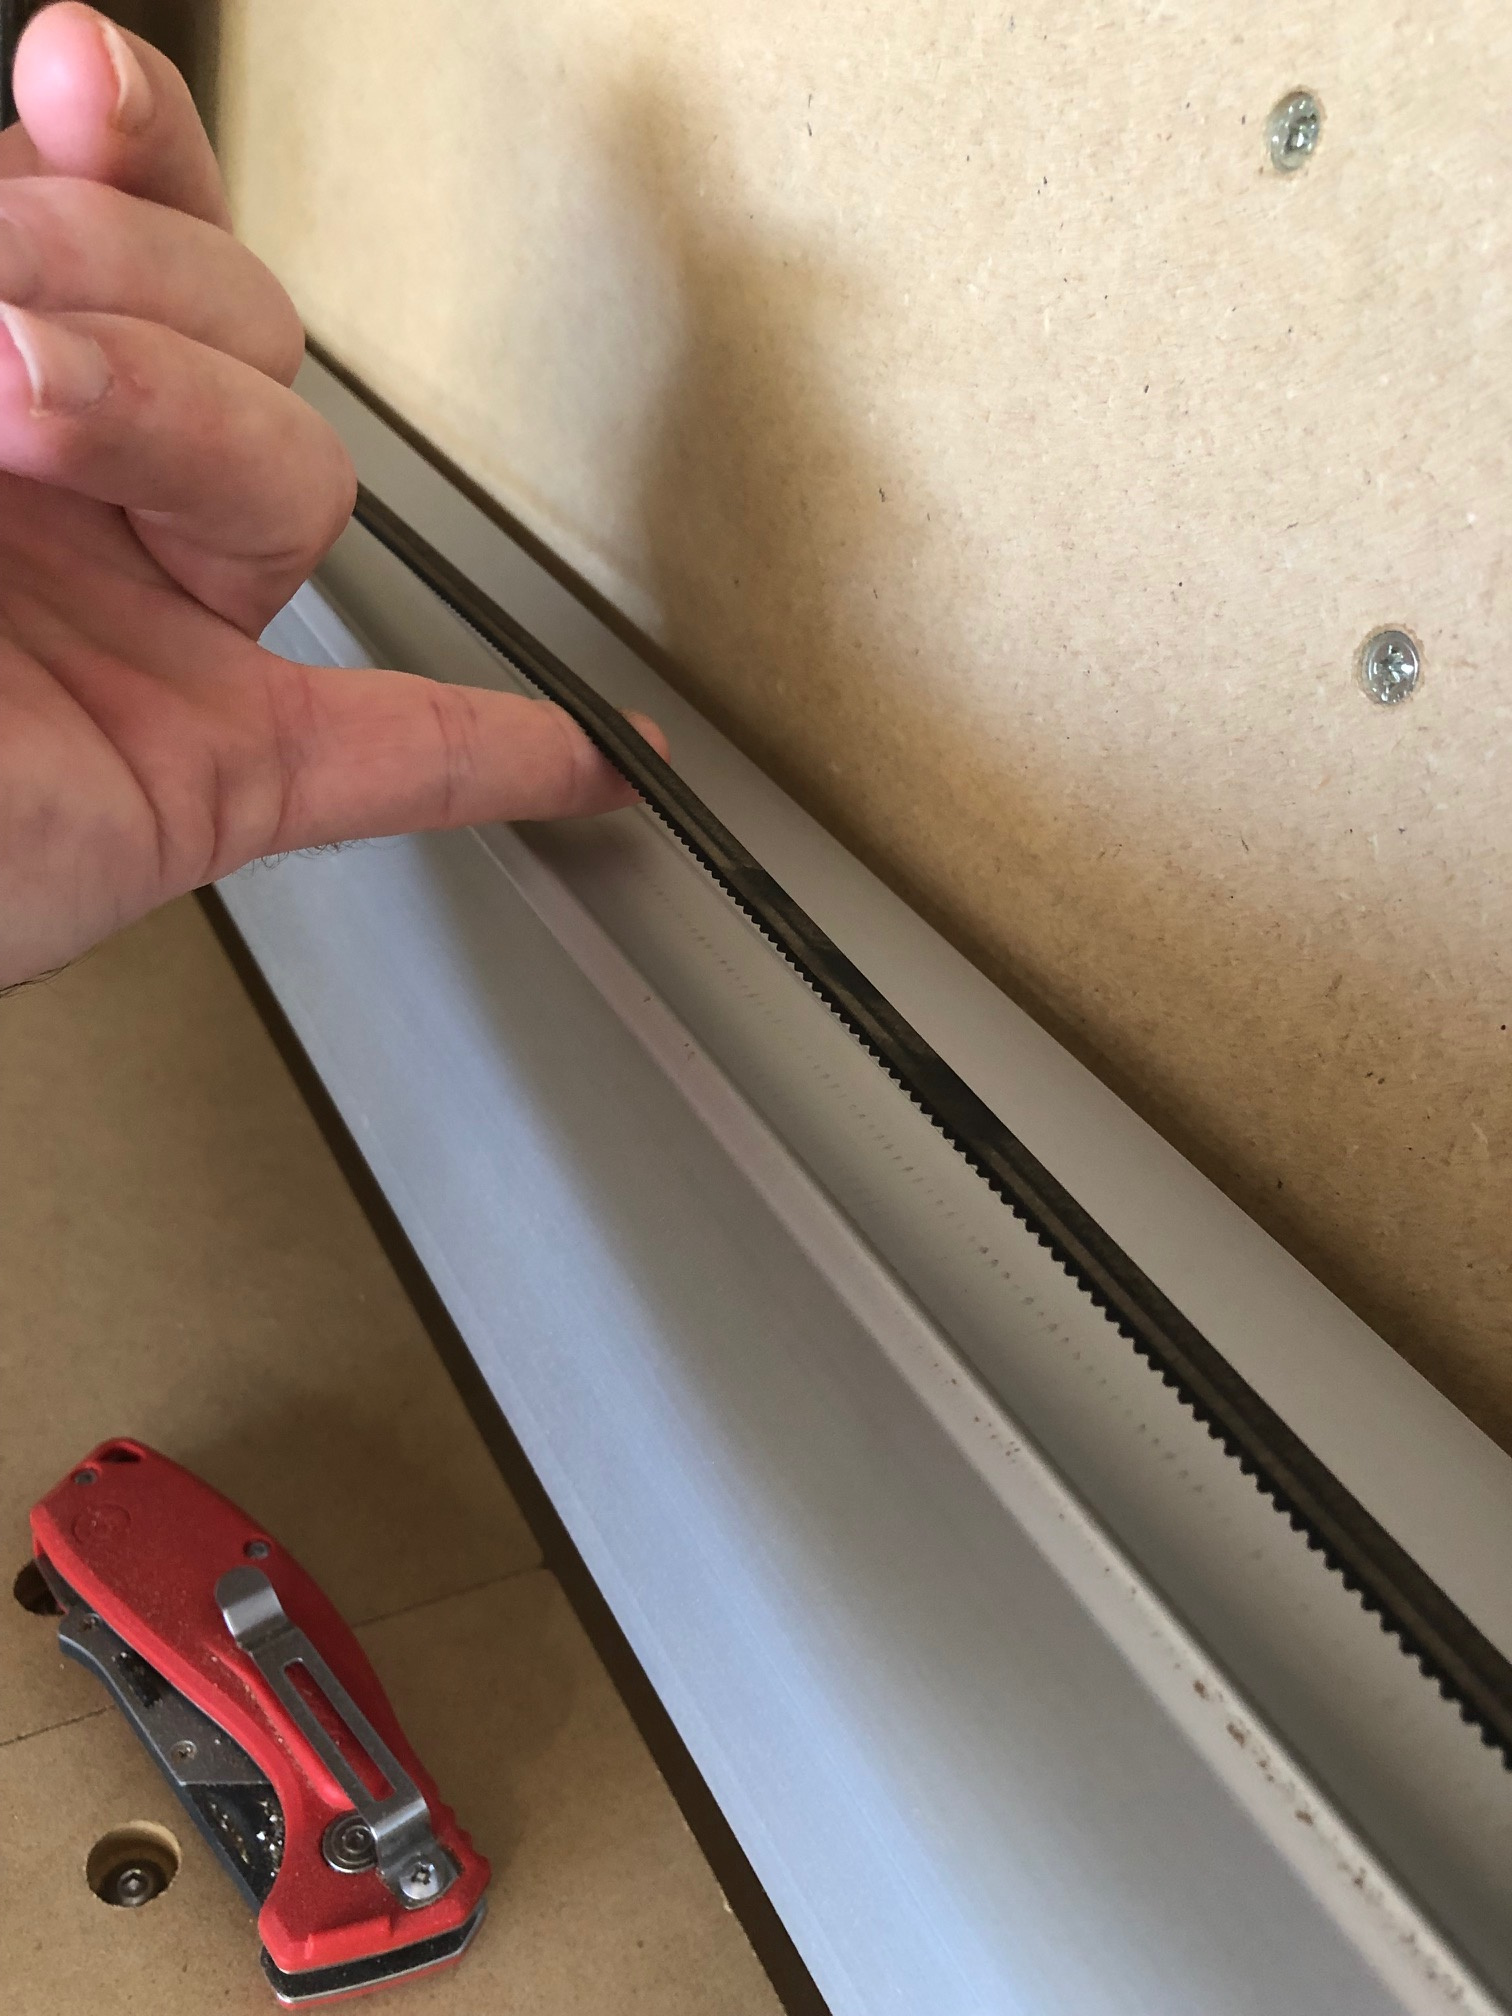
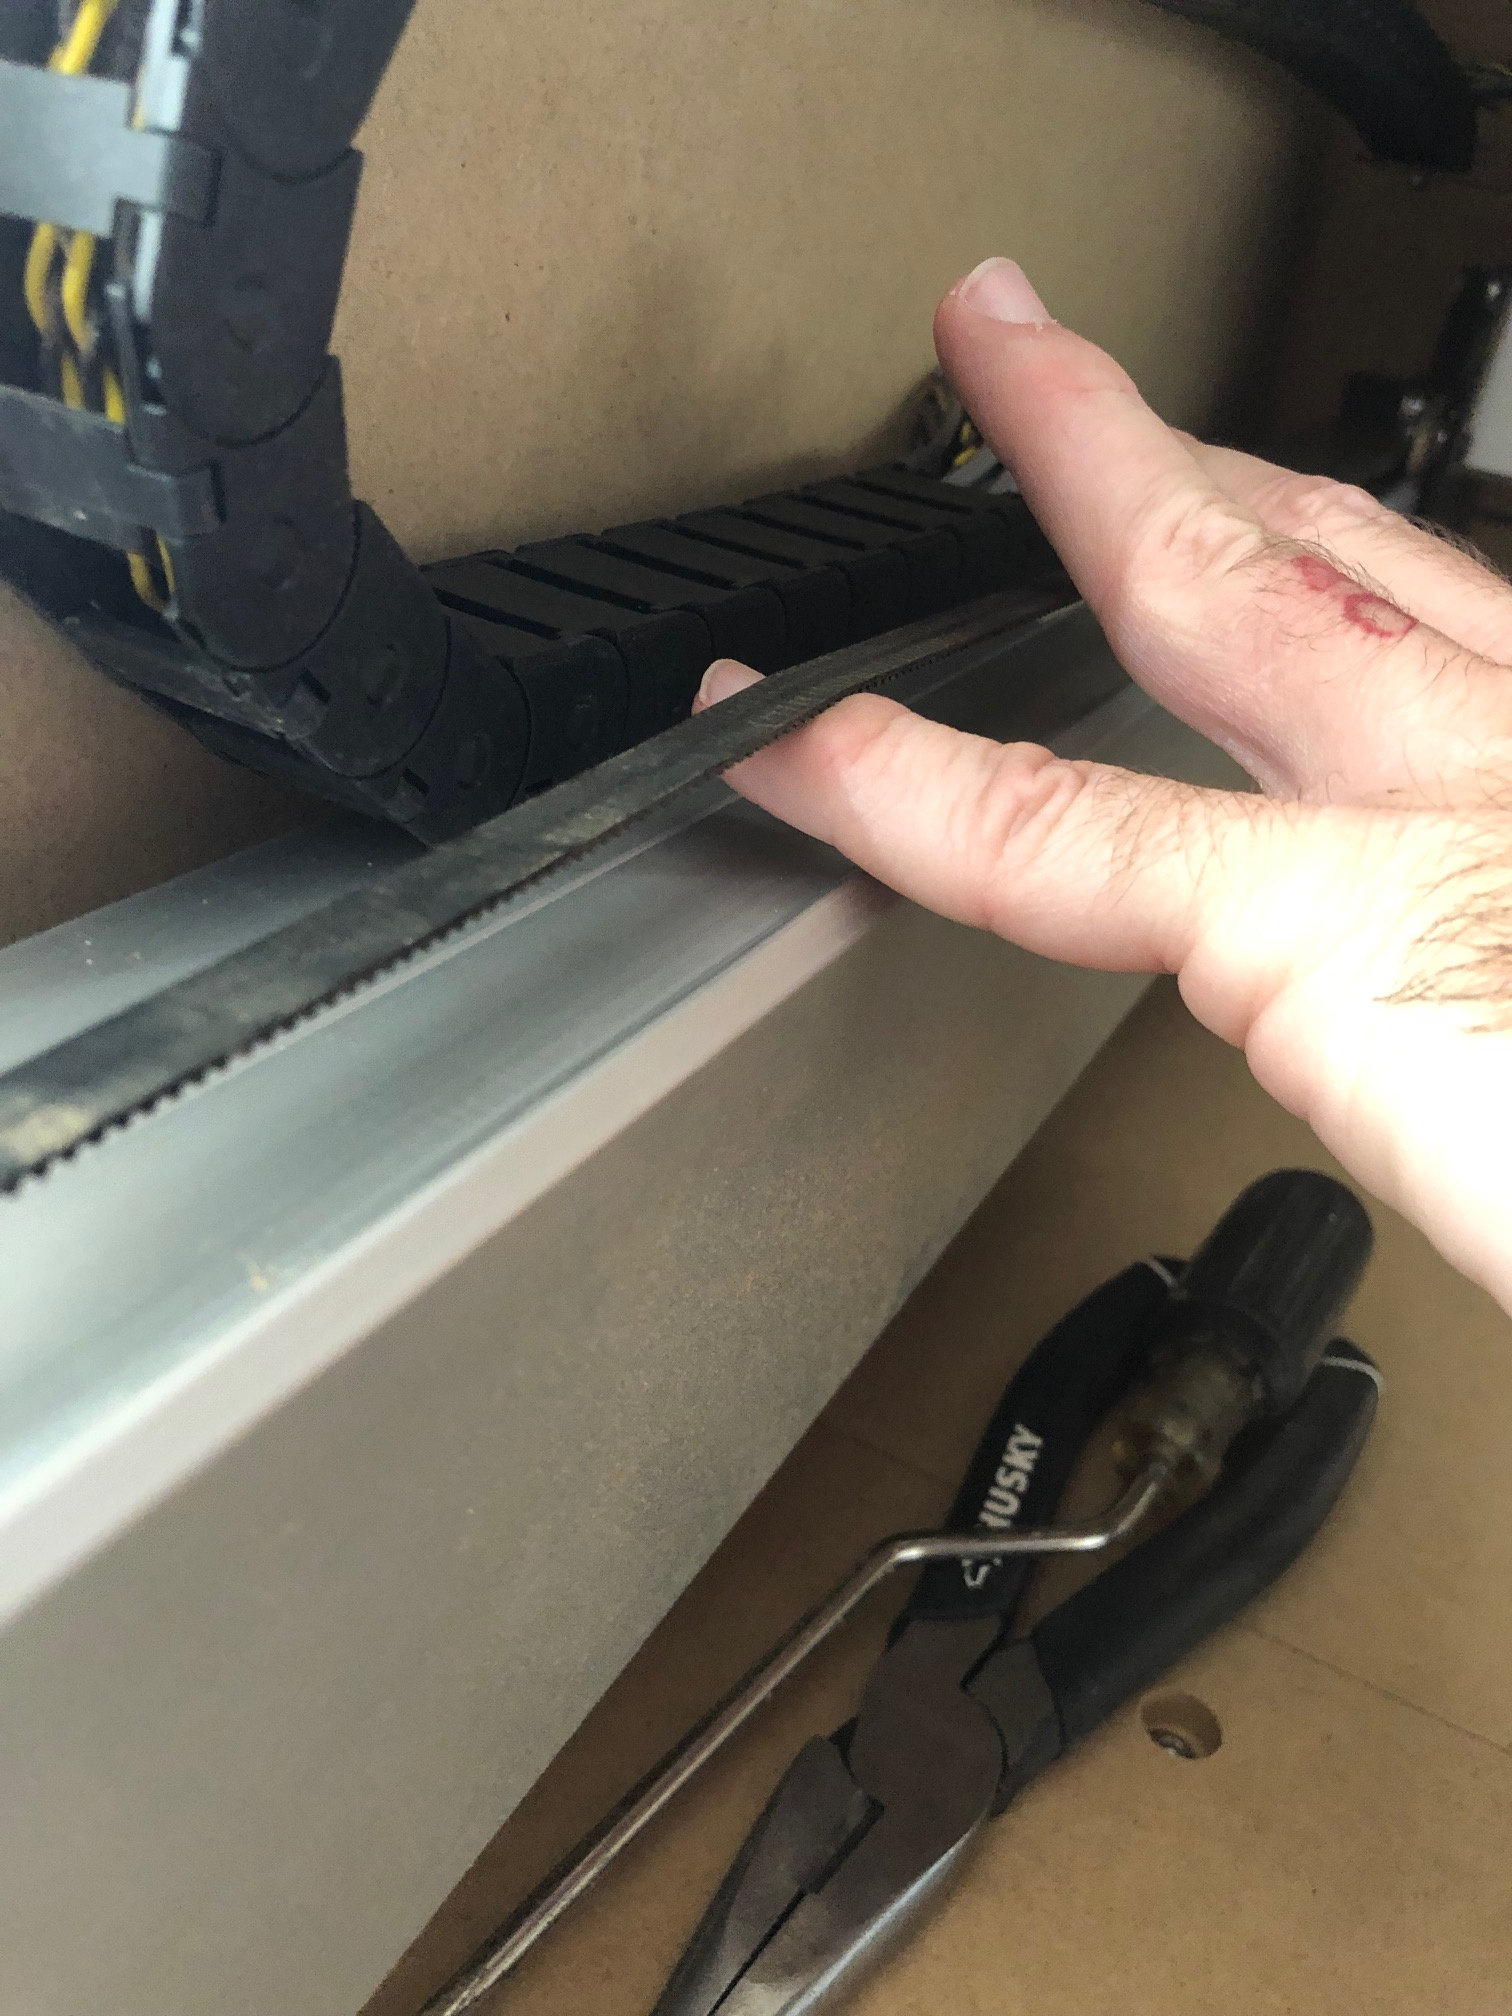
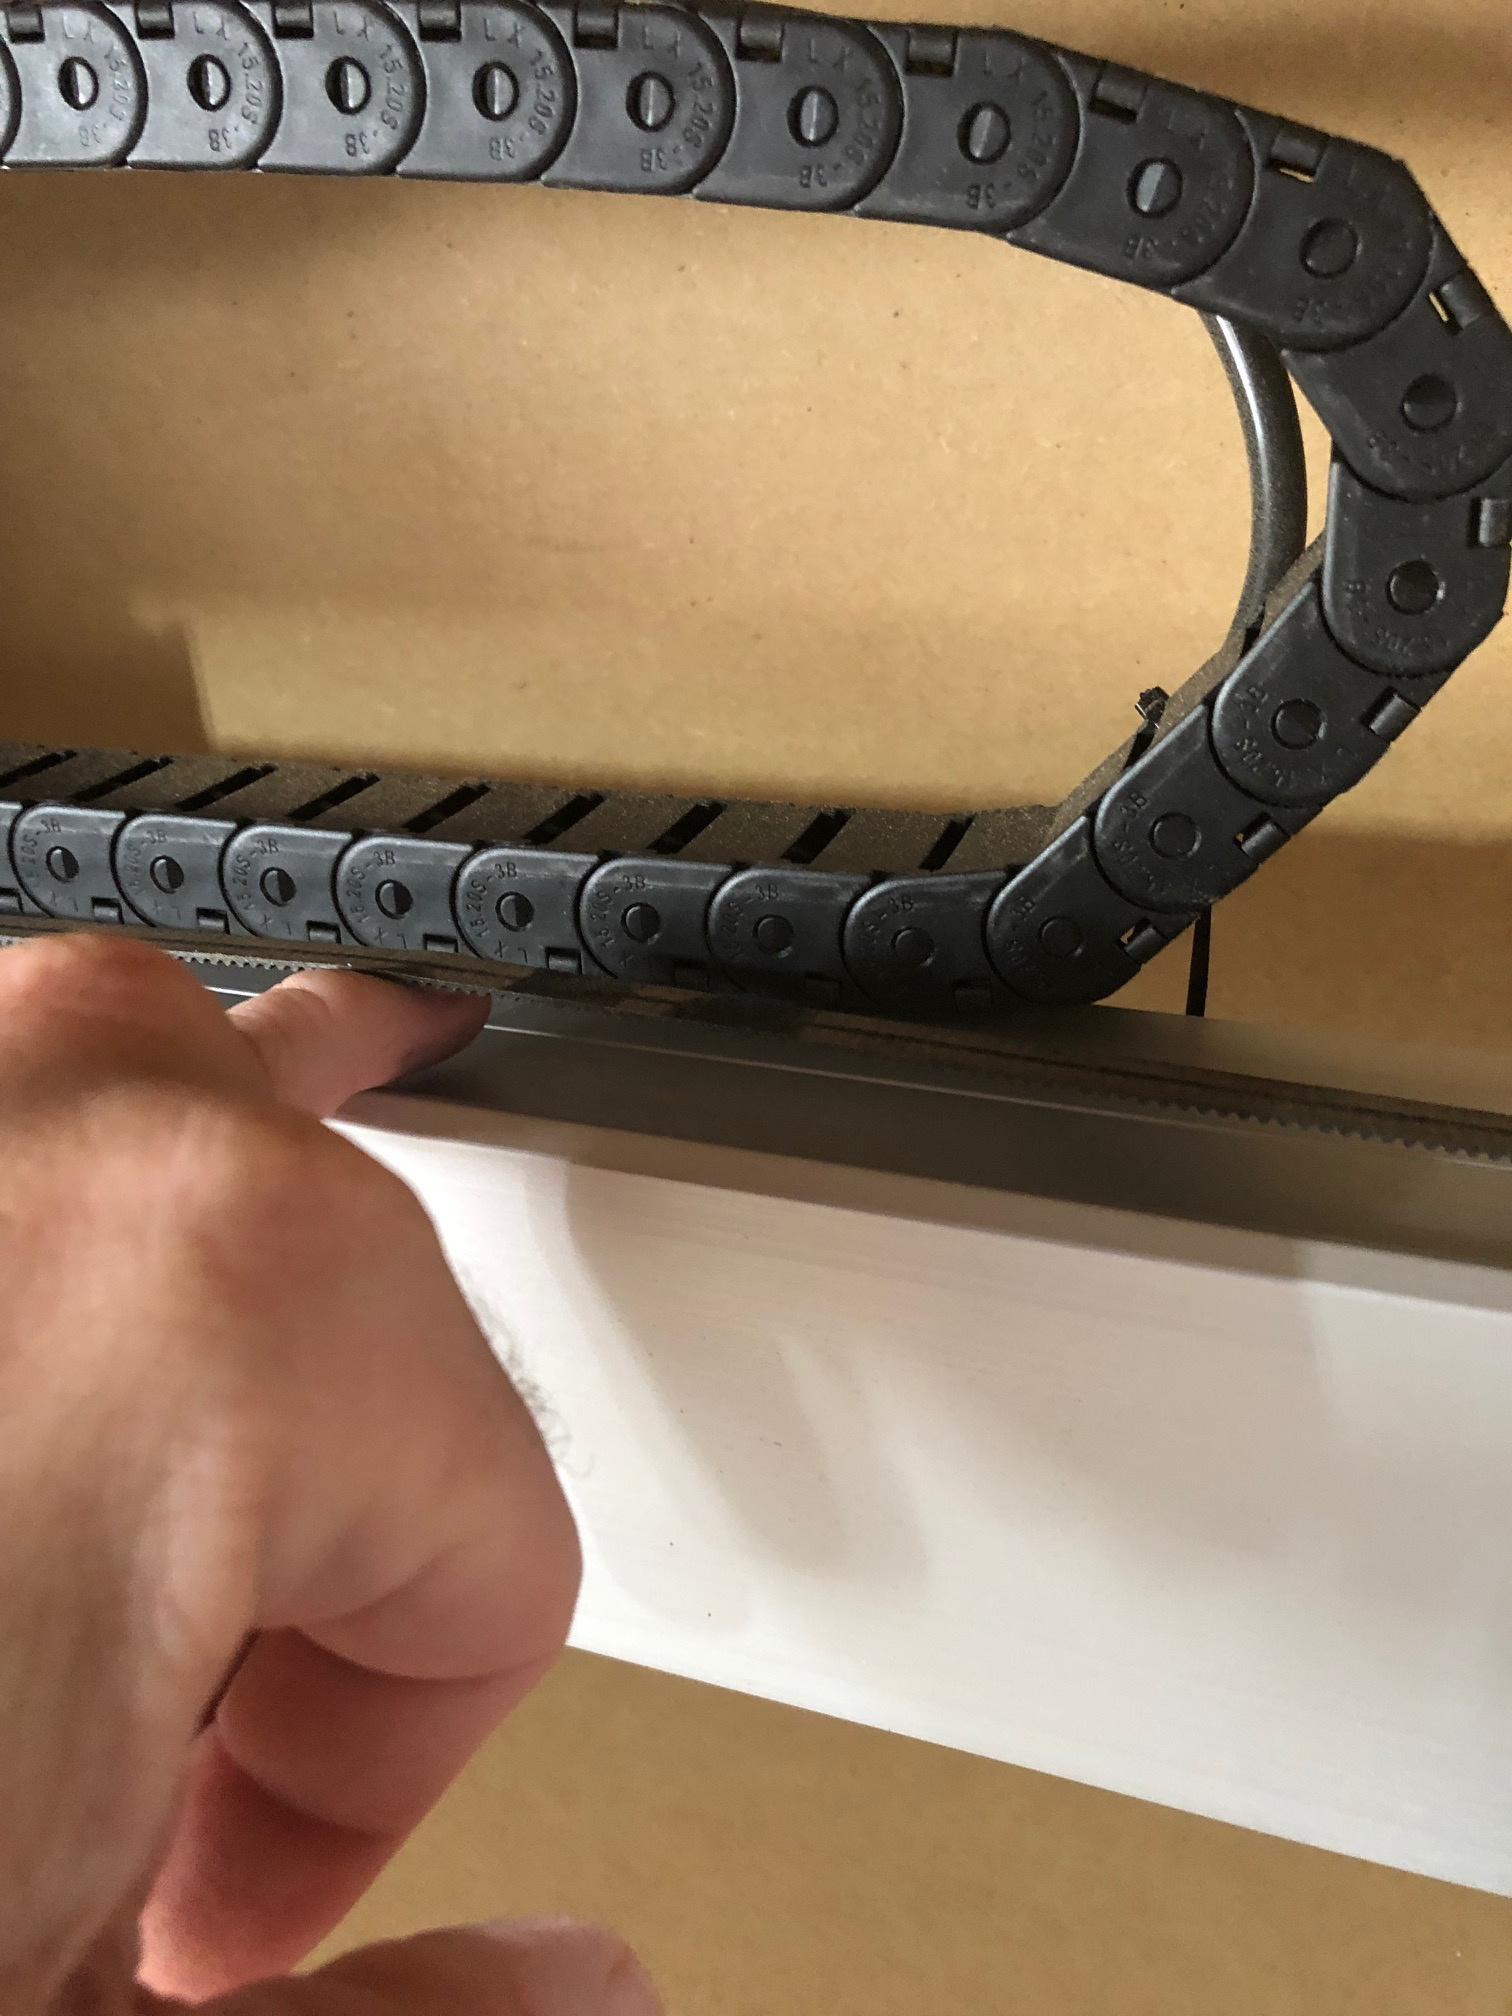
Here are some pictures i just took demonstrating checking my tension at the specified points. Little to no effort yields these results. Right, left, and gantry respectively.
I should note that I have the standard SO3, so I am not quite sure how properly tightened belts feel on an XL or XXL (since they have longer belts…).
But the fact that you can put a finger with “little to no effort” under it, and apparently more like two fingers (middle pic), tells me your belts could indeed use more tightening.
Quick tip to have a controlled way to tighten belts incrementally without going nuts: at one end of the belt, where the belt folds into the clip, use a marker or a tiny drop of white paint, to indicate which teeth is engaged with which, between the top and bottom part of the folder part. Then, release the clip/belt, and readjust the belt in the clip to reduce the length by, say, 2 teeth (that’s where the white mark helps), and put it back/tighten. Catching the thread may be a little tricky with the slightly shorter length, but that’s how it is with this tensioning system. Repeat as needed (maybe 1 teeth at a time) until the belt feels guitar-string tight.
Tensioning your belts will help, but all of this being said, if you did not hear any suspicious noise during the failed cut, chances are @stutaylo is on the money and this is more likely a set screw issue / pulley slipping on the shaft. You must have seen this already, it’s really critical to have that set screw on the flat notch on the shaft, it’s easy to miss and it may have slipped after you initially assembled the machine correctly, so definitely go and inspect all of your pulleys.