I’m in the process of exploring using fancier bits and other optimizations and wanted to document my efforts a bit so you can see lots of failure and maybe offer some insight.
The background is I’ve been doing a box project with a 1/8" upcut endmill, which has been fine but it leaves a lot of cleanup work. I started using an Amana 46180-K compression bit. The results are amazing, between that and using Cut2D to do some more advanced techniques such as ramping, lead in, and finishing passes, I have almost no cleanup to do after the cut. The only negative is the bit was absolutely screaming at me, so I backed off the feed rate significantly, which did help though not fully. Because of that my cut time went from ~15 minutes per box to over 30, which I’d like to try and get back down if possible.
So I began turning to GWizard and doing google searches to work out a reasonable speed, and basically ended up feeling like I have no clue what I should be doing. I’ve seen recommendations for 1/8" endmills from .0625 cut depth through .25" cut depth, speeds from 15ipm to 200ipm. The manufacturer recommends 20ipm with the goal of a .0005" chip load per tooth, whereas most guides I’ve seen for 1/8" bits in hardwood suggest .003-.005" per tooth, a full order of magnitude higher.
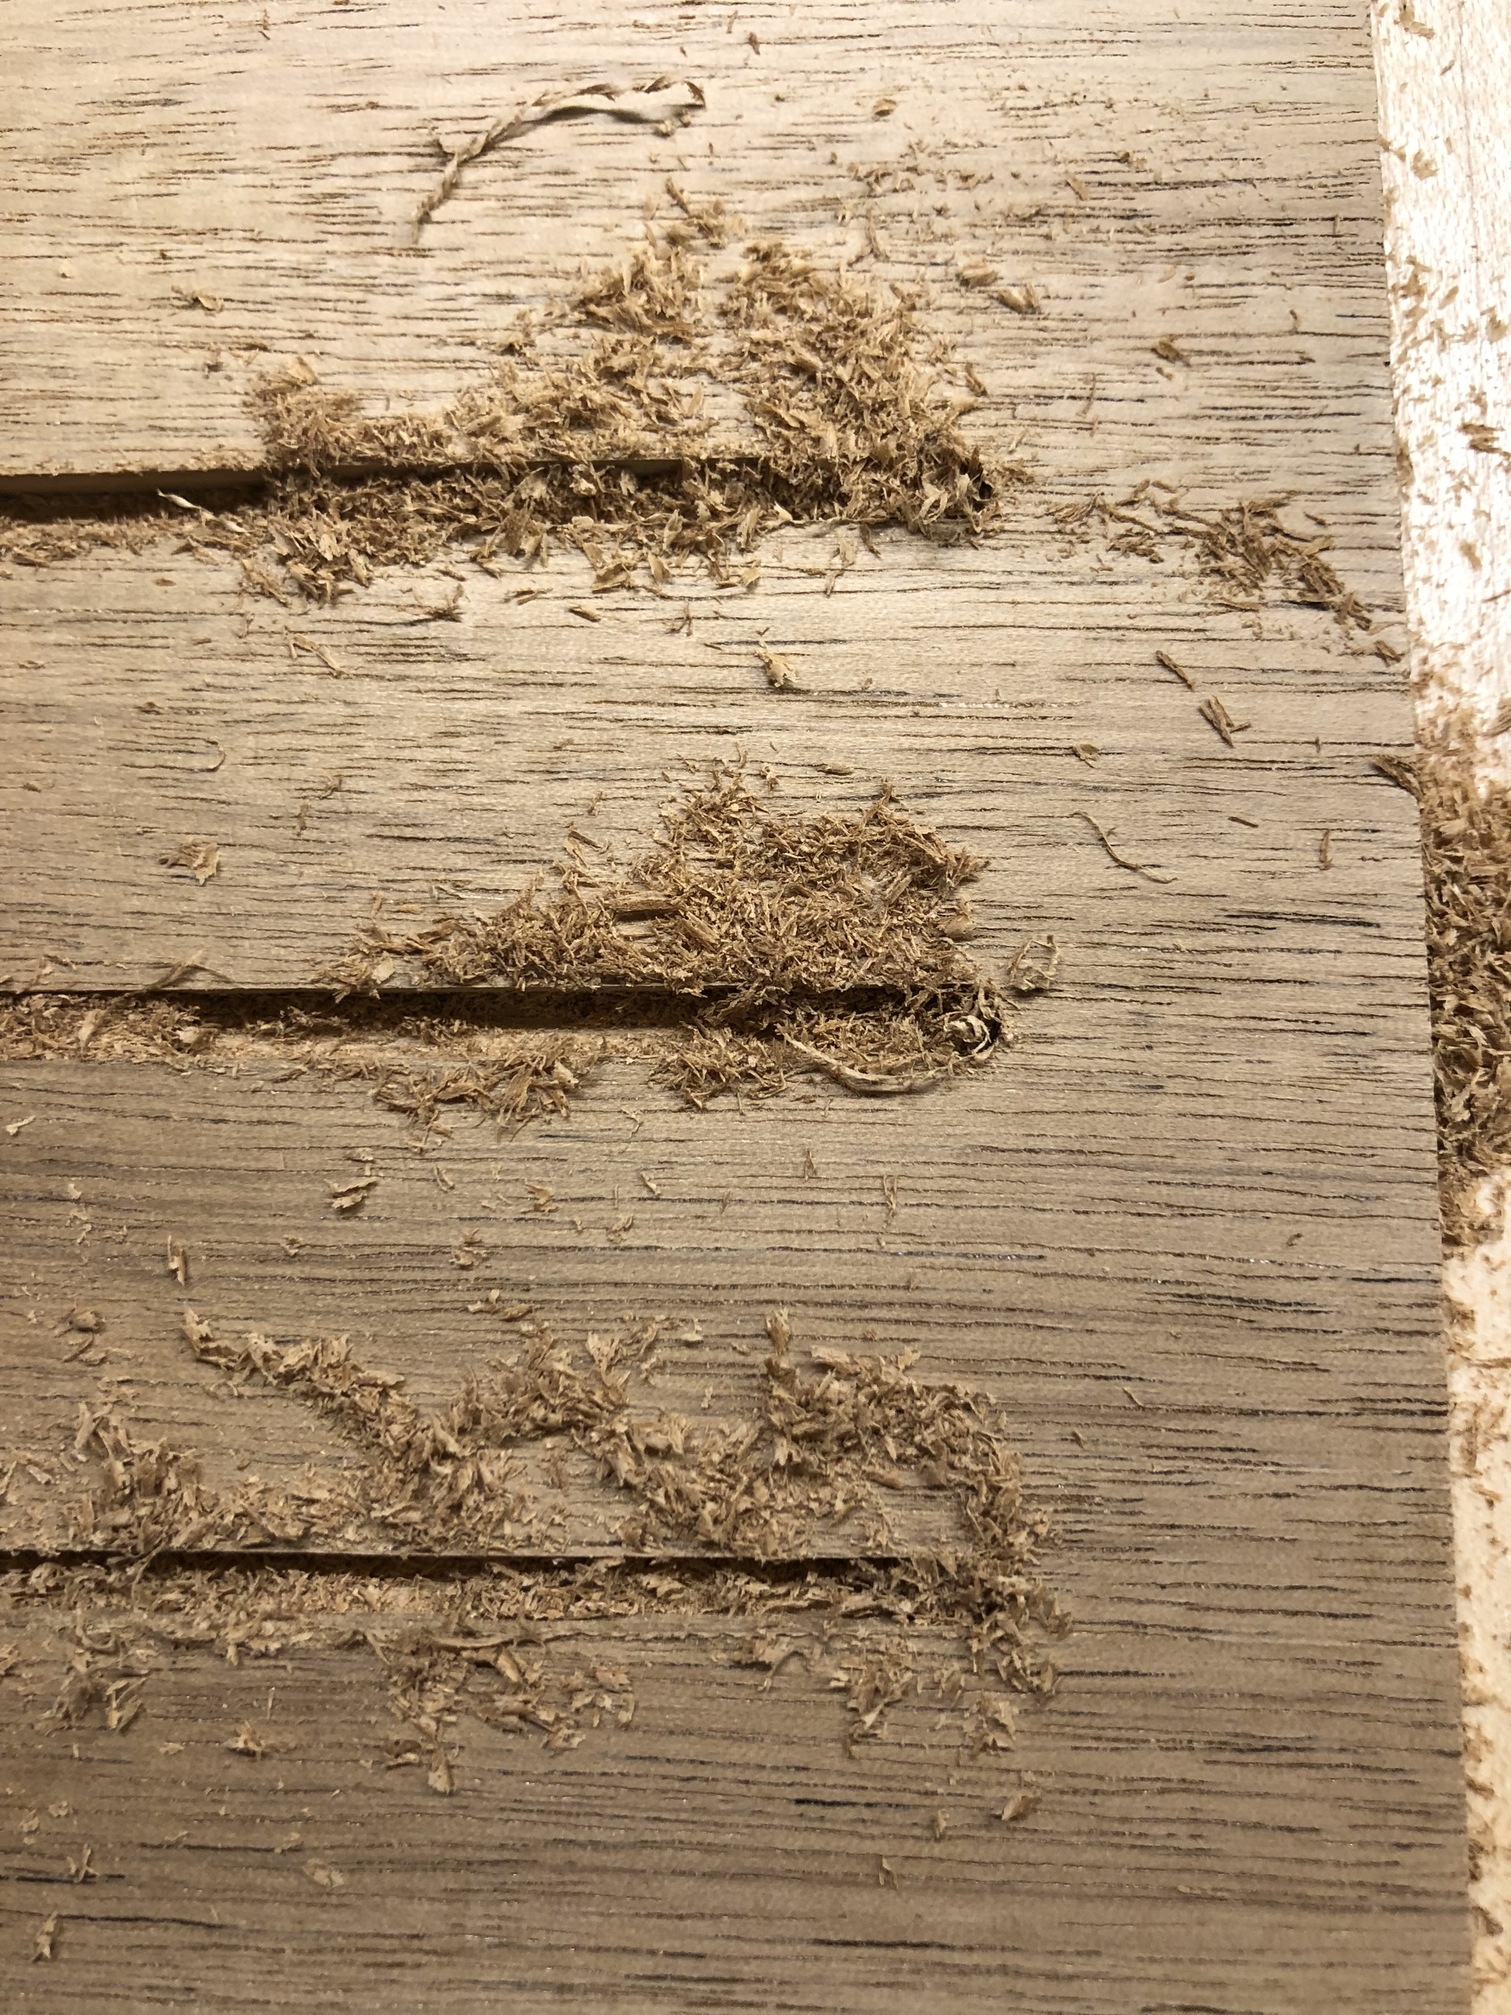
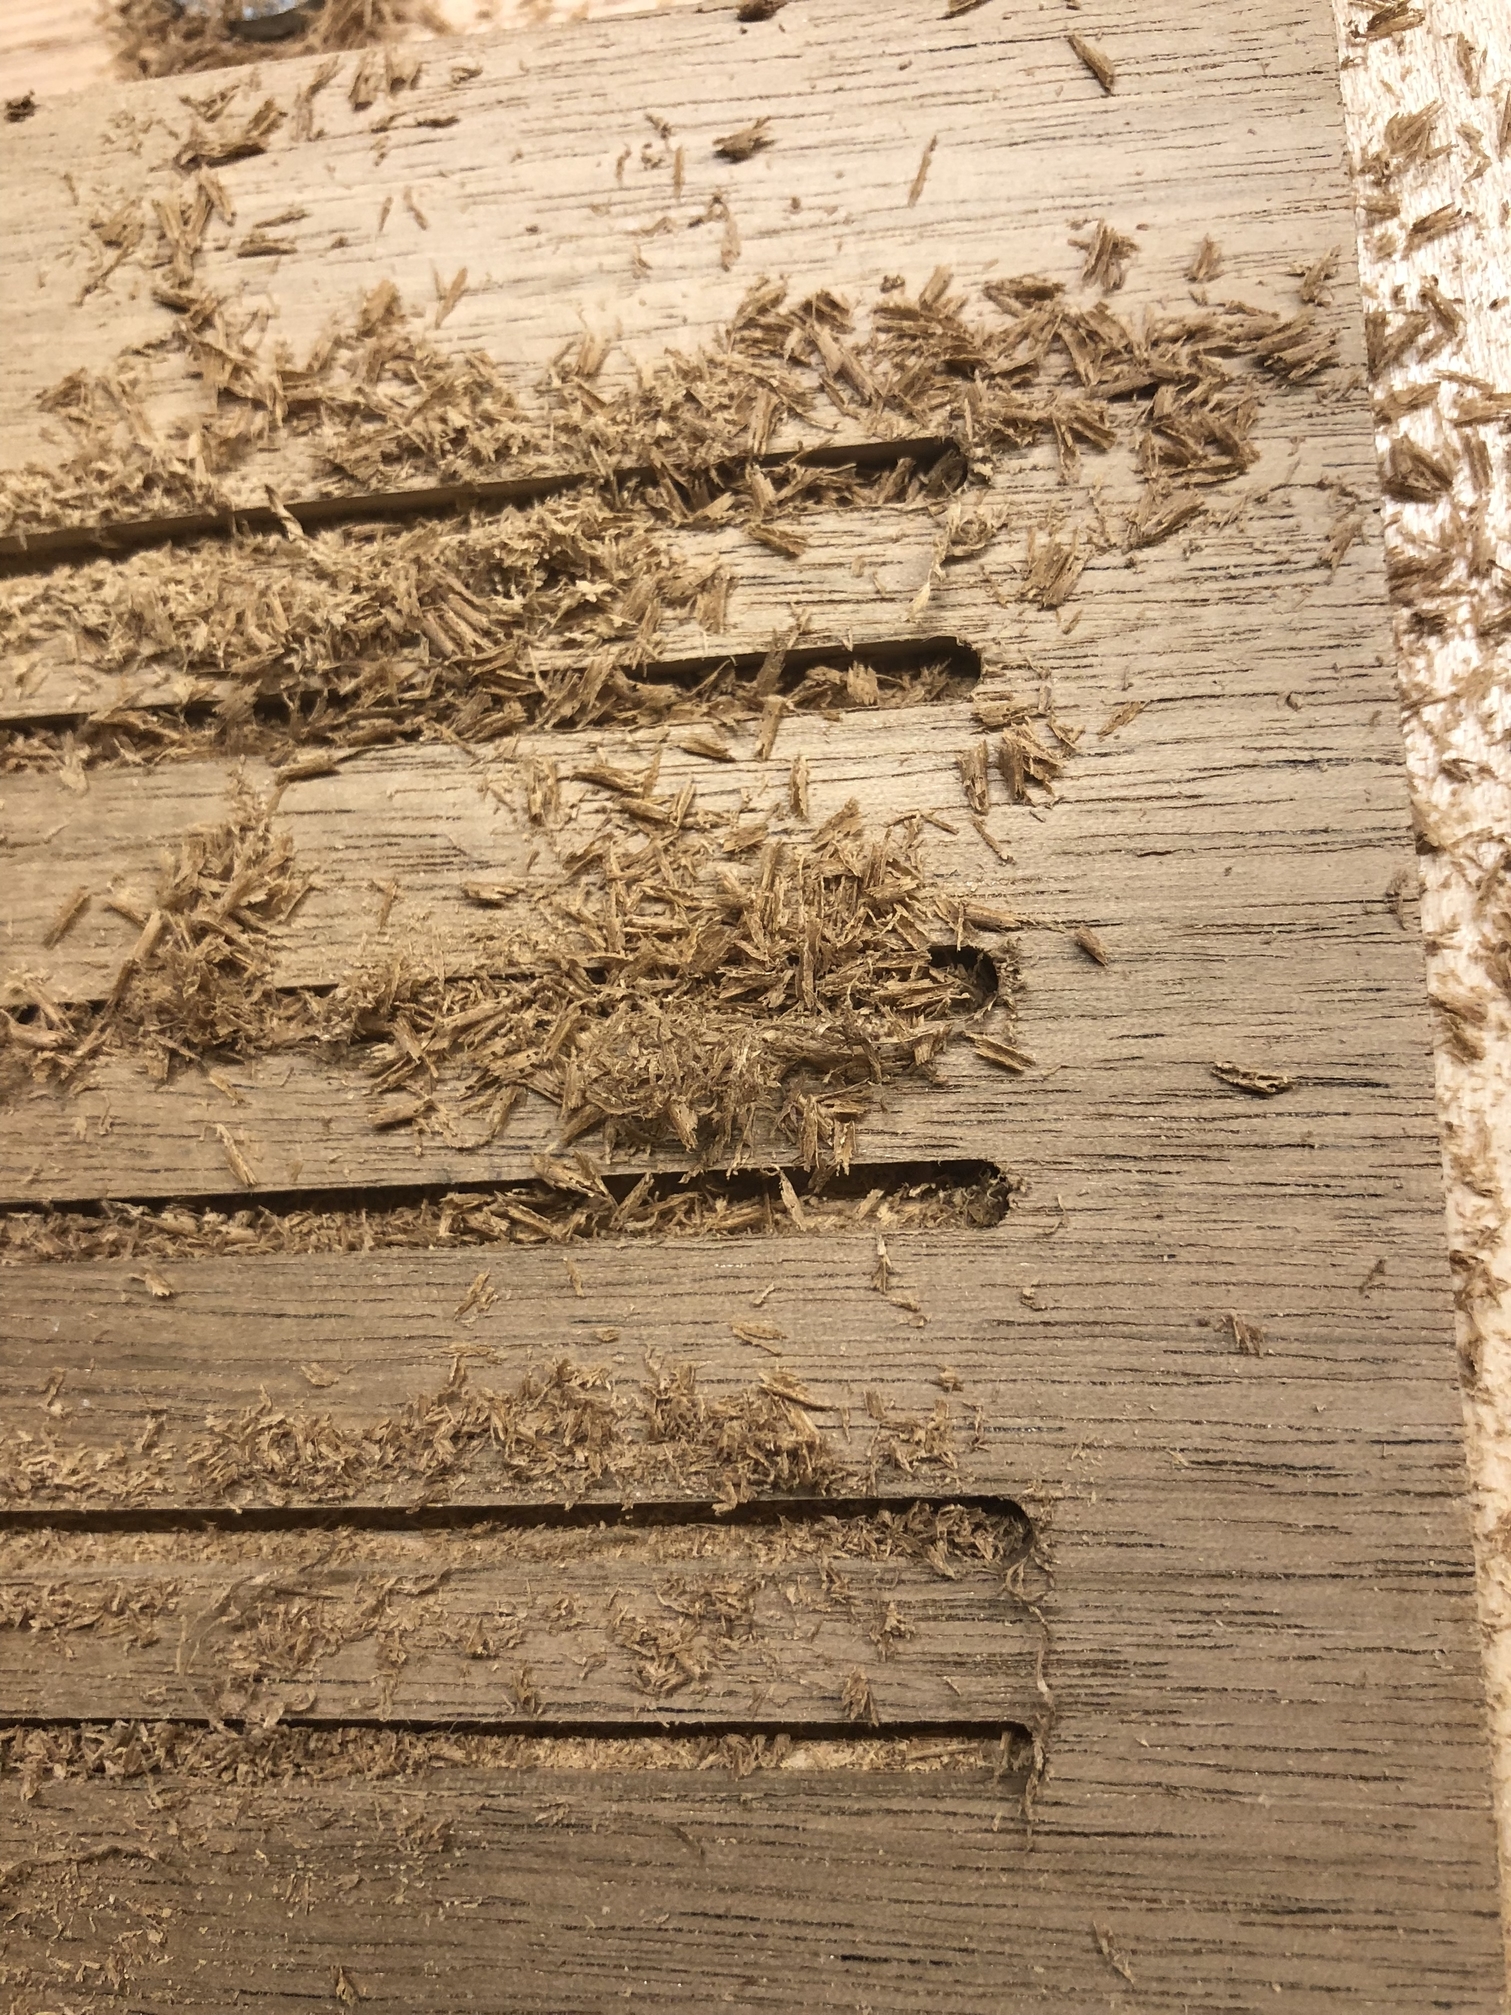
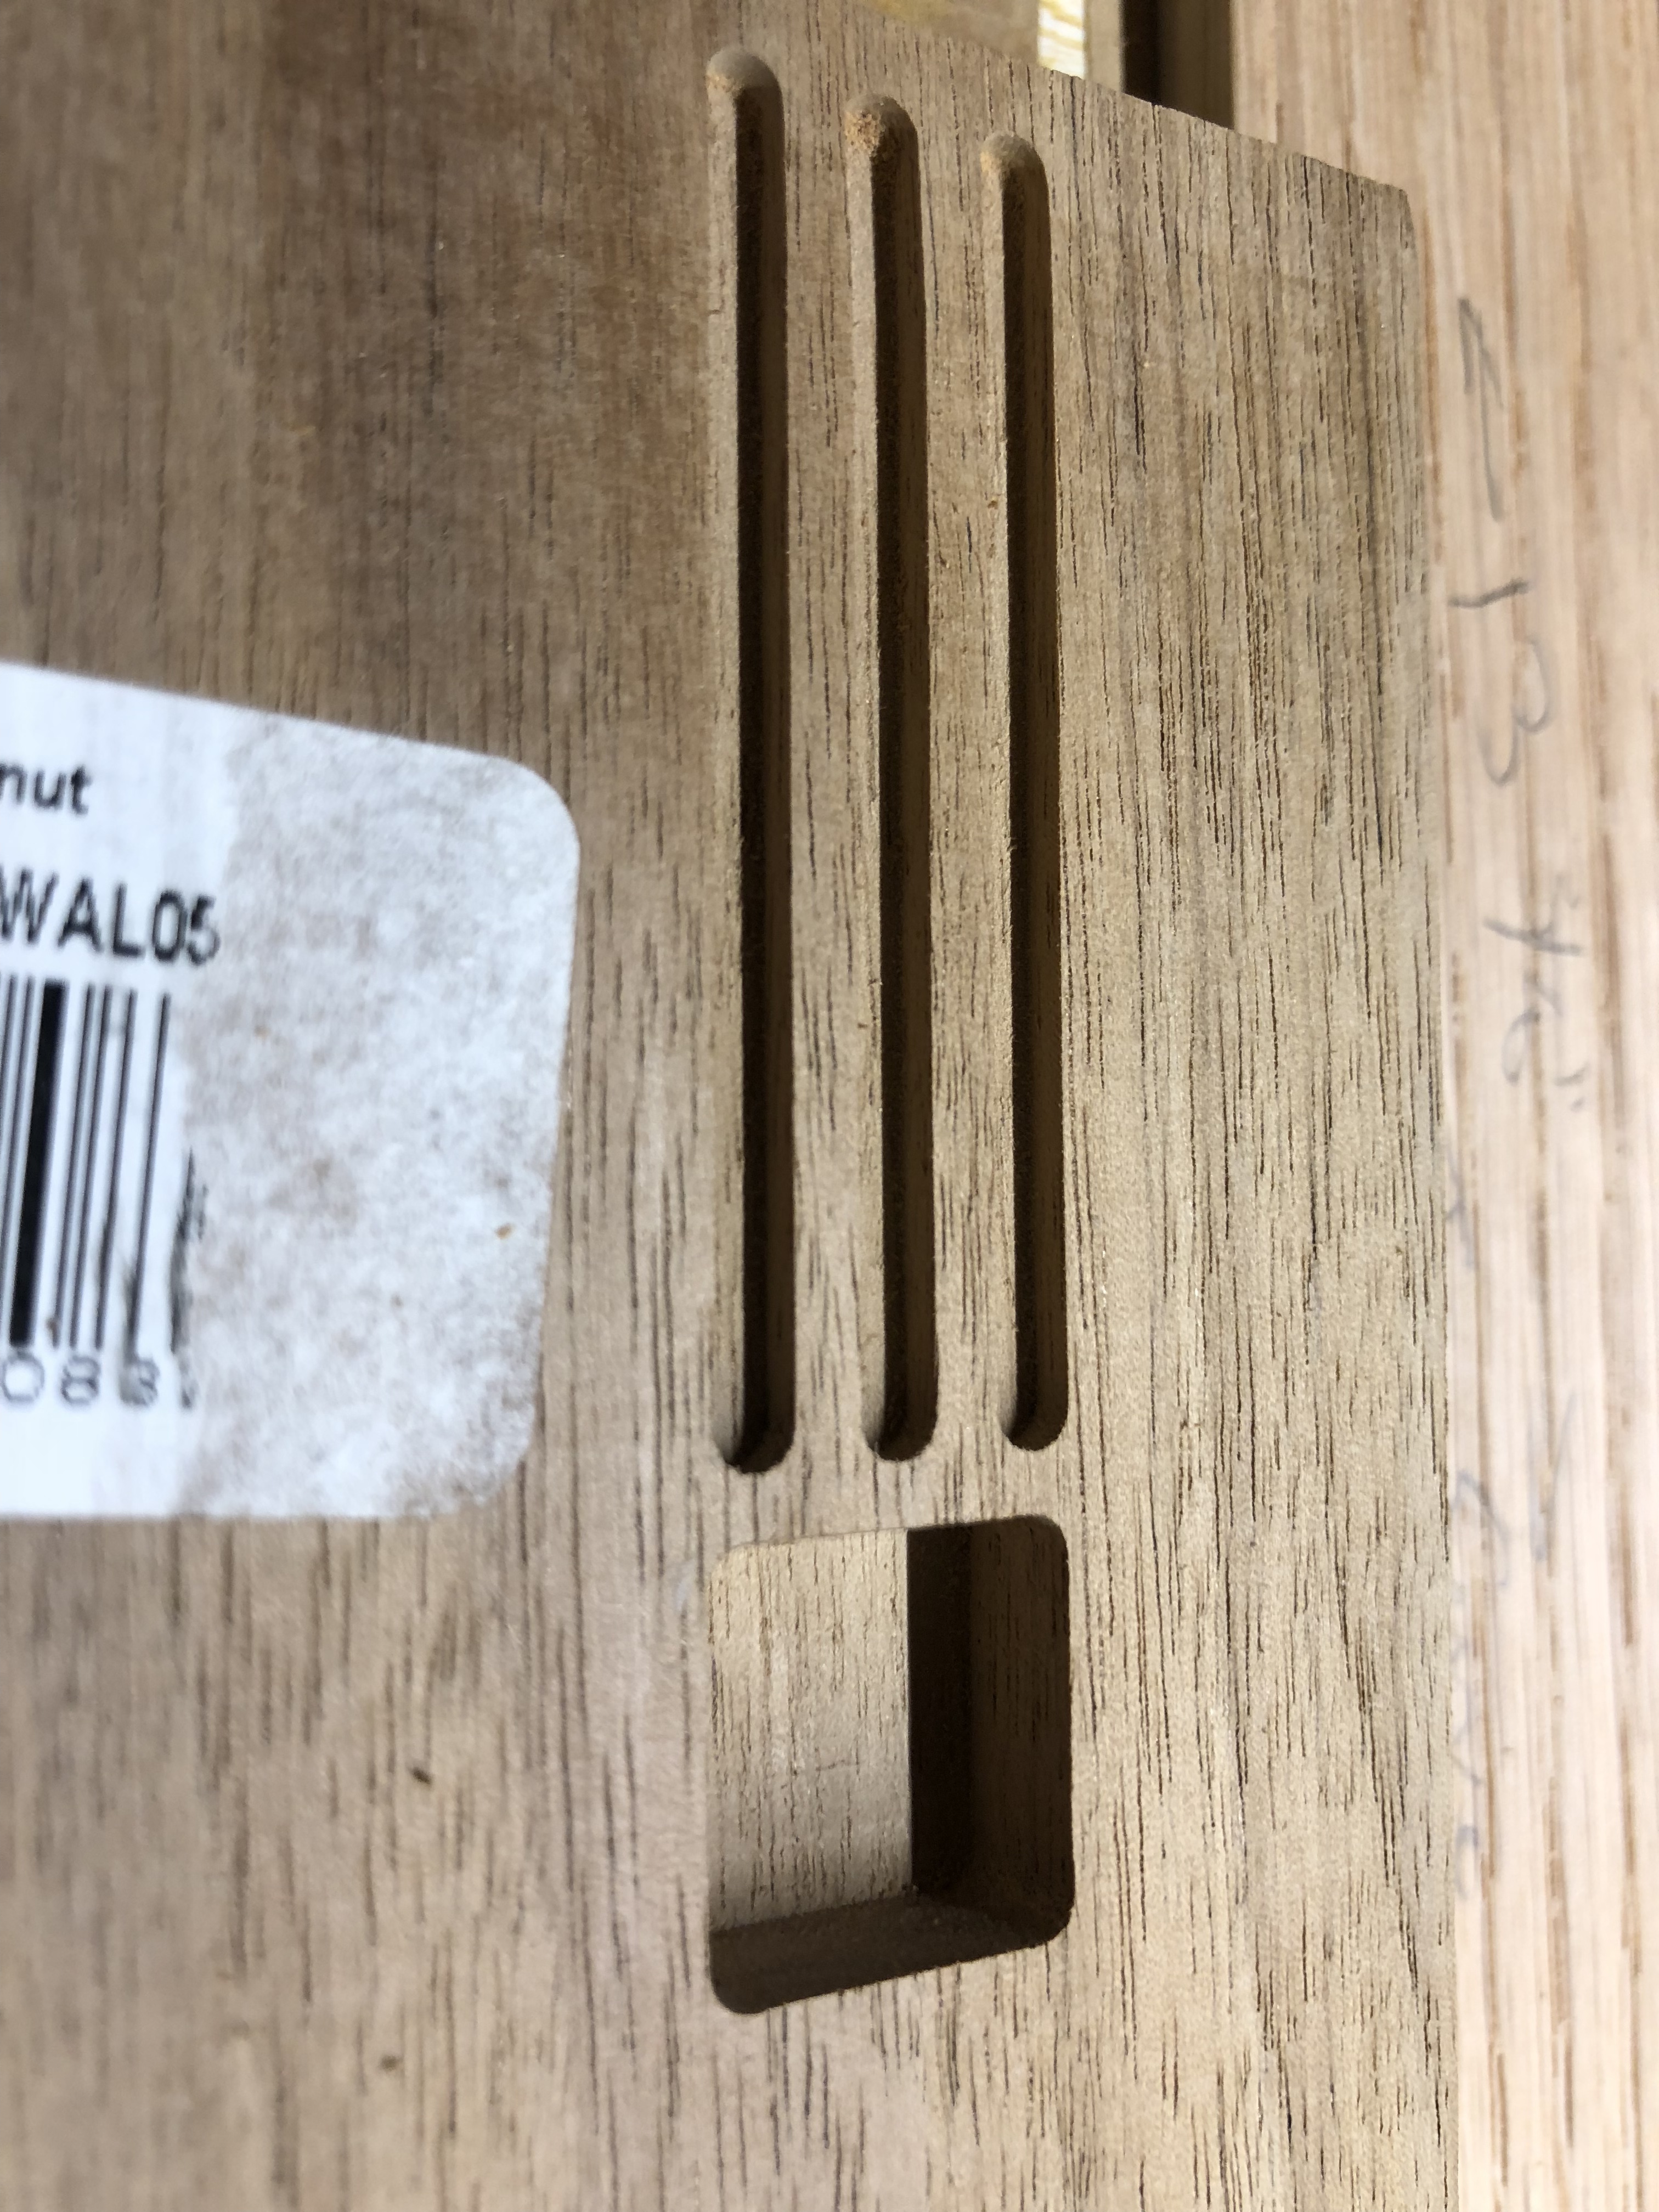
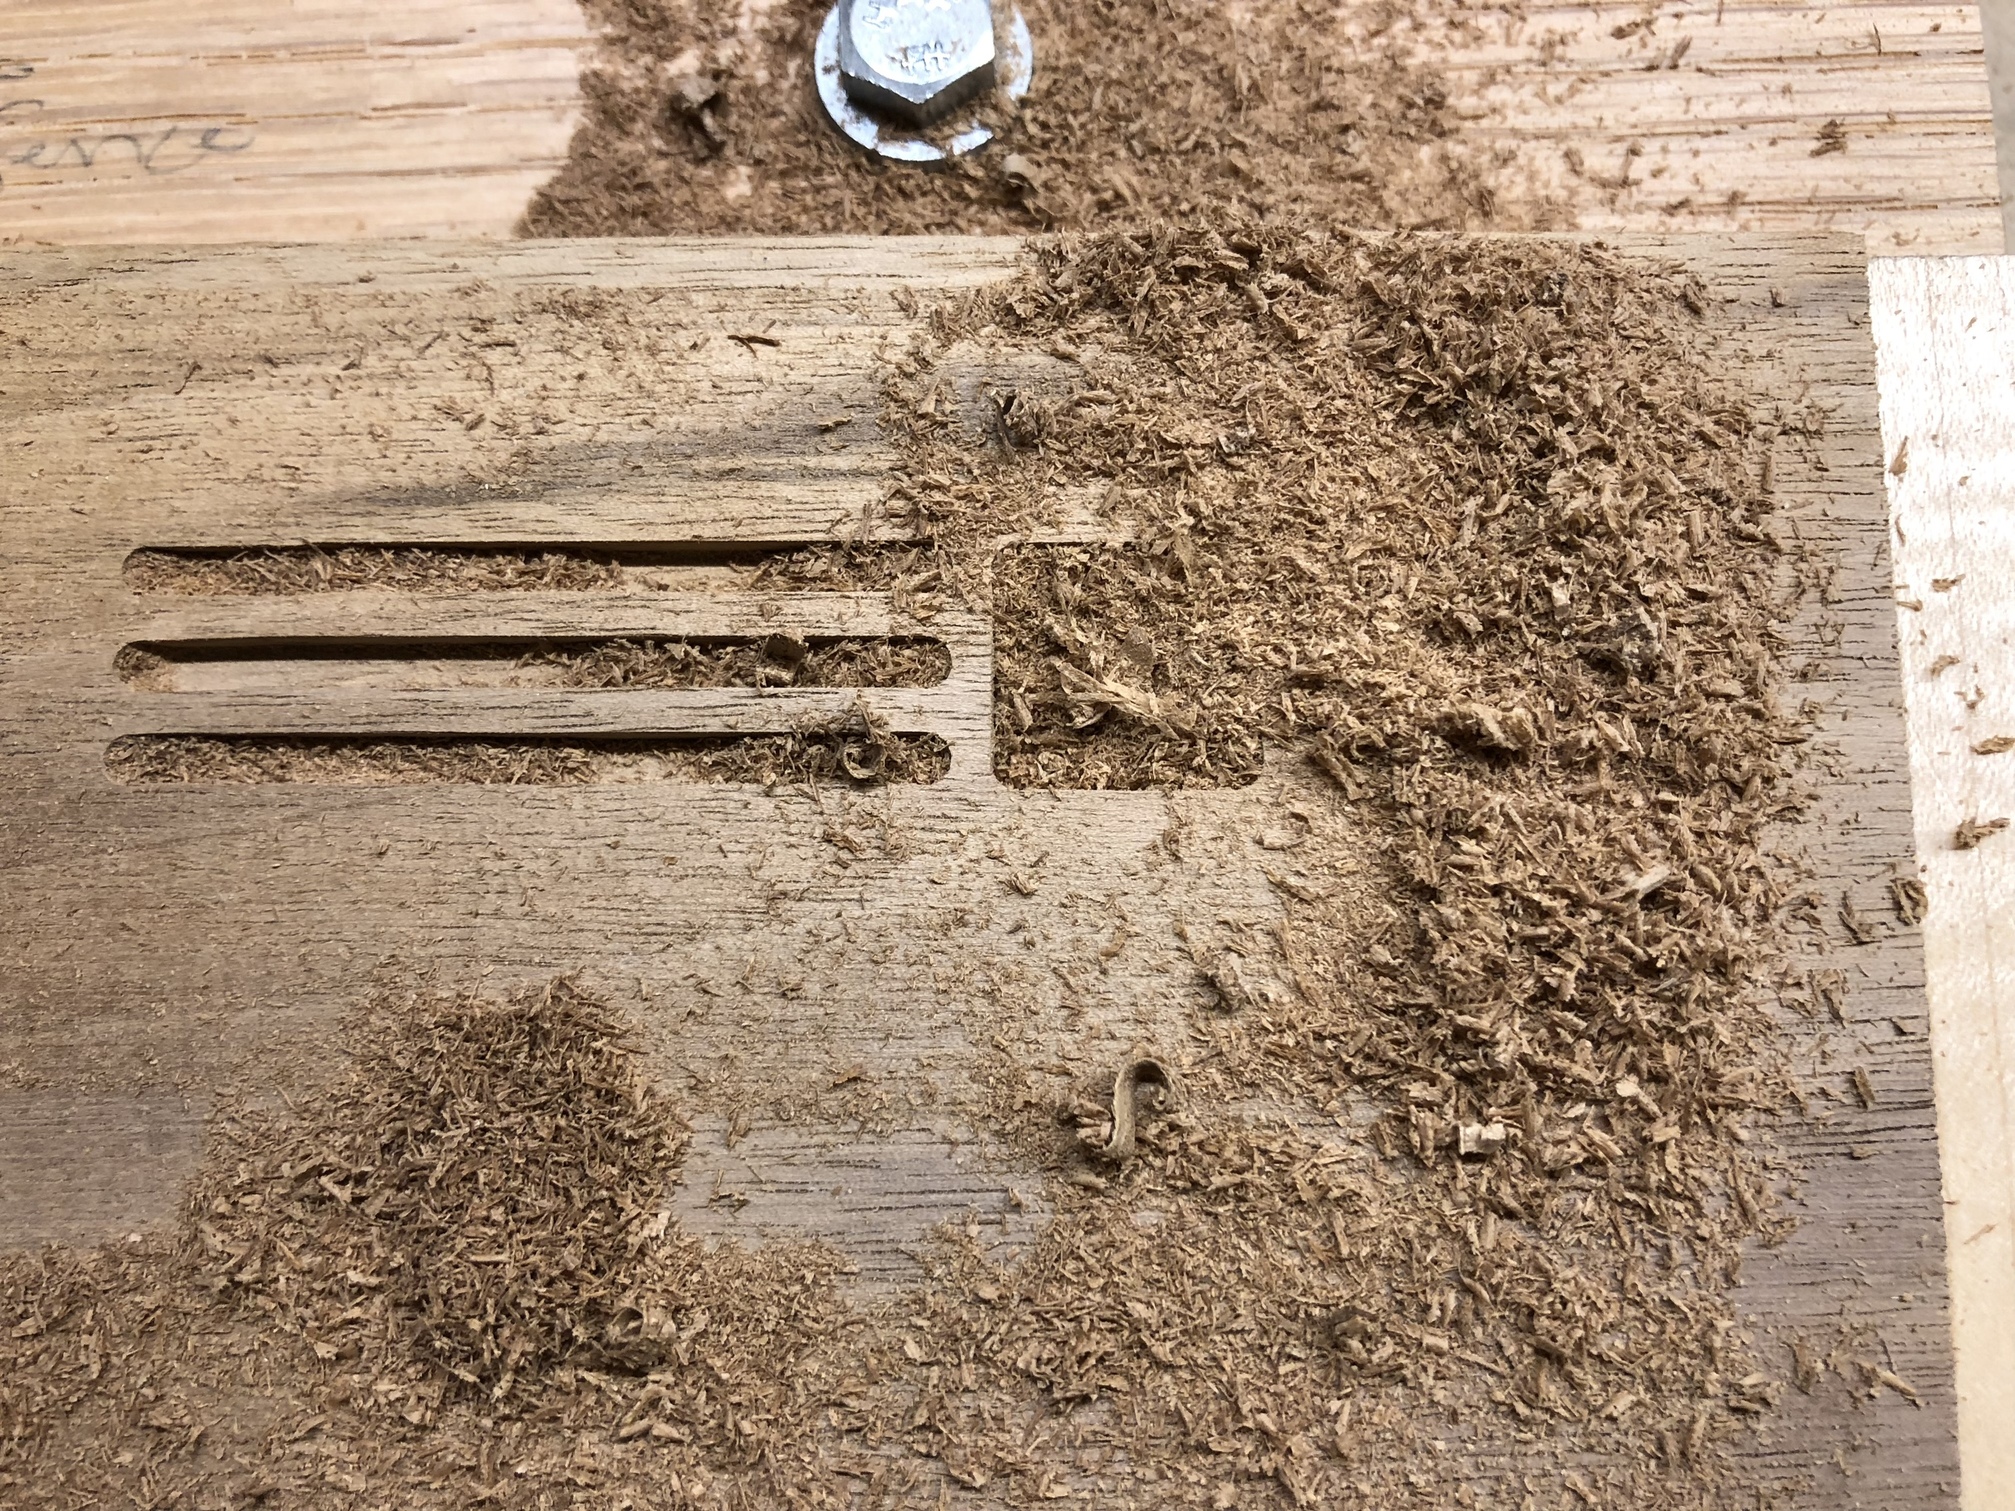
So I decided to put some cheaper 1/8" endmills in to do some testing. The videos below show the same test pattern. The first slot is .06" depth of cut, .12" total, 45ipm, the 2nd slot is .125" doc, .12" total, 45ipm, and the final one is .06" depth of cut, .12" total, 60ipm. The 2nd video is the same as the first but I blocked the dewalt fan so it wouldn’t blow all the chips away, the picture after the video shows the chips, I feel like the bottom is ‘chippier’ than the other two. The 2nd slot sounds like it’s struggling, or is that just me?
I see a lot of advice to listen to the machine and go by sound, but I’m realizing I just don’t have a good reference point for what it should sound like. I’m wondering if people have any insight based on hearing the machine run, am I underpowering it? Should I be trying to go even faster? Or am I already pushing it?
Great write up,I was told years ago that if the bit is screaming its hungry and either speed up the feed rate or rpm.Ive during cuts have had the scream and over came it by turning up the router. Its not ideal but in the middle of a cut didnt have a choice to add a little wear on the router.Any time ive gone back to recut said item i made the ipm a little faster instead of wearing out the router to overcome the scream.I will follow this and hopefully learn along with you
Speeding up the RPMs actually decreases the chipload as you’re taking cuts more often as you cut, whereas increasing the feedrate does the opposite and has you taking larger chips. So that’s the kind of advice I keep seeing and clearly that isn’t correct because they accomplish the literal opposite result, and yet by your own experience both helped the problem you were getting.
In my video the first and last cut at the most comparable, both are two passes at 1/2D, one at 45ipm one at 60, the 60 is louder, but then again it’s not quite screaming the way I was getting before (though to me, it sounds like it’s starting to struggle) so I’m not sure that extra loudness suggests any kind of issue.
I hear chatter in the first video -very- clearly with the second and third lines. You can hear the bit some in and out of resonance.
<coming back after finishing this, it’s way longer than I intended…but it might still be helpful>
There’s a balance between depth of cut and speed, and you can find multiple nodes the work - ie. deep cut, slowly may make the whole job be faster than a light cut very quickly, and sometimes the other way around. Often, this doesn’t matter for us - the jobs are short enough, and one-time-enough that it doesn’t make sense spending a bunch of time trying to find MRR (Maximum Removal Rate) and we can go along with something conservative and be just fine.
For me (my experience here, might not be what works for someone else) I find that the faster I want things finished, the more it makes sense for tool changes from 1/4" end mills for hogging things out to 1/8" mills for the more detail work. The removal rate of the 1/4" mill is SO high without chatter in so many materials, if I’m making a panel of the same thing, I can easily justify doing a pass with a 1/4" tool, then spend a minute or so changing the tool, and still come away with a much shorter total machining time. MY (me…) threshold for that is a about a 30 minute cut time project. More than 30 minutes, and I’ll spend the time generating a roughing toolpath to see how much it would save me…it’s usually a lot with the things I do… Deep slots, cutouts to release material from the parent material, and so forth usually benefit a lot, but it does mean changing the order of things sometimes, or reinforcing tabs to make it really work well. It does often consume more material, or change the spacing between objects, but sometimes that doesn’t matter as much as taking and hour out of a 2 hour job.
Another big problem with wood is that…well, it’s wood. Even from board to board of the same species it varies, as does what happens when you cut with vs. across the grain. I haven’t seen any CAM that understands grain.
Yeah I hear it a bit as well, what would your recommendation be? I’ve checked the machine over for anything loose, I could try adjusting the rpms up/down a bit to try and avoid resonance, but as you pointed out it seemed more pronounced when cutting deeper at the same speed or shallower but faster.
I’ve considered a 1/4" roughing but avoiding it because I’m only making them in batches of 4, I could potentially up this to 8 which would make it worth it but I don’t always need 8 at a time. But regardless there isn’t a ton of material that can be hogged out. The biggest effect would be on the areas between the boxes, at the moment I have a bunch of 5x10" blanks cut and the blanks don’t leave enough room for me to add enough space unfortunately, once I get through these I could make them 11" blanks which should give me the room.
Based on the chatter observation I ended up redoing all my belt tensions and checking things over generally. I also increased the speed on the router 1/2 a number, nominally ~800rpms it looks like. To me this sounds much worse, even though increasing RPMs should in theory reduce chatter if it’s caused by feed/speed mismatch. Chips now look much better on the first, .06"doc/45ipm cut and about the same on the 2nd, perhaps slightly smaller, the .06"DOC@60ipm is closer to sawdust.
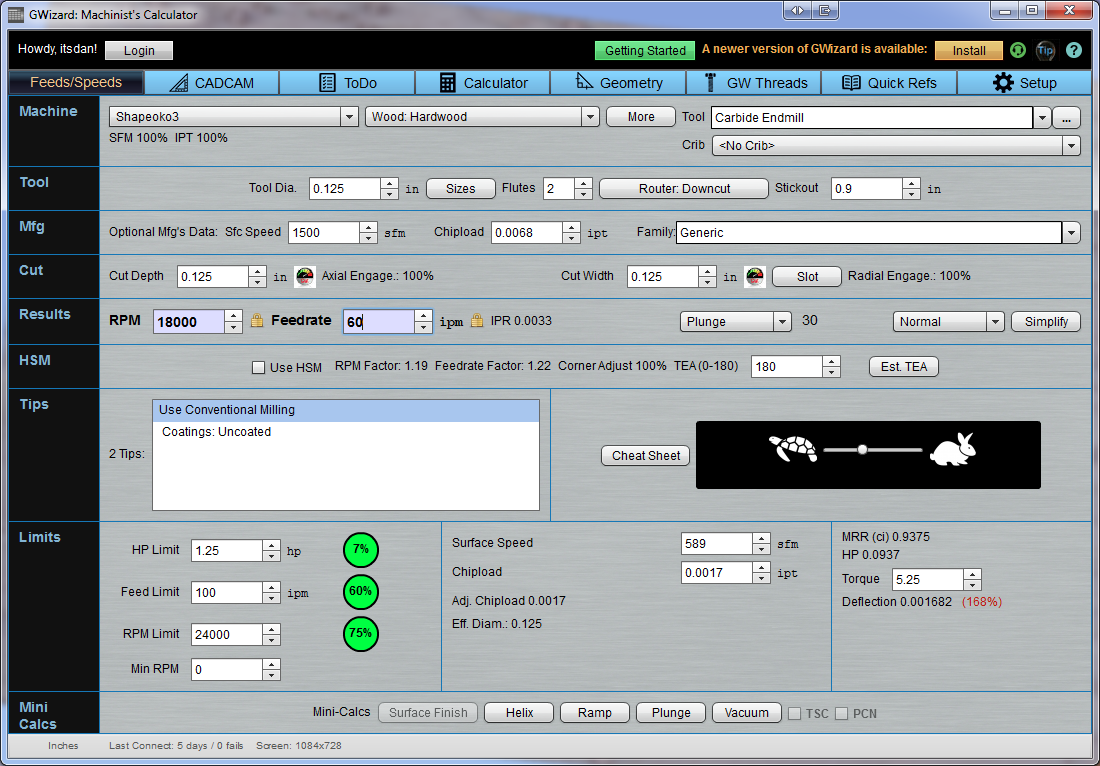
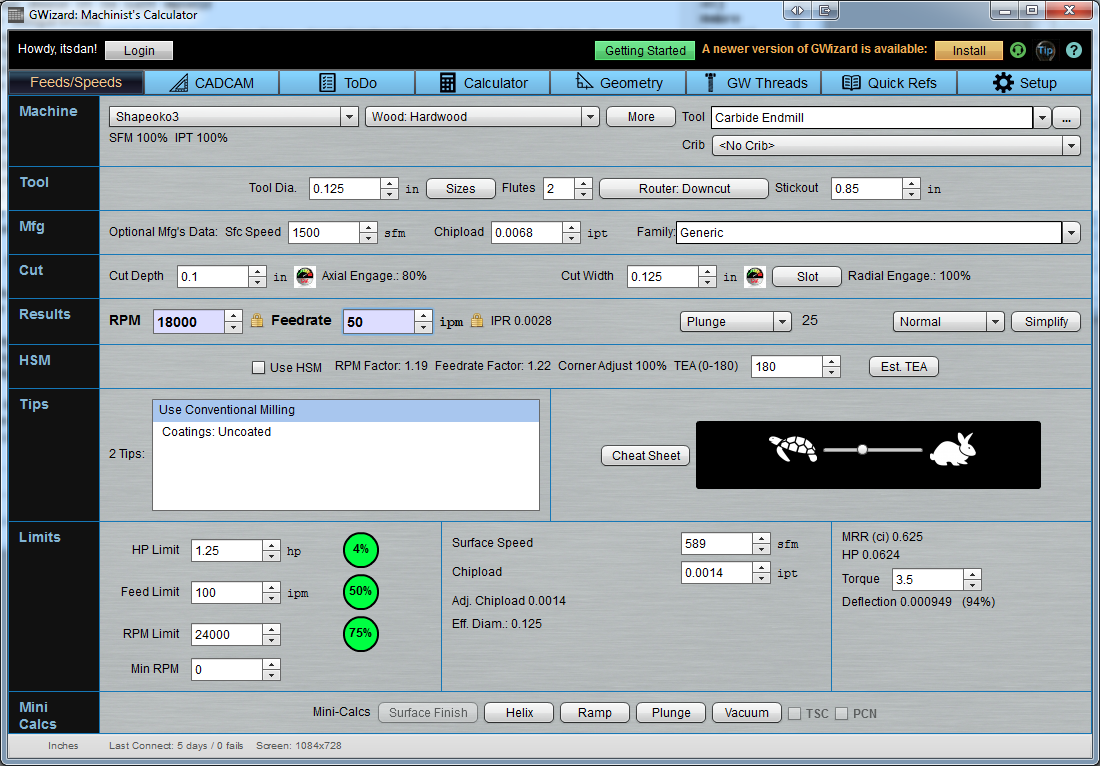
So here’s some fiddling in GWizard. 1/8" bit at 18000 rpm (this is also the recommended speed for my Amana bit). Keeping the bit within deflection tolerances has me around 50ipm, so this is pretty analogous to slot #1. So in the video above is the first cut what people would consider a ‘good’ sound? The chips seems good, I feel like it’s close but I literally can’t tell if I should go a little faster or slower.
If I put in the 45ipm I was using in the video and bring my rpm’s down to 16.5k (essentially the lowest on the dewalt scale) I likewise get no deflection warning, suggesting I can either lower the rpms or up the speed to 50. It’s too late to run the machine here but still curious what other insight the community has.
Also just confirmed my Amana bit is 20ipm but at 1D or .125" depth, I’ll have to setup a test testing gwizard’s numbers as well as Amana’s, but since it’s roughtly 2x the passes at 1/2 the speed it should be pretty comparable aside from time spend plunging.
“Generally speaking, if you are cutting wood (soft or hard) with a tool that is 0.125" dia. or smaller, you can run your spindle as fast as it will go (assuning that it is smooth at that speed).”
And yes they’re talking about router based spindles also. Sigh.
Alright, Eric over at ToolsToday got back to me. I’d asked whycome the amana 46180 has such low chipload guidelines. His response:
The reason why the feeds/speeds are so slow when it comes to inches per min and chip load is because you have to cut the entire material in one pass to get the full up/down combination
You have to ramp into the material when using a compression bit
We do have up or down cut bits that can go faster:
Alright that helps a bit, wish the Amana chart clarified that, would have taken 10 seconds but helped out this hobbyist. I did then follow up and ask if I was stepping down gradually would he expect I could take more aggressive passes inline with the chipload suggestions for hardwood I more commonly was seeing. His response:
Dear Daniel,
To be honest we follow whatever the charts say by Amana Tool because they are the ones who test the tools
They know what works best for tool life and finish
Yours Truly,
Eric H.
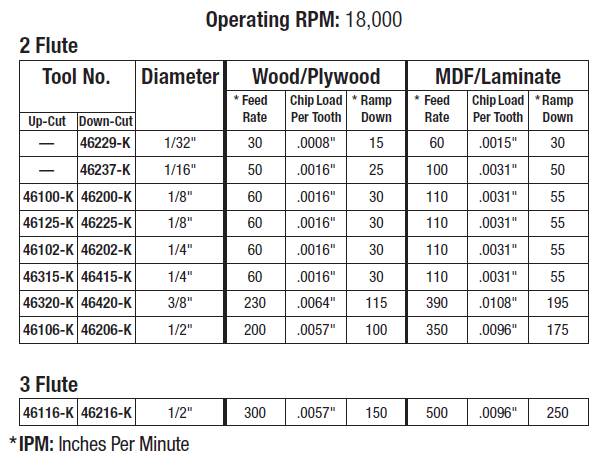
Which is fair, they sell them they don’t make them. The Amana 46225 has a similar profile to what I’m using aside from a) being a 1/4 shank and b) not having the pretty coating on it, but it’s also like $20 cheaper so no real complaints there.
It also has a F&S recommendation of 60 ipm in wood or plywood with a chipload of .0016". Once again their chart could use a recommended step down in my opinion but these are more reasonable numbers.
It seems like the charts still make assumptions about the operator and the machine, which is fine I know there’s infinite combinations of both, but I’d like to see more of those assumptions stated.
You’re supposed to take a depth of cut the thickness of the material when using an up/down end mill? Didn’t know that.
How is that feasible for any material thicker than 3-4mm? I was under the impression you’re not supposed to go much more than half the tool diameter? The most I’ve gone with a 1/8 end mill is around 2mm and even that felt too much in terms of the noise I was getting.
Well so the compression bit has a really low chipload, where most up/down cut bits are .003"-.005" the compression bit was .0005" a full order of magnitude lower. This is apparently, despite being noted NOWHERE on the sheet, them assuming you’re taking much deeper cuts. Also means slotting operations would be difficult but it explains the 20ipm speed suggestion a little more.
I think the intent is you rough it out and then just do finishing passes at full depth. I was trying to rough out and finish pass with the same bit.
Ordered the bit I mentioned, similar profile just 1/4" shank, similar cutting properties but solely downcut. Free next day delivery from ToolsToday and same price as amazon.
ToolsToday got me the bit as stated the very next day. Coincidentally McMaster-Carr I just ordered from for the first time, ALSO got me my item next day for the price of ground shipping. Well done folks.
I’ll adjust my test run to try this bit out, it’s the 46225-K:
Going to try 1/2D @ 60ipm, 1D @ 60ipm, and probably an intermediate setting as well.
If you increase your router speed (from 18k to 27k RPM), you should be able to increase your feed by a factor of 27/18 = 1.5 and achieve comparable results!
Because my project is physically very small it includes numerous direction changes and I suspect I’d have trouble maintaining an actual 90ipm speed, end up running the bit too fast and wearing it out sooner.
OK, but note that increasing router speed decreases router torque and forces for any given feed rate. IMO those are more significant issues than carbide bits wearing out.
Fair enough, I’ll experiment but I generally found I got deflection artifacts with higher feeds even at higher rpms, hense my journey to try and find out the proper way to at least estimate. Once I run those tests I’ll try pushing it a bit more.
Well putting this together for a test today. Using their numbers of 18000rpm and 60ipm I get huge deflection warnings, 300%+ over the desired number. This is also for slotting so that may be the issue.
Okay so playing with the numbers, stickout is a huge component of deflection, I had that at around 1-1/8" but I don’t need that much exposed, the full depth is nominally 3/4" and the cutting threads are 13/16" (.8125") so I’ll put the number at .9 and just eyeball it during setup to just above the stop of the cutting threads.
Awesome so that immediately dropped my deflection warning in half to 168%. Let’s see how various adjustments can help it.
Increasing RPMS 10% to 19800 brings it to 152%
Decreasing feedrate 10% brings it to 151%
Decreasing cut depth 10% brings it to 151%
So those are all about even, a 10% adjustment to a relevant number produces a roughly equivalent 10% drop. Because my final product is me cutting out a hexagon the machine is reversing both axes fully across only a 2" area, so I suspect maintaining the ipm listed would be difficult for the shapeoko. To account for machine stiffness problems I feel I want to pull back a bit on the cut depth. So I’ll try dropping feedrate to 50ipm and cut depth to .1".
Okay not bad, that got me down to 112% of the recommended roughing deflection. I’d probably be okay at this point, these are all just estimates anyways. But I also want to make sure I’m getting good cycle times so I’m going to go back to the first number I punched in, the stickout. I can easily calibrate stickout by positioning the machine next to the wood I’m going to cut, putting the bit loose in the collet, and then using the jog controller to lower the collect carefully until it’s just above the workpiece. I can mark the bit with sharpie or just try to tighten the collet in place enough to hold the bit, then lift it and finish tightening it. So let’s go back and lower our stickout to 0.85", should probably be less than that using the above method but a little margin for error seems good.
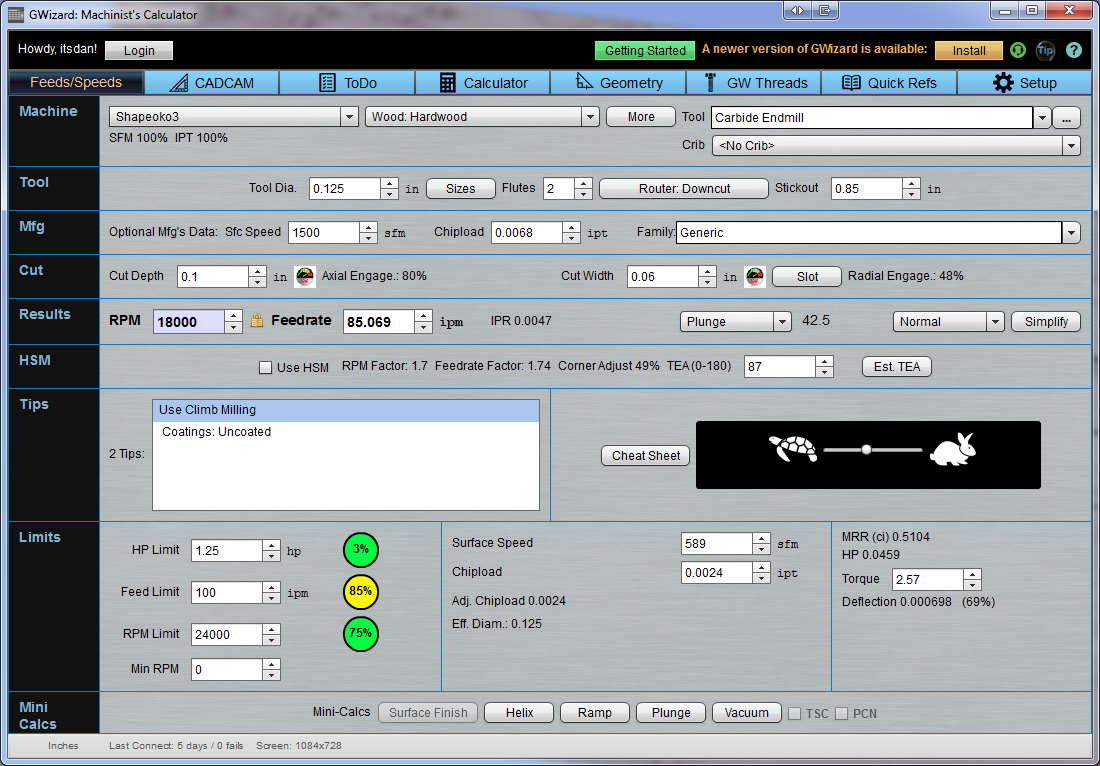
Okay there we go, 94% deflection so right where I want to be. The estimated chipload is .0014" which is right around manufacturer specs of .0016". So that works for slotting, finally I’ll reduce the radial engagement to see how pocketing should go.
I don’t hear as much chattering as I did before, the three lines are .1” @ 50ipm, .1” @ 50ipm with ramp in, and .08” @ 50ipm. The cut came out absolutely gorgeous. Everything produced chips on the small side so I could probably increase feed rate a touch. Once I dial that in I may experiment with higher rpms and proportional feed rate increases.