Recently, CNCjs released support for automatic surface compensation (version 1.11.0, see Releases · cncjs/cncjs · GitHub). A rectangular grid of equally spaced points is probed and the data can be merged with gcode to compensate for irregularity. I suppose this is similar to taking a bed mesh on a 3d printer.
This got me interested. I’ve had a few instances of cutting slightly too deep or slightly too shallow and I thought this might help. Also I like to tinker so it should be fun to toy with.
I ordered this 3d touch probe from Amazon last night and plan to add it in the next week. I saw this post last night and plan for something similar.
I have a Shapeoko 4 and I want to hook the probes up without cutting into any wiring.
My plan:
- From the BitZero 2: Connect the male JST-XH connector to a female JST-XH pigtail with a crimped on male JST-SM connector.
- For the 3D Touch Probe: Crimp a male JST-SM to the end of the supplied wiring.
- For the wiring to the controller: Crimp a male JST-XH to one end of fresh wires (goes to board) to a female JST-SM connector (will connect alternately to either male JST-SM on either probe).
JST-SM are snap connectors and I’ve found them fairly decent for quick changes. EDIT: image was showing the 2-pin connectors.
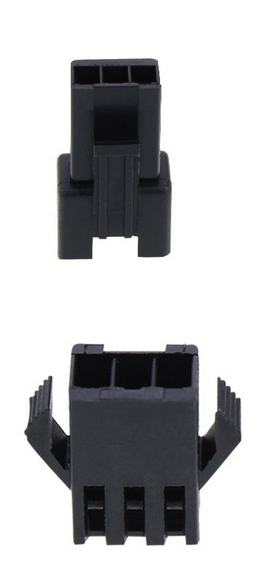
I hope to explore these gSender macros mentioned in this post and any CNCjs macros I haven’t tried yet and see what I can get to work with my setup.
My questions:
- When using this probe as a Z probe, I assume the next step is to use the BitSetter before changing to the bit that will be used. Is this a safe operation? How fragile is the 3D Touch Probe? It has to press that button with a slight force before it registers a value on the BitSetter.
- The workflow as I see it is to probe the stock or bed (I’m not sure which is best) and then use the BitSetter, registering the probe as the “first” bit. The first bit would be changed and set as the “current” bit. Does this make sense?
- Has anyone else tried the CNCjs auto leveling?
Why would I do this? For one, I already have the crimping tool and connectors from other projects. To buy all of this stuff is a small investment but I have found it to be a good one. In the end I won’t have altered any Carbide3d products, just will have wired up some adapters.
Thanks folks! I’m looking forward to breaking out the crimping tool and experimenting.