Hey All,
I’ve had my pro xl for a while and am finally comfortable tackling some real projects. One thing I’d really like to try making is a jewelry box for a family member. I’m not sure exactly on the design yet but I want to keep it pretty simple: 4 walls, a base and a lid. Maybe an insert tray of some kind as well. I’m still a total novice when it comes to wood working and cnc and am trying to wrap my head around the best way to join the 4 sides of the box. Is there a fairly simple way to do this with CC, programing in finger joints or something like that? or is there a better way to go to keep things simple?.
Winston had a video sort of along these lines here: Prototyping a Wooden Computer Case - YouTube
It’s in fusion, so could be complicated. I think the ideas are translatable to carbide create.
@WillAdams has a bunch of how to’s for box building, as I think it’s a bit of a hobby for him. Those can be found either by clicking on his profile or checking out various posts in either unsupported, or how to.
2 Likes
The term you are looking for is “joinery”.
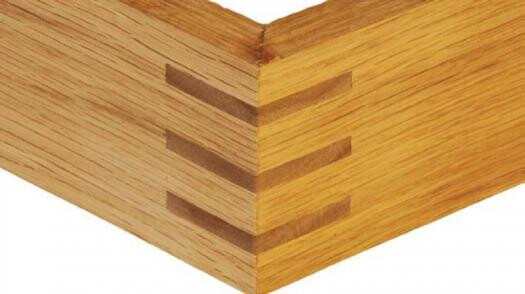
Fingerjoints can be done:
but the typical void-free form requires a fixture to hold stock vertically:
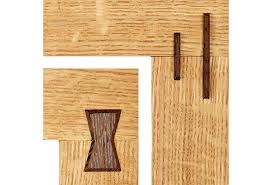
I’ve been working on this for a while, and have worked up a fairly straight-forward technique for doing it flat on the table:
see:
but it requires having a narrow V endmill.
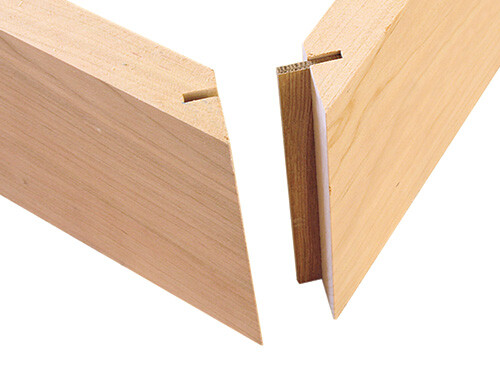
If you are willing to have exposed endgrain, a similar technique is:
1 Like
Take a look at John Clark’s youtube video on cubism. He makes cubes that are decorative but the point is he makes 45 degree corners for a project like your jewelry box.

Now 45 degree joints are inherently weak because they are end grain and end grain does not take glue well and makes a weak joint. So if you want to make 45 degree joints you need to reinforce them with one of several methods.
- You can cut groves in both of the adjacent sides and insert a piece of wood to reinforce the joint. On t he Shapeoko this may not too easy because you either move the piece to a 45 degree angle because the Shapeoko cannot move the bit to 45 degrees and only cuts at 90 degrees.
In the above picture the spline is 90 degrees off. With the grain of your spline running up and down it is easy to break. You want your grain on a spline to run 90 degrees so the strength of the grain is in your favor is someone drops the box on the floor.
-
Another method to strengthen a 45 degree joint is to cut into the joint from the side and glue in a reinforcing piece of wood to help secure the joint.
-
Simple Butt Joints are the weakest of all the joints. The end grain is glued to face grain and if the box is ever dropped it would fall apart. However like the above examples you can reinforce these joints with splines that the Shapeoko could cut for you.
The first two examples would likely need to be done on a table saw and/or router table. The 3rd example could be done on the Shapeoko.
1 Like
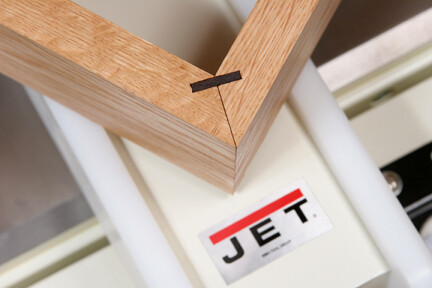
Worked up a way to do splines for blind 45 degree miters cut flat on the machine:
I really appreciate all the great info. I forgot to mention i do have access to a sliding mitre saw, using that to make 45 degree corners and reinforcing them as Guy suggested seems like it would be the simplest way to go. To add even more strength, would it be possible to use the shapeoko to cut a channel in the base for the box to place the side panels into, or would that not work because the channel wouldn’t have 90 degree corners?
The usual approach is to add dogbones at corners to allow things to fit — if I’m understanding what you mean.
The advantages of cutting joinery flat on the machine are:
- single operation (so long as any features on the opposite side can be made using through holes)
- automatic/repeatable, w/ no need for setting up again beyond setting zero for repeat parts
The disadvantage is the requirement that the parts be drawn up — if you could let us know:
- what size box you would like to make
- What sort of lid you would like
- what the stock thickness is
- what tooling you have
I’ll gladly walk through making a file for it.
If you decide to cut your miters on a sliding miter saw try to cut one side of a 45 degree on the right side of the saw as you stand looking at it and the mating side on the left side of the saw. The reason for this is you never get a saw at true 45 degrees. So if you are off by 1/2 of a degree that adds up to 2 degrees on 4 sides. By cutting on each side the error on the right is countered by the error on the left and the error is zeroed out. If you cut all the pieces on the left side of the saw the error you are off accumulates. This is a minor issue but one that can lead to open miter joints.
Most miter saws are not that accurate. By using their scale you really dont know what the angle is. It will be close but close only counts in hand grenades and horse shoes. If you have access to a digital angle gauge like the Wixey then use it by zeroing on the bed of the saw and then when you get the saw angled place the gauge on the saw blade and adjust as necessary. If you dont have a digital angle gauge then an accurate 45 degree angle gauge like on a combination square. Remove the blade and use just the head.
Not to overload you but most miter saws have never been calibrated to the fence and the saw blade. Take your square and place it against the fence. Slide the square over to the blade and see if it is square to the blade. If it is not then loosen the fence and move it and secure it and then check again.
This may seem like over kill but if the fence is not square to the blade you are making compound angles and not just a 45 degree miter.
Most people take the saw out of the box and start using it. Since the saw has traveled thousands of miles and many many bumps and then gets moved around the shop there is many ways a saw can become out of square.
2 Likes
Thanks Will, I really appreciate you offering to help work through my project with me. I’m still working on the design elements but when I settle on the specifics, I’ll definitely reach out if i need assistance ![]()
Thanks so much for such a detailed reply, lots of info there I can definitely use going forward. My dad was a big wood worker and since he’s not doing much of that these days, he gave me a lot of his power tools to mess around with. I have the sliding miter that I mentioned as well as a table saw and router table w/ assortment of bits. Not too sure how accurate the miter is cutting, haven’t used it much beyond cutting some material to size to use with my shapeoko. I don’t have the calibration tools you mentioned but I’ll ask my dad if he has any of that stuff or knows someone who does.
Mitre end grain joints being weak is a myth. Mitre glue joints are actually remarkably strong - not as strong as a full end grain joint, but stronger than side grain. Patrick Sullivan demonstrated this on YouTube. Usually it’s the long leverage that makes them break seemingly so easily - as in large picture frames. However for smaller boxes that have lids and bases, they really don’t need ant reinforcement as long as the joint is tight. If you have gaps or want decoration, then add the splines.
1 Like
Unfortunately, a file for a laser won’t take the box kerf into consideration, and will either require adding dogbones (which will result in visible voids) or adding toolpaths for rounding off the tops of the dogbones w/ a suitable tool:
https://willadams.gitbook.io/design-into-3d/radiused-fingerjoints
This topic was automatically closed after 30 days. New replies are no longer allowed.