I have been so excited to do stuff with my Shapeoko 4 XXL, but this specific issue is totally killing my enthusiasm and I really hope you guys can help
The machine will randomly add entire extra lines to even basic contour cuts. Pictured is one of the cuts from last night. There was only one simple toolpath cutting out the outline of this shape, and the machine decided to add random slashes completely ruining the pieces.
If the random lines it added were just on the surface I would think the bit was dragging across the surface, but they aren’t - they are the full depth of the wood, which means the machine was sitting there going over the lines over and over again as if they were programmed into the cut. Sometimes a particular cut will be totally fine, but about 50% of the time it does something like this, as if some other unrelated project has been combined with the current one.
The wood is oak, and I’m cutting with a 1/8th downcut bit, with the default feed and speed recommended for it.
Here’s the GCode and the simple Carbide Create project:
Simulation looks good, you are taking a conservative cut.
You are doing a contour cut that may be causing drag on the bit as it get down. Suggestion. Make an offset and do a pocket cut.
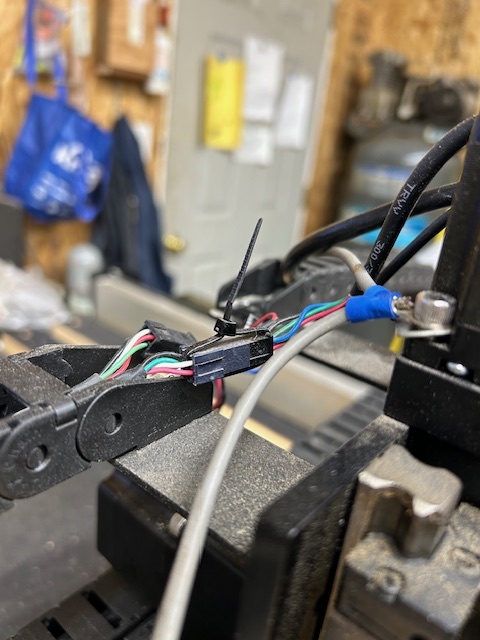
It may be mechanical. Belts, Dust Hose, Coupler. Check wiring connecters to make sure they are tight with no arcing at the pins. This is what I did for that.
I would agree with @Zman to add some geometry (as Will Adams often says) and try that. The machine just tries to execute the gcode. If it is not cutting what the gcode provided it has to be losing steps and going off course. The machines do not have a mind of their own. However when they cut things not intended the machine thinks it is executing what it was told to do so as @Zman check all your mechanicals and if they are good try adding the offset and see if it gets better. Looks like oak and that is a tough wood. What do your chips look like? are you making chips or sawdust? The goal is chips and not sawdust. Also inspect your cutting tool and maybe clean it. You can feel the cutting part with your finger and it should feel sharp. If it does not feel sharp a lot more heat and resistance builds up and can cause loss of steps. Since in your picture you were successful before something has changed.
Maybe your ducks want to fly south to get out of the heat.
Thanks so much for the reply! I guess I was thinking it was something more complicated than just drag on the bit, since the line it is adding don’t resemble the original cut at all.
I ran another cut and watched it the whole time - it literally cuts out the entire shape flawlessly, and after it’s done it starts carving a random line intersecting it.
Just to clarify on the initial photo - these lines I circled in red are completely unrelated and nowhere to be found in the project, like I said they don’t even resemble any of the curves.
I’ll try the pocket cut - is that a common thing, that the machines can’t handle contours well? I thought that was the most basic cut possible.
Contour cut the full depth creates drag on the bit. Even though your cuts are on the moderate side, it is still there. Lost steps due to that friction can occur. That is why I mentioned you should check your belts. Too loose and lost steps are more common. By taking a pocket cut for that cut out, you are relieving the friction that occurs.
Your cutting a .760" deep slot with a bit that has a flute length of .500". You really should be cutting with a bit that has a flute greater than your depth of cut.
Those are not random slashes, those are profile cuts with something interfering with movement in X. Check X axis stepper motor wiring and pulley set screws. Y movement was not affected making tool engagement unlikely as the sole cause however it may be part of the cause.
The machine can cut contours fine — the concern is tooling engagement.
@KevBarn14 has a method for adjusting feeds and speeds so that they will cut reliably, my preference is to just offset to the outside and cut as a pocket down to tab height or the penultimate pass:
and/or
and consider leaving a roughing clearance and taking a finishing pass.
Problem could be :(I believe the first is most likely but Im just an armchair quarterback)
Loose belt pulley on X axis. It may move fine and seem secure until stressed ( like from a bit heavier tool engagement than normal), then it slips. Be sure set screws are lined up appropriately on the shaft with one on the flat, then tighten.
Wire connection on wire from board to X axis motor that shorts or opens when gantry movement/vibration is just right. Trace the wire for the X axis motor all the way to the board, checking that all connections are secure and no black/melted connections. Seems unlikely that this would only occur on the last pass.
Something physically interfering with movement of X. I dont understand how this would occur and affect movement in both right and left directions which is suggested by your pic.
As your machine goes deeper into the project, is there something you are bumping into that is causing the machine to STOP (pause - the spindle is turning but the axis isn’t moving) then turn and go in a different direction? (following the program but stoping when it bumps) Are you using a vacuum attachment or is there something in the way of the x or y axis or something in the path of your belt? (doubt this) As you’re going deeper you may be hitting something.
I looked at your code (just a quick look at the z axis movements, and at all other x or y movements near the end of each run) and I don’t see anythiing that would cause this in the program.
I’m betting that something is slipping in the x or y axis - check that your belts are good and tight without cracks or damage. I don’t think your pullys could be loose, you wouldn’t get your design cut in the first place.
CAMotics is a free program that simulates G-Code and you can watch you G-Code programs before running them to see if they are doing what you expect, or in your case what you’re not expecting.
Whenever you’re running a NEW program for the first time always watch your machine during the whole process and be ready to stop the machine if it does something you don’t expect. (This is what an Emergency Stop is for) Also run a simulation if you can for new programs.
One more thing, remove any excess things (for lack of a better word) in your design, take the time to delete excess junk in your drawing or design. Keep your designs simple and clean. Also use the NODE tool to keep straight lines straight without excess curves in a straight line, or excess in any other area. Zoom in to see what’s going on. When you import DXF or SVG files you will get a lot of junk, just watch for it and clean it up. You don’t need excess junk that you could accidently put in your program. Don’t be to hard on yourself, this isn’t easy to do, there is a huge learning curve. Stick to it, you can do this… Ask a lot of questions, talk to Google.
I’m not being judgemental, I was a lead operator for a world class manufacturing company and I trained a lot of people. I’ve run all manor of CNC Machines…
According to your second post, you stated that you watched the entire design get cut out properly, and then saw the added random cuts being done.
This basically proves that there is nothing wrong with your mechanicals.
I would bet big money that there is some artifact in your design that is causing extra G-code to be created.
I suggest you try to copy one of the ducks to your clipboard, then delete everything else in the design.Then put the duck back and create the cut.
It basically takes 4 lines of G-code to create a square, and these 4 lines are fairly easy to find in a file.
Then add a small square to your design file and cut that square out last.
When you examine the G-code, you should see the square as the last cut (make it shallow, single pass). If the G-code looks good, the job “should” run correctly.
I have had artifacts like a single vertex left in my design which has caused me problems…and they were hard to see/find.
Just downloaded CAMotics and popped the GCode in there, looks perfect on the simulation.
Good to have a reminder to always watch the first time I’m doing a cut. After the first few months of having the machine I got lazy in that regard because there were never any issues. I have watched a few of these messed up cuts happen and it often looks so great until suddenly the machine scoots a few mm to the left and starts doing the same cut offset, or it cuts the shapes out perfectly and then last minute starts doing some erratic stuff.
The strange thing about this is that it does it after having cut everything else perfectly. If it started doing it 75% through the cut it would make sense that suddenly it is moving along the Y axis without any movement along the X, causing lines up and down. It’s just strange that it finishes, pulls the bit up, and then starts this random new cut as if it’s the next part of the design.
No, nothing obstructing movement. I took the vacuum attachment off just to make sure and the issue persisted. It doesn’t stop and turn - it behaves exactly like it does during a normal cut, but with extra steps.
I mentioned it before but it also has an issue where it will slowly offset cuts by a few mm halfway through a cut, so that does lead me to believe there is something wrong with the X Axis pulleys/motors/cabling.
Do you have the “Pro” version where you can save the G-code to a file to examine and run?
Also, have you checked your layers to be sure only one layer is in the design?
ALSO…Since you used another piece of software to examine the G-code (simulate it), make sure that you take the newly examined g-code file and use it to cut your design.