Community challenge #30: Gifts

Still figuring some things out, but wanted to post so people had plenty of time to get some ideas going.

The theme for challenge #30 will be: Gifts
It’s a broad theme. Tis the season for giving, so submit a project you are giving as a gift. Or making for someone else to give as a gift. This is probably as close as we’ll get to an anything goes contest.

I’m hoping that means we get a lot more participation, so with that we’re doing a bit more prizes (see below).

I can’t wait to see what you all come up with. Here are the Rules:

  • submit your entry in this thread
  • you can post multiple entries if you want (though you’ll only win one prize)
  • you must use your Shapeoko or Nomad
  • post pictures of the project and tell us about the process, the mistakes, lessons learned, etc.
  • include the design file. (you don’t have to, but it’s always nice for new users looking back at these)
  • Using tiling will give you +2 points to your vote count.
  • Winner will be decided by voting. Jury prize will be decided by the Carbide 3d team.

Timeline:

  • Deadline is set to Jan 5, 2024 midnight PST
  • there will then be 7 days for voting.
    • voting will be open to legit community members only, and the jury reserves the right to remove votes from “outsiders”, and will also break any tie.

Prizes
Doing things a bit differently this time. Again.
We’re doing a 1st place, 2nd place, and 4 runner ups.

1st Place:
VFD Spindle Kit
Carbide3d Swag

2nd Place:
Our New Crush-It Pro Clamp Kit
Carbide3d Swag

4 Runner ups:
Crush-It Essentials Clamp Kit
Carbide3d Swag

12 Likes

My machine is gonna sit idle in December. Can I post gifts I made earlier this year?

Yes, you can!

I’m not participating but figured I’d post a project.
Grabbed an ornament from thingiverse and popped it into carbide create pro, and did some quick 3e toolpaths.
Pretty quick project overall and my wife digs it.

3 Likes

I made a gift for an intern we sent into the real world this year. It’s from a large slab of live-edge white pine that came off the mill on our site. He’s from the UP, was leaving us in northern Minnesota, and was headed to his new home in Wisconsin. It is rivers and lakes of all the places he’s called home.


14 Likes

Surfaces both sides on the machine. I was hoping to pull River maps online straight into carbide create, but there ended up being too much noise in the images. It became quicker to trace the rivers in Microsoft paint than manually remove things like text, latitude lines, and borders in CC. I really wanted things like the Mississippi, Minnesota, and St. Croix to be visibly wider than other things, causing the V carve to go deeper on those.

The great lakes are advance VCarved to allow sharp edges from rivers and the apostle Islands. I like the 60 degree edge like to.

I’ll post the file if I can remember at work.


5 Likes

Used a really easy technique to imitate waves on the big lakes. You slightly water down wood glue, spread liberally, apply toilet paper, and then just kinda make sure they’re all getting ‘blown’ the same way by a paint brush before it dries. Multiple layers of paper if you want big waves. It leaves a rock solid surface hungry for paint.


6 Likes

@Luke wanted us to give out the new Crush-It Pro clamps to second place, so I’ve modified the prize list.
I’m also hoping he wants to give out a set of those clamps to the organizer. Since those things look super slick!

6 Likes

I sprayed a single coat of poly on the surface before carving. It made painting really, really easy. Just pick your blue, darker where the rivers are deep, and then wipe the surface clear with a damp paper towel.

The after paint I added a water based high gloss poly to the water. A couple layers. On another project I’ve done many coats over those waves. It ends up filling the low spots and really tricking your eyes into thinking you’re looking through water into depths. Hard to explain how much better it looks in real life than the photos. It’s worth a try if you’re at all curious. The materials are dirt cheap.


7 Likes

Lastly, I re-sanded the top to bare wood, leaving the painted areas high gloss. My buddy gave me some Odie’s Oil and it made the pine look better than I’ve ever seen pine look.

Couple brackets on the back to help prevent splitting. It holds it an eighth off the wall giving it a cool shadow line.


11 Likes

Well it is a gift, just took 2 years to finish. Thought I would share.

Purchased my Nomad 2 years 9 months ago and out of all my shop equipment is gets the most use. I think I have bought 1/32 end mills from every vendor on the planet.

Cut on the nomad was:

Flowers 20 gauge - 1/32 end mill. Opaque vitreous enamel, 6/32 plusnut holding them together with a 3mm micro led inside it.
Hummingbird wing 14 gauge - 1/32nd end mill transparent vitreous enamel
Butterfly 14 gauge - 1/32nd end mill transparent vitreous enamel
Base black walnut created in carbide create pro on the nomad.

2 years 9 months ago I didn’t have a clue about any of this. It’s been a fun ride.

The Nomad, the software both carbide create and carbide motion and the support that goes with was awesome.

18 Likes

That is downright amazing. It looks fantastic.
And I get frustrated with projects that take weeks to finish.

I am guessing that took a lot of setups and a lot of files.

Now that you have completed your quest are you selling your Nomad :joy:

2 Likes

A project I have given as gifts trying to drum up business has been relegated to Christmas gifts only. Had fun doing this.

Remember when you measure everything up, there is going to be stain, varnish, and edge color. A great fit turns into a very tight fit very quickly.

6 Likes

Thanks, a LOT of trial and error.

Finishing this I took it to a local gallery and they really liked it asked me to put a price on it and of course I couldn’t. Then the curator took me around and showed me what sells and what doesn’t. The ideas flowed like water, so I think I’m going to be busy. They asked for a collection of 3 or 4 pieces to look at.

3 Likes

Were the parts cut from flat stock then shaped by hand and braised together? Did you do the enamel work after it was assembled or in separate pieces?

I’d love to here about the process involved creating this kind of sculpture.

I buy 6 x 12 copper sheet, then split in 6x6. Here is the design I ended going with. I texture one side to flare the petals and form the shape on the other side. They are enameled as in the pic, then cut and polished and connected by a 6/32 rivet nut. I braze the branches, silver solder the sensitive parts. The body of the hummingbird is sand casted from scrap copper, the wings are attached with solder.
Hope that helps.
flower 12 10

3 Likes

My mind is blown. This is incredible work.

While I hardly feel worthy after seeing the above work (amazing!!!) I figured why not share some of the gifts I’ve been making.

Here is the first one, a gift for my mother, who loves everything Jurassic Park. I 3D printed the raptor claw, so of course ignore that!

I setup the artwork in Adobe Illustrator, exported the SVG and cut from hard maple on my Shapeoko 4 XL, with acrylic paint. I used oramask for easy sharp lines and then sanded the surface a bit.

8e55e773bede71fe0833cb2b56b1bd8b4691feed_2_666x500

9 Likes

That’s a fantastic way to make waves! I’m definitely going to try it out on a project I’ve been planning on do soon.

I’m new to CNC and just got my Shapeoko 5 a few weeks ago. I grew up framing houses with my dad and he taught me how to use every kind of hand and power tool. I’m now in the software industry and enjoy combining my digital and tooling skills to produce physical things. While I’m new to CNC, I have a lot of experience with software development, 3D printing, and vertex-based modeling.

My parents built a cabin on a mountain in Wyoming in the early 2010s. In 2020 they retired and moved south. I have seen a few topo map cuts on social media and had the idea of making a topo map of the mountain where they built a cabin. This took quite a bit of research into data sources, GIS concepts, various ways of creating toolpaths, and physical testing.

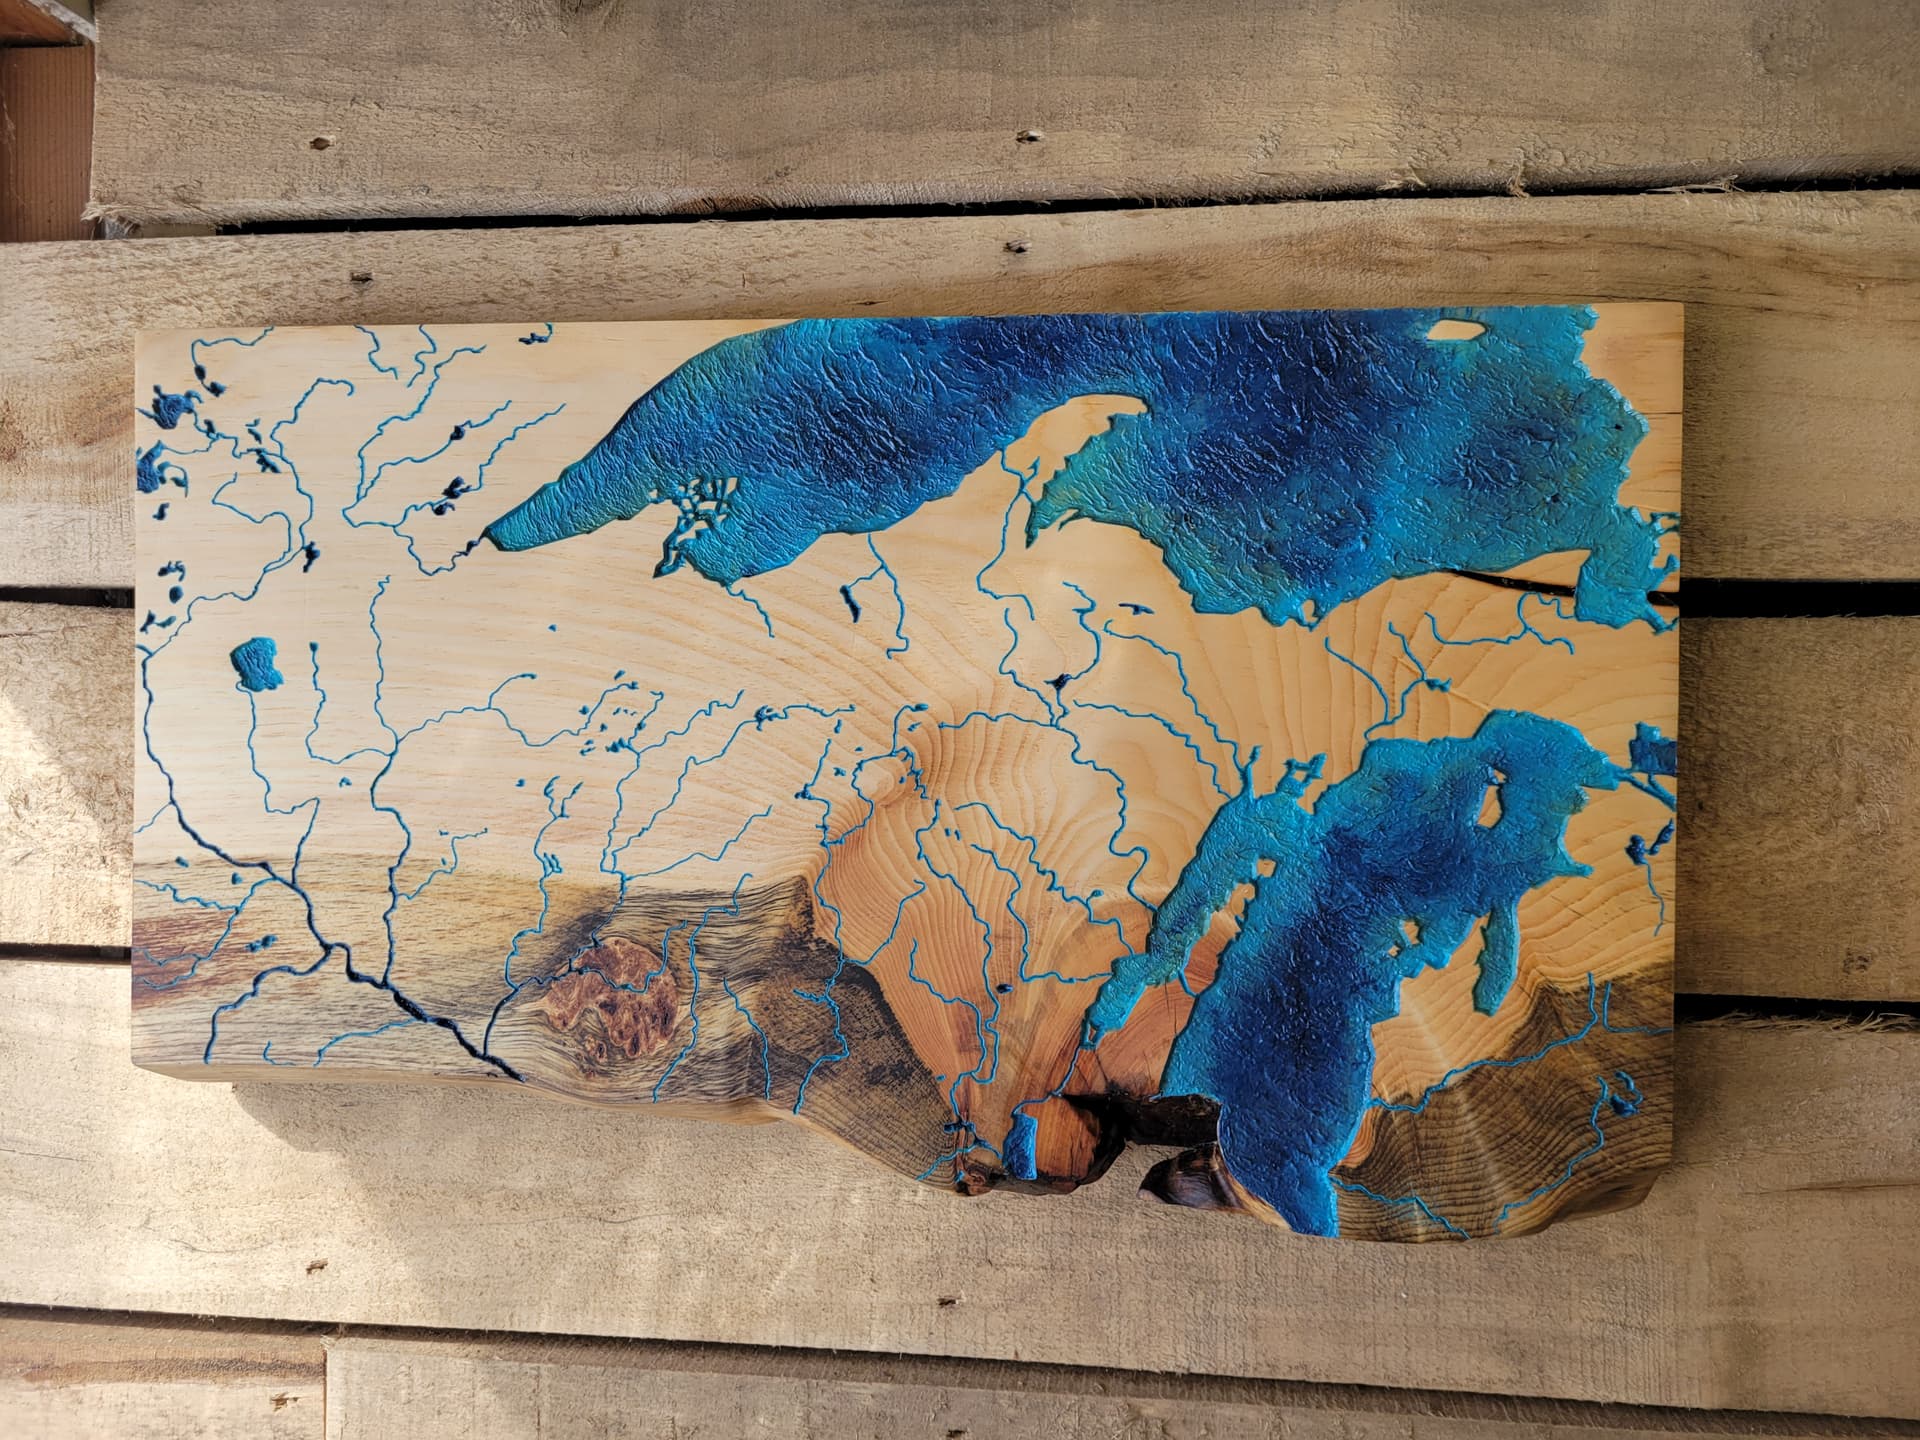
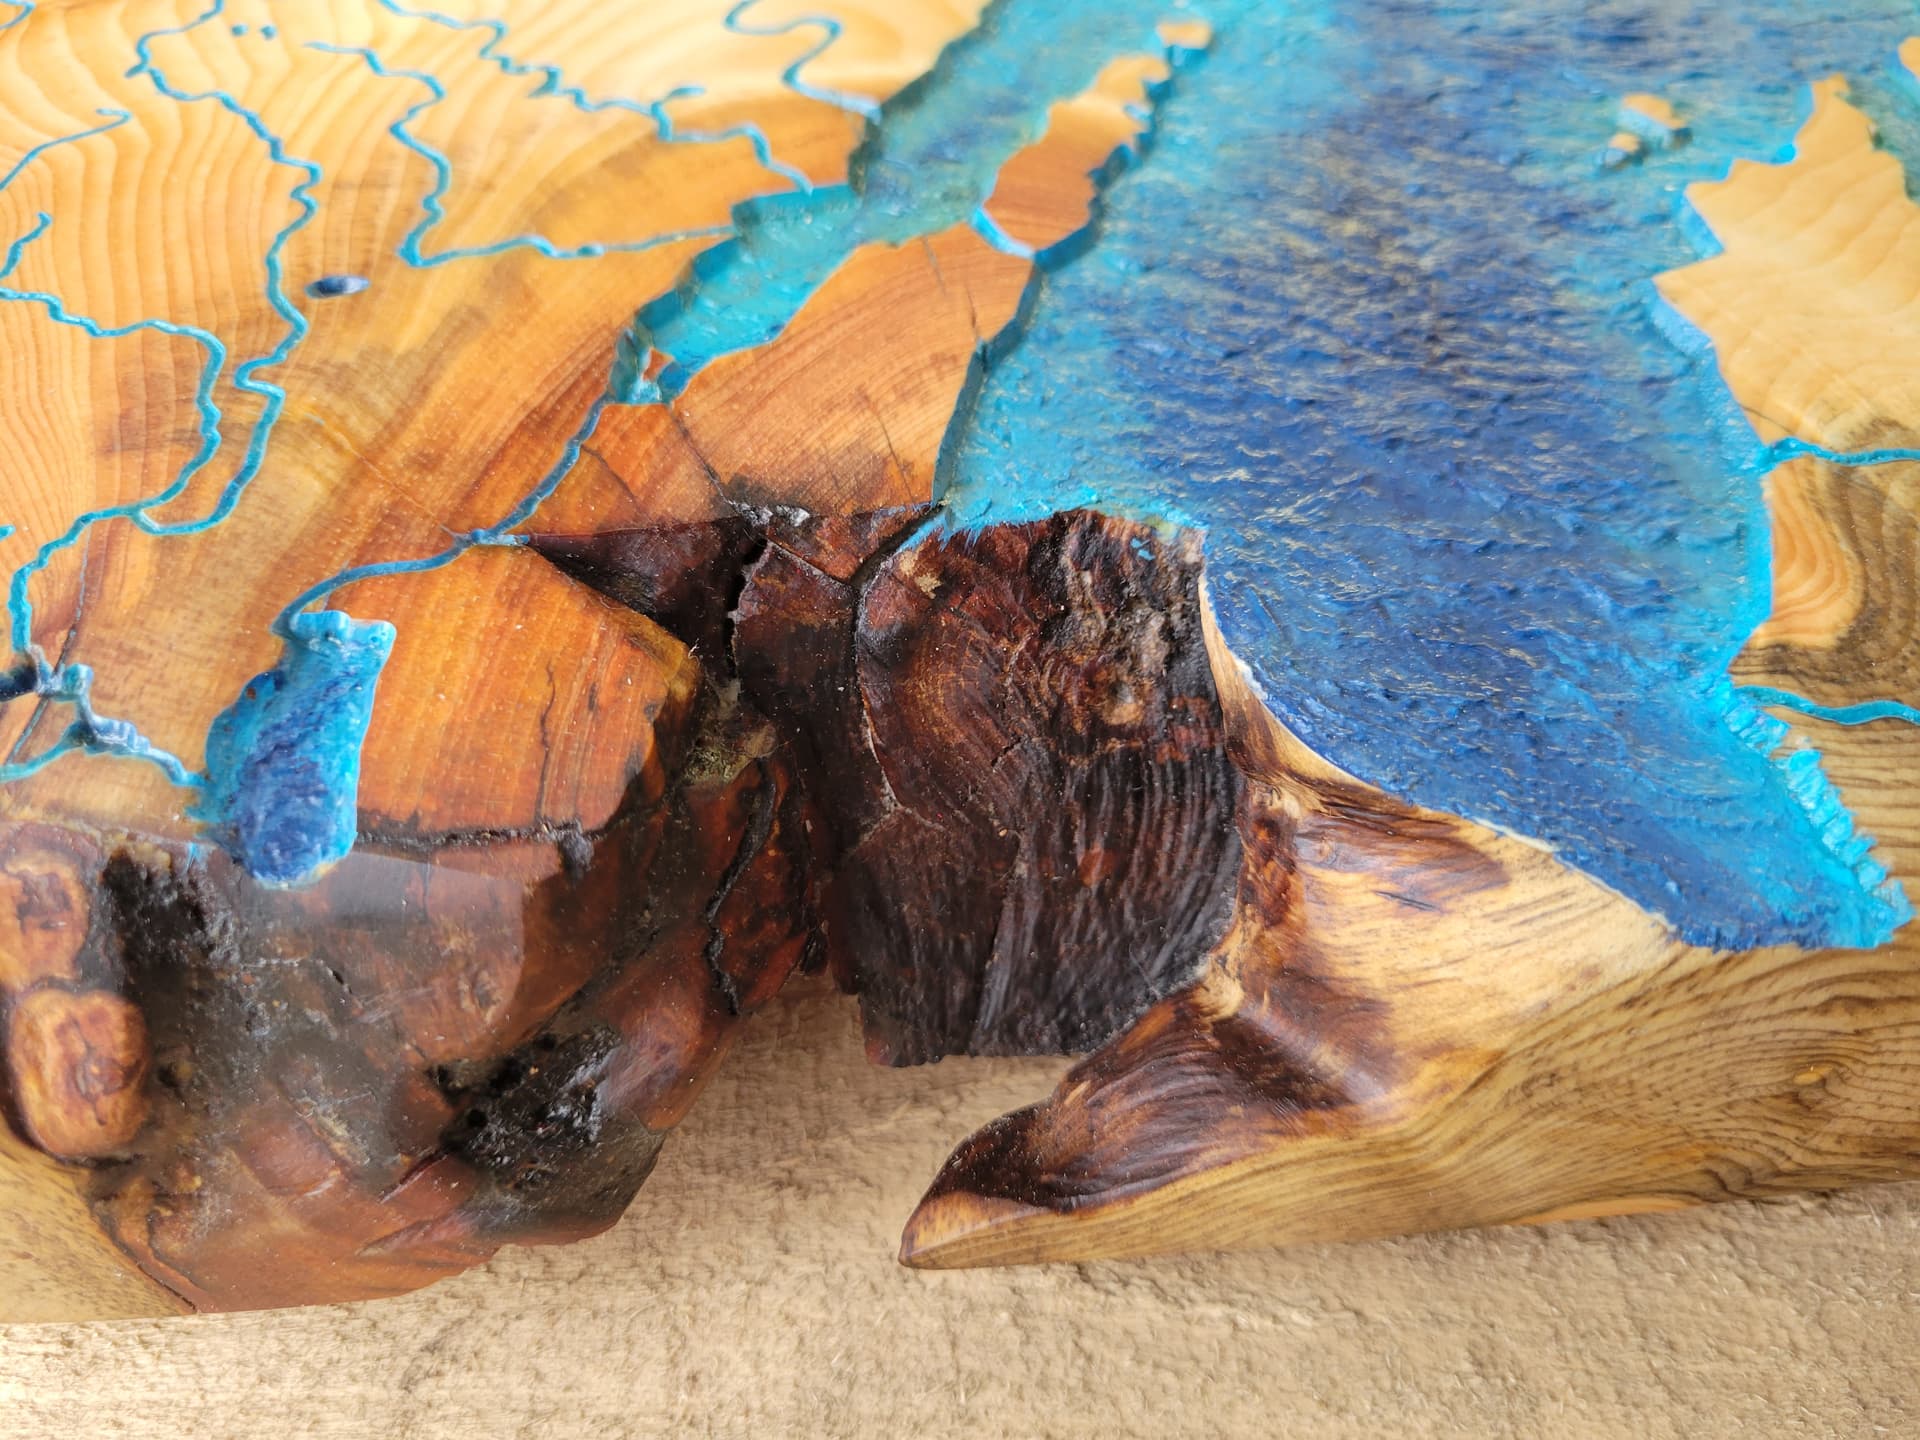
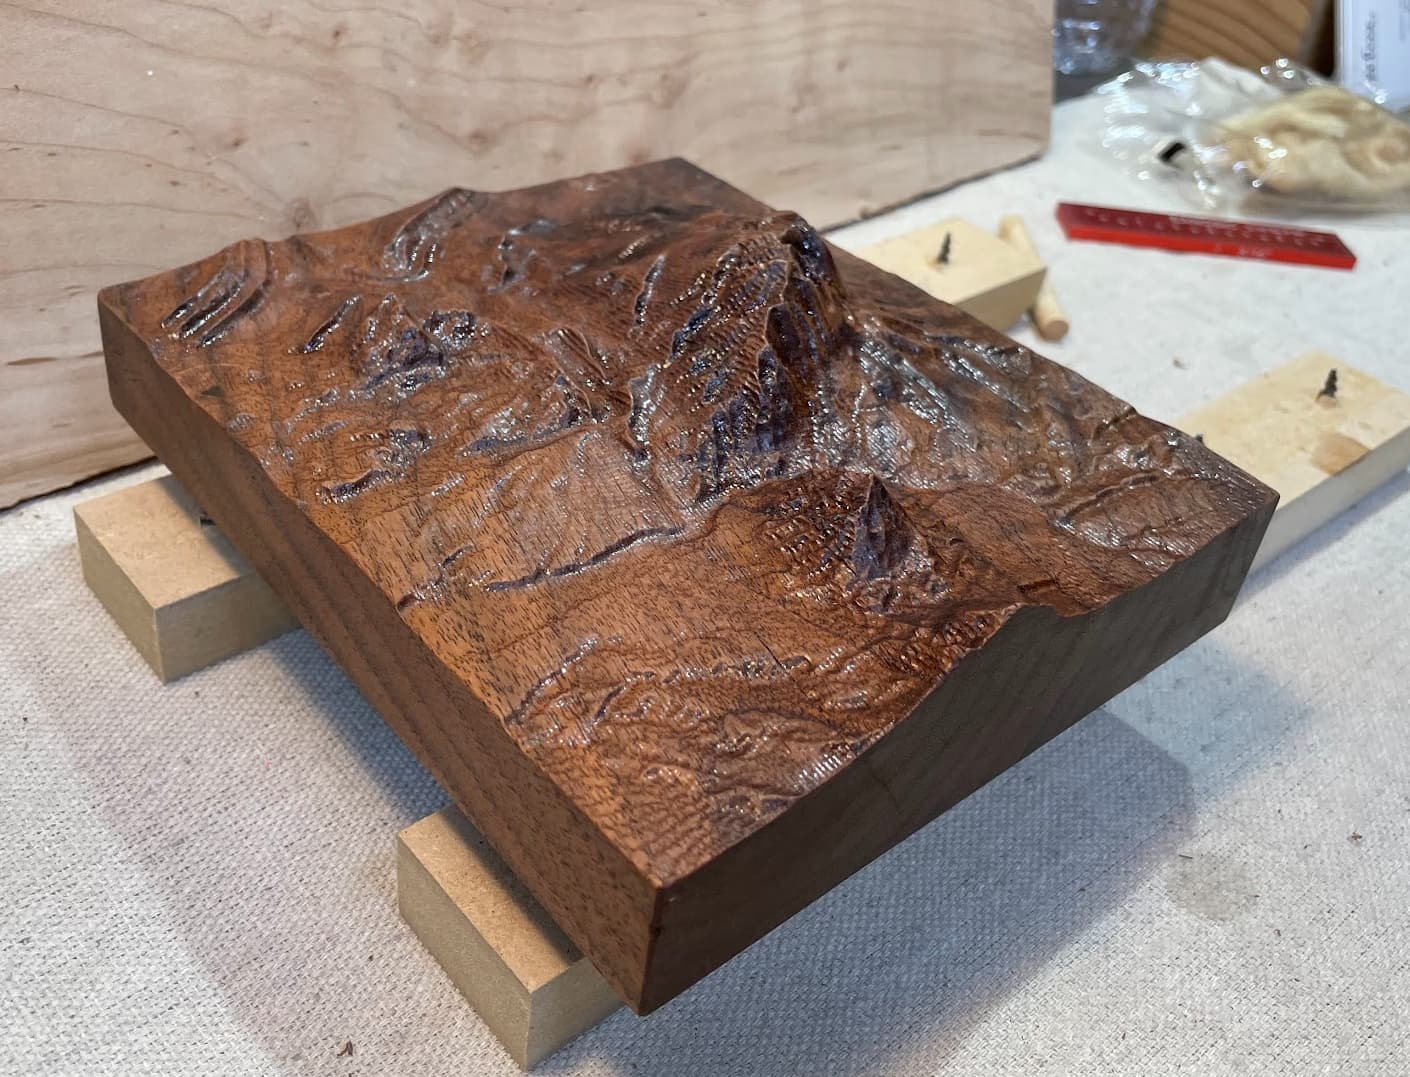
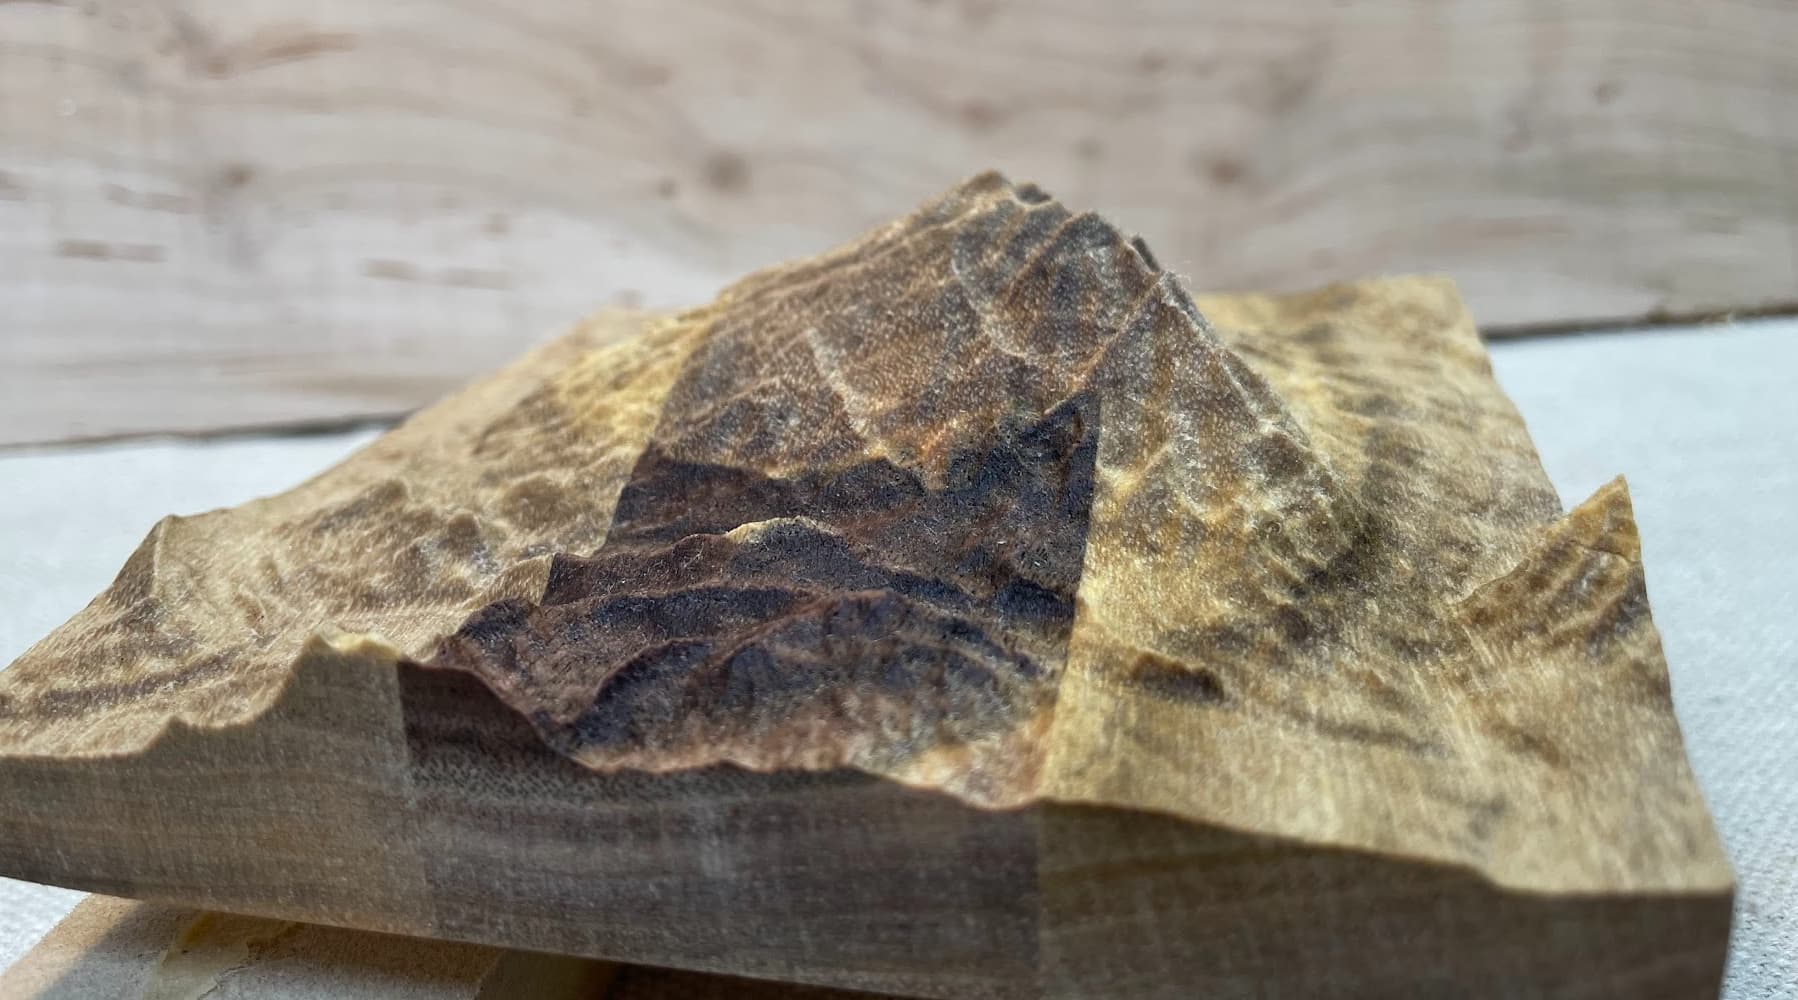
First, here’s the “near-finished” piece, which was drying in this photo, hence the inconsistent sheen. I have a few more coats of oil finish and then I’m going to laser engrave the name of the mountain on the side, my logo on the bottom, and put little leather footpads on the bottom:

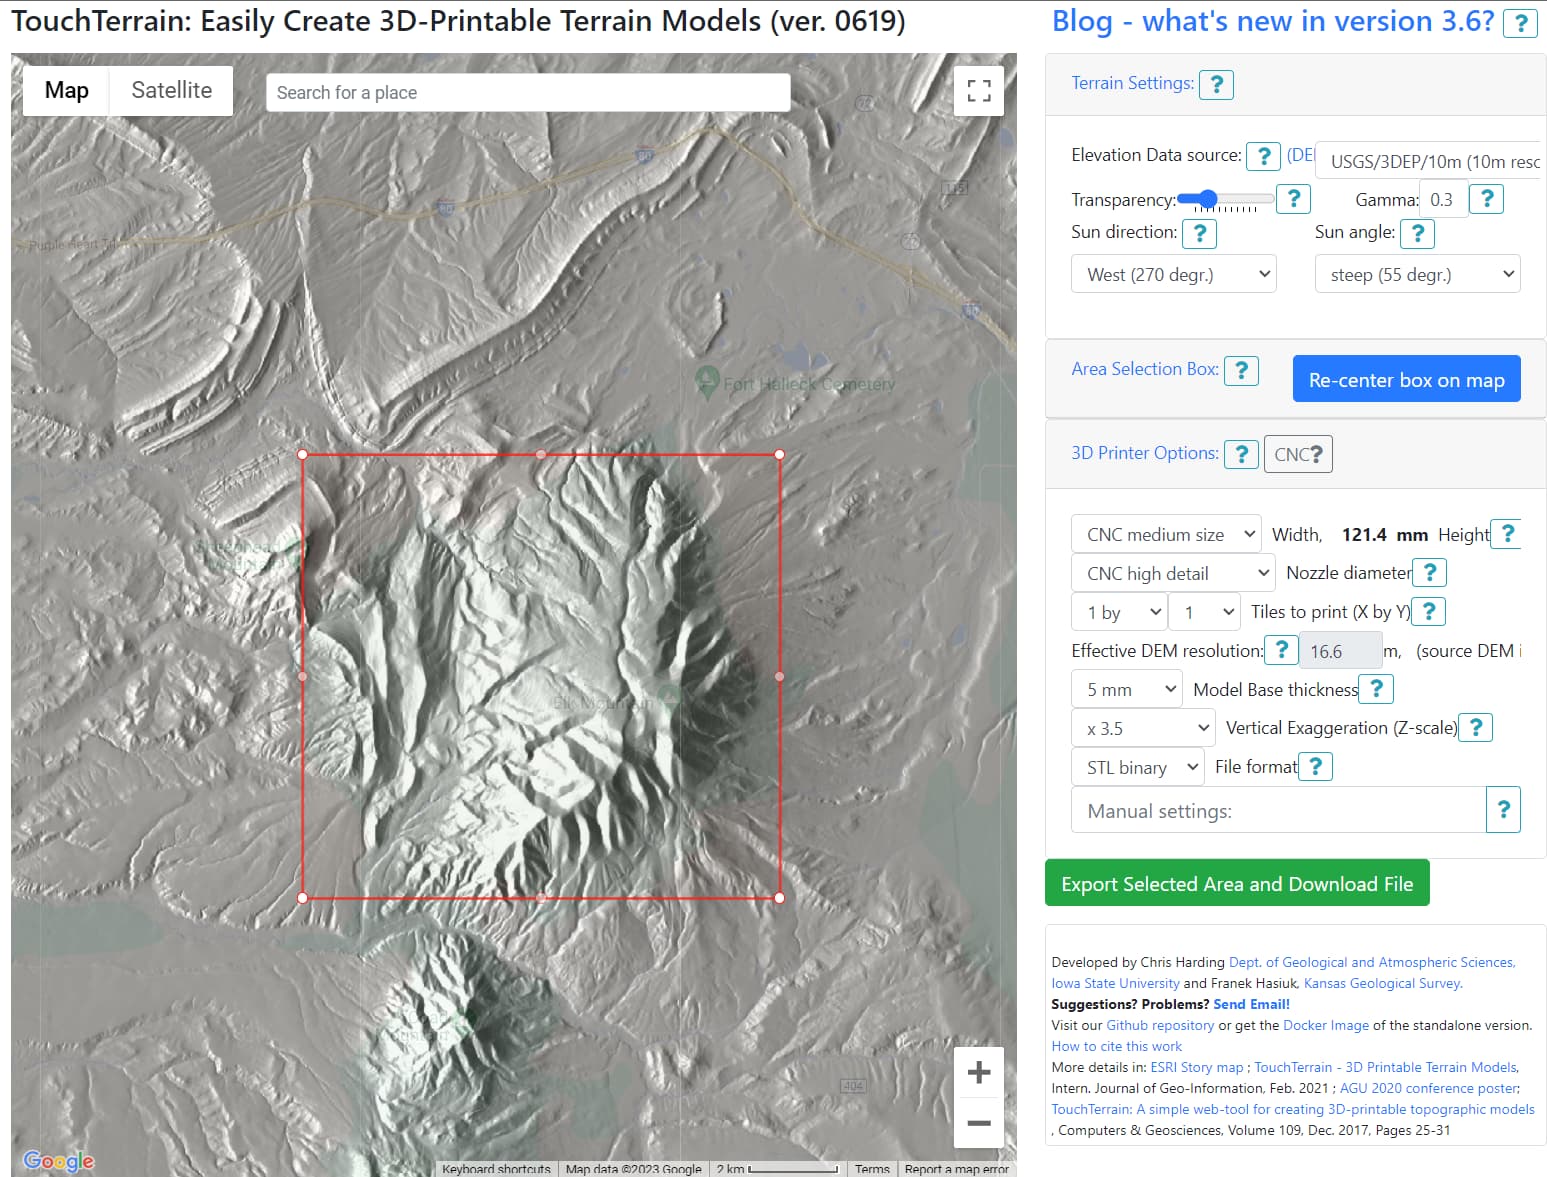
I started by experimenting with the most popular data source: Touch Terrain. It spits out STL files, which I am familiar with from 3D printing. While it’s a great tool, I didn’t end up using it because you have to do a lot of “hoop jumping” to get STLs into a millable format. But it’s worth mentioning for other users.

Instead, I used a data source called Tangrams which spits out grayscale heightmaps. I’m familiar with using heightmaps because I’ve done a lot of video game development and these are often used to create terrain meshes in video games. Carbide Create Pro can generate rough and final tool path passes from a heightmap!

I pulled various crops of the mountain area into Photoshop and other tools and experimented with how much area I wanted to represent and how much to exaggerate the elevation. I found that slightly blurring the image and exaggerating by about 2x gave me a good balance of distinct features that didn’t have too many sharp points or stepping due to the exaggerated Z.

With Touch Terrain, you can choose the exact exaggeration but in Tangram, you can’t. Heightmaps basically use the concept of “exposure” since the grayscale represents relative height not absolute elevation. Instead you have to experiment with the base height and absolute height. A little pro tip is to import that same height map like 5 times and increase the height by 1/16" or 1/8" each time and run simulations of each in the same file until you get an elevation that “looks right”. Then delete all the other heightmaps that you don’t want. Also, NAME THEM BASED ON THE HEIGHT. Once you hit “done” you can’t re-edit the heightmap in Carbide Create Pro (feature request: please allow editing). So creating multiple is a workaround. Note that I obviously care more about aesthetics than geographic accuracy.

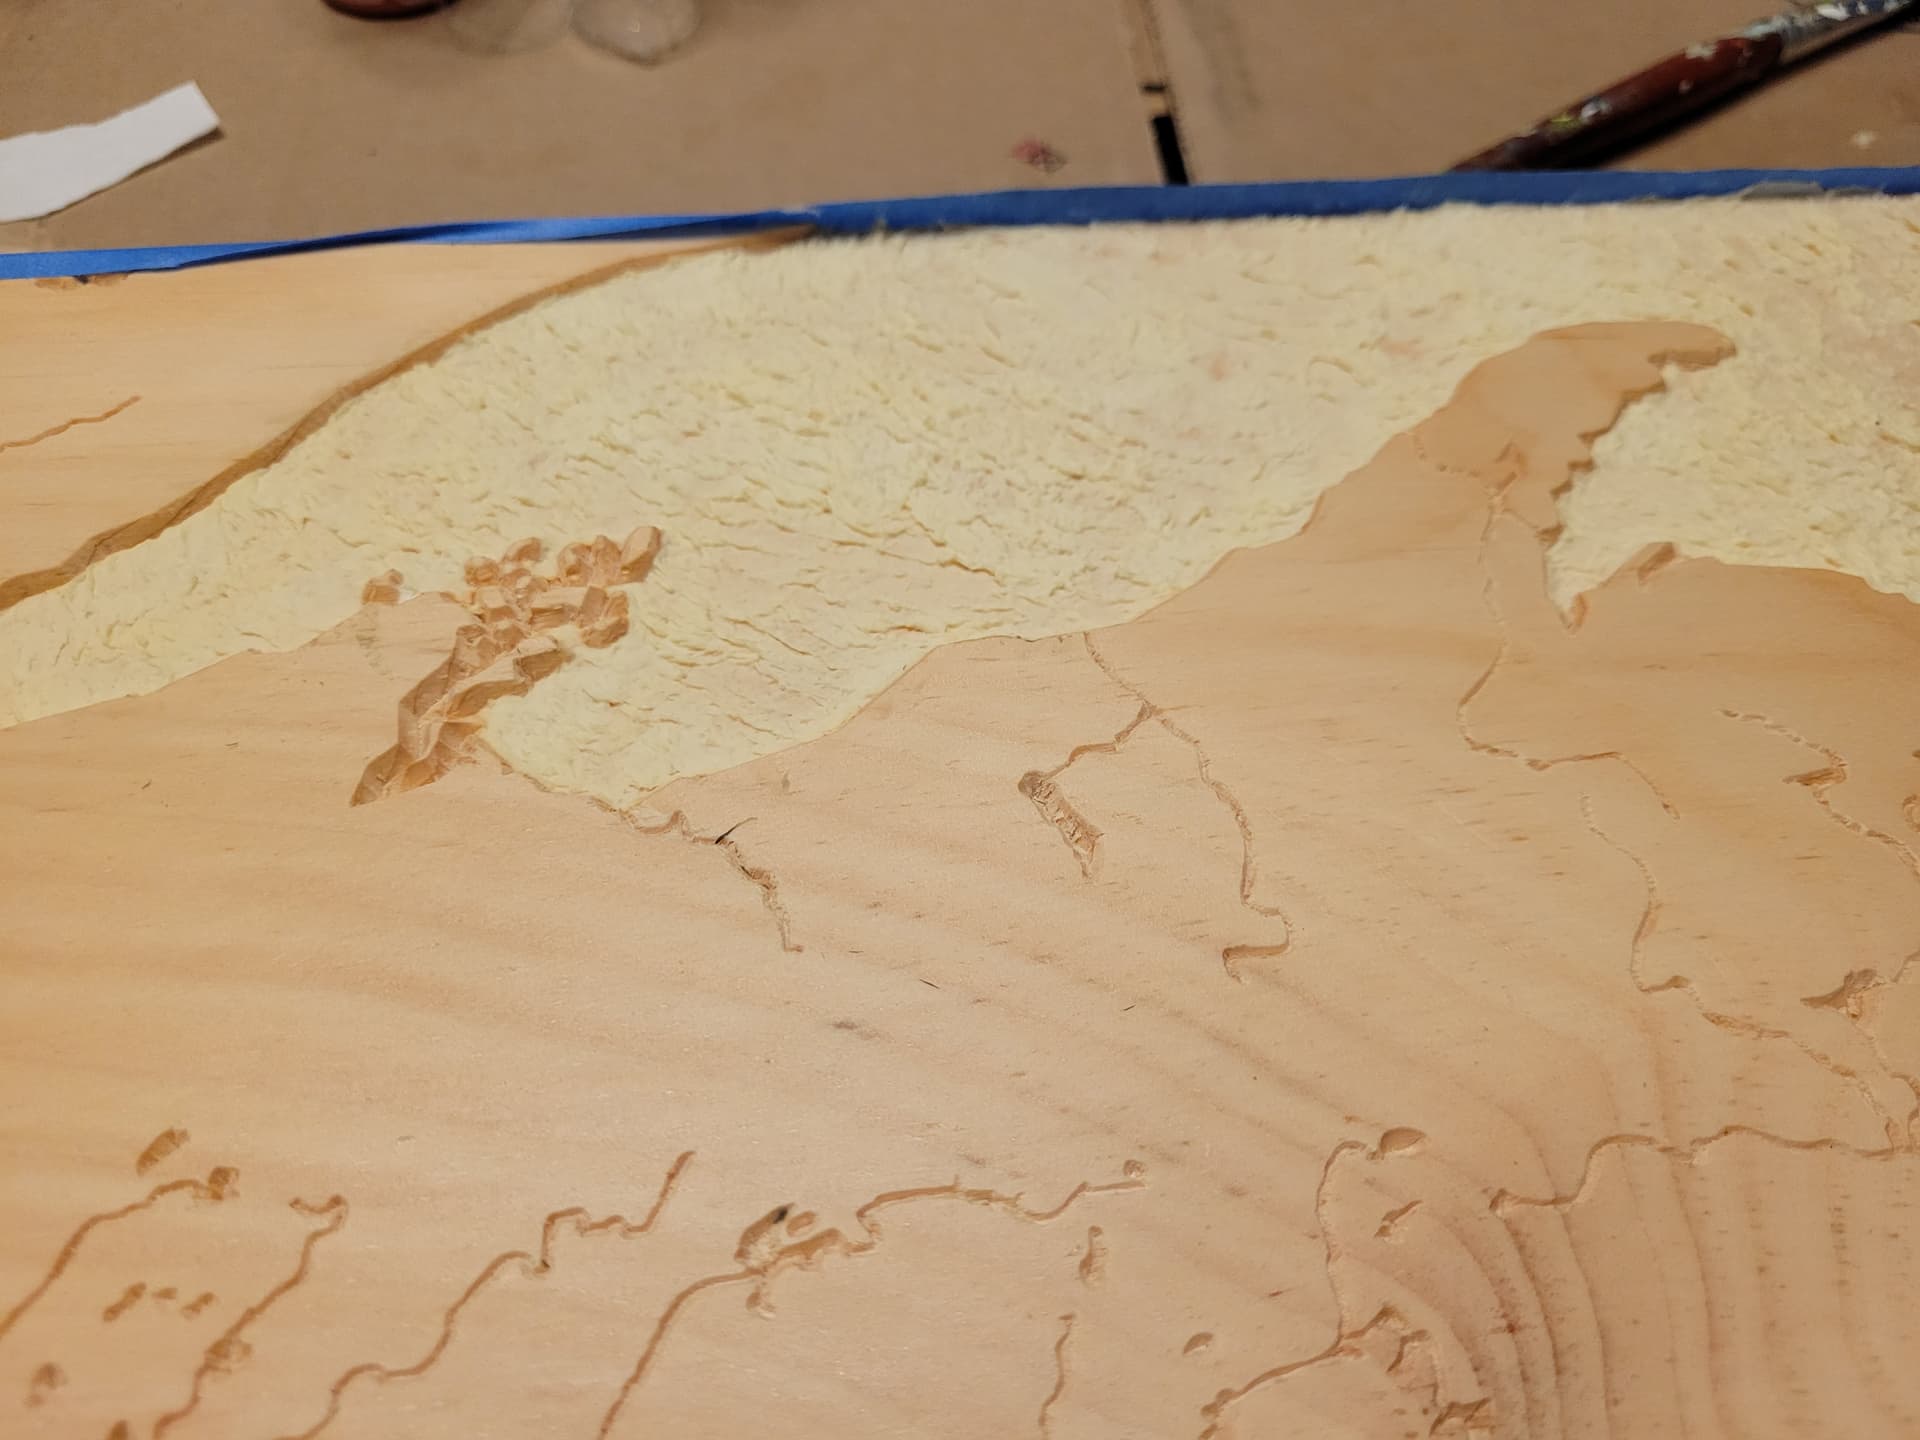
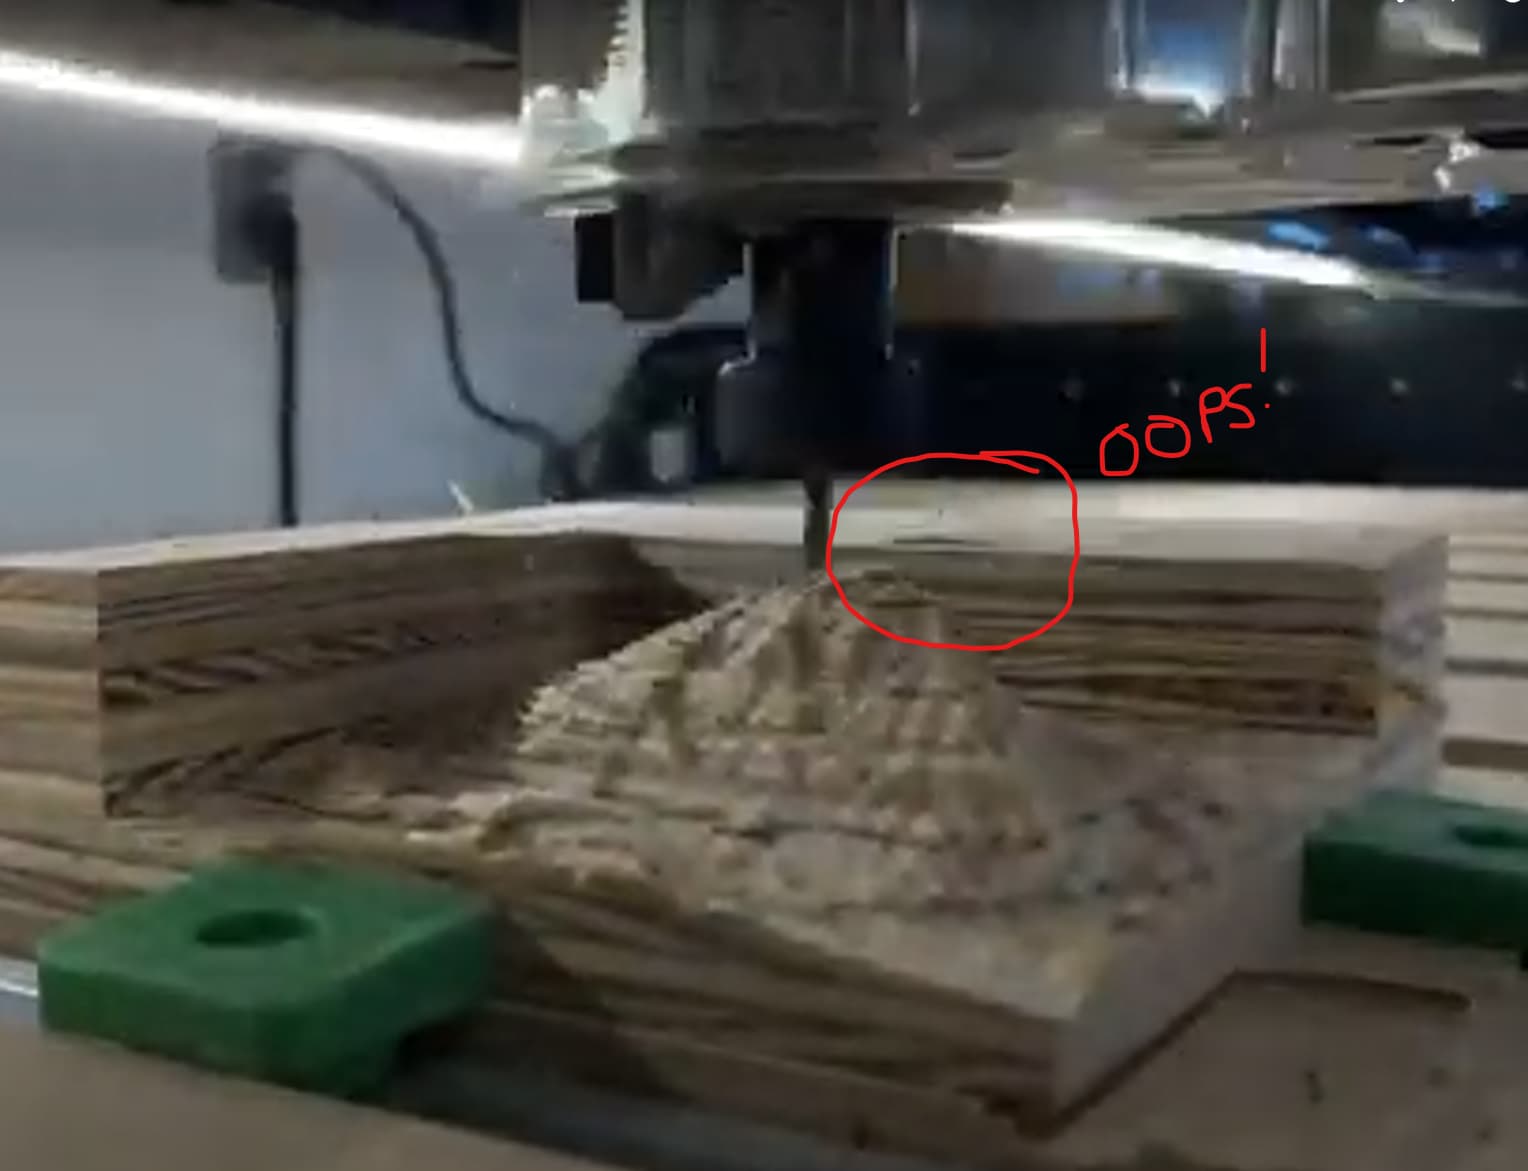
Once I had figured out the data sources and tools, I cut my first test in cheap plywood. The biggest problem I had here is that my 1/8" ball mill has a really short shank and my router head kept running into the unmilled wood. On future cuts I would remove wood around the piece with a 1/4" downcut first to give the head plenty of clearance:

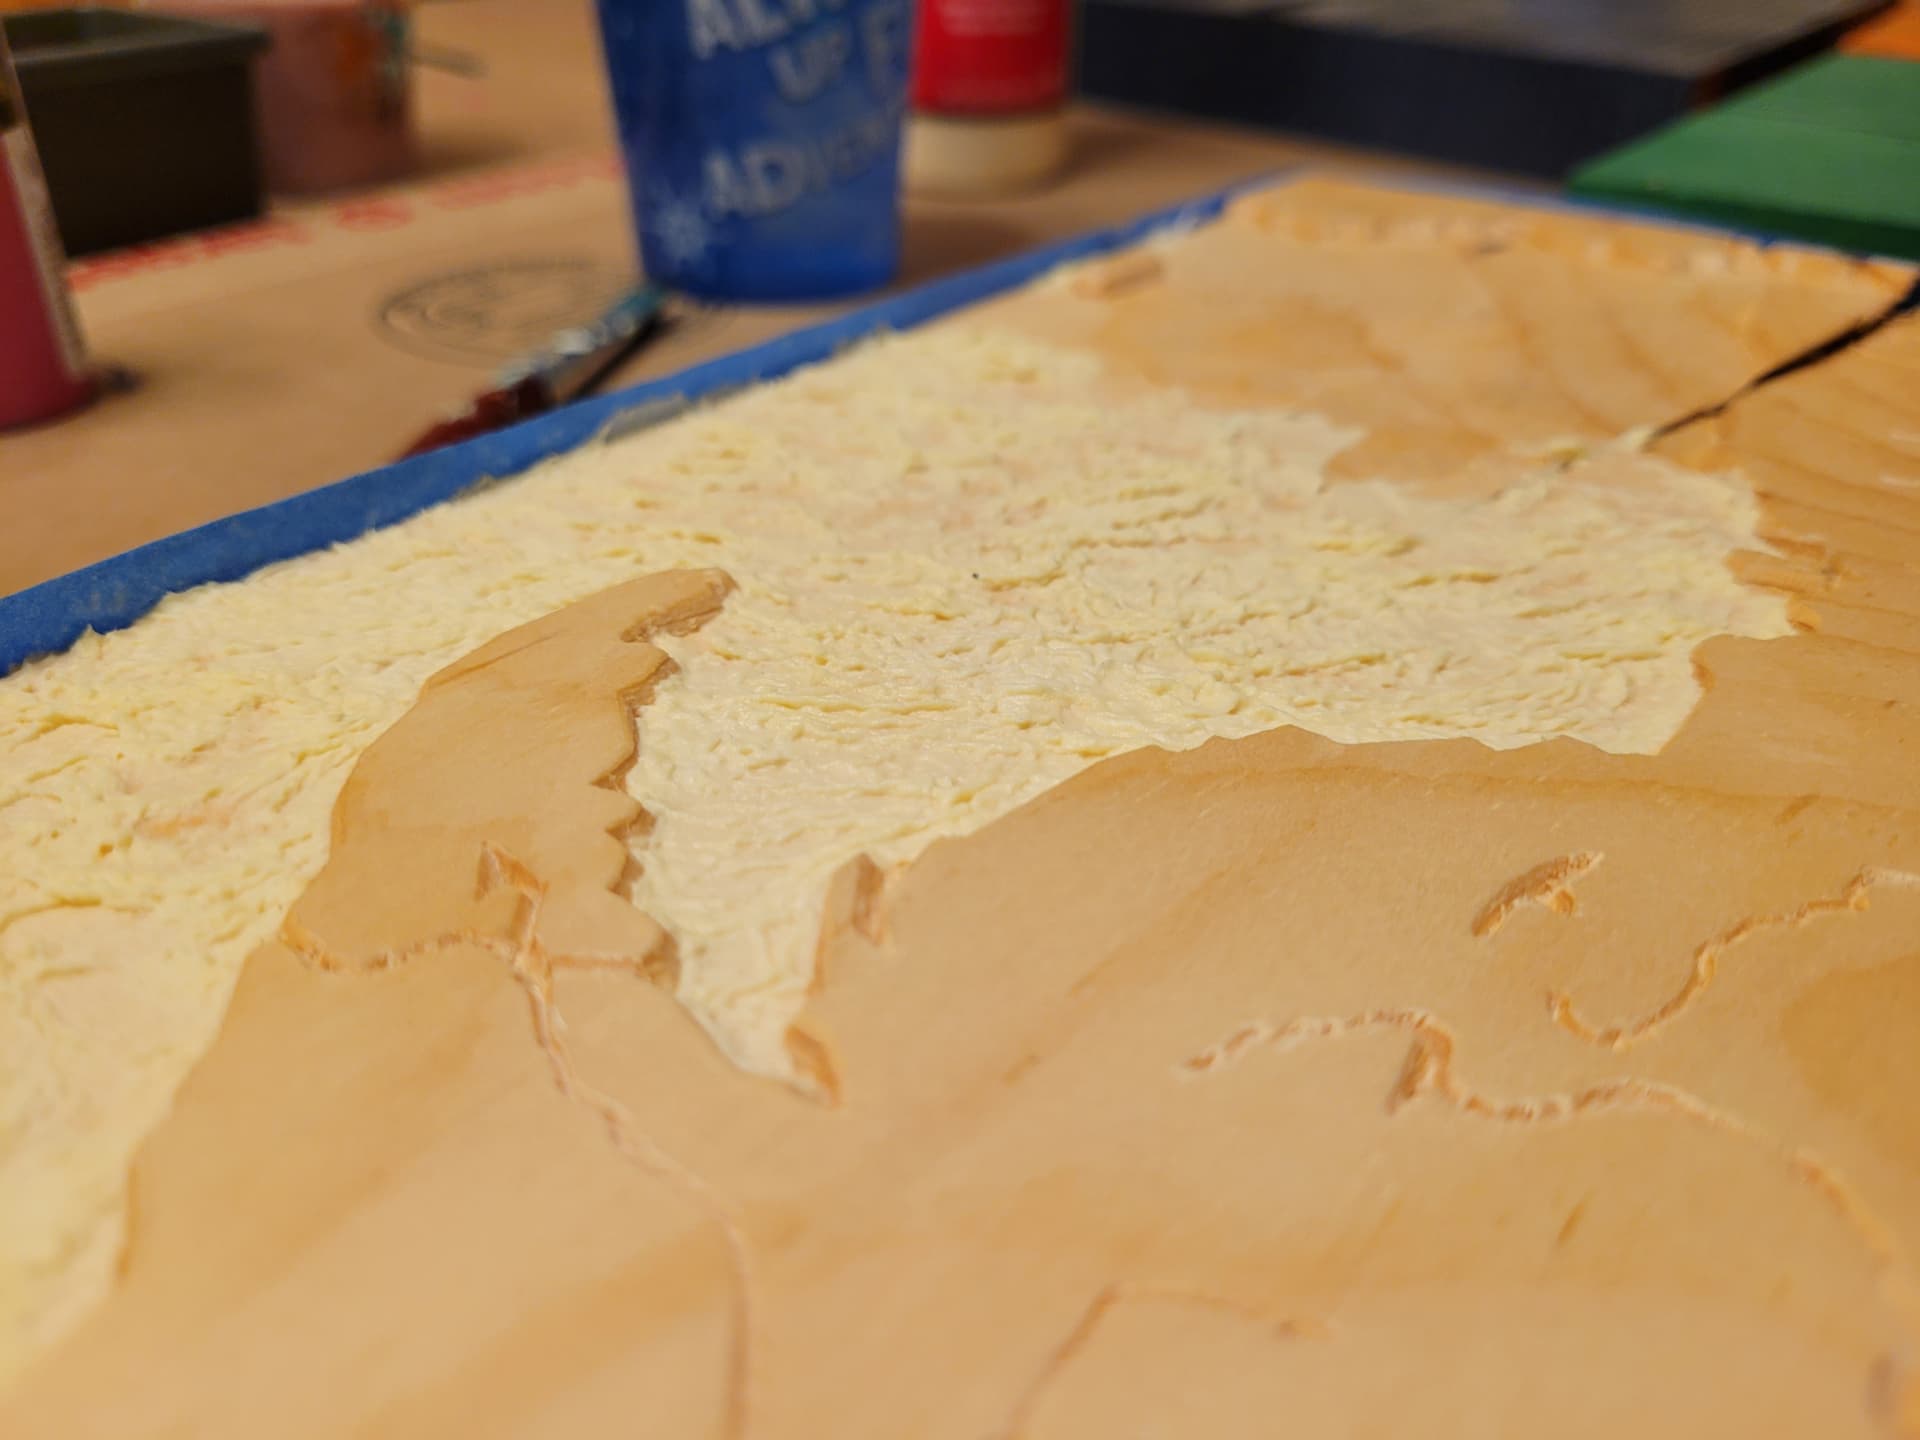
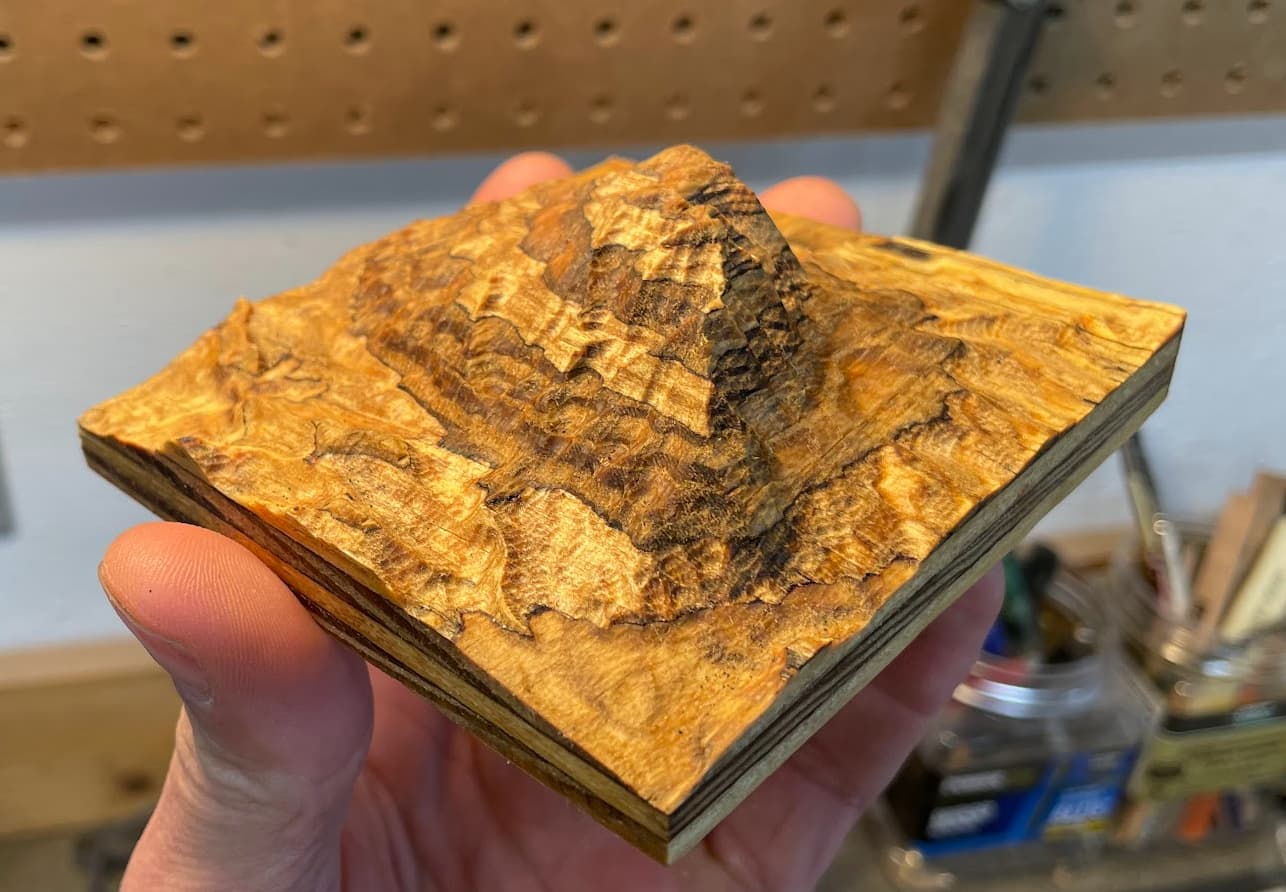
Despite the head crashing into the wood on every pass, the test cut turned out decent:

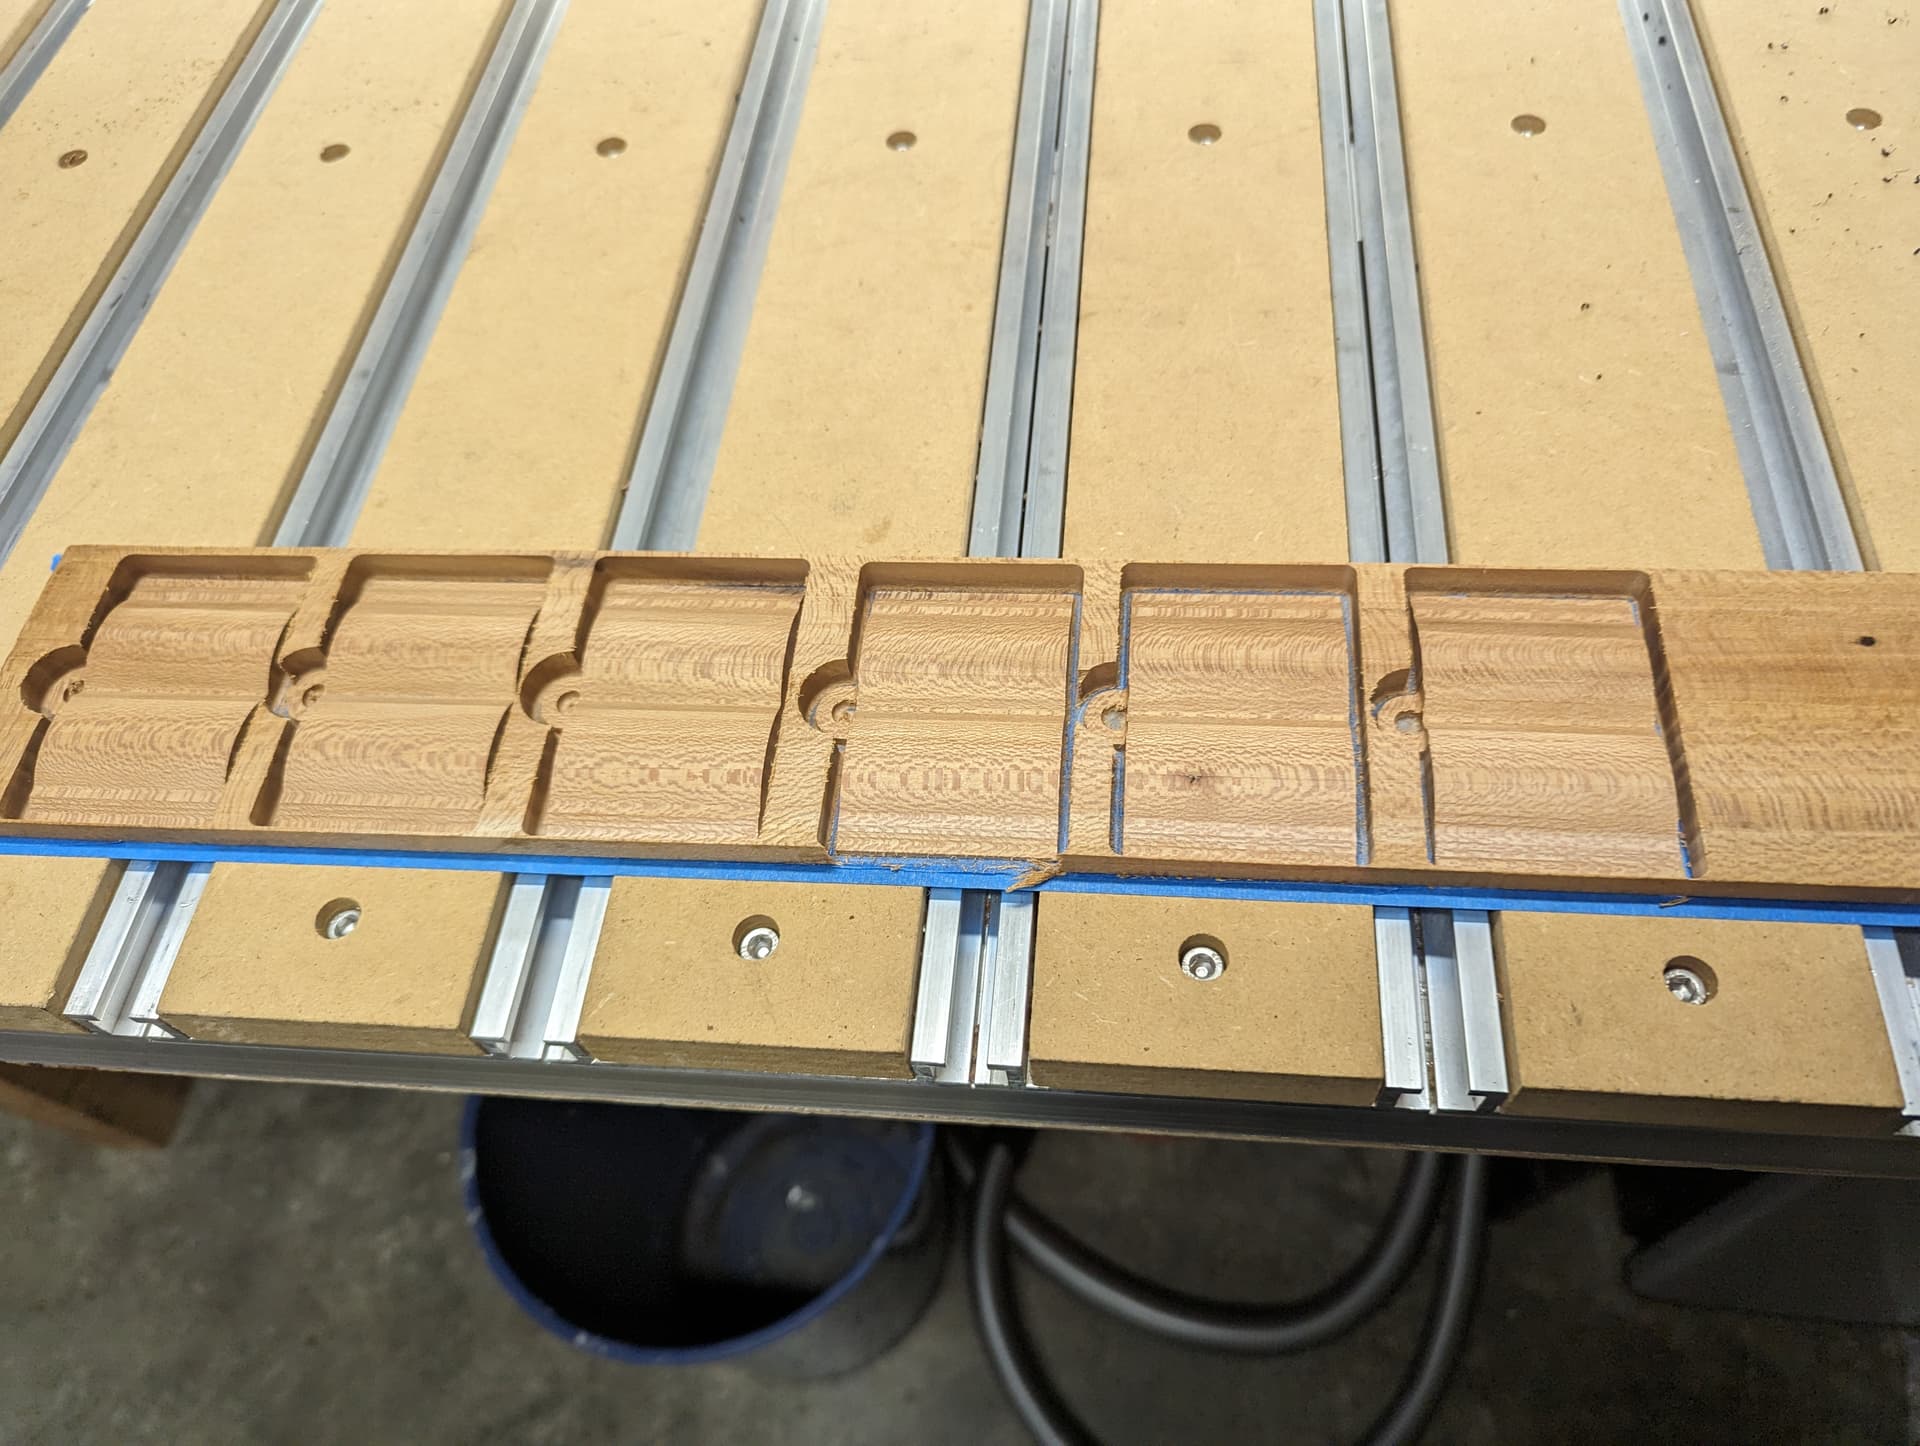
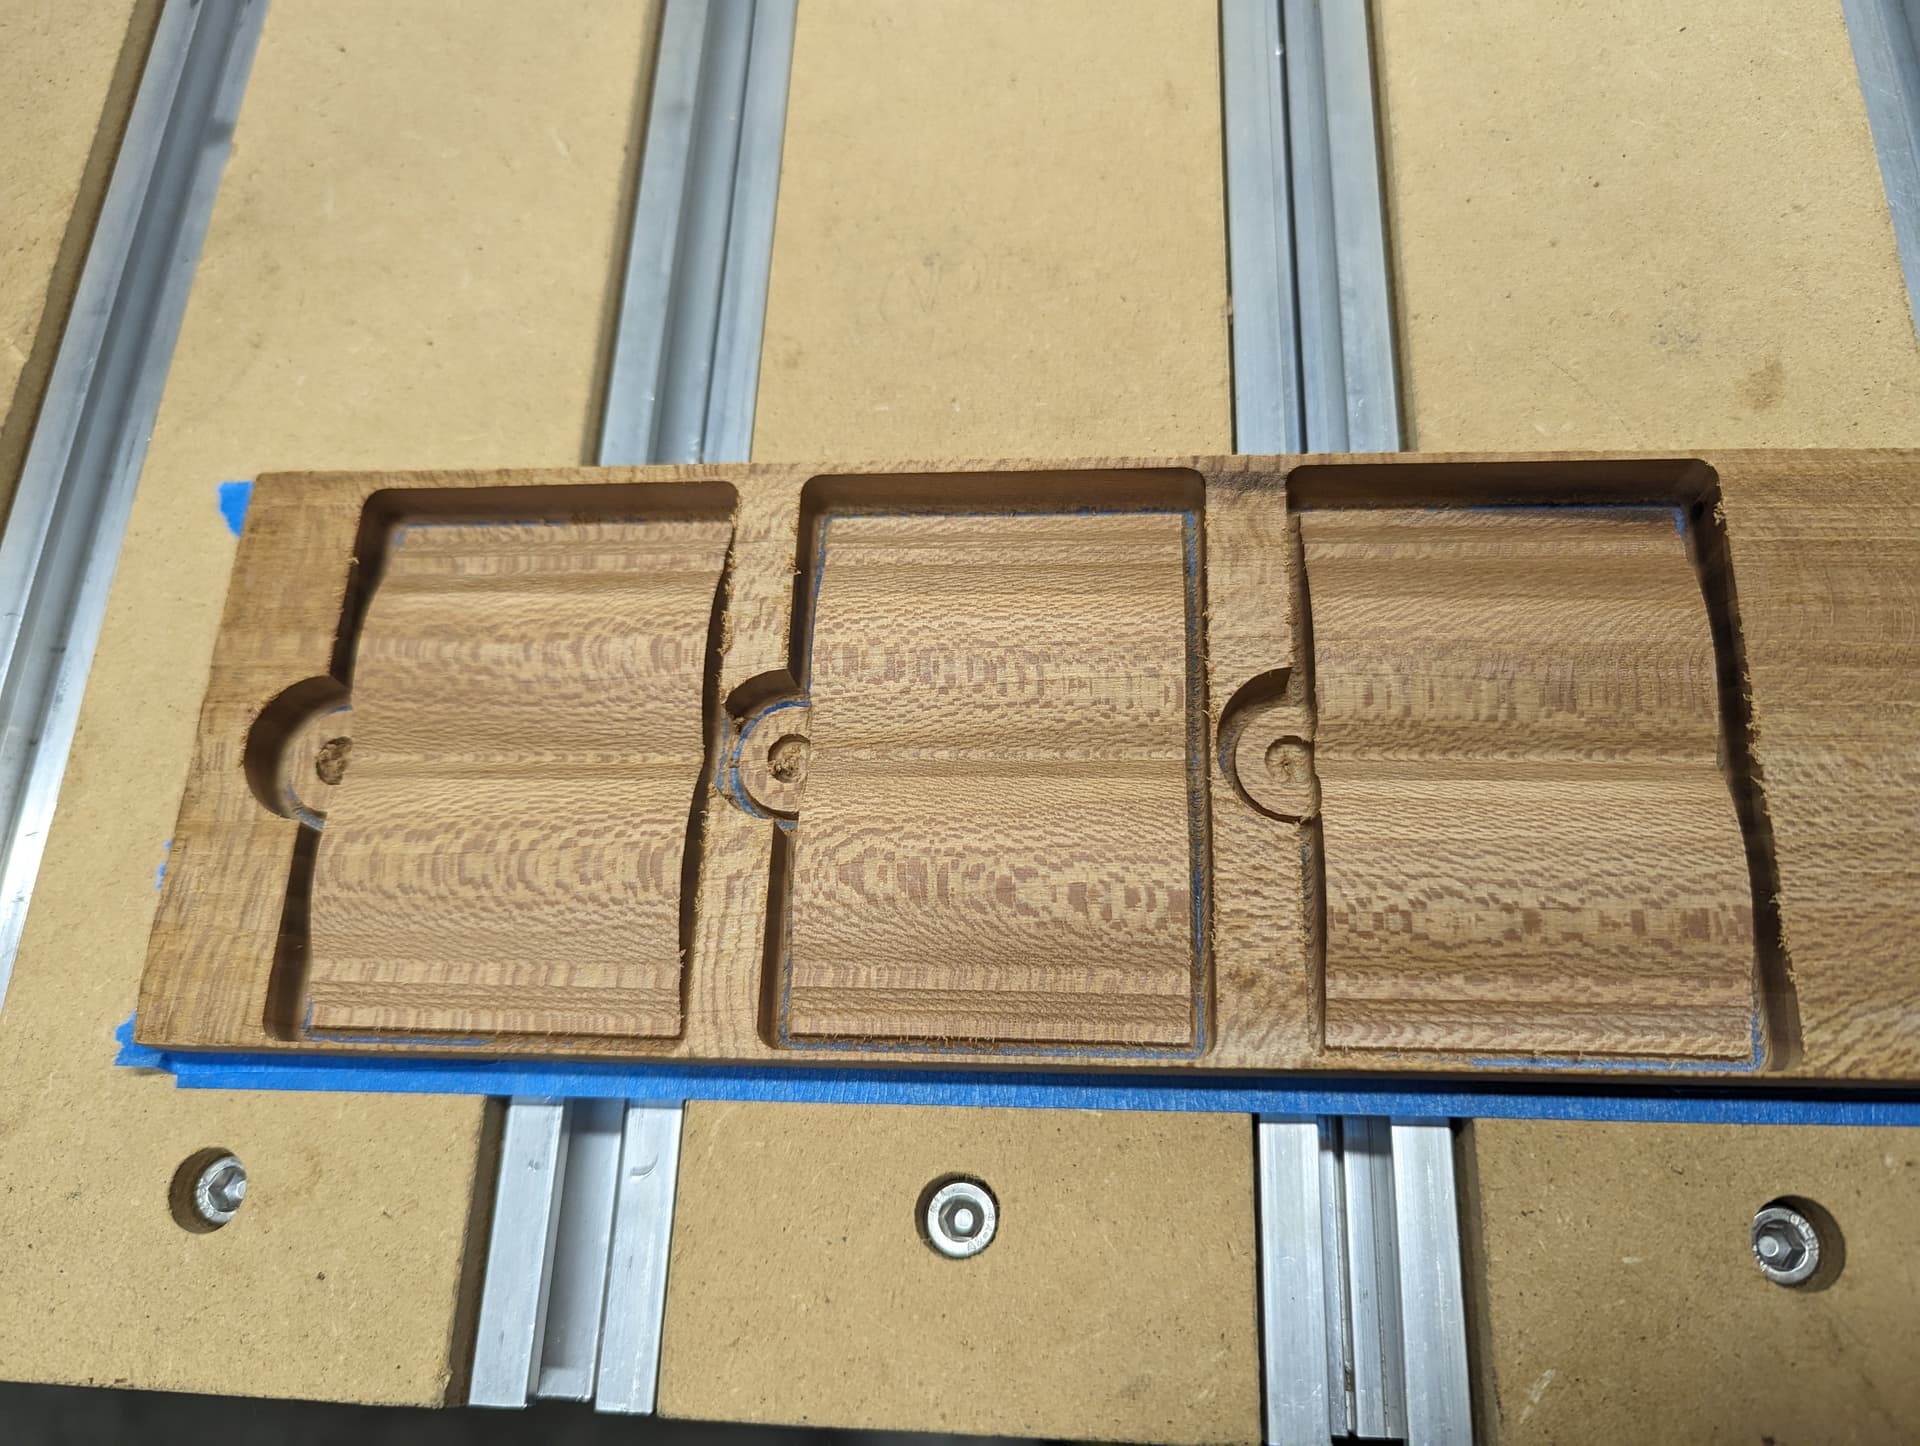
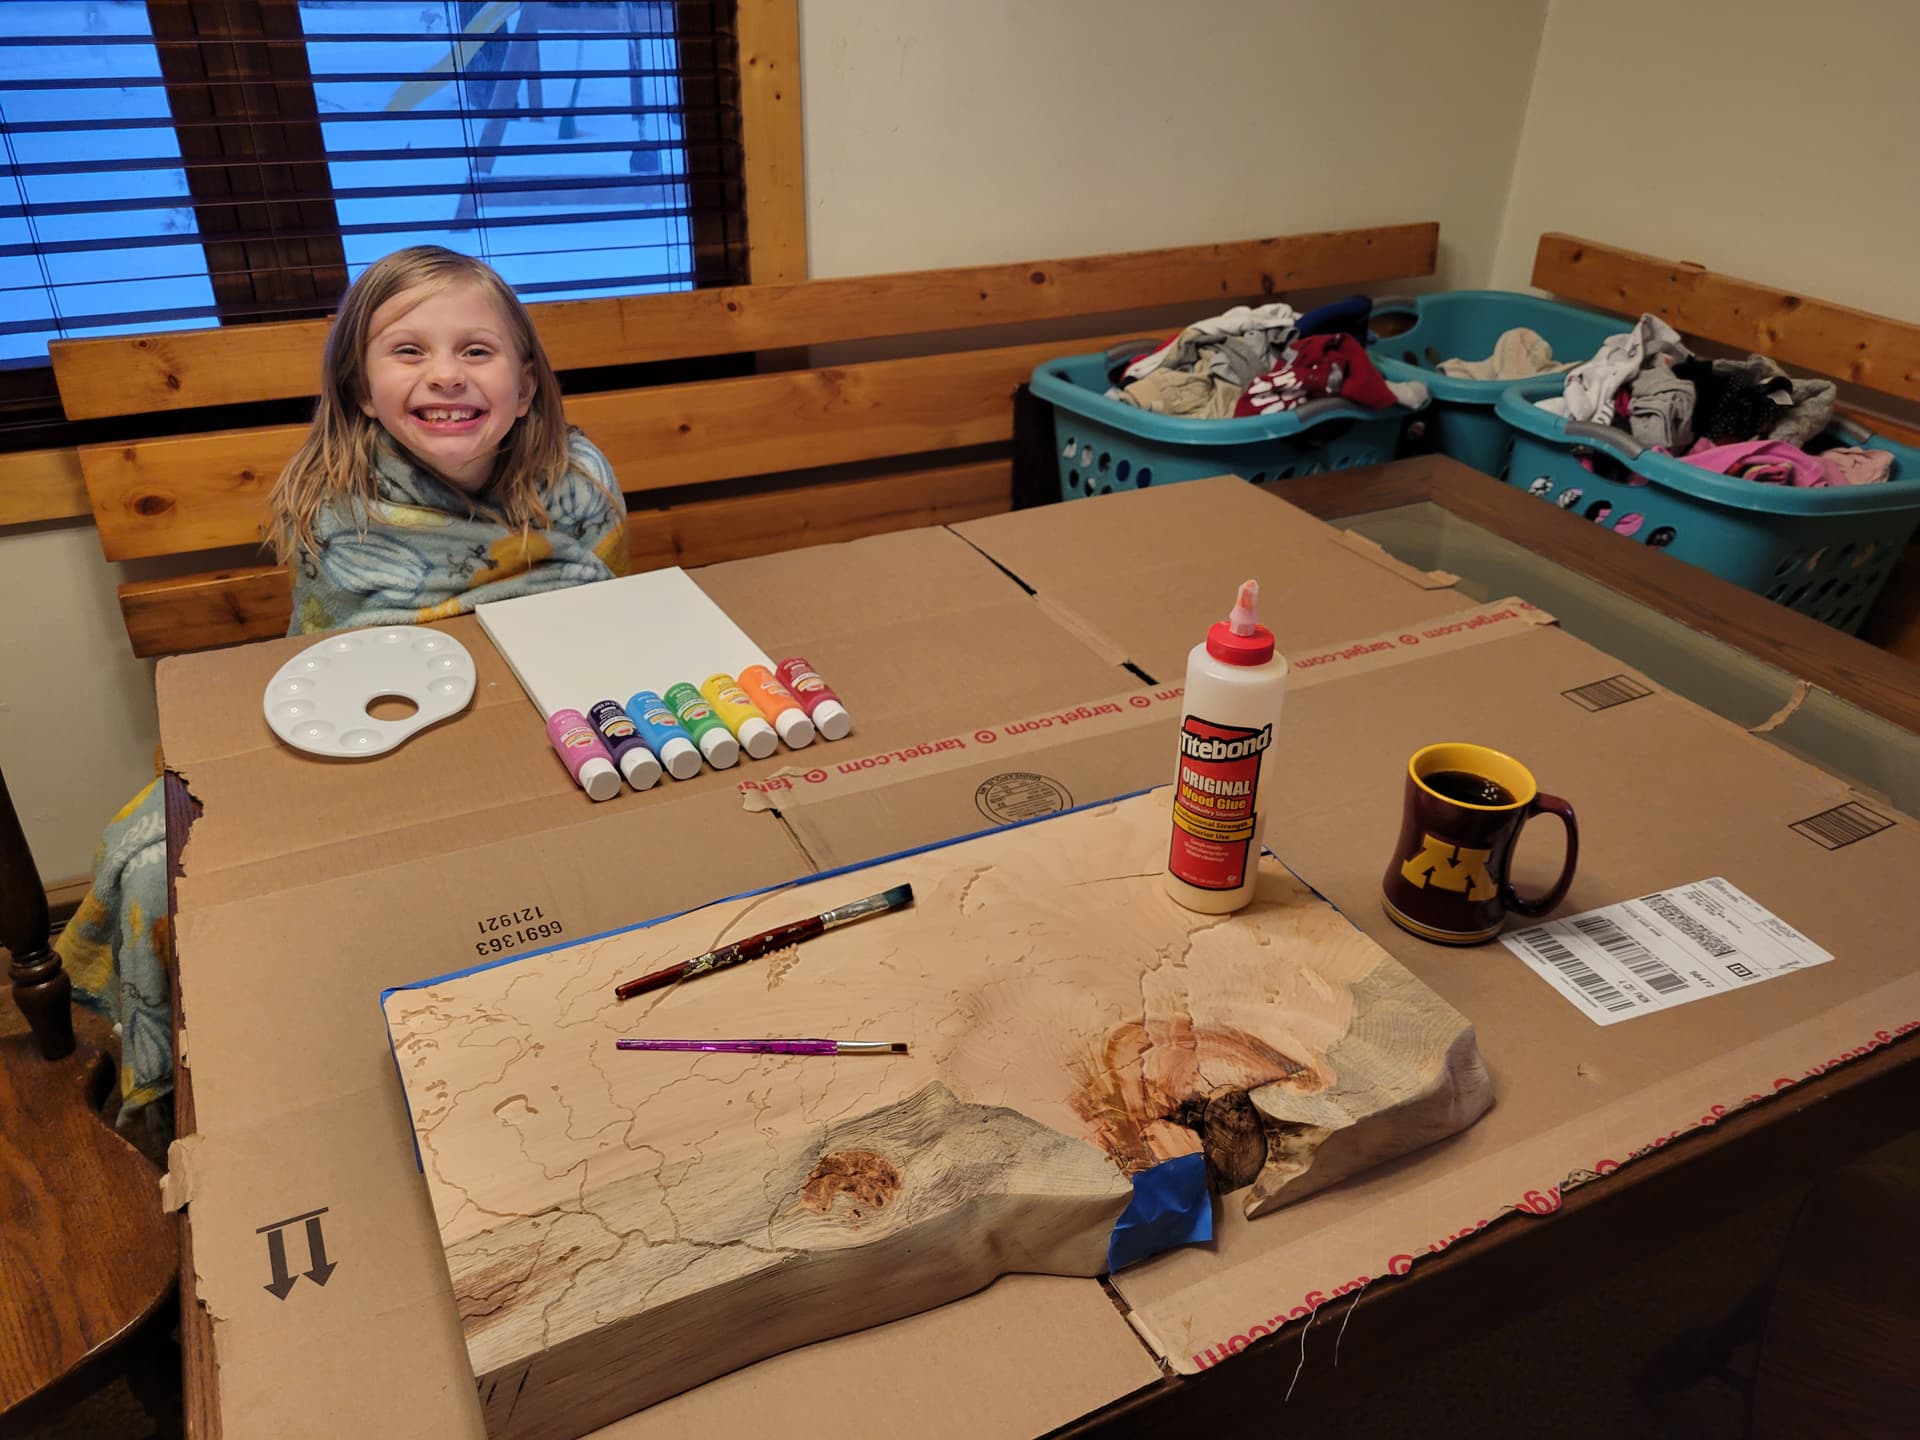
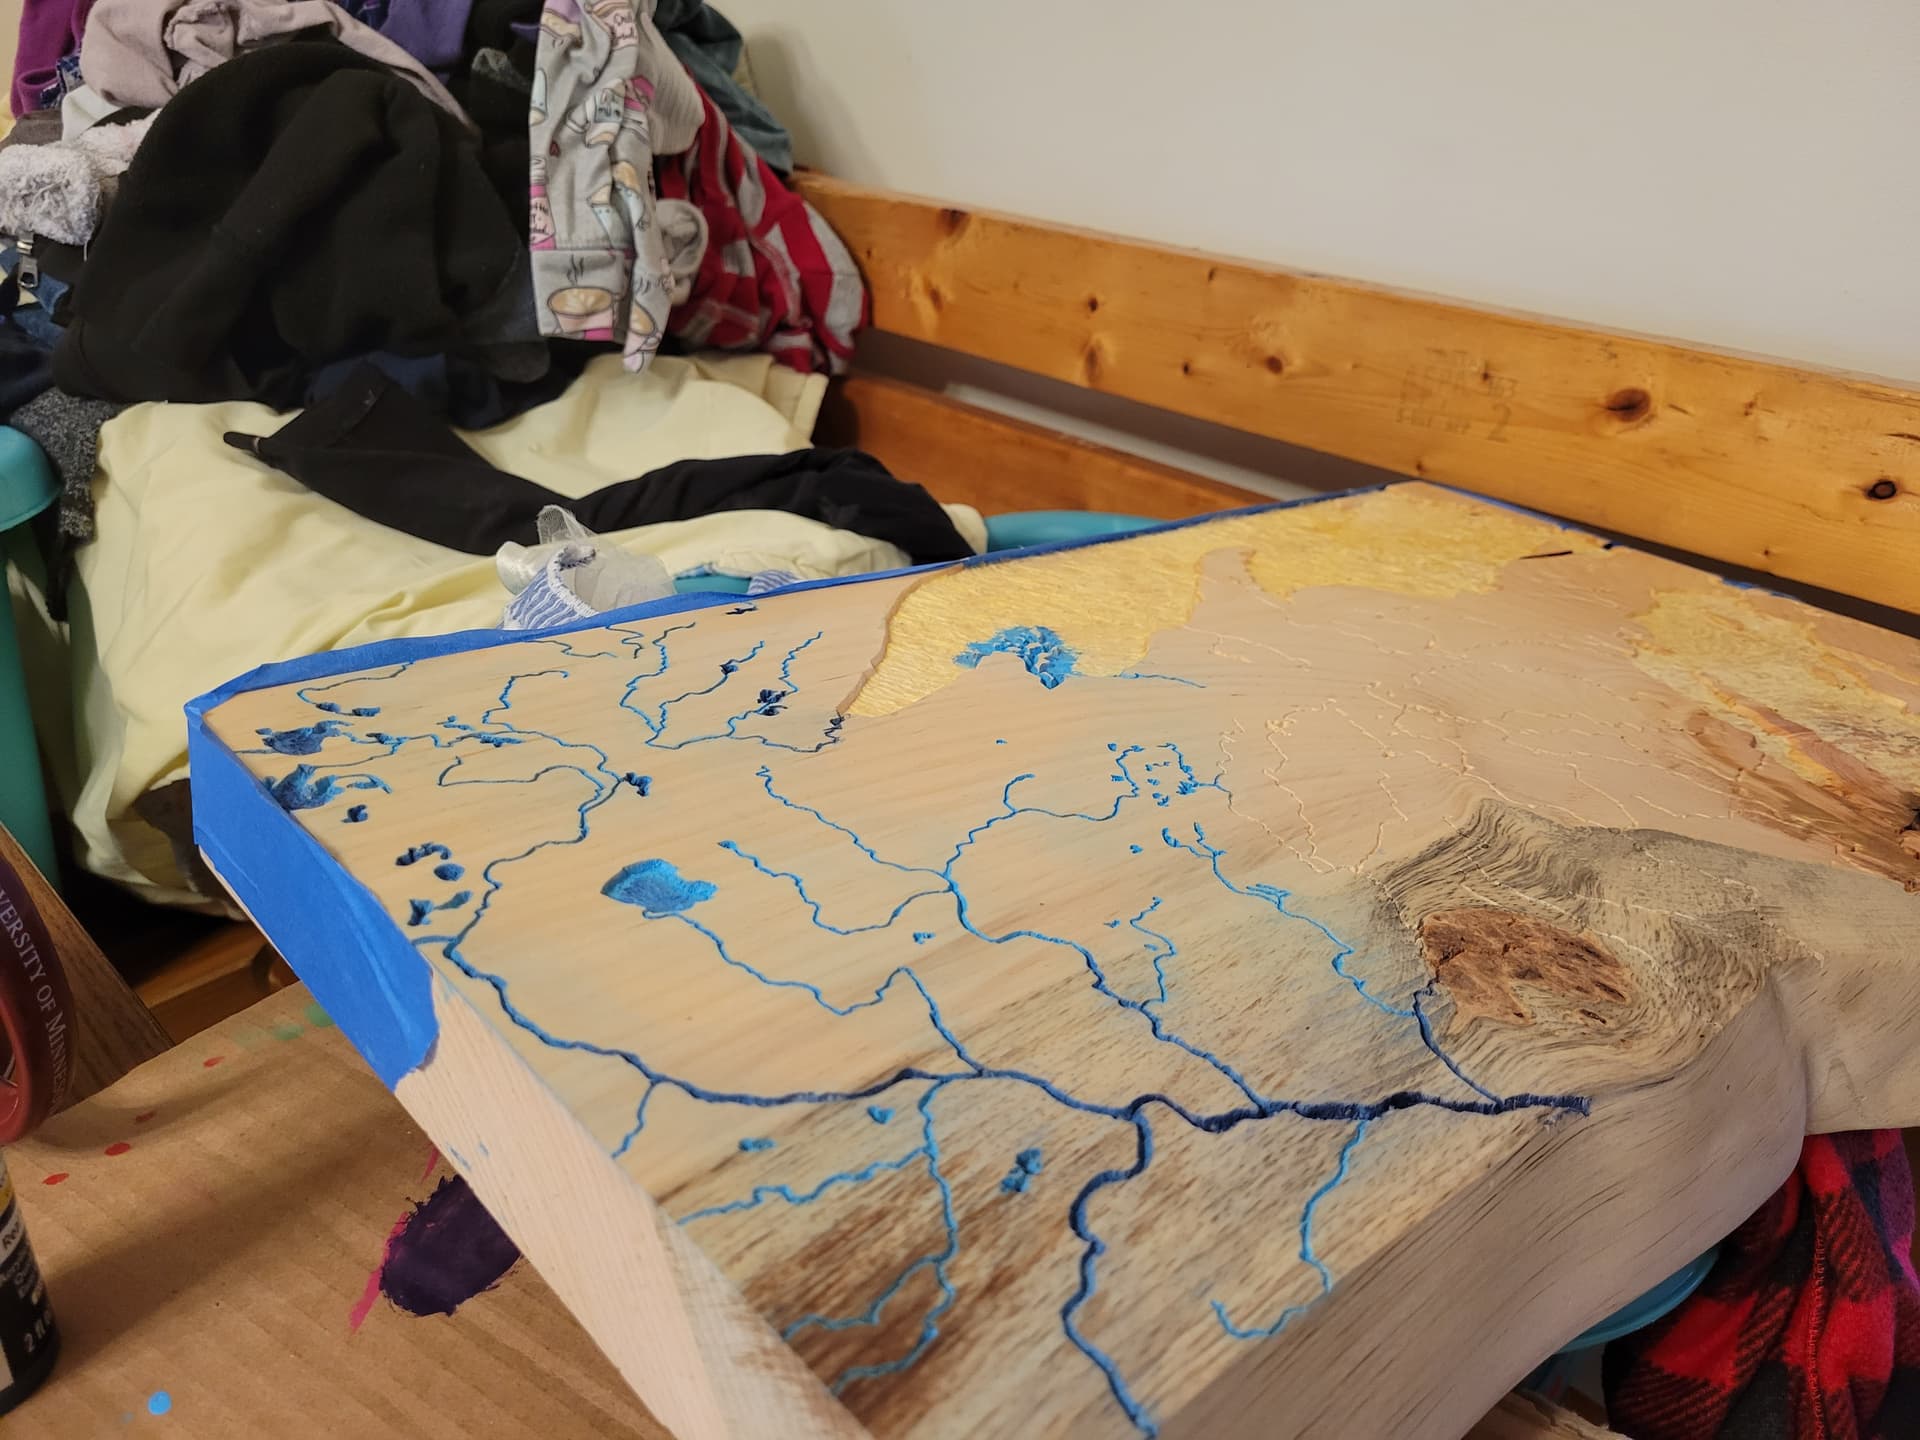
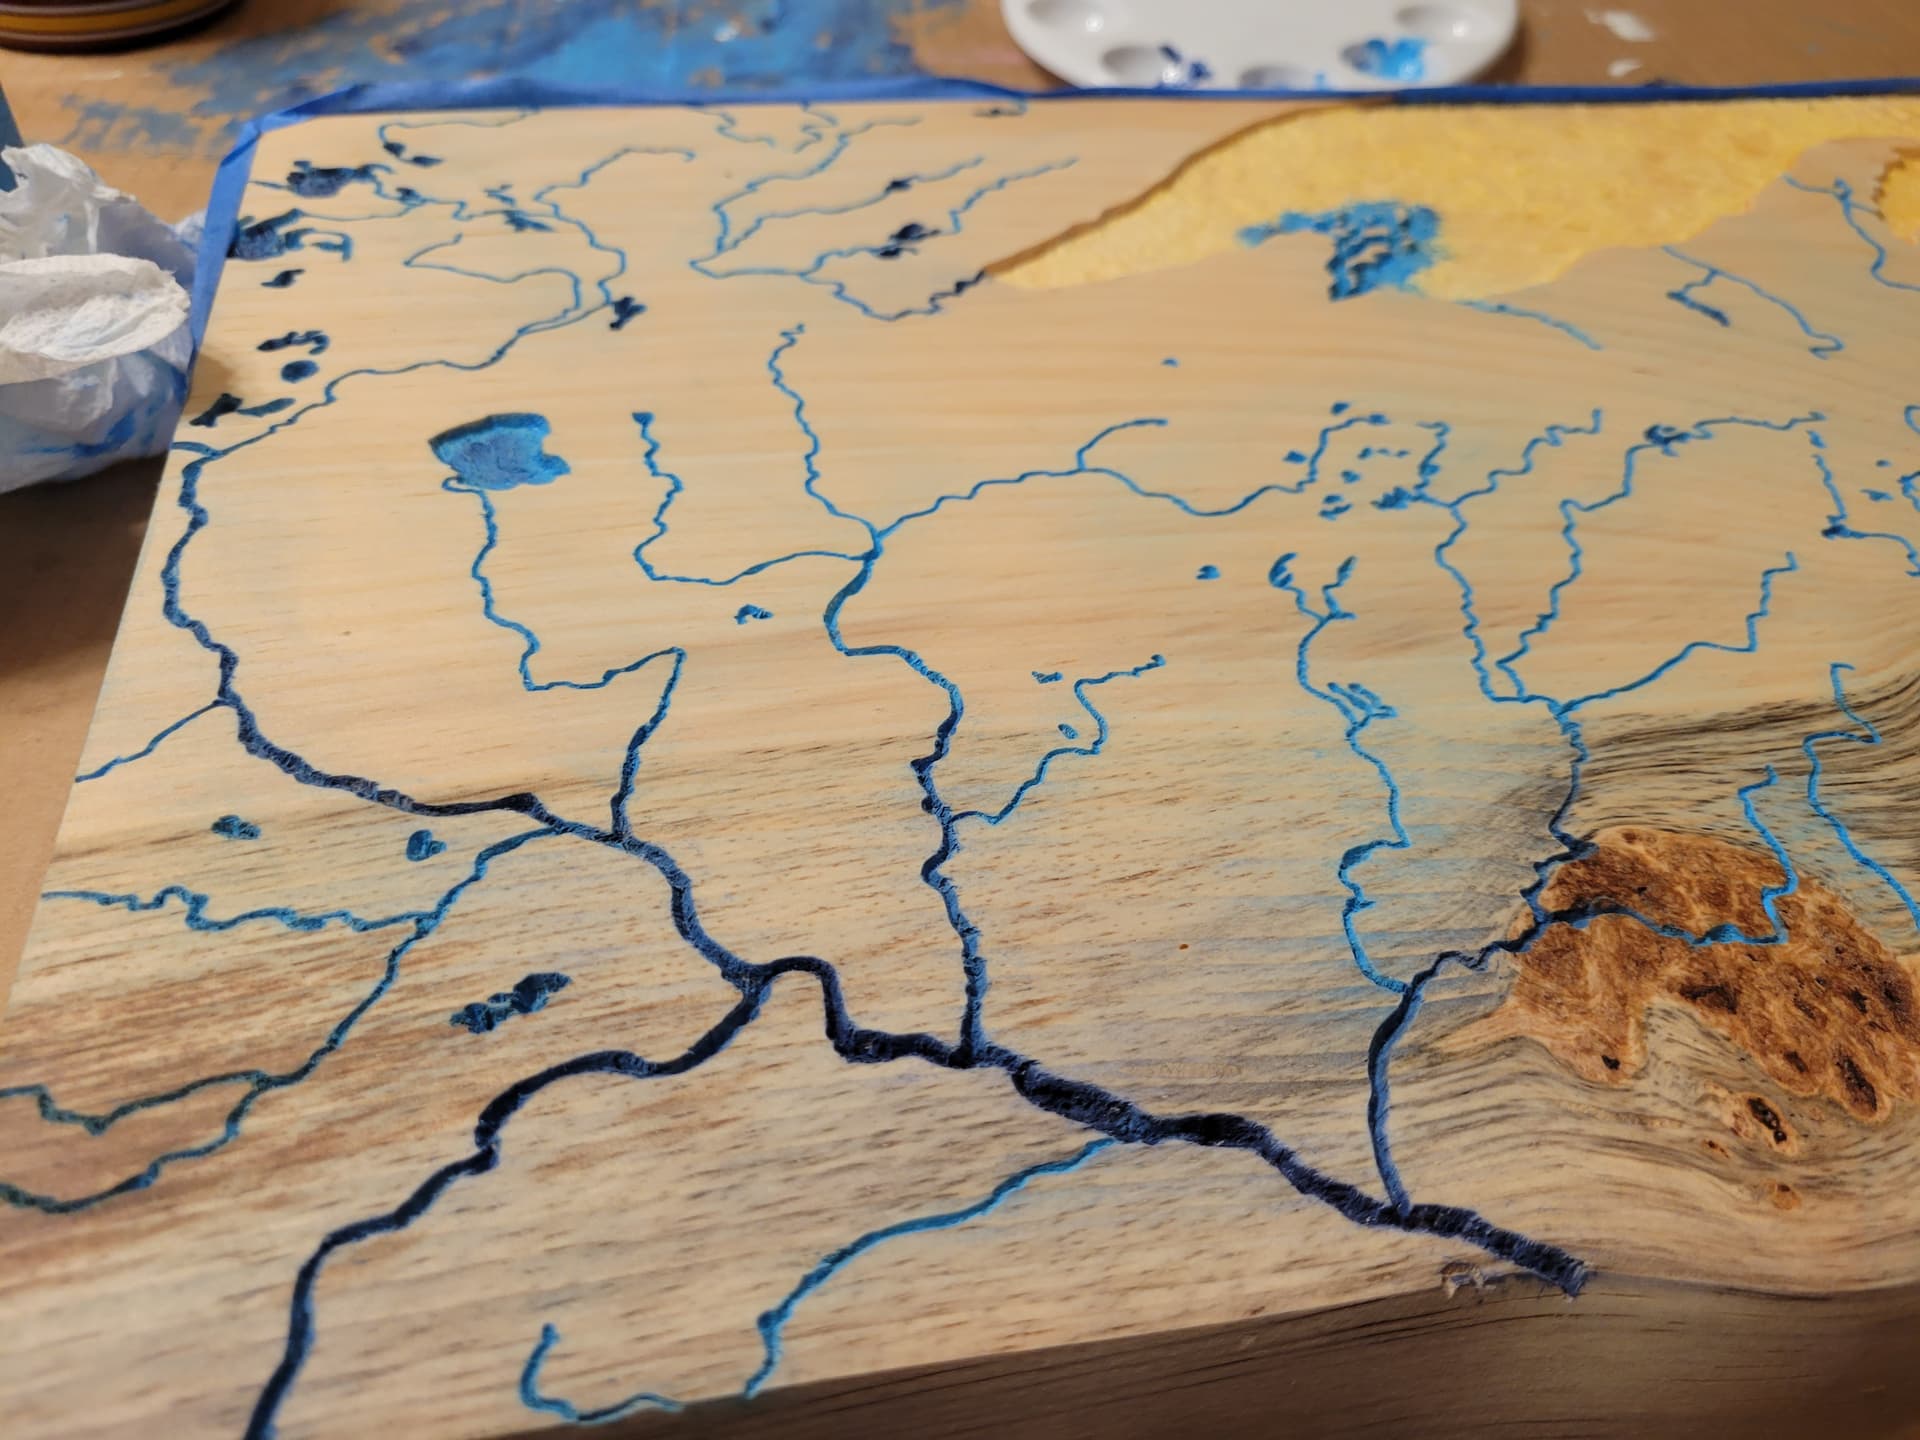
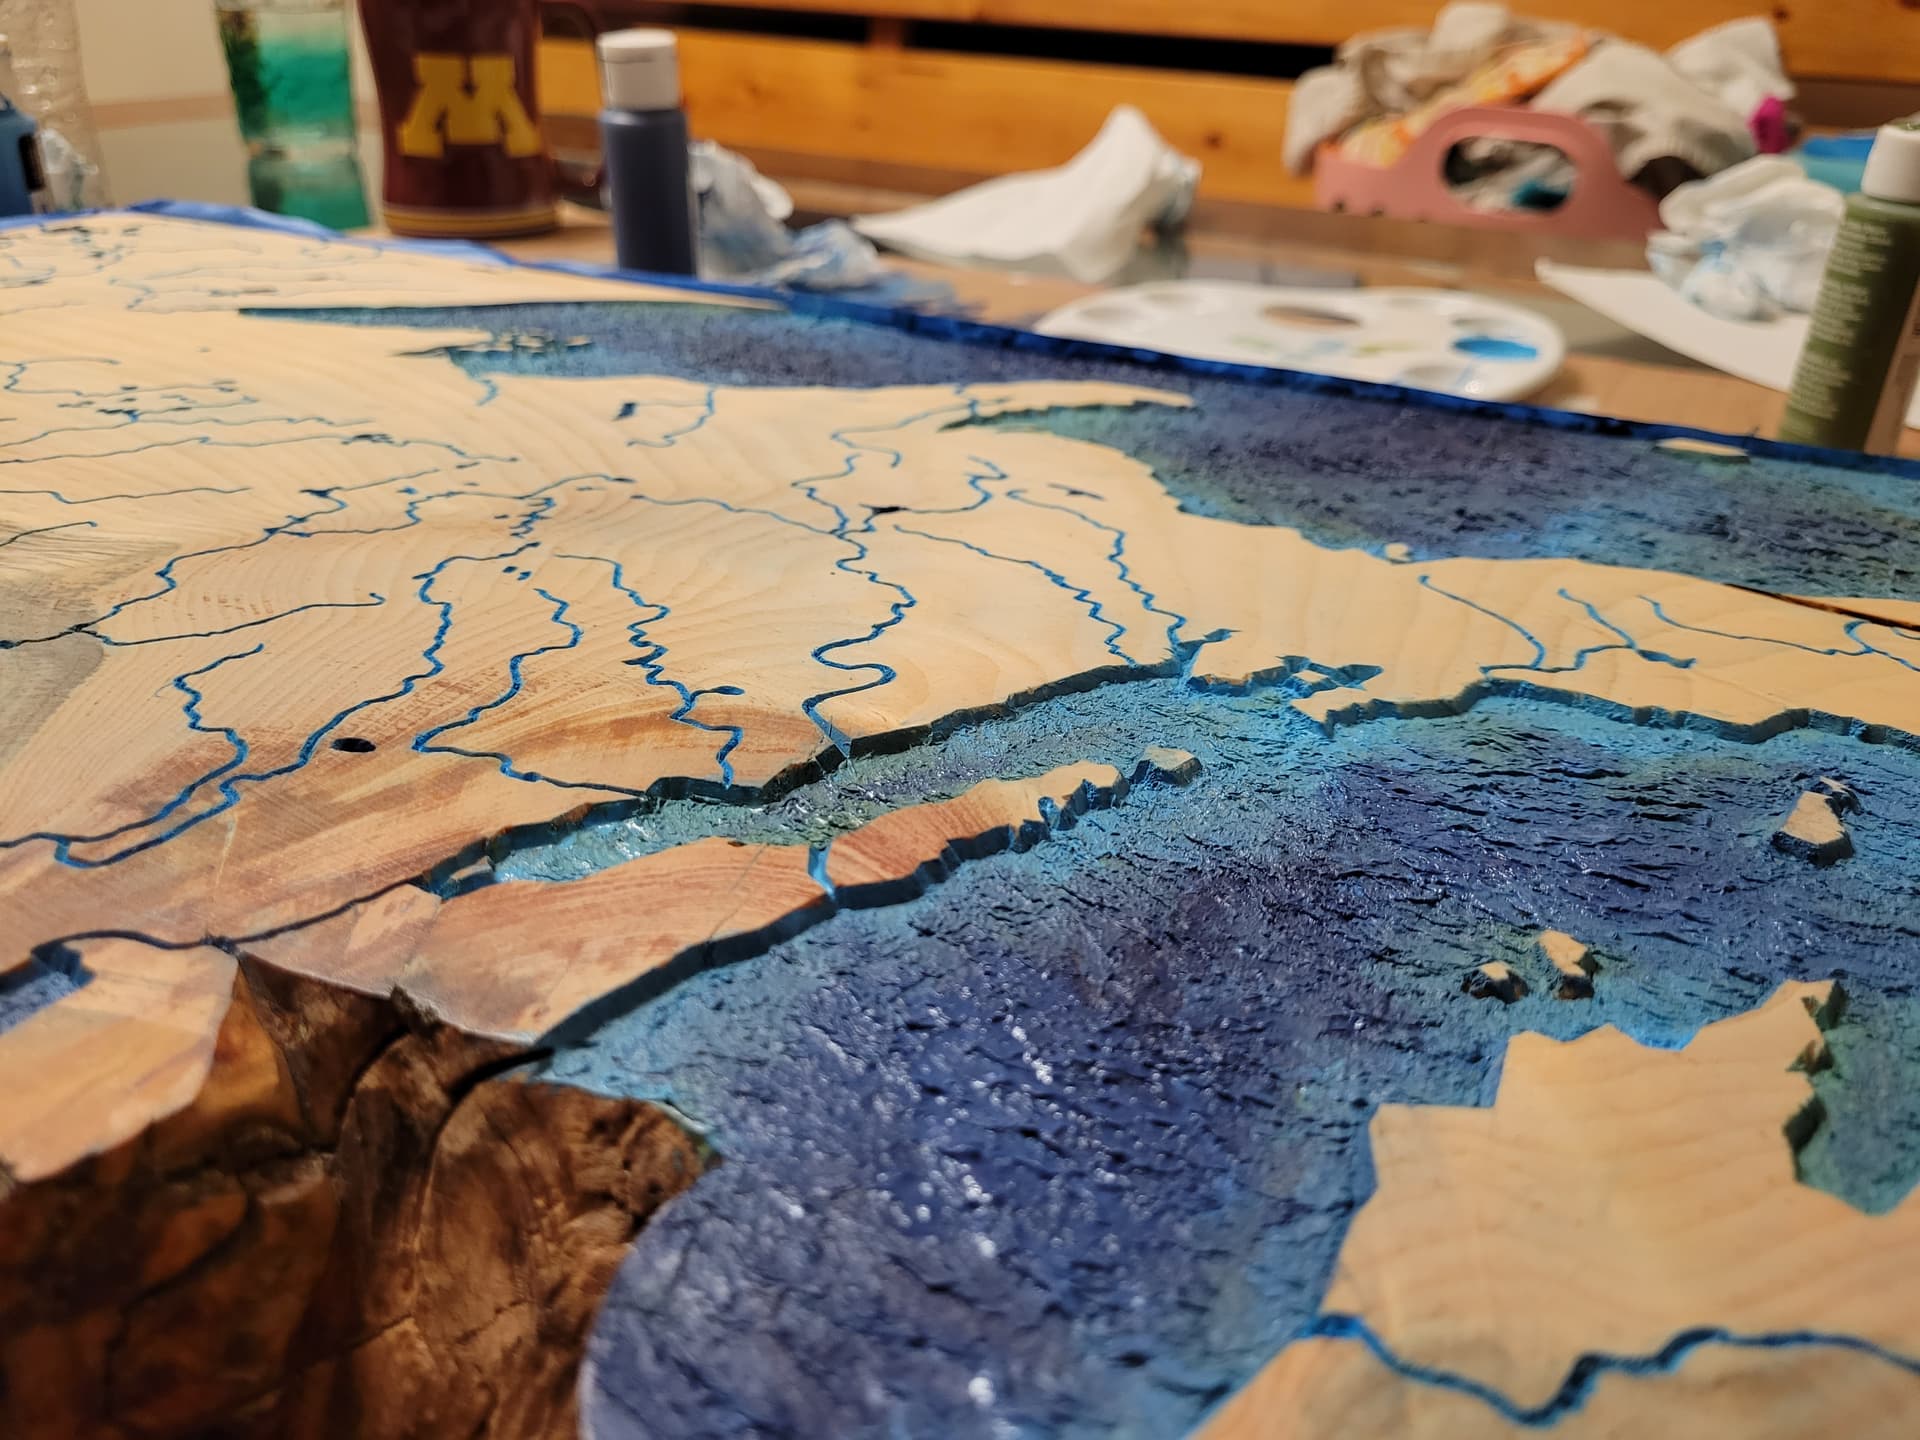
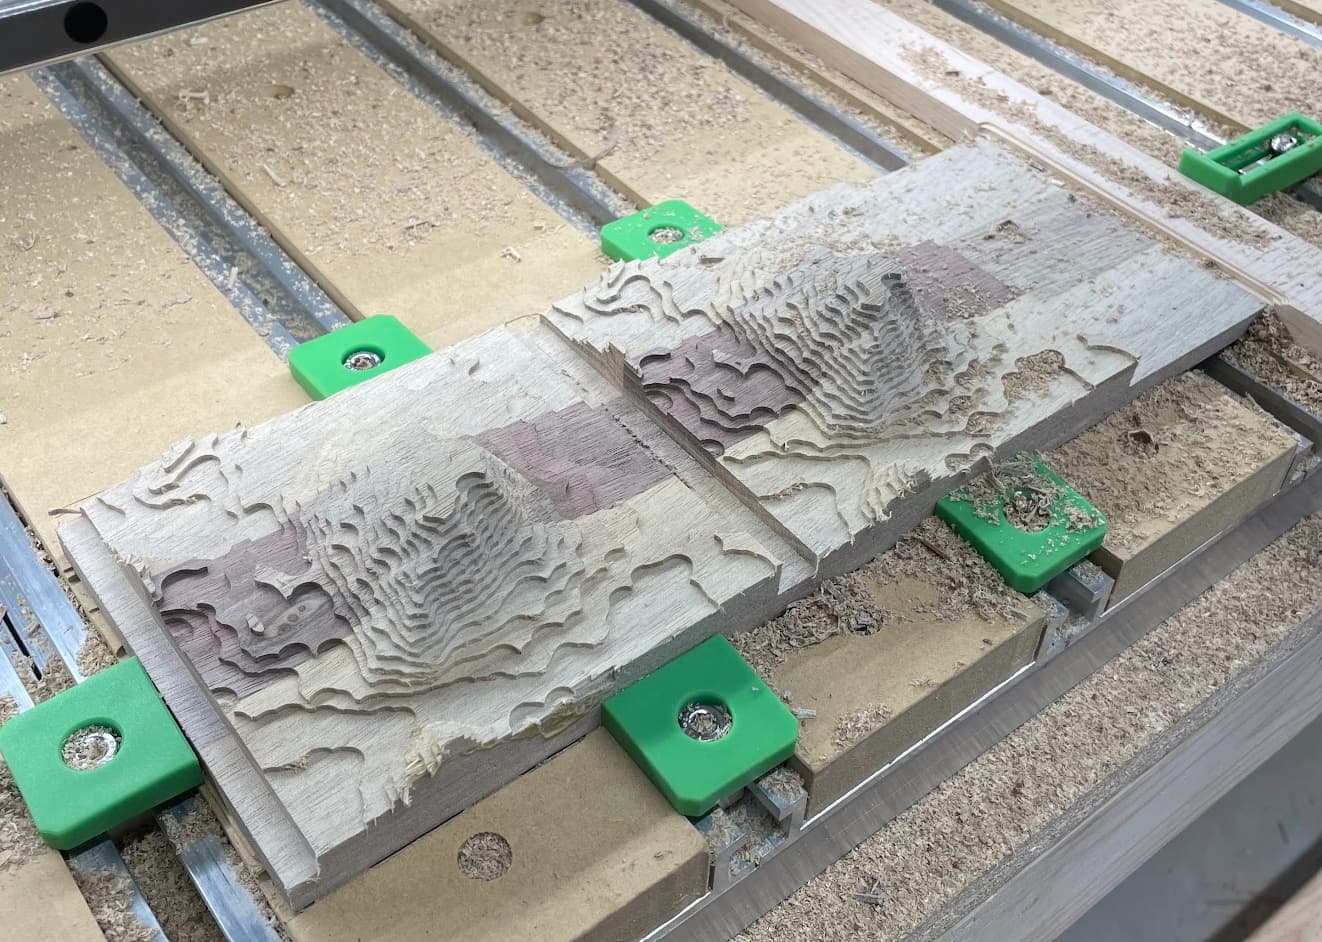
For my next experiment I laminted some cutoff walnut pieces together to create enough surface area to do a couple more. These were cheap tests but turned out nice enough to give as gifts to some of my other family that love this mountain… Notice on these that I milled away any wood in the rough pass that might hit the router head on the final pass:

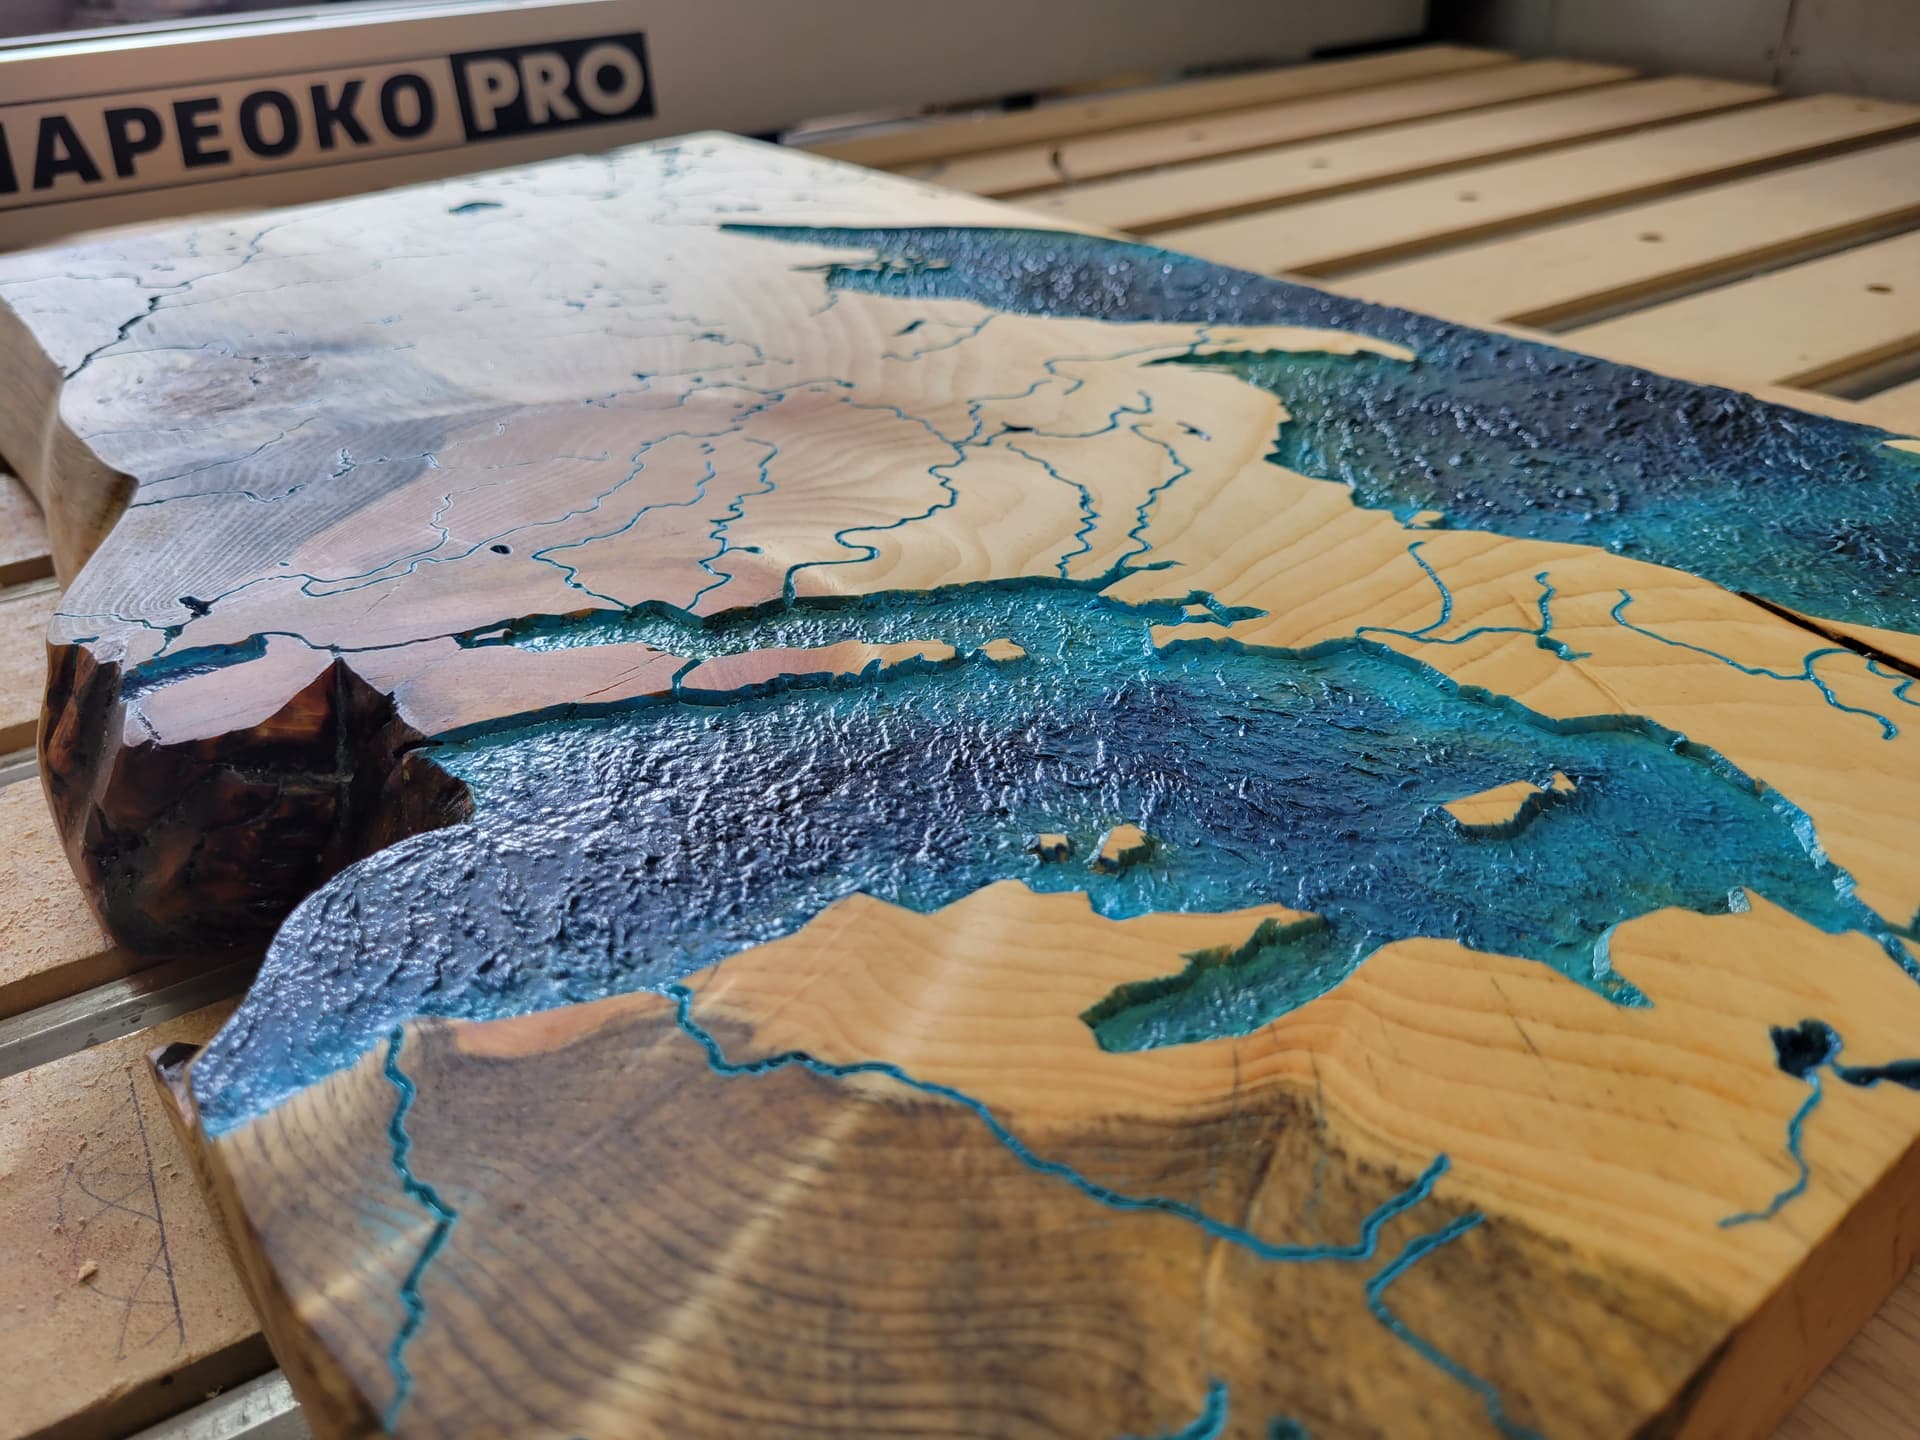
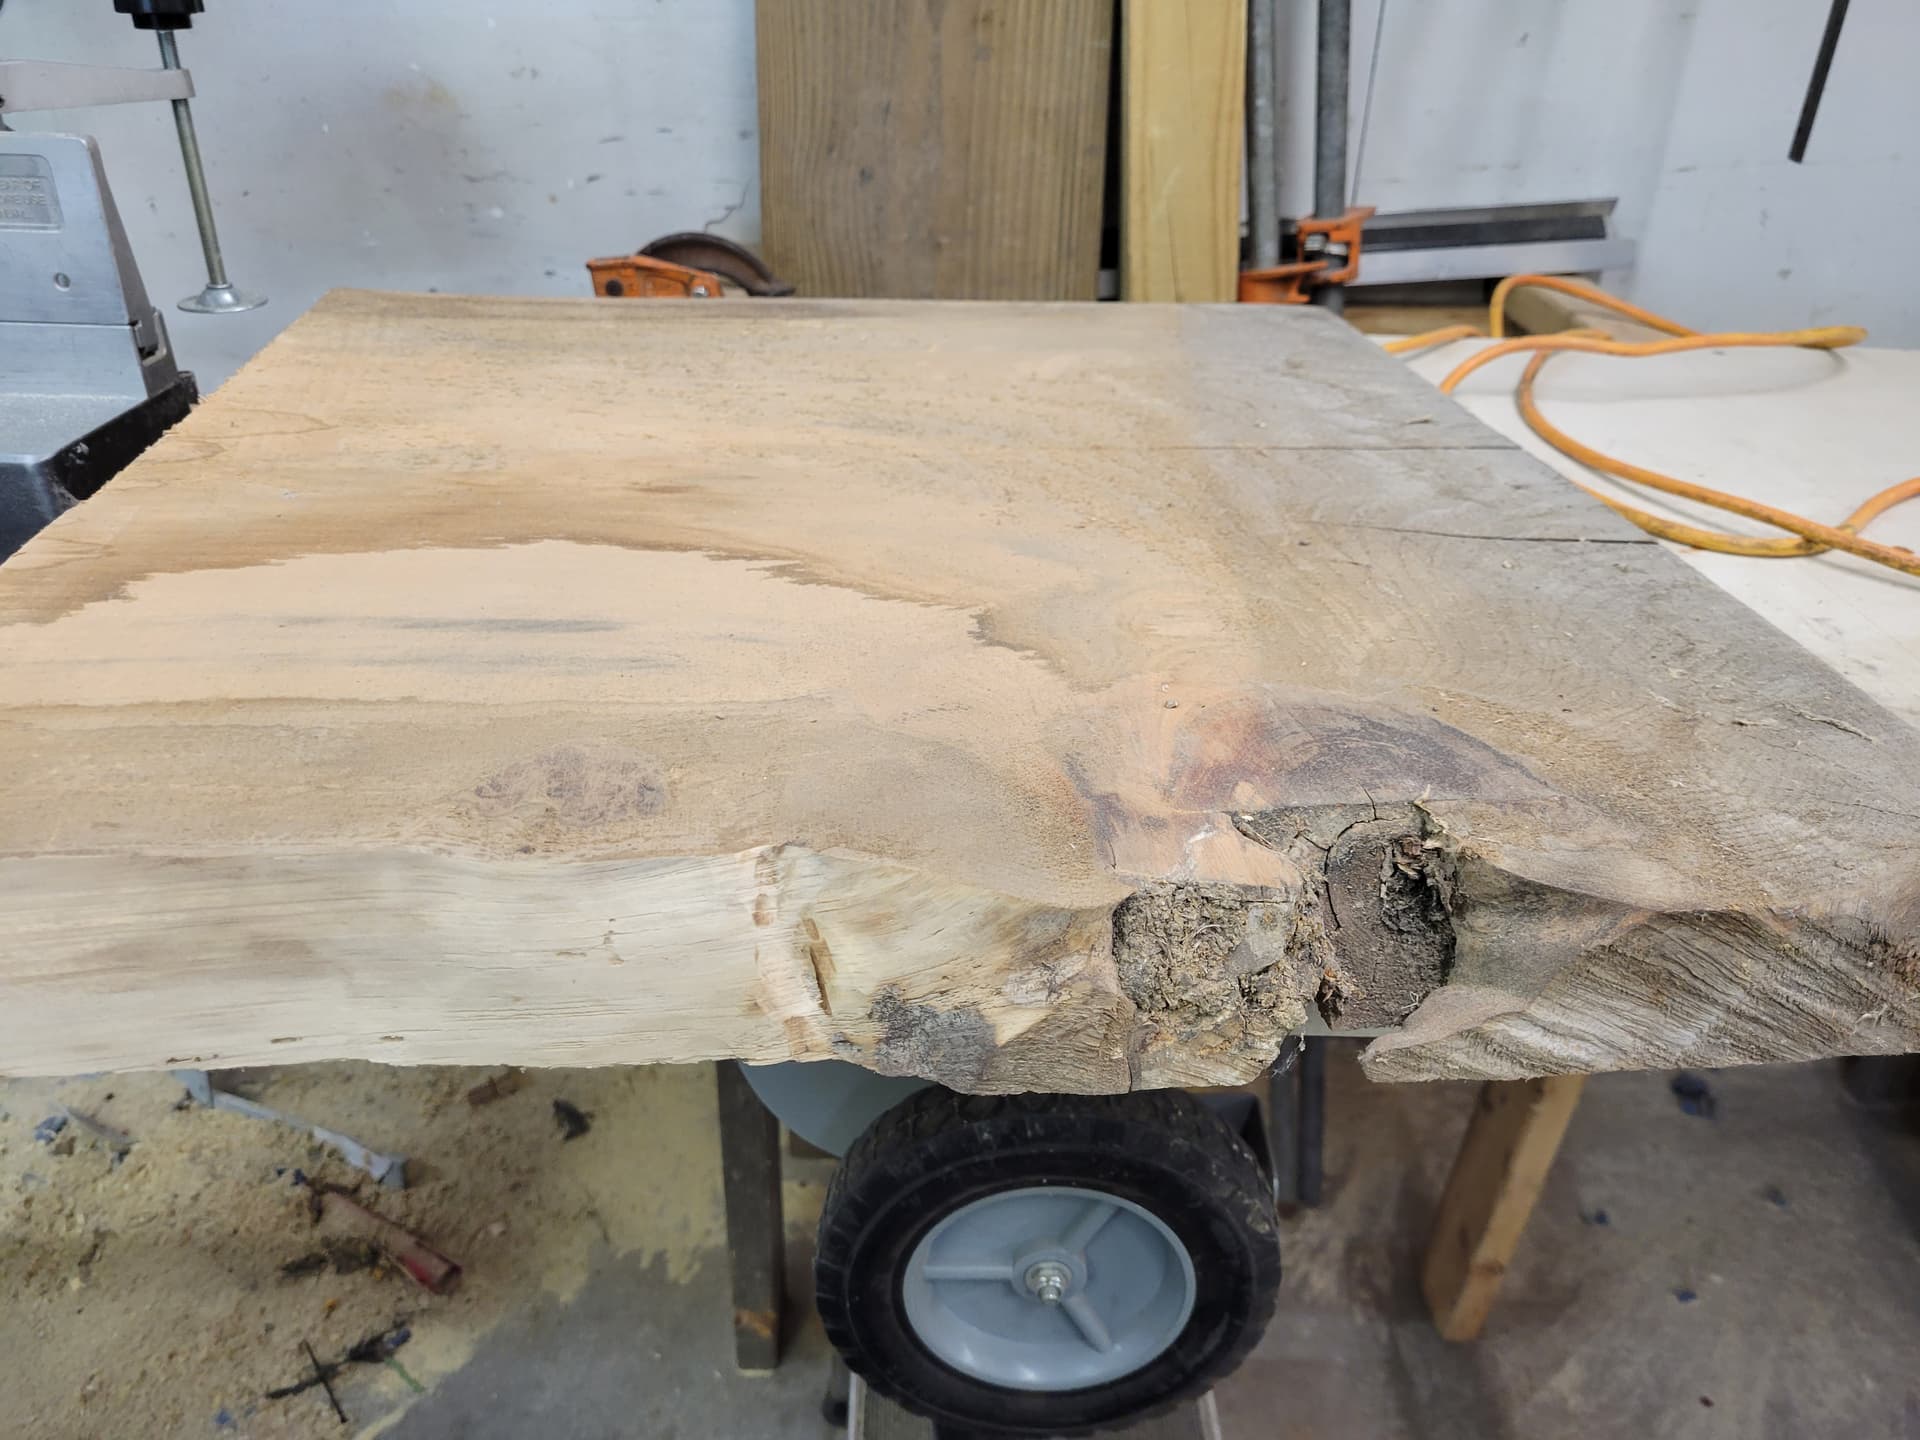
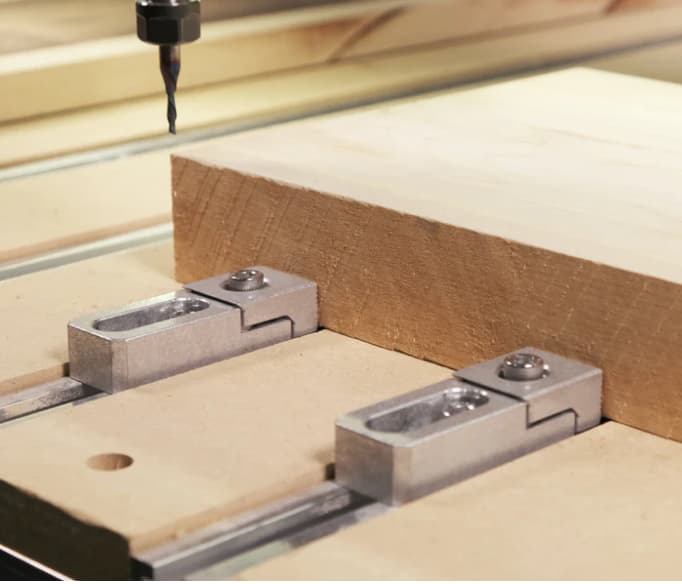
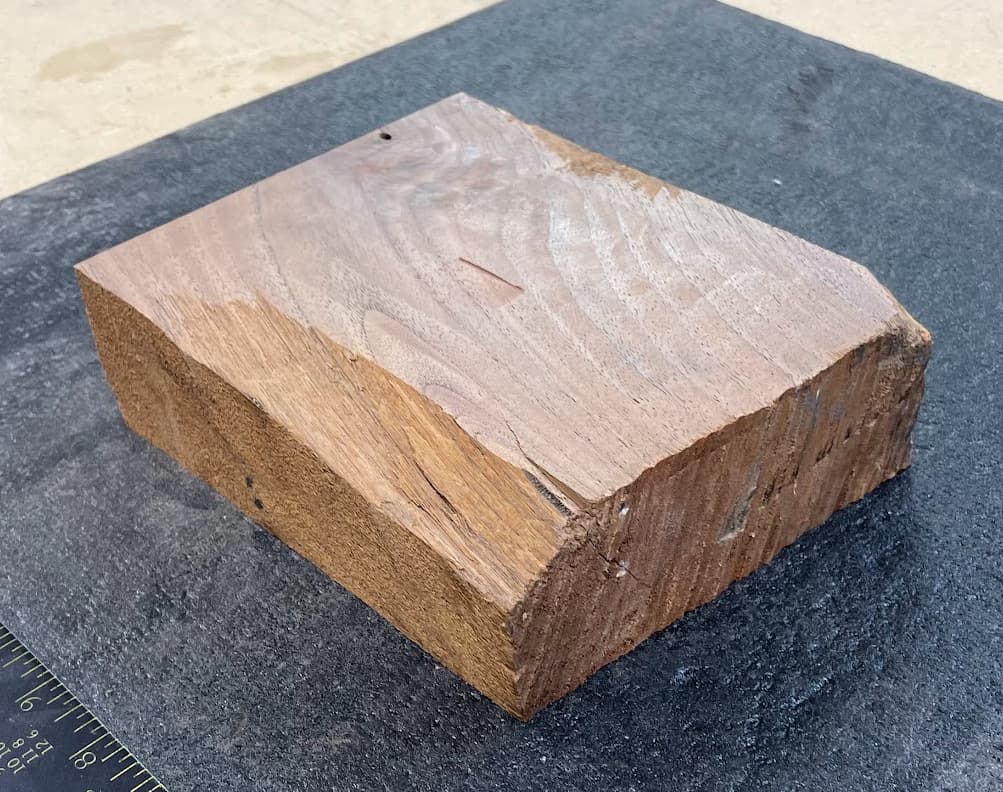
Now that I had the process pretty much figured out, it was time to test it on the more expensive solid chunk of black walnut. I got this big rough cutoff from my hardwood supplier and flattened both sides with the McFly surfacing bit:

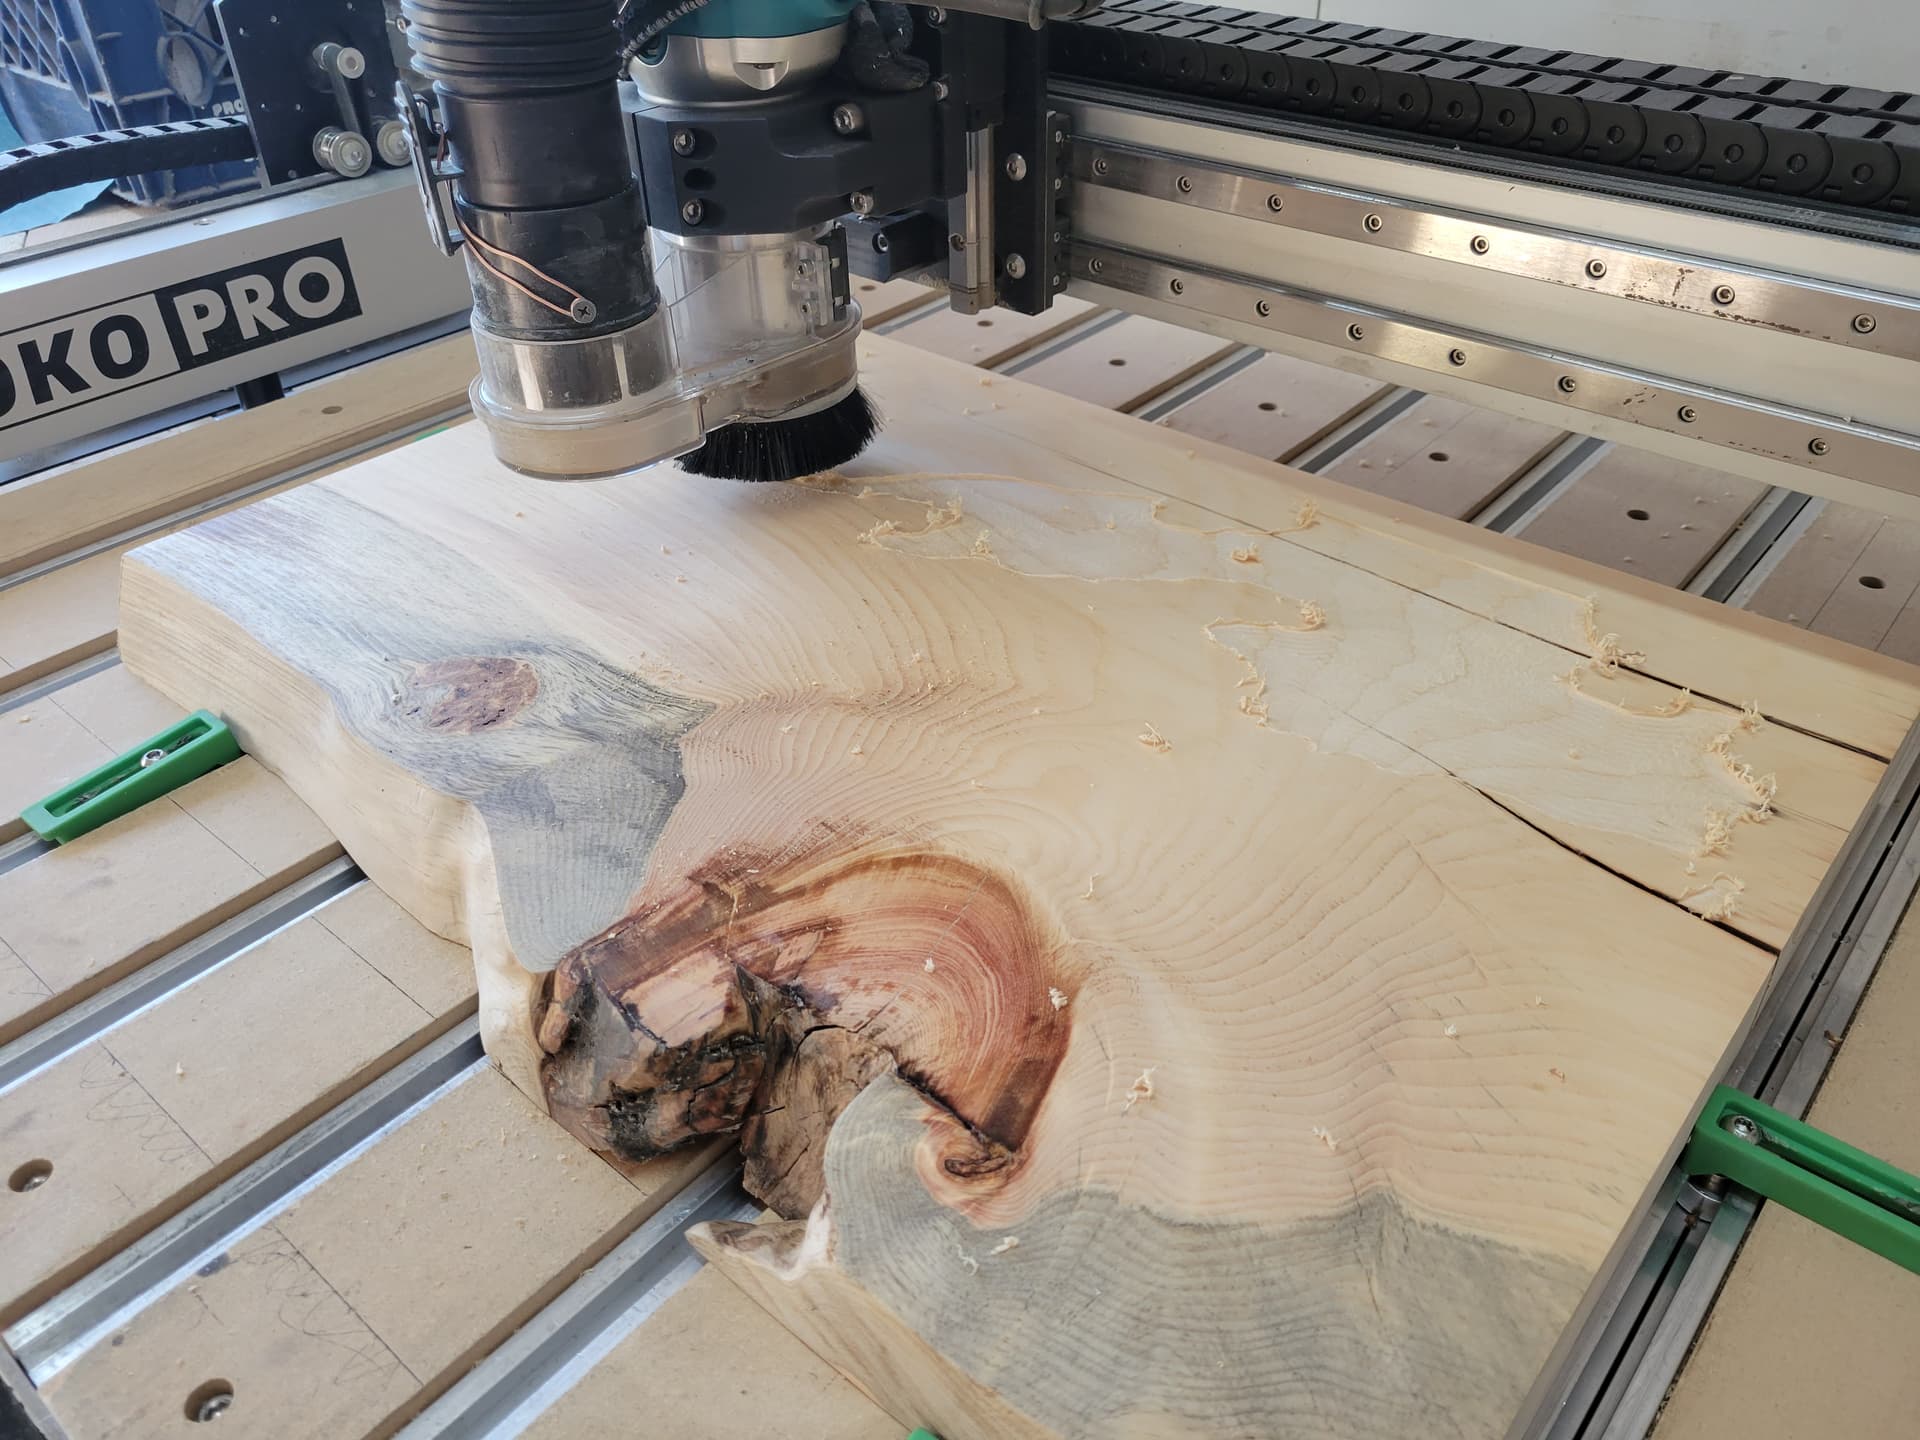
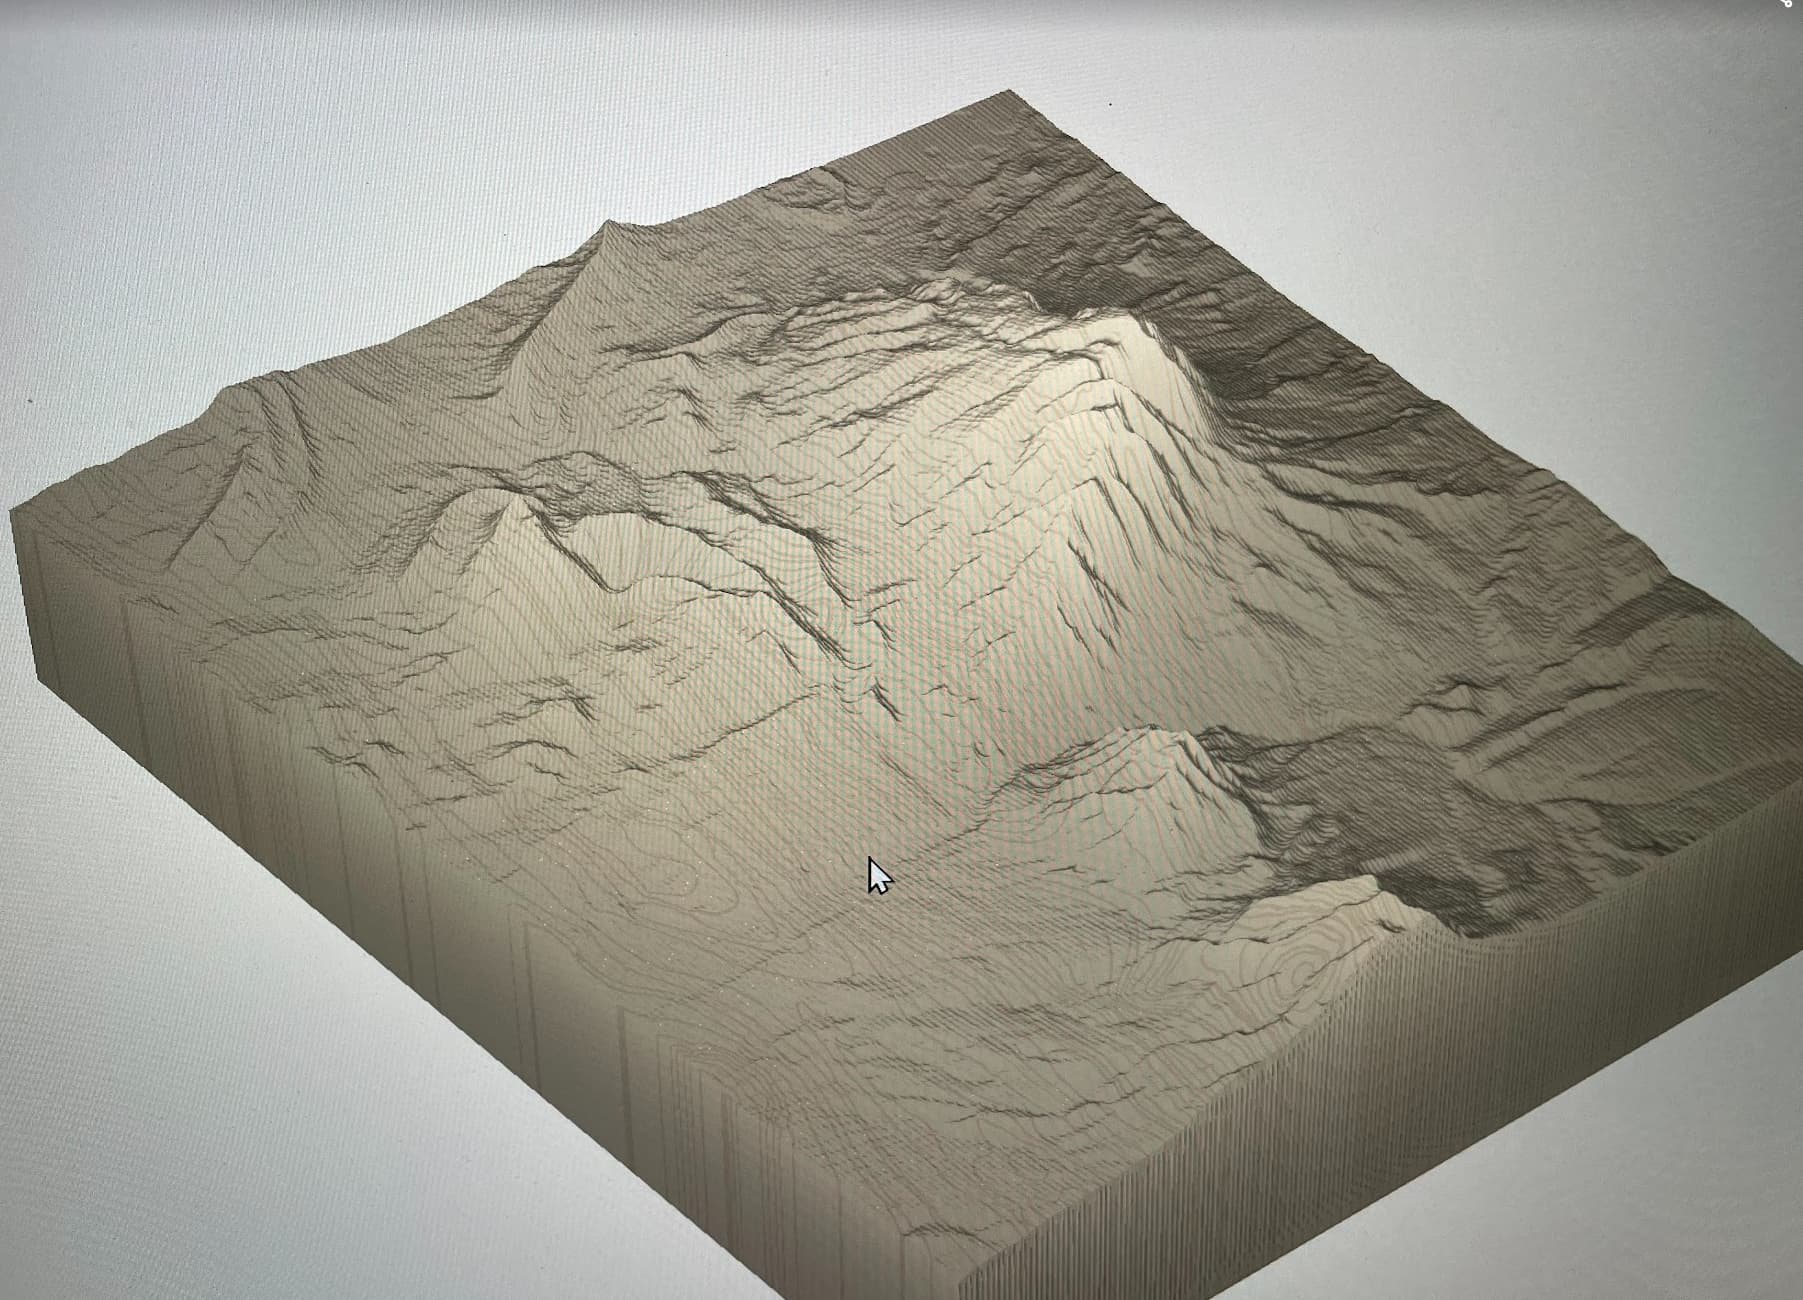
I oriented the wood so the finishing pass would be as aligned with the grain direction as possible, and so that the big divot in the side of the wood chunk would be milled away to a lower elevation area. Here’s the simulation (yes I took a pic of my screen because I was in a hurry)

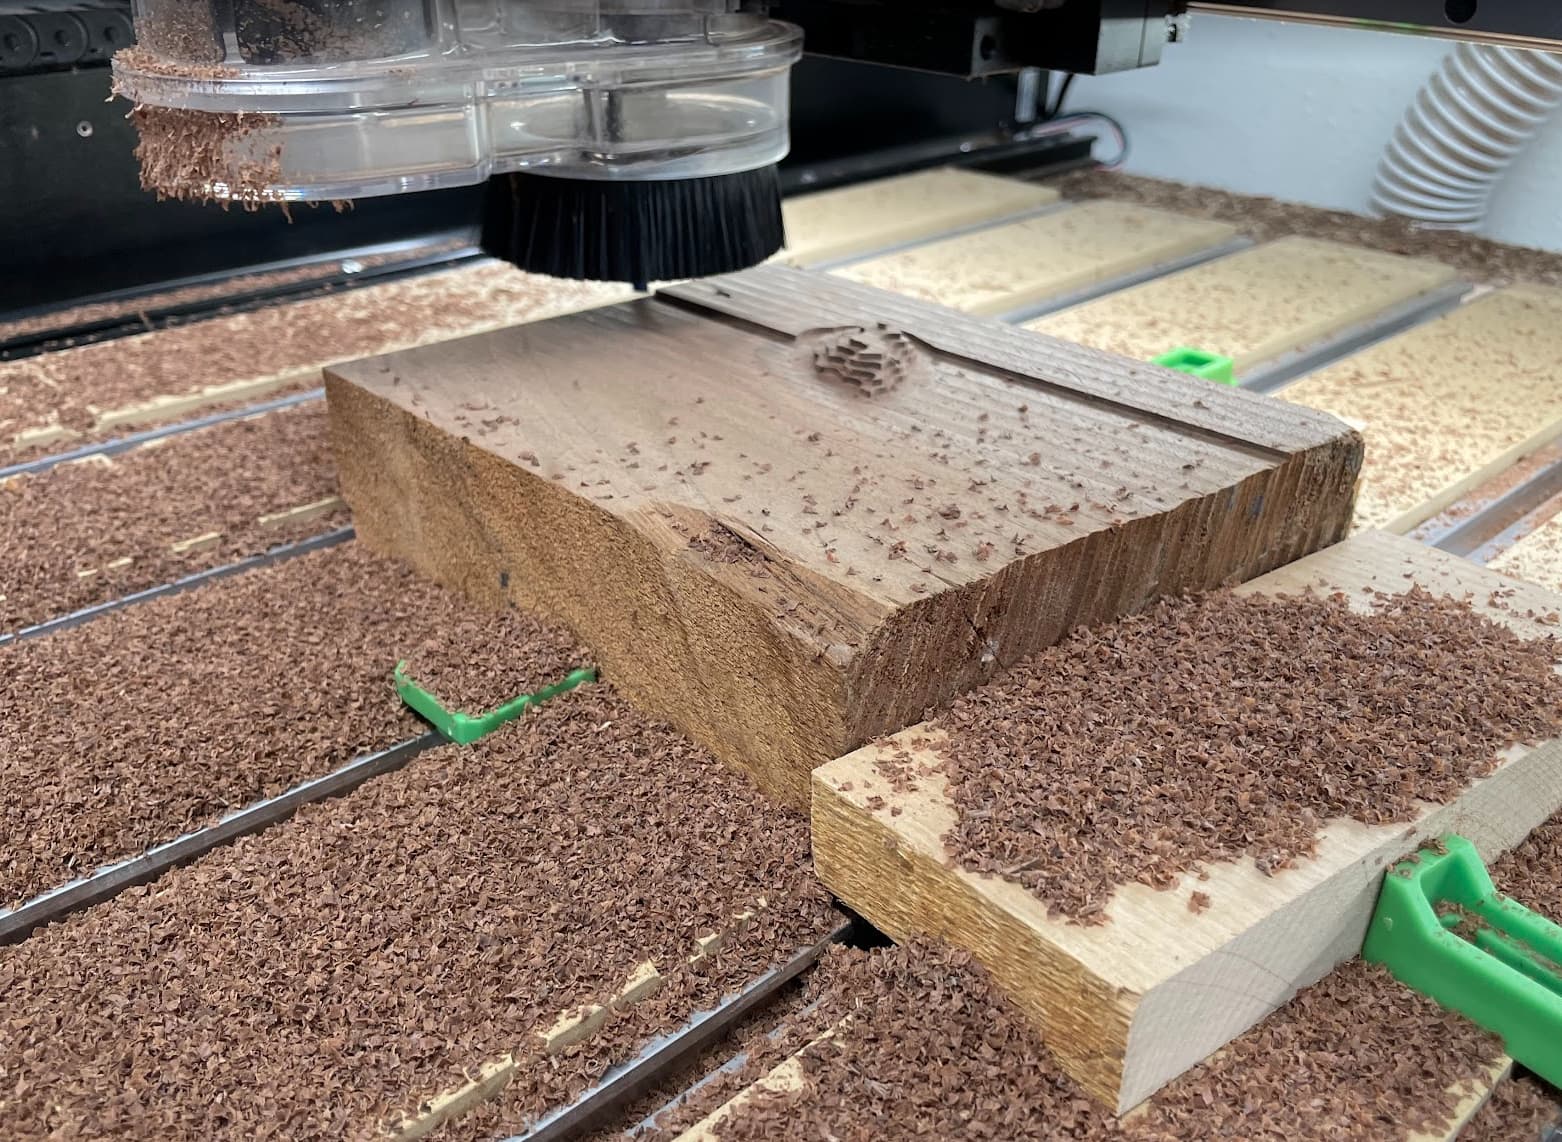
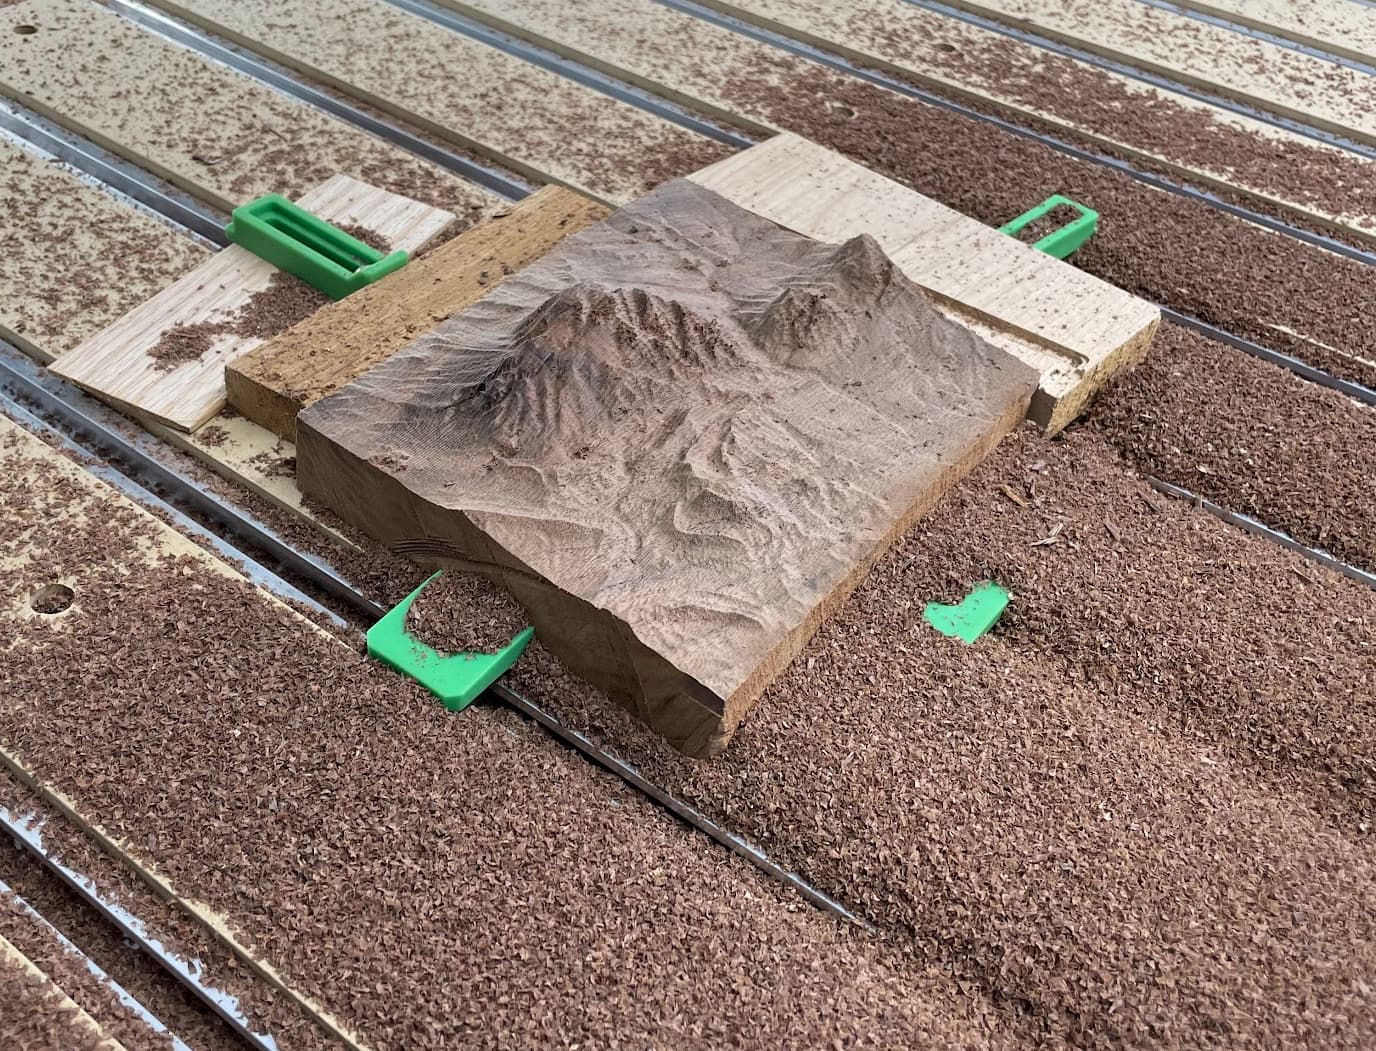
It took hours to mill down the rough pass with a 1/4" downcut. Also I had to leave the vacuum pretty high so it didn’t hit the peak so it made a mess:

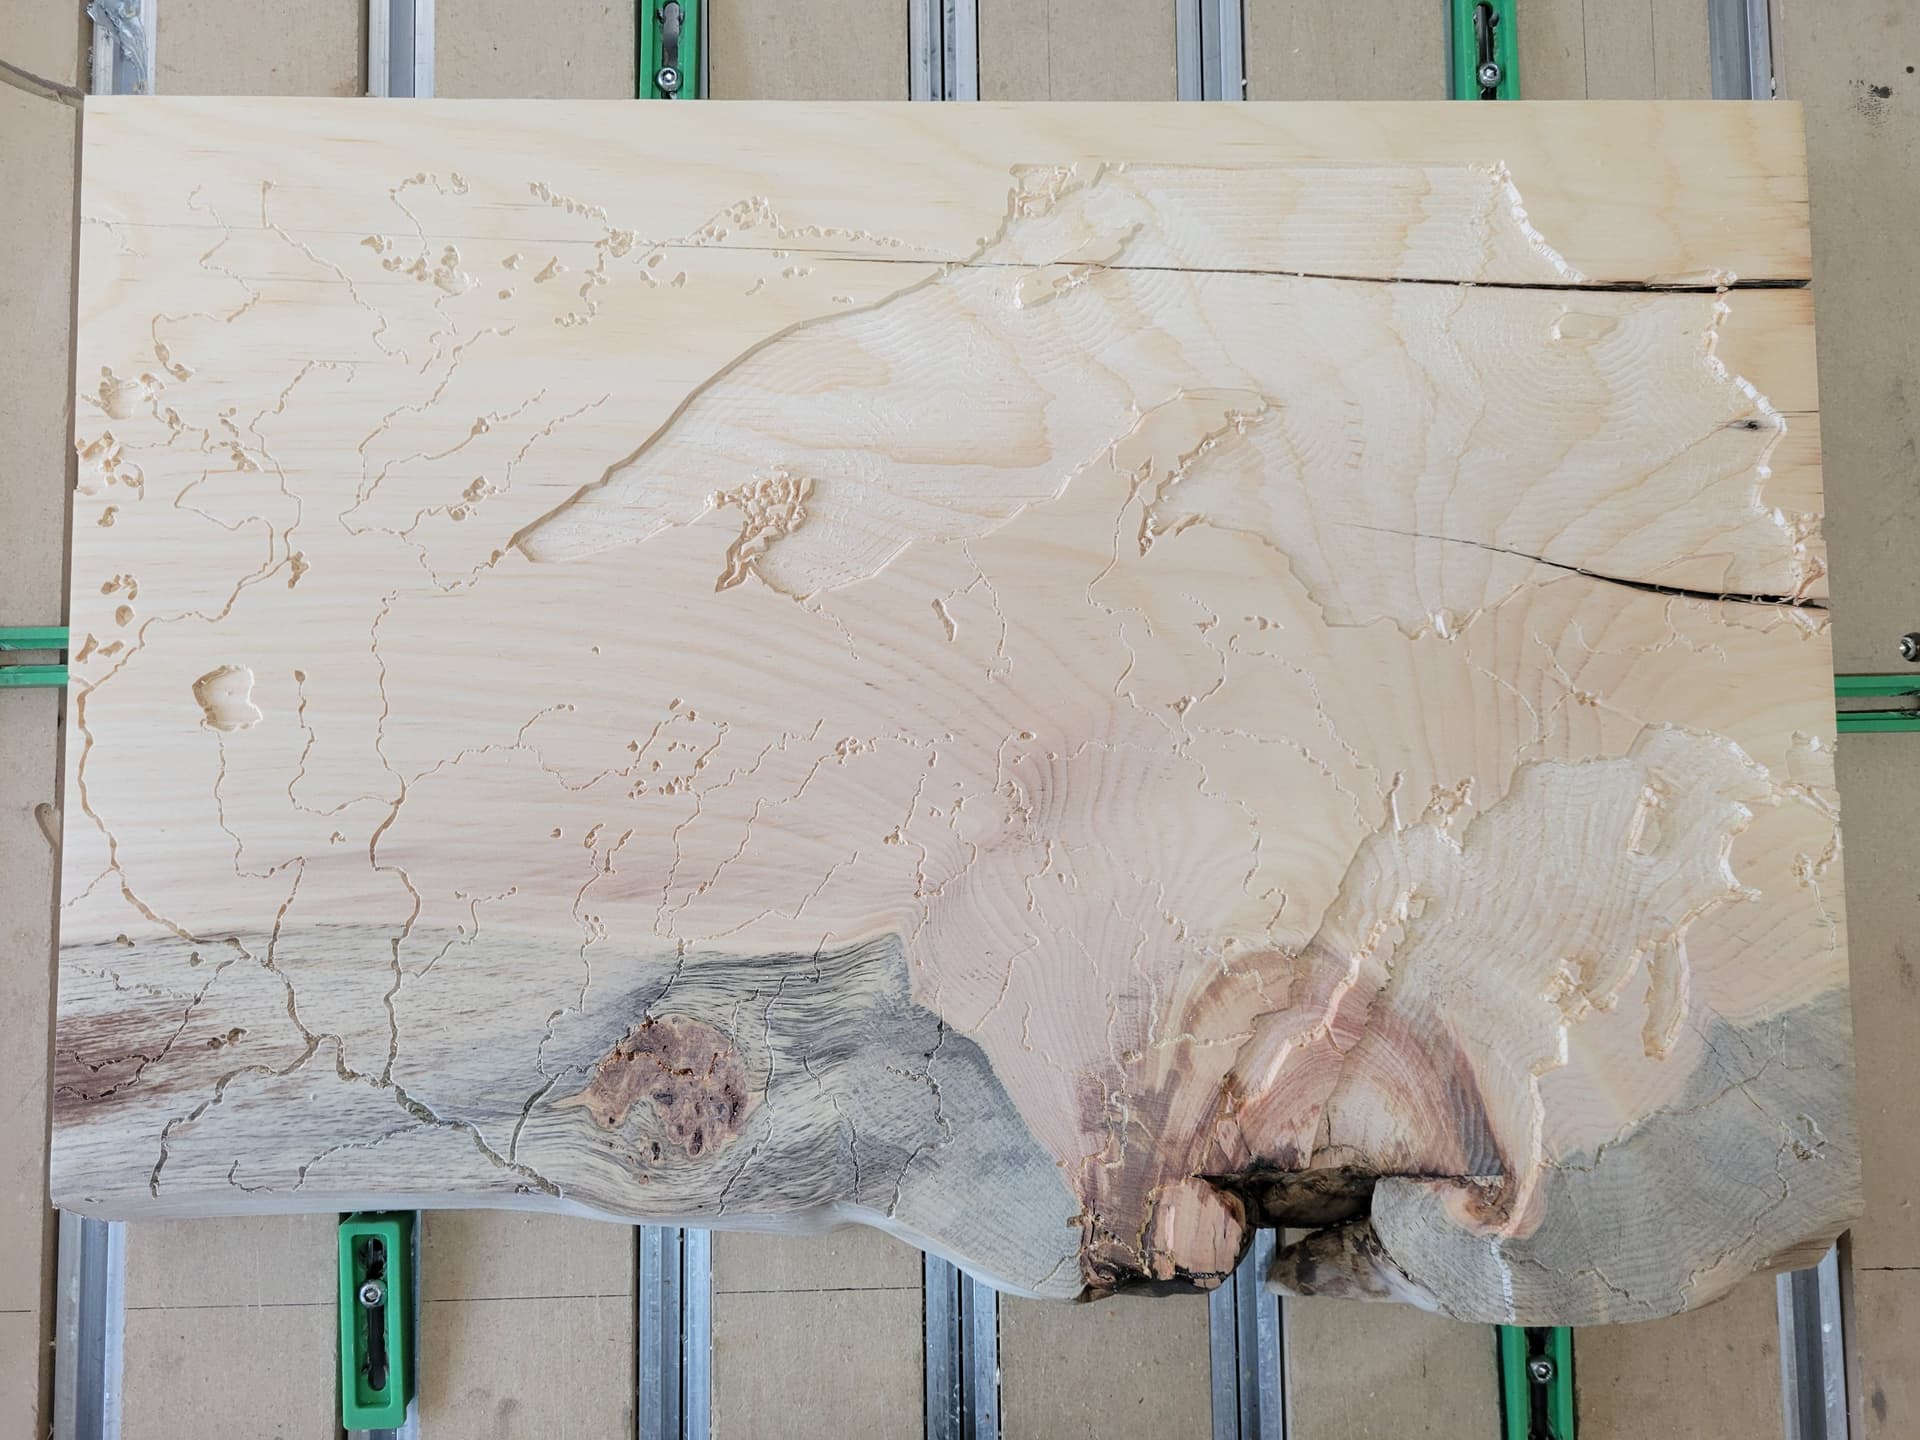
And the smoothing pass. For the distance between passes, I divided the mill diameter (1/8" ball end) by 4 and rounded that down to 0.03". It’s precise enough that I can see the original, raw sampling data so going more precise with your tool or pass width probably won’t improve finish by much:

To clean up the piece, I used a plastic brush to smooth toolpass lines and “fuzz” bits, and a green scratchpad to smooth it up. I am finishing it with Watco Butcher Block oil because I’m out of everything else and can’t get it in before the holidays.

So there you have it. I’m not including files here because my files were very specific to the place and this unique piece of wood. But hopefully I’ve given you enough information to make your own files and topo cuts of a place that is meaningful to you or your gift recipient!

15 Likes

This toilet paper tip is HAWT :fire::fire::fire:
Thanks for that!

2 Likes