Community challenge #30: Gifts

scolba Entry 3 - Family Puzzle

The Process
This one is for my Mother in Law (all of these entries are for my Wife’s side because we are celebrating tomorrow 12/23. My side doesn’t celebrate until new years, so I have some more time for theirs! :D). I wanted to make her something that means something to her, and to me as well. This one sort of hit me in the middle of another conversation. Kind of a eureka moment.

She really enjoys puzzles. She isn’t the type to sit in one place for more than a couple of minutes. So she almost always has a puzzle out on their big island in the kitchen. And as she walks by from doing one thing to another, she will always stop and find a few pieces, and then move on. Well…turns out, I like puzzles too! I just didn’t know until recently, when she started bringing her puzzles back out after a kitchen reno there. So my enjoyment is directly from her, so you can see the tie in there.

So the rest is fairly formulaic, and seems like is an Etsy staple. Each family is a piece, the pieces fit together, etc. Originally it was going to set into a round base with a 1/2" pocket, that would have a keyhole for haning on the wall. Then I was planning on setting neodymium magnets in the base and into each piece so you could remove them. However after making the base, and cutting the pocket, it turned out to be scaled incorrectly. So it got scraped in favor of time.

I didn’t want to just buy and Etsy file and go nuts…though in retrospect I would have saved myself a lot of headaches if I had - but I also wouldn’t have learned as much as I did. I googled, found a suitable file, converted it in Inkscape, imported into CC, and then went through probably 4 different versions, and after a series of CC crashes, me not saving correctly, learning how to actually manipulate nodes, I finally had my files for my pieces and base.

Mistakes and Lessons Learned
This is probably my most frustrating experience so far. For design I made some stupid mistakes and didn’t save when I should have. For the cutting part…my machine kept disconnecting several times during the cut, and so I would have to start over. I had to start over 3 separate times. Additionally, the router was revving up and down like it was running super rich…and eventually would almost completely shut off before spinning back up. The TL:DR version of this story is…its not static (though I do plan on adding grounding wires), its not the brushes, it was what I thought was a good heavy duty power strip from Stanly. So the lessons learned for me on this one are:

  • Save Often
  • Use directly connected outlets
  • If cutting parts that are meant to nest together, print out paper versions of the plan first to make sure you scaled things correctly.
  • Don’t just add a chamfer without double-checking the text. (Facepalm)

Howie Puzzle Pieces Heart.c2d (644 KB)
Howie Puzzle Base.c2d (716 KB)


scolba Entry 4 - Love Multiplies

The Process
Ok last one for me, until at least next week! :smiley:

This one is for my wife. So we had our first kiddo 2.5 years ago. The little dude is just the best. As we found out we were going to have another one (surprise!) we had talked candidly with our families about how we were a little worried about another…we love our first kid so much, how could we possible love another one that much?! My wife’s grandmother had been asked that same question before and her response was, love doesn’t get divided. It multiplies. She is gone now, but the family choses to remember her with that quote. I don’t plan to point out many others have been attributed with it. :slight_smile:

So that’s the scope here…this is a representation of our little family, with that saying in a partial banner across the top.

So for this one, I don’t remember what inspired me to do it, but I was thinking about how cool it could be if you could undercut with like a t-slot bit for some different effects. I don’t even know if that is possible, but instead of going that way, I spit it into two parts. A textured pocket behind, and a contoured top.

I was hoping to use light wood, as maple is my wife’s favorite, but availability and time became an issue. My maple isn’t wide enough for the base I made first, and my thin birch plywood version just didn’t work - don’t have a down cut bit. So more resawn cherry it is!

Mistakes and Lessons Learned
I learned a lot with this one trying to get the different pockets to work. Even now as I look back at it after doing the puzzle project, I see how sloppy it is, and how much better it could be. The biggest challenge I had was trying to get the hearts to stay together for support, but still give them definition. I ended up using a vcarve bit on a contour pass, and then cut the negative space out afterward. It left something to be desired.

I actually screwed up quite a bit on this one, and it’s got a lot of blemishes (that are hidden in the photo!)

So here are my takeaways on this one.

  • My 1/8 single flute doesn’t go all the way through 7/8 stock.
  • A dull flush trim bit will cause tear out
  • BitZero is awesome, but it does not set the angle of the stock along the Y (for some reason I had it in my head that if my stock isn’t parallel to the beam, when I probe with BitZero it gets the measurement, sees the angle and adjusts accordingly. No idea why I assumed that, but there’s not enough data gathered there to even tell, and that assumption, and careless angle with slim margins cased me to go off the stock)
  • I need to get better at creating pockets along common pieces.
  • Adding some sort of locating pin or slot feature to the top and bottom pieces would go a long way to gluing them together.

sign font family.c2d (316 KB)
sign back textured.c2d (132 KB)

Btw - in case you are wondering, it does indeed multiply. Our daughter is 8 months now and is also, just the best. :smiley:

10 Likes

This piece is done on Shapeoko 3XXL with basic Carbide Create. Base is 3/4" MDF, and the layers are 1/4" MDF. After the barbed wire was cut, i used a pointed roundover bit on the edges to give it some detail. The perimeter side edge was hit in random pattern with angle grider to give it a distressed look. After it was all painted it was flooded with clear epoxy.

Cougar Ink / Brad’s Custom Signs

17 Likes

Nicely done, @brahau65, both the project and the video!

2 Likes

Made using my Shapeoko 3 XXL (with it’s OG belt drive Z axis and dewalt router)

The Process:
Poem was written by a friend who wanted to customize a project for her mom for Christmas. We came up with the idea of a small serving board that can be used for both display and using food-grade finishes (just in case) featuring her poem.

I designed the file originally using her own handwriting. After importing into Carbide Create and sharing the design, she was too critical of her own handwriting - so we opted for a handwritten font instead. And of course, the font she chose: Every single letter needed clean up (deleting and/or smoothing nodes) so that was a bit of work.

It was a 2 hour cut with a 60 degree vbit. Material used is maple. Then a simple #201 end mill for cutout.

Lessons learned:

I cut the board, and sealed with mineral oil - and as soon as I poured in the epoxy, I knew it was not enough to hold back the pigment and I had a ton of bleed into the surrounding wood almost immediately after pouring the epoxy. We originally had chosen black for the lettering but it was much too stark and harsh for the design.

Second attempt: using epoxy resin with mica powder only. I went with a bronze brown color to align with the warmth of the maple and it was a wonderful choice.

Very happy with how this turned out!


9 Likes

[Full Tutorial Video ](2023 Gatton CNC Christmas Challenge https://youtu.be/Pu0gCng4d_g)

Linked above is the tutorial video for this 3 stage epoxy light up Christmas tree I designed and build for my mom. This was also a submission to a different holiday contest I found for cnc users. Wish I knew about carbides before! Just found this post today haha

The file was made from canva then edited in carbide create. I designed and carved the back to fit the lights custom.

First step was to Carve and pour epoxy 3 times on the front side before surfacing. Then flip it over and pocket out the areas for lights and custom fired back cover. Tons of time in carbide create making all the vectors and toolpaths.

No major mistakes, but I don’t like how dim the lights are or how they are fitted. I would get stronger lights for sure next time.

6 Likes

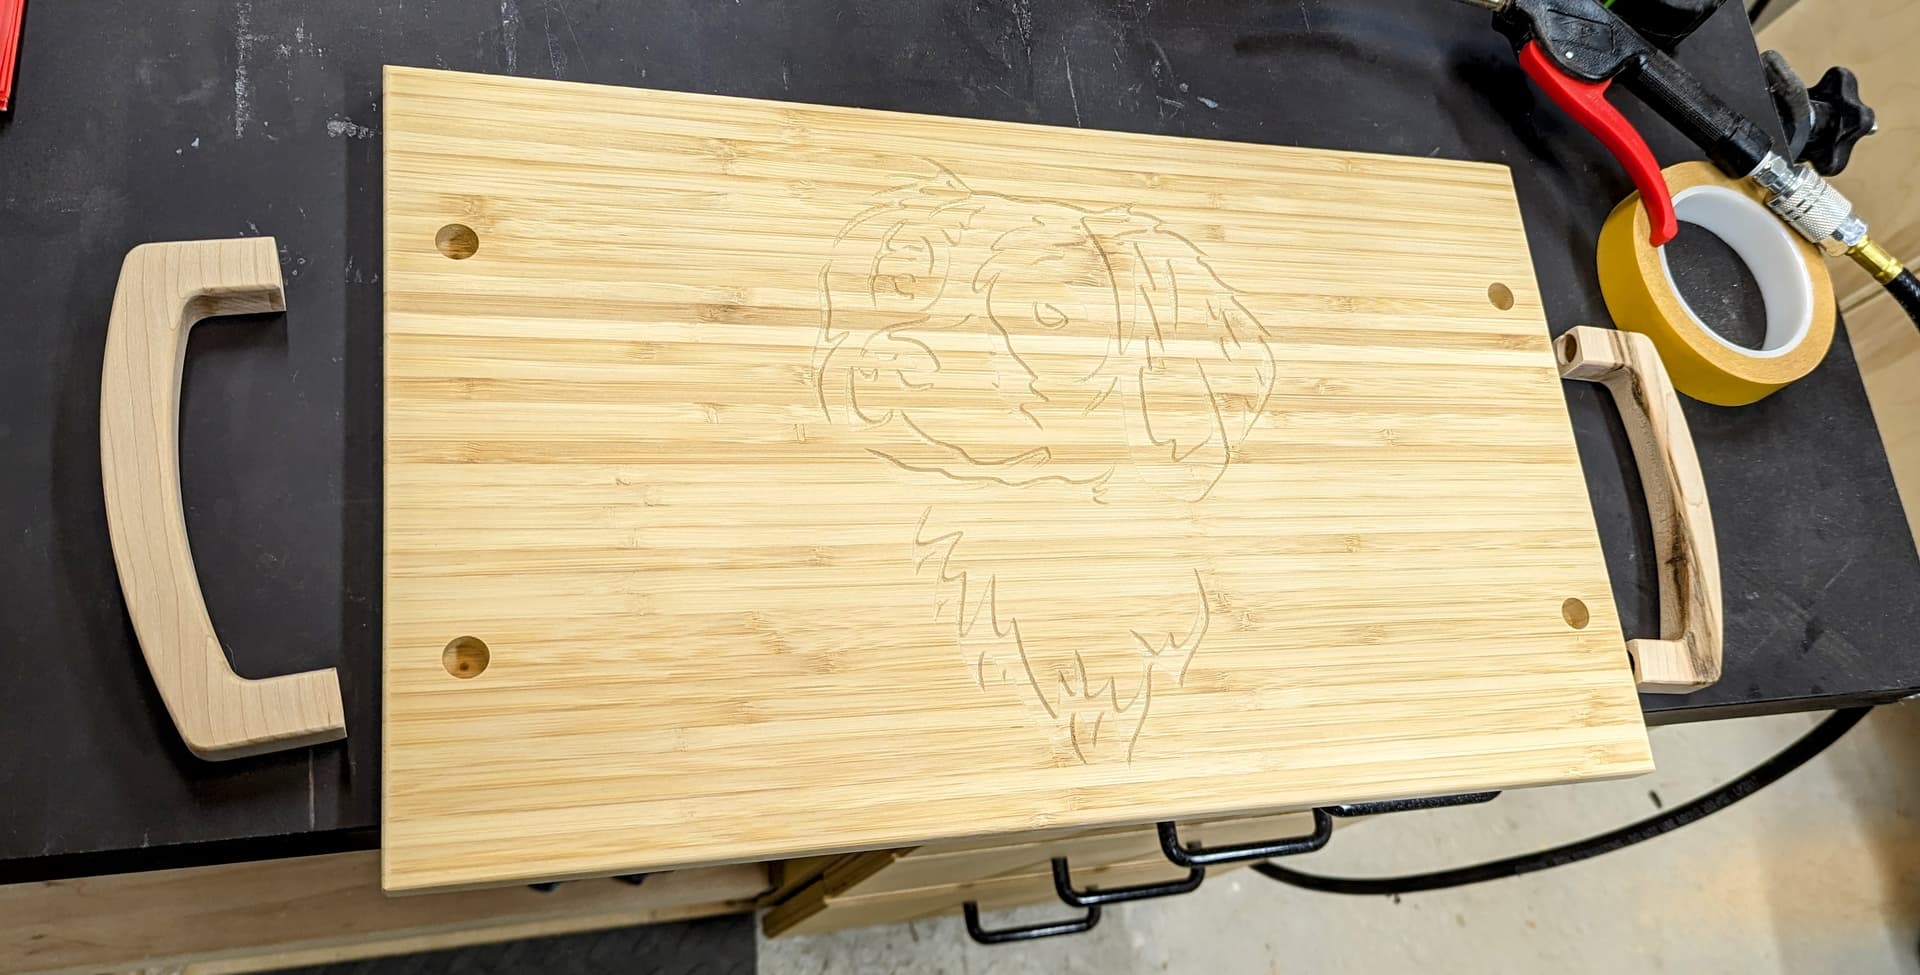
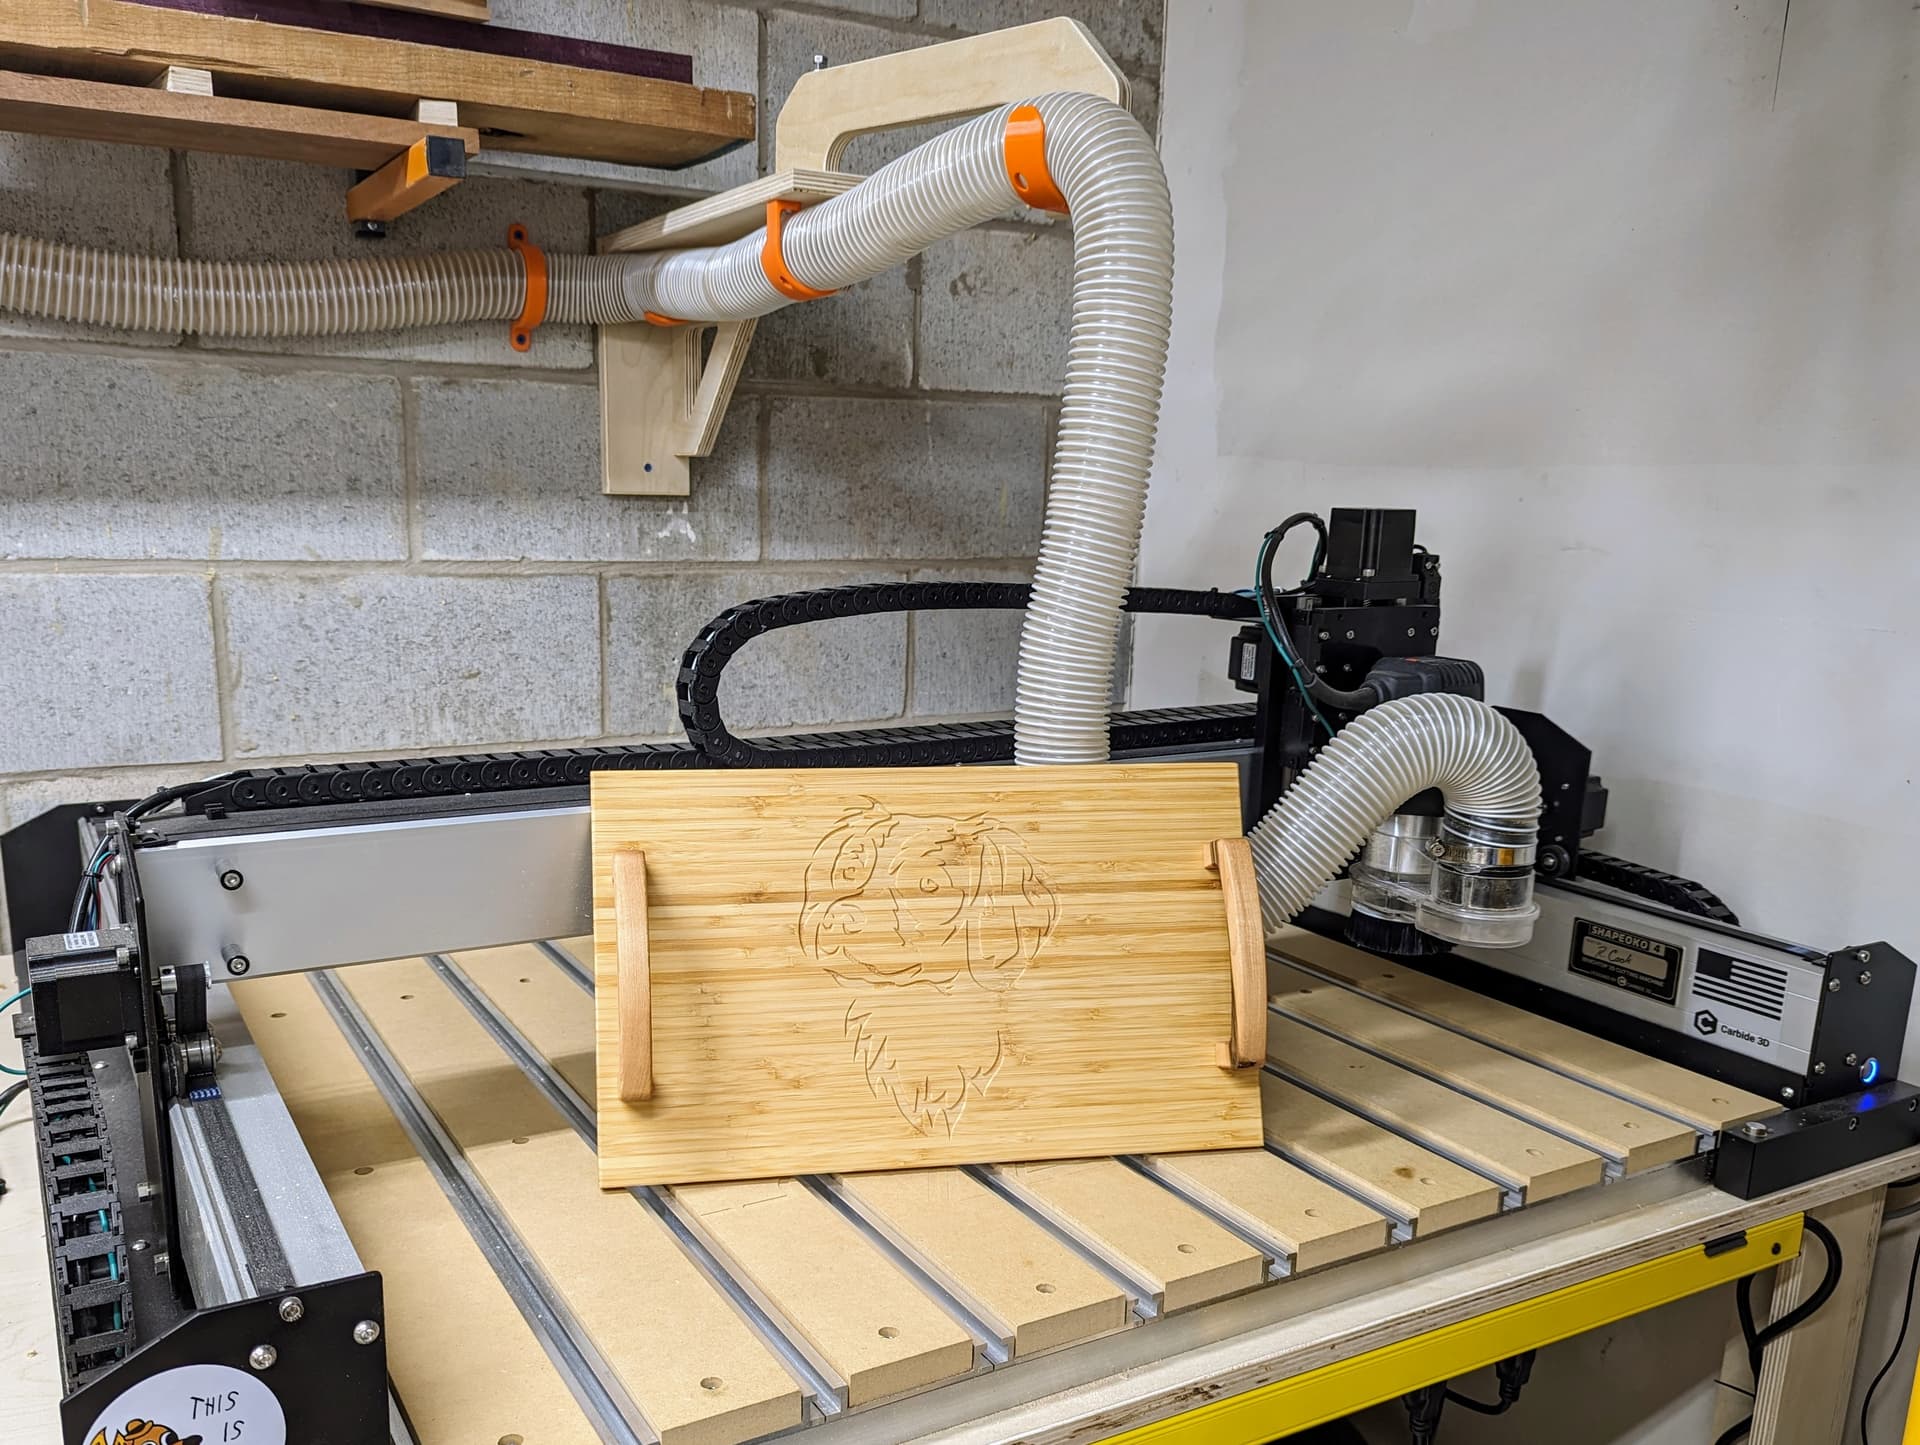
A serving tray on which to present some treats for my father this Xmas. I’ll happily post the files, though design was done in Carveco Maker, so the designs are in .art and not an accepted attachment type. The toolpaths are in .nc (Shapeoko post-processor, mm), which will be attached at the end. Carving and shape cutting performed on my new-last-month Shapeoko 4 XXL.

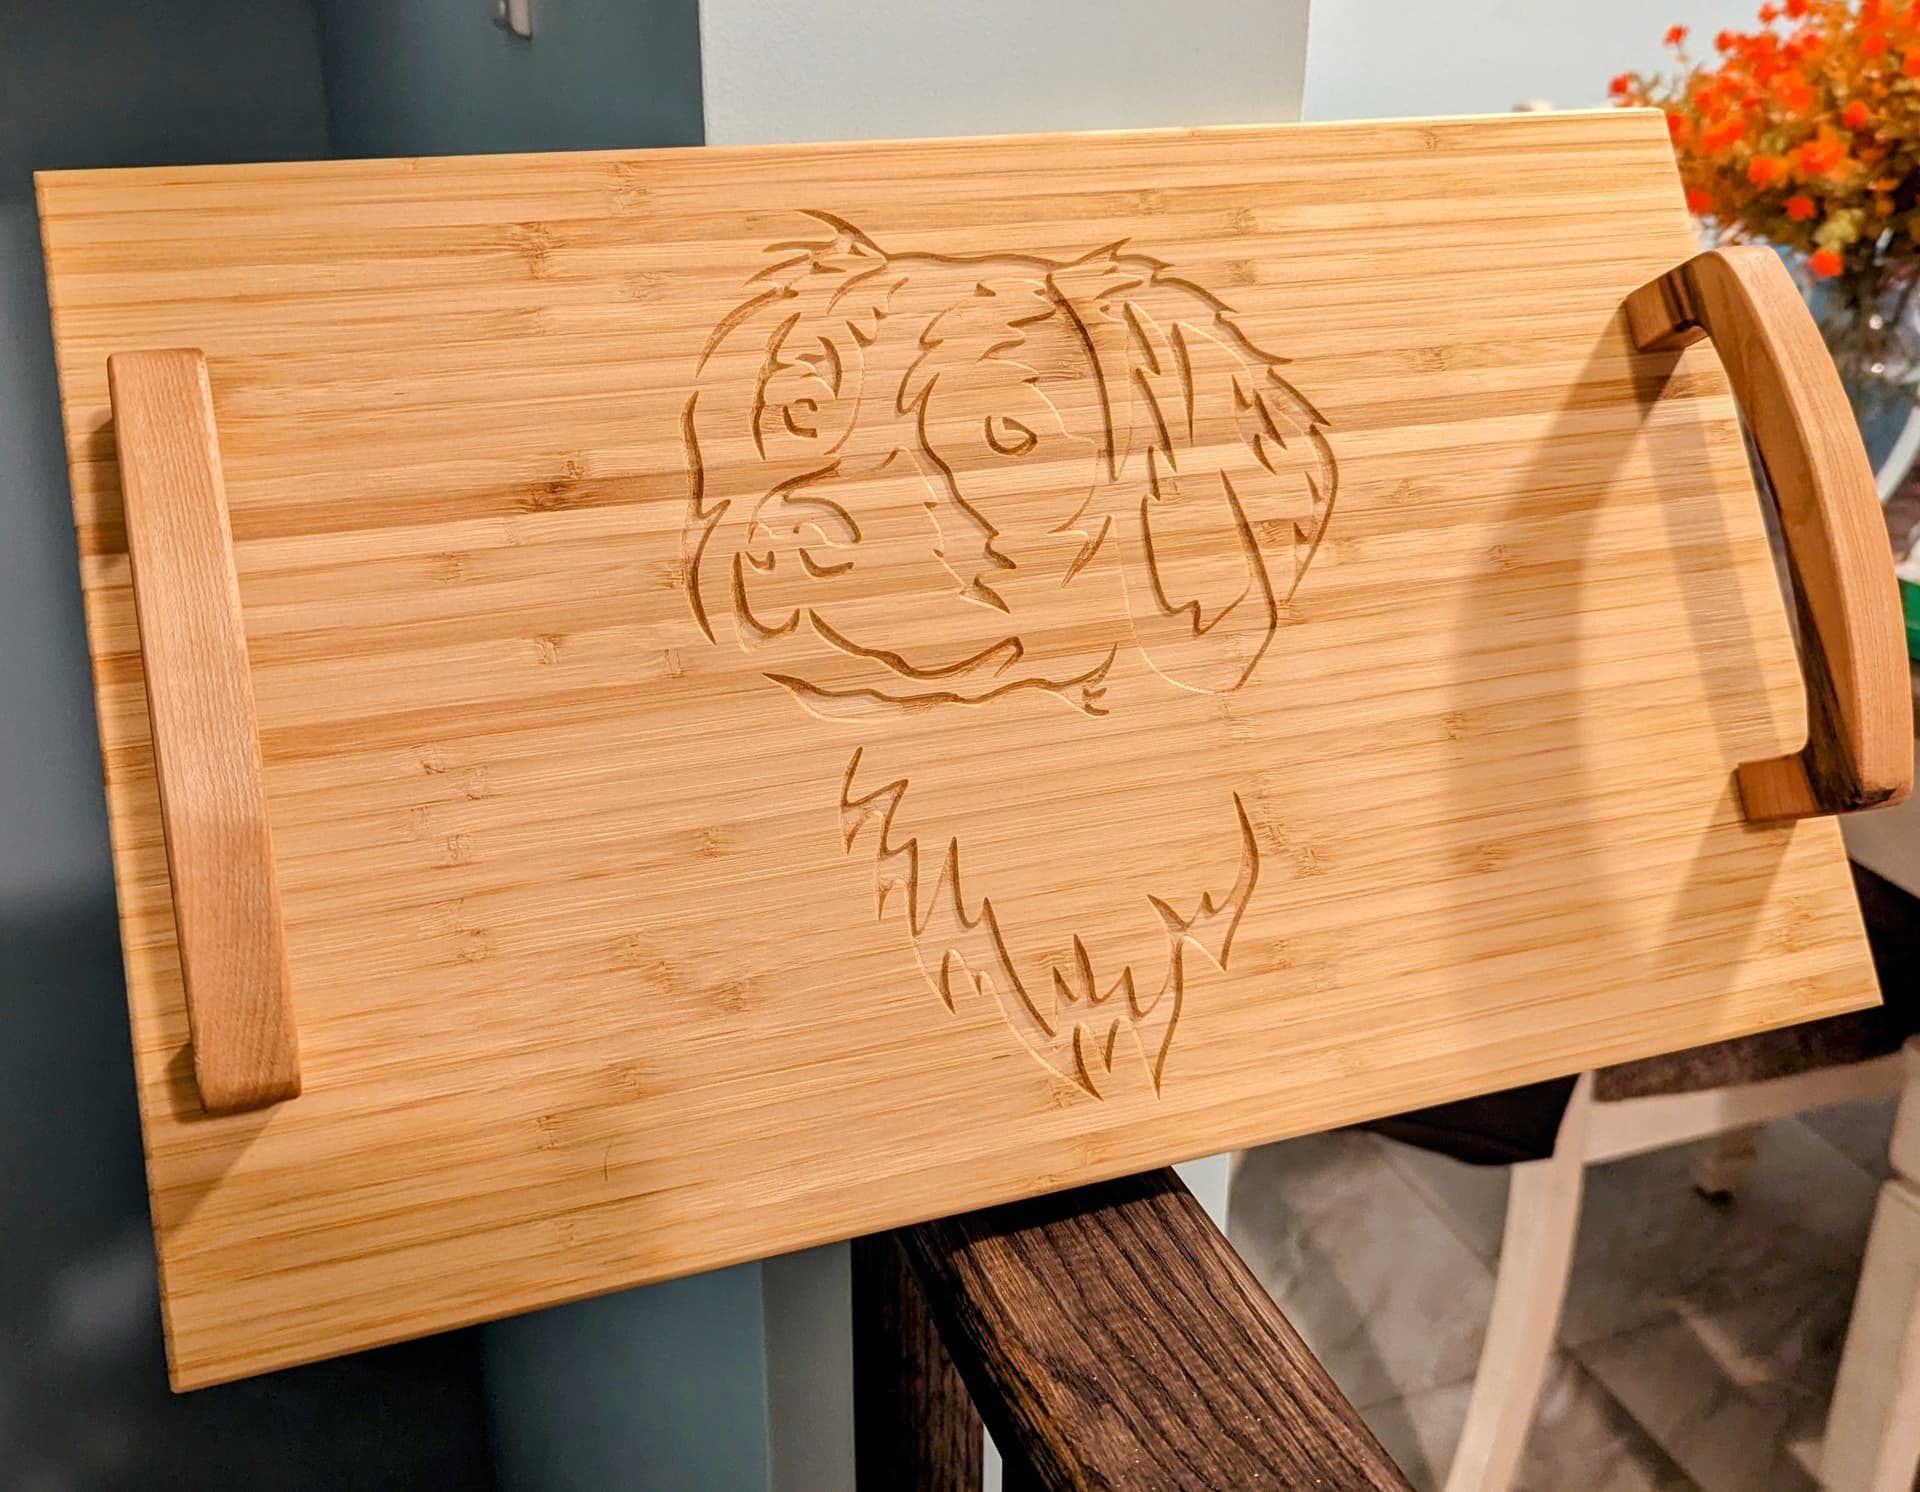
My dad had a Brittany Spaniel when I was a kid and that dog went with him everywhere. His favorite dog, even 30 plus years later. He’s not very mobile and has some issues with his grip now, so a lap tray with easily grasped handles should also be useful for him.

The tray started out as an IKEA cutting board. The handles are from some scrap hard maple stock I milled down to 3/4" for this. I intentionally used the piece with a little extra spalting because I thought it could use the contrast.

  1. Trimmed the beveled edges and of course the IKEA logo off.
  2. Ran the v-carve using a 90 degree, 1/4" v-bit, 1/8" up-cut bit for roughing.
  3. Sanded back the original oil to clean bamboo, especially since these cutting boards are not very well-smoothed or flattened.
  4. Ran some maple over the jointer and cut to length, then surfaced the other side on the Shapeoko, using a 3-wing, 1" surfacing bit.
  5. Ran the profile cuts for the handles with a #201 (1/4" up-cut).
  6. Drilled 3/8" dowel holes into the handles and top of cutting board so no fastening was visible.
  7. Eased all edges of both the board and the handles on the router table using an 1/8" roundover bit.
  8. Sanded all surfaces to 180 grit.
  9. Glued handles to board with dowels and let glue set.
  10. Coated with food-safe mineral oil and let set for a couple hours, then wiped it down.

The main thing I learned on this one is that I have zero luck with Oramask. I intended to color-fill the v-carve, but my roughing pass shredded the masking beyond use. That’s both my main mistake and something I learned I need to find a better method for. No matter how clean thy surfaces I apply it to are, unless I am using only a v-bit, the stuff either pulls up or shreds on me.

I just realized I could reverse the tooling order on these. Well, I’ll give that a try for my next attempt using OraMask on a carve!

TrayHandles.nc (71.6 KB)
Spaniel_VCarve.nc (412.4 KB)

8 Likes

IMG_2602
my 3rd carving,

7 Likes

Made using my Shapeoko 3 XXL

The Process:
I found original idea I believe on this site many years ago and decided to give it a shot. They look nice and are perfect not just for newlyweds but also I am making some more of these for all my dear friends who have been married for a long time.

The longest time-consuming part is making re-creating the many long sweeping vectors in the big “illuminated” letter. Converting from a raster image into vectors, then painstakingly cleaning up extra vertices for the many curves in all the flourishes. Once its done it can be reused of course …one letter down, 25 more to go for other names!

Everything was cut using a 60 degree v-bit. Except for the final cut out. However its Ieft in place for the next and final CNC step , to flatten and remove epoxy. Same .25 endmill for cut out was used for final epoxy surface removal. More to come on that….

Lessons learned:

Making sure your environment is safe and stable. I tried to run another quick layer removal after a power failure due to overloading my circuit panel. I though I could get away with it since absolute zero didn’t matter for simple surface g-code boy was I wrong….TBH I think it was because I didn’t tighten the collet enough.

Second attempt: I was not watching when the next incident occurred, and I almost cried when I realized I lost one of my most cherished accessory mods for my Shapeoko….Not sure what happened but my suck-it dust boot became the next victim for this gift idea. So sad :frowning:

In the end it looks great and I cant wait to give this as a gift and see their expression on their face. Of course I cant tell them the pain it caused ! LOL


14 Likes


6 Likes


6 Likes

Facebook was spamming me with ads for something similar, so I drew it up in Affinity Designer and cut it on my S03.


Files
bear family-20231225T140522Z-001.zip (3.8 MB)

8 Likes

Colorful Rooster Wall Art/Catch All Tray with Epoxy inlay made from Hard Maple wood.

For Christmas my Mother asked me to make a rooster on my CNC machine. She gave me vague instructions, but this is what I came up with.

I found an image that I brought into Carbide Create to trace. In Carbide Create I created an outline of the image. I used this outline for the pocket tool path. Next I did another outline set for .4inches for the lip. I used this outline for the cutout tool pass with tabs. I used an advanced v-carve tool path to create the rooster inlay. Here are a few pictures of the process.

I found a nice piece of hard maple wood. I ripped two piece on a table saw to the dimensions I needed and glued them together. I let the glue cure for 1 day and then started on the project with my Shapeoko 5pro.

Before I started on the rooster project, I surfaced both sides of the board with a surfacing bit to ensure it was flat to the machine.

The first tool path was carving out the pocket.

Pocket tool path done, now doing the advanced v-carve tool path to create the rooster inlay. Started with a 1/8 end mill, then used a 60 degree v-bit.


Rooster inlay finished. Up next is pouring the different colors of the rooster in epoxy.


I used mica powder in the Epoxy to create different colors. To get the epoxy into the feathers and small areas, I used syringes with needles.


I let the epoxy cure for a day. I used the pocket tool path with a 1/4 end mill to surface the epoxy and create a nice flat surface with the bottom of the pocket and the inlay.

Epoxy surfaced and ready for it to be cut out

Cut out tool path done.

After cutting the tabs off, I went through several grits of sandpaper to get the wood smooth to the touch. I put several coats of oil to finish the project off. I am happy with the way the rooster turned out, and my mom loved it.


What I learned/would do differently:
I only used two clamps when gluing the 2 boards together, I should have used 3 if not 4 would have been better. When I surfaced the epoxy, I only surfaced the outline of the rooster and not the entire area of the pocket. It created an uneven surface, so I had to create a new tool path to surface the entire area of the bottom of the pocket. It worked out perfectly. I should have taken the time to move some of the nodes to create softer lines on the outline. There are some sharp edges and points. Perhaps I should have used a bowl bit on the pocket tool path to create a rounded edge on the inside.

18 Likes

Harry Potter Hogwarts Crest

For Christmas I made the Hogwarts Crest for my daughter to display with her wand collection. She is a Harry Potter fanatic, so this crest will make a great addition to her growing wand collection. I found an image of the crest and used carbide create to trace the image.

I used birch plywood with an advanced v-carve tool path. Used 1/4in end mill then switched to a 60 degree v-bit to finish up. Then used 1/4 end mill for the contour cut out path.


I cut of the tabs, gave it a quick sanding and cleaned up some of the fuzzies left behind. I used white acrylic paint for the first coat. Then used the appropriate colors for each house and also painted the back yellow.


Things I learned: I am not very good at painting. Trying to do the feathers on the eagle was hard for me with my severely limited painting skills. I liked the way the crest turned out, and my daughter is thrilled with it.

14 Likes

My gift project is a pair of knives and display boxes for our son and son-in-law. Inspired by knife scale projects posted in the forum in the past year I thought I’d try some made from epoxy.

All work done on a standard size Shapeoko 3
Design and tool paths using CCPro 764
CAM CM Beta 622

The process is fairly straight forward.

Scan your knife blank at 96dpi or as close to that as your scanner will allow. I used our Epson printer / scanner. Import the scan to Carbide Create and use the Trace function to get a vector to work with. Using Node Edit and Scaling you should get a vector for a test cut in a piece of scrap wood. You’ll see where you need to make node adjustments in your vector after a test cut. The picture below shows the pin holes for the scales enlarged to a diameter of .245”. Exporting and printing your vector image with the printer may be an option, I just didn’t think of that at the time.

Duplicate your working vector (maybe a couple times) in CC and save those off to the side. Decide what area you want the scales to cover on the knife blank, trim your vector accordingly and duplicate. Save the duplicate off to the side or on another layer. That gives you the outside contour of your scale.

I cut my scales from a block of epoxy my wife and I poured with the block being just over 1/2” thick. The contour tool path used to cut the scales blanks from the epoxy block was changed to a pocketing tool path to make a holding fixture for the scale blanks. The tape and glue method held the scale blanks in place for machining.

I wanted the scales to be replaceable. To make that happen I drilled out the pin holes in the knife blanks to accommodate stubs. The studs and screws clamp the knife firmly between the scales.

The scales blanks were flipped over and the tool path for the grips was applied. A drilling operation with recesses for the bolt head and nut were also ran at this time. The scales were attached to the knife blank and a little sanding was done to fine tune the fit around the outside of the knife.

The boxes were pretty easy having the shape of the knife already modeled. The lower half of both boxes are cut from Black Walnut. The fop of one of the boxes is a combination of Purple Heart and Cherry, the other Oak and Cherry. The scale models were inverted to create the pockets on the lower and upper half of the boxes. There is a shallow ridge and pocket to help keep the two halves of the box aligned along with 4 magnets holding the two halves together. The bottom half of the box was flipped over and a pocket was cut for a sharpening stone compartment. A compartment cover was cut from Paddock and is attached with two magnets.

Mistakes and lessons learned:

Don’t count on two of the same knife blanks being exactly the same.
Don’t count on them being straight.
Save your work often and save an updated back up file.
Cut your work in scrap lumber first, even if you have to glue up a few pieces.
Never pour a 1/2” thick block of epoxy at one time, it takes forever to set up.

12 Likes

Gee Whiz there are so many great entries to this contest I can’t believe it. My entry is a topographic map for my brother.


I bought my machine with the hopes of doing more of these because of how much I love the tactile nature of the map. It took me a while to figure out the process, but with the help of @Radiation I was able to figure out a workflow that did the job.

I used Tangram Heightmapper to get the topography data and exported directly into carbide create. I did make sure to get the appropriate ratio of the export so I could size the wood accordingly. There was some trial and error on getting the image to import directly, but in the end I got it worked out for the 8/4 material I had on hand. After that I made a base with appropriate GPS coordinates and did a flip job to make 4 feet so it would stand a better chance of not rocking if it didn’t end up completely flat.

Overall I’m quite pleased, I think I might make one for myself!

21 Likes

thanks, I appreciate the compliment

It wont let me add more than one media item to this post so I will try to reply to my post with more

This wooden truck was a project that has been on my mind since I first thought about getting a CNC but had always been pushed back in favor of practical or profit-making projects. My youngest nephew was born this past March, and as Christmas approached, I knew exactly what I wanted to make him for a gift.

The immediate problem I faced was that I am not yet comfortable with 3D modeling to the point I could design and machine the complex geometry needed to accomplish my goal so I knew I had to break the design into more simplified shapes.

I decided to (loosely) base the truck off of a classic Chevy C10 pickup because it is one of my favorite body styles and the design is fairly simple. The design of the grille was inspired by my '94 Chevy (my favorite body style). I found a side view of an '85 online and set it as a background image in CC. I used vectors to create an outline and scaled it to roughly the size I wanted the finished project. From this, I was able to work out the sizes of all the other parts.

The assembly consisted of several CNC cut parts:
chassis, wheels, tires, body sides, back cab wall, bed floor, grille, and rear bumper

The chassis was cut out of 1/2" Baltic Birch plywood

The body sides, cab wall, and bed floor were milled from 1/2" solid cherry.

The ribs on the bed floor were accomplished with a pocketing operation and a V-bit contour. This was faster than doing an advanced V carve because the ends would get cut away on the final toolpath.

The tailgate, roof, and hood were all cut from a single glue up of cherry and padauk. These parts were shaped after they were glued in place using a combination of the bandsaw and sandpaper.

I machined the wheels from maple and the tires from walnut. The tires were machined in two halves so opposing tread could be added more easily. I didn’t have a good way to make the tire treads on the CNC so I resorted to a few shop-made jigs.

The tire treads didn’t look aggressive enough for my liking and since I glued the tires on prematurely, I had to remake the whole set.

The interior parts were all made the old fashioned way

The grille was a simple pocketing operation on a piece of 1/4" maple. The backside was milled away to accept a thin piece of walnut. The pockets for the park lights were milled slightly deeper than the headlights and pieces of oak veneer were glued in.
The front bumper was shaped on the router table. The “bumper bolts” aren’t just decorative, they are small dowels that help hold the bumper to the chassis.

The roof and hood started out as 1/2" thick panels that were shaped after being glued in place. The taper on the doors was also added after glue up.

The steering wheel and dash are made from poplar and the bench seat is walnut

The tailgate was shaped to match the angle on the bed sides using a sanding block with course grit paper.
Somehow I forgot taillights in my initial design so I had to hand cut and inlay some pieces of padauk after the fact.

The rear wheel tubs were cut by hand and added later. A consequence of designing as you build.

Some of the lessons I learned from this build:

I really want to learn more about 3D modeling and machining. There is so much more detail I would like to have added. I am still overjoyed with how this first attempt turned out.

I need to work on cleaning up my design process. My computer screen tends to look like my workbench. It is utter chaos to anyone else looking at it but I know exactly where everything is. I will probably come back around and clean things up so I can potentially sell the files for this.

If you are going to calibrate your machine, do it BEFORE you start cutting any parts; otherwise, your new parts wont fit previously cut parts. I feel even dumber reading that back to myself.

To wrap things up:
I am extremely happy with how this project turned out. It was built to be driven so it is fairly robust in construction and lacks any parts that could break off easily (ex. side mirrors, exhaust pipes). It will probably be a while before my nephew can actually play with it but I think it will be a great 1st Christmas gift and one he can cherish for many years to come.

15 Likes

5 Likes

15 Likes

@Rafi Love this! Where did you get the block B from? Would love to make one of these for my niece that just got engaged at Thanksgiving.