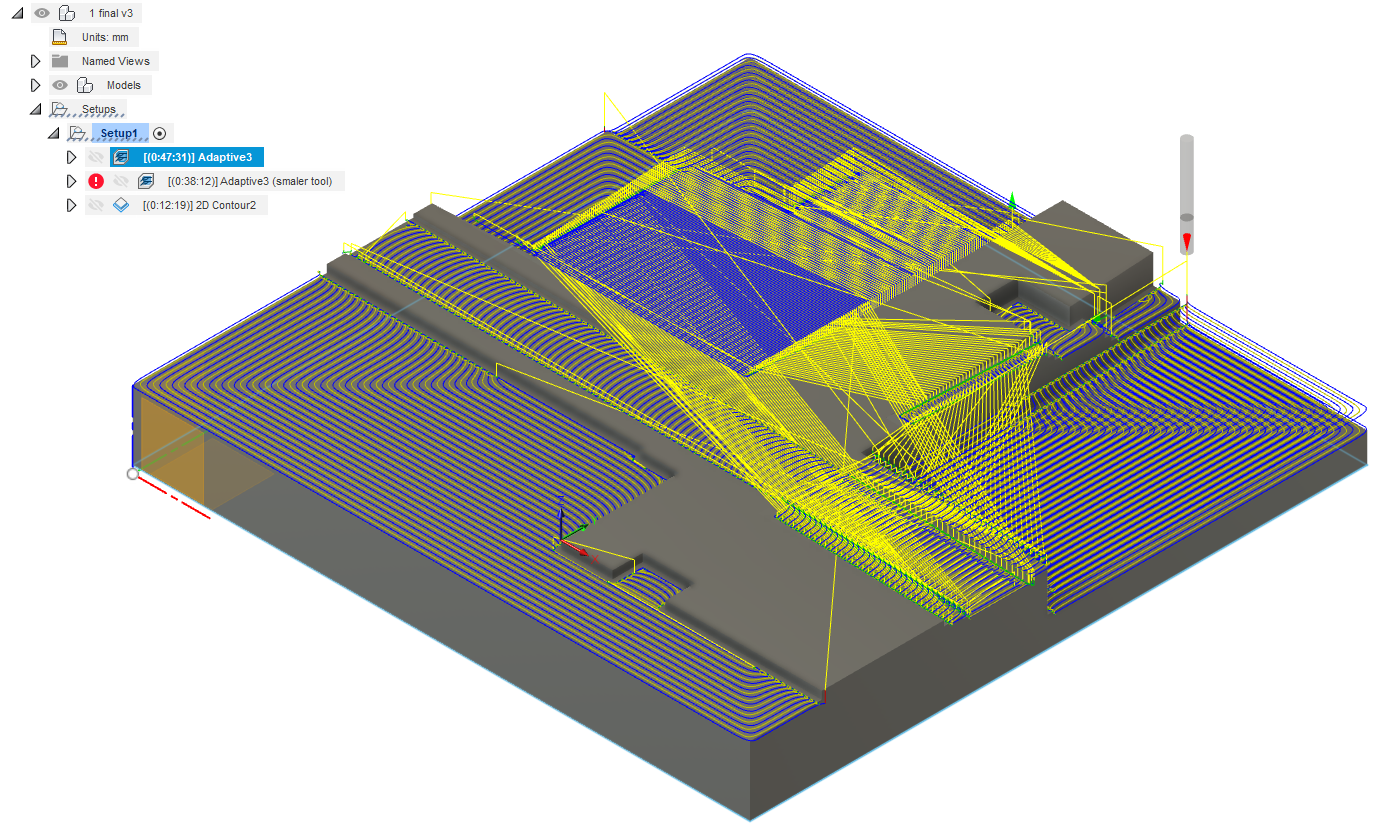
Hello, if anyone has a moment to check my fusion file that would be great.
It’s cutting Renshape PU on a standard machine.
I’d like to get the milling time down if possible.
Any thoughts welcome.
Hello, if anyone has a moment to check my fusion file that would be great.
It’s cutting Renshape PU on a standard machine.
I’d like to get the milling time down if possible.
Any thoughts welcome.
Hi @Theo,
I had a look and here are some comments for you to consider:
Disclaimer: I have never had the opportunity to actually cut renshape myself (but if Winston’s video about cutting renshape on a Nomad is an indication, it’s very easy to mill, hence my adventurous recommendations). So take all of this as generic advice, experimentation will be key (as it always is).
Happy machining !
Thanks Julien
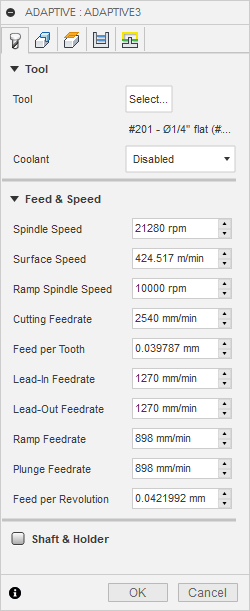
Yes, based on wiki. Renshape type materials do vary in density, I’m cutting https://www.neillsmaterials.co.uk/product/sikablock-m600/, which is similar to many woods, e.g. oak in density.
Does this value matter as the spindle is manually controlled?
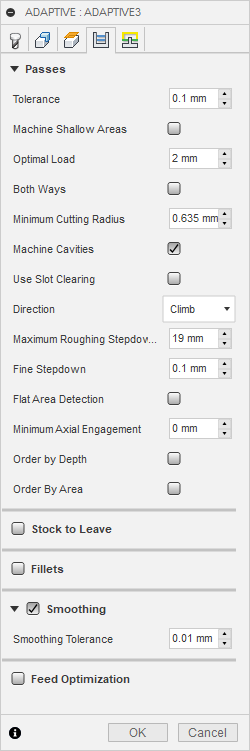
19mm DOC sounds scary! I didn’t realise with adaptive cutting I could go so deep. But as you say it seems the greater depth of cut is better than the large stepover for time.
My uploaded setting had it taking 1hr 40mins, not 1hr as you suggested?
Yes, I considered this, but time was more important.
I tried the pencil tool path, that seemed to be the best choice? But an 1/8 bit seems to make little improvement and ended looking poor. I’m not aware of any smaller bits? that would work deep, unless I got a new collet adaptor for less that 1/8?
Would this be neat and clean around the edges?
Does that mean I zero Z on the waste board, and then XY on the top corner of the stock? Because I can’t zero the corner correctly if not hovering on the corner?
Didn’t know that was a factor, the file is a Sketchup import I was given. Normally I use Rhino which imports as editable surfaces.
Wow I sure hope it’s softer to mill than oak, or my recommendation is way off ![]()
No it doesn’t, I was just wondering. Do you set it manually to 20.000RPM then ?
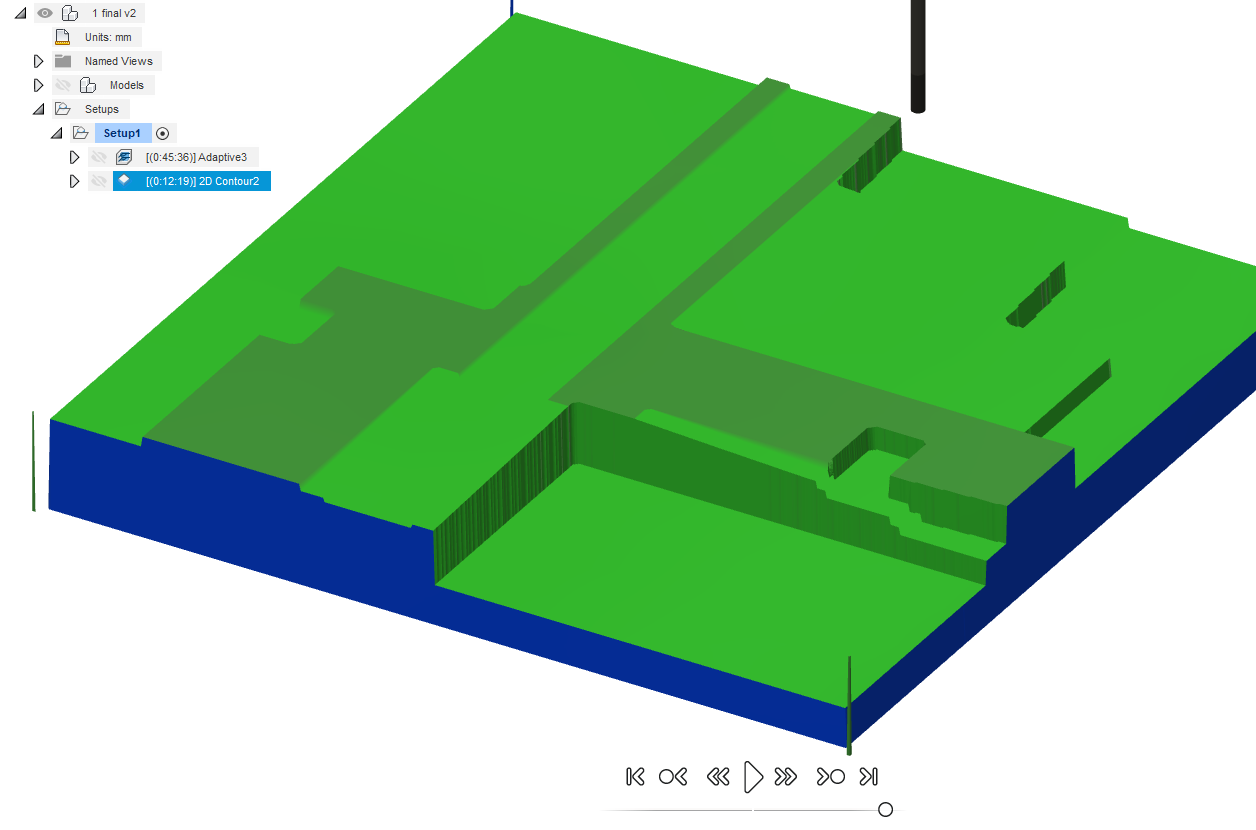
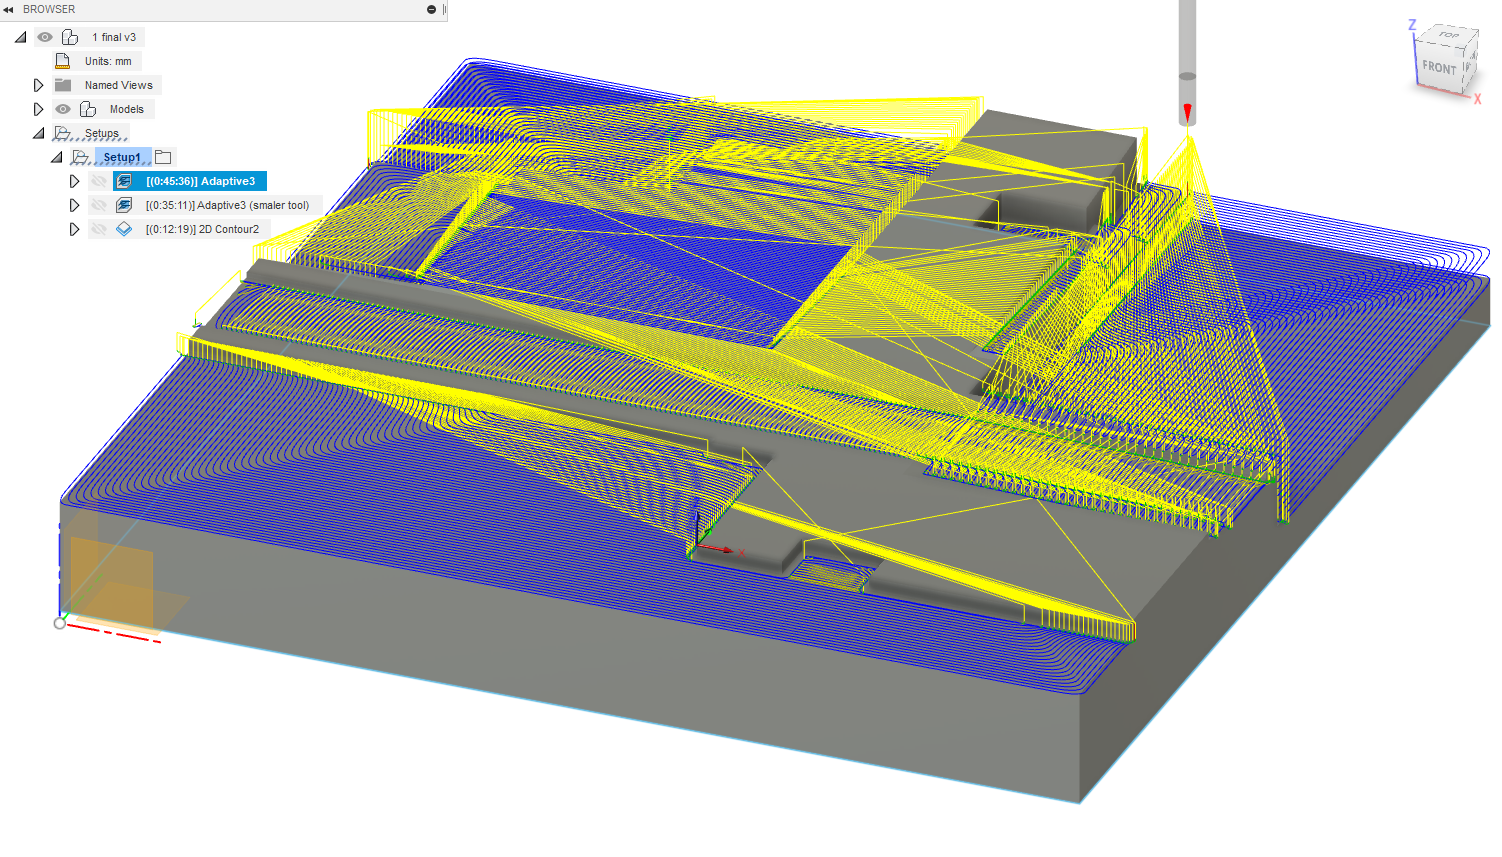
Here’s the link to the current state of the local project I played with, it has the 2mm optimal load adaptive, at 45min:
Ok. Just asking because the result looks like this with “my” settings:
I did not mean for the flat surfaces, but for the corners: no toolpath is going to help since the geometry of the 1/4" #201 endmill is what it is. I meant you can add a toolpath with an 1/8" endmill that will go and remove more material in the corners, making them “less round” (but still visibly rounded, just with a smaller radius). If the rounded appearance of the inside corners is not a concern, ignore that comment.
Going to a smaller endmill (e.g. 1/16th) will be difficult as they typically don’t have a long enough reach for the depths we are cutting here.
It should be just as good as the current contour with 4.5mm stepdown, and it might be better because smaller stepover = lower tool engagement = fewer opportunities for deflection/vibration = fewer tool marks.
The optimal solution to get perfect walls around the piece, I think, would be to use an endmill that has a large enough length of cut to do a single contour pass at full depth, but finding one that has 45mm length of cut would not be easy. Doing two passes at 19mm is the next best thing I think. Or maybe doing a spiral toolpath around the piece would work great too.
If you have an XYZ touch probe, zeroing on the top left corner is the easiest (sorry if I’m stating the obvious), just install the probe there overhanging the corner, launch XYZ probing cycle, boom you’re done.
If you zero manually, indeed that’s more debatable, I would probably set the zero to the center of the top of the stock (easier to locate accurately and draw a mark there)
Thanks again Julien.
3.5 - 4 Makita
Just downloaded it and it’s 1hr 20. See picture. Could it be another setting in the machine time?
Yes, thanks, I did consider this. I didn’t have a flat 1/8inch at the time.
No probe. But the stock is already overhanging so I doubt a probe would have room. Stock is 420x500 cutting to 400x400.
The issue with using the centre stock is that will be milled away! So if I run a second tool or the machine fails I am unable to use the same point. Hence using a corner of stock that is not milled. As far as I can tell this is the best option - A fixed corner?
Oh did you mean the total time of the 1/4" adaptive and the 1/8" finishing ? I was talking about the 1/4" adaptive only, which is 45min :
for those settings:
What you could do in these circumstances is:
But as long as you are happy with that specific zero point, by all means use it, I was just curious why you had set it there, and you explained.
I think the issue is Rapid Feed setting in the machine time box? What is the correct figure? I am just selecting the 1/4inch.
Also, how do you get the times to show up next to the tool paths?
Mmh. Now I have a question for you too: where do you click to get that “machining time” window?
EDIT: oh right, it’s there in the context menu for toolpaths
I activated the “show operation machining time” option in the preferences a long time ago, and that’s the only time I ever check now:
Oh thanks. I think your Rapid Time is wrong. 3000 is mine. Mine seems to be accurate to how long things actually take?
So I checked this morning, and for some reason rapid feed in machining time menu was set to 30,000 (!) for me, yet I’m pretty sure I never modifed it myself since I was not even aware of that setting.
Anyhow, if I change it back to 10,000mm/min, the toolpath now takes an estimated 53minutes.
You can slightly optimize that by enabling “Both Ways” in the adaptive toolpaths parameters, then it’s down to 47min:
But there are still a fair number of rapids outside the material. It should be possible to create multiple local adaptive toolpaths (one by “sub-pocket”), and optimize that further. And then again, only a cut will show if the 2mm adaptive load can be pushed (back) to a higher value in renshape, and then the cutting time would go down significantly.
Mystery solved! Explains our different times. I’m pretty confident 5,000 doesn’t match real world times. Haven’t upgraded CM yet. Will stick with 3000 for now.
If you have the opportunity to cut this project or a similar one with LOTS of retracts/rapids, let me know what difference you see between the estimated time and the actual cutting time.
I measured the actual cutting time on a project of mine this week-end, and the Fusion360 estimate was within 10sec of the reality, BUT it had very few rapids, so that configurable value had no weight at all.
Estimated cutting time aside, if you haven’t already I think you should take a look at Winston’s recommended GRBL params (which happen to be the defaults now in CM 5.x) the machine just feels more “alive”, and rapids can be up to 10.000mm/min, which in a project like the one in this thread, will certainly help a lot.
EDIT: sorry, just saw in the other thread that you are aware of the 10.000 rapids in CM5. Ignore that last paragraph.
This one is already cut, there will be others!
So tell us, what feeds/speeds/optimal load did you end up using and how did it go ?
I cut it before this thread, sorry, as per the original Fusion file. Posted here as a test case to see how I can improve in the future.
This topic was automatically closed 30 days after the last reply. New replies are no longer allowed.


