I started building an enclosure for my Shapeoko Pro XXL but being this is my first CNC machine I did not realize how much slack I am going to need to carry in the hose to the Sweepy 2.0. I am looking at either using Festool or an Oneida-Air supercell for dust collection. The Supercell uses a reinforced hose but Oneida is saying it won’t be an issue if there is enough slack. Not sure if this is true. If anyone has any experience or information on this it would be greatly appreciated.
My original enclosures height I designed to be 24" so I would be able to flip open the back and front of it onto itself. Now I realize this is way too short to accommodate enough slack for the hose so it doesn’t bind the router while its moving around.
What height should an enclosure for the Shapeoko XXL be ? And does anyone have a simple enclosure design? I tried to design this myself and its a miserable failure at this point with a lot of wasted materials.
Griff
(Well crap, my hypometric precursor device is blown…)
2
There are as many answers to this question as there are members in this forum.
For me, a lifetime member of the GoBig or Go Home fraternity, I’d recommend minimum of 32” interior height. That’s what I used for my spindleized XL and now my HDM. I also like room on the sides, personal preference. Mines not as pretty/organized as others but it works for me.
I have used Peachtree 2.5 inch vac hose on my xl. I had a boom positioned in the center of the spoilboard. That gave me enough flexibility to reach the 4 corners of an xl. For an xxl you may need more height to reach all 4 corners.
The Peachtree hose is very flexible. Sure there are other brands but flexibility is the key. The Peachtree has a copper wire molded in for grounding to reduce static.
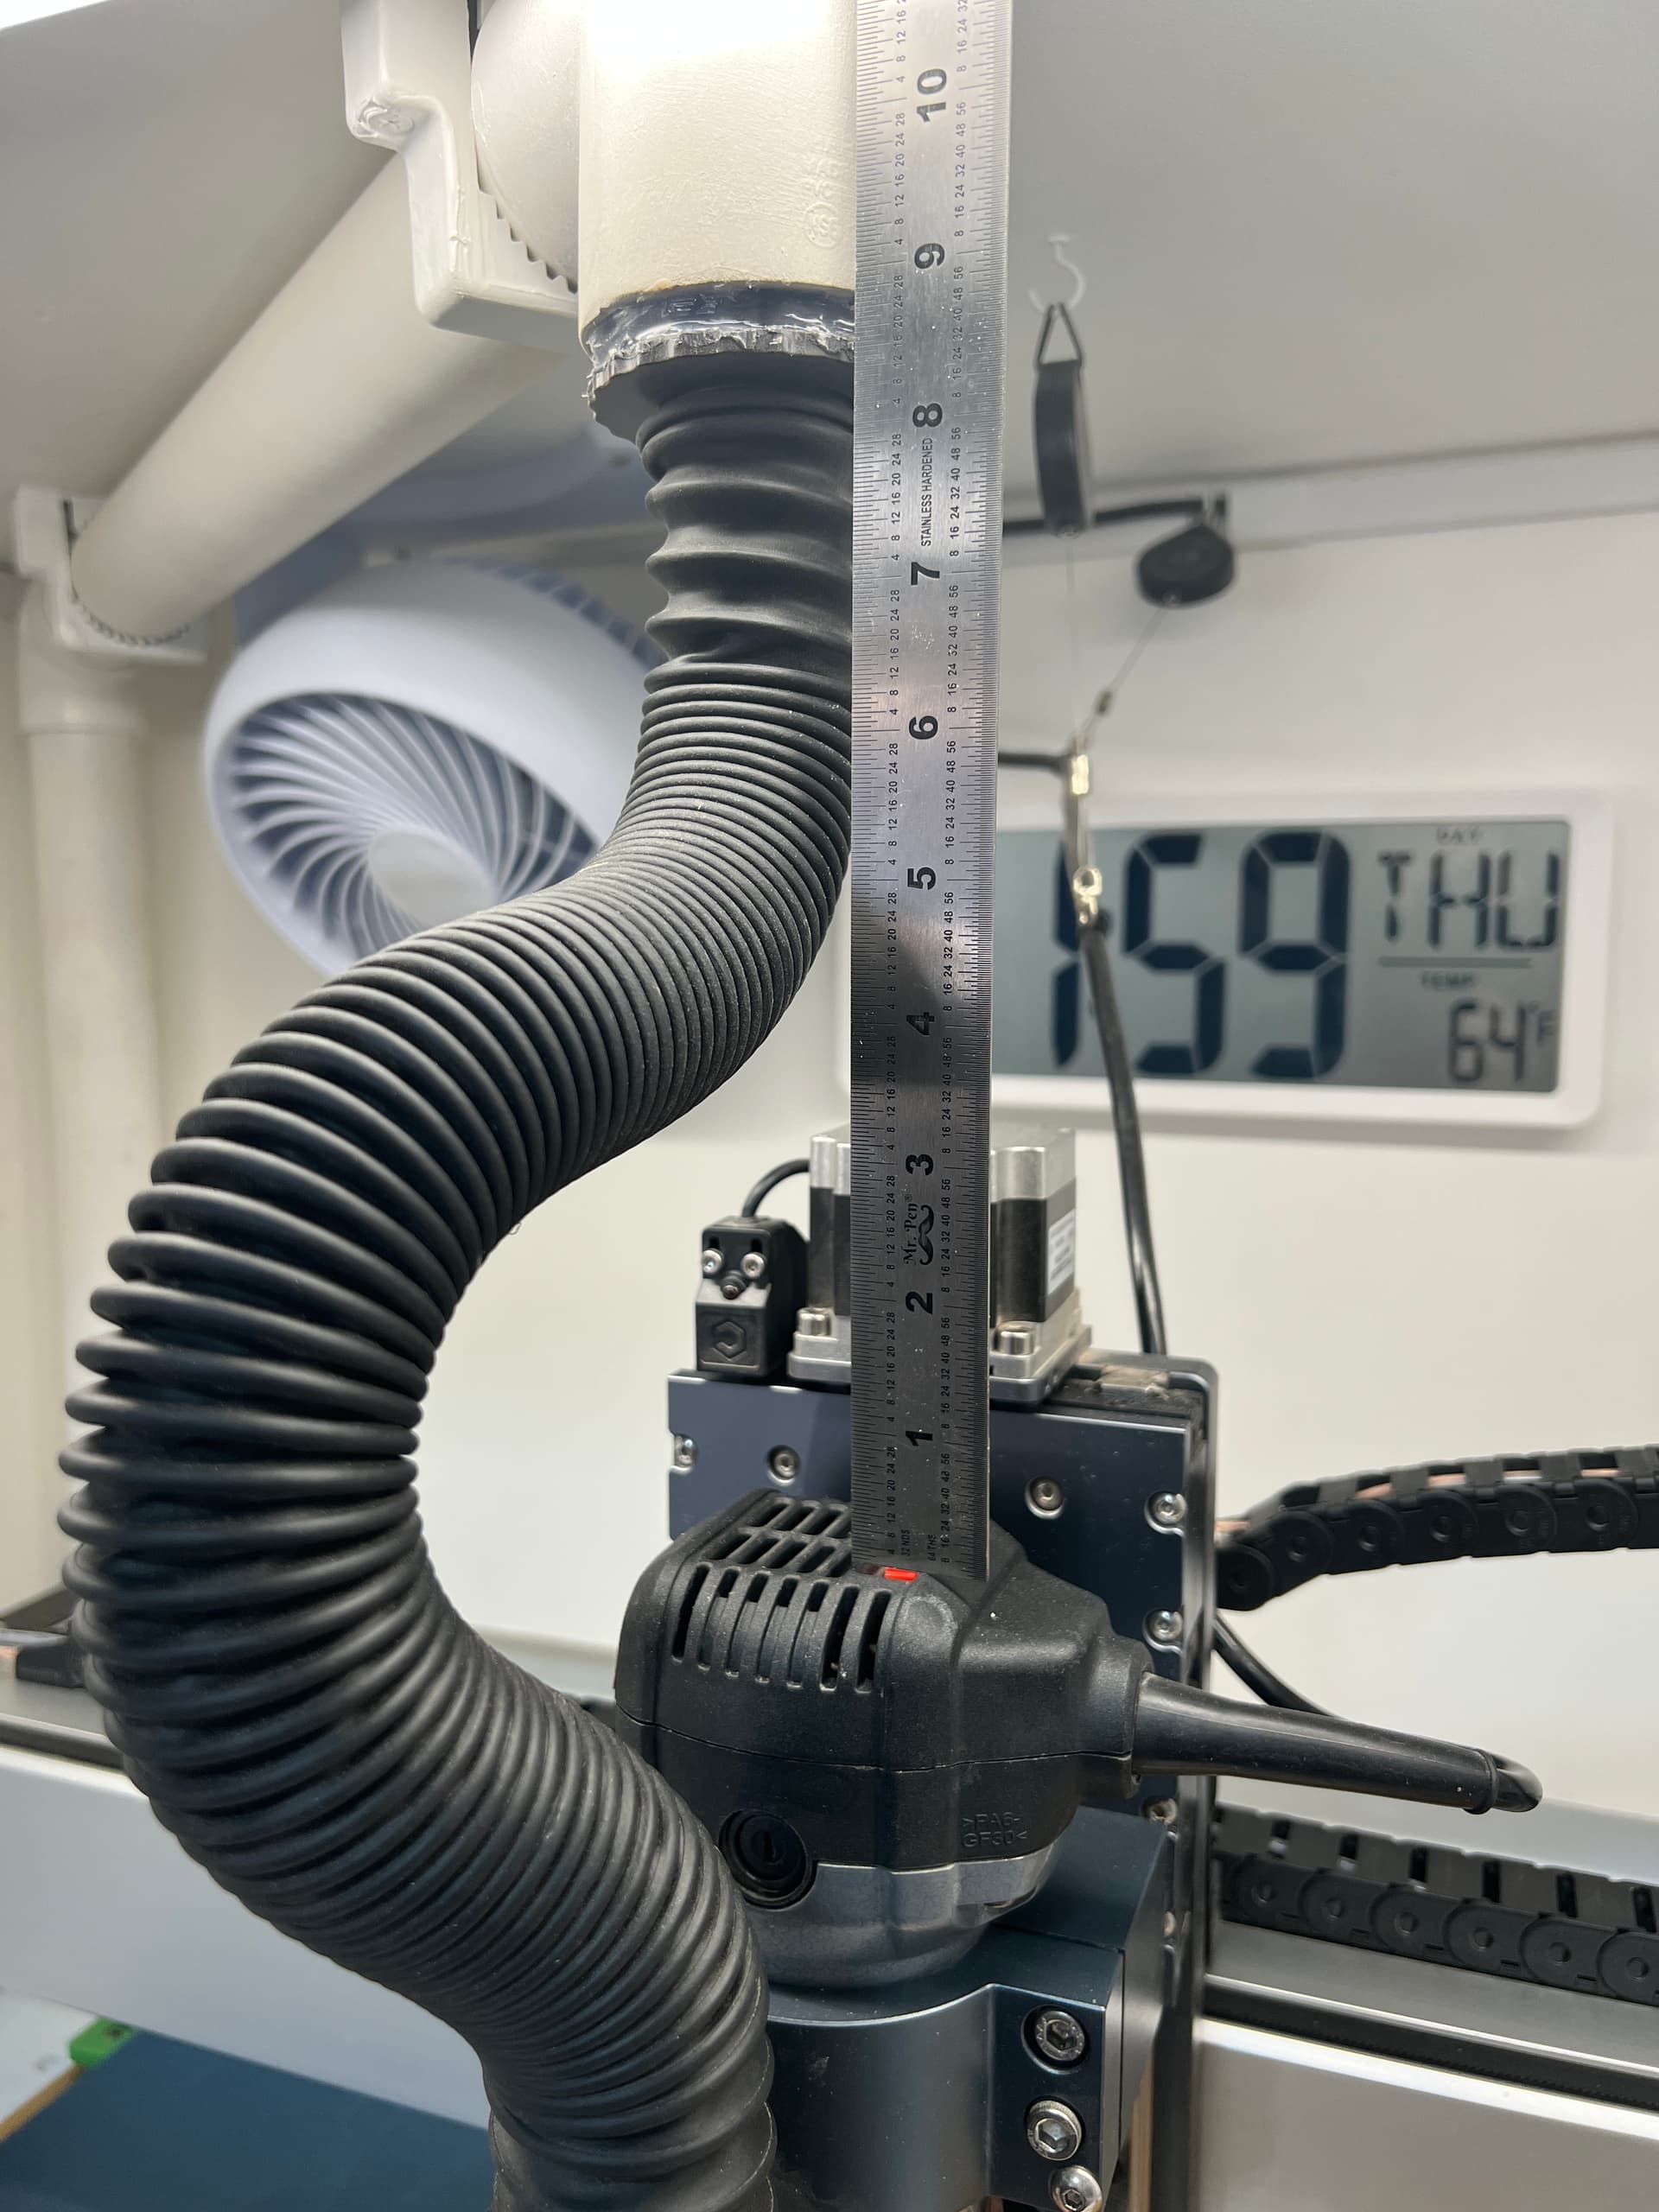
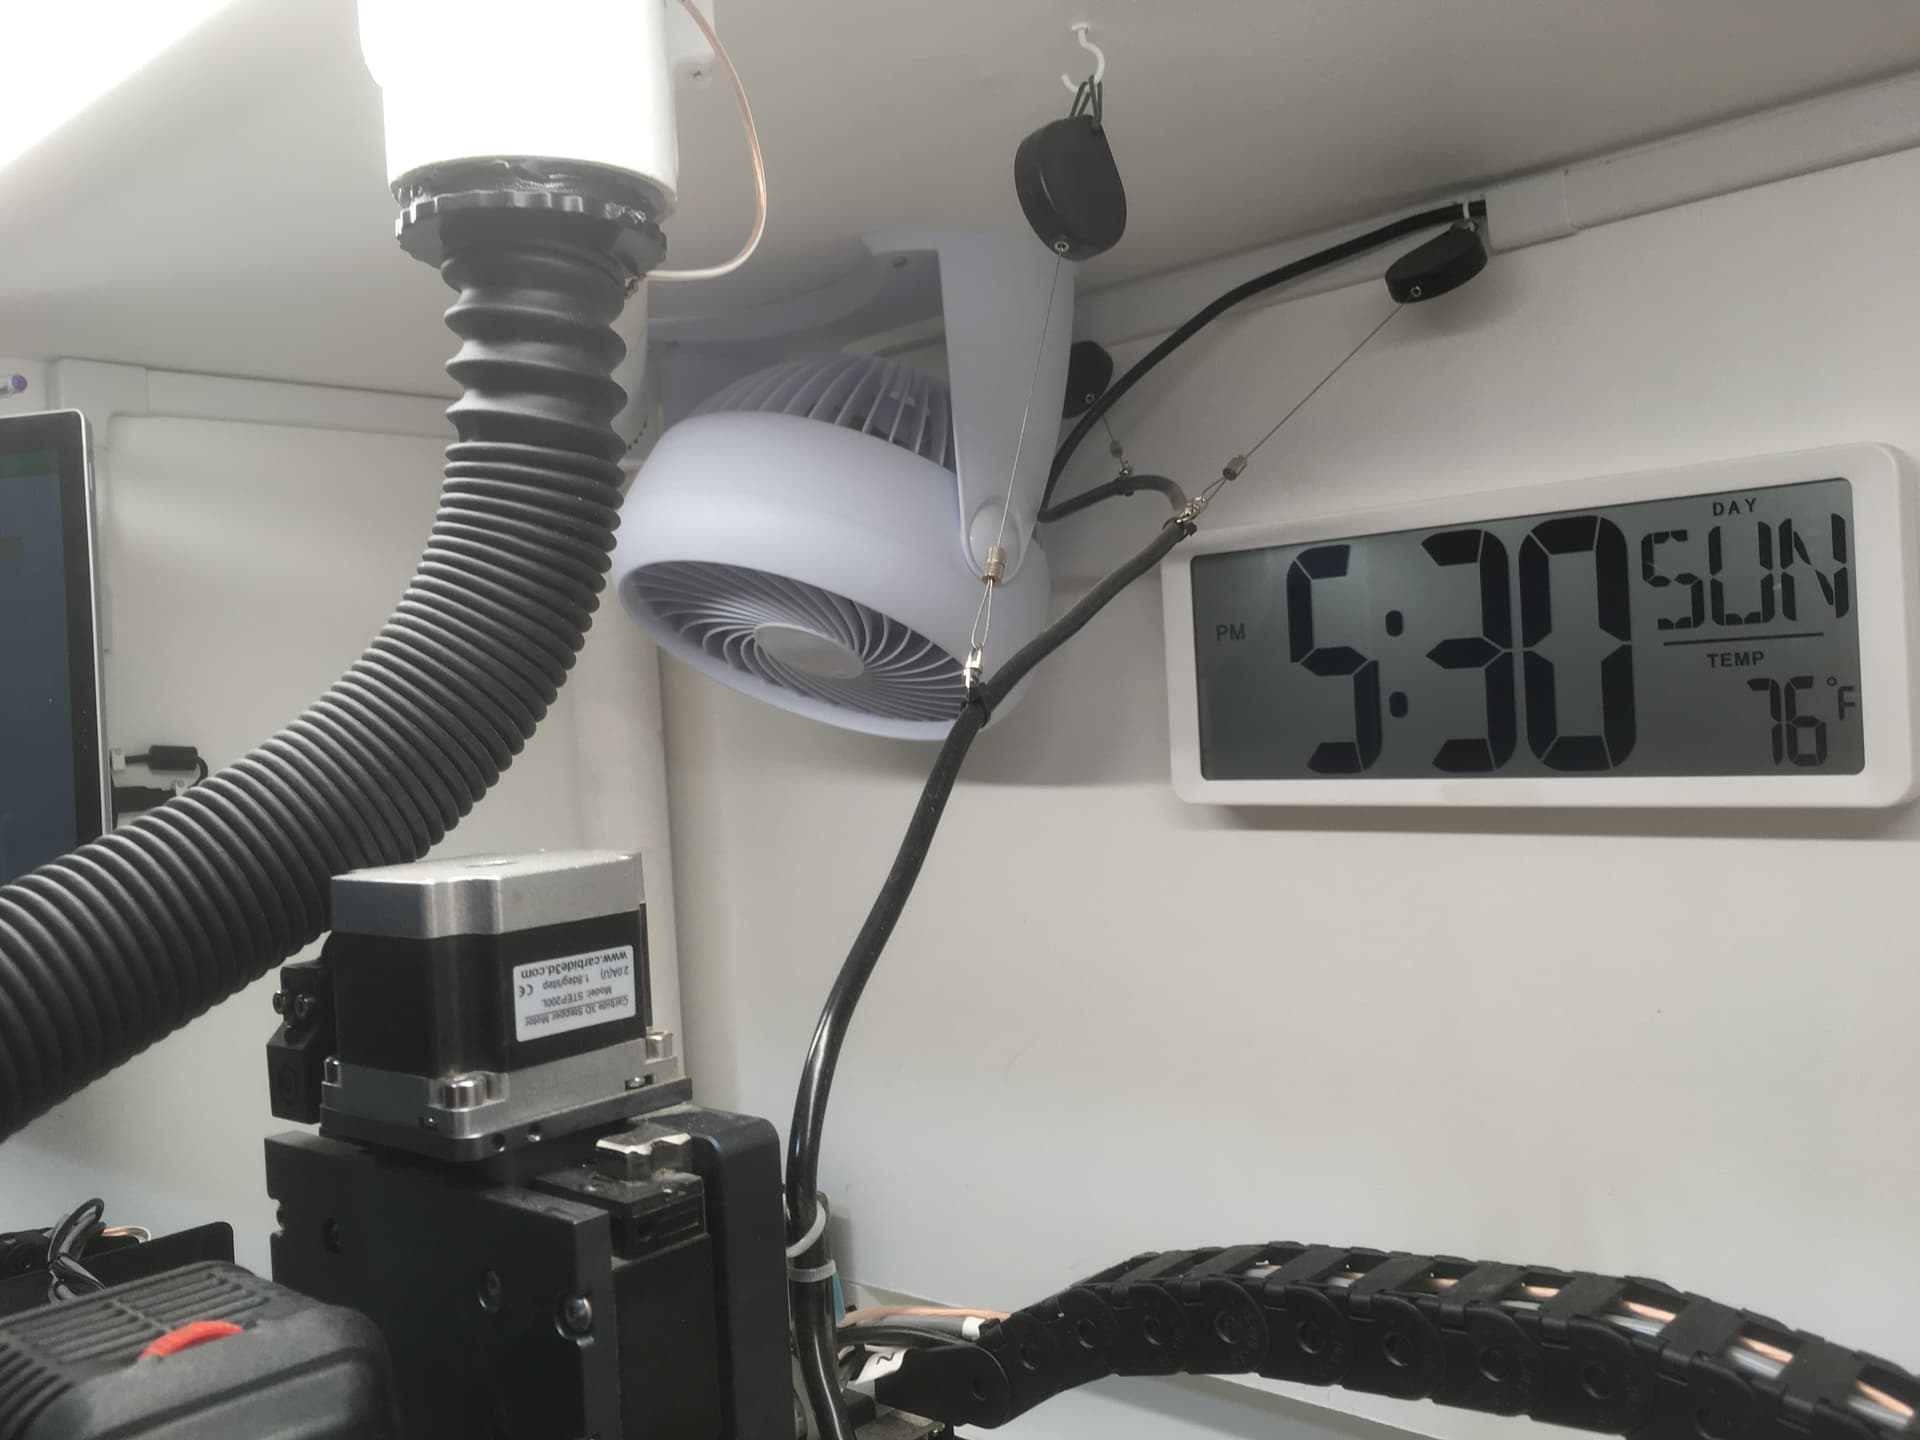
I have this Rockler hose which has really good “expansion” (a tight spring). Notice the difference in the compressed section and the expanded section (expanded due to the adapter). Rockler claims 4x expansion, and that seems accurate. I cut the hose to the length I needed.
In the above photo the router is in the position where the hose needs to be compressed the most (Router directly below the PVC port, Z axis all the way up).
And here is a picture with the router in the home position, with plenty of hose expansion left (unused).
I did need to purchase an additional 2 1/4" adapter, but the adapters are nice in that they also rotate.
I also take a very aggressive approach to grounding my CNC (Thank you @LiamN - Grounding your Shapeoko). I cut away the outer liner at the very end of the hose and soldered a ground wire to the spring within the hose (notice the copper/white wire at the end).
The Peachtree hose is very flexible. Sure there are other brands but flexibility is the key. The Peachtree has a copper wire molded in for grounding to reduce static.
Do you have any experience with an Oneida air hose ? Their 2.5" hose doesn’t look very flexible to me.
I got a huge boost in air volume when I switched over to cheap PVC waste pipe for most of the run back to the cyclone and about halved the length of flexy hose, despite the overall run being longer.
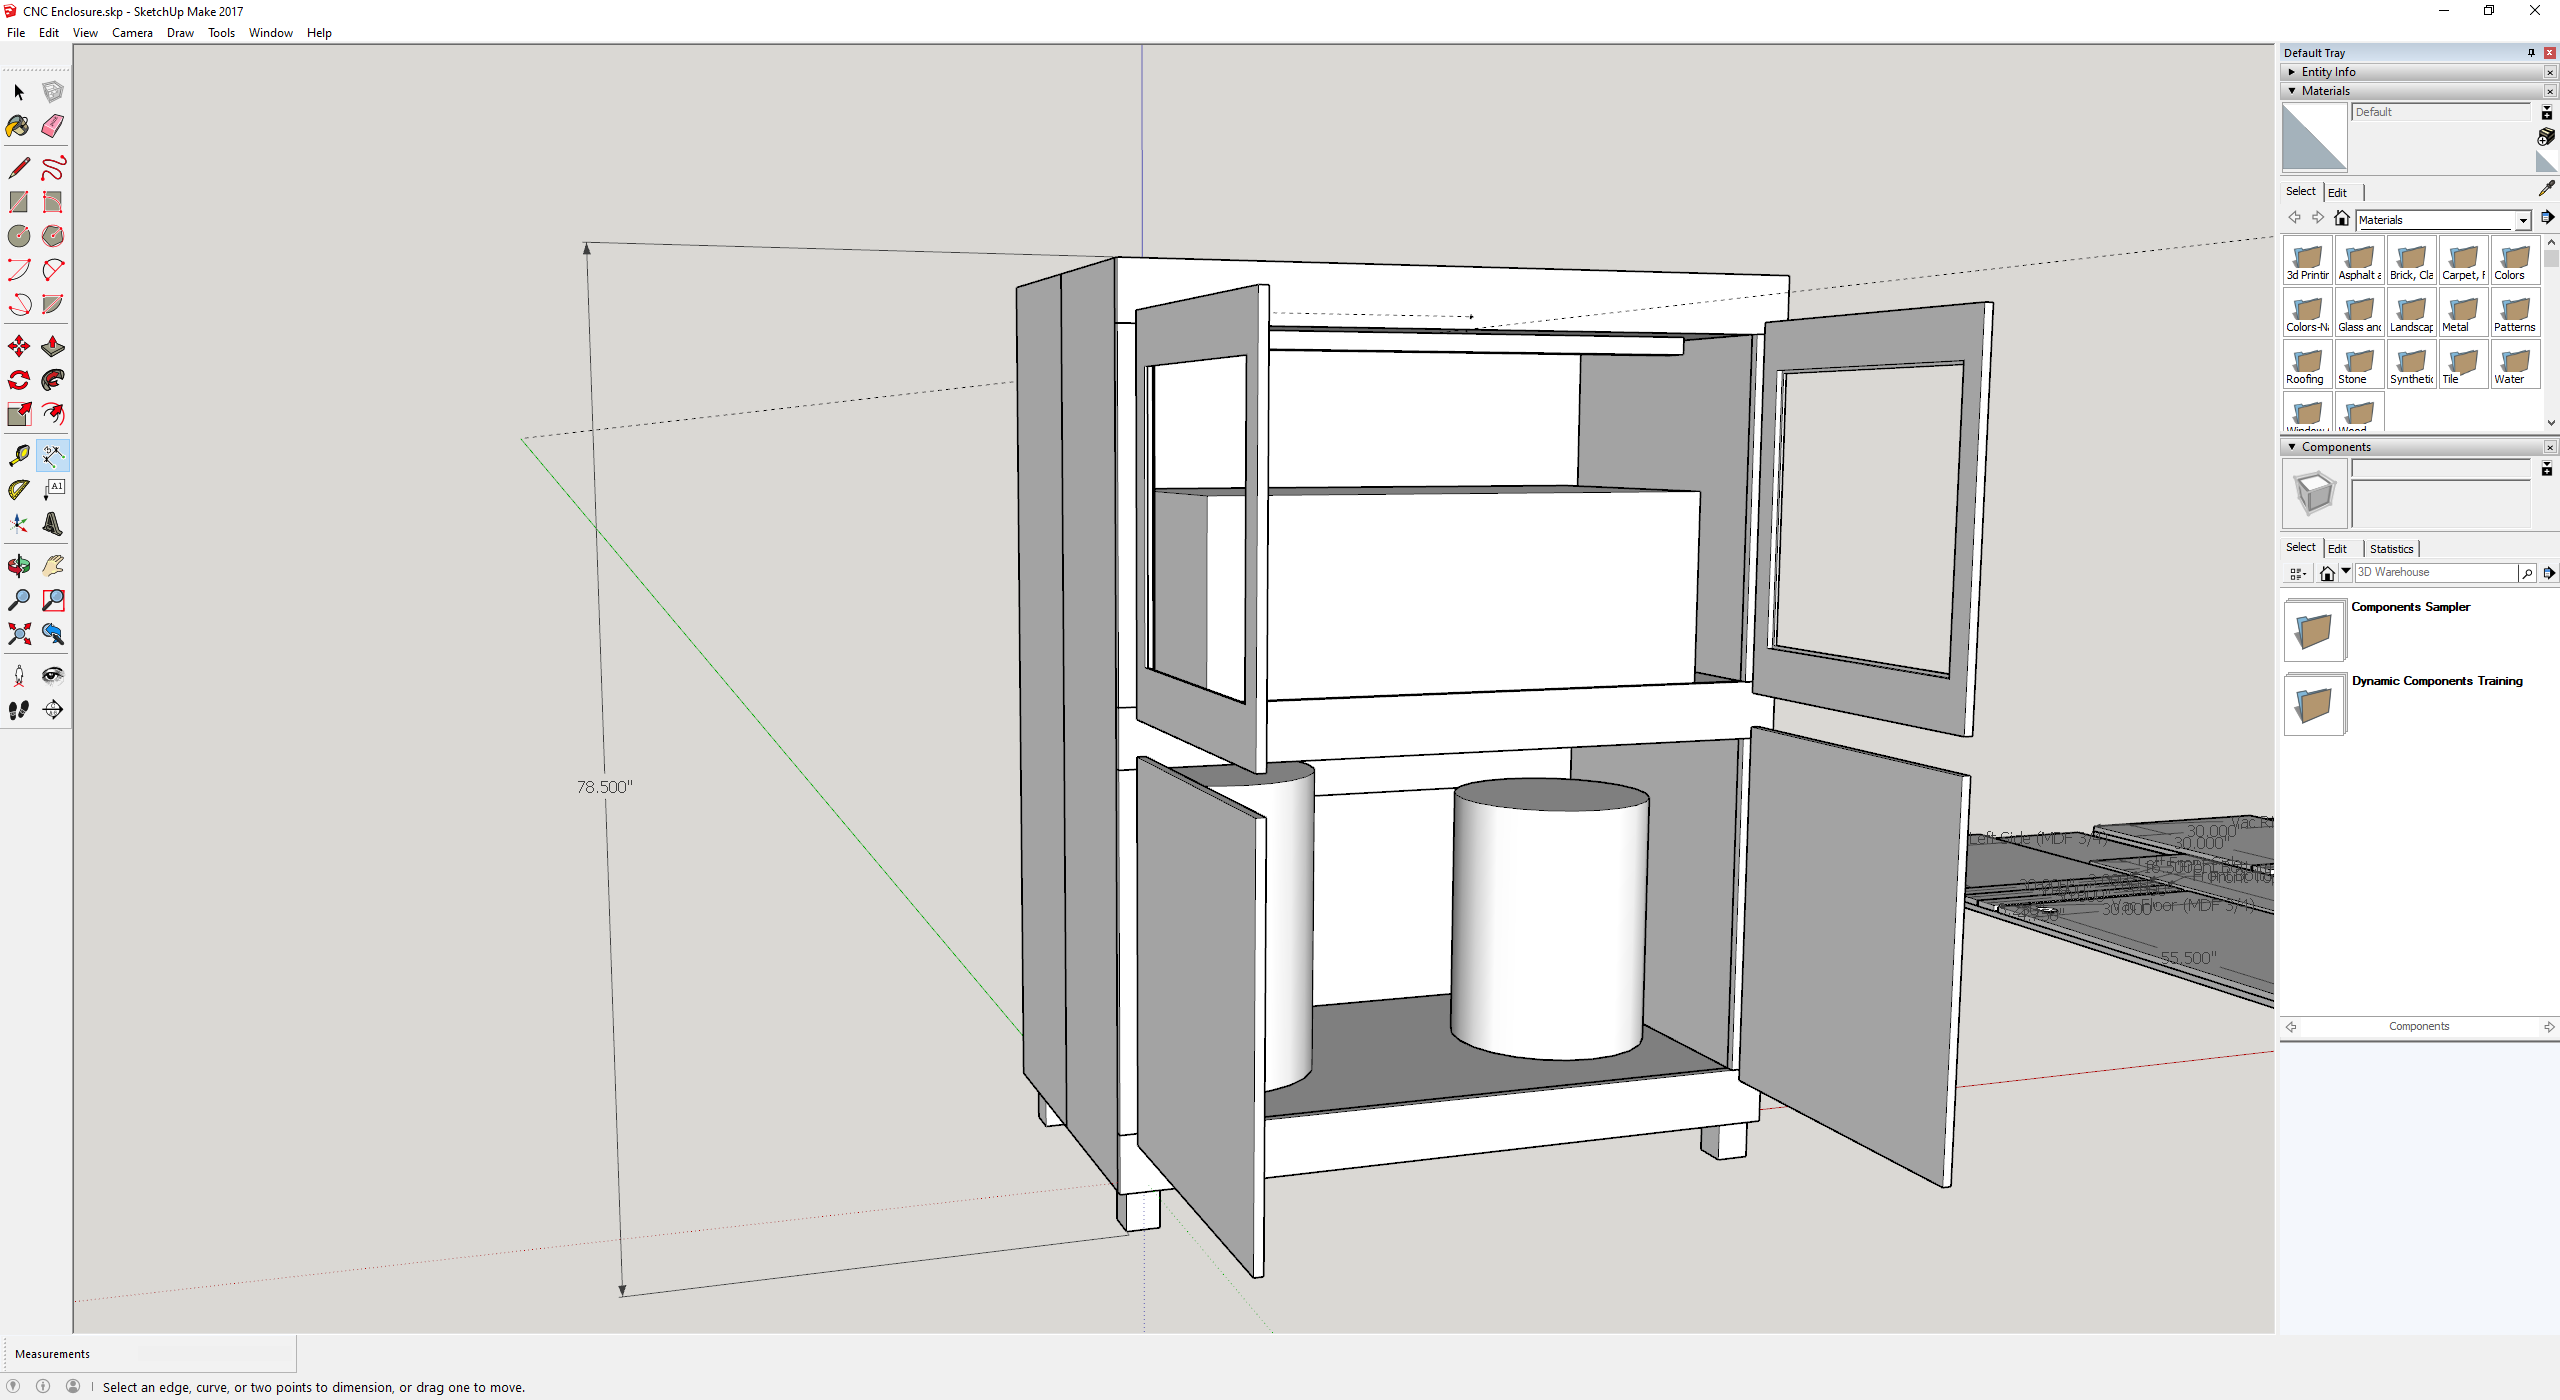
According to my plans, it should be roughly 78" tall but I didn’t know the actual height of the casters when I designed this. Without the casters, the enclosure should be roughtly 75" tall.
According to my plans, it should be roughly 78" tall but I didn’t know the actual height of the casters when I designed this. Without the casters, the enclosure should be roughtly 75" tall.
Hi Cog (and hello everyone, this is my first post)
I’m also working on an enclosure for my new pro XXL.
I wanted a way to keep the hose slack to a minimum, so I used a pocket door track and a couple of roller carriers to support some of the excess slack. Hopefully you can see the attached photo.
Full disclosure, the inside of my cabinet is 31” high, so I had plenty of room, but I think a method like this might be used to reduce necessary headroom to a minimum.
Something I had also briefly considered, because I have a tendency to over-engineer things, was a gantry.
It would have required two pocket door tracks front to back, and a third perpendicular pocket door track hanging from the rollers of the above two tracks. With this method, I could’ve probably reduced the end slack to only a few inches, and the overall height of the gantry and hose would’ve been approx 7” max from the ceiling. The slack at the end would have been just what was needed for vertical drop from the gantry to the router head. Maybe a solution like this would work for you?
I admit that it would have been way over-complicated, but it would have been a fun engineering challenge.
In reality, simpler is usually better and less likely to fail, so maybe ignore everything I’ve said and just raise the roof?
Best of luck with the project!
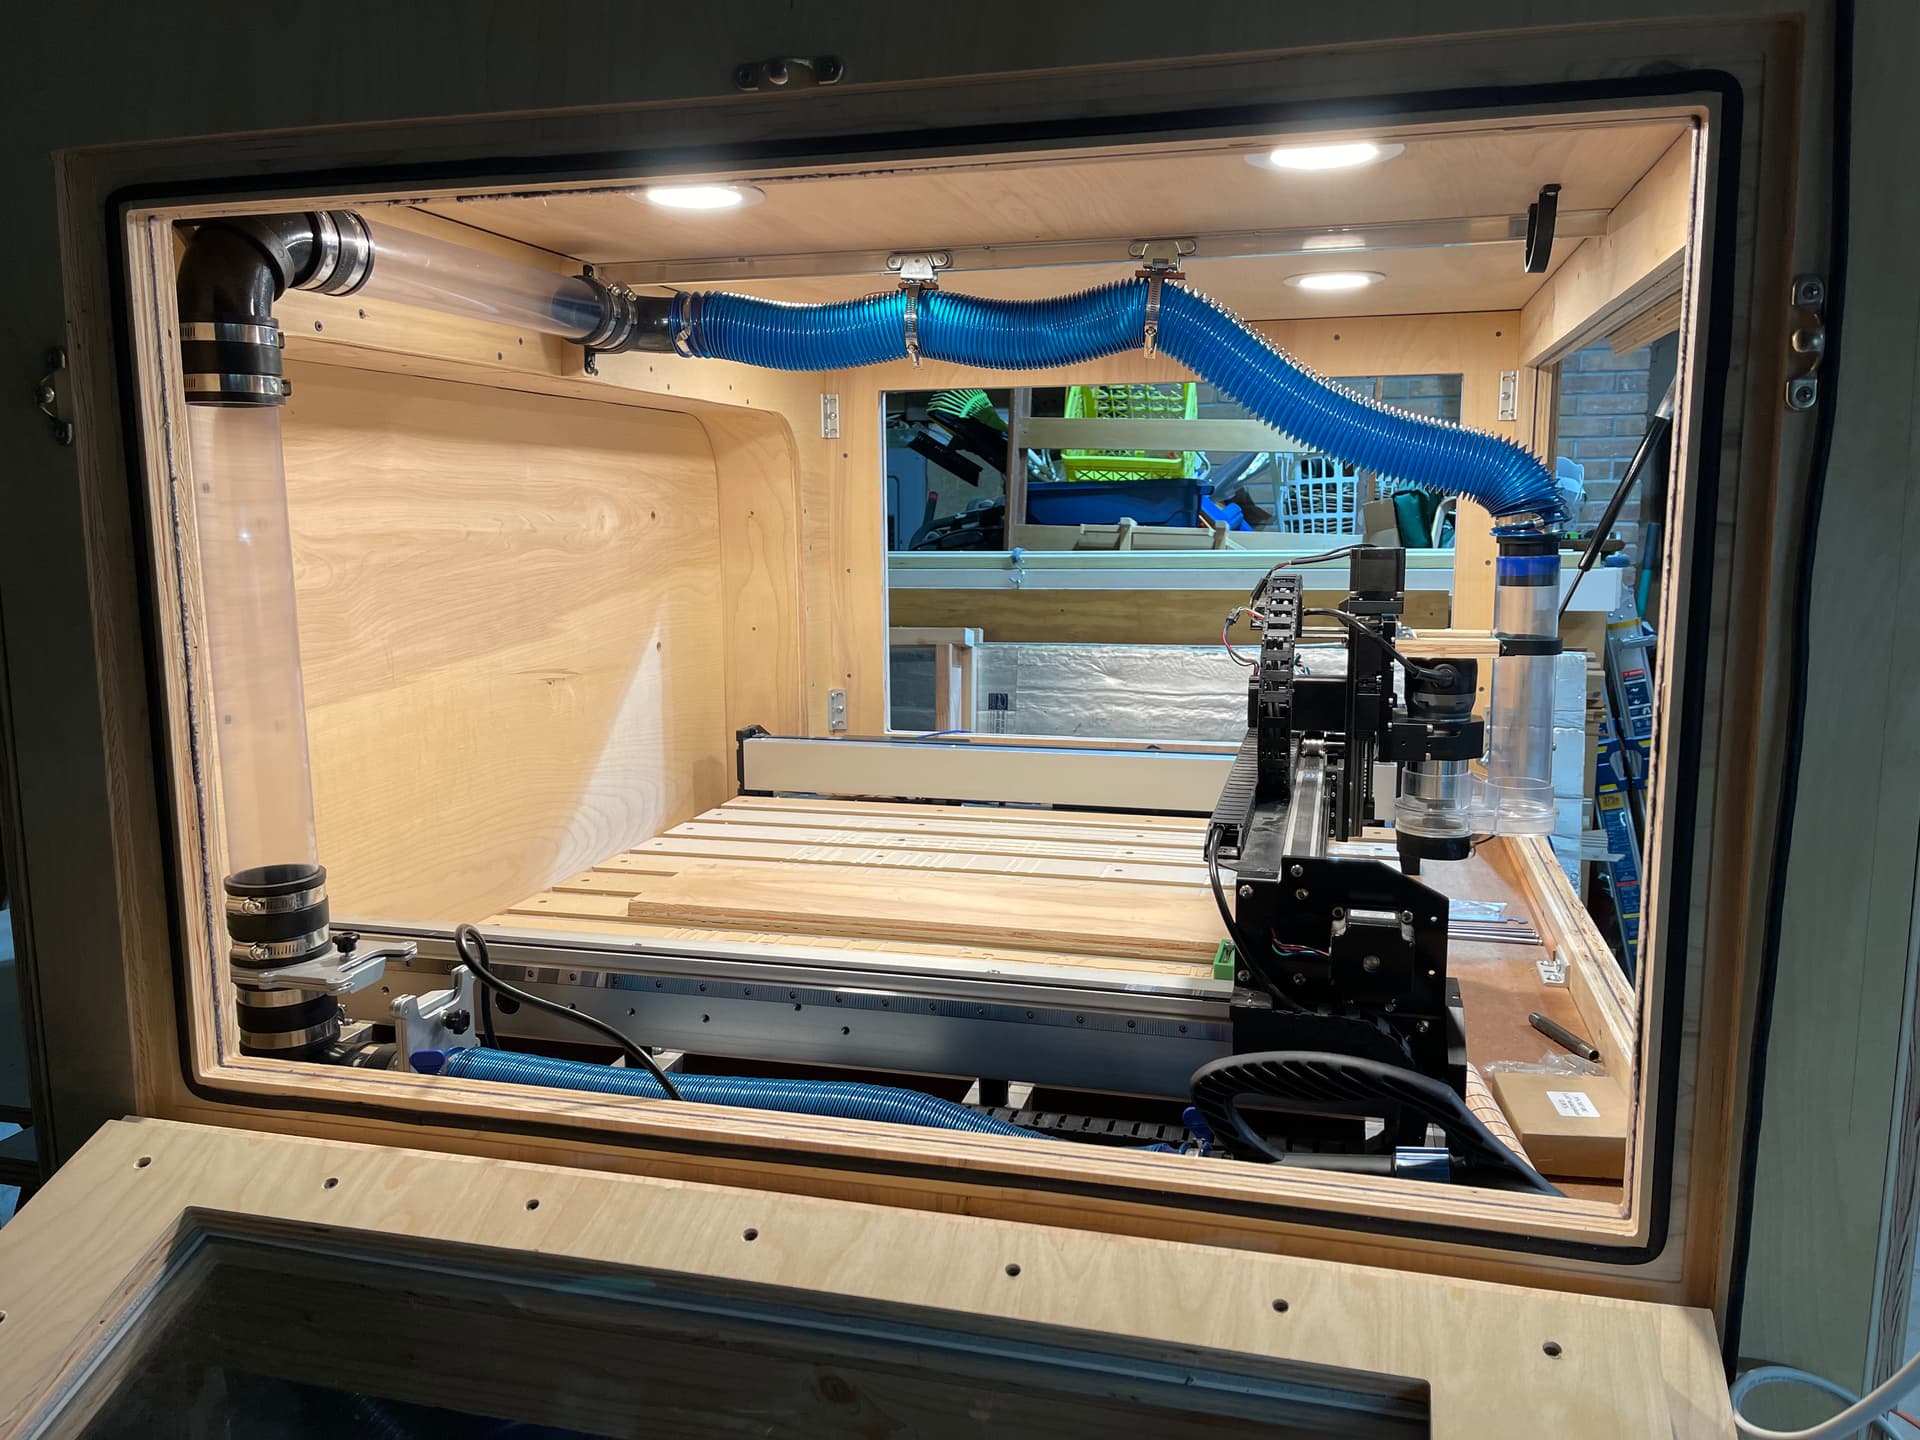
That is a very nice enclosure I like how you sealed it around the door. I also like how you ran the vacuum line. The seal around the door is similar to what I was looking to do but I Built the original frame out of 1 x 3 pine boards and doweled them. Yours looks much sturdier. and dust proof.
Thanks, Cog. I’ve completely overbuilt this thing but it’s been a joy of a project. It’s mainly designed to kill the noise but i’m very much not a sound engineer, so I’m making it up as I go along and crossing my fingers that it’s effective. I’ll share more photos with the community at some point in the future when it’s all done.
I chose them specifically because I wanted a warm 3000k light, and a very flat surface profile. I find that they’re the perfect amount of light for the space.
Are you willing to share more info on your cabinet? Like what material and parts you used. I’m looking to build something for my 4 xl. I had the thought of the recessed lights when I first thought about building.