Usual preface, I’m with PreciseBits so while I try to only post general information take everything I say with the understanding that I have a bias.
Extra preface. I’m not nearly caffeinated enough yet… So I may miss expanding on some things, ramble more, etc. Not to mention what it’s going to do to my grammar and spelling.
To expand on one point not covered in that linked post, you extra can’t measure the true size of a single flute cutter mechanically. The opposite side of the cutting tool from the edge of the tool has to be ground away so that it doesn’t rub in the cut slot. How much is ground away depends on the design, intended chiploads, and balance specs. The only way to measure a single flute tool is to get the “swept diameter” using something like a tool makers scope or optical measurement tools that can track total maximum width of the cutter through a complete rotation.
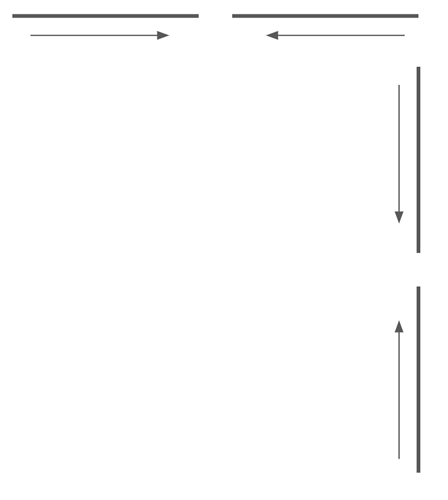
If you are trying to narrow down where you might have issues, you can at least narrow down deflection using the following test. Cut 2 lines, with a gap between them in each axis, cutting in opposite directions.
Then measure the delta of the edge of the pair of lines and divide by 2. This is the deflection of that axis. This number will change with the material, feed, tool diameter, and plunge depth.
Length of the gap doesn’t really matter. The line lengths need to be long enough to let the tool get to speed after acceleration and before slowing to end the cut.
The upside to this is that it will give you deflection data without having to know your runout, or exact tool diameter. Both runout and diameter can effect the cut as they change the forces of the cut and chip formation. However, the delta of the cut edges is the raw deflection for those forces.
The obvious downside to this is that it only measures slotting force deflection. In theory it might be possible to get non-slotting numbers by offsetting a second line using numbers from both edges. However, I haven’t had nearly enough coffee yet to trust myself figuring that out (or if it’s even true). The issue is that you would need to put the offset on opposite sides of the cut (which ones depending on if you are climb or conventional milling).
Potentially simpler way to get a pocketing number would be to calculate your MRR for your pocketing operation, then adjust your plunge depth of the test to match. Won’t be perfect but should get you close.

