Hi everyone,
New to CNC but love the community here at carbide. Hopefully someone can help steer me in the right direction.
I bought the nomad pro 883 6 months ago and just recently found some time to play with it. I’m working on a custom computer project (basically creating my own case and layout) that’s water cooled. Currently the motherboard I have uses a narrow ILM socket which isn’t very prevalent to the consumer market and I’m in need of modifying an existing CPU mount adapter, Swiftech’s Apogee Drive II for AMD to fit the Intel Narrow ILM Xeon socket layout. Fortunately, the change isn’t that big, just a few mm in one direction, and a few mm in another direction. So if I can just re-create the existing adapter, I can adjust the hole location to make it work for me.
I’ve attached an existing layout of the adapter mount and just need some help pointing me in the right direction on which software tools to use to create it, what tips to use to cut it, what material to use to make it, it needs to be stiff enough as there will be some tension on it.
One concerning part is there is one portion that is threaded which I’m not sure how to tackle.
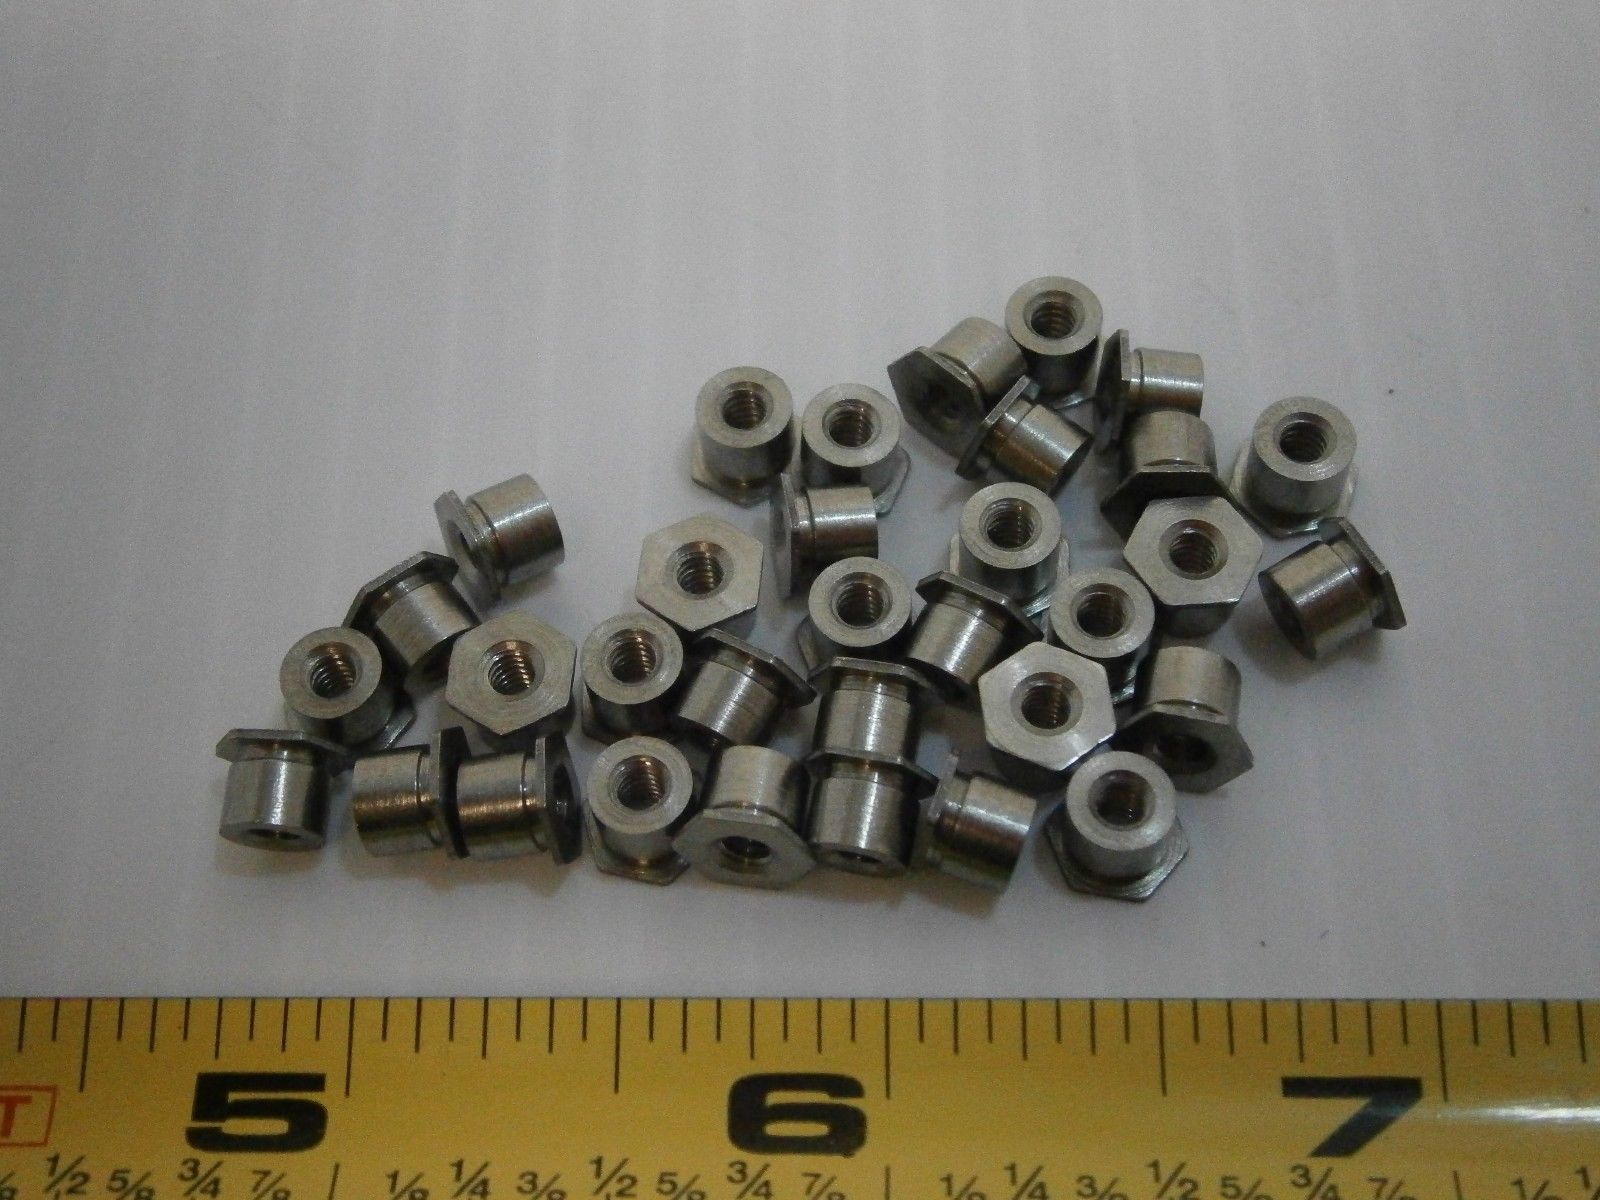
Draw up the shape from a scan or photo (Carbide Create or Inkscape should work), Cut out the shape, put holes for where the threads go and mount swaged (one brand name is PEM which I believe is what is used on the ShapeOko 3) nuts there?
Thank you so much, the swage nut was key, I had no idea that it was called that. Do you know what type of material I should cut it from? I’m thinking the 6061 aluminum 1/8" inch sheet would work but what would you suggest as the bits to use?
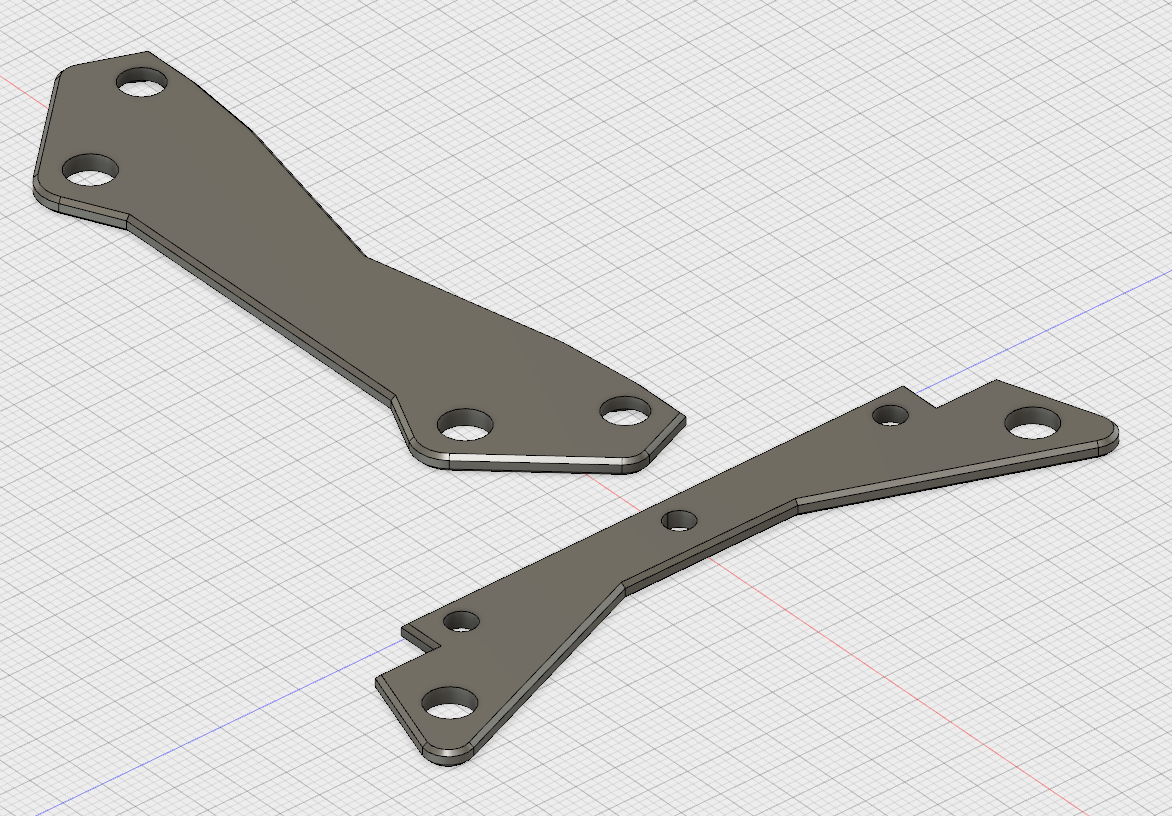
Thanks everyone for all the help again. I spent some time over the weekend and learned some Fusion360 and have created what I think should be the adapter plates and now just need to make it on the Nomad 883 Pro. <<-- the fun stuff
@WillAdams I also ordered the PEM Swage Nuts, it took forever to find but I think this is the right one for me but I’ll need to cut it a bit short: http://www.ebay.com/itm/261924386051
@ApolloCrowe Thanks for the advice. I think the link you attached is wrong though, it’s for the balled cutter and not the flat cutter as written. I already went ahead and bought the 1/8" inch aluminum plates from the site and I think I also need the flip jig and the vice? How do I go about cutting both ends symmetrically? Can I use both the blue glue and the white glue wax?
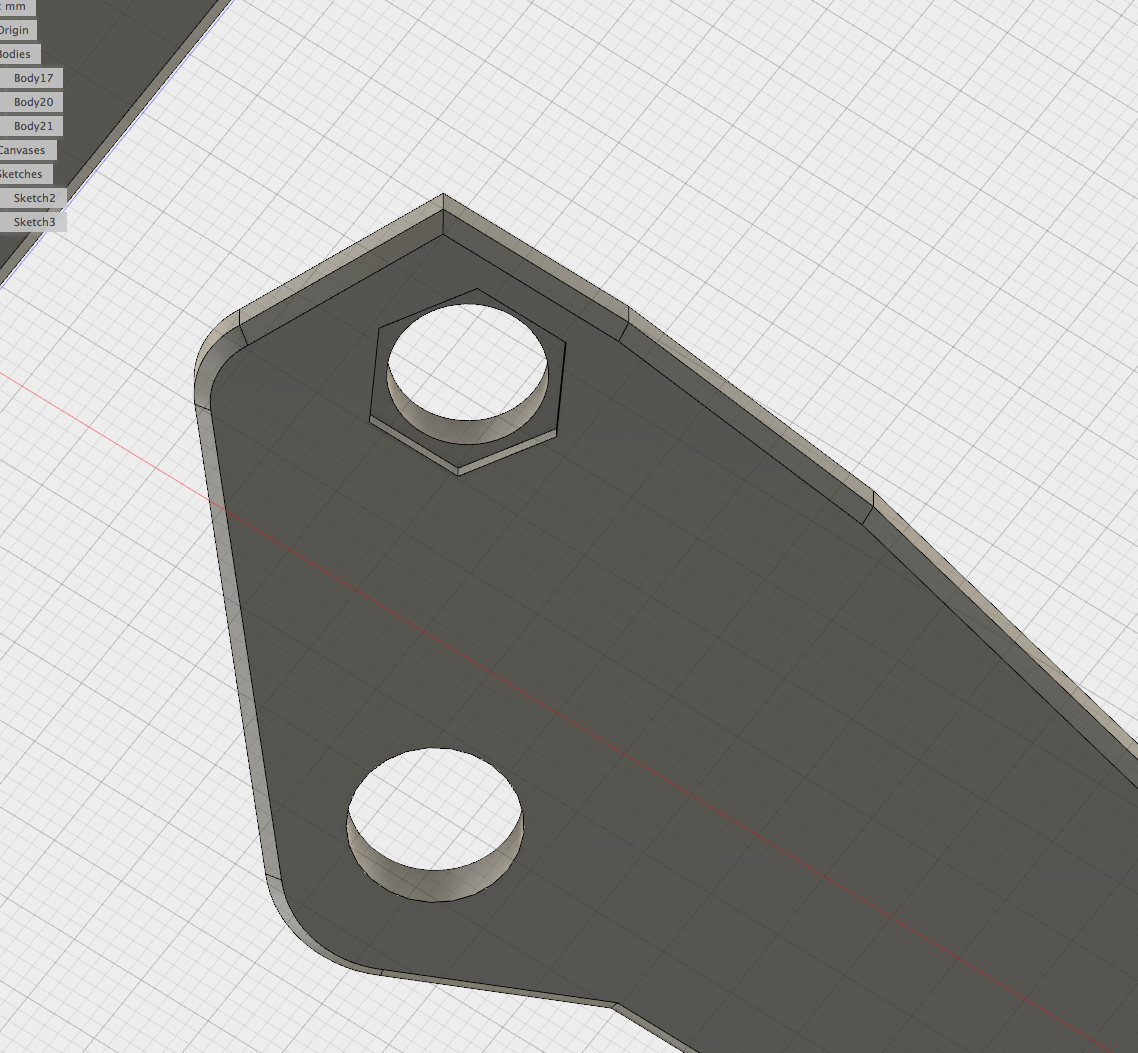
I’m attaching an image of the plates from Fusion 360, could you give some advance on what bits I should use? I have a 0.5mm chamfered edge as well so it feels a bit better in the hand. The length of both plates is 92mm.
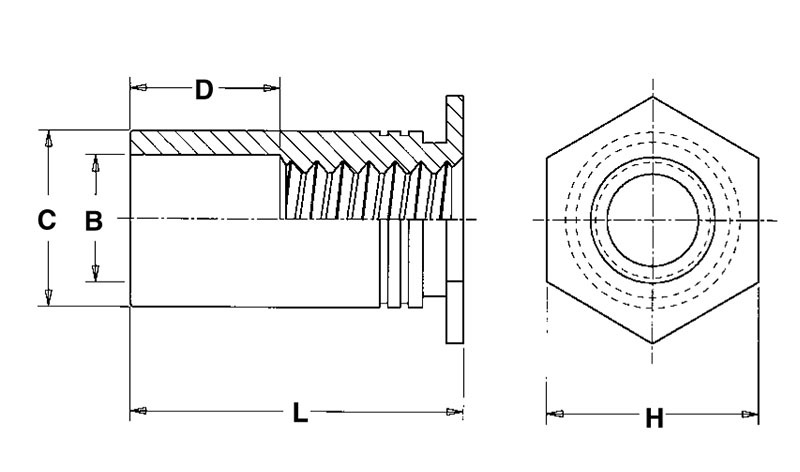
One interesting thing is on the back side of one of the plates is where the swage nut goes in. The hex diameter is 6.7mm and the nut threads through a 5.0mm hole, will the machine be able to cut this?
Probably not. The hole, yes, not the corners of the flats unless you use a really tiny mill, and then you would still need to relieve them a bit. I’d recommend a “nut-sert” instead if you have enough vertical space. It’s very much like a swage nut, but it’s a bit thicker, I’ve had good luck with them in thin materials like this.
I’d work up an offset path using a V-bit to cut the chamfer.
Probably there’s a specialty bit for it, or some machining equivalent to a bearing-guided bit in a router table, but I’m a low-budget, hands-on kinda guy.
@ApolloCrowe I exported the DXF but it doesn’t seem to import into Carbide Create. After I click open, nothing happens. I can however, import it into Adobe Illustrator so the file seems to be fine. I have attached it here.
How do I go about tapping holes? Is it more secure than cutting it?
I use Rhino, and when exporting DXF’s use: “2004 Lines”
See if you have any DXF options.
-Also- for scaling issues which happen, I put a box around my part to scale to.
An 8"x8" square is helpful around your part for example.
Can you put both brackets in an 8x8 square and upload it again?
You can also export an SVG out of AI. that has worked for me.
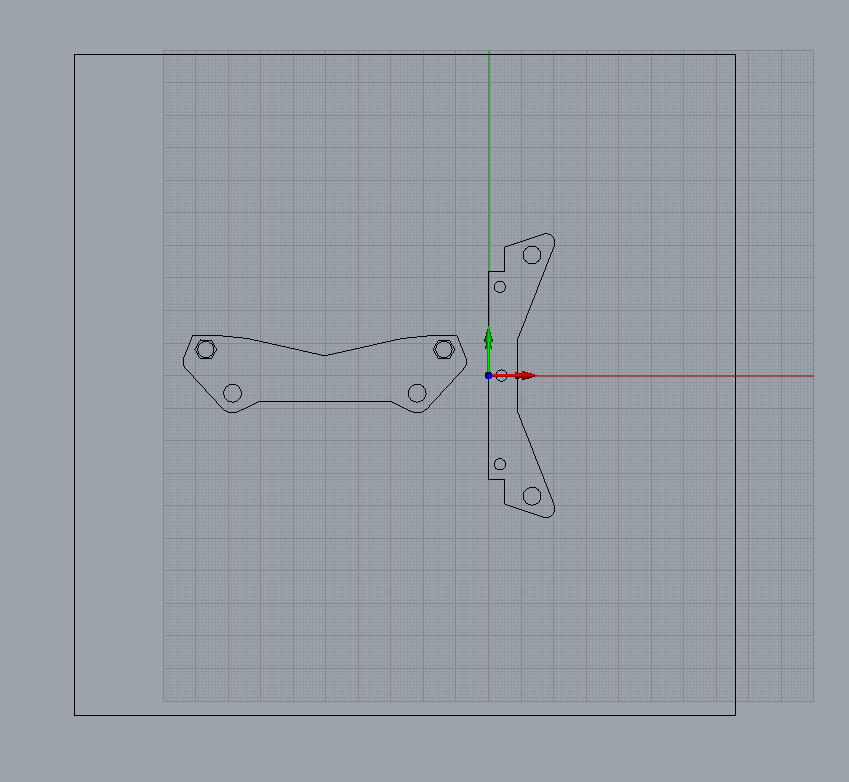
Hi @ApolloCrowe I have attached the combined sketches and also put an 8 x 8 border around it. I still can’t seem to get it to import into Carbide Create, it just shows up as nothing. Not sure what’s wrong here.
All I need is to cut the two pieces at 2mm thick and then screw them together and insert them onto the CPU water block but it’s becoming quite a challenge for someone who is new to the field.Narrow ILM Apogee Combined.dxf (7.9 KB)
Tom,
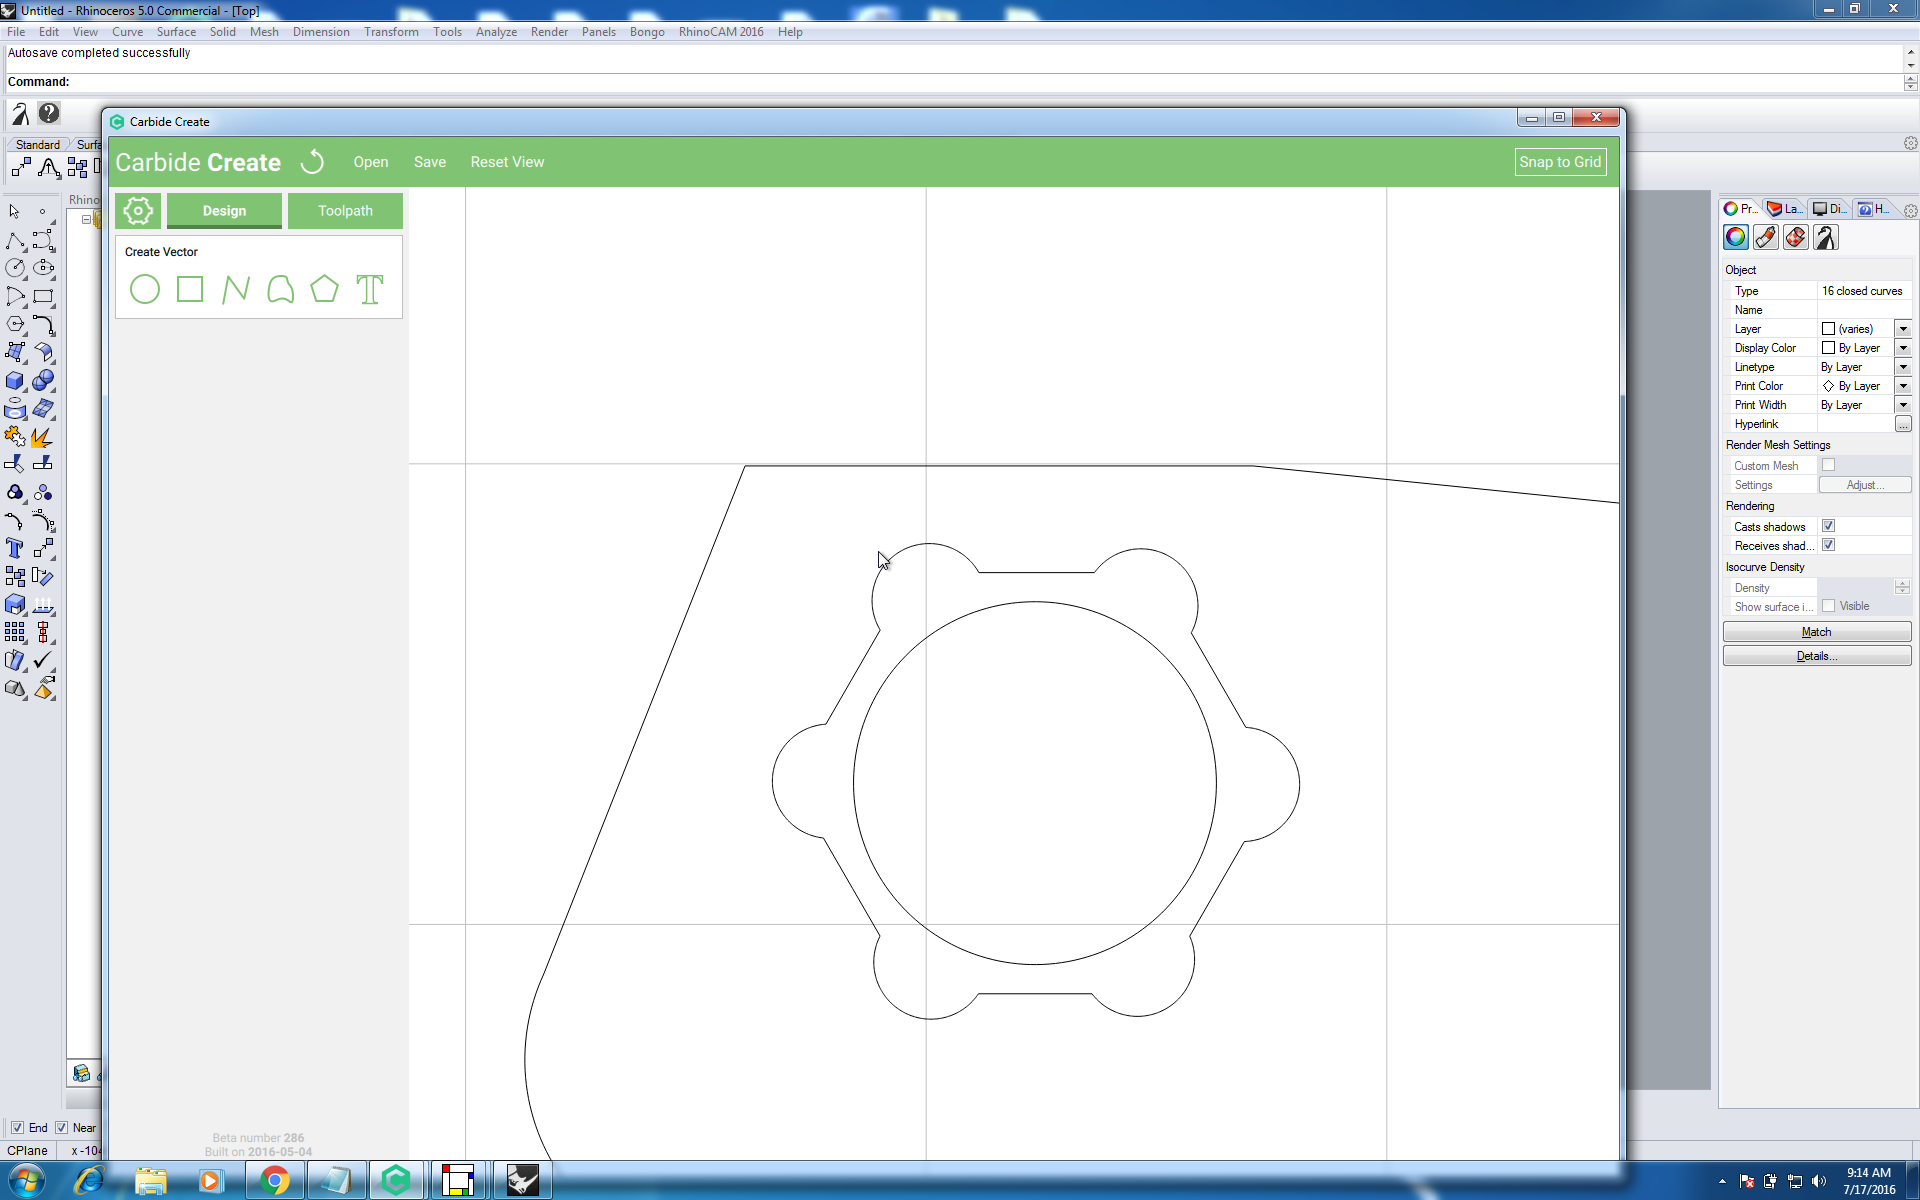
Im not sure why your not able to open the DXF in Carbide Create.
When I save a DXF out of Rhino I have several options - I use 2004 lines (which would be a basic format)
This is what the file looked like in Rhino- Do you have any DXF export options?
If not, you may need to open the DXF in illustrator or inkscape and save it as an .SVG
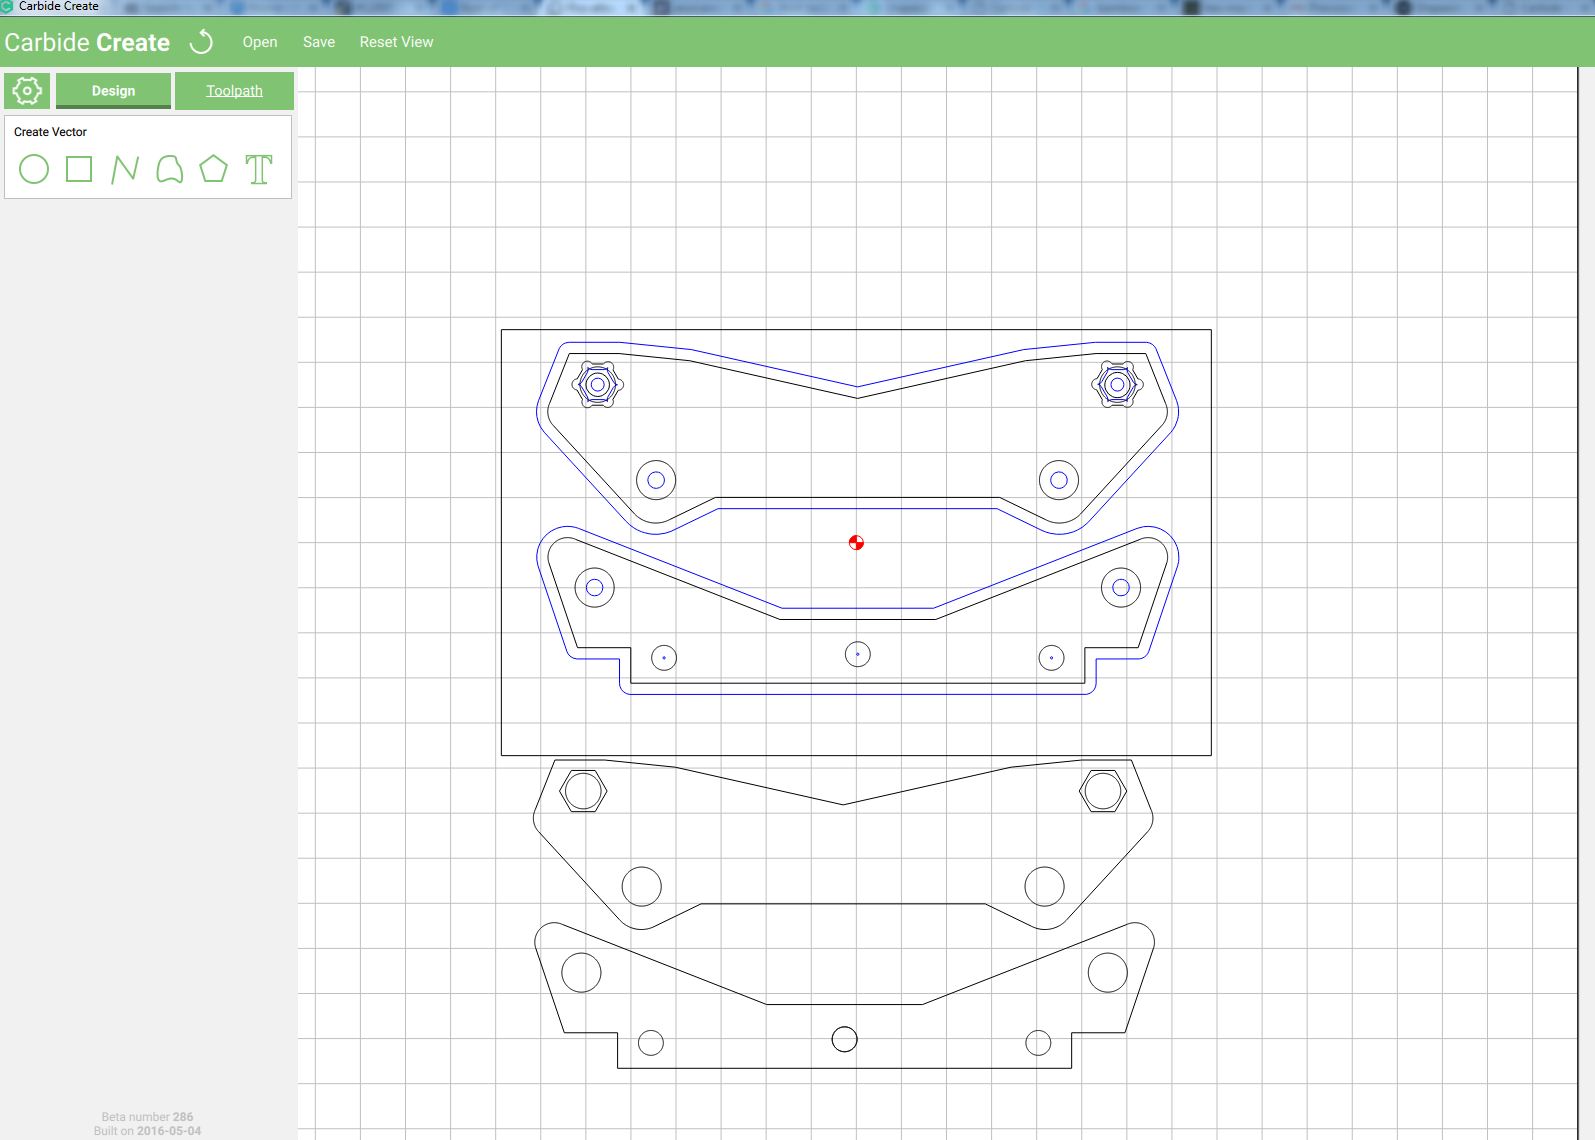
@chemist_slime
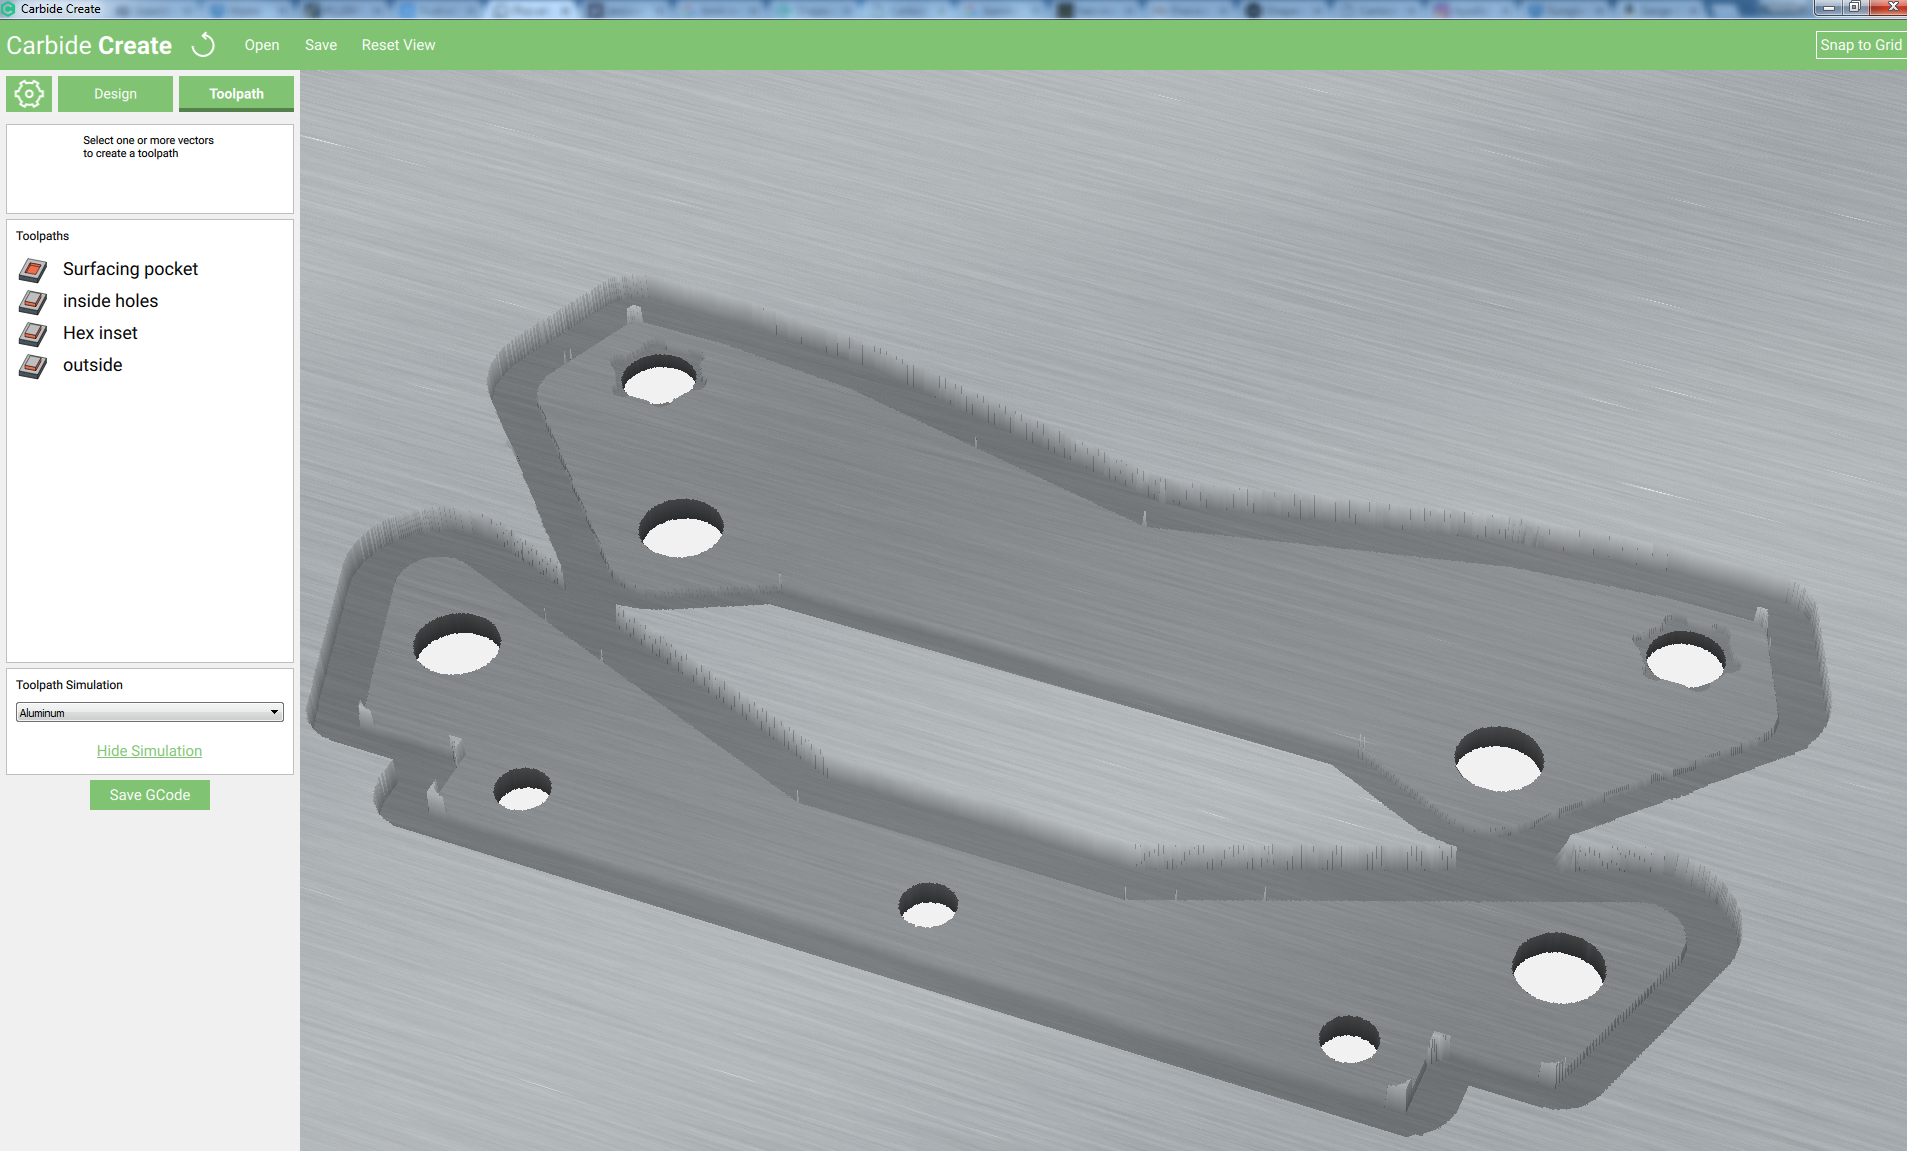
I added some toolpaths - I do recommend doing a test cut in some acrylic or something to test the fit before you go into aluminum.
Toolpaths added:
Part Preview:
Notice the inset hex toolpath is using a #112 1/16th
The holes and the Outside cut use the #102 1/8th
Consider these toolpaths place holders - the order in which they cut can be re-arranged and modified for the tools you have on hand and the thickness of the material you decide to test with.
@ApolloCrowe Thanks so much for all the help. It’s one of the reason why I bought the Nomad 883, everyone keeps on saying you’re so helpful and they weren’t wrong!
I’m going to give this a try today and to respond to the 2004 lines question, I don’t see that as an option and I had searched this on the web without any results. I’m using Fusion360 and all there was, was a right click and export to DXF as far as I saw.
Currently at my disposal are the following items all purchased from Carbide, do you see anything else I would need?
Aluminum Plate 4 x 5 x .125" (Qty 5) (my adapter needs to be 2mm but I only saw the 1/8" option on your site, so after the cut I’ll need to somehow shave off the other 1.375mm, any advice on that?)
Nomad MDF Wasteboard (Qty 4) (in case I mess anything up, not sure if this was needed)
#112 .0625" Flat Cutter (Qty 3)
#111 .0625" Ball Cutter (Qty 3)
#102 .125" Flat Cutter (the one that came with my Nomad)
#101 .125" Ball Cutter (the one that came with my Nomad)
Machinable Fixturing Wax - Strong (Blue)
The Low Profile Vise. I had thought that I would need to flip the pieces in order to do the chamfered edges but I think for simplicity sake I’ll hold off on that)
And the PEM SOS-6440-6 stainless 4-40 thru hole hex threaded standoffs. This is as close as I came to the original one that was used in the old adapter plates that didn’t fit. I couldn’t find any stock on eBay that was less than this in height, so I think I’ll need to grind off some of the top in order for it to be flush when the 2nd adapter plate sits into it and I screw the top over with a washer and secure the two together.
I have a feeling that I’m overdoing this but I’m certainly up for the challenge. I could have tapped the holes but it just wouldn’t look as nice. I’m quite particular of how things fit and the finish of them, if they don’t end up looking good, I don’t even consider using them. It’s a pain to live with but is also another reason why I bought this CNC machine - for precision.
It sounds like you have everything you need, but I would still test cut it in Acrylic first.
You can pocket down 1.375mm into the 1/8th material to the desired 2mm thickness, it is added machine time, but you get a part made.
Its going to take awhile -about an hour is my guess, depending on the step over.
I adjusted the Carbide Create file and attached it below.
Note: Units are changed to MM now. Toms test Brackets 2mm thick.c2d (1.9 MB)
To reduce the part thickness I added a Surfacing Pocket Toolpath to the Carbide Create file (1.375mm deep).
This should bring the thickness to 2mm, but please double check the whole file- Im just using the info your giving me.
Then I increased the max depth of the other previous Toolpaths by 1.375mm as well to maintain the desired part dimensions. (please double check)
@ApolloCrowe Thanks again. I didn’t have any acrylic so just bought a white and black set from you guys along with some extra bits. Is the 0.5" V-bit you guys sell on the site what would be used for chamferring the edges? It seems a bit big but it’s the only option I see.
I also noticed that you guys now carry #122 .0312" Flat Cutter, this wasn’t there the last time I ordered, is this new?