Apologizes, I know this topic has been beaten to death but I couldn’t find a clear answer In the threads/wiki if all I want to do is delete the USB cord between the S3 and computer running CM.
If the S3 were a inkjet printer, I’d be tempted to get a usb print server to just function as a Gcode receiver. But In my experience these devices weren’t the most reliable. Please correct me if I’m wrong?
So that leaves me to conclude that at preset, short of getting a Mac mini or similar Windows/OSX device and remoteing into that through CM’s 8080 GUI there is no way in which I can sit whereever I want with my laptop while gcode is sent to the S3?
I realize that I can abandon CM and switch to a raspberry pi; but I’m trying not to go down that new rabbit hole.
You will need some kind of device to be connected to the Shapeoko’s USB, running the G-code sender, and accessible from to your remote laptop: using a dedicated Windows or Mac computer to do this (as you mentioned) is simple but pricy, while at the other end of the spectrum, plugging a raspberry pi is cheap but more involved (and can’t you run CM then).
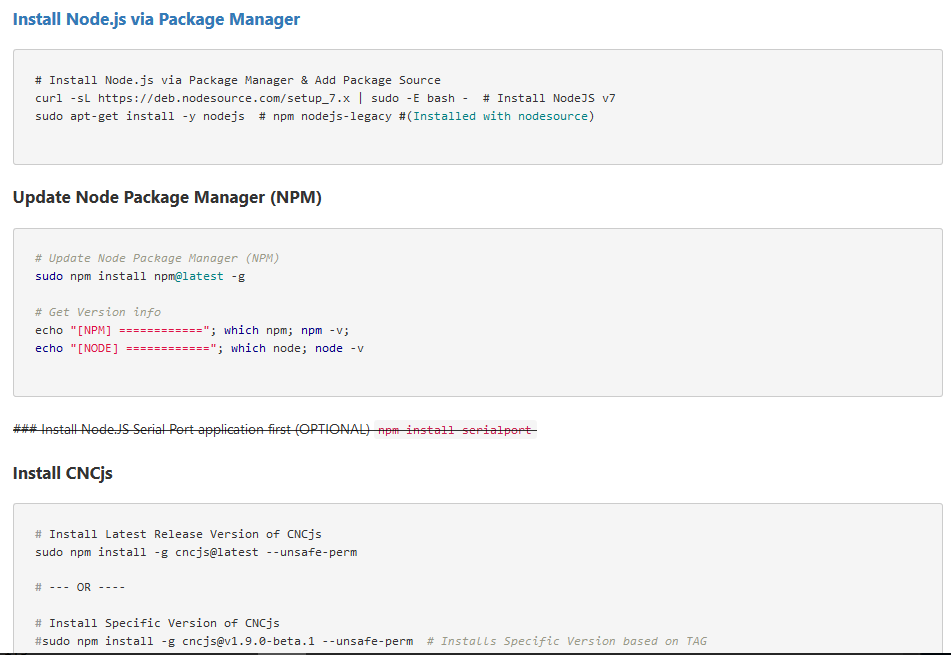
If you were willing to move to CNCjs, I think you would probably be surprised how simple it is to install it and then connect from your remote laptop from any browser. It’s a pretty shallow rabbit hole (and I know a LOT about technical rabbit holes ). The instructions here look long and scary, but in reality it boils down to flashing the standard Raspi image on an SD card, then type these lines
Darn, you said you didn’t want to go down that route, I could not help it
Hopefully more normal people will chime in and propose more user friendly solutions using cheap(-ish) windows devices
The easiest way to do this is to get a small headless device such as an Intel Compute Stick and install Carbide Motion and Dropbox on it (or some other drive software, or set up a network server), and set CM to auto-launch, and just remote into the device to shut it down.
i did the raspberry pi route with cncjs and it worked well.
decided to upgrade our living room mini pc (msi cubi) since it was dated and running a norm hdd.
gave it a clean wipe and have it currently loaded with cncjs for windows and running headless via remote desktop.
works great as well and very small footprint. i remote in and do most the work via my desktop while I’m tweaking CAD or CAM. then will adjust stuff on the fly with my ipad to touch probe and jog around as necessary.
Thanks for the quick summaries; I’ll probably go with a cheap stick/tablet. One other thing that I stumbled across when googling was using a serial Bluetooth module like this.
Anyone out there hack the stock controller to be a Bluetooth device with one of these?
Mark, I personally would not rely on a wireless signal between your Shapeoko and the computer/sender. You are probably aware that interference from a microwave oven can stop Bluetooth and Wi-Fi signals as they operate in the same frequency band so if someone starts a microwave oven in the vicinity of your Shapeoko, you may lose your connection to your Shapeoko and ruin your project. I’m telling you this because I often experience this type of issue when I listen to Internet radio in my shop situated in the basement and my wife turns on the microwave on the main floor and I lose my audio signal until whatever she is cooking is ready.
Yeah… I thought the same; it’s particularly problematic because I’ve in a multi-unit building. So while you can go yell at your wife; I can’t go yell at my neighbor’s wife.
Then again, I’m sure you’ve had jobs fail initially because of running into the usb hub, your laptop falling, or usb noise/emi issues… so it’s not exactly a perfect wired solution either.
I was more curious from the standpoint of how plug and play would it be with the stock controller just to have a test. But like I said a micro PC or tablet is the route I’ll probably go.
I have used some HC-05 a few years back to add wifi support to arduino projects, it was straightforward but still required to have the arduino code send a few specific custom commands to configure the module. Therefore you would probably need not only to do a tricky soldering job to access the shapeoko controller ATmega’s UART signals, but also to mess with the GRBL code. It can be done, but this is definitely not going to be plug and play.
OK, so I didn’t want to let @Julien to have all of the fun chasing rabbits down holes, but I didn’t think this would be much of one, so…I was just running my SO3 via bluetooth via one of those cheap HC-06 modules that I use all the time with my students.
It was actually pretty simple.
Quick version (need to sleep):
I configured the module, using an Arduino Uno and a software serial sketch, to use a baudrate of 115200. I had also previously changed the name of the module, so it would be easily recognizable when connecting. This configuration could be done with a USB-TTL Serial adapter using something like PuTTY.
The commands I sent: AT AT+NAMESO3XL AT+BAUD8
Next I connected it to the SO3. Just to the left of the stepper connections are breakout pins for the serial connections. Top to bottom the pins are (GND, GND, 5V, RX, TX, Reset). They are labeled “Serial_Programmer” or something on my v2.2 board. I wired the GND and 5V pins on the Carbide board to the corresponding pins on the HC-06. The Rx goes to Tx and vice versa.
I made sure my device (I used a Win10 Tablet and my Android phone) was paired with the SO3XL bluetooth device. The pairing code, by default, is 1234 (that can be changed via AT commands, but experience tells me that I will forget it if I change it). On my Windows Tablet (a $59 Acer from Walmart, years ago), I found that the device adds two serial ports. I opened CNCjs (this would not work in Motion as @WillAdams mentioned) , guessed the first of the two new ports, and connected! You know the connection to the HC-06 happens when the blinking LED goes solid. One weird thing, I had to click reset in CNCjs before the response from the board came through. My guess is that the HC-06 has no way of resetting the board on connection. After that, in controlled as normal. I ran a brief, no cut job without issue.
Curious, I checked the Google Play store, and sure enough there are some grbl controller apps. I tried one, it connected and jogged and would allow loading of gcode from my phone, but I didn’t really like the layout. Still cool. I may look for another to try.
Anyway, I’ll probably never use my SO3 over bluetooth. That Acer tablet is always connected and always plugged in. I do have a little drawing machine I built that will probably get this treatment.
Sweet!
Good to see I’m not the only one susceptible to be triggered
I probably wouldn’t like my G-code sent over a wireless connection. What would be nice is the ability to store/load G-code locally on the controller, to make it virtually immune to EMC during a job (not that I ever have EMC disconnects myself). That would require different electronics with e.g. an SD card reader, like 3D printers do, let’s put that on the wishlist for Shapeoko4
NICELY DONE, I had a Nano lying around from an old project and I stopped at “man I really don’t want to remember how to code a sketch to do this”. Glad that I helped get the creative juices flowing!
No need. I’ll post it here later, but it was basically just the built-in software serial example.
EDIT: Here it is (I included some “helper” text.
#include <SoftwareSerial.h>

SoftwareSerial grblBT(10, 11); // RX, TX

void setup()
{
  Serial.begin(9600);
  Serial.println("Enter your AT commands.  Make sure there is \"No Line Ending\"");
  Serial.println("-----------------------------------------------------");
  Serial.println("AT (will should respond with OK)");
  Serial.println("AT+NAMEXYZ (changes name of device to 'XYZ')");
  Serial.println("AT+BAUD8 (changes baud rate to 115200)...DO THIS LAST)");
  Serial.println("---Sketch will need to be re-uploaded with changed baudrate (115200)");

  grblBT.begin(9600);

}

void loop()
{
  if(grblBT.available())
    Serial.write(grblBT.read());

  if(Serial.available())
    grblBT.write(Serial.read());

}
 ). The instructions