As a software guy, i like to code my flowcharts using GraphViz. It uses a pretty simple language called ‘dot’ and it makes tedious things fairly easy.
at its simplest you just write
A->B
B->C
As a software guy, i like to code my flowcharts using GraphViz. It uses a pretty simple language called ‘dot’ and it makes tedious things fairly easy.
at its simplest you just write
A->B
B->C
You’ll drive everyone back into confusion if you try to “program” this explanation chart with IF/THENs and etc.
Maybe so. It still looks understandable to me (that may be part of the problem…), but an alternative could be to generate multiple flowcharts with no decision points, for a number of predefined situations (e.g. scenario 1= single tool job, scenario 2 = multi-tool job with one g-code file per tool, scenario 3 = multi-tool job with BitSetter)
That’s what this thread is for I guess, everyone is welcome to comment, especially newcomers!
Probably have a separate chart for Bitsetter and Z-block and the various scenarios there.
I would strongly suggest a small-ish set of linear flows
these become checklists that people print and pilot-style will go down every time.
conditionals for things that are not conditional for the human involved (you have a bitsetter or you don’t, that is not conditional for the owner of the machine) just make things more complicated.
Hi everyone,
I have released v3 of the ebook (same link as before: https://shapeokoenthusiasts.gitbook.io/shapeoko-cnc-a-to-z/)
Below is the list of main updates:
Anatomy of a Shapeoko:
CAD, CAM and G-code:
Cutters & collets:
Feeds & Speeds:
Shapeoko setup:
Running a job:
HW upgrades:
Usecases/cutting wood:
Note: I have NOT re-generated the associated PDF and ePUB yet, this will require a signicant additional effort, because the basic pdf generation scheme I have is not satisfactory, I need to work on that.
As always, feel free to send comments (typos, errors, useful things to be added)
Julien’s e-book continues to be the absolute best resource anywhere for both new and experienced Shapeoko users ( and other cnc machine users for that matter)
Everyone should read it every 3 months or so… every time I can guarantee you will learn something new that suddenly becomes relevant and most useful to you as you grow!
Hats off to Julien!!!
Well I had a good surprise tonight, it turns out that gitbook rolled out an “Export as PDF” option in beta, and it generates a PDF file that is quite good, with none of the quirks I had in the PDF I generated for v2.
Anyway, here’s the PDF export of the ebook v3 (bundled with the feeds and speeds calculators):
I also re-generated the ePUB version, it’s not as good (it has a few remaining format issues in places), but might be of interest to someone:
@WillAdams: would you mind editing the first post in this thread please, to update these two links to the PDF and ePUB there ? For some reason I can’t edit the post myself.
@Julien And so the God of CnC said onto him “Please create a book that both old and new will find useful”
Julien replied with a smile saying only two words “V3 Baby”
Thanks for the hard work look forward to reading this tomorrow
Jon
I actually lol’ed while reading this 
I always enjoy your posts Jon, still laughing from that one
Just wanted to let you guys know that I stumbled upon a new setting in gitbook that enables “export as PDF” for readers, so I activated it and you should now have the ability to download a PDF copy yourself, of either a given page or the whole book :
It takes about a minute to generate a 128MB PDF (full book)
Hi,
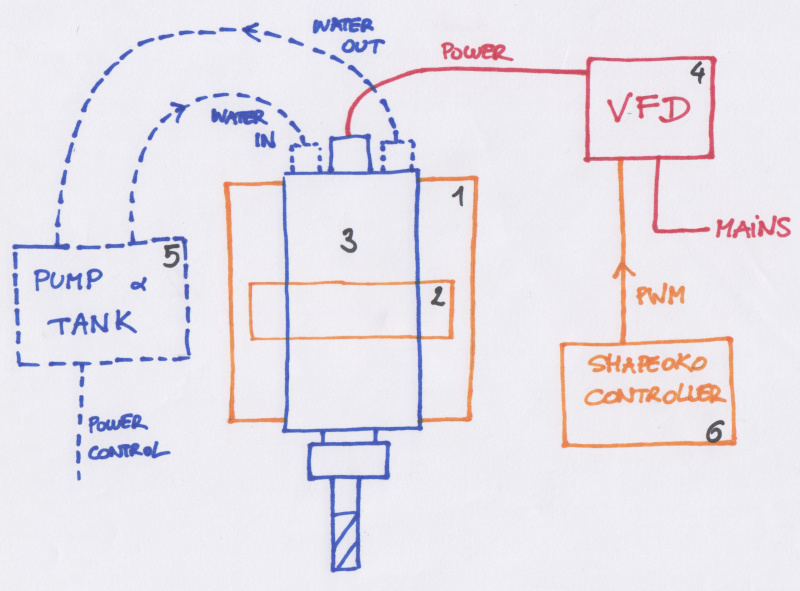
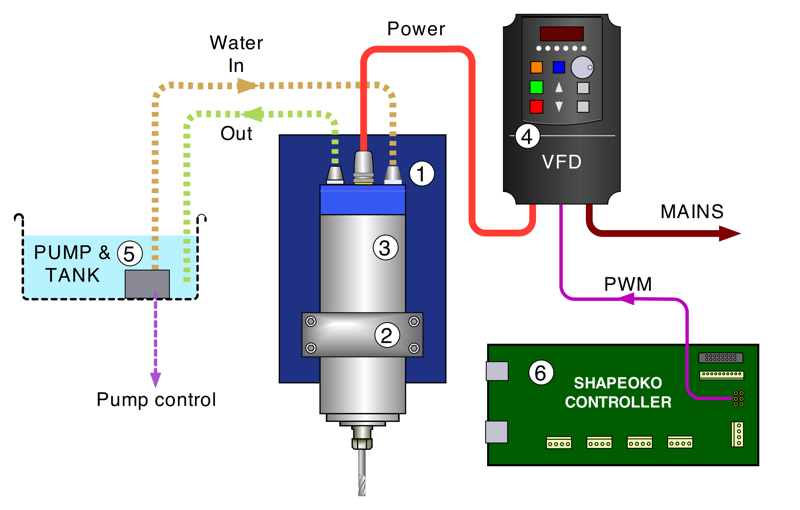
I originally intended to release a v4 of the ebook later this year, but then @patonclover contacted me and offered to redo all my crayon-doodle-style illustrations in digital format. Now, he has completed redoing all 50 (!) of them and I couldn’t be happier with the results, so the ebook deserved to be released now as “v4 patonclover edition”.
It’s available at the same links as before:
Online version : https://shapeokoenthusiasts.gitbook.io/shapeoko-cnc-a-to-z/
PDF version : https://drive.google.com/file/d/1NMKZ5VHGA_6NmcA0ykqQv60WiPigrlTR/view?usp=sharing
Here’s a random before/after illustration:
@patonclover, thank you again for making the ebook look so much better! I think the community will agree that you did a fantastic job there.
As usual, if anyone has comments or ideas about what should go in v5, I’m all ears.
Cheers,
Julien
Since you’ve asked ![]() , I’ve been waiting for a Table of Contents item called “Finishing.” Yes, I understand how those worms can get out if you open that can!
, I’ve been waiting for a Table of Contents item called “Finishing.” Yes, I understand how those worms can get out if you open that can! ![]() However, I spend a lot of time finishing a cut piece. I can’t seem to find those projects that just need “oil” slapped on to make them done!
However, I spend a lot of time finishing a cut piece. I can’t seem to find those projects that just need “oil” slapped on to make them done!
Perhaps an “Introduction to Finishing” topic would include discussion on using three coats of unwaxed shellac with some finish sanding in between coats (especially for the dreaded MDF.) Or you can use shellac to reduce the staining effect of stain. Then there is whether to poly coat or not.
How about getting some input from some of the guys that are building those Aztec symbol derivatives? Those use several methods from paint wiping to lasers for the finishing process.
Not to add many deeply discussed sections, but finishing finishes the cut parts, so it is just as important (if not more) as cutting without generating fuzzies.
ADDED: I recently made a gift for the lady at the bank that helped me to get my “stuff” set up just right. It was a “gold brick” made from stacked 3/4" MDF that looked as identical as I could make it to scale. Anyway, I don’t even remember how many coats/layers of dewaxed shellac that I put on it, but sanding each one after long drying times was the key. That piece came out so silky smooth that I had to go back and add some “defects” so it would look more real. Her boss wanted to know where it came from! ![]()
I found the original illustrations quite charming and will rather miss them, and while the new ones are very high-tech, wish that they were done with a tool and font which spaced out more nicely (see the spacing of “MAINS” in the above), and that they had some of the charm and originality of the originals.
Looking forward to reading it this weekend!
In covering finishing (which I agree is quite a can of worms) I’d urge you to also touch on post-processing of parts and strategies leading up to that:
Just my two cents, FWIW I am a finish carpenter by trade.
I see trying to narrow down what info goes into a “finishing” chapter as quite the daunting task. I agree with @CrookedWoodTex that the subject should definitely be covered in some introductory fashion. Seeing as your book @Julien is an introduction to CNC and not woodworking, I wouldn’t venture too far down the path of any one finishing method and would recommend focusing on topics like @WillAdams brought up as they are more specifically applicable to CNC. With all the well-read individuals on this forum, I imagine it wouldn’t be too hard to round up a page (or two) of links to reputable websites and such that provide information on specific finishing methods that could be added to the book. Then those readers who are getting into CNC to work with wood will have a nice collection of links to any method they are interested in trying out or reading up on.
The intent of this guide is to help new users of the Shapeoko CNC learn enough about both the big picture and the underlying technical details, to feel at ease with the machine, the workflow, and CNC lingo in general.
What @WillAdams itemizes is certainly a valid part of the process. The only reason I mention “finishing” is because that is when the next cut/carve starts. I remember the results of my first piece, “So, is this finished?” To me that meant, “Is that all?” So, I made sure the next one was done, and I was moving on to the next one before anyone saw it.
The book doesn’t have to go on-and-on about finishing techniques (like @Microwave_Monkey says), but finishing means the part is finished. Next! ![]()
So, I agree there is definitely a topic to be covered there, and it could possibly be about how to minimize the post-cut finishing effort by optimizing the CAM ?
Anyway,

So I think a middle ground could be to cover:
Charming? - they were like artwork to me! IMO they should be treated as such and be included in an appendix! Nice job Guys!
i have the chip thinning one framed in my office lol