So I have been running my nomad for a good while now and I am trying to over come the limits of the machine itself at this point and was wondering if anyone here had some input.
Currently I am small scale manufacturing knife spacers out of 6061t6 that need to be within one thou thickness. I have been able to do this thus far with both delrin and 6061 by cutting the stock completly through on super glue/ blue tape then hand hand sanding. As I am going and looking to make a more stream line process I am running into the tolerence limits of the machine (listed at 1.5 thou repeatability iirc?) So this is more of a looking for tips and tricks to to improve my work flow/ get around this problem
For some information about the spacers themselves and the setup im using here are some photos/ videos
Here is my base going up
I have also faced/notched my vice tops and I have my vice locked in place. It is never taken off to avoid very small variance in flatness between the axis’s.
Some action
Fresh off the vice
Here is the problem point I am having, I am zeroing off the soft jaws themselves and I still end up cutting into them a very very very faint amount. It is not consisent. some times it does it some times it does not and it errored in the +z direction. If this is a factor of the probing or backlash im not sure. I wipe off my probe position everytime I have a tool change to avoid any inaccuracies formed from a rogue chip. Regardless, the nomads probing sequence settings are locked behind gates that we can not get to. I have already slowed down my xyz homing.
Here is a example of the over/under cutting im talking about.
Here is a finished part prototype after some tumbling. These were made with older less refined settings/ operation orders with no finishing passes.
Zero is done with the endmill I’m using. Using the bit zero as a conductivity circuit rather then how it’s made to be used, I lower manually till I’m near the soft jaw height then go down 1mm then .25 then .025 (iirc this is the smallest increment carbide motion uses. If not, I am using the lowest movment option) till I get the led to come on, it’s close enough doing this method that the deflection I put on the gantry with a single finger can complete the circuit if I go back up .025 and push down on the z axis with a single finger. I have tried doing it both .025 above the stock as zero and right on the stock with the led circuit on and I still get varied results ( within carbide 3ds posted repeatability ±)
There are actually a bunch of factors here that could contribute to your problem:
Repeatability of the machine itself: the ability to accurately return to the position you zero at
Accuracy of zeroing: does the zero position actually match reality
Repeatability of homing
Repeatability of the soft jaw height: you don’t remove the vise but it looks like you do remove the soft jaws. When you reinstall them, are they always at the same height? Tiny bits of dust could make a difference for example.
Soft jaw parallelism with machine axes: if the soft jaws aren’t parallel, you’re going to cut them.
Endmill deflection: as the endmill is pushed back a tiny bit during a cut, geometry makes it slightly “longer”
Assuming you don’t home between zeroing, you can rule out homing as an issue. If you do home, you should try using your dial indicator to see if there’s any variance between homing runs.
For repeatability of the machine itself, you can again try using the dial indicator to see how precisely the machine returns to a specified position.
Guess what the answer is for repeatability of the soft jaws? Yep, that’s right, it’s once again the dial indicator!
Same for soft jaw parallelism, sweep your dial indicator across them same as you do in your video of the Nomad bed.
To rule out endmill deflection, I’d cut a very small lip around the edge of the soft jaws. It can be a teeny tiny lip, it needs to be just enough that the endmill can stop cutting for a second.
The last and hardest is zeroing accuracy. Repeatability is easy (our old friend the dial indicator) but accuracy is a little harder, because you need to be able to say for sure that your machine is properly zeroed. The process I used to calibrate a Z-probe is this:
Put a piece of stock on the bed.
Surface it with an endmill. Do a finishing pass.
You now know for sure that the surface of the bed is at -[depth of cut]
Run the probe (on the Nomad you should be able to use G38.2 in the MDI I think)
The delta between -[depth of cut] and [probe trigger height] is the precise, exact, honest to god height of the probe
After you do that, you can compare the actual height of the probe to whatever value Carbide 3D uses:
Zero off the same stock using the regular Carbide Motion routine
G38.2 probe the stock like you did during calibration
Check the probe trigger height and compare it to the one you saw earlier
I use an LED with a battery to do much the same thing with metals (although I recently got a second hand BitZeroV2 to try).
Your explanation covers Z. How about X and Y? Are you using an endmill (which is not circular and can introduce small errors) or a smooth probe for that?
X and Y are almost always spot on, if im looking for accuracy that way I use a ground gauge pin (- .0005 inch set and verifed) with the led method. Then move up above my stock and use mdi to move half the distance the axis im zeroing then zero it out in the menu. I completly stopped using the bit zero because mine had vartiations over 1.5 thou just in the thickness tolerence alone from one end to the other let alone the differences in the x y (measured with mitutoyo caliper and quantumike). The bit zero would be completly fine for doing x and y if carbide would let us modify the gcode being used for probing. About 80% of the time I spend at my machine I think about swapping back to ugs or getting a new controller and running linux cnc so I can just have it all open source again. Not complaining about the machine, It does what its advertised to. Just some shower thoughts xD
What vice do you currently use? I was looking at the smw hobby vice but it takes up so much space and would require me to buy the entire new table setup because the hole patterns dont line up.
The SMW stuff is really nice for highest precision. I couldn’t afford to do the full setup in one go so I took a hybrid approach, see: Vise alternatives - #8 by flynnjs
FWIW I think you can kinda hack it by copy-pasting gcode into the MDI. You could also make your own probing routine and put it in a G-code file and run it like a job.
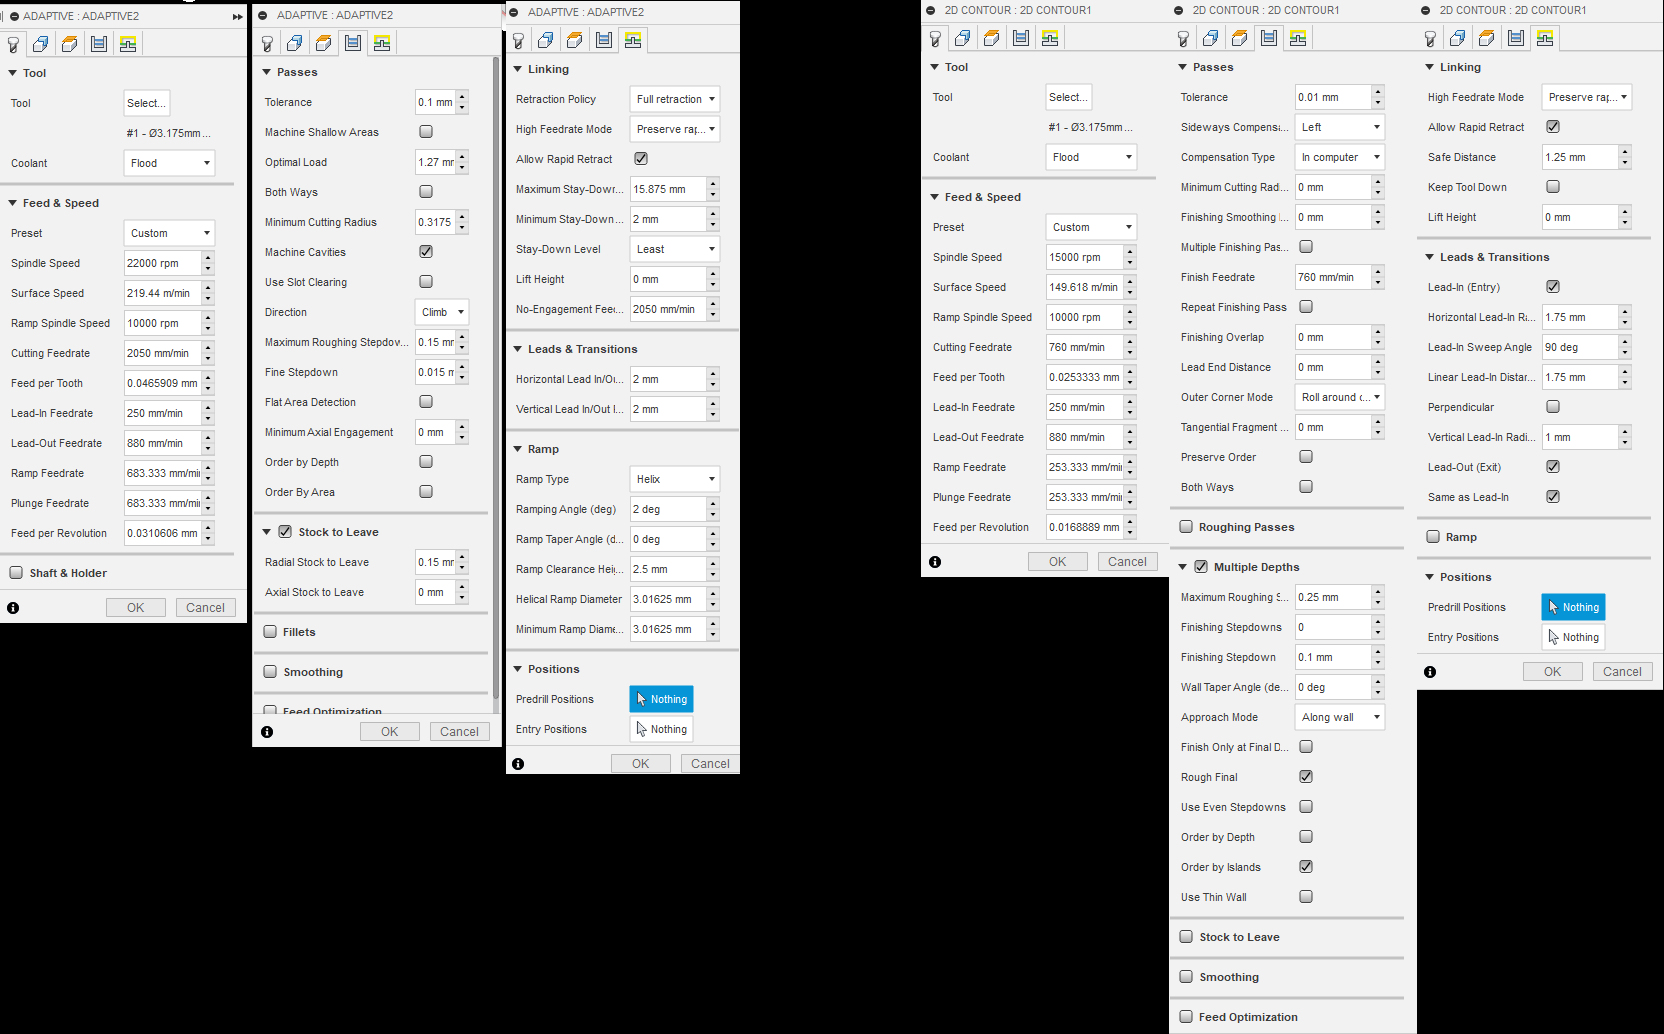
Slightly OT but do you mind me asking what your feeds and speeds are and what cutting tool you’re using in the video? You’ve got a really nice finish and I’d like to crib your settings
This here is the settings I used for the video and the finished part . Adaptive on the left finishing on the right, Will give you cold to the touch parts with no lube or chip fan in 6061 t6 . I have ran the machine up to its limit at 24k rpm but the machine is very very un happy at that speed, The difference between being completly maxxed out vs 22k rpm with those settings listed was only 43 minutes vs 46 minutes. At 24k rpm the spindle creates a nasty resonance( not visible in the part but just overall not fun to be around ). Endmill is just a standard #102 2 flute 1/8th inch ive been using as a feed testing endmill. Finish is better with tap magic as cutting fluid but you can end up with chip recutting unless you have an airblast.