Pardon me if this has already been suggested, but how about casting flat coloured epoxy separately, then machining it to fit in the cutouts, maybe against a machined ledge in the cutouts. This would avoid any entry of the wet epoxy into the frame material, but also allow you to practice with different coloured pieces to see which you prefer. A bit like doing stained glass but cutting it on your CNC. The issue might be making a consistent thickness of the epoxy pieces, but it would only show on the inside.
John
1 Like
mmh. Interesting. I’m not a fan of iterating on tolerances for tight fits, however I could follow the inlay approach, make the contact surfaces angled, machine epoxy inlays separately, glue them in place, then resurface the final piece to flatness. If the current approach does not end up working ok, I’ll definitely consider this instead, thanks
You could machine the body into a T shaped separator bar to insert the epoxy translucent elements from behind, that’s how the old Tiffany type lamps are made in lead and glass so it would be in keeping with the original style where the lead never perfectly matched the glass. Epoxy would probably work well as a glue to hold them in  The slightly protruding metal elements are quite characteristic of the Art Deco lamps.
OTOH you may be looking for a modern version of the Art Deco with a completely smooth and flush front face, which arguably the Art Deco folks might well have done if they had the manufacturing fu at the time.
1 Like
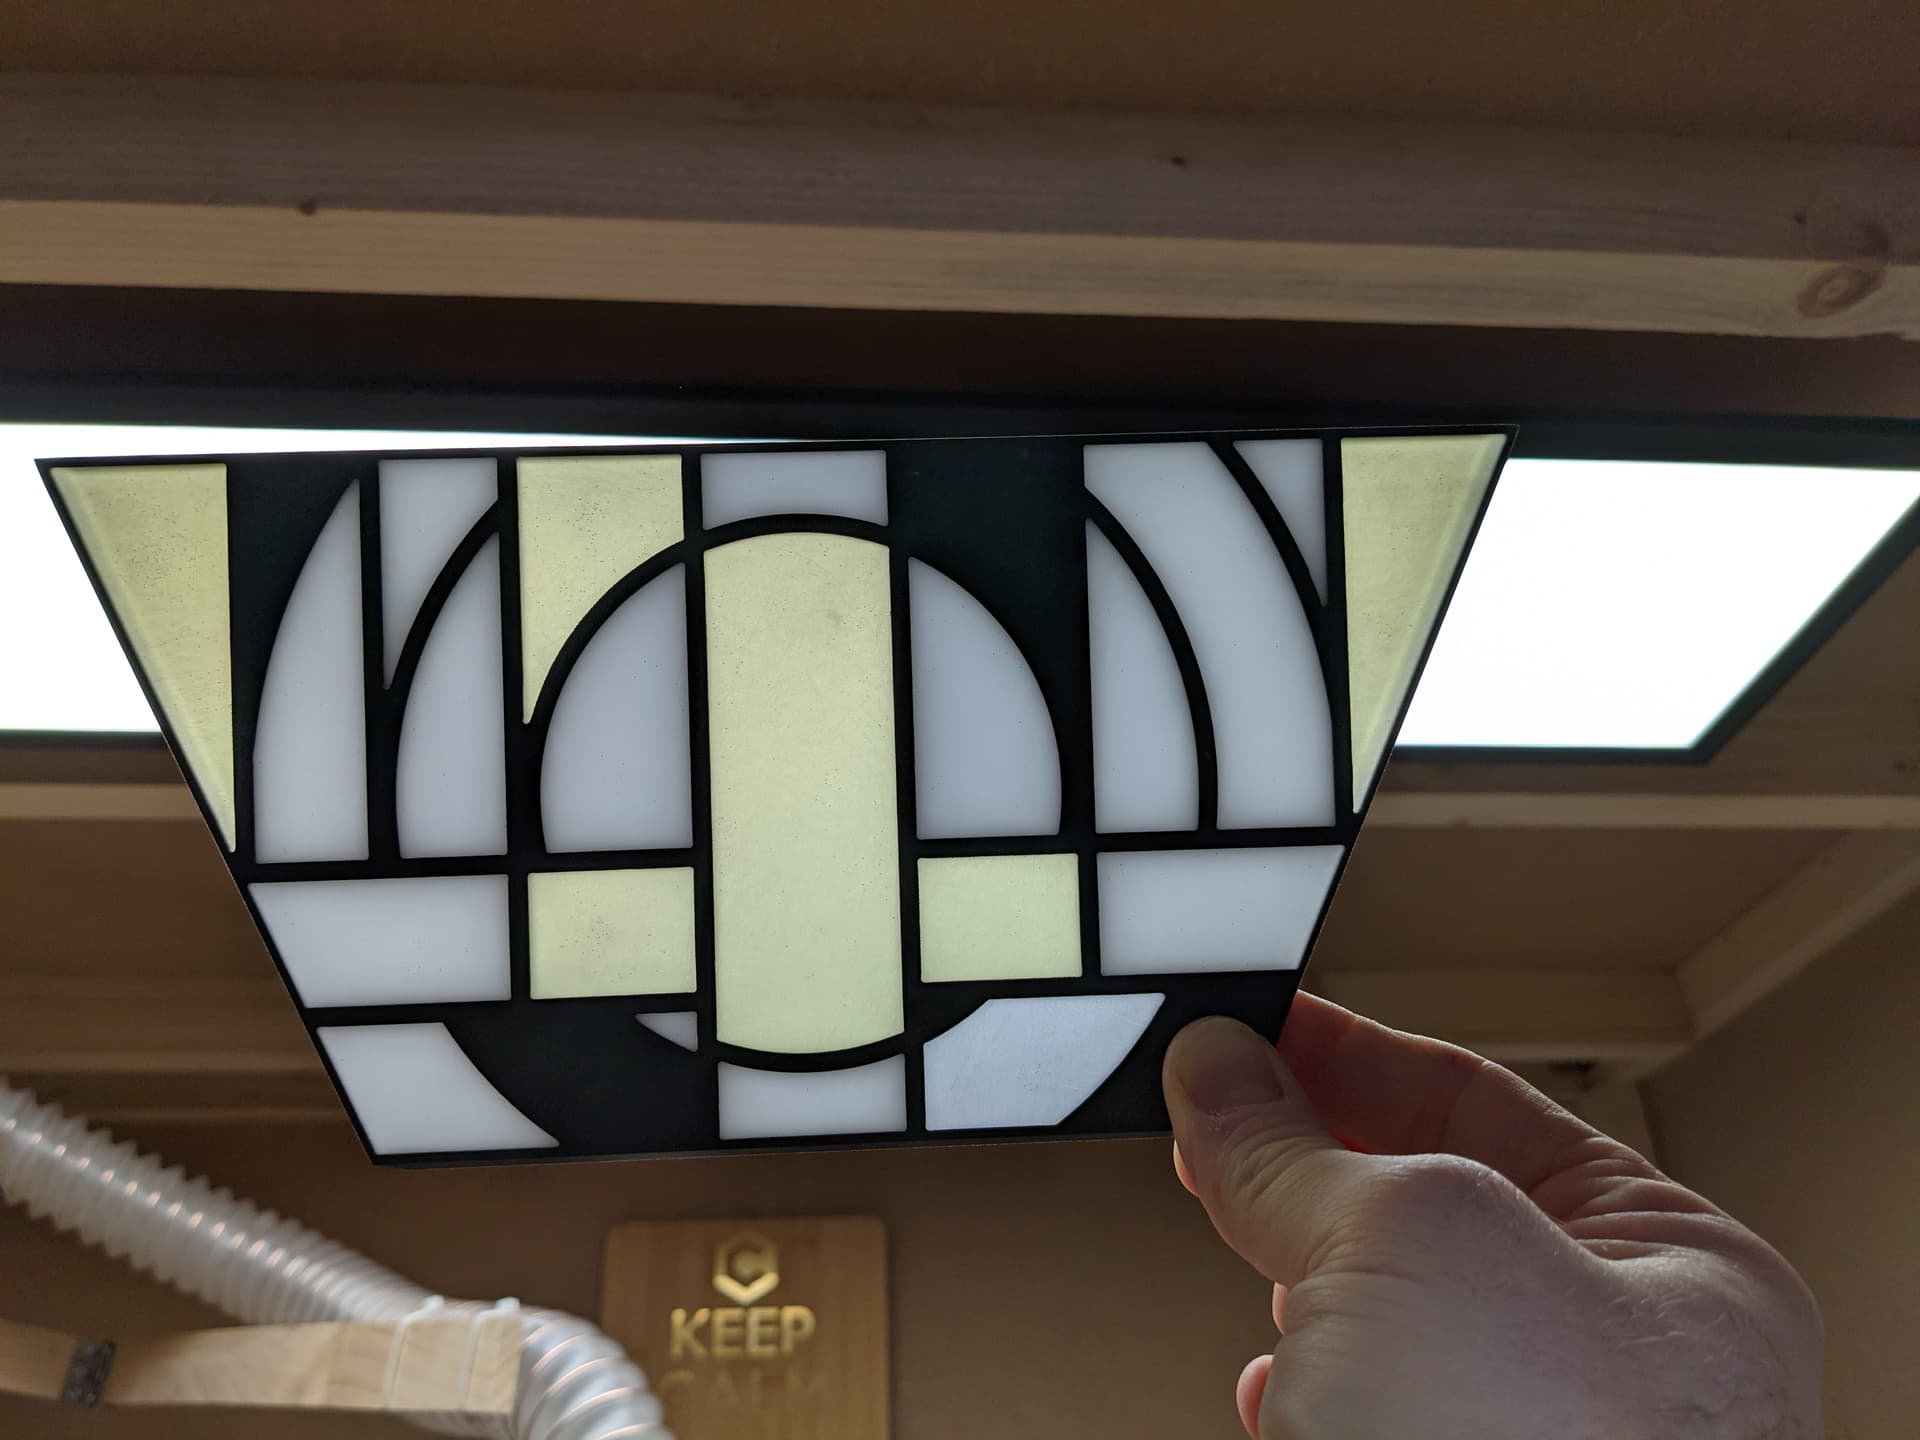
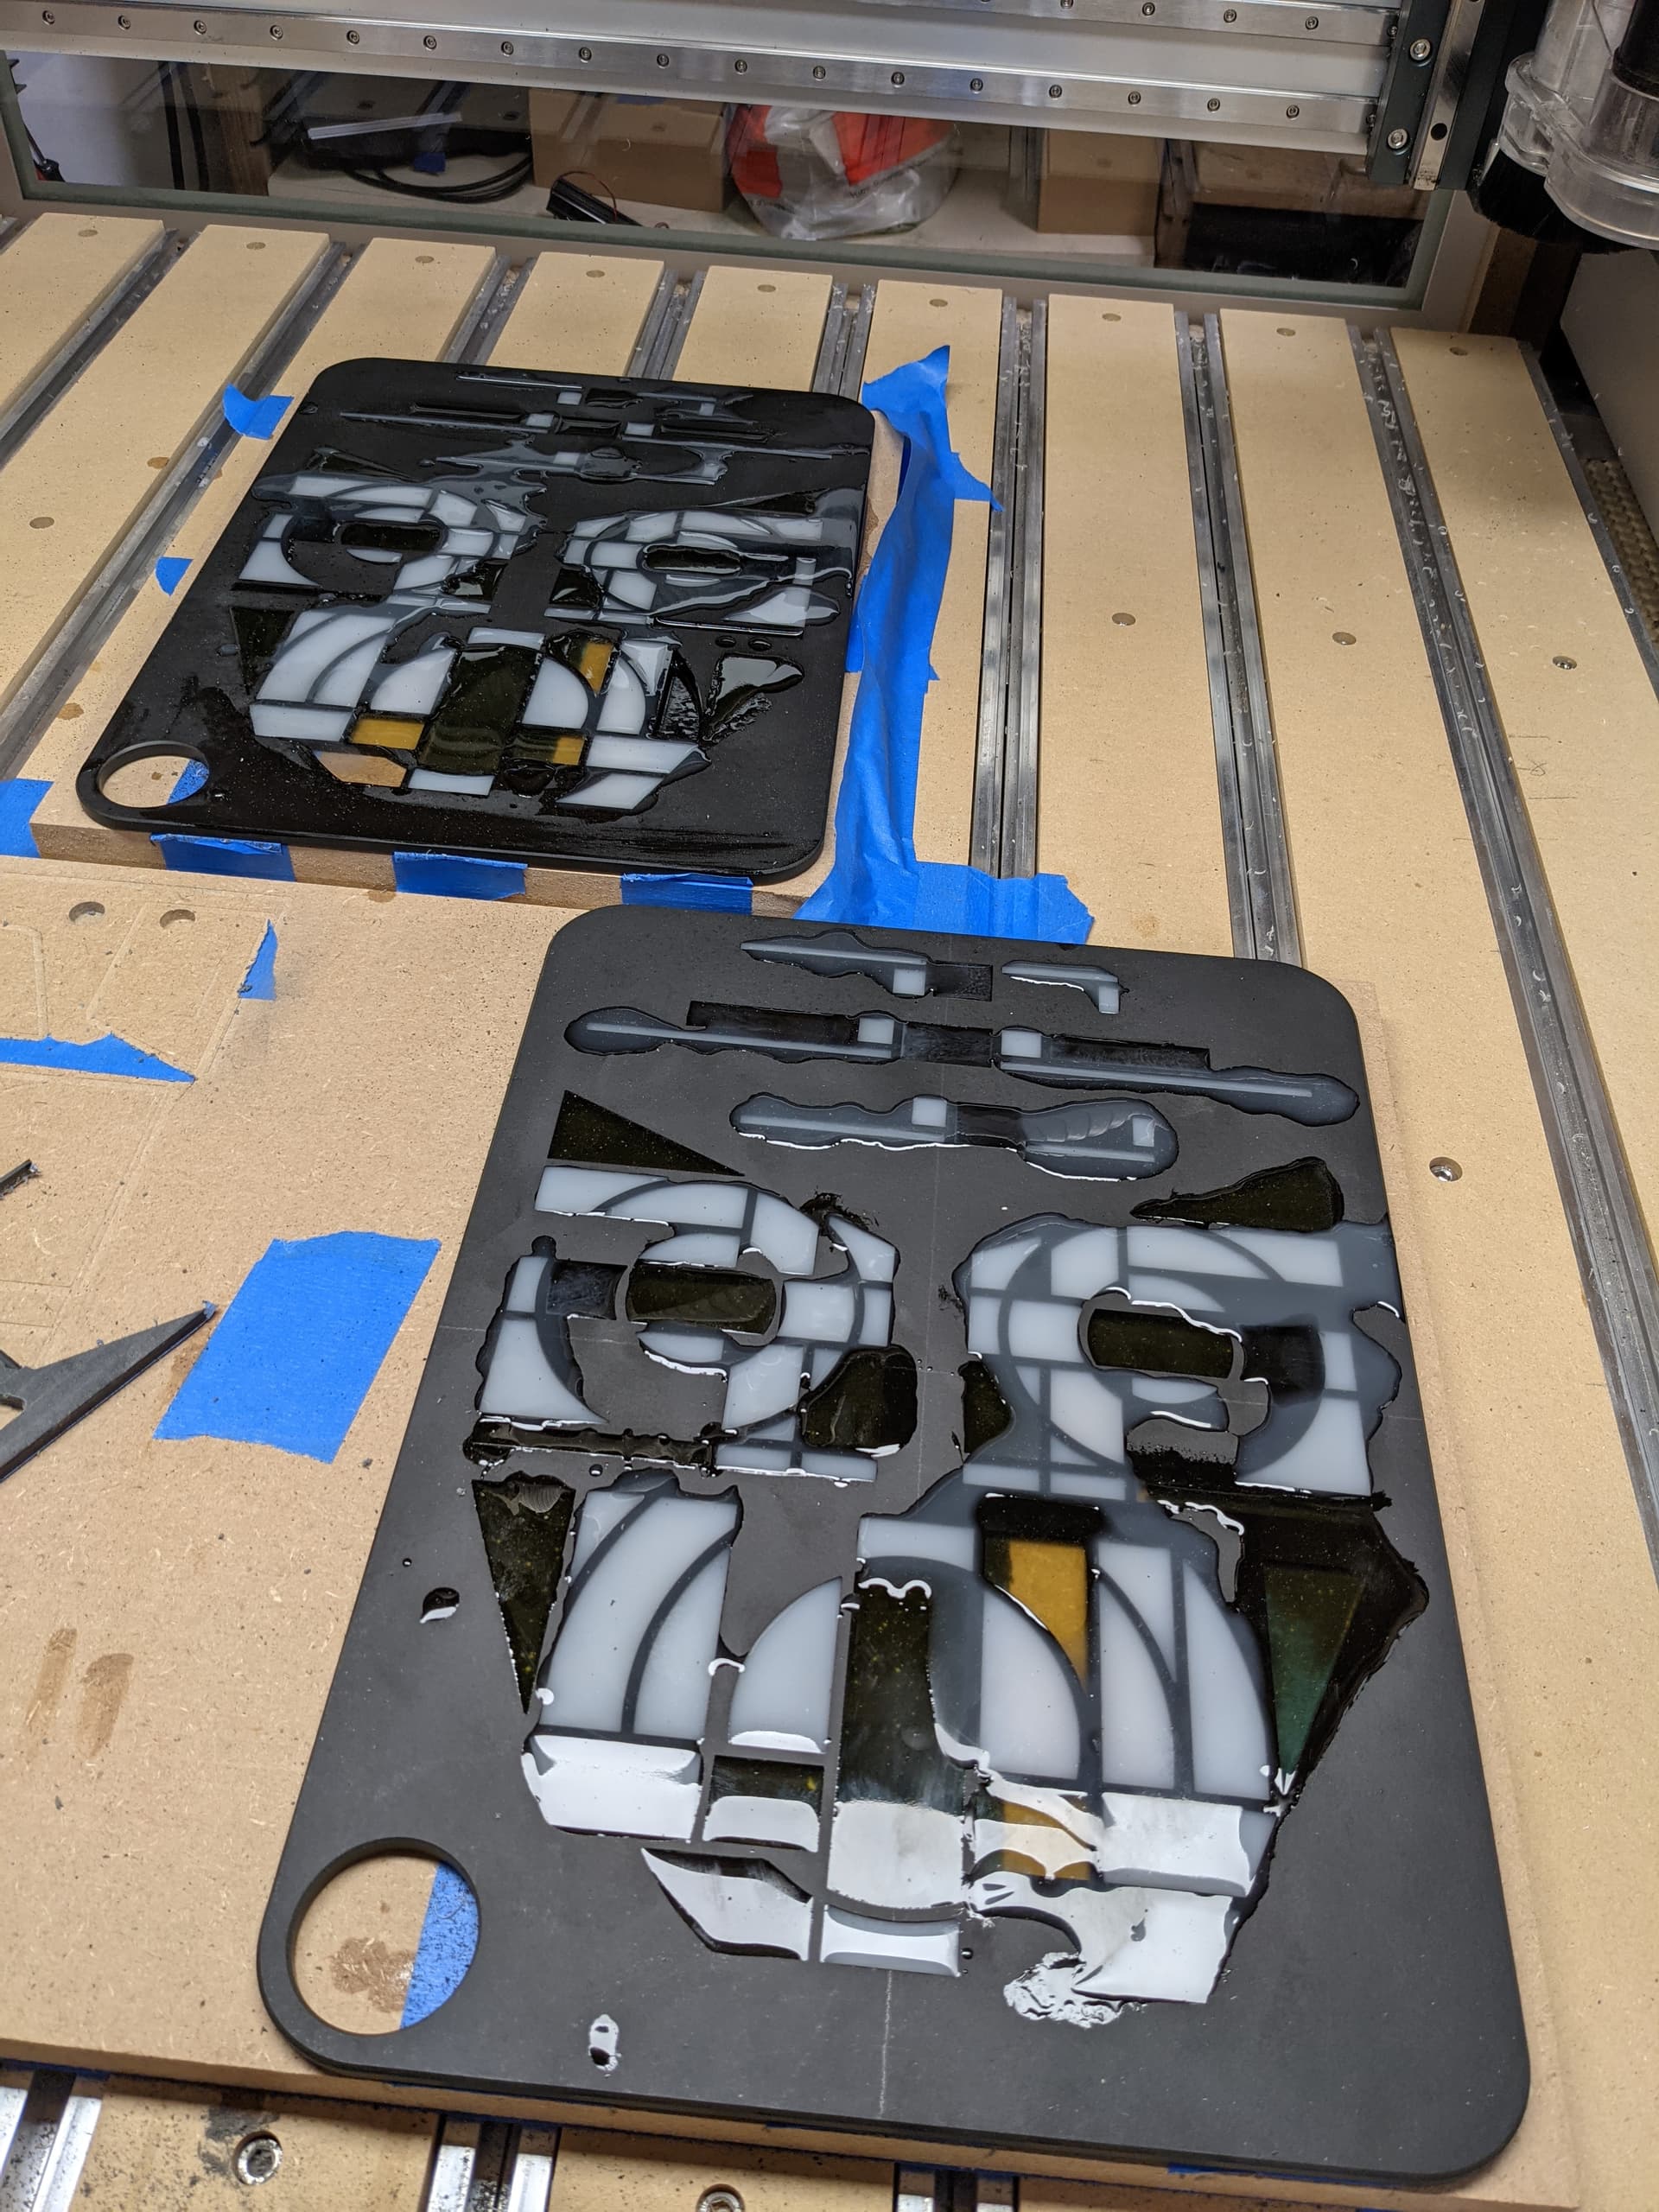
Translucency is quite ok after all, with my current recipes for epoxy/pigment mix.
I’ve said it already but I’m very surprised how sharp the edges turned out to be on the richlite part. This is almost as dangerous to handle as a non-deburred aluminium part…
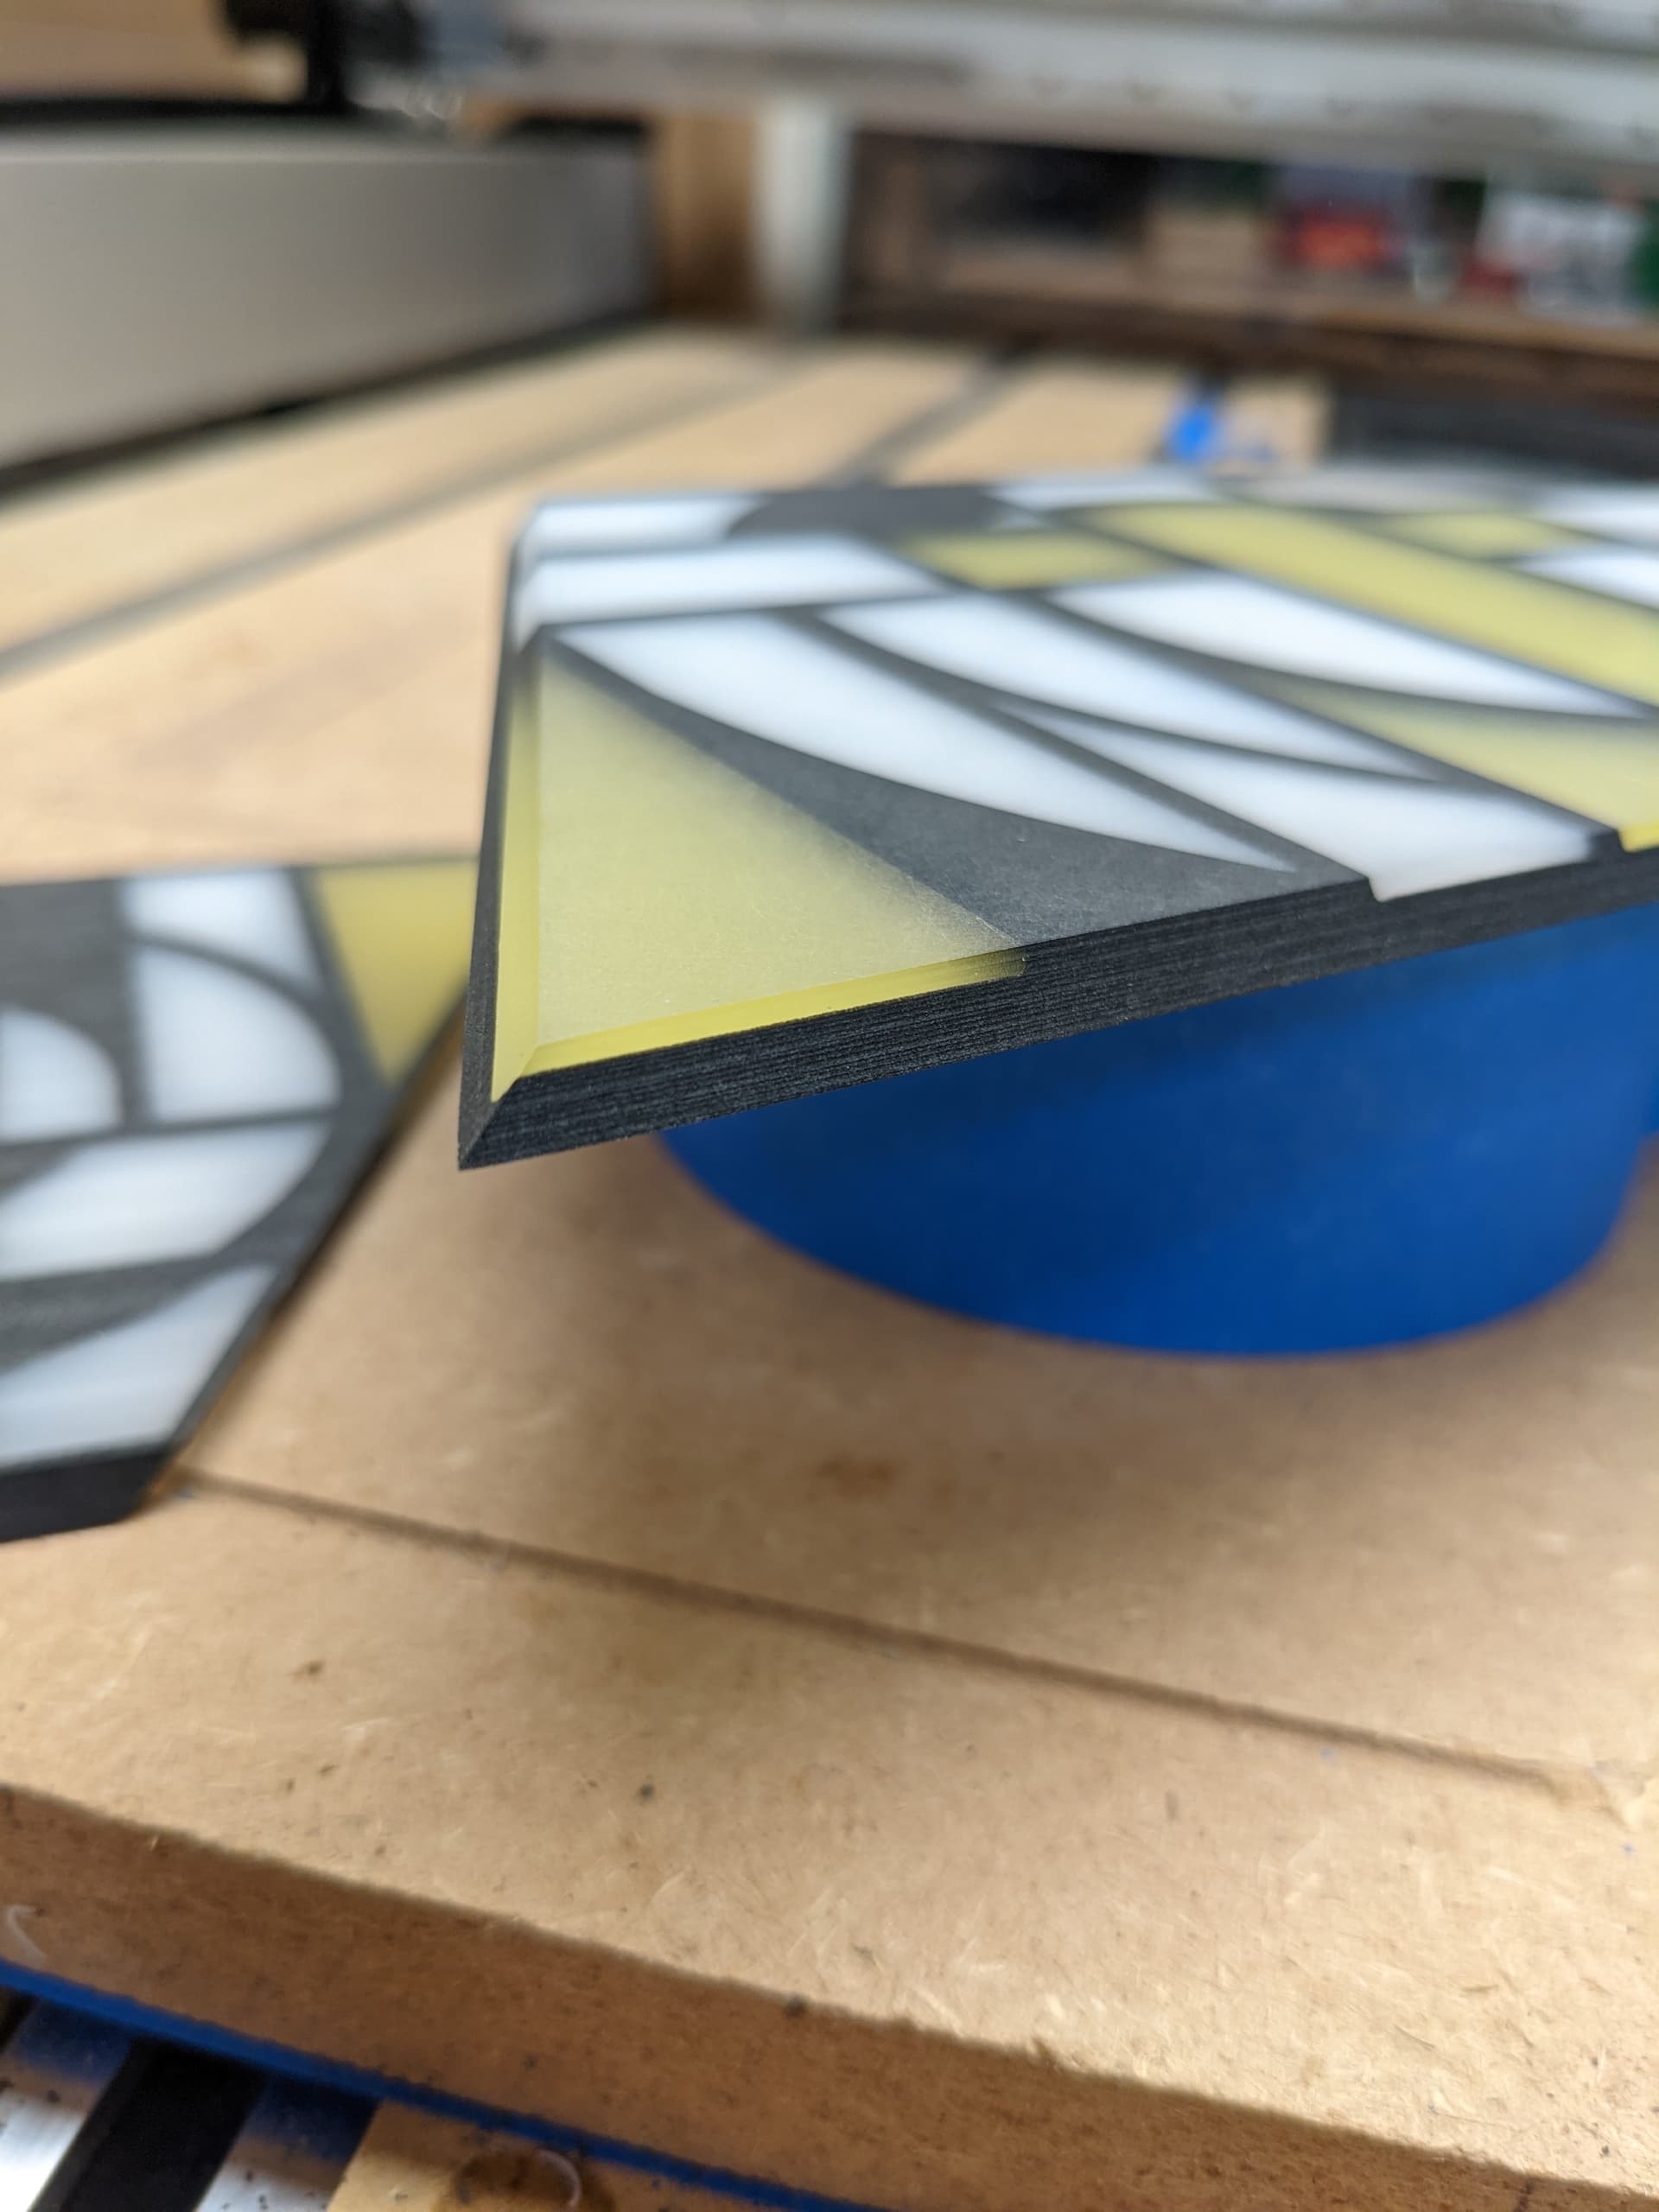
so there’s hope that the corner joints will not look too sloppy
(sanded to 240 on the right, as-surfaced on the left)
Now, the richlite does have a very matte (if not dull) look to it, I’m now considering pouring a thin layer of clear epoxy on the faces as a finish to bring out the contrast…that will be tomorrow’s test.
11 Likes
Very nice result all round!
1 Like
Really nice result. Personally, I like the borders dulled…gives it a more vintage look.
1 Like
Tonight I learned something I already knew.
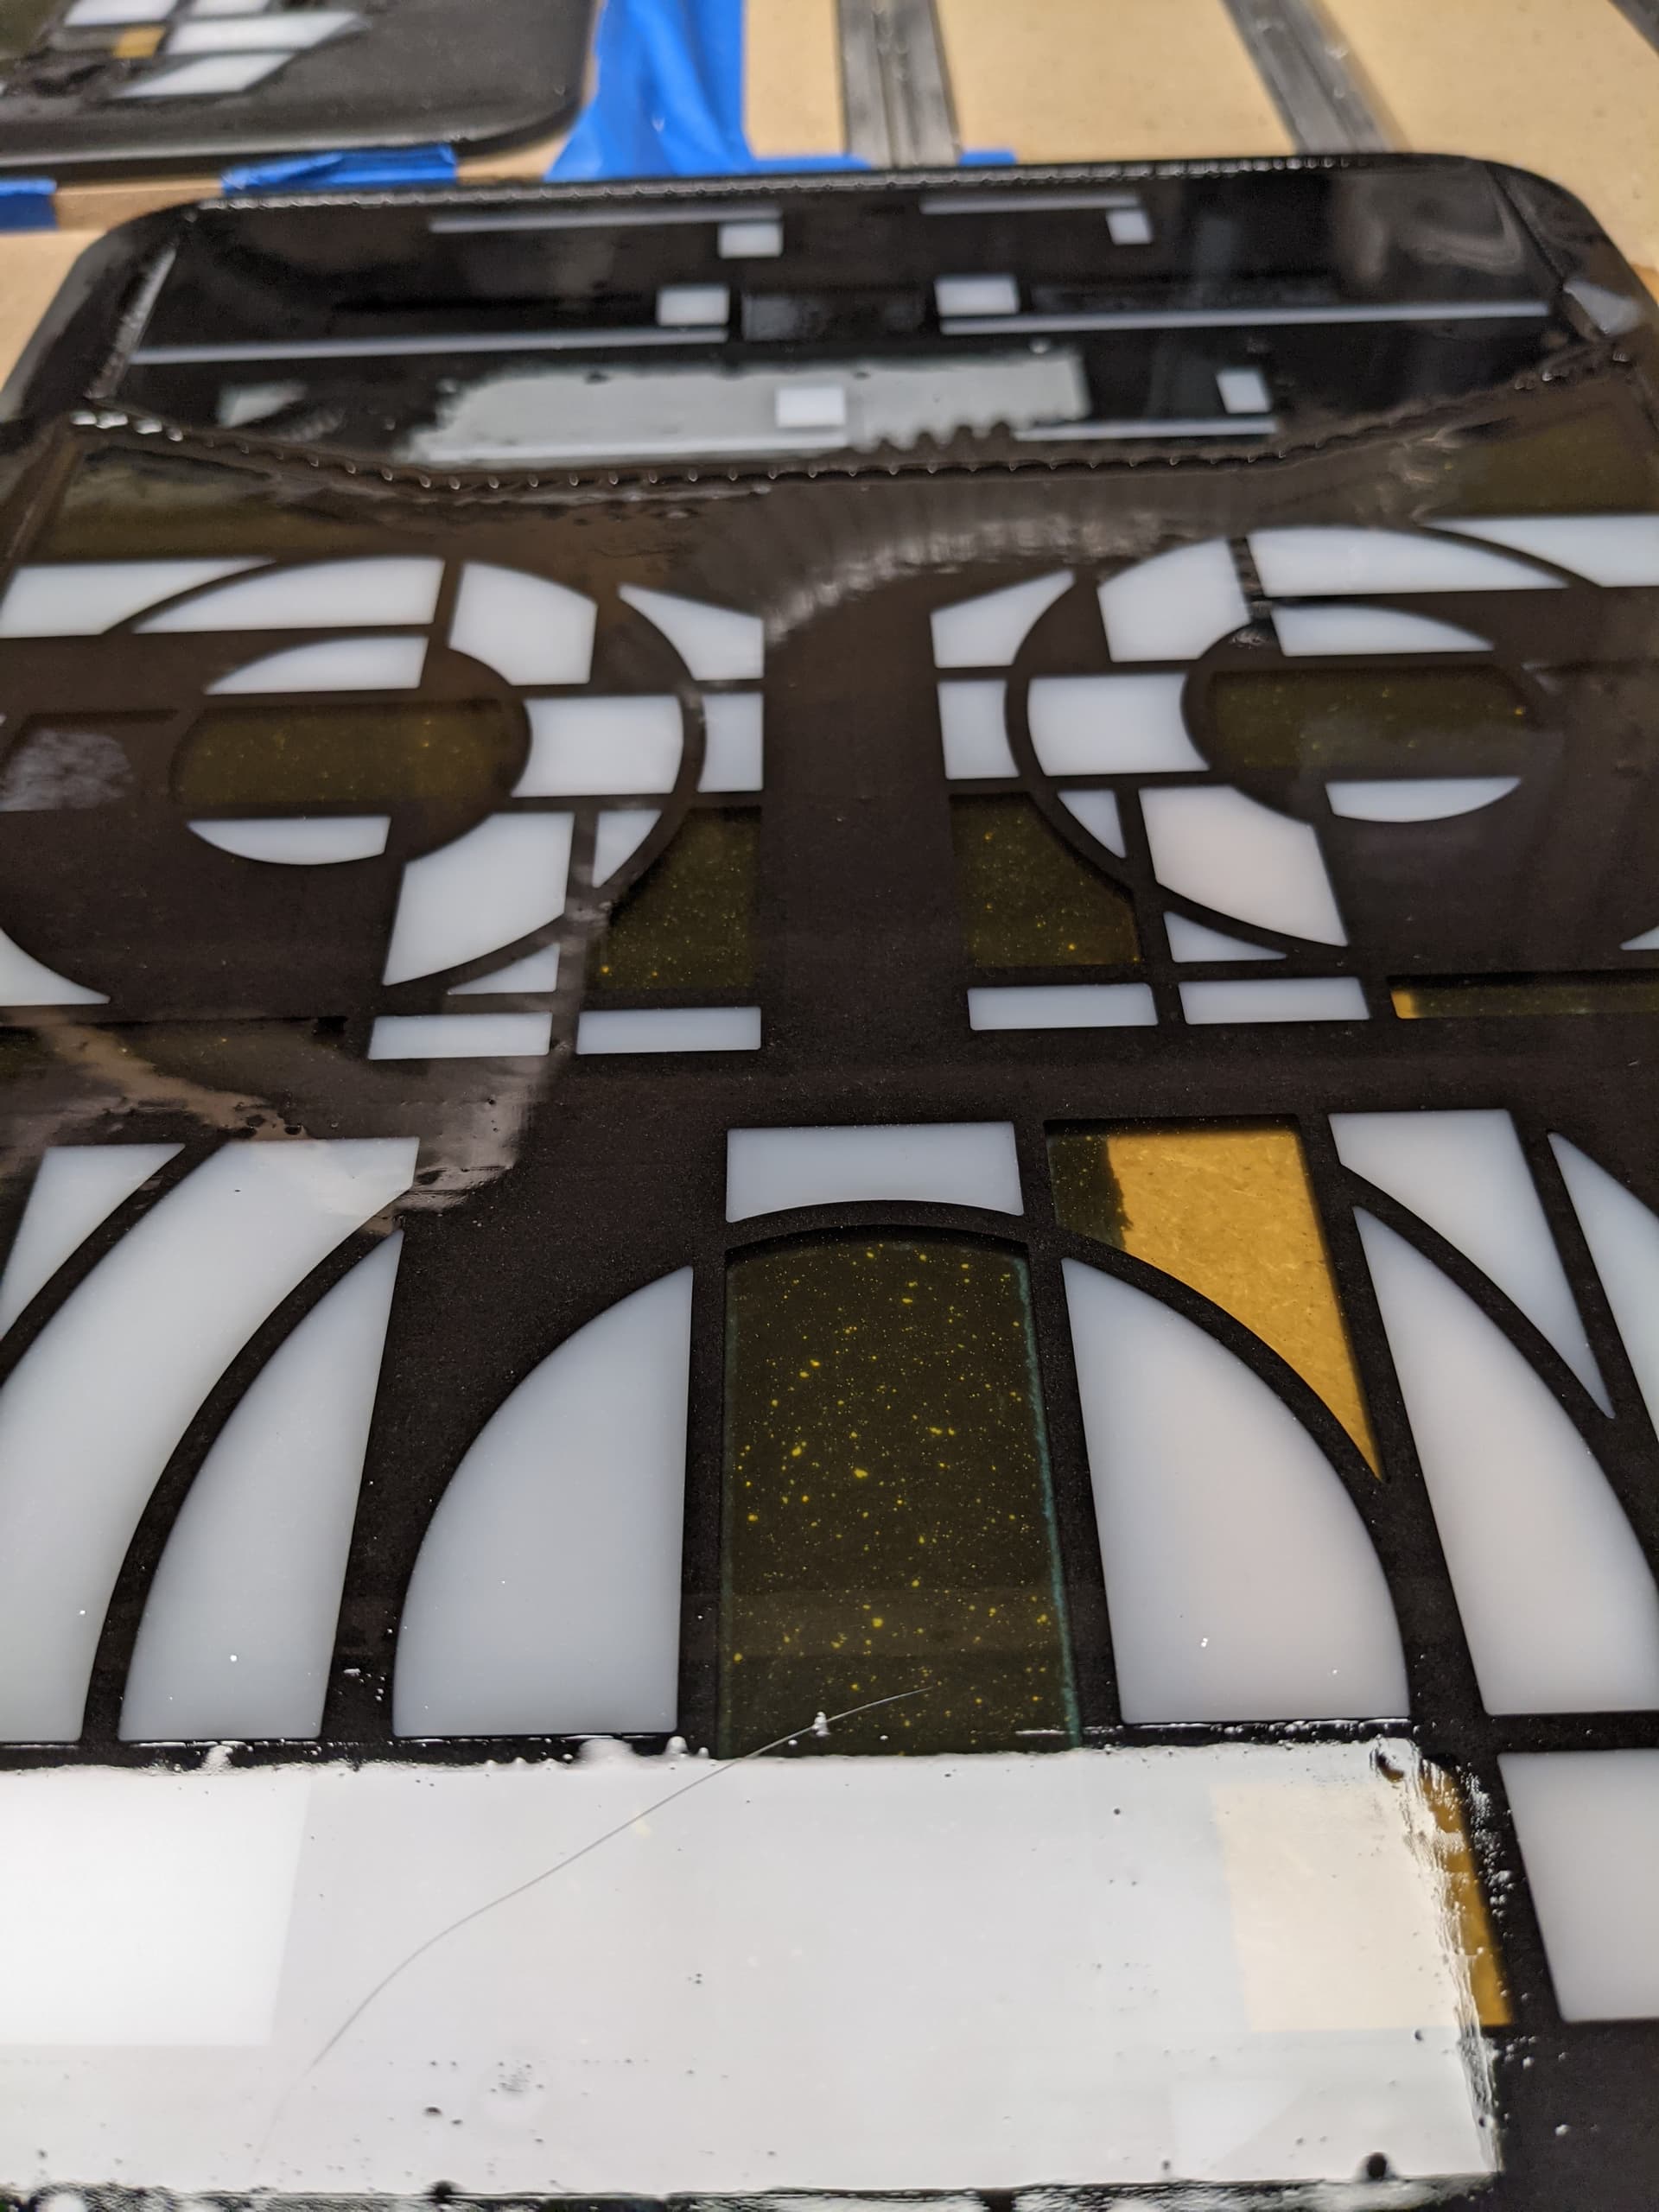
I had messed up one part of the lamp that was already cut, so I decided to clean up the corresponding pocket and pour epoxy in it again. I taped the piece onto a sheet of acrylic, poured the epoxy, and when I came to release the piece tonight, when I flipped it I noticed the clear epoxy had leaked in-between the piece and the underlying acrylic (d’oh). Which resulted in a large stain/spot of clear epoxy onto the unsanded, raw piece:
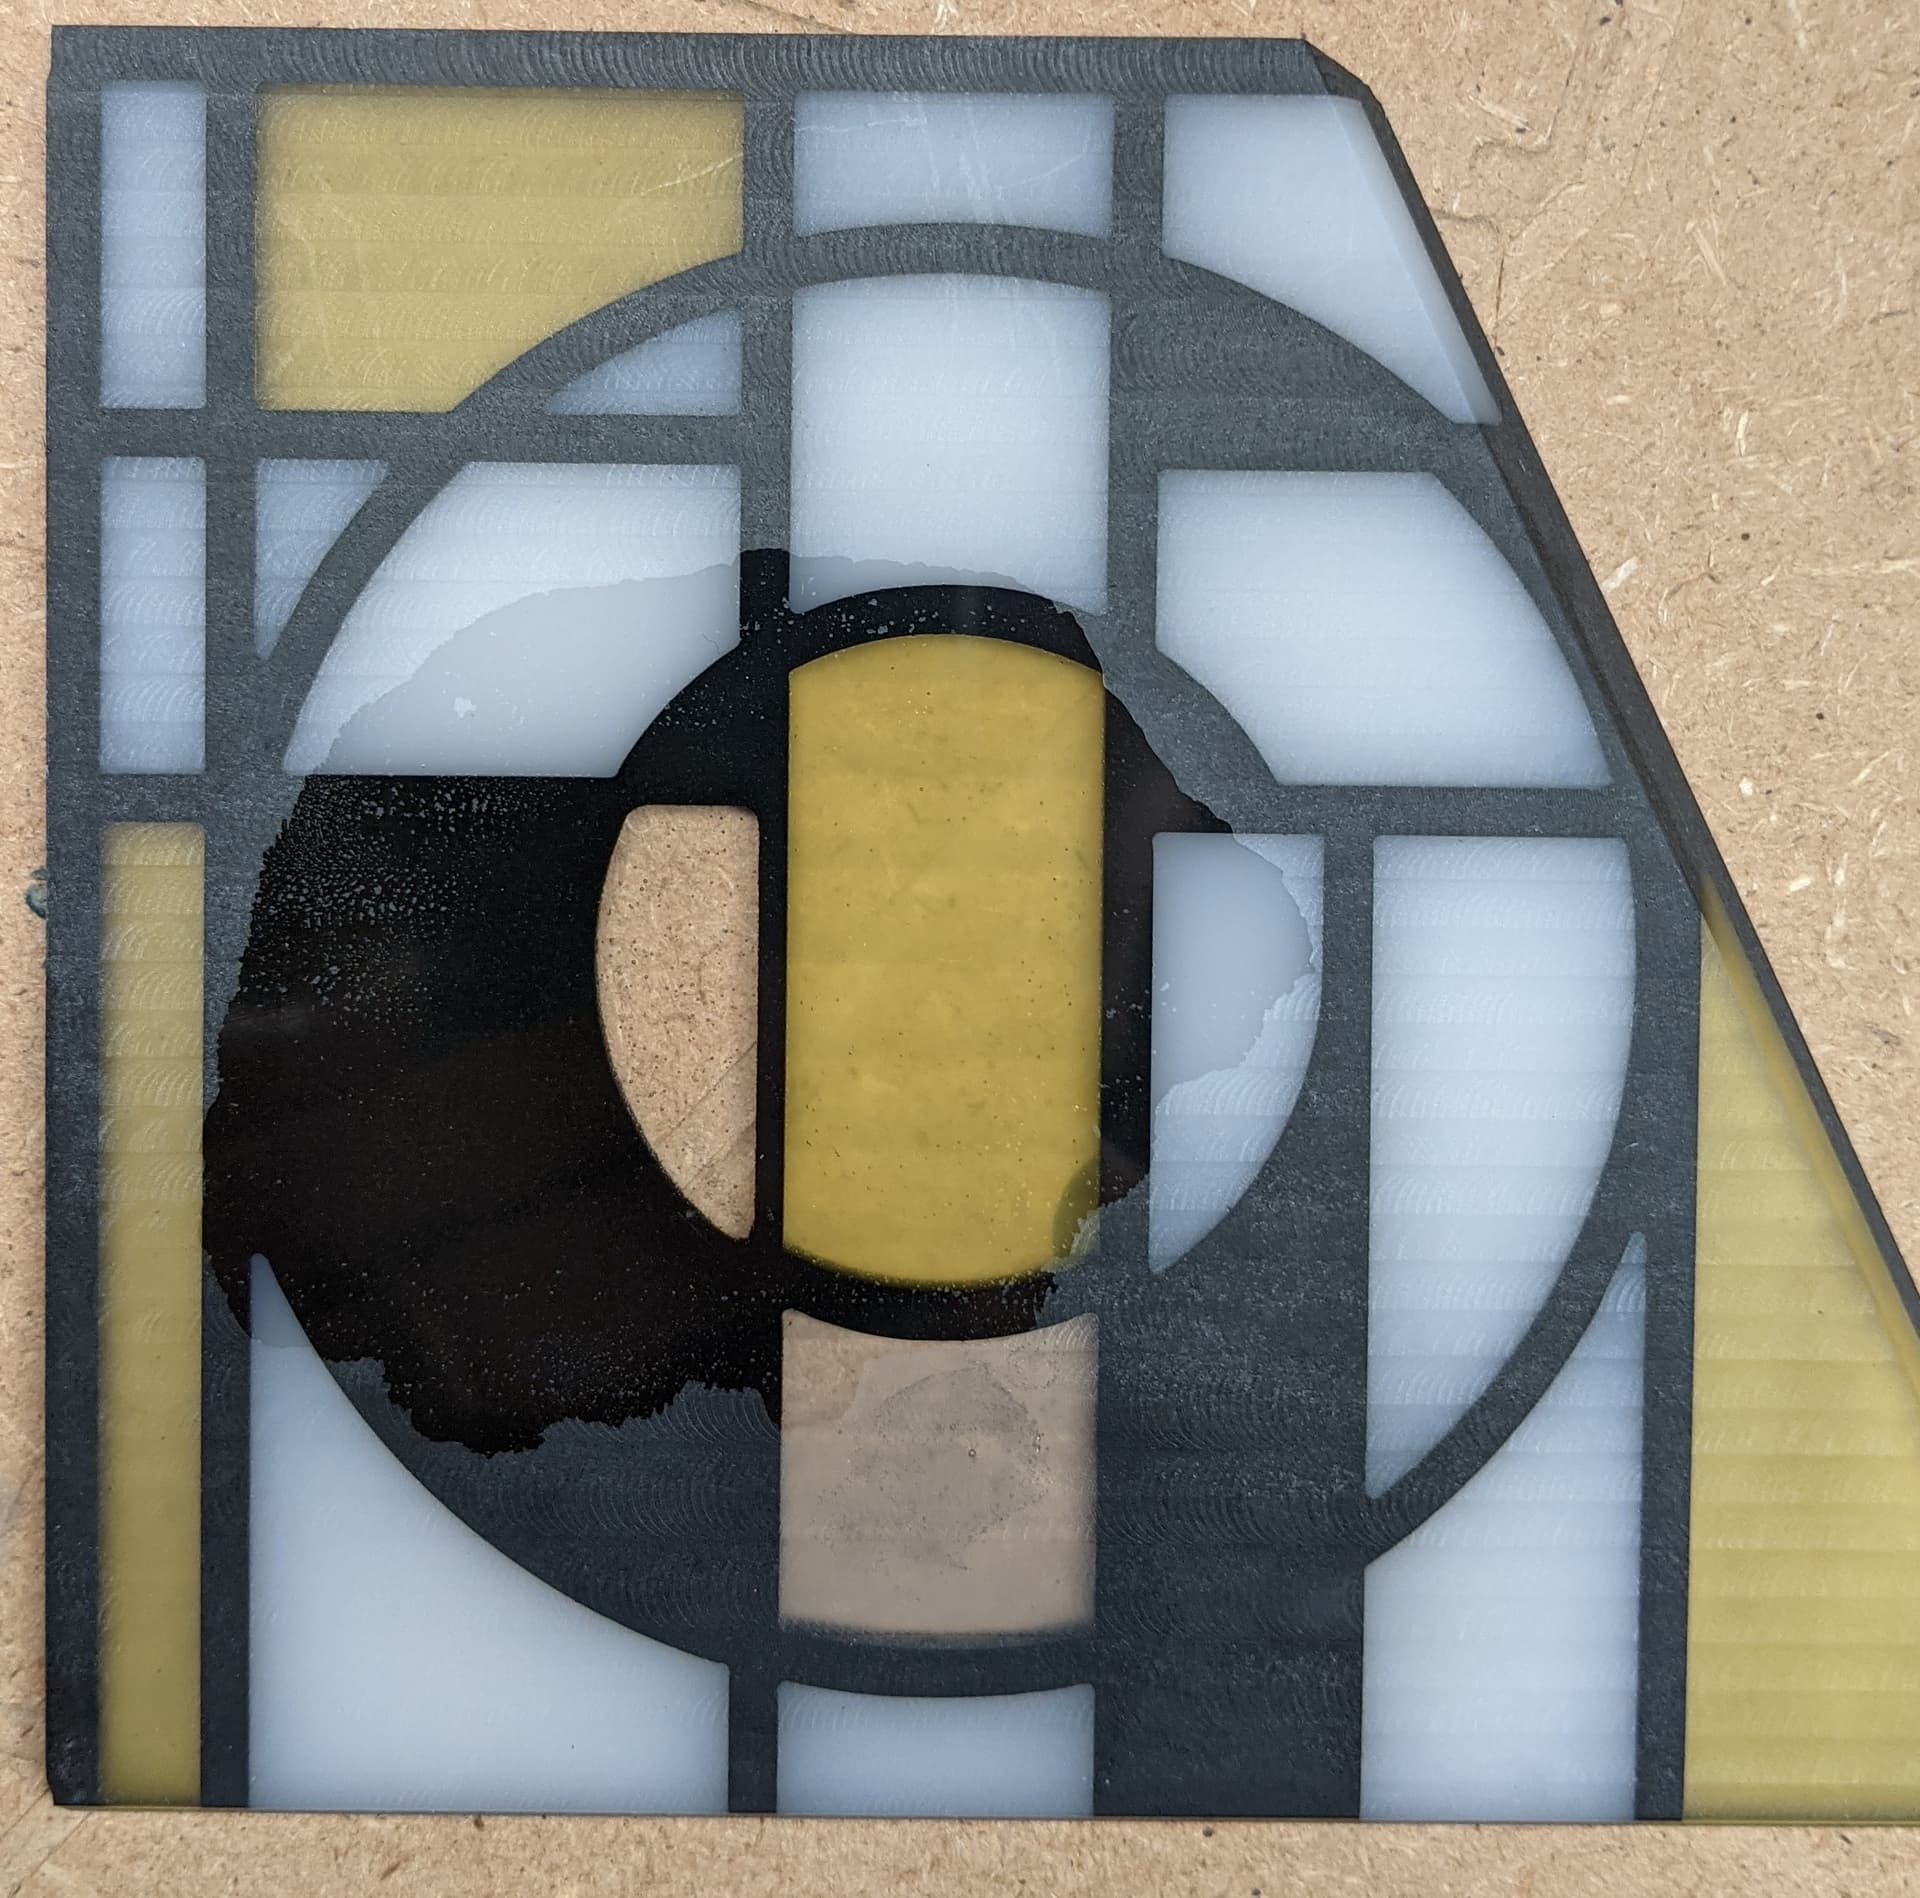
If you ignore the bubbles, it is striking how the thin clear epoxy layer not only made the raw colored epoxy smooth (that part I knew, classic technique to finish pieces), but it also did wonders for the contrast of the richlite frame, when compared to the dull grey/black look of the unsanded richlite areas. The picture does not do it justice, it’s really uniformly black (but now glossy, of course)
Anyhow, I’m now thinking I will apply a very thin layer of clear epoxy on all parts, as my finish strategy, and not even sand anything at all before. Did I mention I hate sanding ?
To folks who do this routinely: do you use a special kind of very fluid epoxy, or just the same mix as usual?
7 Likes
Turning an oops! into a wow! If only I could get things to work that way for me more often. Though the current community challenge was my first epoxy casting, I have used a lot of epoxy over the years for repair work. That was usually filling small voids, patching gaps, reattaching broken parts, and building reinforcing layers onto a substrate. The slower curing epoxies are great at self-leveling, but tend to cure poorly in very thin layers. The fast-cure type often cure before they level completely. My suggestion is to try a test with the mix you’re currently using and let us know how it turns out.
1 Like
My experience has been that warming the epoxy before mixing it gives a more fluid consistency, but for a shorter working time before curing starts. I too have used the ‘final layer’ of resin to hide surface blemishes and it is remarkable how well it works and what level of blemish it will hide. I have wondered whether reducing the proportion of hardener might give a longer working time, but couldn’t find any decent source of info on what effect it might have on final hardness, surface finish etc, so haven’t tried that - every time it becomes a question in my mind is when finishing a piece that I can’t/don’t want to take a risk with…
3 Likes
Don’t reduce the amount of hardener, unless manufacturer specifies you can do so.
Otherwise you end up with a not fully cured sticky epoxy mess.
Better to change hardener to one that has a longer open working time.
Open working time can be extended by reducing the temperature of the resin and hardener mix.
You might be lucky to salvage an uncured mess by post-curing it with heat or gamma radiation, heating is a gamble and the latter option is usually out of reach for most people.
2 Likes
@Sawdust
I’ll definitely try the mix as it stands, since this is what I accidentally did anyway 
@BrokenEndmill
I’m all too aware of the “permanently sticky mess” that can result from not mixing in enough hardener, so I don’t want to go there
@AndyC
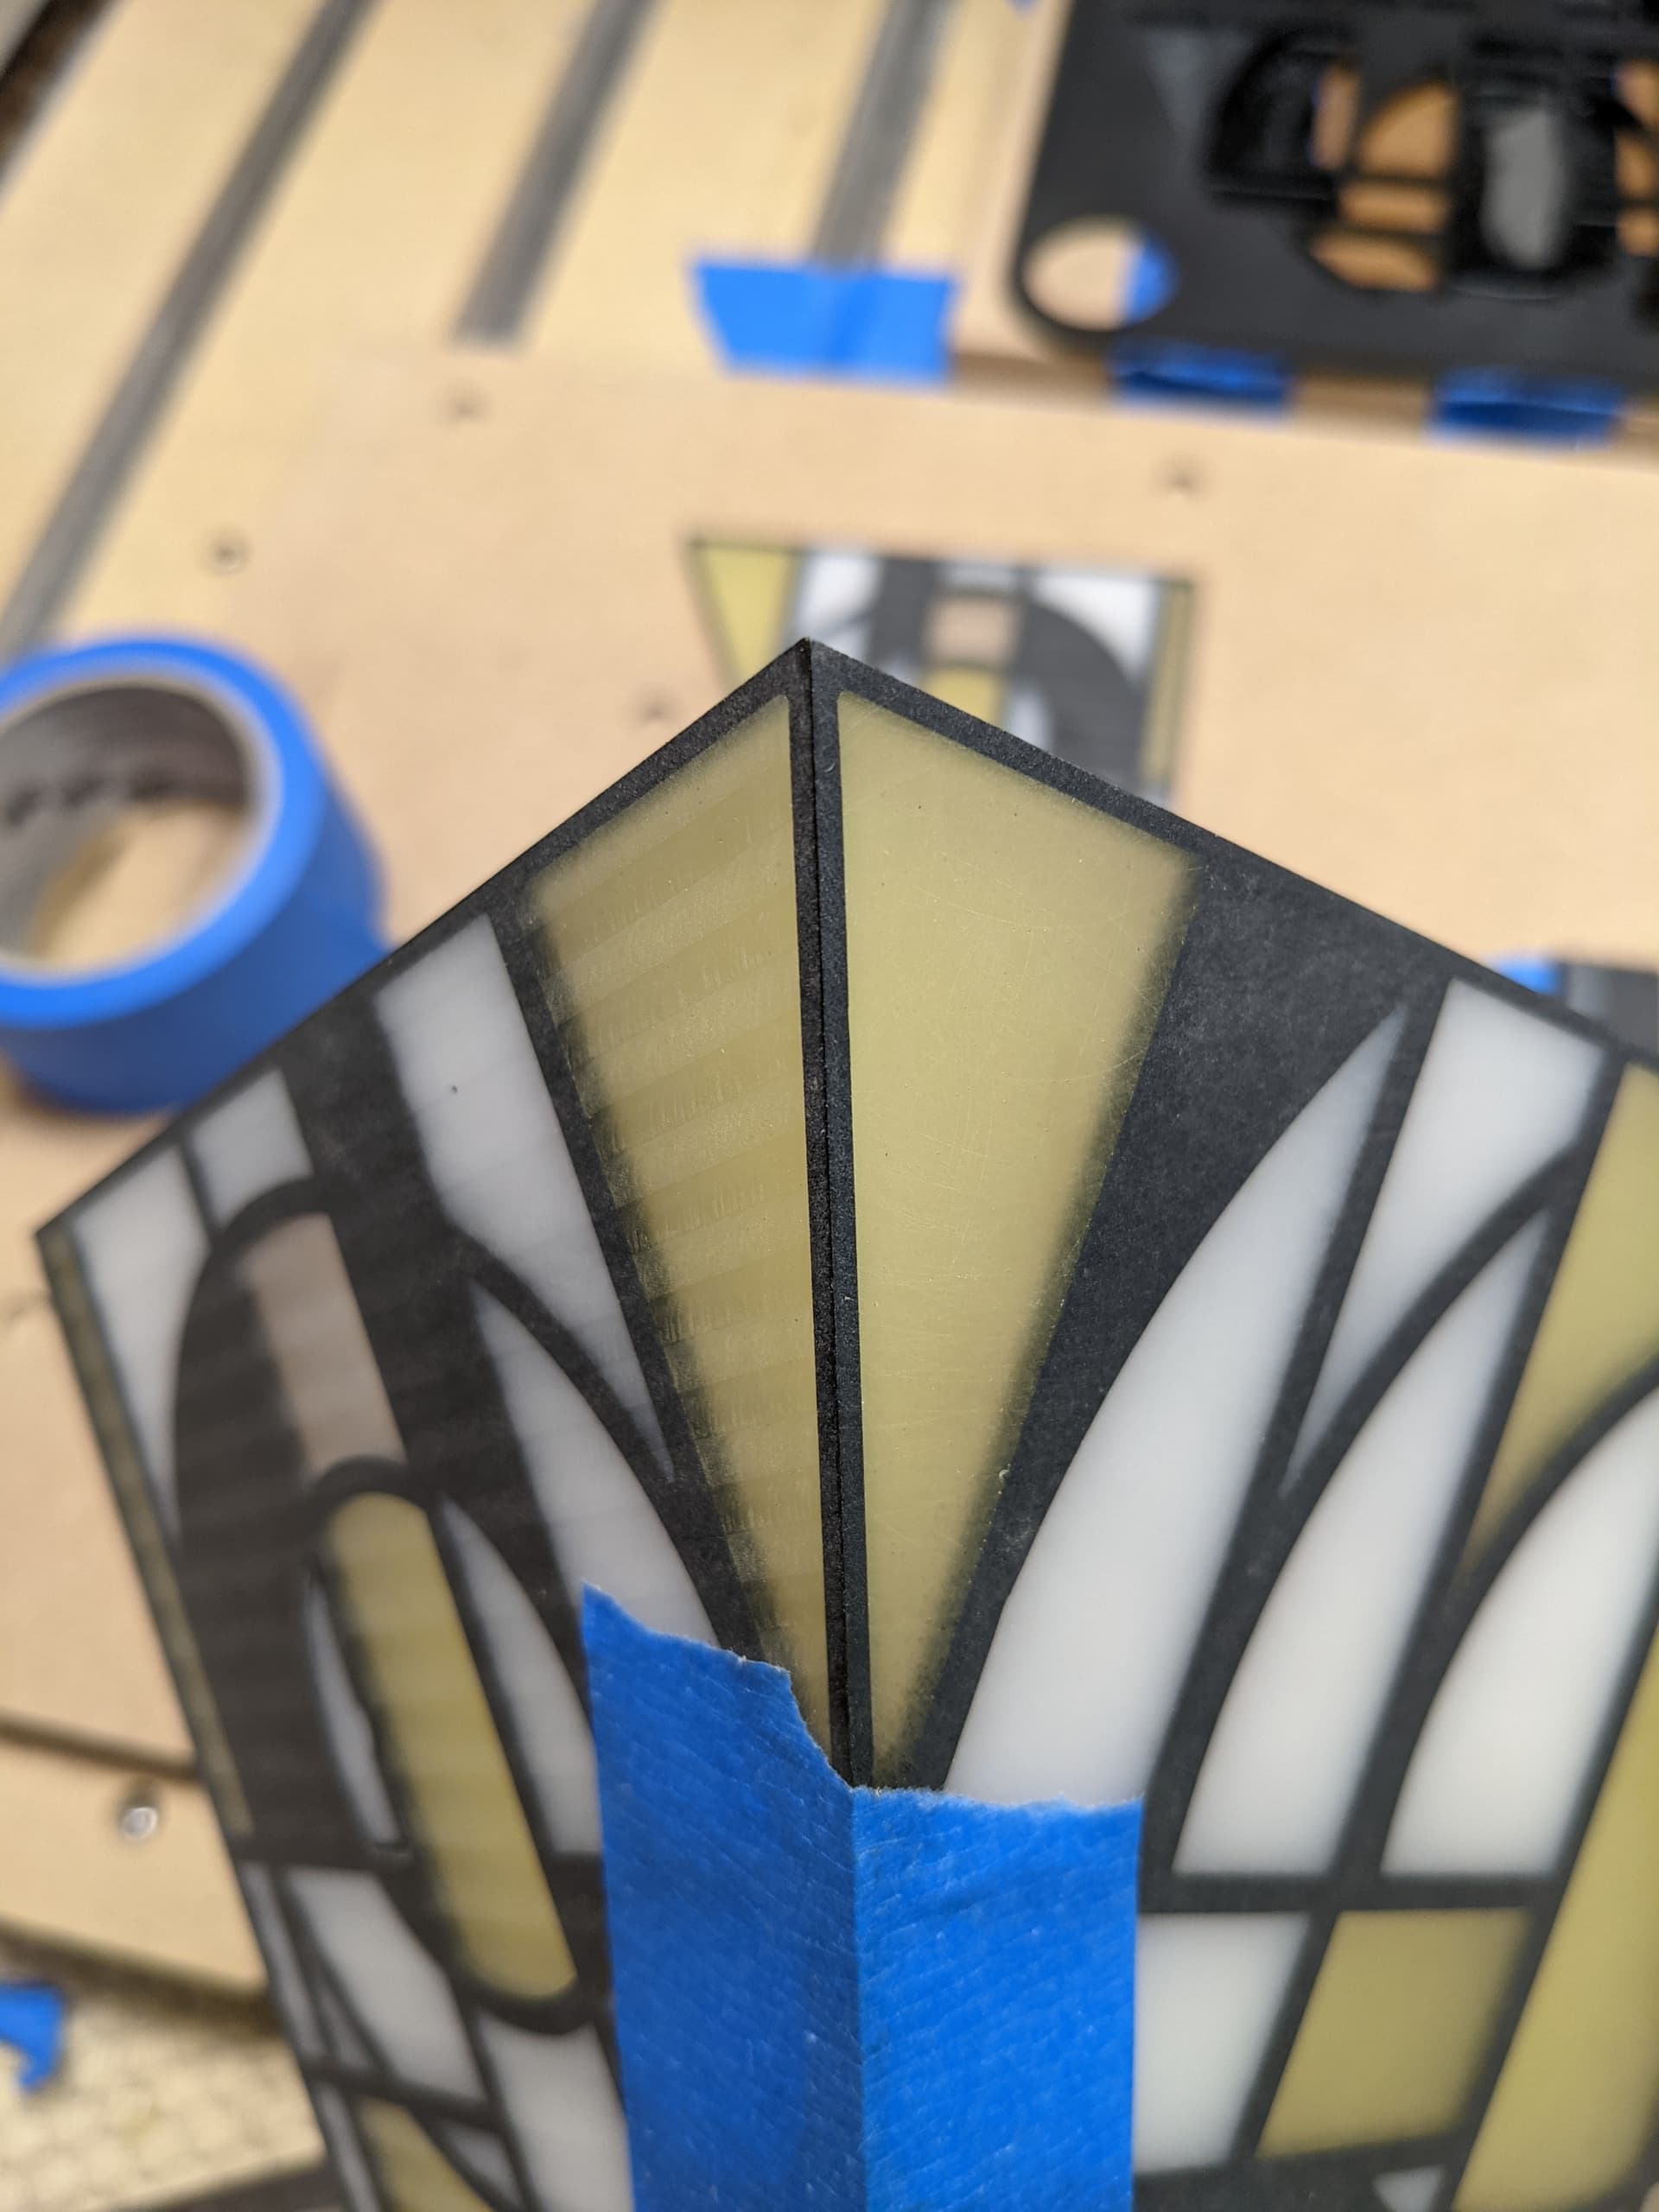
Warming the epoxy mix sounds like a plan, thanks. In my case, if I lay the part on a stand, pour clear epoxy and let the excess drip, I’m fairly confident that the top surface will turn out ok, but I’m not so confident about the sloped edges, where I could end up with a small ridge (?) of epoxy being stuck all around the edge by surface tension. I am considering masking the sloped edges with tape, to protect them from the finish epoxy layer, since those parts will not be visible and that’s where the glue will be, so raw material there is better anyway.
I also want to try spraying shellac on the parts instead of the epoxy finish, which may give me the same contrast/glossy finish, with a much less messy process ? We’ll see!
Shellac is the “clear” winner, in my opinion. It can cover pretty much any material. I was going to suggest it, but I didn’t want to divert you from the epoxy mindset!
1 Like
I have a really nice one-burner induction heating pad for my shop (like this one, but not this brand). Fill a cast iron pot with water and it’s a great no-spark, no-flame warming bath that I’ve used for epoxy and other glues. Safe for the shop, hard to burn yourself (wouldn’t say impossible), quick, and very controllable.
I’d recommend it!
1 Like
Epoxy is great in that it is self-levelling, fuss free to apply and covers blemishes really well. Where it gets a little tricky is the edges - bleeding over, meniscus-ing, or as you have already identified, ridging where a barrier such as tape is placed to contain it. I have tended to reserve a final cut to both trim the epoxy to size and the final part to size - but for your chamfers, if they are already cut… might be tricky. Can your workflow leave the chamfers until after the epoxy gloss has been applied?
1 Like
I can definitely do that, good idea. I “just” need to go and buy more cutting boards of this type, since by now I have made too many small mistakes to use prototype #1 in the end (which I guess is why they call them “prototypes” ![]() )
)
Tonight’s conclusions so far:
- shellac spray is not going cut it as an effortless finish strategy: it does improve the contrast of the black richlite, adds the glossy aspect, but definitely does not hide the absence-of-sanding / surfacing toolmarks like epoxy magically does. Sorry, no pic, nothing interesting to see.
- first dry (and sloppy) fit with all 12 parts coming together as a sconce (to be):
r
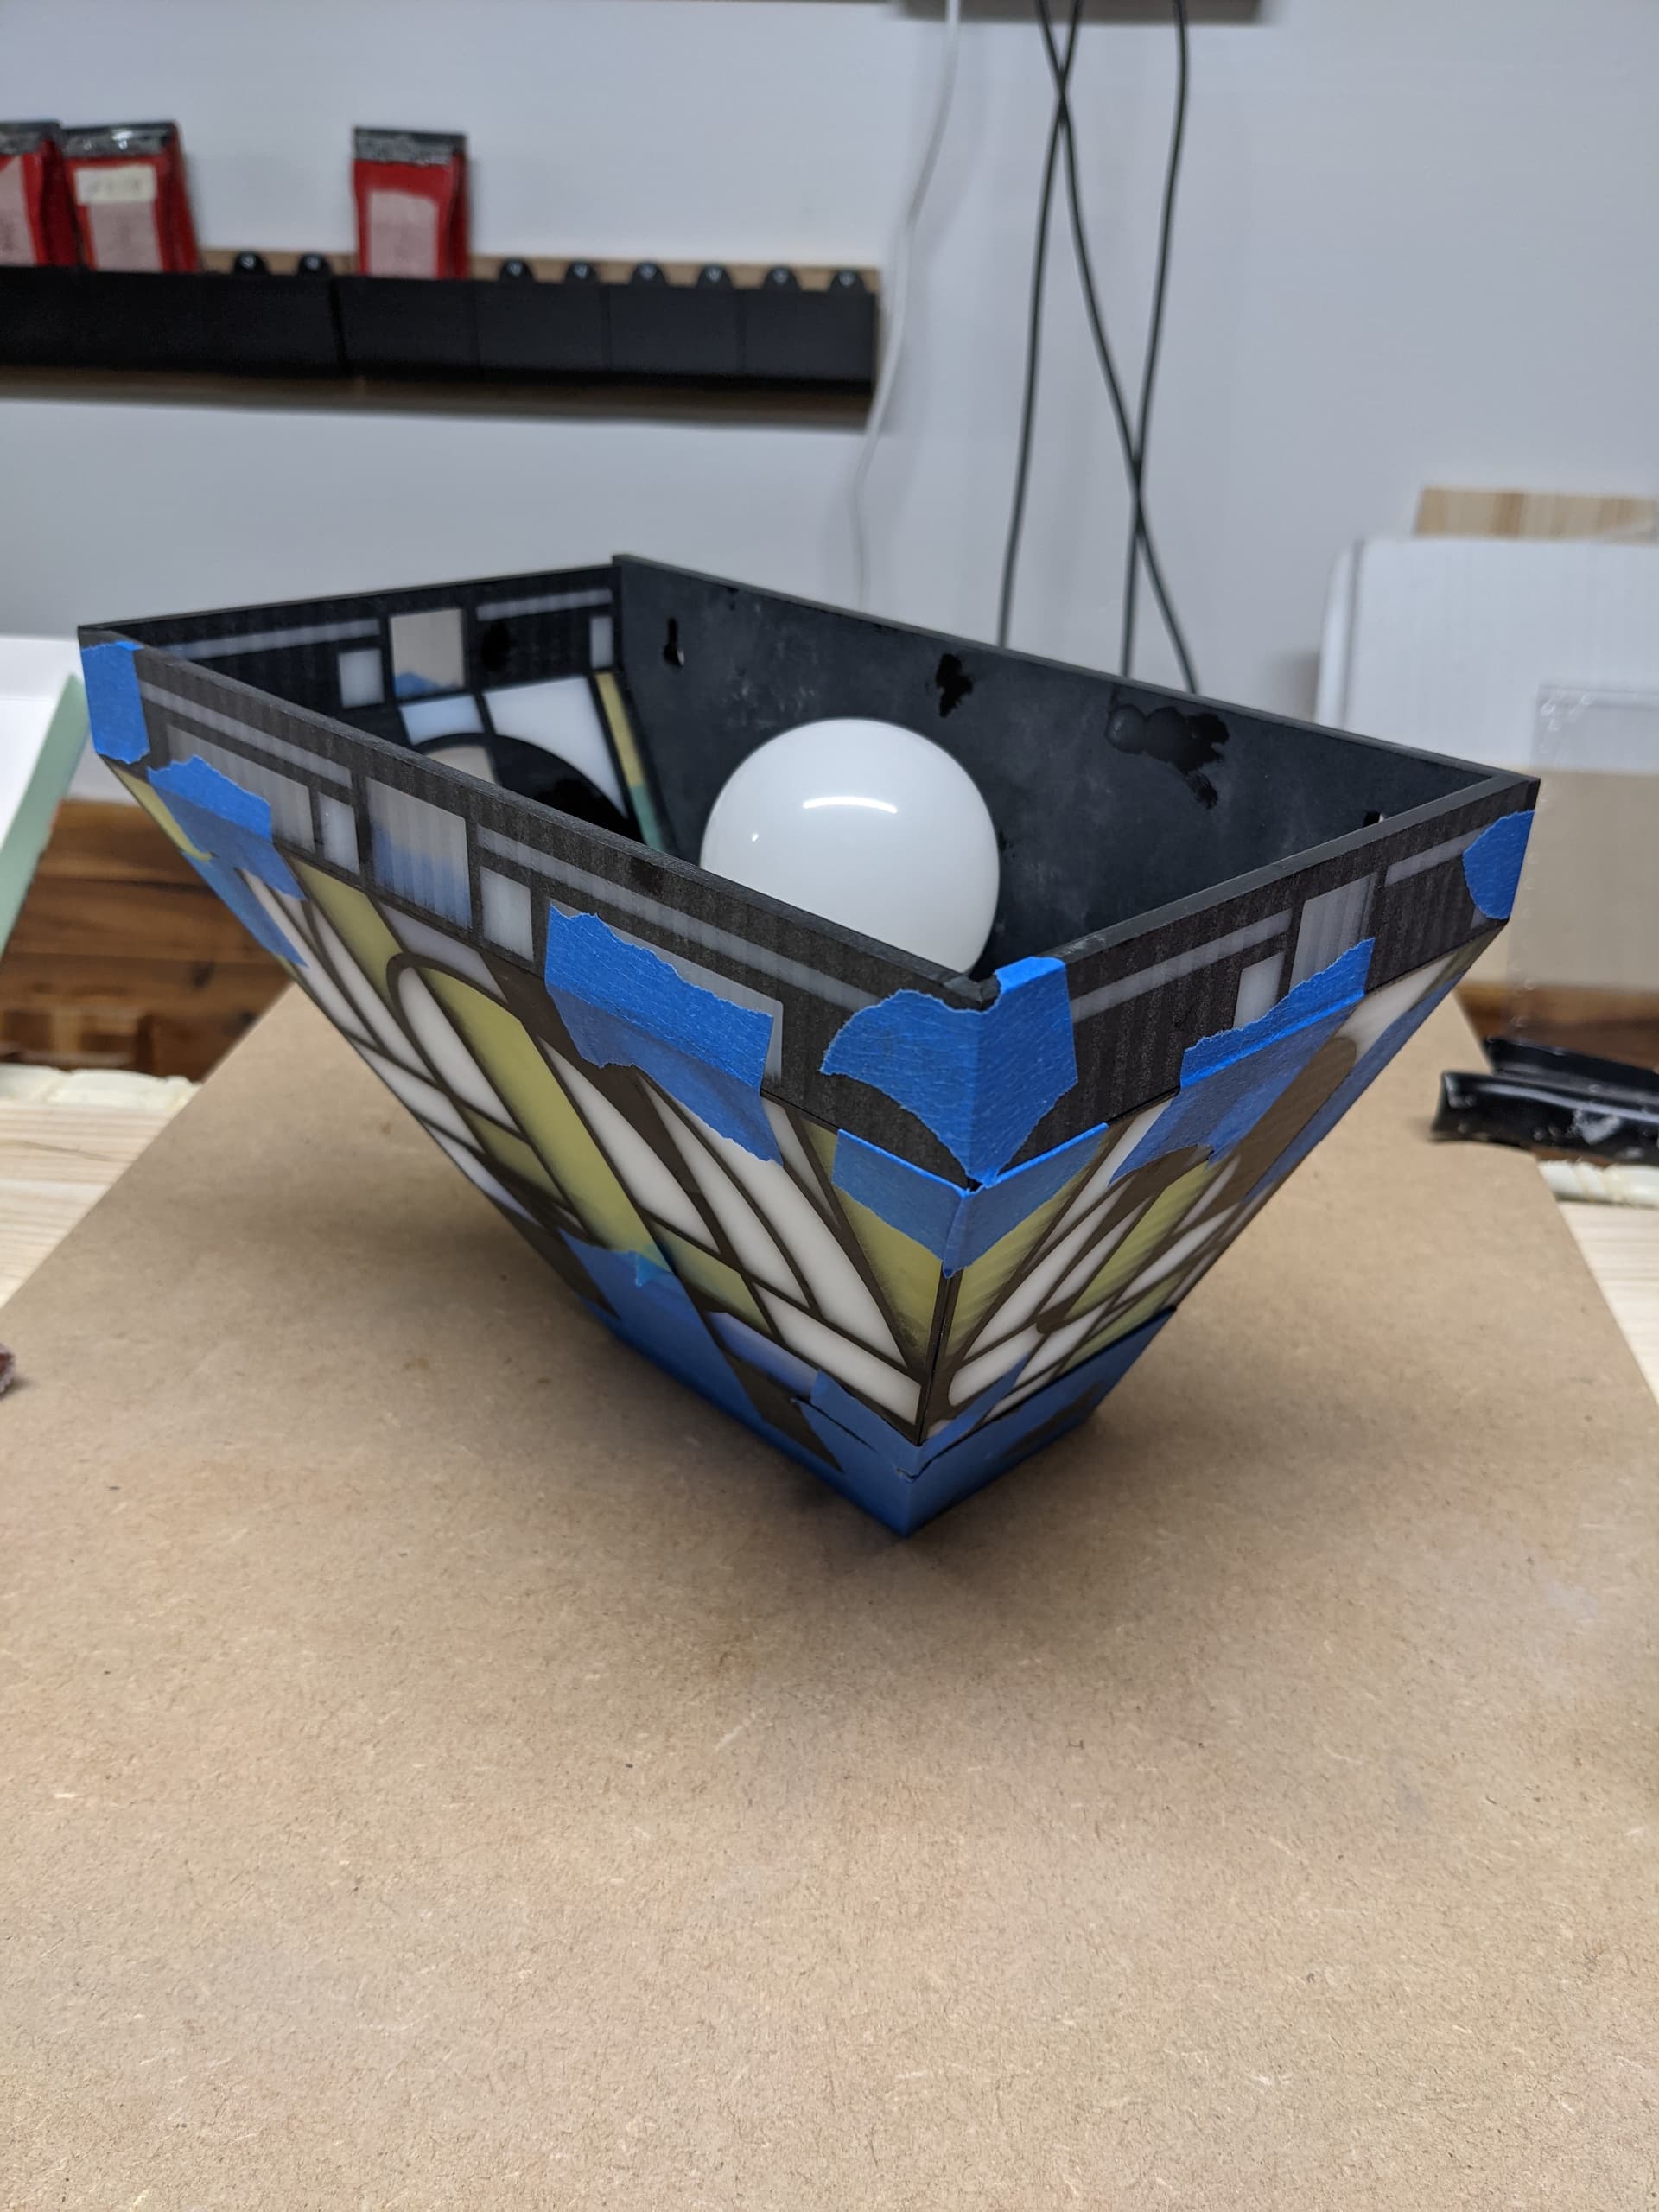
Yes, that is too much blue tape (you know me by now…), but it seems like all angles match. I am definitely going to need some king of jig to assemble this for real when glueing.
Preview of where it’s going to go on the wall (blue tape ruining the effect, included)

Now that the Fusion360 project has been put to the test (and the many errors fixed along the way), it’s time to do prototype #2, and test @Andy’s strategy.
I’ll surface this:
then do the clear epoxy finish, then cut the chamfers, then flip the part and do the other side. Or something like that.
12 Likes
First try is a no-go
#Disappointed.
I must be doing this the wrong way. Since it needs to stay on the wasteboard for the next steps, I cannot hold the piece in my hand, drown it in epoxy and let the excess drip. So I tried to apply thin coat of clear epoxy with a brush, and while this does bring out the contrast, the surface is not perfectly smooth, I have a numbers of bumps and dots that are very visible.
I’ll surface this off and try again.
Edison mindset, I have not failed, I have identified 1 way that does not work, on the road to success
2 Likes
Could you pin align the pieces? Drill through the piece in 2 scrap areas and down into the spoil board, push suitable index pins in to give you registration, then you know you can put them back in exactly the same place after hand epoxy work? I have a pack of 5mm ground pins for just this sort of alignment task
1 Like
Yeah I definitely could do that. This is what I do for the flip side registration already.
I’m trying overpouring on a testpiece right now, we’ll see
I’ve used this succesfully many times and it fills some light sanding marks and other blemishes. Available in matte and glossy.
2 Likes