Tool Changes for Advanced Vcarve?

TL;DR How do I do tool changes on my Shapeoko3 XL without a Bitsetter/BitZero. If I can’t…which combination of accessories do I need?

Apologies if this has been answered elsewhere but I’m a bit confused at my options here. I recently tried to do an Advanced Vcarve with Inlay using the latest version of Carbide Create & Carbide Motion on my Shapeoko3XL and was unable to do it because the program run didn’t allow me to re-zero the Z after the tool change. The steps I’d tried were as follows…

Initially started with using Carbide Create to create the tool paths (clearing plus Vee). Then my typical workflow is sending the Gcode to UGS, except upon resuming after the tool change pause where I swapped from endmill to Vee bit and re-zero’s the Z, the Z axis did an unexpected plunge that pushed the bit into the workpiece. The plunge was rapid and right where it wanted to start cutting again…it plunged quickly then raised up slowly and resumed the cut as I would have normally expected….except now I had a 1~2mm hole where i didn’t’ want it. I studied the Gcode endless and could not see where/why this happened. I chalked it up to some obscure incompatibility between Create and UGS.

So I moved on….and tried using Carbide Motion to do the carve. Clearly this would be a more compatible path. Except during the tool change pause there was no provision for re-zero’ing the Z. Damn.

So I moved on again…this time upgrading to Carbide Create Pro so I could export Gcode for UGS to use in passes.

It’s important to note here that I adopted UGS over Carbide Motion so I could avail myself of two features: first, the use of a game controller as a cheap pendant. This is MASSIVELY helpful. The second was the ability to use a cheap, DIY Z-probe.

This ended up working for me but not without some manual editing of the Gcode that Carbide Create Pro spit out…dividing it up into two separate passes and removing some incompatible lines that were throwing errors.

So…there you have it. Now…finally to my main question: how can I simplify this tool change issue? Previously tool changes were no problem because I could spit out passes in discreet, individual files. However the Advanced Vcarve module wants to unify those operations in a single Gcode file.

I’m not above/beyond using a Bitsetter or BitZero, but those tools have always seemed a bit pricey for what they do and I’d previously got by quite well using my own DIY Z probe and UGS.

I’m a little unclear on the exact workflow and integration of the Bitsetter and BitZero. To my understanding the Bitsetter is just for tool changes and resetting the Z offset, whereas the BitZero is for also probing and zero’ing the X and Y (however it appears to ONLY work on the corners of your workpiece and the not the center, which is what I often do.

Thanks for any advice.
The BitSetter allows Carbide Motion to measure the tool so that it may manage tool changes and adjust for the tool length offset.

The BitZero allows setting the origin relative to the corners of rectangular stock or a flat surface.

The big things which the official accessories bring to the table are:

  • support — they “just work” in Carbide Motion
  • Schmitt trigger for debouncing the signal making probing more precise and kinder to delicate tooling

If you need the center you can position a BitZero so that the edges are aligned 3mm wo the left of and below vertical and horizontal center lines (I’ll position it by putting a 3mm piece of acrylic so that the corner is right at the center), then probe for X and Y to set the center, then probe for Z to get the surface.

Using Carbide Create/Motion, the BitSetter is necessary. The only other alternative is bits that have a collar that is adjusted so that it is EXACTLY the same distance from the bottom of the bit for each tool.

Honestly, the BitSetter has been my favorite accessory for the Shapeoko. I had one on my Shapeoko 3 (now in the possession of my friend and running awesome after 8 years), and I have had one on all of the 5 other Shapeokos I’ve had. They are built WAY better than most companies that have the same type of accessory on a hobby/prosumer machine, so the cost is justified in my opinion. For the price it removes hours of time (depending on how much you run your machine). I value my time heavily. :slight_smile:

As far as workflow…you are correct. The BitSetter tells the machine where your Z is on the tip of the bit. The BitZero tells your machine where the material is on the machine. So they do different functions, but work together.

To give you my opinion on them, I have the BitSetter on every machine, but out of 4 Shapeokos I currently run, half have the BitZero. But I’m the exception in that 2 of the machines I run are HDM machines and have tooling plates with mod vises. They mostly run precision metals and plastics and many time the BitZero won’t work with my projects and I have a conductive probe. I’m also a pretty experienced machinist. I recommend the BitSetter 100% of the time. The BitZero I recommend if it works in your work flow, and I use one around 75% the time myself even on projects used for scientific research. :smiley:

3 Likes

I agree with Josh 100%. :+1:

I added the BitSetter to my SO3 XXL a few years ago and it has really simplified tool changes, especially when using Advanced V-carve.

Also to note, I haven’t had any problems/issues with it.

:smiley:

2 Likes

Thank you for that concise answer. I’m not sure yet if I want to be held to the whole Create/Motion ecosystem, but there is tremendous value in something that “just works” right out of the box as opposed to cobbling together several parts to make a system.

Do you know of any way to use a pendant or external physical controller to jog the Shapeoko? Like I said in my original post that feature was a huge reason I went with UGS. I’d auditioned several gcode senders and the pendant (using at cheap $10 game controller no less) was a boon to my workflow. I had the keys mapped to not only jog XYZ but also change the step size and ability to zero X/Y with a the push of a button.

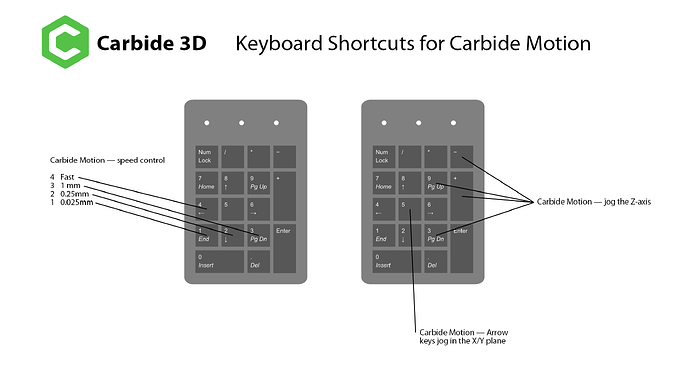
On my machines I run the Rii Mini Keypad off of Amazon. It makes jogging easy with no additional software.

Number keys 1,2,3,4 = Jog speed (1 = 0.001", 2 = 0.010", 3 = 0.100", 4 =
Fast)

Top right direction keys = jog in X and Y

PgUp/PgDn = jog in Z

I found it to be much easier than any options for a pendant short of a rotary style on industrial machines.

https://www.amazon.com/Upgraded-Rii-Wireless-Keyboard-Raspberry/dp/B00Z81U3YY/ref=sr_1_6?crid=LBOZOP9XE8G5&dib=eyJ2IjoiMSJ9._wQhsJ4M9oTLuQM2G5jJVan8AQHkLiIpw-cJ-BlvIrPmM6knTs2GI58TnGQGxpXIx_J2PKHfcf2yUKxrsJl6c1CaSBrugbwkFlZiVgCX8IM14hDns1BKGrF73z1b-tWBLp5v3L55ug3tFaLuvWI1TcKUh2dYgJesDGqlenDCWeIv_1NQfbJj9vbaW-ZMZVWW8AV6d1WxFQ9aNUlF3q-5iCpofphE3ROuNb7GeKPTnsk.psKGSy-zPPNWt-G4OzmYiwmx_bTBGGr0u39BvbRKYm8&dib_tag=se&keywords=rii%2Bmini%2Bwireless%2Bkeyboard&qid=1723225799&sprefix=rii%2B%2Caps%2C133&sr=8-6&th=1

1 Like

Or, one can use pretty much any numeric keypad:

Or, you can use a custom keypad such as:

Or, if you wish, a gamepad w/ keyboard re-mapping software can work well:

3 Likes

Oh wow. This is exactly what I need! Thank you.

1 Like

This topic was automatically closed after 30 days. New replies are no longer allowed.