Can someone help look at this file and let me know where I went wrong.
Scenario:
I was cutting maple and the 3/4" bowlbit stopped spinning in the corners. Inside went great. Could be smoother finish but was ok.
The outer inner pass was fine.
Outer finishing pass. FAILURE! ALARMS! HELP! DID I BREAK MY SPINDLE!? It plunged WAY too deep (I seem to have issues with this - I went for dinner and paused it on outer finish, came back and it dug in way too deep - like 0.4" or so. Did I go too tight? Freaking out thinking I broke the machine!
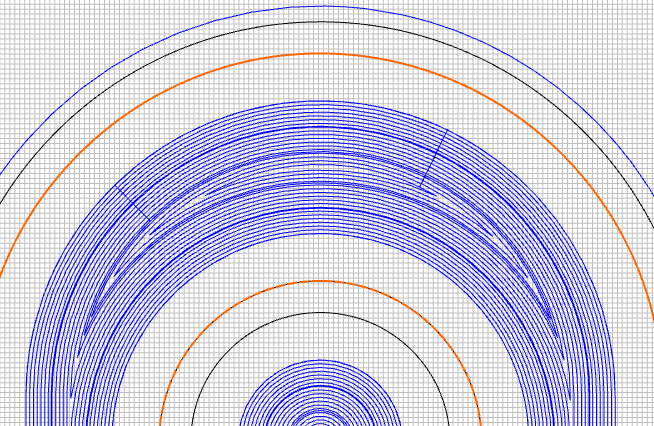
NOTE: Corner in Carbide Create is funky, I can see it is not just going nicely in one pass around which I’d prefer but “left right left right” iso just around and around… Cant fix this in the program.
Any help appreciated. Ended up just cutting the middle out with a 1/4" endmill and the “bumping/stopping” of bowlbit was so rough it actually moved the piece to the right a bit so one big failure. Just hope machine is oke!
Added SVG if you’d like to create it plus my original cut file.
If the cutter stopped spinning and the router/spindle kept turning that sounds like the collet wasn’t tight enough.
It’s always good to tighten the collet nut with two wrenches. One on the shaft and one on the collet nut.
The cutter might have been pulled out from the collet when it stopped spinning. Using a sharpie to mark the cutter at the collet nut will give a visual if the cutter is being pulled out.
This might be from to much depth of cut / to fast of feed rate/ wrong rpm for that particular cutter.
Using scrap wood to make practice cuts with the bowl bit will help you to find the sweet spot (DOC/ Feed/ RPM) for that particular cutter.
I always start on the conservative side then increase things depending on how it’s cutting.
Your file appears to be well constructed.
I might reduce the finishing pass to an even lower DOC value. In the video I went to .5mm DOC and a .75mm Stepover. It came out super smooth.
I’m with the others here in regards to what went wrong. It sounds mechanical. Workholding or collet related. The only way to know is to run it again.
Ok I will run it again and use the tape/glue method iso clamping plus ensure my collet is super tight. Q: Is there a way to avoid it doing this weird up down in the corners and just go smoothly like the inside? And @KevBarn14 your settings go up to 20000 but Shapeoko 5 can only do 18K, correct? See my settings in screenshot for my bit. Dont think I can use settings you used in video. LMK.
Again appreciate all the support out here. Having some much fun!
The toolpathing interpretation by the software is a function of the vectors and the stepover. By altering your stepover value, often you can force the program to choose different paths. I’ve made some changes to your file, take a look.
If you have Create Pro, ramping is super handy for bowl bits. It allows them to ease into the initial cut at each new depth.
The RPM number is the spinning speed of your router or VFD. The 65mm VFD goes to 24,000 RPMs. If you’re using a Carbide Compact Router, it goes to around 30K at it’s maximum. I saw that you had the bit spinning at 9K or so for several of the toolpaths. I ran mine much faster and that allowed for a faster feed rate. It’s all a balancing act of Feed Rate and RPM for each endmill and material.
The limit you might be remembering on the shapeoko is 200 in/min. or 5000 mm/min. This is the Feed Rate limit for the machine.
Take a look over my file for setting suggestions. Remember that every piece of wood and every cutter has different “ideal” settings. Determining those ideal settings will be up to your own experience and experimentation.
Keep making new things and learning new aspects of CNC.
You can also use the Clamp Steps from our 3D printed library to maintain proper clamping angles with the Essential Clamps.
The Library is here: 3D Printed CNC Accessories
Clamp Steps are in the second row. If you don’t have a 3d Printer, various thicknesses of scrap wood can be used. 1/2" / 1/4" / 3/4" small offcuts are handy to have as “steps” under your clamps.
Here’s a video featuring the topic: https://www.youtube.com/watch?v=bC5SV51obx4
Thanks so much! have free CC, not the Pro. For clamping I use the Crush-It Essential Clamp Set and Get a Grip Workholding Kit but cant get high and always fiddling getting is snug (mostly 1.5 inch high I feel is the magic number on the SH5). @KevBarn14 maybe a YouTube video work on clamping pros and cons!?
3D printing: FUN! Will print some off and try them out. Have some extra MDF I’m using as extra workholding and will try @Woodcrafter suggestion as well. Slowly learning but having fun!
@KevBarn14 Your numbers scare me! So high, but Ill give it a try. Was also cutting walnut, and some basic walnut bowls turned out fantastic using my settings (mostly walnut, maple, oak). But I am very conservative as just learning. Keep an eye on “what did you cut” next week and Ill post results - as busy getting summer jobs done in Ontario and less time to play till the weekend. Canadian summers, they start, you blink … and then they are gone…
I use adobe CC for everything (graphic designer by day) and thought Fusion 360 would be the answer, drawing I find very easy, but the CAM is a hard one to grasp. Plus you need to do 1 NC file per tool change with the personal version. I am now considering CC Pro. Wish it would come with a complimentary year of the program when purchasing Spindle and Shapeoko!
NOTE: Downloaded trial and gonna try it. Saw pricing a year and its not bad.
Trying the cut tomorrow - will keep you posted. Here is the updated file if you want to beat me to it and show off your skills Or just review - up to you!
Nope - no bueno. It’s that strange tool path at the outer ring causing me issues. See pics. The strange thing is that that ring goes deeper than the rest of the path.
Further, it does it twice. It gauges / bites down and then retracts and does the circular motion I am looking for around the inner “bowl” retracting the height.
This is how it starts just biting away the round edge. Little cuts is the ramping as now downloaded the Pro version to trial.
Hi Marleen, I’m taking a guess of the problem. It looks like the wood that your using is not flat to the table surface. I see the clamps you have placed holding it down but there is a big gap. You could try adding shims under you work piece. Every time the cutter goes across the turn it my be teetering down and shifting the path of the cutter.
I installed a fence on the front of my machine. I manually routed the piece of wood square. Then, I used a piece of 1x3 on the back side and long clamps to hold it in place. This allows me to face an entire surface without hitting any clamps.