I am trying vcarve inlay. I have carved the female part in some oak. The male part is cutting now. I created the female part with adv vcarve with 1/8 end mill and 60 degree vee. That came out well. The male part I made 2 tool paths. One with 201 and 302 and one with 102 and 302. I ran the 201 until the 302 was called for and stopped job. Put in 1/8 102 and cutting air but around text it is starting to cut. I had read to use same bits for both male and female but wanted to rough with 201.
Will post pics when done. Cut female .20 inch deep and male .18 inch deep. The female part is oak and male is cherry. I had some .25 inch cherry laying around planned and ready to use from a previous project.
I went to Rockler Tuesday and got some Mas epoxy as a backup if male part fails. I have been wanting to try inlay for a while.
I am making a small table to use some oak ballisters someone gave me. The legs were cut to size and top of leg was square so I turned them to 1.5 inch round 2 inches long and bottom was square so I turned them round as well. Makes a nice leg with the factory turned part.
Well during the 102 portion my drag chain fell off the back of the gantry and hung up. So the x position was off. I got a block of oak and double sided tape to fill the gap where it falls off. Started job over on a new piece of cherry.
During the first run with 201 I noticed the piece being forced down after getting down from .25 inches to .18 inches. I think the piece was bowing up because of pressure from outside edges. For new piece I put some blue tape down in center and super glue to keep piece anchored. Live and learn.
Ok I got the carving done and the male plug fit into the female socket well with an exception.
I cut the female pocket 0.20" deep. I cut the Male socket with 0.18 depth on a piece of .25" thick stock so I would have a 0.02" void under the male socket for glue squeeze out. When I inserted the male piece in it sat pretty high with a gap between the surface of the female side and the wood left on the male side but I went ahead and glued it together. The inlay fits well but there is a bigger void under the male part and in a few places I can push down on the male inlay and get a little flex.
Wondering why the male part did not fit down into the female part further. After surfacing the excess part of the male plug there is almost a perfect fit with no gaps but the inlay is very thin and did not seem to go to plan.
Any suggestions. I would post the project but I only have the male part and did not save the female part and then wrote over that with the surfacing. I should have made 3 projects but wound up with only one. I wont make that mistake next time.
I made dozens and dozens of practice pieces before I was happy with the results, mostly in MDF. Generally I didn’t bother to surface or even glue them up as you can usually tell by just placing them together how good the fit will be. Those that I did glue I then cut in half to see what was going on inside.
The important thing is to write on the test pieces which bits you used before you get them all muddled up.
Seeing as you are at least making progress, I would cut the same female cut as previously and adjust the depth of cut on the male to .19, and try the fit again. Then increase the male by a further .1 etc. I am assuming you have just made a simple shape.
I cut the female part to .depth of 20".
I reversed the text and drew a box around the text, selected the box and did adv vcarve to depth of .18". Leaving the text at 0 depth and pocketed around text to .018 depth on the material that was .25" thick.
I expected the inlay to drop down to the surface of female side but it did not drop down all the way leaving the inlay much thinner than .18".
@gdon_2003 You want your start depth to be 0.18".
That will essentially make the designs match up 0.18" down the male inlay. If you left the start depth at 0, you’re matching at the surface with essentially no inlay.
Take a look at my post and pictures in this thread.
Ok I think I got it. For the male you want 0.18"+0.18 for depth of pocket around male pocket around inlay. That would make the pocket depth of.36" making inlay .36 above floor of pocket in male piece.
I’m sorry Guy. I’m not quite following what you said there.
I’d recommend:
a 0.2" female pocket
a male start depth of 0.12"
a male total depth of 0.2"
This gives you a “glue gap” of 0.08" (2mm) and a “saw gap” of the same. Once you add glue, clamp the snot out of it. The 0.8" gaps might be a bit much, but it’s really to give you the room for the clamping pressure. As you get more experience with inlays, that could probably be reduced, but moving 2mm isn’t really that much room to move (again, clamp the snot out of it). A lot of the guys here that don’t get tight inlays are bottoming (or topping) out when they clamp.
Thank you for replying. It is the start depth that is confusing me. I have seen the start depth on several posts and in a video that Julien linked on using vetric for vcarve inlay.
I will just try to follow the setting on male piece and see what happens.
Are you using Vcarve or create? (Or something else?)
The start depth is the depth at which the male and female outlines will match up. Ultimately, this is the depth that the plug will fit into the pocket before the profiles match and the walls touch. You’re basically doing the same thing you did initially (with the zero start depth) but ignoring the first 0.15" of wood. Imagine if your first test had another 0.15" underneath what you saw as the “very thin inlay”…that’s what the start depth does.
Again thanks Neil. I think I got the concept. My concern is with a starting depth of .1 the material on the male plug is still there and the cutter would make a .1"+DOC on the first cut. I will try it and report back. Thanks for your patience.
Yup. I’m not sure if CC takes that into account. Most programs don’t. Basically they treat it like you set your zero 0.1" beneath the surface of the piece.
I got it figured out. I kept setting the top of the male plug as 0 and max depth as 2.1. That created a male plug that the T in my example was too big to fit into the female pocket. As Neil Ferreri replied to set the male plug to start depth of 0.1" and max depth to 2.1". That worked but the reason it works is why I was having such a hard time understanding. When you start with the 0.1" depth the actual size of my T in the example is smaller so it fits down inside the female pocket. When I used 0 on top the actual size of the male plug was the same size as the female plug so it would not go down into the female pocket.
The depth of the female pocket was .2"
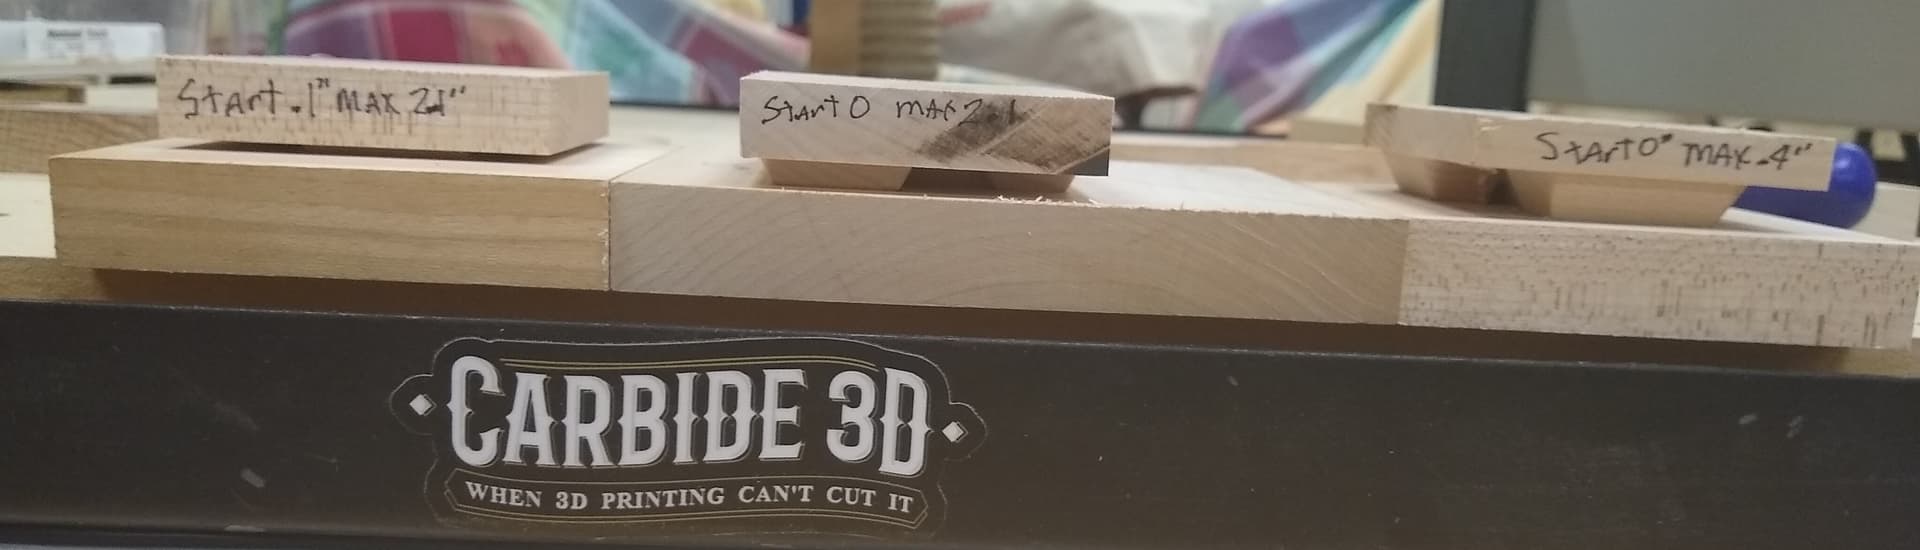
In my picture the left most plug is started at 0.1" and max depth of .21". The distance across the T is 2.04" at the top of the Vee cut.
The second from the left is a male plug starting at 0 and max depth of .21" and the distance at the top of the T is 2.1"
The third from t he left is a male plug starting at 0 and max depth of .4" and the distance at the top of the T is 2.15"
The forth from the left is the female pocket. The distance at the bottom of the T is 1.923"
So the solution was the start depth of .1" but the reason is the carving of the T is smaller than starting at the top of the work piece. This is the missing part of the puzzle for me. I have seen multiple videos of telling you to start at .1" but never the reason why. The reason is the male plug size of my T character is smaller so it fits into the female pocket. This has been twisting my brain for a couple of days because until I cut multiple test pieces and saw them side by side and the light went on. Everyone said to start the male plug at .1" but never the reason why.
Thanks to Neil Ferreri for answering. If it were not for my hard head and over thinking this I could have figured this out a few days ago. Live and Learn.
In this picture you can see the male plug fit into the female pocket on the left is the start depth at 0.1" and max depth of 2.1. The middle one is starting depth at 0 depth and 2.1 and then on the right side is starting at 0 depth and max depth of .4".
Hopefully someone looking for vcarve inlay instructions will find this explanation helpful. Of course if I had only have followed directions I would not have wasted so much time. However hard learned lessons are not forgotten.
I went ahead and surfaced the top off. I had put glue in the vcarve so I mixed up Mas TableTop Epoxy with TransTint black die. Let the epoxy sit overnight and surfaced it off. Looks great. Will post pics later. Sealed with shellac and got a coat of Spar Utethane on it. This will be a shop stool or could be a side table. Wanted to put a durable coat of finish to stand up to outside. One leg is a little tight so I need to chuck it back in the lathe and turn a few thousands off and then finish the legs. I will use TiteBond III because it is water proof.
I love it when a project can be saved. The epoxy looks great. Because the epoxy is slow set I was able to run heat gun over it repeatedly to get air bubbles out.
Just have to decide whether to glue legs on or not. If I glue them in I will have to deliver in person 3 hours away. If I leave legs unglued I can mail it and my friend can glue them in. I will do all finishing with it apart because it is easier than assembled.