Before I start, I want to thank all of the people from this forum, the Facebook groups, and all over the internet that reached out to help me or that posted information in a place I was able to stumble upon it when I needed it. Thanks!
I know there are lots of resources for a spindle upgrade, but after doing an all-in upgrade a few months ago I decided to provide as many resources in a single place that I could. Hopefully this helps someone else in their future endeavors. I’ll include a few discussion points, but most of this build is explained by the wiring diagrams I created, links to just about every single part you’ll need for this build, and even the Carbide Create file for my control panel posted on Cut Rocket ( https://cutrocket.com/p/5fe1ae8cdb4cb/ ). Also, I am located in the United States, so all electrical things are based on the type of juice we have here.
I made this to fit my space, so it’s about 16" high x 17" wide x 12" deep. Those measurements could be adjusted to your needs, but I wouldn’t go much smaller since it’s pretty tight inside the enclosure, however there is still plenty of room for good airflow. I used scrap 1/2" and 3/4" Baltic Birch plywood for the box and a piece of 1/8" thick white polyethylene painted black on one side that I got for free from a local sign shop. The front is bolted on with Rampa bolts and threaded inserts I had left over from a recent furniture project. I do not recommend this method since it requires lots of extra wire slack in order to allow the panel to be removed to access the inside. I would recommend using a hinged front panel and running the wires so that they follow the hinge and everything can be neatly secured and easy to follow.
Along the lines of wire management, I soldered and heat shrunk every wire splice/junction. This became excessive when combining many wires together (24v positive and negative lines). If I were to do this again, I would look into terminal busbars for these connections instead of soldering.
The main features I desired were:
- Self contained electronics enclosure to keep things central and minimize dust interference.
- VFD inside the enclosure to minimize the noise of its always-on fan
- CW-3000 “chiller” instead of a pond pump and bucket since it’s a nice setup
- Remote indications for CW-3000 so that it didn’t need to be front and center
- Ensure coolant was always circulating when the spindle is or may be used
- Emergency “stop” that doesn’t actually kill the file in process, but quickly pauses (operates the same as if you lift the lid on a Nomad while it’s cutting)
- Shapeoko control for the spindle on/off and speed, plus the ability to run it manually from the VFD
- Dust extraction auto on/off during cutting
- Ability to run the dust extractor between cuts for general clean up
- All in one power setup to minimize the switch sequence required to get up and running
- Along with the above, a way to help me have a better habit of turning off the Shapeoko power
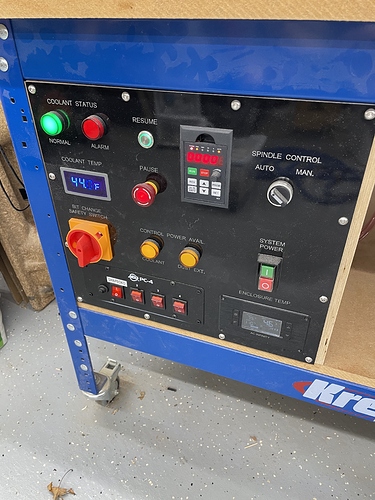
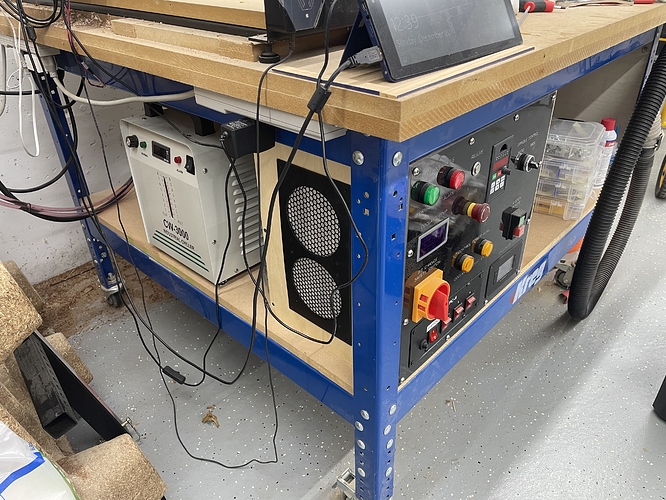
And here it is:
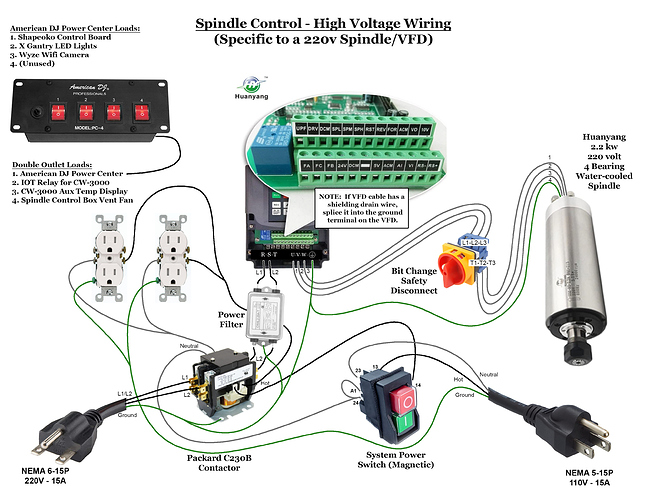
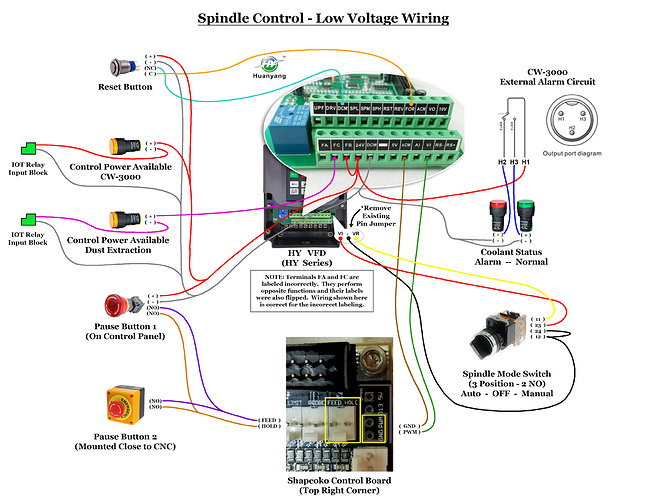
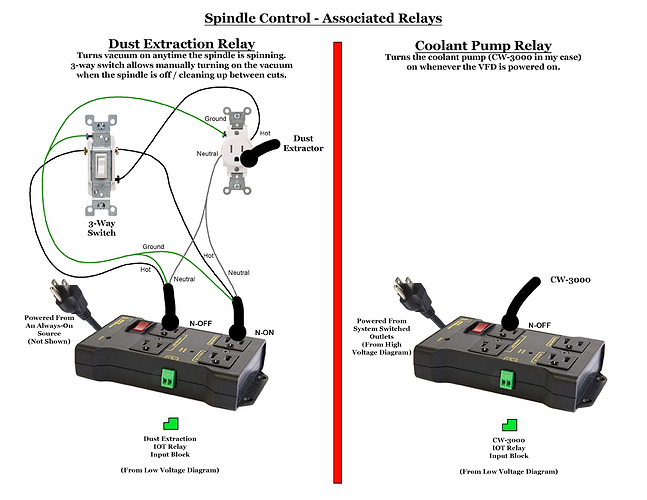
There are 3 drawings that show the High Voltage, Low Voltage, and Associated Relay wiring that I used.
And just a bit of a disclaimer: I am not a licensed electrician, so follow your local electrical codes. But, remember to physically separate high voltage connections from low voltage connections, typically using an enclosure and proper strain relief as wires enter and exit the enclosure. And don’t forget to properly ground everything, including metal enclosures and junction boxes.
There is a full explanation of the VFD parameters in the user’s guide and lot’s of great info here (Post #7 from the top is super informative): VFD Parameters (Huanyang model)
To keep this a little bit more concise, these are the VFD parameters I have changed outside of factory defaults:
- PD001 = 1
- PD002 = 1
- PD004 = 400
- PD005 = 400
- PD006 = 2.5
- PD007 = 0.5
- PD008 = 220
- PD009 = 15
- PD010 = 8
- PD014 = 5
- PD015 = 5
- PD024 = 1
- PD044 = 2
- PD051 = 5
- PD052 = 32
- PD053 = 0
- PD070 = 1
- PD072 = 400.0
- PD073 = 0.0
- PD141 = 220
- PD142 = 10
- PD143 = 02
- PD144 = 3000
I wanted to point out the biggest difference that you won’t find in most people’s parameters is what I have set for PD052. Although the manual calls this some kind of a fan setting, with the wiring I have shown, it’s actually what causes the dust extractor to turn on and off based on if the spindle is spinning or not.
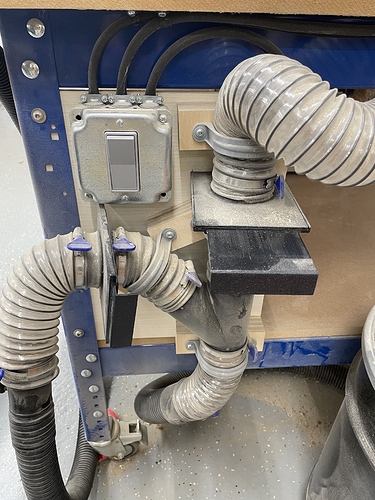
Along with the dust extractor, I did not include drawings or parts for how I have my dust extractor plumbed in, but here is a picture of that. I have one hose going to my dust boot and one hose that hangs on the front of my table that I can use for general cleaning. The blast gates control the air flow. The switch allows me to turn the vacuum on and off between cuts while still keeping it’s automatic functionality during cuts.
Below is the parts list and where I found them. If something is no longer available, alot of things can be substituted for other parts, but just remember that the low voltage parts are working at 24 volts and you may need to adjust the panel cut file if substituting parts.
Lastly, I have a few supporting photos that I’ll include at the end.
Parts:
Huanyang 220V-2.2KW Water-Cooled Spindle (4 Bearing Model)
Shapeoko HD 80mm Spindle Mount
*Only compatible with the HDZ
ER20A Collet Nut Wrench
Spindle Wrench (21mm)
Huanyang 220V-2.2KW 3HP VFD (HY-Series)
VFD Control Panel Extension Cable and Panel Mount
*Only needed if you will be mounting your VFD away from where you desire to control it from. My VFD is mounted inside of the electronics enclosure and I used the extension cable and mount to locate the control panel seamlessly on the front of my enclosure. Note: You need to open the entire front face of the VFD and swap the cables. This is not just an extension for the cable that’s already installed in the VFD.
Shielded VFD Cable
*I ordered 20 feet and only had about 4 feet left over. Unfortunately this cable is wider than the included connector to the spindle is designed for. Removing the outer insulation gets it to the right diameter. I then added a large heat shrink tube over the now exposed shielding prior to tightening the clamp. Without the outer insulation, this portion of the cable is weak, so finding a good way to keep the cable upright as it comes out of the spindle connector is important to prevent strain/bending hard at the connector as the spindle moves along the X axis.
This video was very helpful in understanding the best technique to use when connecting the aviation connector to the spindle end of the VFD cable. Don’t forget to slide all of the needed parts onto the cable before soldering because this cable is too thick to slide them on from the other end later! https://www.youtube.com/watch?v=_GLeCt_u3U8&t=96s
https://www.wireandcableyourway.com/16-3c-w-ground-shielded-vfd-cable.html
CW-3000 Coolant Circulation System (110V Model)
Fan Dimmer Switch
*A useful mod to reduce the noise of the CW-3000’s fan. More details in my other post here: CW-3000 Fan Control (Reduce the noise!)
Plastic Tubing (1/4” ID)
*This is the main tubing line used.
Plastic Tubing (3/8” ID)
*This tubing diameter is only used for a few inches out of the CW-3000 until reduced down.
Barb Style Tubing Reducer (1/4” to 3/8”)
*2 pieces needed
Miniature Hose Clamps (5/16”)
*6 pieces needed
RV/Marine Antifreeze
*Just shy of 2 gallons needed. Don’t dilute.
Drag Chain (18mm x 50mm)
*For Y Axis Rail
Drag Chain (15mm x 40mm)
*For X Axis Rail
Drag Chain Mounts (15mm x 40mm)
*PwnCNC no longer sells these, but the Thingiverse model is linked below. Perhaps he will print them to order if you contact him? I had to drill several holes (and tap a few into my aluminum rails) for these to work perfectly with the drag chains I bought and my desired setup, but these were an excellent foundation to work from. I also had to cut the outer wing wall off of the Y axis support bracket so that the 18mm x 50mm drag chain would work there. I used M3 flat head socket cap screws (15mm long), lock nuts, and appropriate tap to fasten the drag chain to these brackets and into my aluminum rails where possible.
IoT Relay
*2 units are needed
Reset Button
Indicator Lights (24V)
Pause Button 1
https://www.amazon.com/gp/product/B075R7HK8J/ref=ppx_yo_dt_b_search_asin_title
Pause Button 2
Rotary Switch (3 Position)
Bell Wire (18/2)
*I used this for as many low voltage connections as I could (where a red/white color scheme worked for me)
Hookup Wire (22 AWG)
*I had this already and used it for low voltage connections where I wanted a color other than red or white (bell wire). The difference in wire gauge between this and the bell wire doesn’t matter for this application.
Dupont Connector Kit
*I already owned this tool. These connectors were very useful when connecting a wire to something with connector pins already installed (VI-VR pins on the VFD, Feed/Hold pins on the Shapeoko, and I believe newer Shapeoko’s have pins preinstalled for GND/PWM). Breadboard jumper wires with female Dupont connectors already installed can be cut and spliced to the end of your wires if you don’t want to get the connector kit linked here.
https://www.amazon.com/gp/product/B07X9MJ8G2/ref=ppx_yo_dt_b_asin_title_o00_s00
Ferrule Crimping Kit
*This is definitely optional, but I really like using these on solid or stranded wire that will be installed into a screw clamp terminal (most of the VFD connections, the indicator lamps, and the bit change safety switch).
Nema 6-15P Cord
*Cut off the female end.
Nema 5-15P Cord
Power Filter
Magnetic Power Switch (Powertec 71355)
Contactor (Packard C230B)
Disconnect Switch (3 Phase)
Power Center (American DJ PC-4)
*The outlets are on the back of this unit, so if you panel mount it like I did, you will need to craft a way to access them so that you can access the plugs. I made and ran 4 short jumper wires that terminate into 4 outlets mounted on the back of the enclosure, effectively replicating the back of the Power Center onto the back of the enclosure.
Heat Shrink Tubing
Spade Connectors
*2 packs needed
https://www.homedepot.com/p/Tyco-Electronics-0-250-Series-16-14-AWG-10-Clam-Female-Disconnect-Fully-Insulated-Nylon-EB0280-000/202204295?MERCH=REC--pipsem--303994276--202204295--N&
Ring Terminals
*Used for high voltage connections at bottom of VFD
Crimp Tool
Power Cord Wire Spool
Duplex Outlets
*2 pieces needed
Single Outlet
3 Way Switch
https://www.homedepot.com/p/Leviton-15-Amp-3-Way-Toggle-Switch-White-R62-01453-02W/100356976
Electrical Plug Ends
*3 pieces needed
Wire Nuts
Electrical Enclosure
*This was a snug and awkward fit to house the contactor and the power filter. I recommend a larger enclosure, a second smaller enclosure to house the power filter by itself, or the love of a good challenge.
Junction Box
*2 pieces needed
Four Outlet Cover
Single Outlet Cover
Cable Clamps
*2 packs needed
CW-3000 Aux Temperature Display
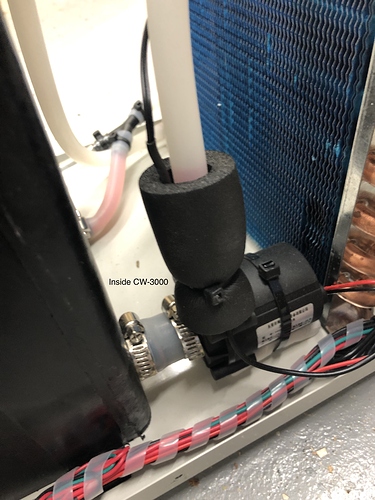
*Allows the CW-3000 to be out of sight and displays in Fahrenheit. You must open up the CW-3000 in order to use this. Once inside, there is a tube shaped piece of foam insulation on the discharge tubing of the pump. Inside this insulation is the CW-3000’s original temperature probe. Slide this 2nd probe in about the same spot and run the wire out and to this display.
The User’s Manual is found at this link. https://www.parts-express.com/pedocs/manuals/sure-electronics-temperature-display-manual.pdf It explains the use of the internal dip switches to modify the display settings. 1-ON, 2-OFF, 3-ON, 4-OFF was my combo for Fahrenheit temperature units and using CH-2 input (the middle wiring terminal).
Power Supply for CW-3000 Aux Temperature Display
Enclosure Vent Fan and Controller
*Possibly overkill, but since I wanted the VFD (it’s noisy) and many other components to all be housed inside of the main enclosure, I wanted to ensure that I was moving air through the enclosure and also I like to know what the temperature is inside. I placed this discharge fan on the bottom of the enclosure blowing towards the ground. This allows gravity to assist in minimizing dust that might come in through this unfiltered fan when it is not running.
Enclosure Vent Intake Grille
*I positioned this in a location that was easy to access to vacuum or change the filter.
Enclosure Vent Intake Filter
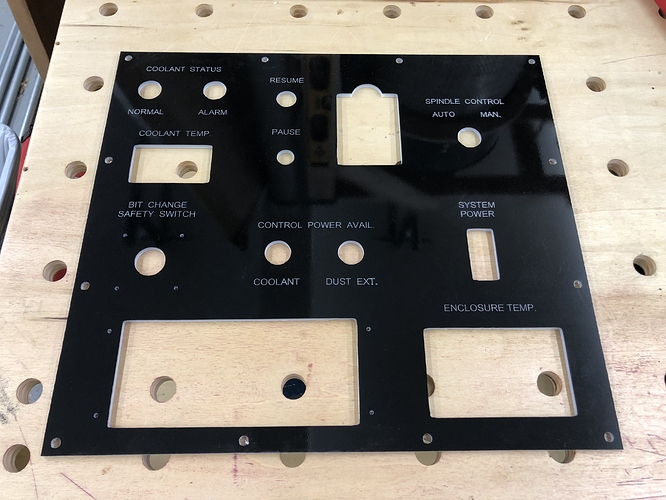
This shows the front panel I cut out. I used a Dremel with a sanding wheel to decrease the thickness from the back side in the few areas where items “snap” into place instead of screw. Ensure that your CNC is decently calibrated prior to cutting this file or else the parts might not fit into their respective holes well. And on the same token, the Power Center needs to be partially disassembled (remove the front plate, but leave the wires still attached) in order to shimmy it into its hole.
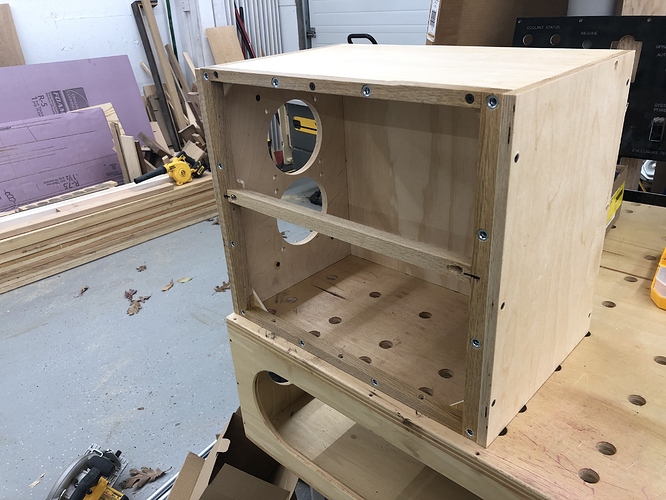
This shows my enclosure box. I used scraps that I had to fit the space perfectly under my CNC table. The bottom of the enclosure is the shelf it sits on. This shelf/bottom is where I cut through and installed the AC Infinity cooling fan, aiming at the floor.
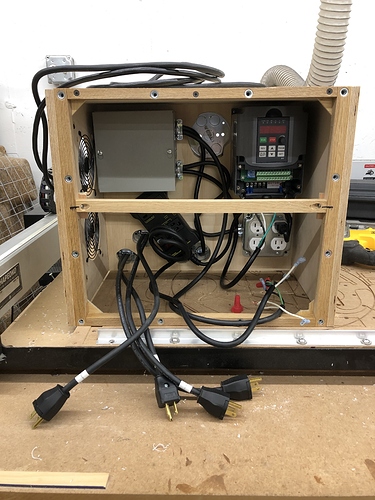
This shows my enclosure box after the high voltage wiring was mostly complete. The top left is my contactor and power filter enclosure. The VFD is mounted in the top right. The bottom left is my CW-3000 IOT (the Dust Extractor IOT is mounted outside of the enclosure). Also in the bottom left are the pig tails I wired to extend my Power Center outlets outside of the enclosure since you would otherwise need to have non-permanent power cords, like the Shapeoko’s cord, running through the enclosure wall – note: the components for these pigtails are not included in quantities listed in the above shopping list). The bottom right is the power receptacles used inside of the enclosure, controlled by the Powertec switch.
**I do not have a picture of the low voltage wiring inside of the box because it was a disaster. 100% mess. Just going to show that I would recommend using the hinged front panel instead of bolt on.
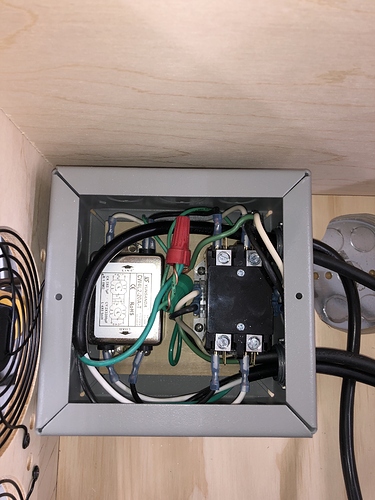
This shows the inside of my contactor and power filter enclosure. I used a scrap of plywood to mount the items too. It was a very snug fit, but worked.
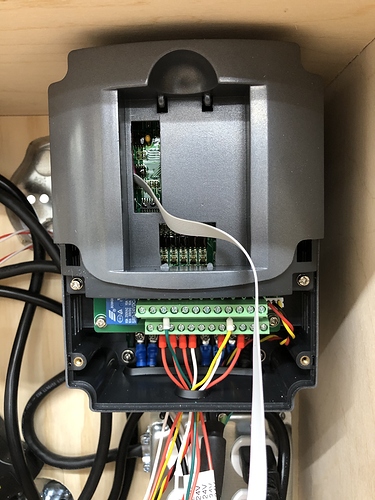
This shows the VFD after all of the hookups are made. Note: you must remove the entire front cover in order to swap the VFD extension cable seen here.
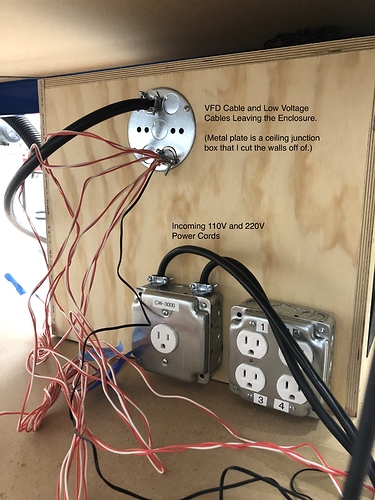
This shows the back of my enclosure. I didn’t include parts above for the outlet setup seen here (Power Center pigtails are on the other side of those outlets) or for the circular plate at the top. I’m not in love with how either of these worked, so I’d recommend you experiment with other options if you care to.
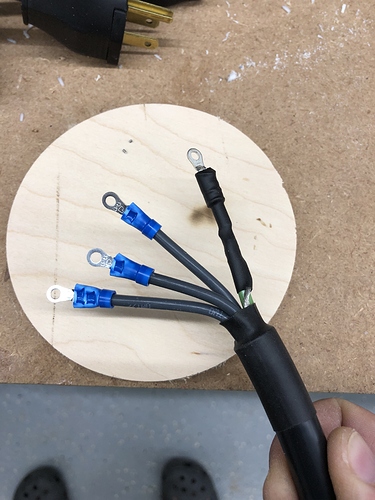
This shows how I incorporated the VFD cable ground and shielding drain line together at the VFD end of the cable. You don’t need to do anything with the drain line at the spindle end. Also in hindsight, I’d recommend splicing all of your ground wires together into a single wire before adding the ring terminal. There is not much room on the VFD screws for more than 1 ring terminal. I got mine to fit with two, but it was difficult.
This shows how I added the extra coolant temperature probe into the CW-3000. Just slide it into the foam insulation tube and zip tie it off so it doesn’t accidentally get pulled out.
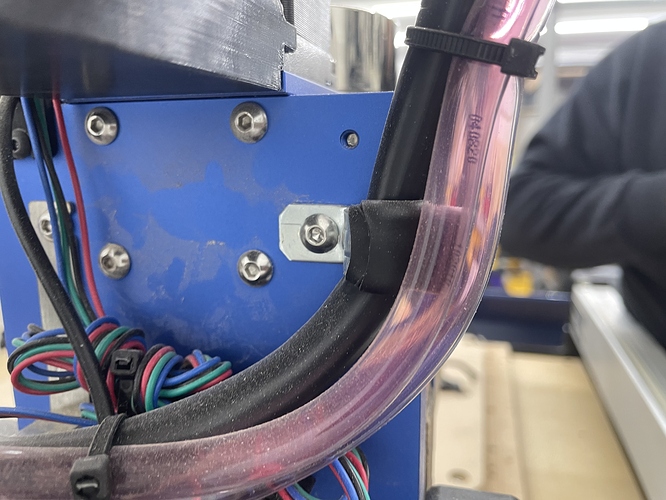
This shows how I used a conduit clamp covered in thick heat shrink in order to keep my VFD cable upright at all times.
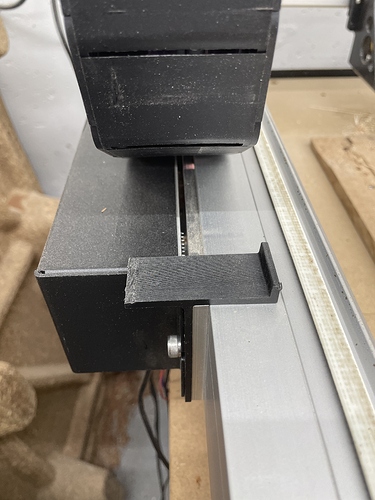
This shows how I modified the 40mm PwnCNC drag chain bracket to fit my 50mm wide drag chain (extra width needed on the Y rail).
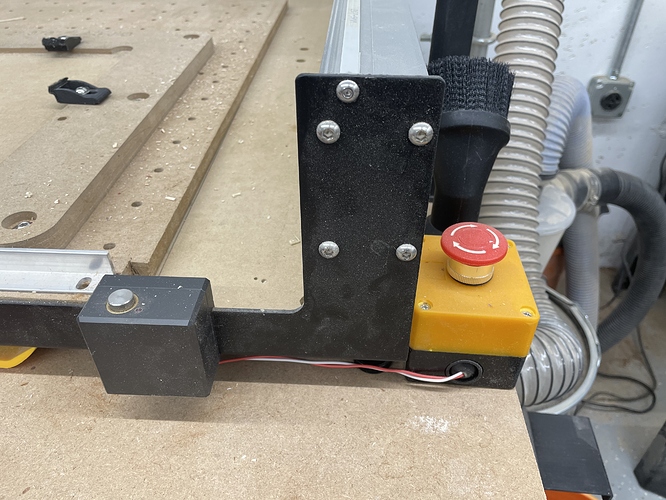
This shows where I put my 2nd pause button on the top of my table.
