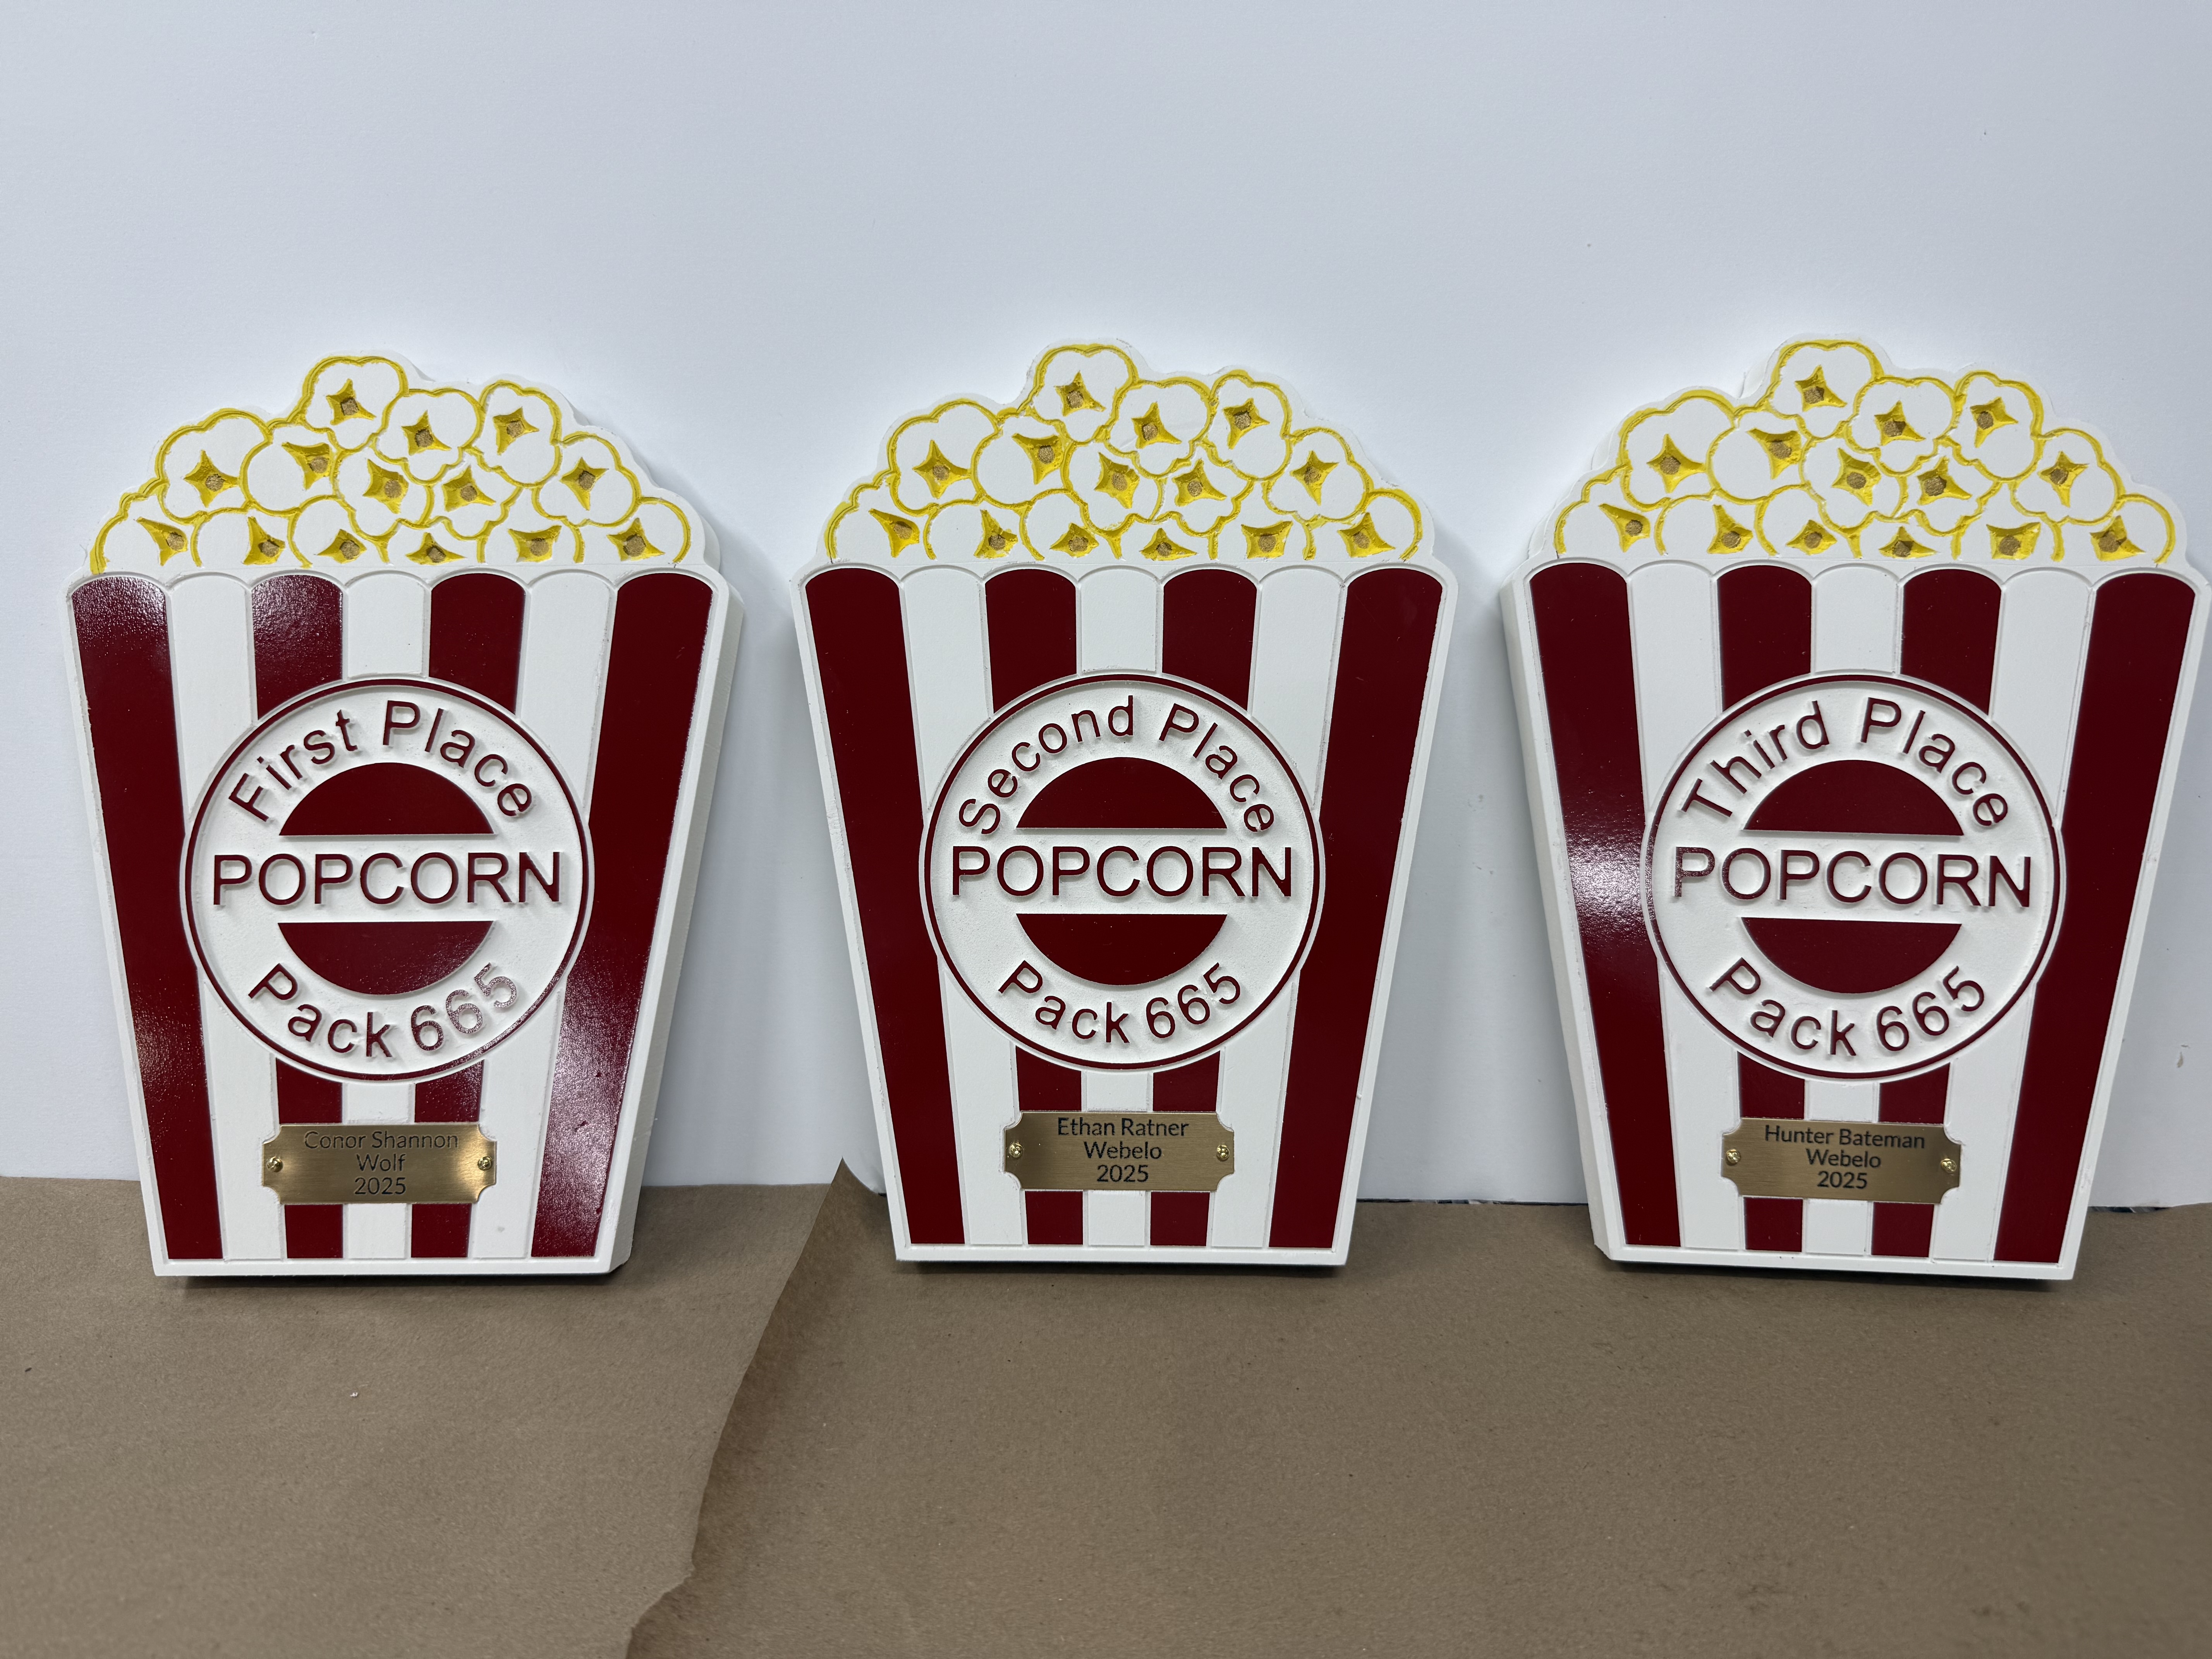
Fourth year in a row for popcorn sales awards for the local cub scout pack. They are made from PVC.
They have always looked like this but I have changed strategy a couple of times.
First year I painted the whole thing red and then ever so slightly machined the paint away where it is white and at the surface, so popcorn pieces and the white stripes.
The next couple of years I masked and used the stingray to cut the lines and pealed away what needed to be red so I could paint just that.
This year I used the same strategy but used my laser to score the lines with just enough power to get through the masking. Then removed mask on the areas to be painted. After it was dry I put them on the CNC (one at a time) and crosses my fingers that the zero point was going to line up properly. I wasn’t careful enough in getting one up to the fence so I had to redo that one.
The laser way much quicker than using the stingray and didn’t have issues in the corners. Those of you with a laser or laser attachment may want to consider that route sometime.
The only issue is that cutting PVC on a CO2 laser can release poisonous gas that is bad for you and corrosive for the machine.
I did some testing with the masking material on MDF first to dial in my power and speed settings but even still in a few places it scored ever so slightly into the PVC. I wore a respirator just in case.
I don’t know if the diode lasers in the CNC add ons would have the same issue.
PVC (polyvinyl chloride) contains a lot of chlorine (from its vinyl chloride units). A laser doesn’t “melt it cleanly”; it heats it extremely fast in a tiny spot, causing thermal decomposition (pyrolysis) and sometimes burning if oxygen is present. That breakdown is what releases toxic/corrosive gases.
What the laser does to PVC (mechanism)
Rapid local heating: Laser energy is absorbed and converted to heat at the surface (very high temperature gradients).
This creates HCl gas (corrosive, toxic to breathe) and leaves behind conjugated polyenes (char-like residue).
Secondary cracking/oxidation: At higher temperatures and/or with air present, those residues and additives further break down to:
Carbon monoxide (CO) and carbon dioxide (CO₂)
Soot/particulates and various irritant organics
Potential formation of chlorinated organic compounds; in poorly controlled, oxygen-containing high-heat conditions, dioxin/furan-type compounds can form in trace amounts (risk depends strongly on temperature profile, oxygen, and time).
What gases you can expect (typical)
HCl (hydrogen chloride): the hallmark emission from PVC laser cutting/engraving.
CO (and CO₂) if there’s incomplete/complete combustion.
Irritant VOCs/particulates from pyrolysis and from plasticizers/stabilizers in flexible PVC.
Why lasers make it worse than “gentle heating”
The beam creates very hot micro-zones and instant pyrolysis, generating gases faster than they can dissipate.
Any fume extraction delay means you inhale a high-concentration plume near the cut.
Practical implication
Laser cutting/engraving PVC is generally avoided because the fume stream is corrosive (HCl damages lungs and equipment) and can include highly hazardous byproducts depending on conditions. If you need a PVC-like plastic for laser work, people typically use acrylic (PMMA) or certain laser-safe polymers instead.
Yeah, I knew that it is bad and really tried to only go through the masking layer.
I have people asking me to do baseballs and softballs on the laser periodically and many of them actually use a synthetic PVC cover. It is extremely hard to identify in the listing for the balls if their synthetic cover includes PVC or if its some other material.
I really wouldn’t have even mentioned the idea here except that I thought others may want to give it a try on masked wood.
If I make these again next year I may look for a different approach.
Those awards would look pretty sweet with a walnut/maple inlay but thats a good bit more work. (well, actually just a lot more nerve racking).
When working with unidentified material it is best to assume the worst. Lasers have introduced new hazards to already hazardous workshops. The larger lasers have extractors and filtering but most DIY/Hobbyist machines do not have smoke/dust extraction. Even though you have a pair of lungs you kind of need both to be healthy.
I do wood turning and some exotic woods make people very alergic when the chips/sawdust gets on their hands/arms. Same for machining exotics on your CNC. Plus breathing the dust can make you have a respiratory problem. I am in a turning club and some of our demonstrators dont wear respirators or face shields. If you are alone in your shop and get knocked out it may be some time before someone misses you and comes looking for you. Meanwhile you are laying on the floor bleeding and maybe bleeding out. So take safety serious and dont FAFO. The FO is BAD.
Well, you must have sent out some advertising to our neighborhood because some animal (bear?) got into our bin hunting for some Taco Bell last night and knocked off our sign in anger when he realized there was no food inside☹️
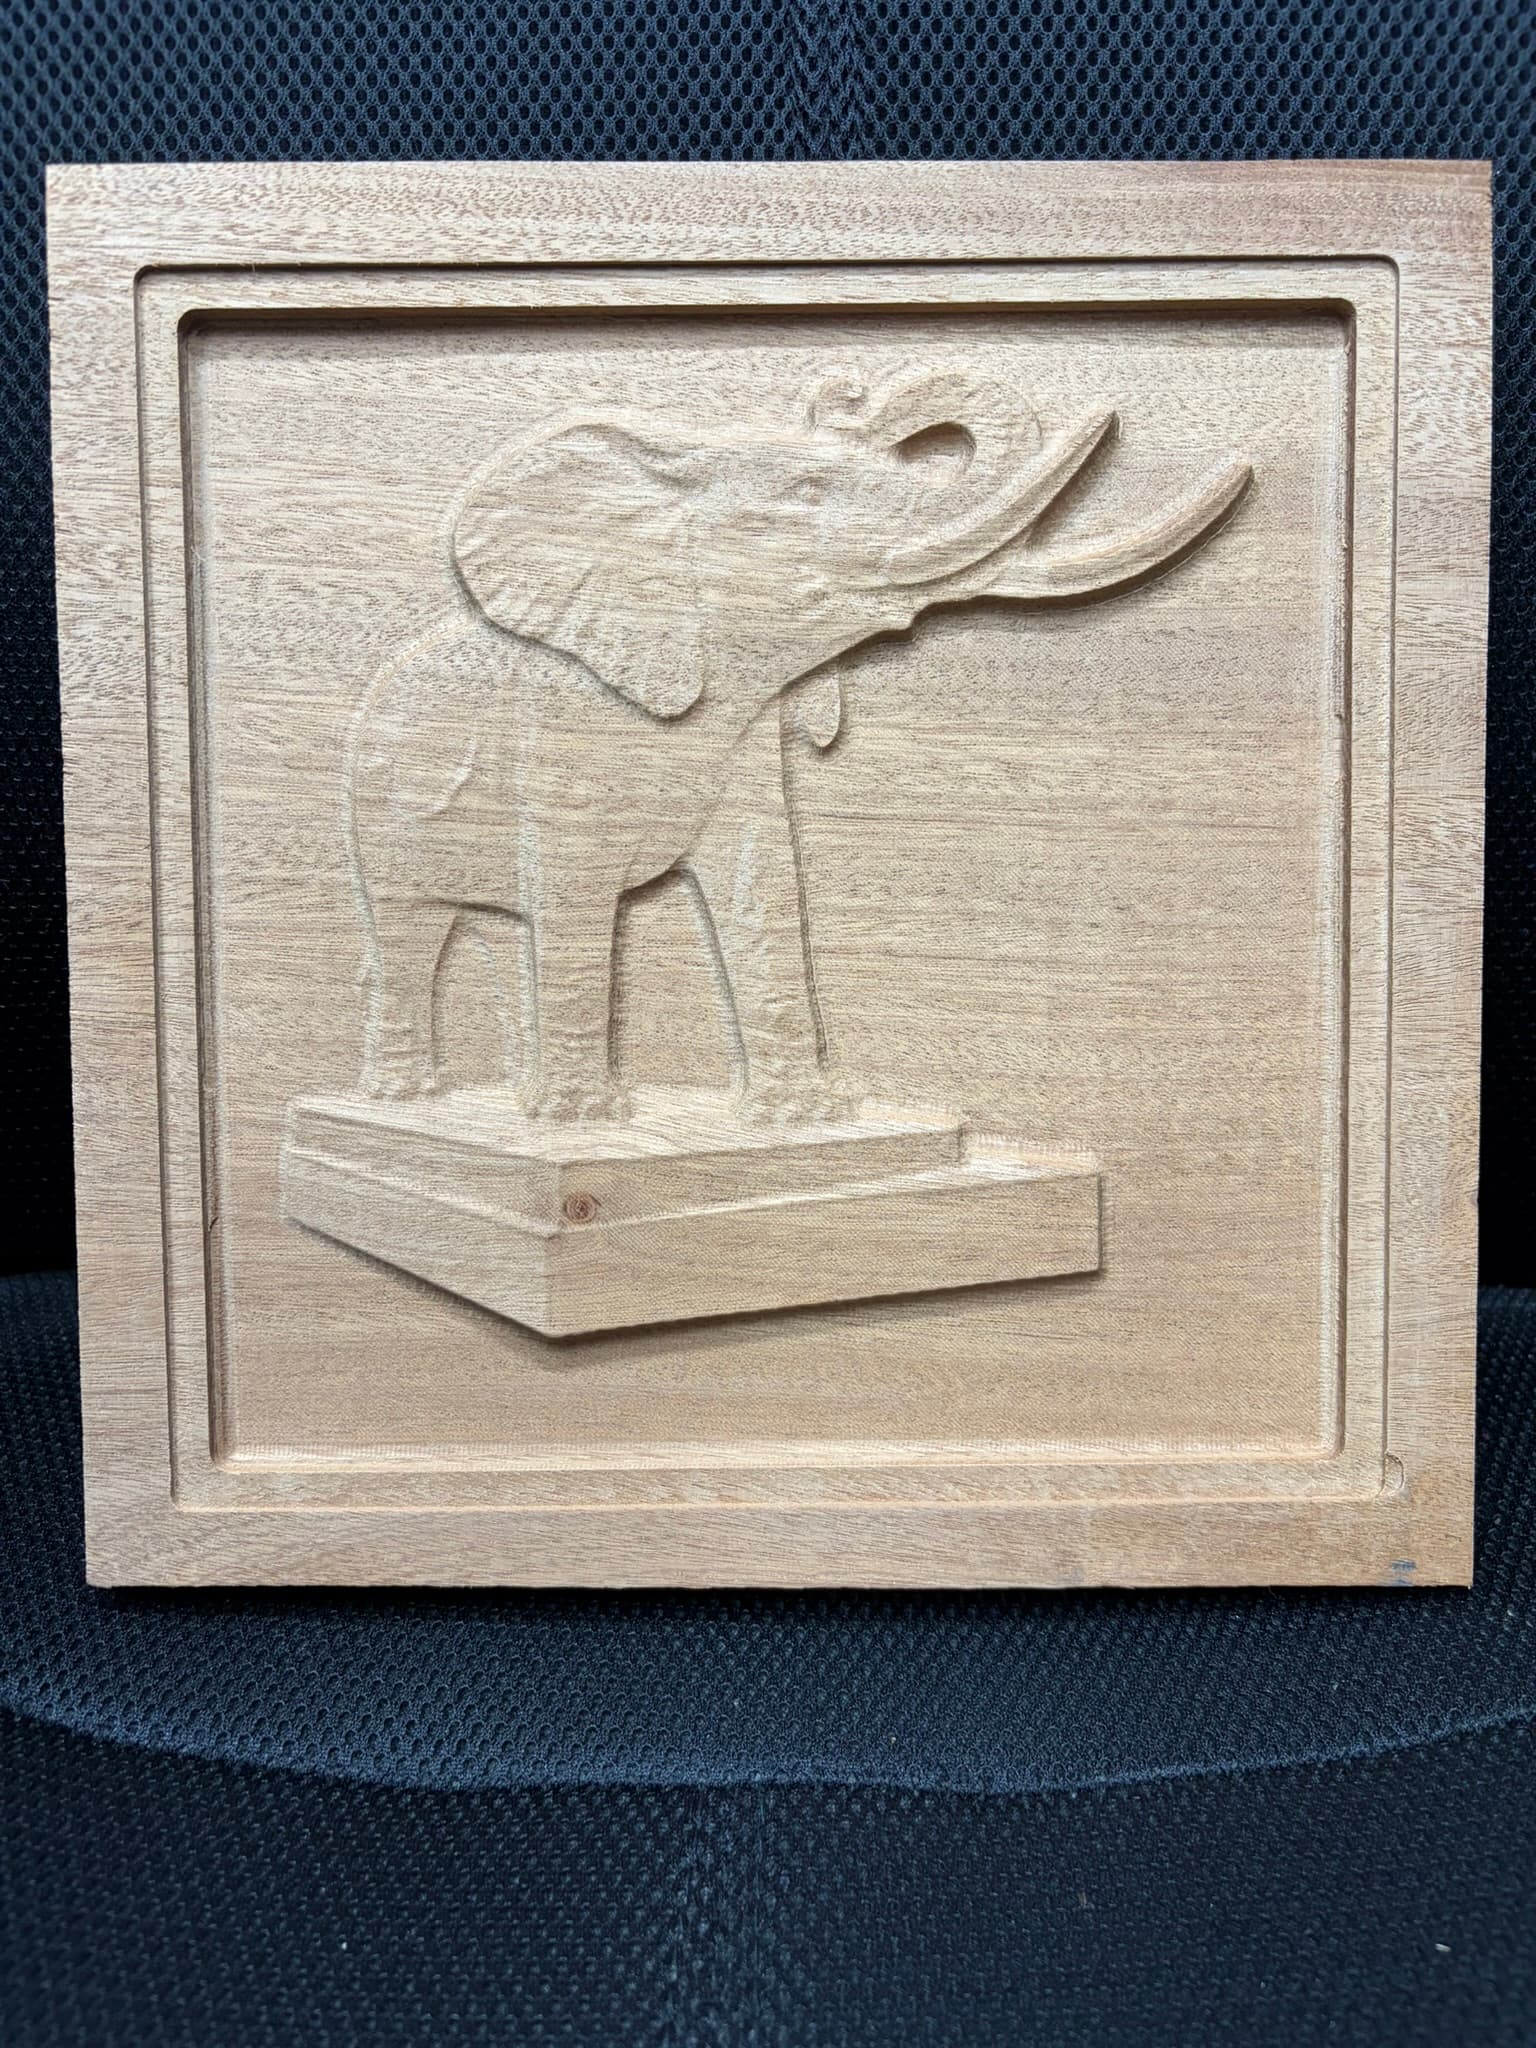
I’ve been wanting to do this one for a while now but haven’t been able to get the design “just right”. Using @xenith web app https://community.carbide3d.com/t/picture-to-3d-carving/101059/12 I was able to get a really good STL file.
I live in the town where Jumbo the elephant was killed by a train and there is a life size statue of him here. I used a picture of the statue I found online, removed the background using CoPilot, imported it into the app and created a decent STL which I imported into CC.
While this one turned out pretty good I’m likely going to play some more and make it a little taller so it stands out even more
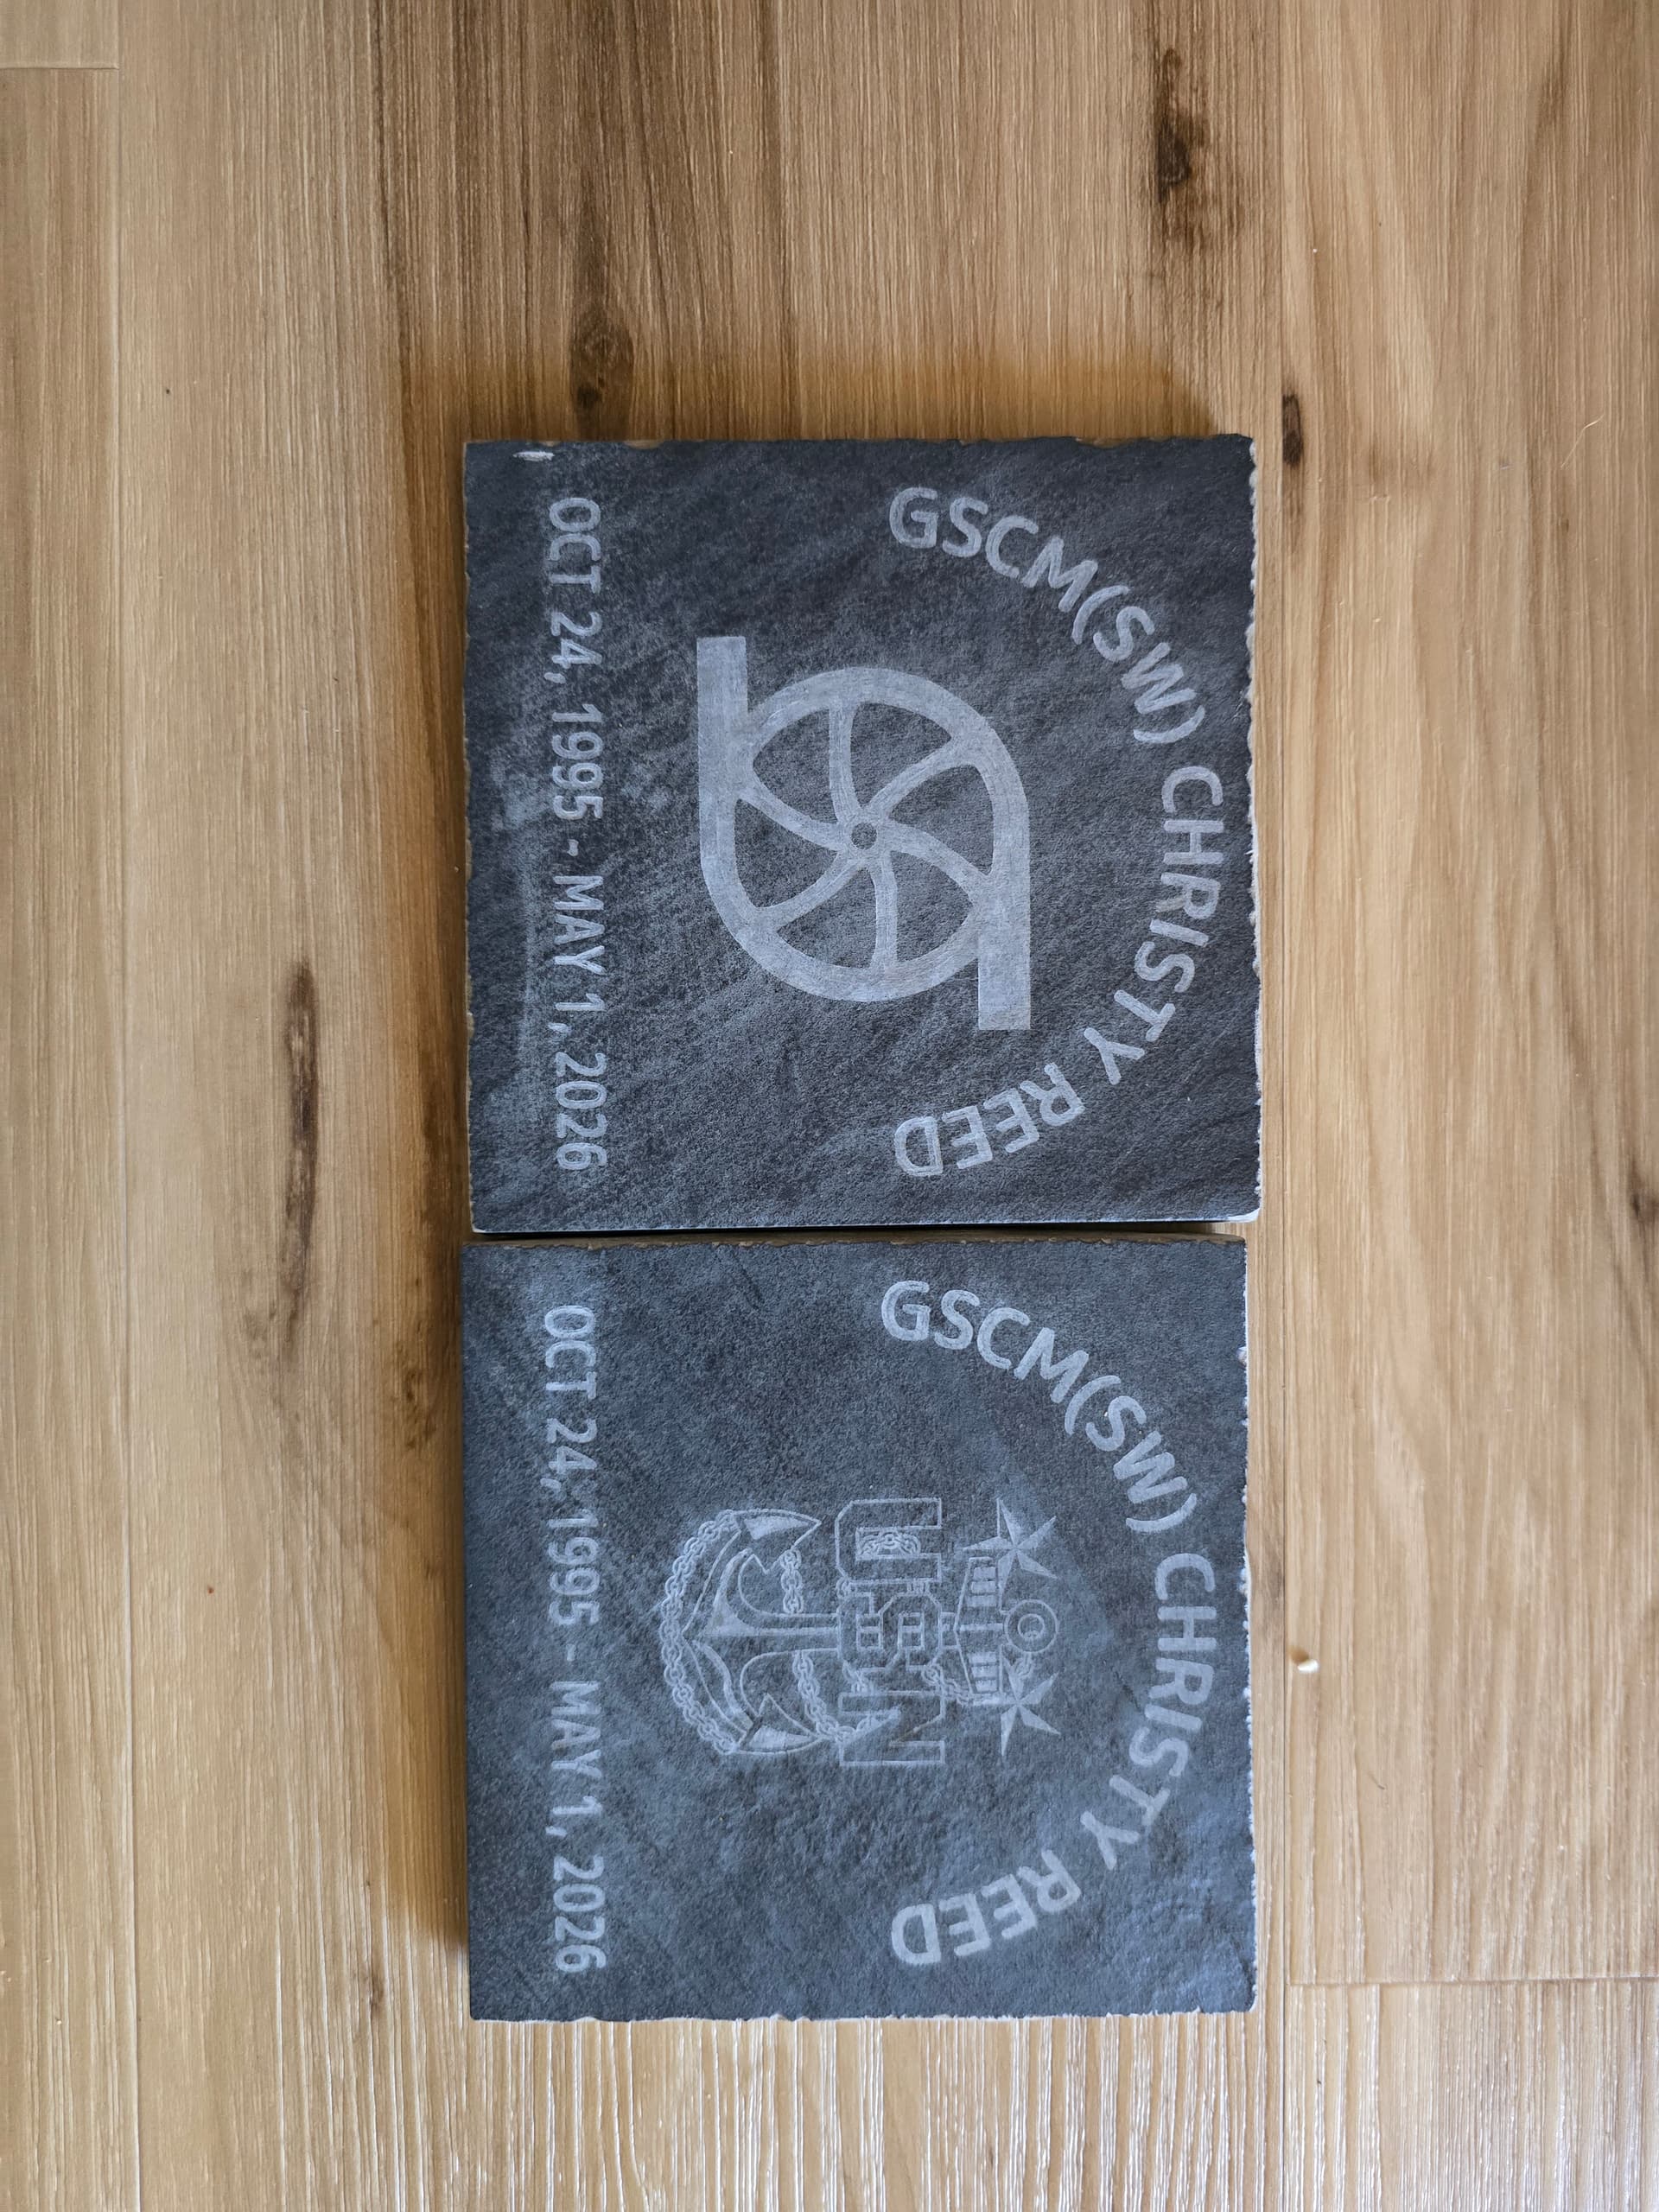
So used the Mcetcher for these coasters that are for a friend of mine retiring after over 30yrs in the Navy. My question is these are carbon colored porcelain tiles that I cut down should I put some poly over them to give it a glossy finish or what is a good way to seal this?
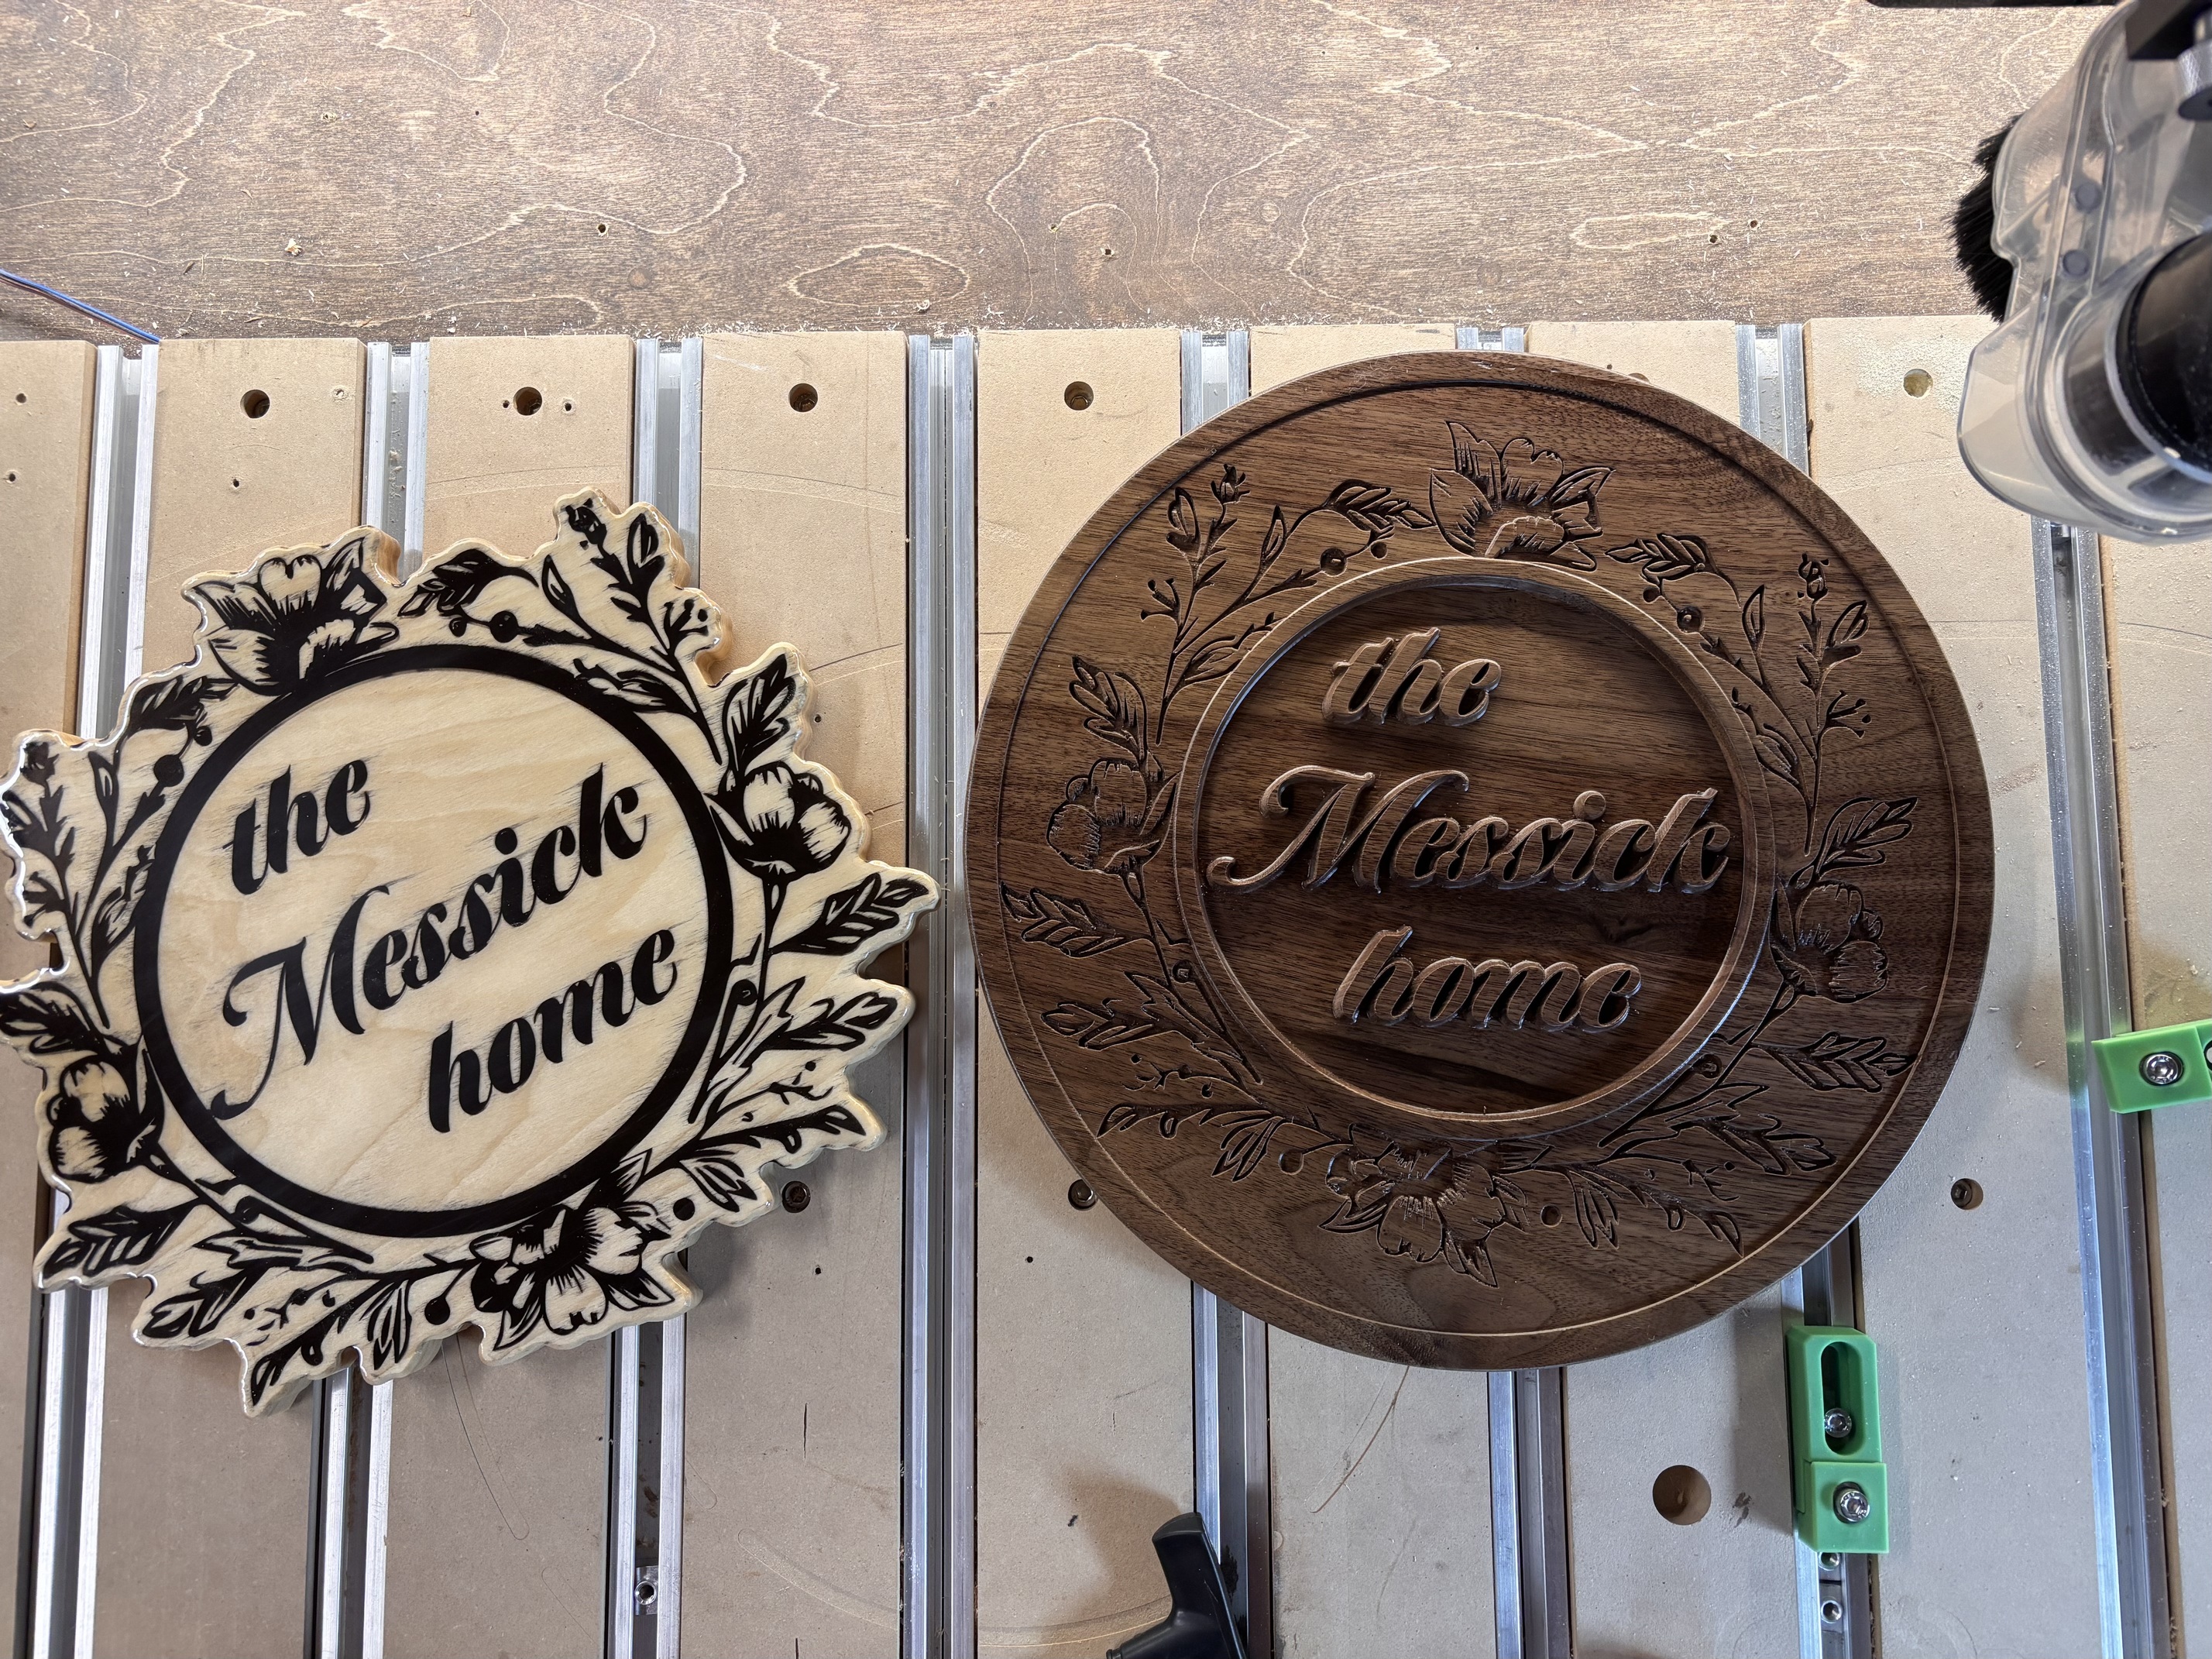
While Christmas is long gone, we had one lingering gift left to “redo”. Neither Cathy (my wife) nor I were pleased with the final product for one of our daughters and we finished literally on Christmas Day. So we gave her the option of us redoing it if she wanted. We had struggled with the wood chipping, epoxy finishing, and a variety of other things. When our daughter was given the choice she requested a revised version. We are much happier with this (though “the finishing lady” was never quite satisfied with the finish in between the letters…the grain fibers would never quite staydown.)
NOTE: this is a prime example of why we’re don’t like giving surprises for gifts. We would rather the person get EXACTLY what they want and tell us ahead of time while approving every part of it. Easy for me…Cathy literally purchases her own gifts.
Side by side (the unchosen one and the revised version) Poplar w/epoxy vs Walnut. It amazes me. Ultimately these were the same design except the poplar doesn’t have the outer circle. The different toolpaths are a HUGE difference!
Gary, when this has happened to me, I have wiped the raw cut down with a moist towel. That raised the grain wherever it was after drying. Then I ran a final 0.002” duplicate toolpath to clean up the last remnants. A sharp bit helps, too.
I can see on your first one that the poplar was not sealed well enough to keep the epoxy from running out through the grain. Poplar is bad for that. I quit using it. I think I just like darker wood.
The final one looks really good, though. +1
PS. Y’all are so good at your projects that its hard for any of us to criticize your work!
I’m in the same camp when it comes to milling composites. I’ve worked in aerospace composite fabrication and assembly and I try to explain that the hazards should be taken seriously.
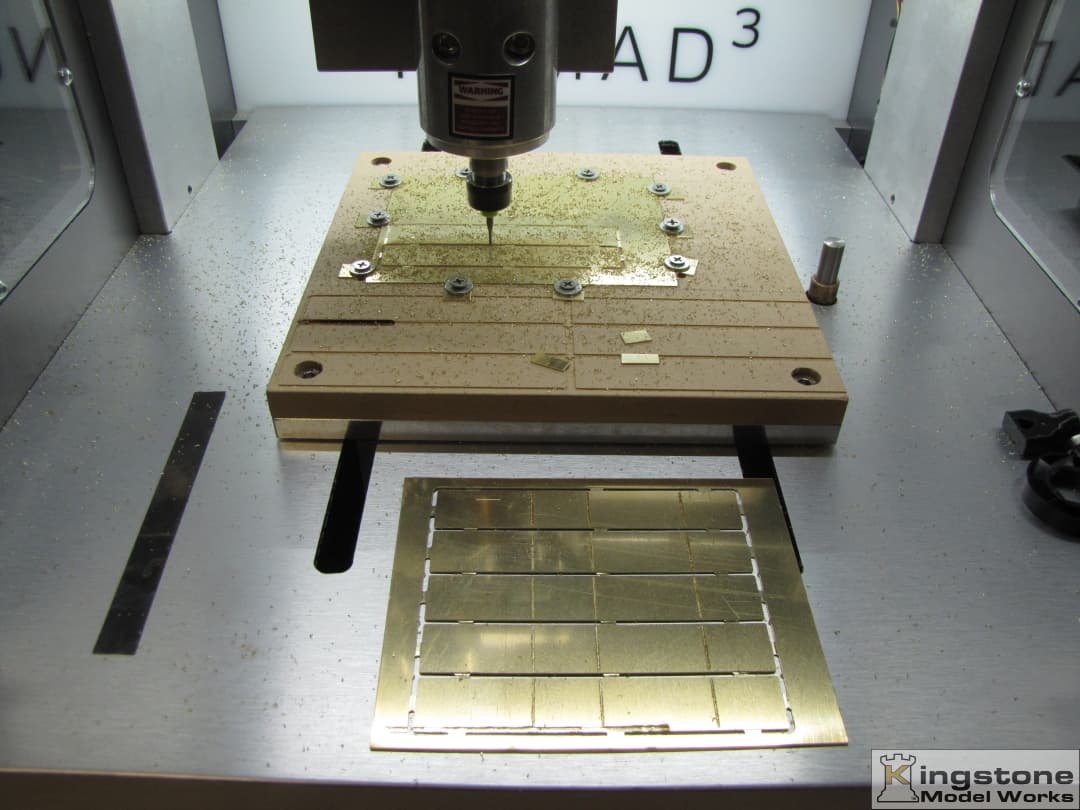
Hi. I’m new here on the forum. Model railroading is my hobby. Love these table top CNC machines. Started out with a Sherline CNC mill many years ago and just recently converted the Sherline from lead screws to ball screws. Last year I bought the Shapeoko Nomad 3 to get into 3D milling for model railroad parts.
This past weekend I finally converted one of my Sherline made parts to try out on the Nomad 3. Broke a cutter on the first cut out piece. On the second I got the “0” start location wrong and the last part ran off the brass plate.
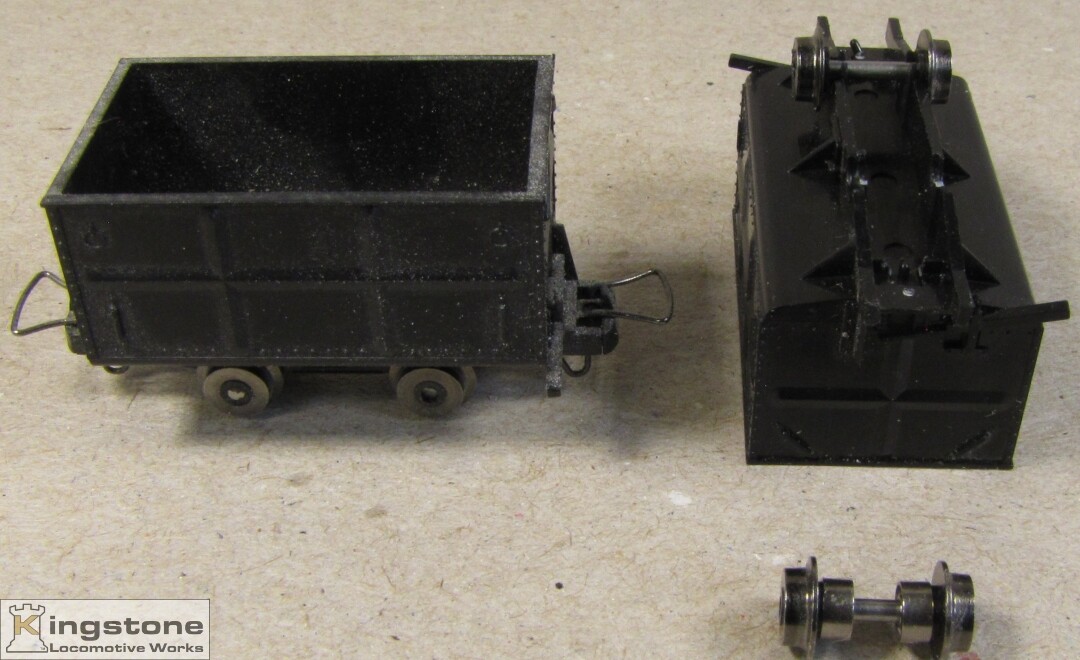
Here’s what I’m trying to build. These are plastic quarry cars in HOn30 gauge. They are to light and won’t track properly always derailing so i thought I’d make them out of brass so they would be heavier and track better.
@Bernd some adhesive backed wheel balancers would be cheaper than brass for adding weight. Not as fun though
Looking forward to seeing what you do going forward
@TonyMurray I personally like the look of it raw since you get the nice color change when it’s wet.
Sealing it may help it to last longer but then it just always looks wet (in my humble opinion )
Either way though, they look awesome. Great job
Great advice and I most assuredly will be utilizing that practice next time. When I told “The Finishing Lady” she was very happy indeed. She got very frustrated trying to sand in between those letters. I’m actually looking forward to the next one now thanks to this input
And thanks for the great compliment! It means a lot coming from someone from this community