What did you cut on your Shapeoko/ Nomad today?

I would argue that the Sloyd method of instruction should be a standard part of all education:

Students may never pick up a tool again, but they will forever have the knowledge of how to make and evaluate things with … hand and … eye and appreciate the labor of others.

2 Likes

Nice job Bubba (love the name). I duplicated the Lee Valley version in Fusion and made some of these myself. I do like your design…… If you want my take on the Lee Valley version, I’m happy to share it.

1 Like

My week-end project was making a weird todo list item holder. I have tried every solution out there when it comes to managing my tasks/priorities, and try as I might I keep coming back to using post-it notes slapped in the front of my screen, which is the only way that works for me so I thought I might as well embrace it. The thing is, post-it notes don’t stick for long periods of time, and it’s also not practical to move them around to adjust priorities in my list of things to do. So I figured that while I would not get away from scribbling my tasks on yellow pieces of paper, I could make something that would allow me to rearrange them easily, manage different priority tiers, not lose any of them because they would fly away.

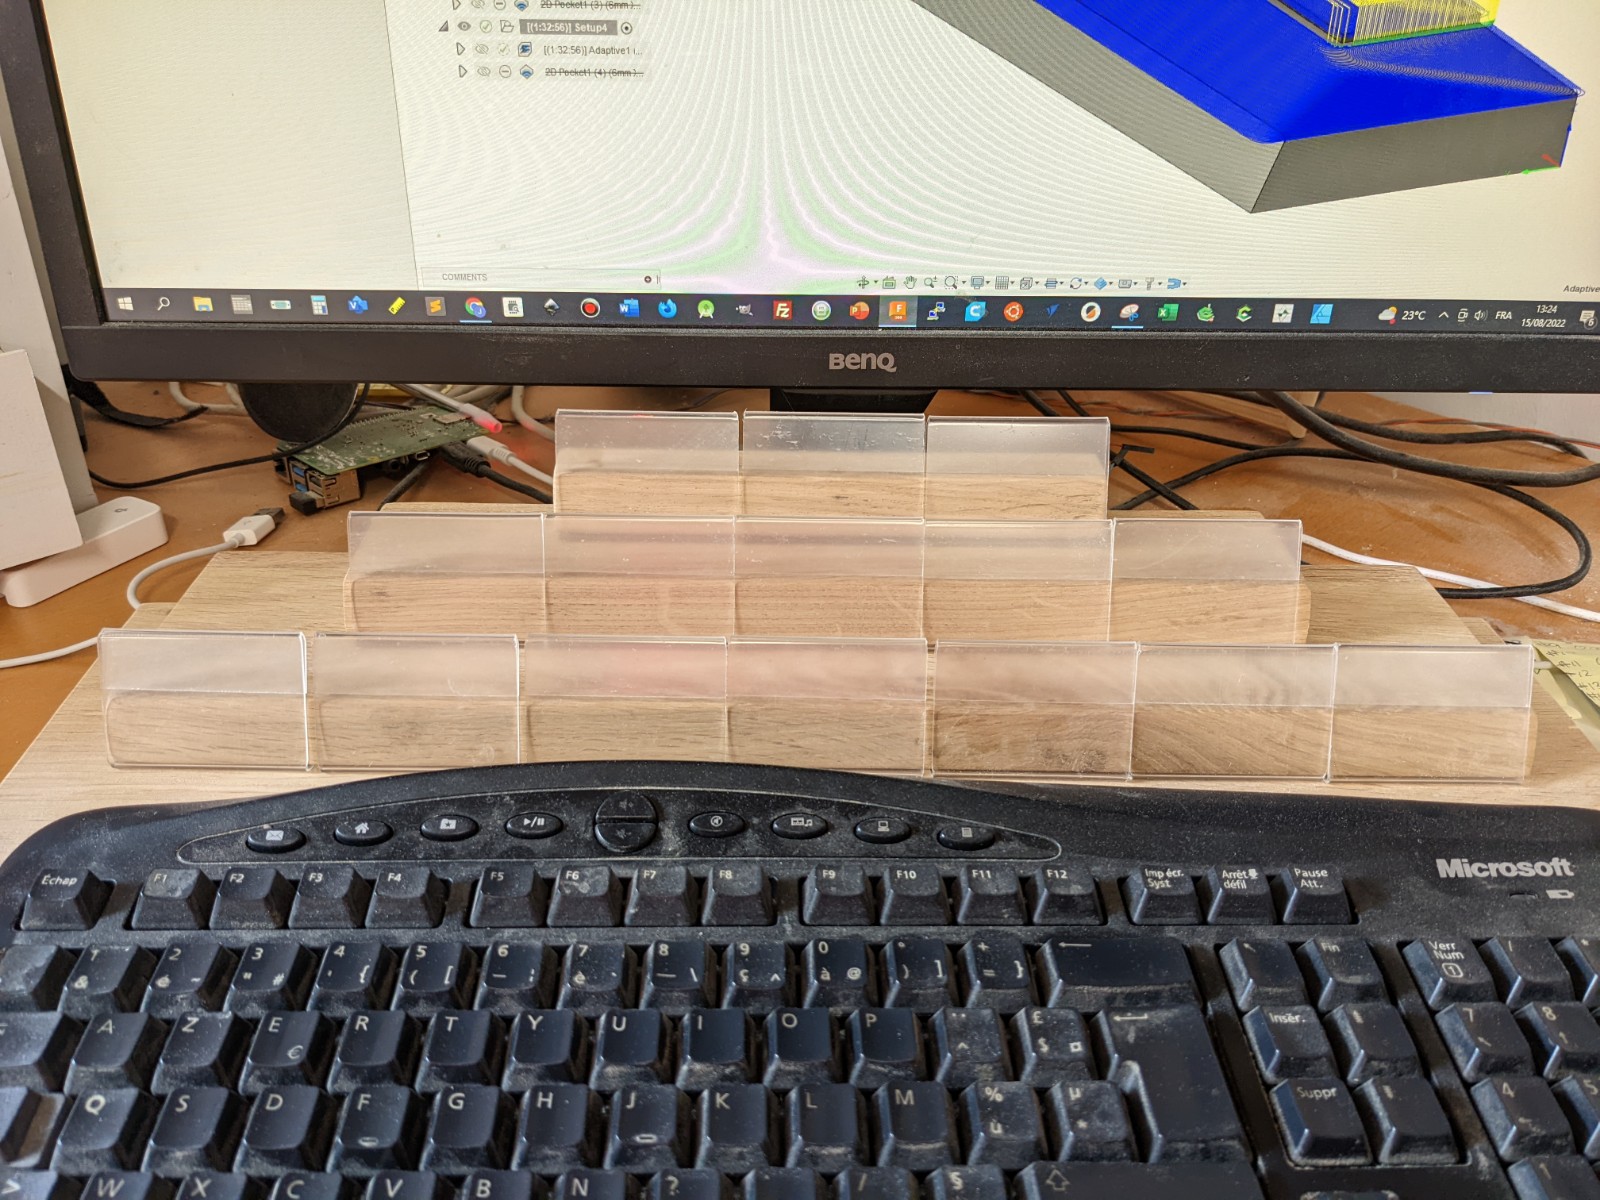
I bought a 40-set of those mini card holders on Amazon,

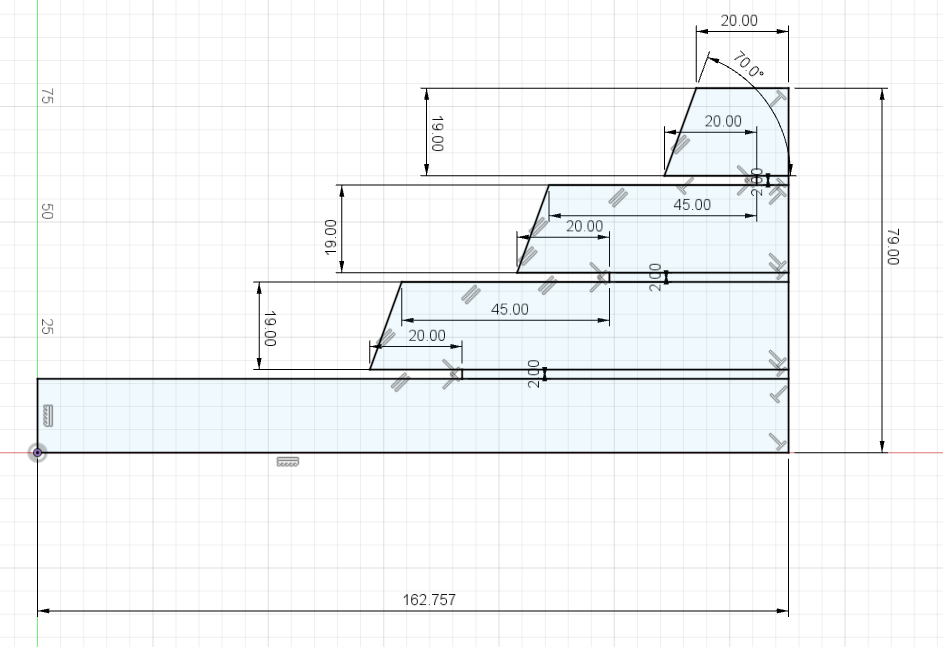
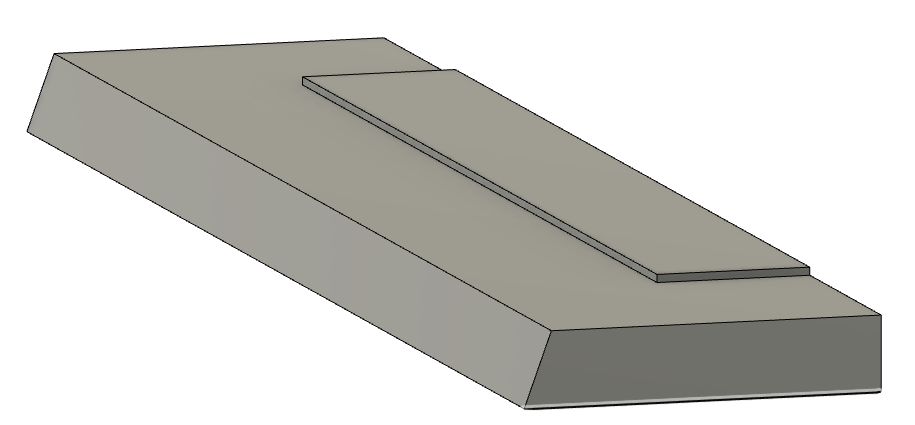
and designed a kind of post-it-pyramid-holder-thing that has three levels (low/long-term priority tasks at the bottom, middle-term tasks in the middle, and the matter at hand on the top row)

And I could then easily move the plastic holders from one row to the next when my priorities change. Or possibly order tasks on a given row by priority and shift them all to the left.

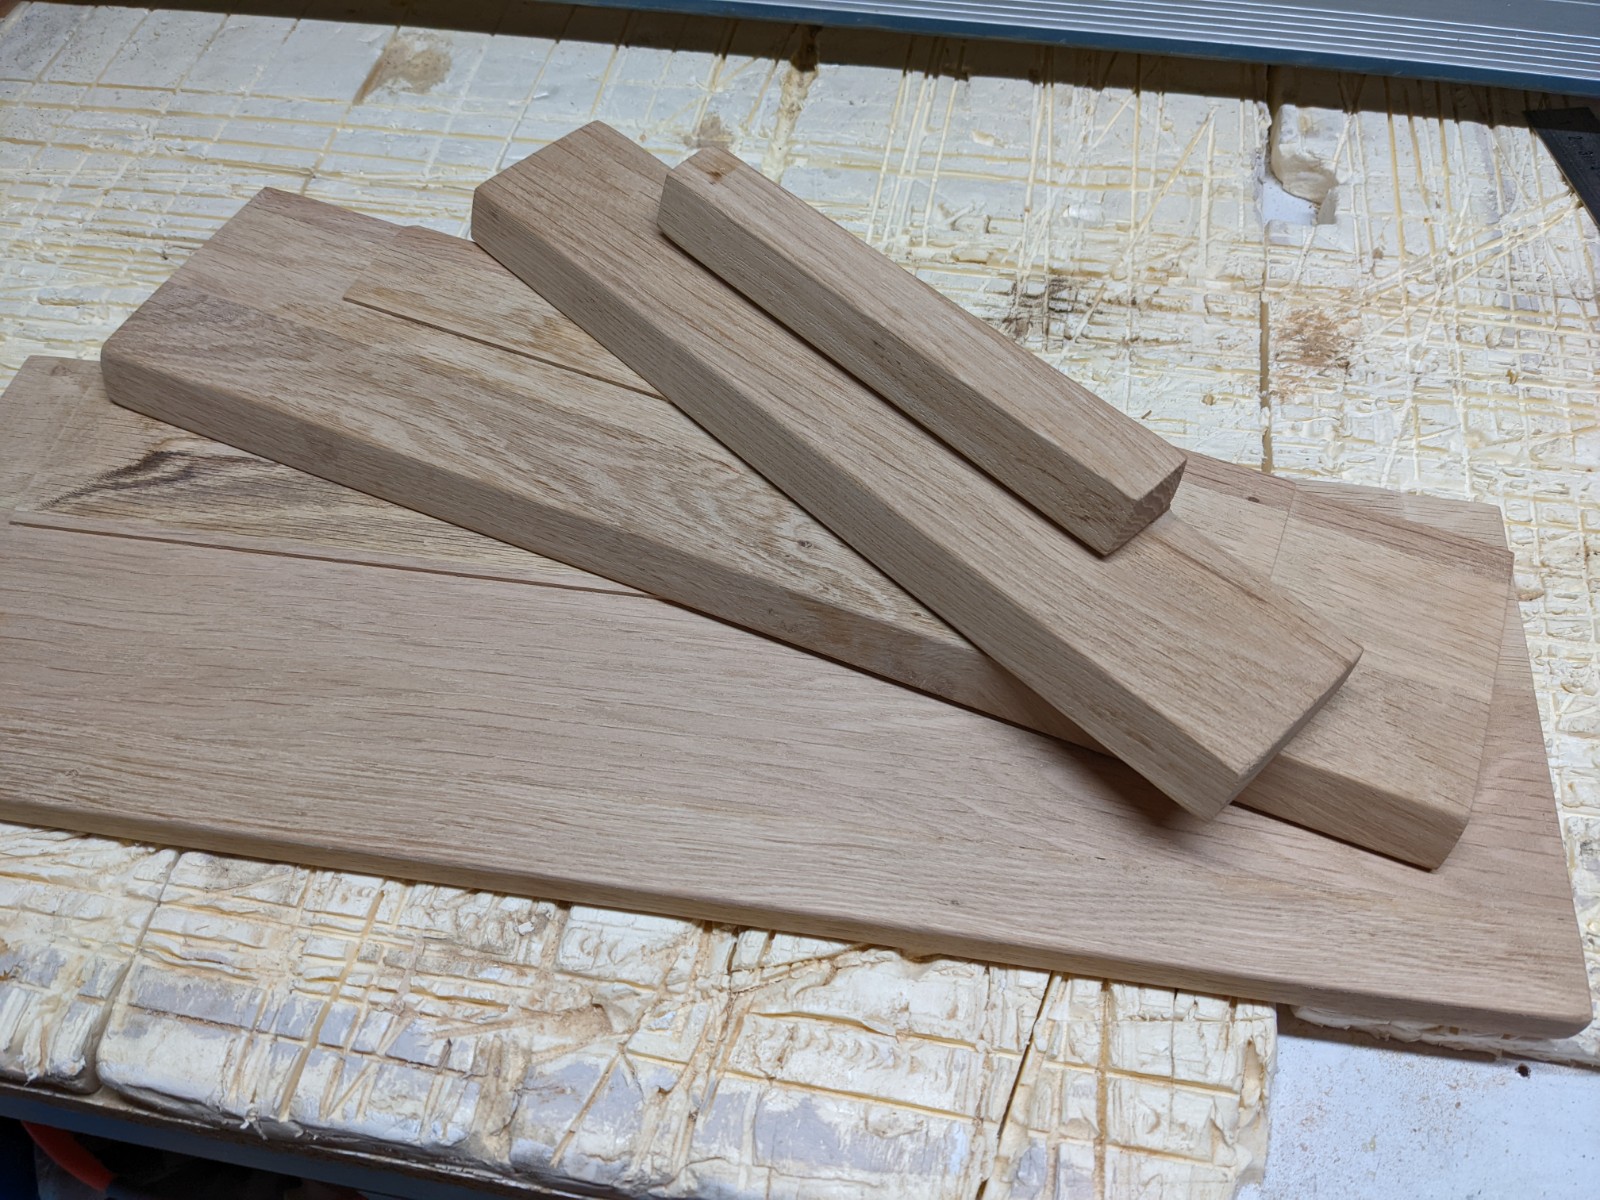
Anyways, to make the tall bulky pyramid I sliced the model into 4 levels, using regular woodworking tools to cut them to size and cut the 70° bevel, and finally used my Shapeoko to cut them to the final thickness and cut the embedded 2mm spacer between each layer and the next.

Nothing to say about the CAM, very simple 3D adaptive clearing using a 6mm three-flute downcut I had on hand. Everytime I generate a toolpath with lots of rapids like that I’m thankful to @fenrus for coming up with the gcode optimizer that circumvents Fusion360 limitation on rapids for hobby users.

Uneventful (albeit long)cuts later,

I glued the four layers

And voilà, majestic bulky post-it holder holder, ready to be used.

If I know one thing, is that one can never tell in advance whether such a thing is actually going to be useful, or end up in the bin after a few days/weeks. Time will tell !

16 Likes

Reminds me of a product which Levenger made a while back (and which is still in production):

(for those who aren’t familiar w/ the company, they bill themselves as “purveyors of tools for readers”, though their pricing and business practices arguably are a better for for “stuff for business-people who want to seem literate”)

I carry a “Palm Notes Case” (mostly to use as a blotter), and a “Levenger Safety Case” which was modeled on the cases used for tools carried by knitting machine mechanics is where/how I keep my Niwa Camera Tool Kit and some other small/precision tools. I just wish that they’d been truer to the legacy of the Esterbrook pen company.

1 Like

I usually use my Shapeoko XXL as an adjunct to my traditional woodworking. For example, if I have an unusual shape, I will mill a hardboard template on the Shapeoko and then use that template to rout the actual wood blank on my router table.

In this case, since this was a one-off, it occurred to me that I could skip the template, or rather, use the actual wood blank as the template. I set up the Shapeoko to mill my shape into the wood blank about 6 mm deep, Then I cut close to the line using my bandsaw, and completed cleaning up at my router table, using a bearing bit against the milled edge.

I suppose I could have milled the whole thing on the Shapeoko, but given the thickness it was just quicker to do it this way.

Also, while I had the blank on the Shapeoko, I used a 1/16" bit to mill the mortises for the square pegs that are characteristic of the Greene & Greene style, and the central design. The job was slightly complicated by the need to tile the job, as the headboard was longer than cutting area of my XXL.

12 Likes

A work or art!

Fantastic figuring on the wood. What is it?

Over the weekend I made two Men’s Valet/Catchall’s for my buddies.

I used 3 hardwoods, epoxy, Vcarve, and my Shapeoko.

A few minor “custom features” that only I will notice, but my buddies are stoked and impressed.

My skills are definitely coming along.

Wood is;
Walnut, Cherry, and Maple.

The finish is Cutting Board Oil.


.

16 Likes

You inspired me to make one for myself.
I’ll post when I get it done.

I already have the basic design. I plan on cutting out the body from 1" x 12" x 12" pine and using dowels to align.
Then I will cut out the front and back from the same pattern, but without the pocket and dowel holes.

I think I will put a little pocket cut on the bottom inner lip for a piano hinge.

Thanks for the inspiration!!!

Santa Mail Box Body with Dowels

2 Likes

Guessing you used a laser for the print, what type was it that allowed the distance from the optics to the board? I have a diode, but it has to get right up on the material, wouldn’t be able to do this at all with it.

(Anthony mentioned this is an epoxy inlay, not a laser job, you are correct that this would be difficult to do with a laser due to the focal distance and no clearance for the laser shroud, and removing the shroud is not a great idea)

1 Like

Stellar G&G example!

Some trophies for a friend’s golf outing

21 Likes

Tod they look brilliant,have you got them set up as LED display?I would assume just as a trophy,One of our Friends have asked me to do something very similar but will do it as a LED display.

Thanks, Julien, I missed that.

Graham, thanks. No LEDs. These are a Pro Bono gift for some good friends (but not that good :smiley: :smiley: )
Nah, I just didn’t even think of lighting them up. That would be a cool project though.

2 Likes

Tried out making inlays for the first time on the nomad 3.
maple and walnut wood. For both I cut the pocket 0.05" deep and for the inlay I reduced the size by 1%. I used CA glue and then faced off the inlay in the nomad for the islands and hand sanded for the Iwa bird.


23 Likes

I used a 20° v-bit. (the trick to get the ° symbol is to hold down the ALT button and press 0176)
The start depth is .5" to match the pocket cut. Flat depth set at .75"

I should have let the epoxy cure a little longer but I got too excited. I redid the pocket cut with a start depth of .45" and a max depth of .5".

What I learned.
I am making another set for my brothers. I will set the start depth of the V-Carve at .51", then fill with Epoxy. Then when I recut the pockets, I will set the new max depth to .51".

Also on the first pocket cut, I used a raster tool path. On the second pocket cut, to clear the epoxy, I will use an offset tool path. The reason for this is on the Raster tool path I get a little bit of tool marking on the ends of each pocket. I think the offset tool path will clean that up.
I will post the next batch when completed. I am letting the epoxy set a little longer.

I would share the file but I did it in Vectric.

Catchall in CC.c2d (564 KB)

I converted the file from Vcarve to CC.
It’s not perfect so make sure you check it out really close before you use it.
I had to separate the left side and right side to make the tool paths work so now it’s not centered.

Edit: sorry the file is empty. I will try again tomorrow.

1 Like

Love the Hawaii islands inlay. I’ve been trying to do a 3d wall hanging of islands but so far have not felt what i have created is good enough to hang yet.

1 Like

Thanks! Me too I’ve been trying to get a 3d model that shows the topography of the islands and then cut it out of koa wood but haven’t found a good model yet.