I’m starting the knowledge hunt to make the Shapeoko have a 48x48 cutting surface.
I’m curious if anyone has experience with wheels using the 80/20 extrusions?
I’m starting the knowledge hunt to make the Shapeoko have a 48x48 cutting surface.
I’m curious if anyone has experience with wheels using the 80/20 extrusions?
I have a bunch of this from a 4x4 build I did. Should have all of the screws and T nuts as well as v wheels. Send me a message if you are interested and i can get an inventory of what I have and a price for you if you would be interested.
I was actually looking at those now. How do you like them? Pretty seamless integration to extrusions?
ya it works really slick. I have a bunch of the 1500mm pieces sitting around with a bunch of T nuts and screws. ill let it all go cheap just to get it out of my way. Just shoot me a message if interested.
I take it you would need 6 pieces at 1500m. One for top and bottom for each of the three rails?
What size 80/20 did you use? Did it work perfect with all components of stock Shapeoko or did you have to make custom pieces for attach x rail to y rail?
How about you y to y connection? Did you custom fab a piece? Do you have a pic of your setup? Would love to check it out.
Presumably you’re looking to cut wood or plastics at that size nothing harder?
Are you concerned with cutting speed or high accuracy?
The Shapeoko gains a lot of benefit from the oversized extrusions with their excellent rigidity, from some other threads it takes a pretty chunky cross section of extrusion to stay reasonably rigid (second moment of intertia). The deflection goes up with the square of the beam length. There’s some good numbers for this, see the deflection maths sections in these posts
If you’re going to build basically from scratch on new extrusions I’d seriously consider some cheap ebay / AliExpress HGR15 rails for the X axis instead of the V wheels.
The belts are less of a problem, deflection is closer to linear with length and you can use the kevlar cored belts easily on the standard motors and pulleys.
At this size I’d suggest using a torsion box for the base to eliminate the spoilboard bouncy castle problems too.
Just wood would be the material. I’d be upgrading my Shapeoko 3 XXL to have a bigger bed.
I would want to keep same accuracy and speed that the Shapeoko currently has? Are you saying the accuracy and speed would be compromised with upgrading size or saying it would be improved?
I’m saying that as you extend the axes and belts your cutting deflections & vibrations will get bigger which will likely limit your effective cutting speeds. This is doubly so if you choose a less stiff extrusion than the very good Carbide extrusions (most of the 8020 stuff until you get to serious cross sections). You’ll also pick up more belt deflection with length but at least this is linear, I’d go for the kevlar cored belts, you’re cutting wood so this should be OK.
Final accuracy will be OK so long as your extrusions and linear motion (V wheels or rails) are at least as good as the Carbide linear motion gear. Not all V Wheels are as good as each other. However it may well take longer to get that final accuracy due to increased cutting deflections forcing you to run slower cuts.
Take a look at the Deflection and Vibration thread for a more detailed discussion of the issues.
Absolutely incredible threaded you mentioned. It’s going to take me some time to get through it and fully understand it but it gives me a great starting point for knowledge.
My goal in the end is to just be able to cut a 4ft stock sheet piece of plywood. As long as one direction allows me 4ft I can tile the rest to get longer pieces. With that being said I think I can save some headache and just upgrade the x axis. Will look into the linear rails you mentioned.
Liam,
Curious your thoughts on this system…
It seems like a viable option to upgrade the frame. Have you heard or seen of this setup? Curious if it would be a seamless transition to upgrade the XXL to.
Interesting, I’d not heard of them at all.
I’d be interested to hear what other folks think of these kits too.
They appear to be based on the workbee, the bit at the bottom of the page where they thank Carbid3D and the Shapeoko as being an evolutionary ancestor of the workbee and their queenbee might ruffle a few feathers here ![]()
Looking at their extrusions I think they’re a step down from the Carbide aluminium girders. When I estimated the second moment of inertia for the Carbide extrusions I got about 106x10^4 vertically and 58x10^4 horizontally (mm^4 is the unit). I don’t see any engineering spec for the extrusions so I went Googling and found this data sheet from Misumi
I consider Misumi a good source as I’ve seen quite a few custom CNC machine builds using Misumi rails and the builders have mostly said they were very flat, straight, well finished, square cut etc. Also Misumi has a strong reputation in general.
Real mechanical engineers, please butt in and tell me I’m doing this all wrong here…
In the data sheet, pg 2-521 I see the Misumi 4080 in 40mm x 80mm with no C beam cutout and that has second moments of inertia of 18x10^4 and 63*10^4 respectively. So that’s a downgrade of 58 down to 18 and 106 down to 63, given that you’re planning to run a longer beam, not so good. The QueenBee is also C beam so even weaker with some horrid twisting modes too and we know how the Shapeoko Z axis loves to apply a twisting load to the X beam.
Looking at the Misumi 6090 on the other hand that claims 52x10^4 and 111*10^4 which is more like it.
Most of the stiffness of these beams comes from the outer surface material, that’s why the Carbide extrusion is so strong, the 5mm wall on the outside. If I remember correctly from the calcs, if you made it from solid aluminium it would only be about twice the stiffness. All the twiddly bits inside the 4080 don’t do much to add to stiffness.
The statements about bolting extra bits of extrusion onto the main beams adding to stiffness I don’t buy. They are not sufficiently rigidly attached to form a single member in bending, they may well absorb vibration energy through friction at the contact surfaces though. (Again real mech eng please do correct this if it’s wrong)
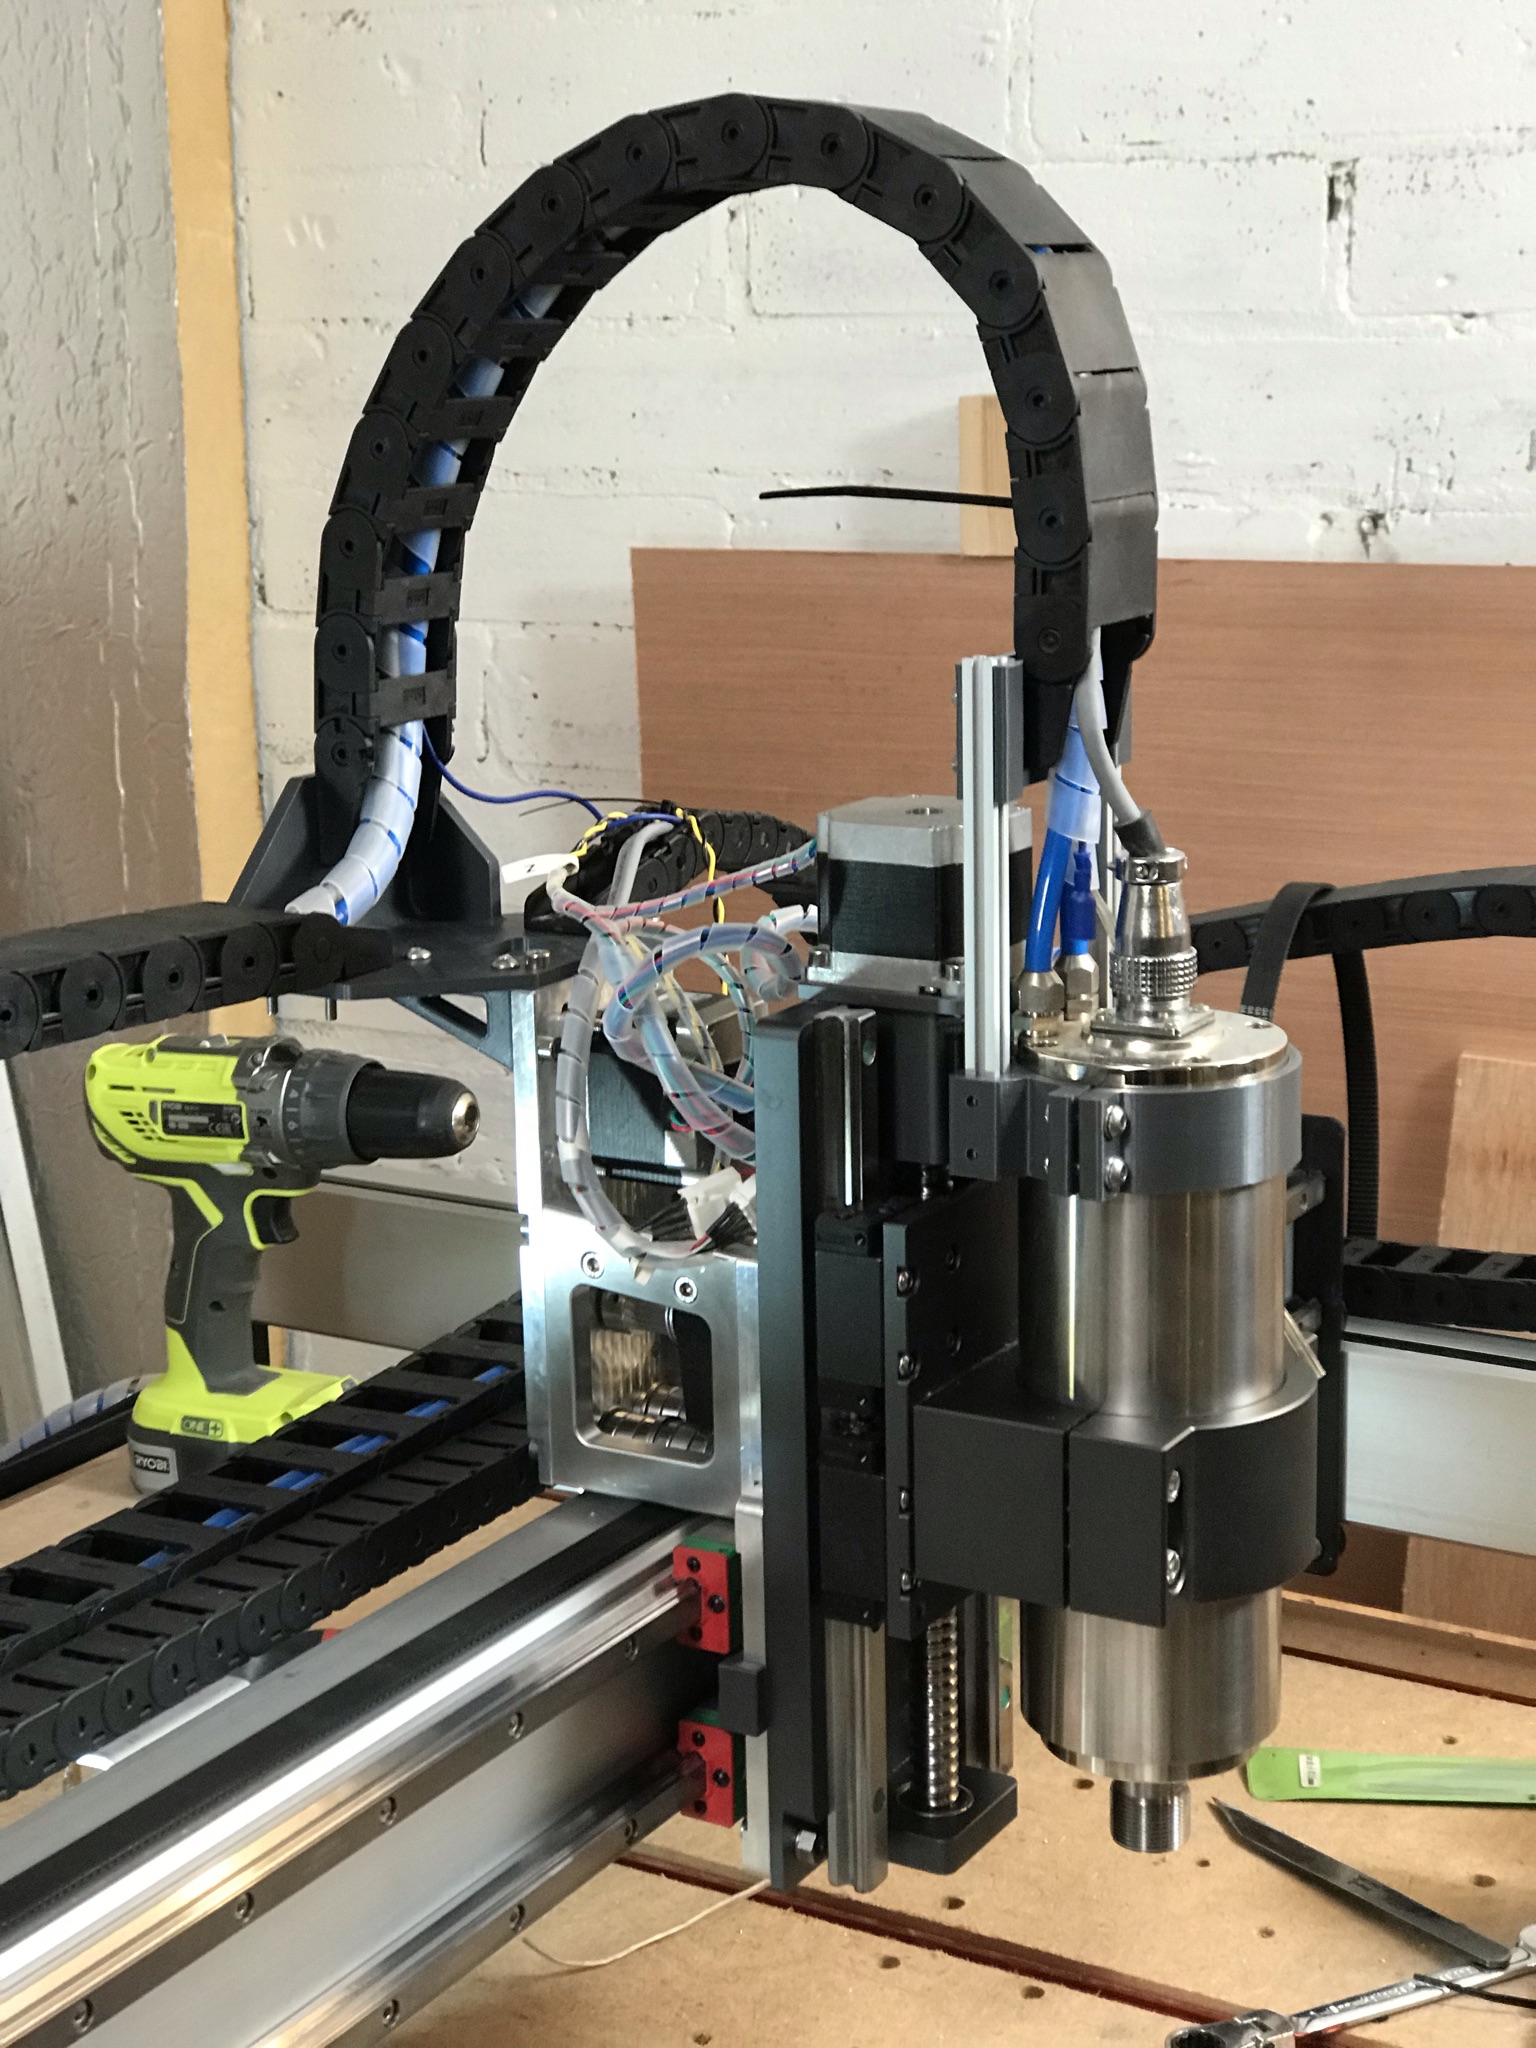
Otherwise on the QueenBee machine, I think the linear rails are good, but then, I would say that, I have a slightly modified version of Dan Story’s rails upgrade
See Dan’s thread about the rails here
My personal view is the X axis rail upgrade is most of the benefit with the Y being a secondary if you want to go the whole hog.
The leadscrews in the QueenBee design, well, let’s just say I’d go kevlar cored GT2 belt or ballscrew.
Hope that helps.
I wonder if having a dual-beam X-axis would make sense… Basically have two X-axis beams like there are two Y-axis beams, with the spindle in between the two beams.
People have looked at it, and it was done in various ways for the SO1 and 2.
Big issue is one loses Y-axis travel.
Another problem that comes with the dual X beams is that you have to keep them very parallel if you use linear rails, any flex or misalignment and your rails can start to bind up. This guy’s build shows how much work goes into that alignment, you can also see the impact of Will’s point about reduced Y travel

I found a video on assembly of the QueenBee, when I got to the bit where the leadscrew plastic nuts were spaced off the axis plates with stacks of spacers on a pair of wobbly bolts I had to stop…

This discussion has led me down some great research. Watched some videos today to learn more about moments of inertia. Appreciate the homework everyone. Information like this is great.
This topic was automatically closed 30 days after the last reply. New replies are no longer allowed.