very nice ! I don’t recognize that software in the screenshots, what is it ?
If you guys continue to produce such great C3D-themed objects, we should ship them all to Carbide 3D’s headquarters, and they could put them on a “user gallery” shelf! 
very nice ! I don’t recognize that software in the screenshots, what is it ?
If you guys continue to produce such great C3D-themed objects, we should ship them all to Carbide 3D’s headquarters, and they could put them on a “user gallery” shelf!
Wow that is so cool, I did not know you could wrap textures around curves. I wonder if fusion has a option for that. Also the dowels go down into the spoil board? Never thought of that method for locating I was making jigs wasting material, thank you!
Really awesome design!
That would be LinuxCNC! I had a lot of issues with the noisy power at my rental causing disconnects, Jorge went above and beyond to help but unfortunately we couldn’t find a solution. I have run my XXL on a gecko G540 and mesa 5i25 under LinuxCNC for a few years now. It’s very robust, but I’d still like to run the CM board again someday.
Thanks @CNCInspiration it came out far better than I thought it would! I reckon you could model it in fusion, the hard part would be designing it so you could machine it and have it still look how you want, aspire has the option to wrap the tool path to the model, so you can be sure it will be machined as per the preview
Yeah I kind of winged the dowels, I just did the 4 pocket holes straight through the material and about 10mm into the spoil board. I saved the zero location and spacing of the dowel holes so they can be reused. I think having a jig that locates with dowels would be ideal, then have can have lots of set ups on that jig for different jobs
@stutaylo Very nice! A much classier use of the logo than my “in your face” version. Also, LinuxCNC looks really slick. When you get time, I’m sure many would appreciate seeing the path you too to get there.
Thank @neilferreri! Yes LinuxCNC has been good, it’s so powerful, I think I use it to about 5% of its capacity. It is really not beginner friendly which is a shame. However now I’ve made a config file for the XXL it wouldn’t be as difficult
I have been putting something together to detail my controller setup and share it with the forum, its been at a standstill for the last few months - I’ll try and get it finished.
So Julien you can’t throw a submission in the mix? I don’t see a reason why not? Public vote and all…
Nah, that would be super awkward. And I already won one of these challenges two years ago, and the prize was cutters
Nice congrats, I will go look at the past contests and check it out
YES. I would love that. Also, flattery is the way to my heart, keep those logos coming ![]()
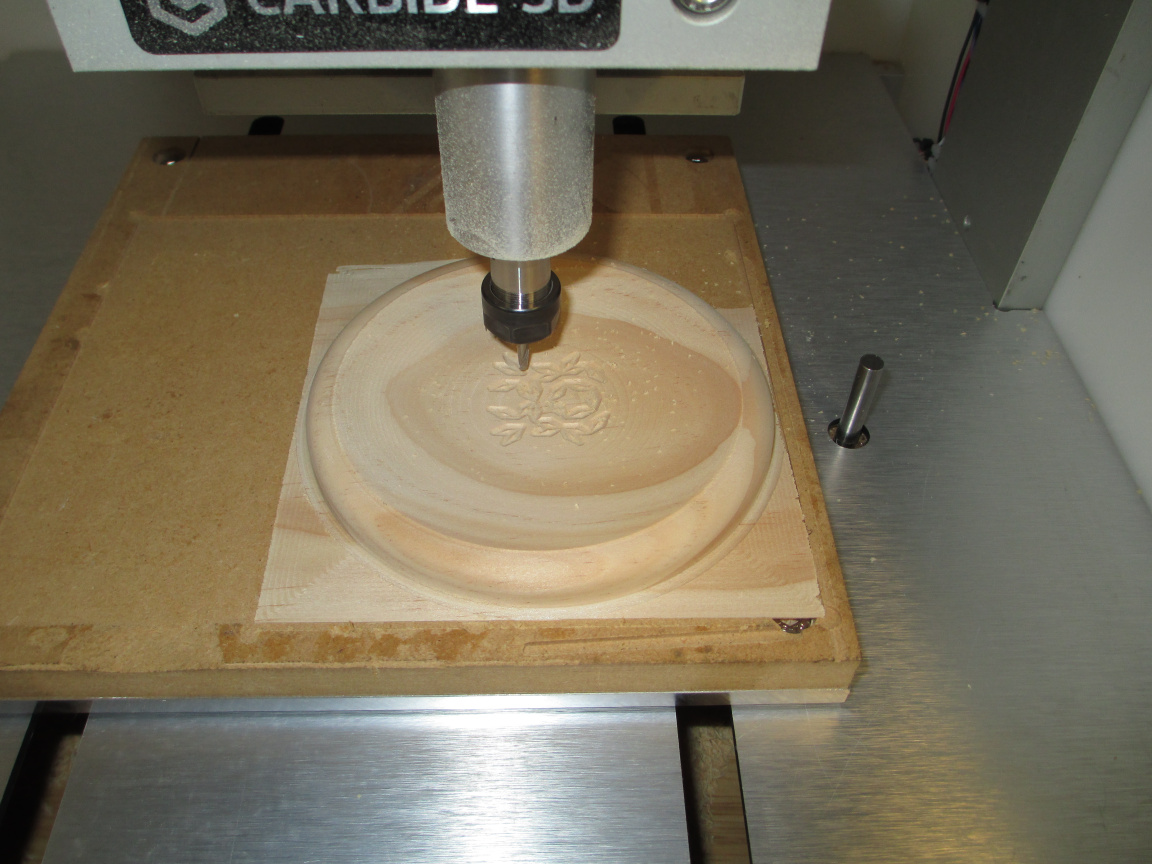
Fun little project experimenting solely with Carbide Pro. Thanks for the challenge to encourage tools we don’t use much.
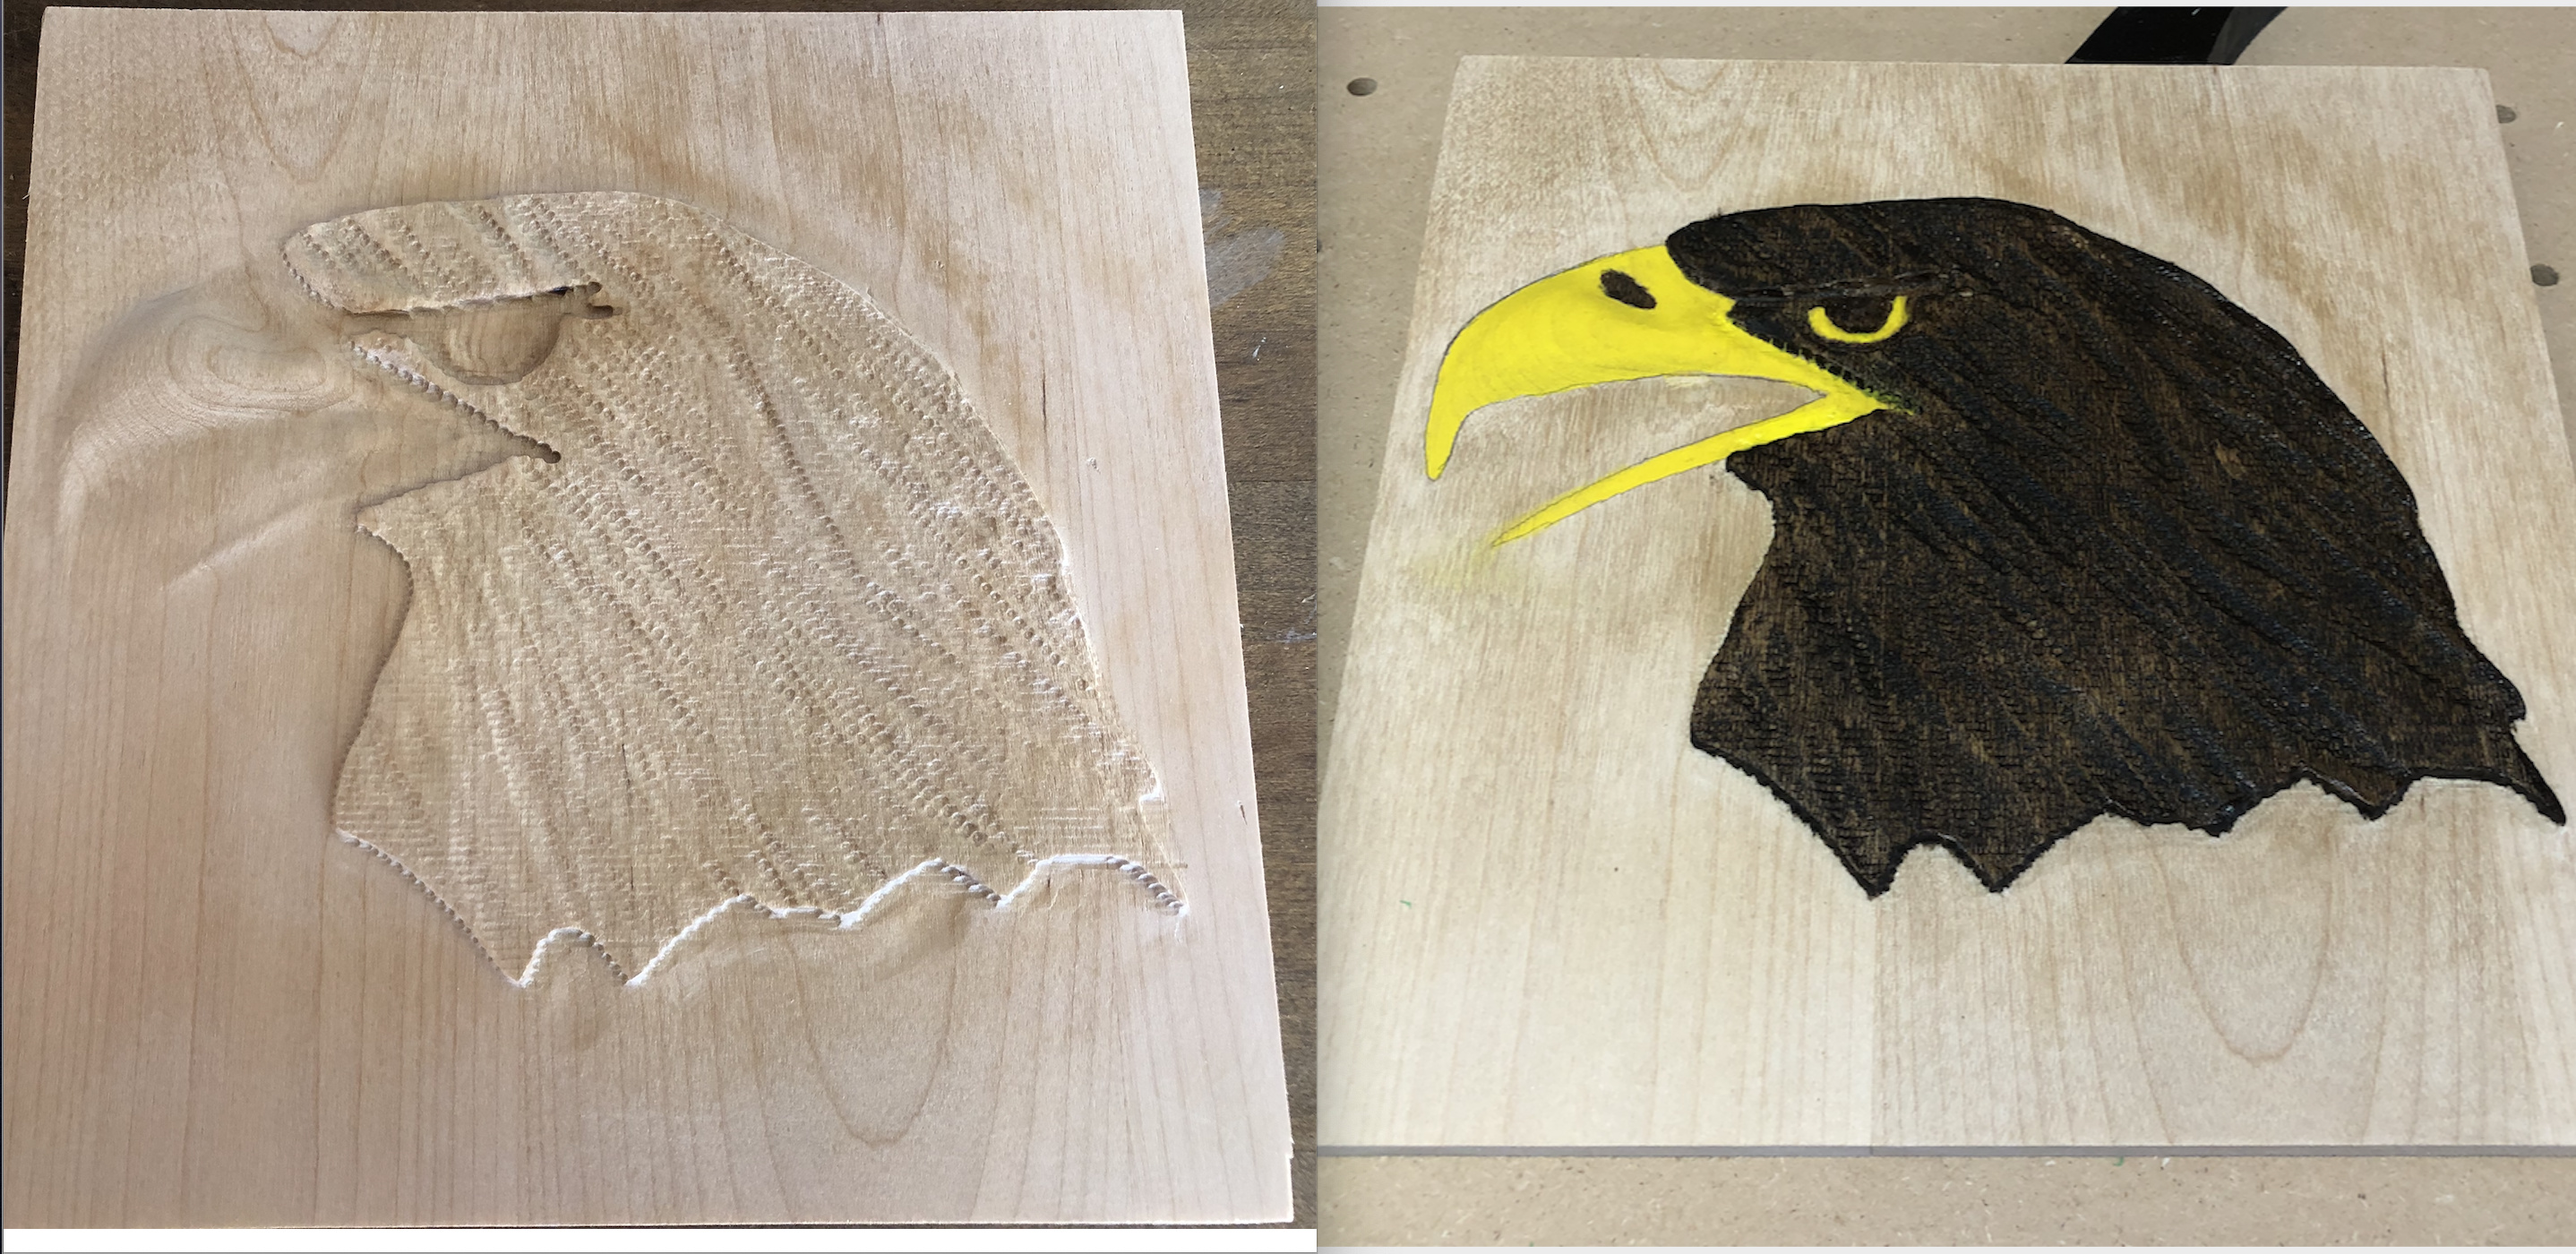
Golden Eagle using CC Pro.
Carved in Maple, .25 End Mill, .0625 Ball Mill, .125 End Mill.
Eagle Head Textured.c2d (2.5 MB)
Allright, final week for submissions. We already have a great mix to choose from when voting begins, but there is still time for a few more entries!
What the heck. Here’s mine.
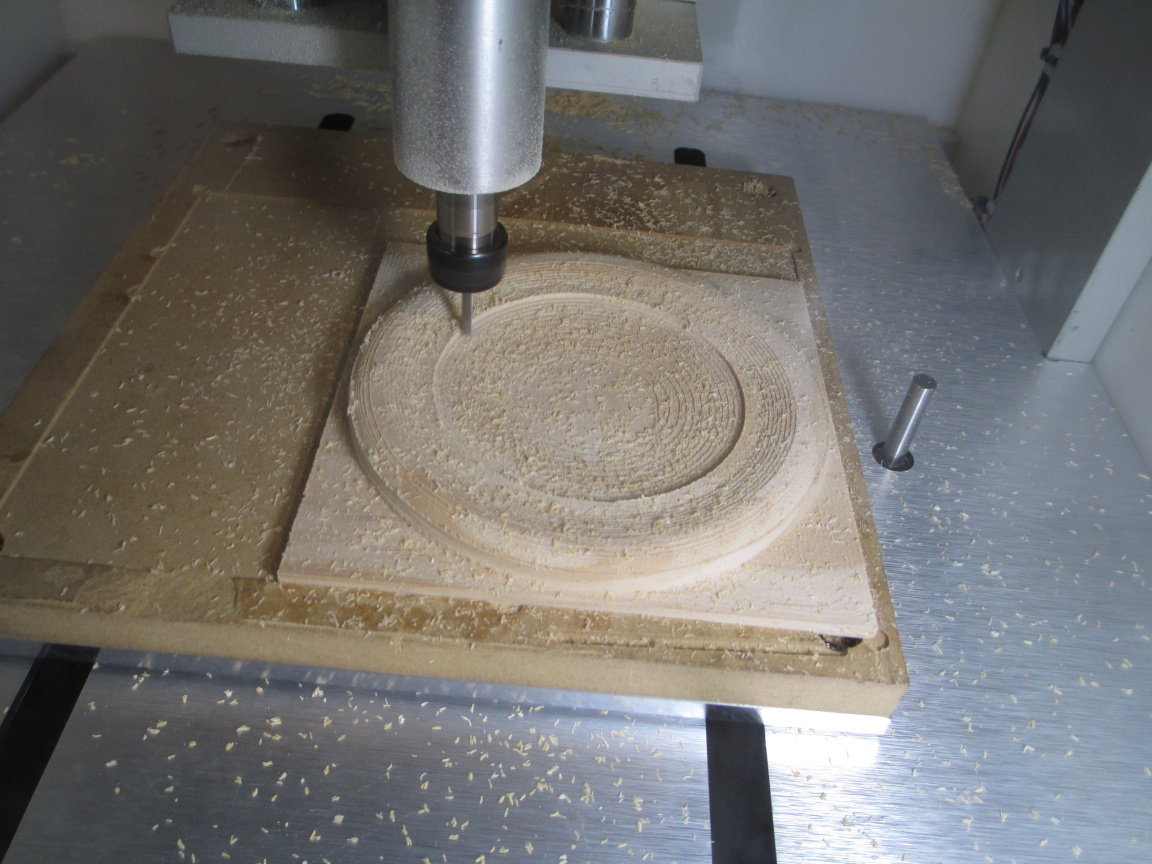
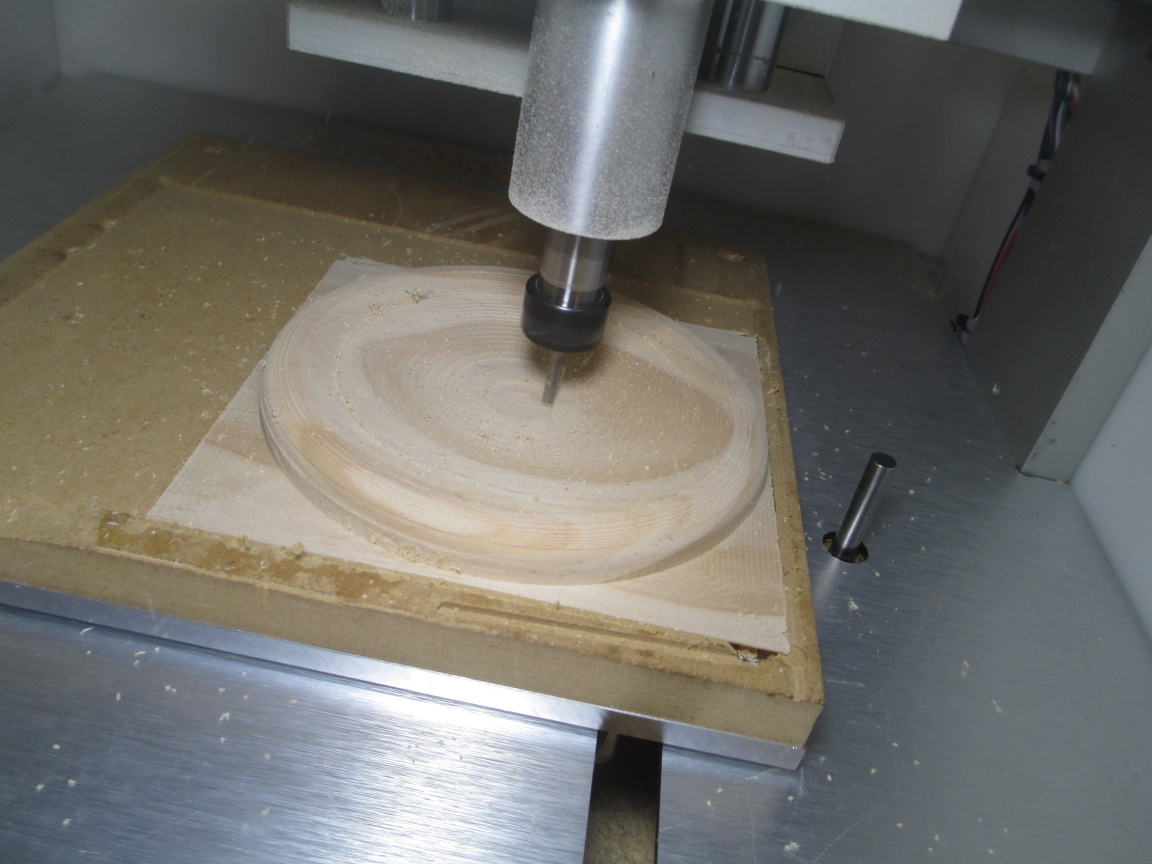
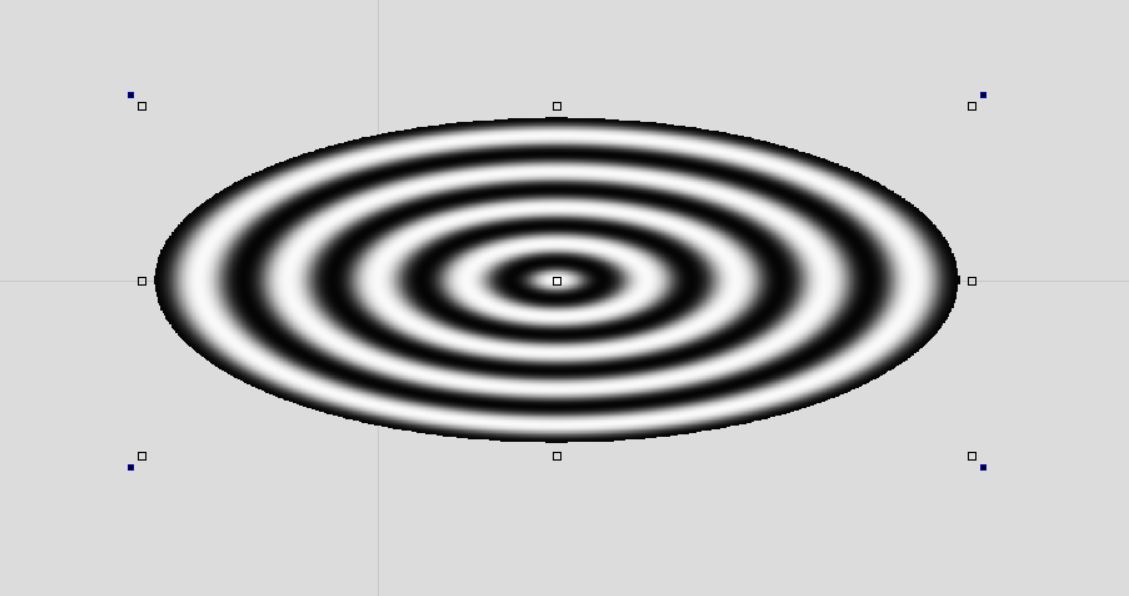
This is something I have been playing with for a good while. It turns out that it is a LOT more involved than it seems it should be.
First, the product:
Not yet removed from the machine or cleaned up, the perimeter is about 0.1mm thick.
First, a few machining shots, then the glory shot, then the process:
The software used is Inventor, though Fusion360 would do as well. The texture is a Penrose tiling projected onto a spherical bowl, with a transformation applied to the tiling before projection to compensate for the surface shape (the transform is a simple radial compression-- the radii are compressed proportional to the square of the radius from zero at the center to about 0.05 at the perimeter. Not much was needed here, and it really doesn’t show, but I wanted to be able to use this with much deeper bowls) projecting from the plane. This was done with proprietary software (read this as: I bodged this up in C and the code is ugly), to produce an SVG. I converted the SVG to DXF with Inkscape and imported as a sketch. The bowl was created by extrusion and revolving cuts, because this is a demo piece so I didn’t worry about elegant.
The machining was done on Nomad Pro Ser#127 using a 3.175mm square end for stock removal and a 3.175 ball end for contouring and the texture.
The texture was laid in by finishing the bowl with 0.5mm material left (I didn’t model a surface for this… axial leave material was fine due to the small angle. For anything much deeper, I would need to model the surface to keep consistent enough thickness) The texture was projected and milled in. It is pretty much what I wanted, but the actual product this is for will be done with a tighter tiling to eliminate the flats in the middle of the wide rhombi. The processing time is already more than long enough for a demo at this size.
Glory shot:
The inventor model will follow in the next post (it is not pretty)
The Inventor model (done with the education license. Not for commercial use) with CAM.
penrose_15gen_d.zip (1.8 MB)
I think Fusion should handle this.
This isn’t the kind of thing that can really be done without a good 3D modelling CAD and CAM.
The final task with this is actually into a moderately deep elliptic paraboloid. I haven’t worked out the transform for that yet. I need to experiment a bit. It is for a client, so I don’t know if I will show the final product here when I get there (it will be a while. I am tied up pretty good right now with primary job and several other projects)
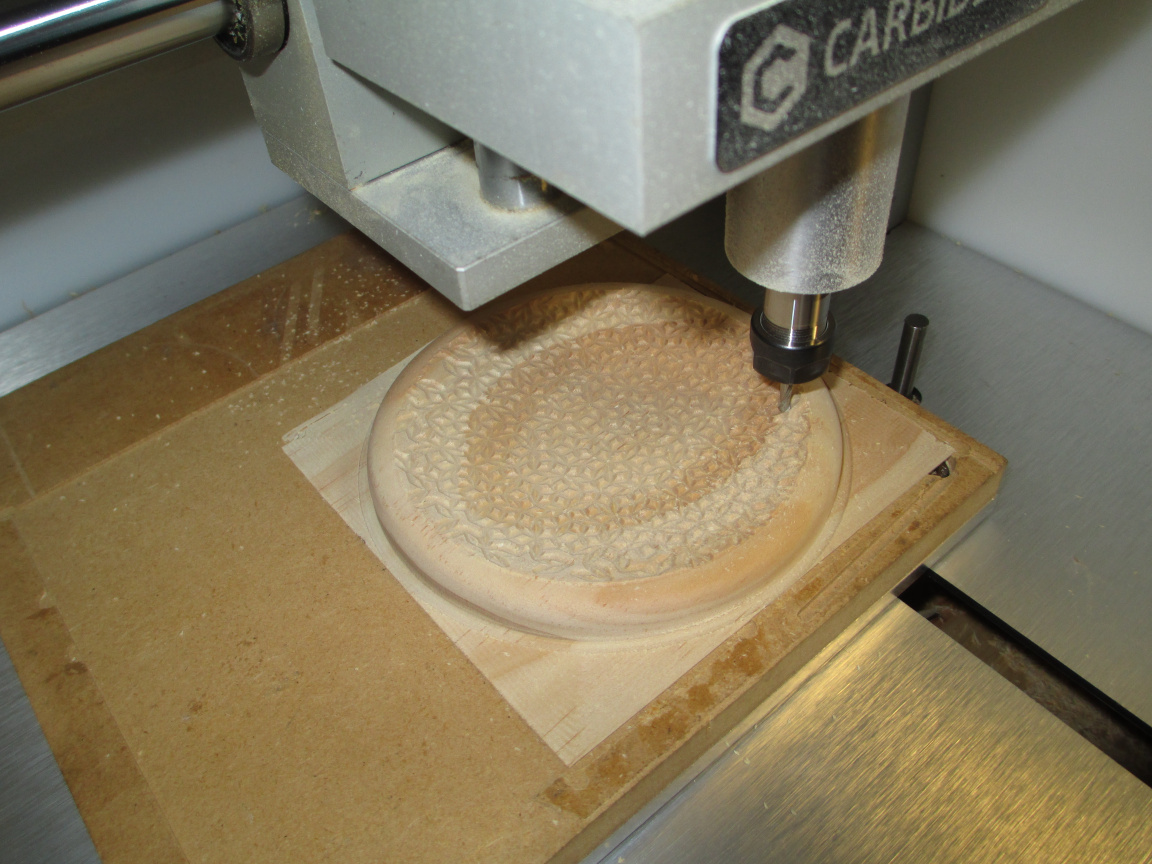
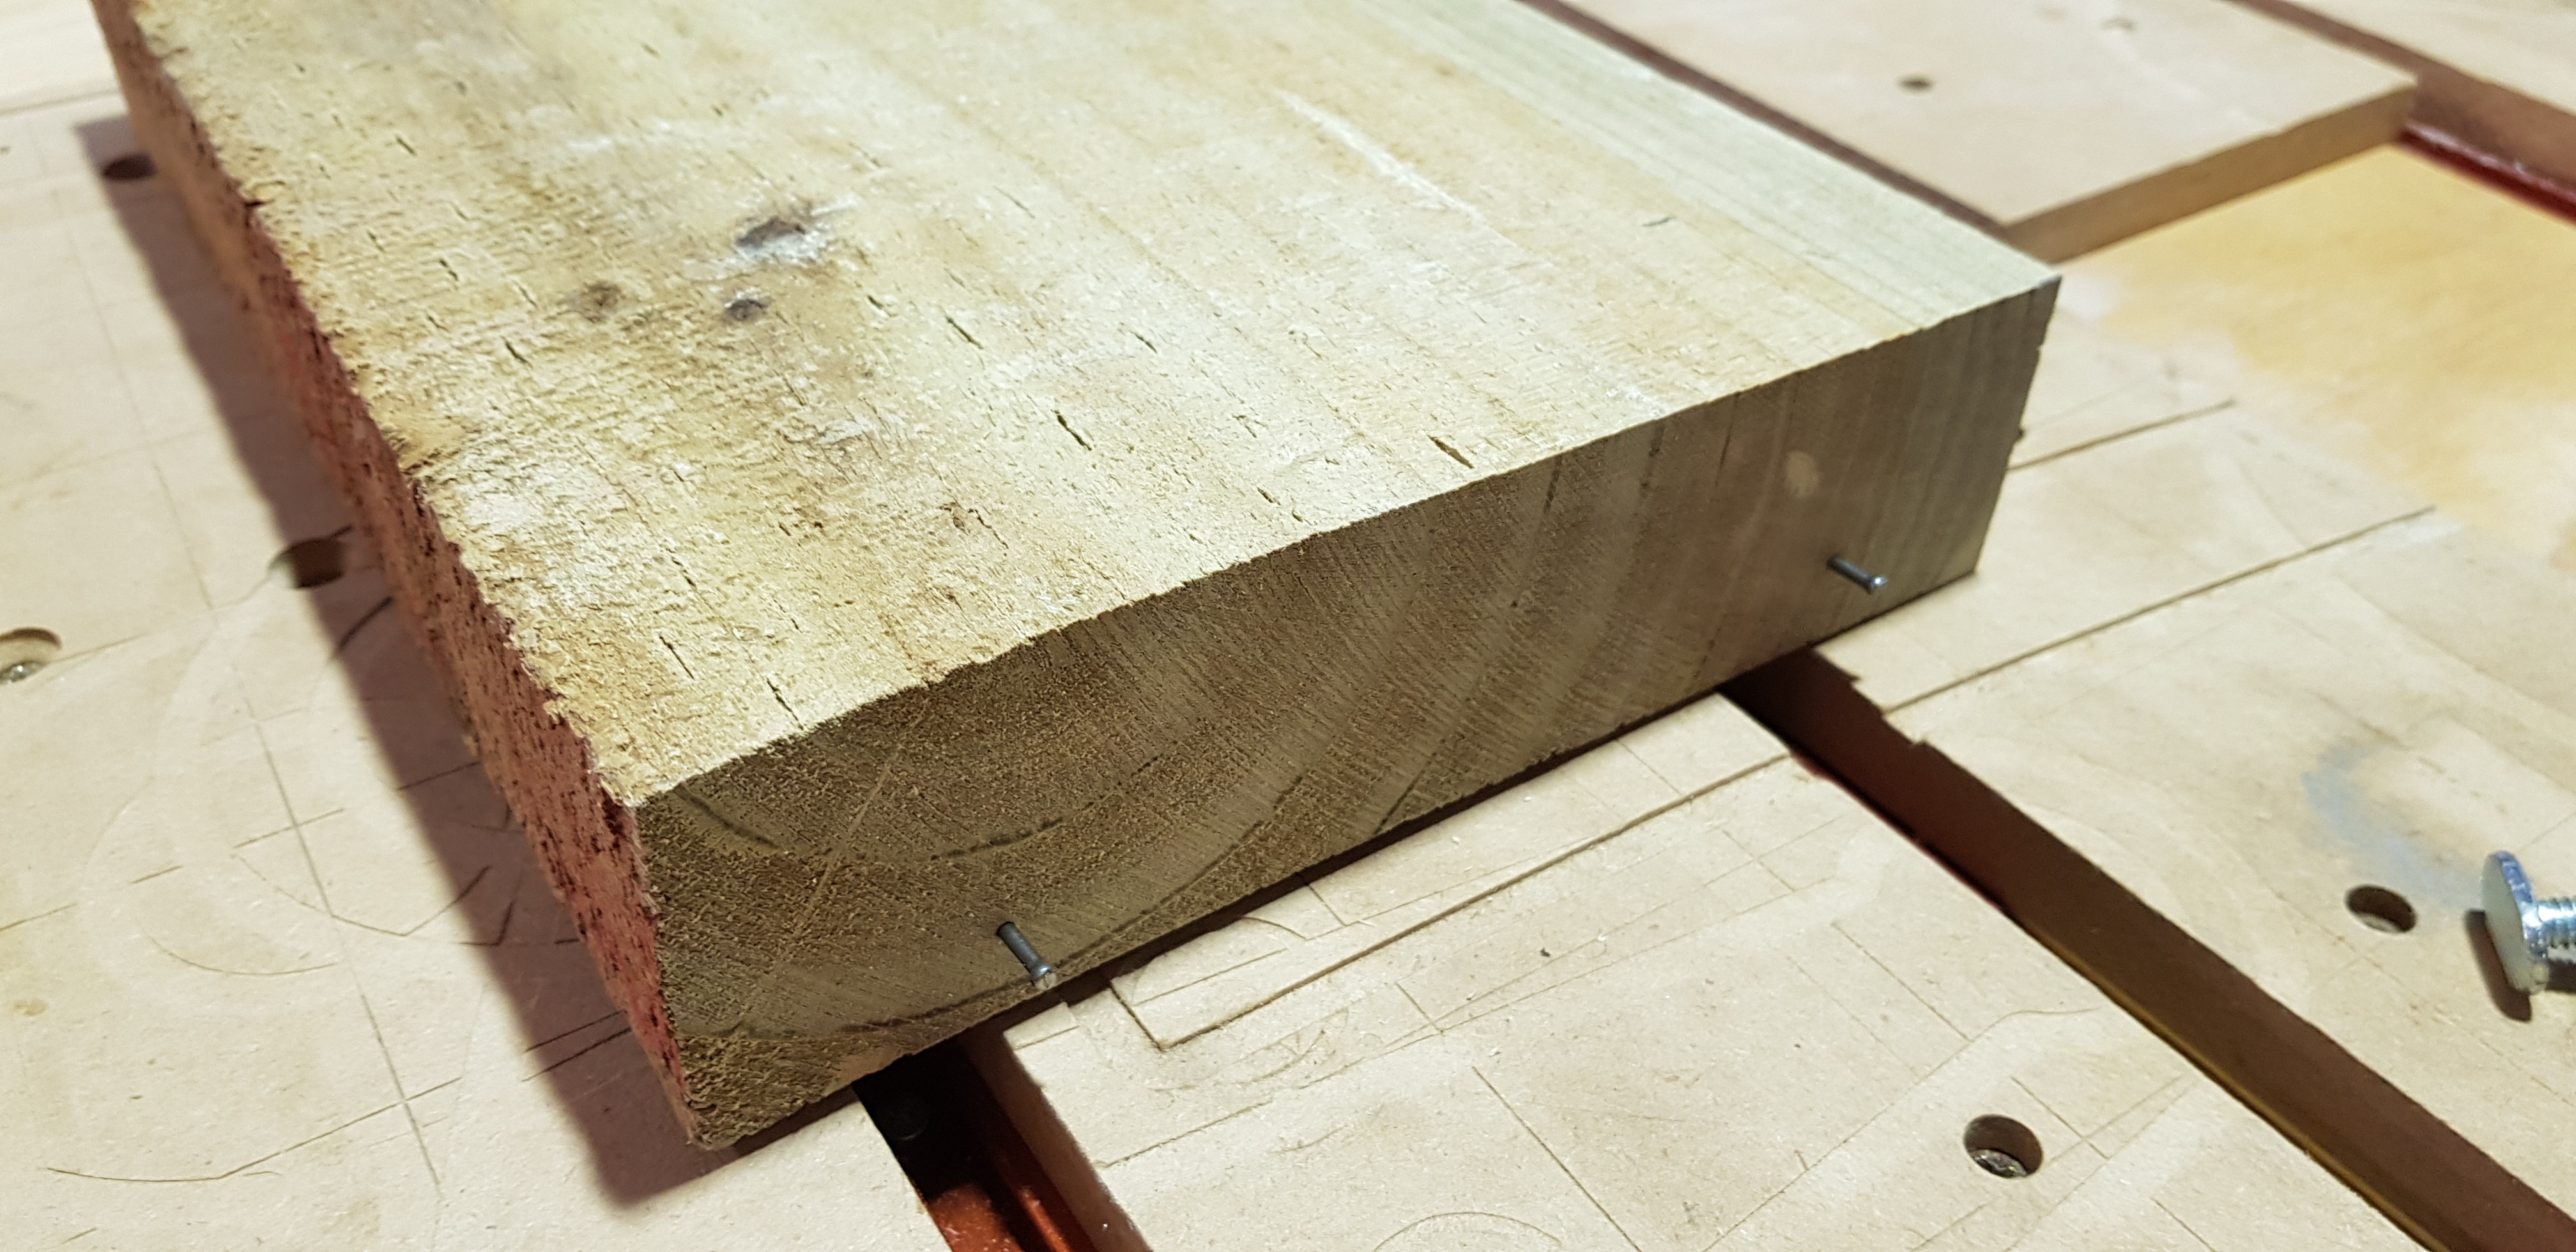
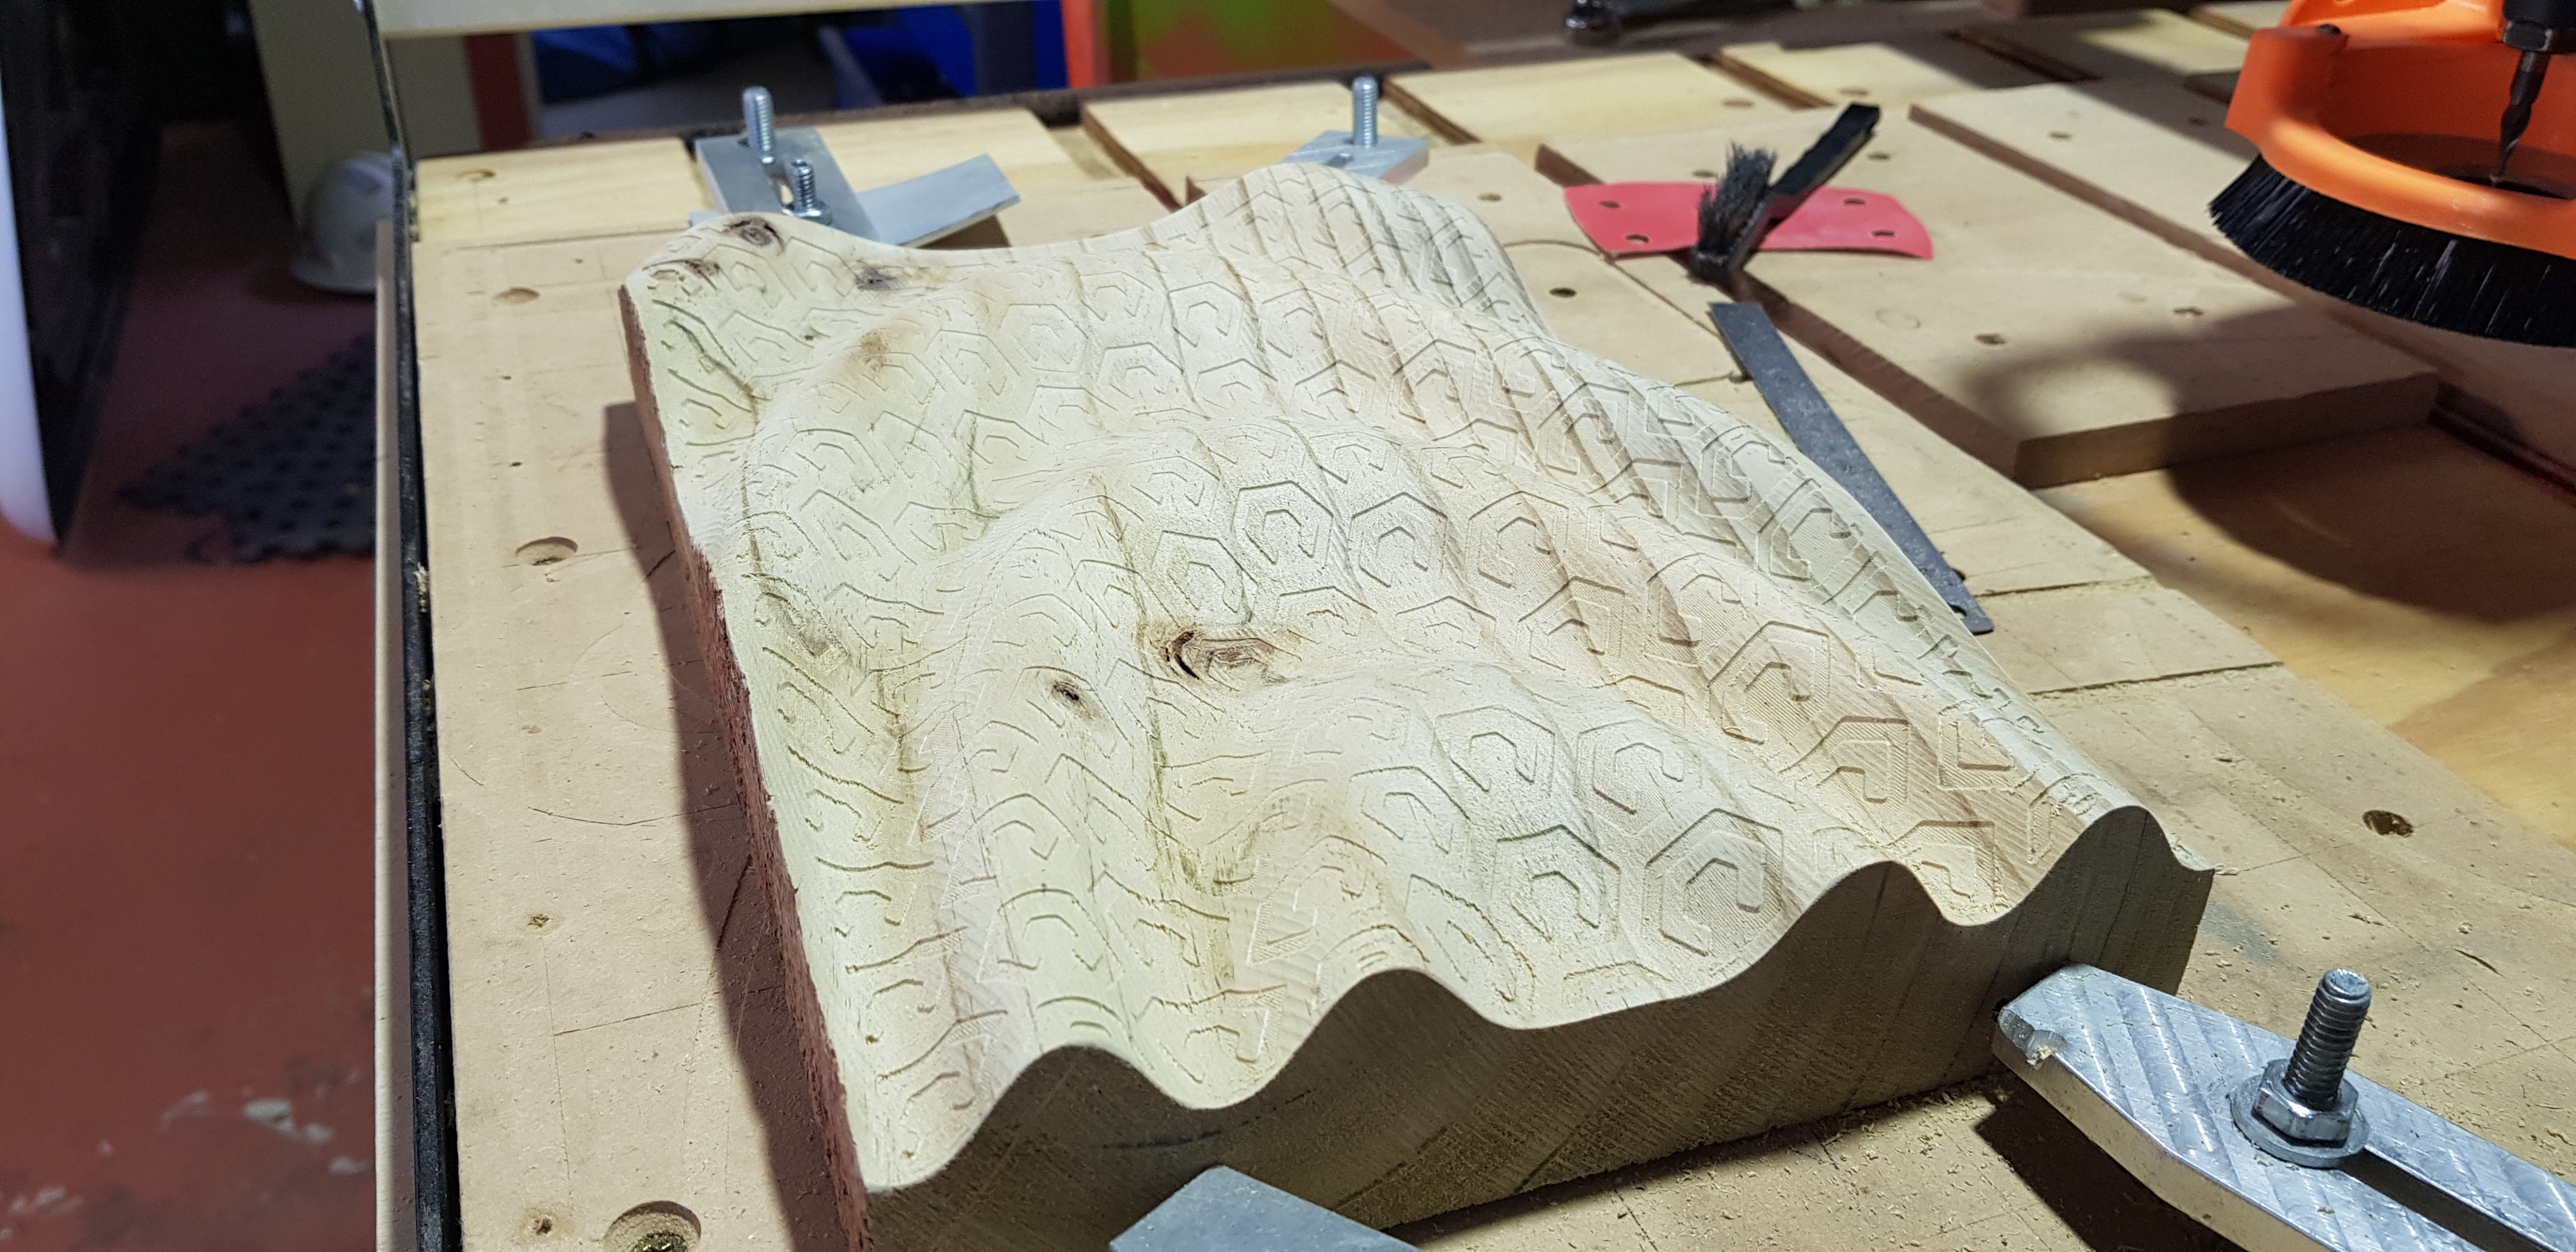
Here’s my second entry - somehow managed to get some time in between planning a wedding and moving house!
Files are here - Dropbox link - I’ve included Logo SVG, ripple model that will work in any Vectric Software, and my Aspire 9.0 file
First off I created a ‘ripple’ using the techniques Here (youtube)
As the effect I wanted was for the whole piece to be machined, I put some nails in the ends of the pine and used my clamps to hold it down that way. It worked OK, but I should have used bigger nails, and more of them.
First off was the 3D finish toolpath, this worked really well, the only issue being that I overestimated the flute length of my Ballnose endmill, and was right on the edge of cutting past the flutes. Turned out ok in the end, but one to be wary of next time! Cut time was about 40mins for this one
Then the pocket/logo toolpath, this is where I realised I had made an epic mistake in setting the zero on top of the material… obviously no top of the material left… it’s a bit hard to explain, but I basically moved the 1/4" ballnose bit to the wasteboard and zeroed it with paper, taking note of the absolute offset. then I changed to the 0.5mm bit, zeroed on the wasteboard, then moved up to the measurement I had taken before changing the bit. it worked!
The toolpath worked well, I did have a blackout in the middle of the cut, but I resumed from roughly the same spot. This toolpath took about 4 hours.
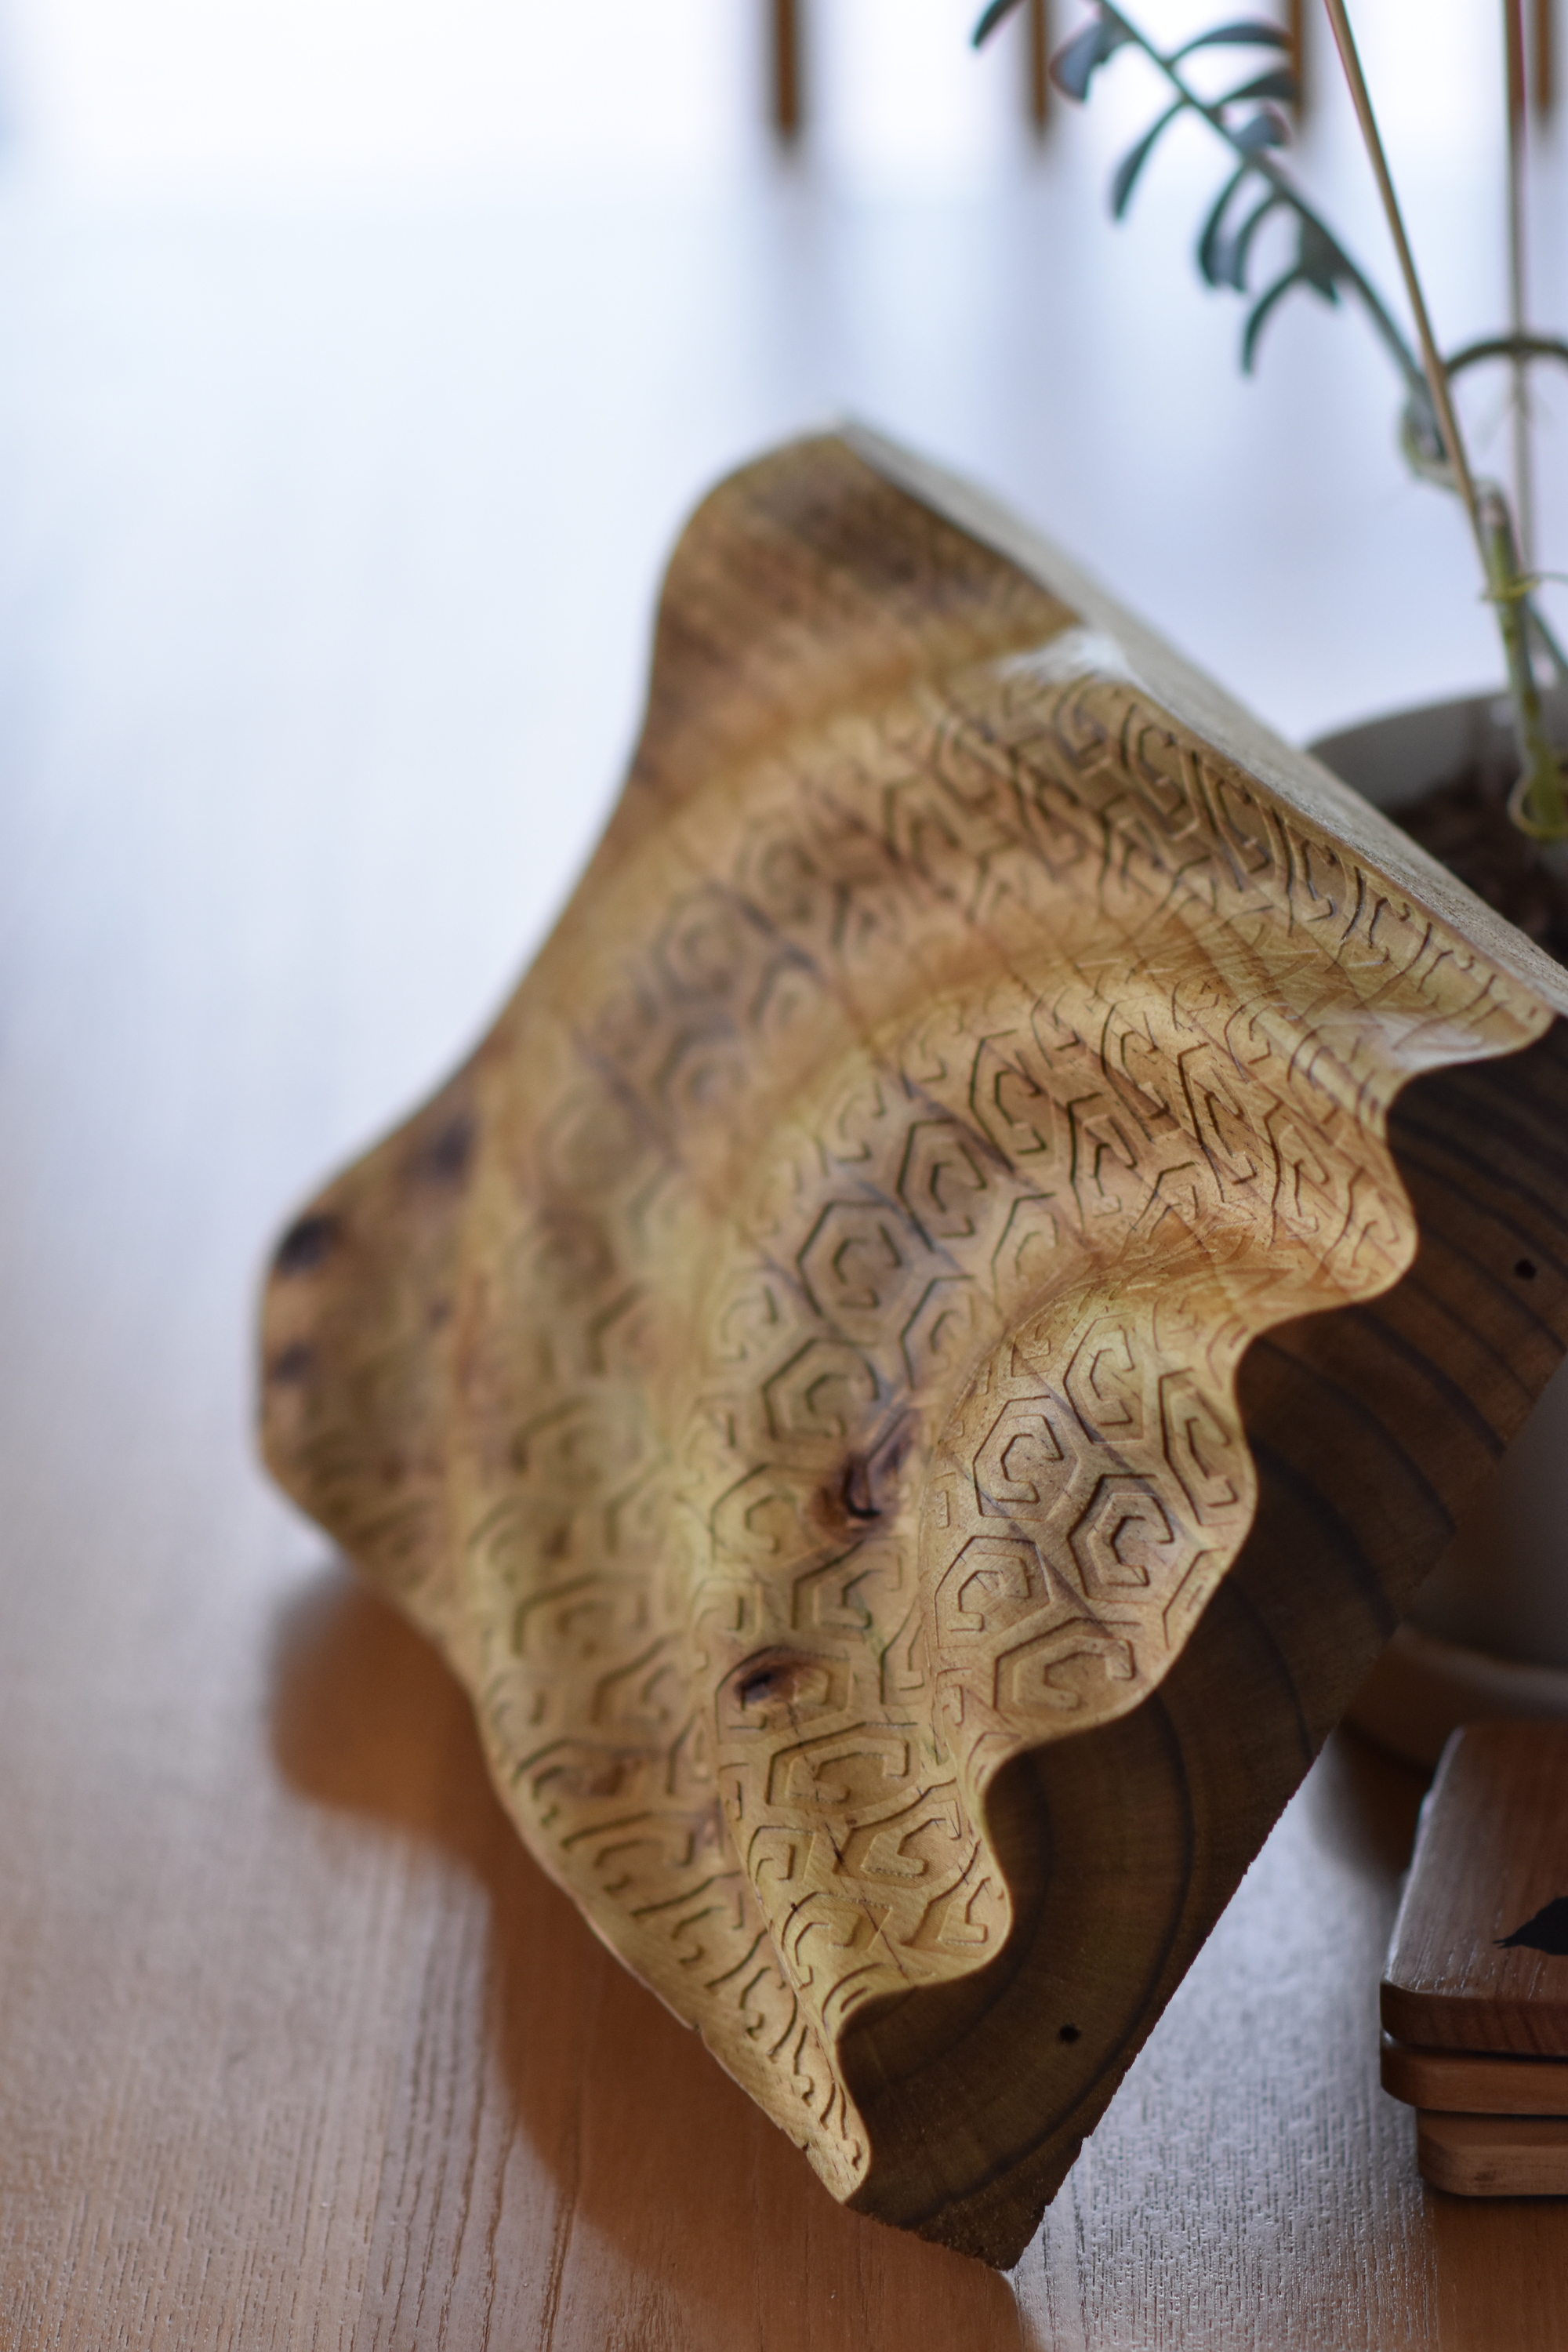
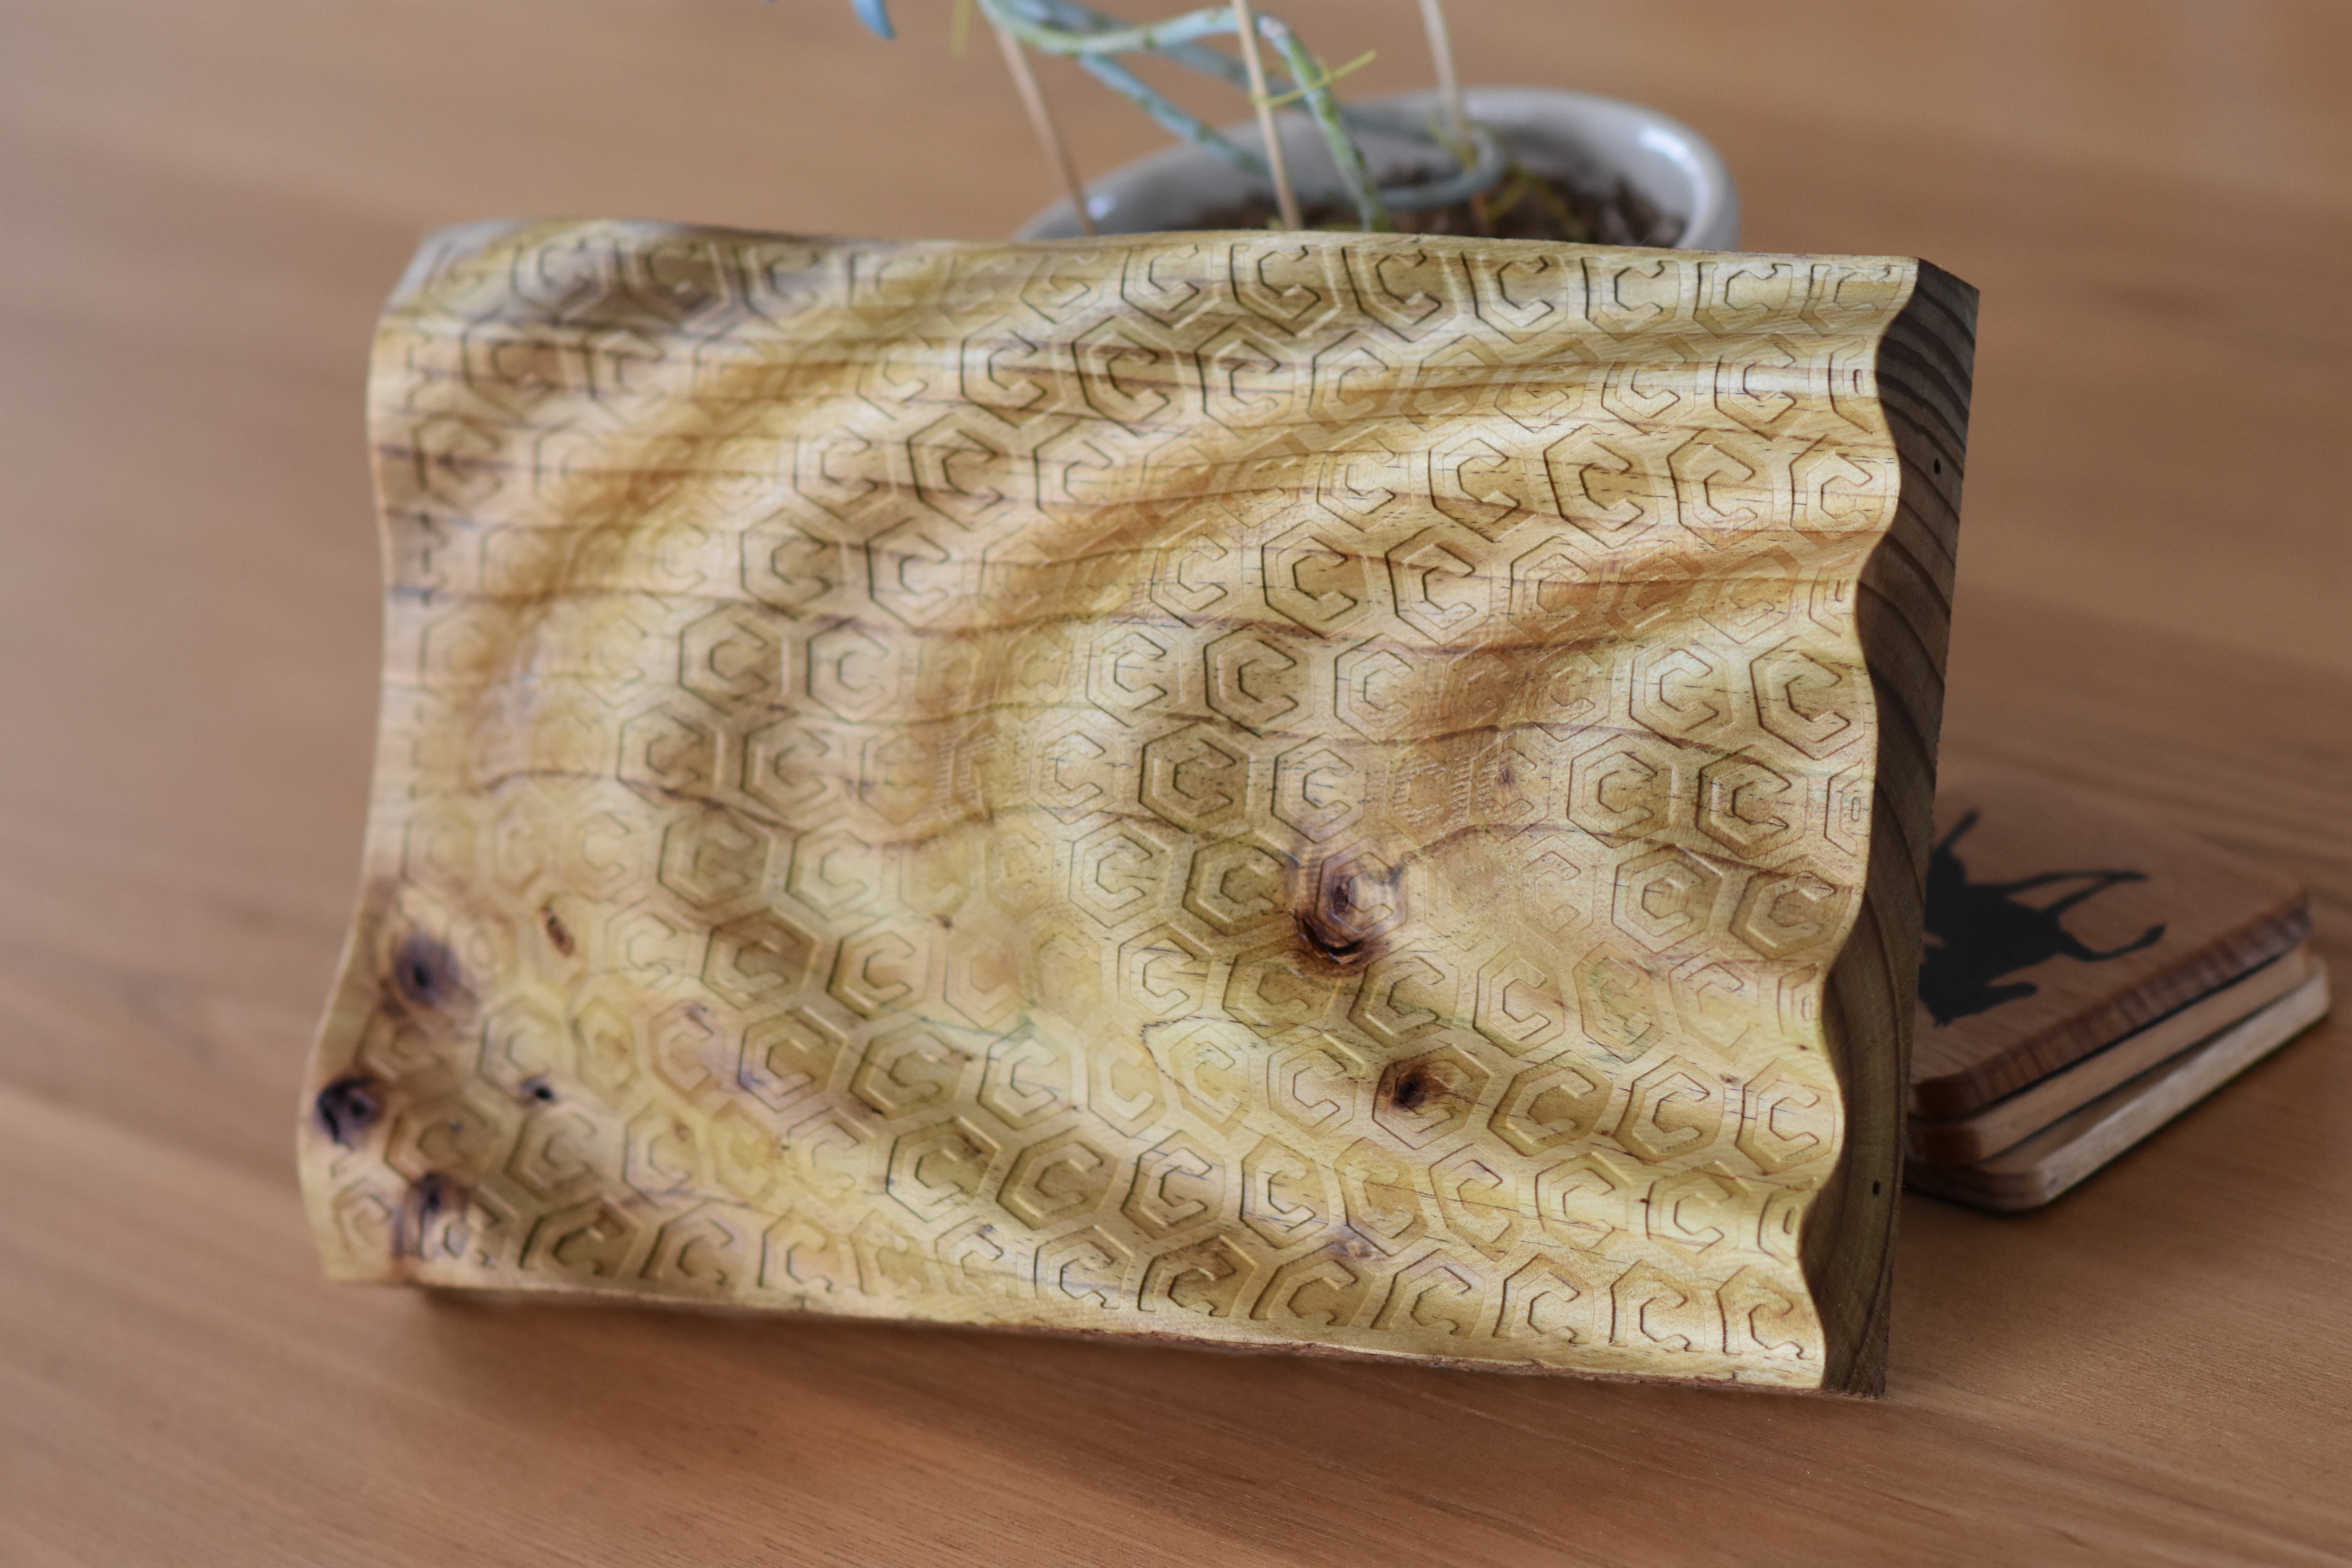
A light sand and a scrub with a toothbrush to get the hairs off, then a coat of ‘Kitchen Bench Oil’
Here are the glamour shots
Thank you! It got me on the wrong side of the wife to be (should have been making an arch to get married under, not playing!) but I’m really happy with how it came out.
@neilferreri still loving that carbide3d green pvc you did!
I’d love to see that if you’re sharing it (no pressure, I don’t like when people just ask for stuff for free) I’d have to adapt it to LinuxCNC but I’m sure the sequence would be the same.
Boy I felt stupid, then smart for getting myself out of it!
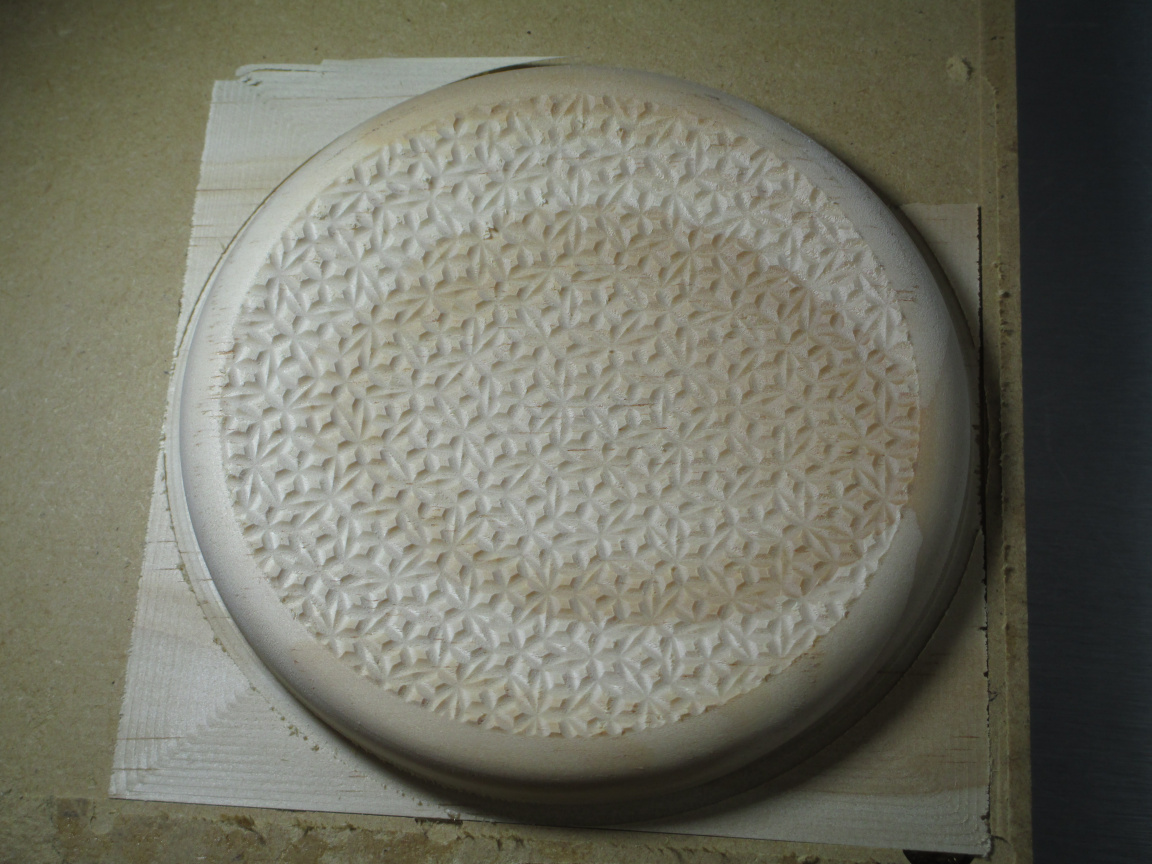
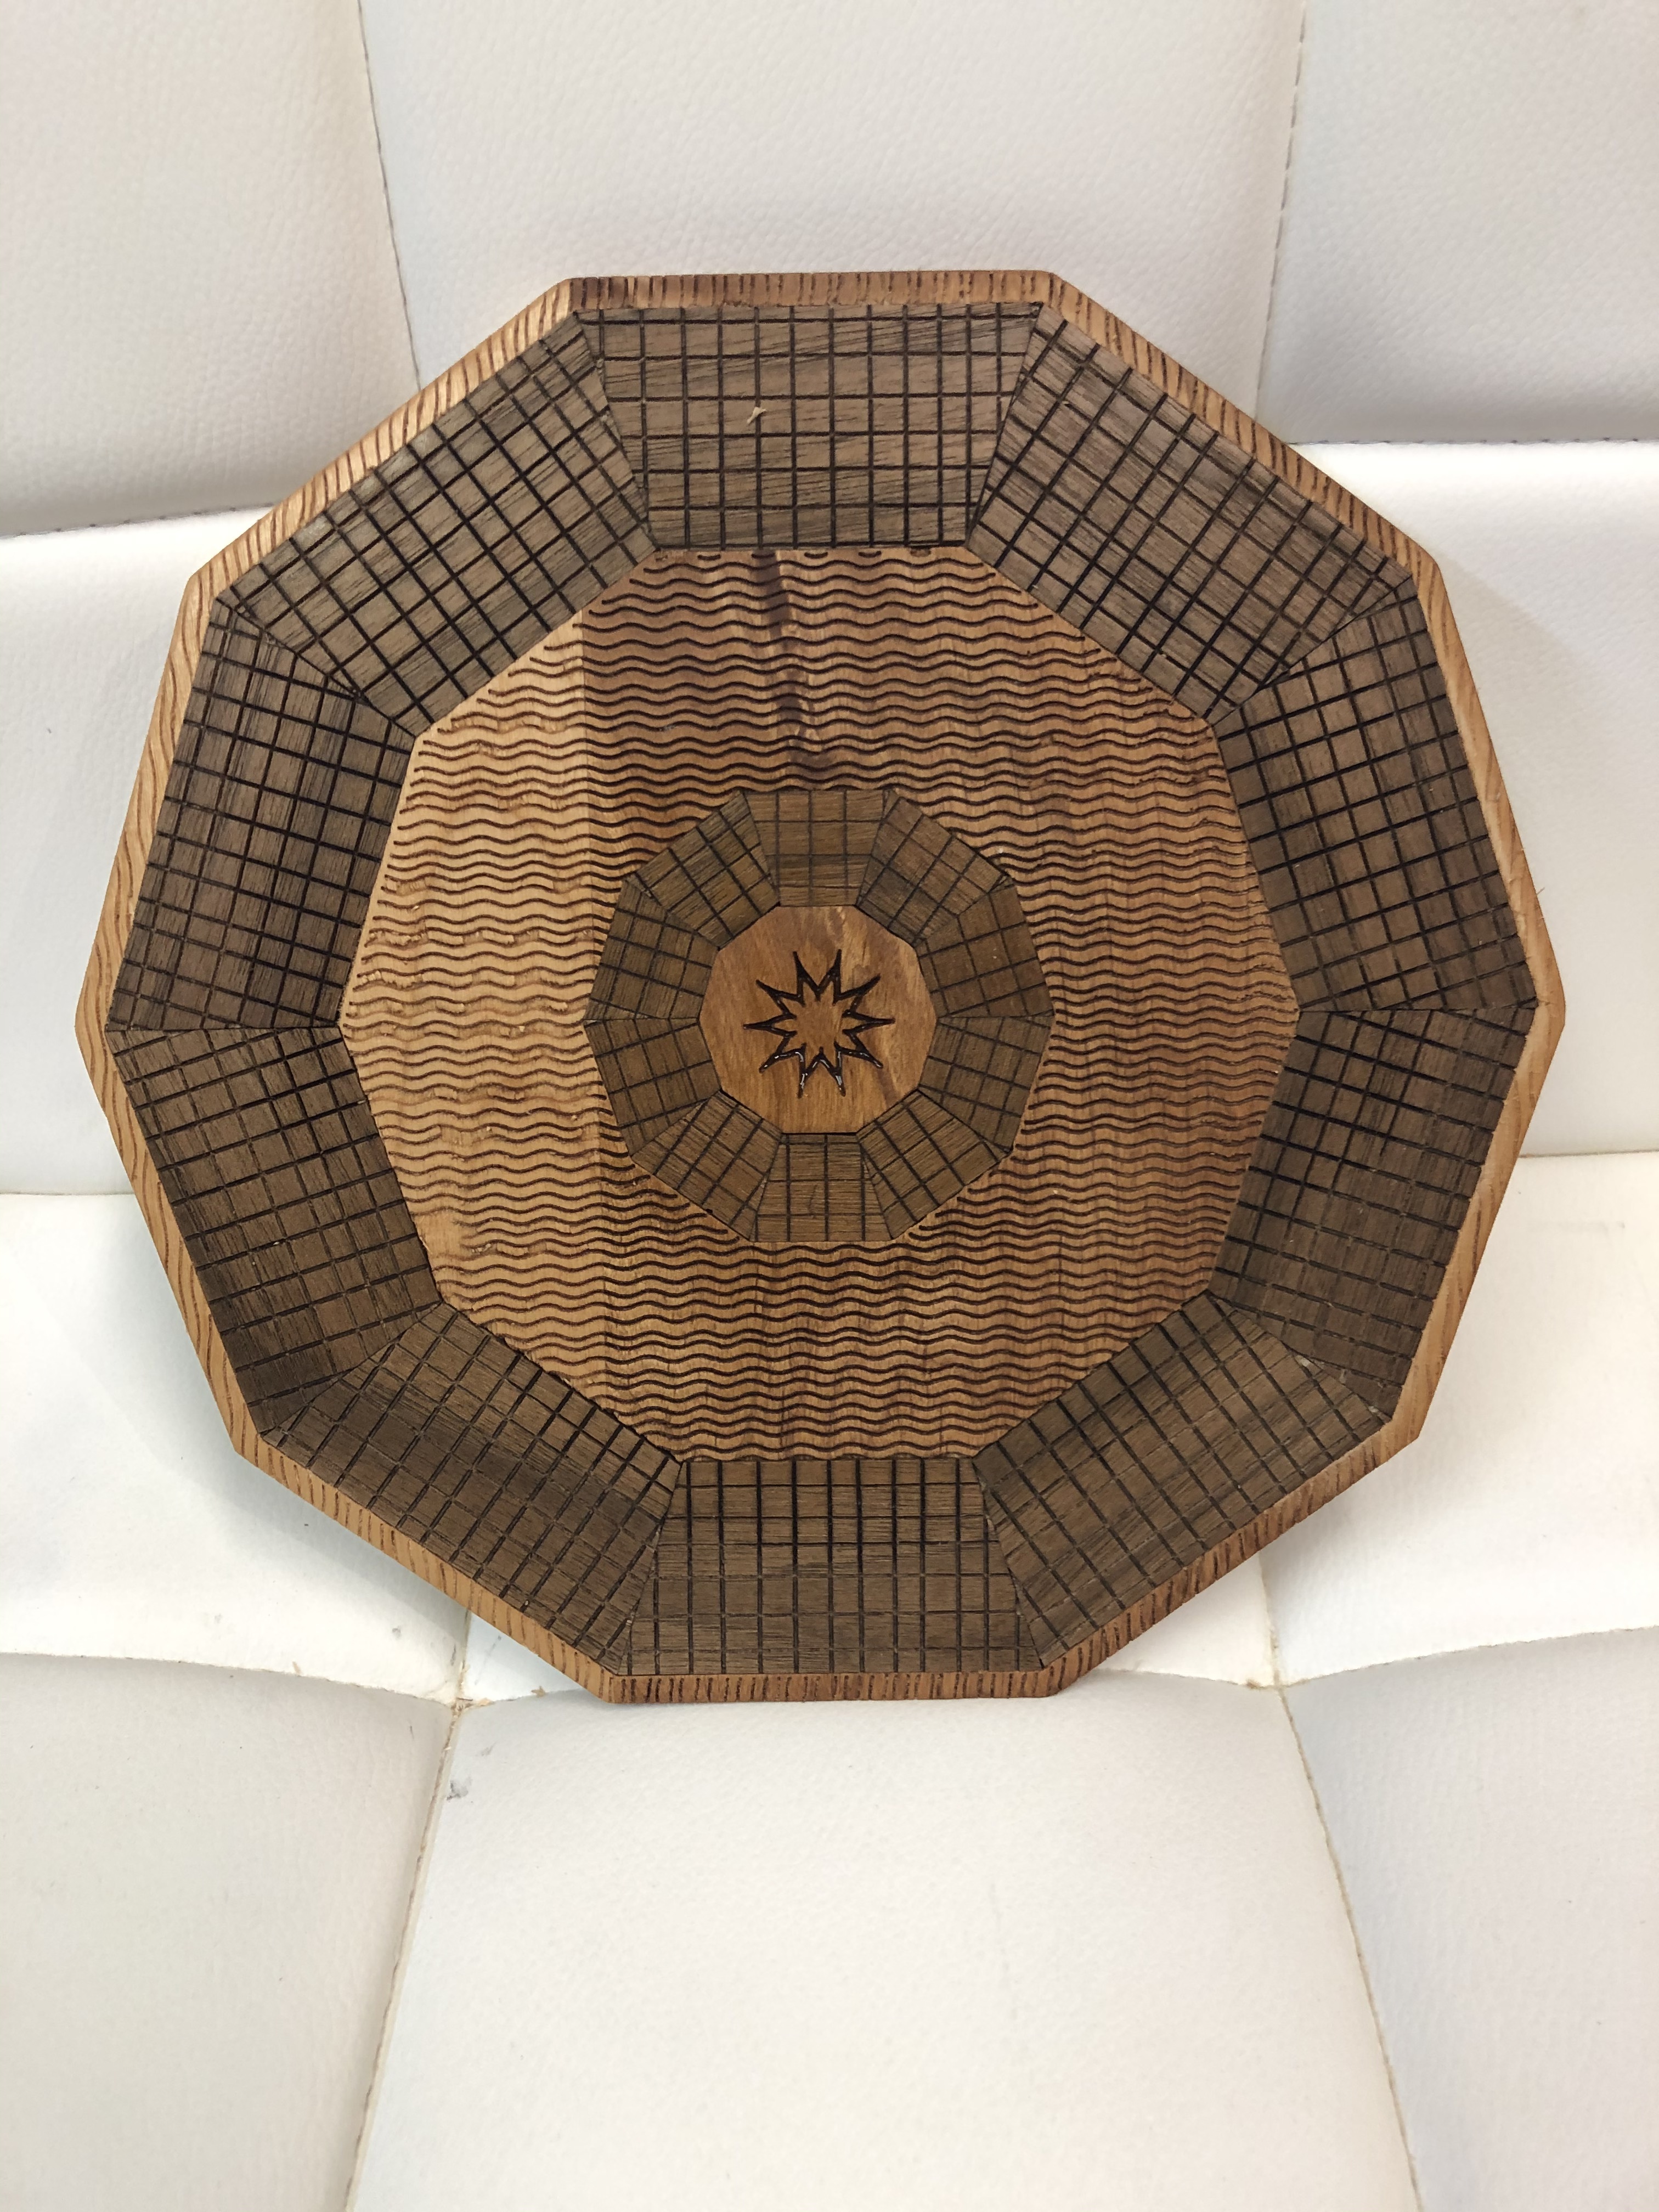
9" decagon Alder Trivet with inlayed Walnut.
Designed in VCarve, ran using .01 Engraver, Amana .125 up cut EM and .0625 up cut EM.
Geometric inlayed trivet.zip (1.5 MB)
Managed to get an entry done, wasn’t sure I was going to be able to with needing to put on my new steel core belts and having to deal with an unfinished garage with temps around -10 F. I am still hoping to get another entry done on Friday before the deadline. That one is a lot more ambitious of an attempt (4 sided machining) that I am hoping I can pull it off.
But for now here is the one I finished.
Not sure if I am sharing this correctly, but here goes
Wow, incredible pieces being submitted! Stu I was playing around with something similar. I can’t get over how smooth the curves are on the c3d Logo wrapped like that! Very nice!
The Walnut platter is really cool!
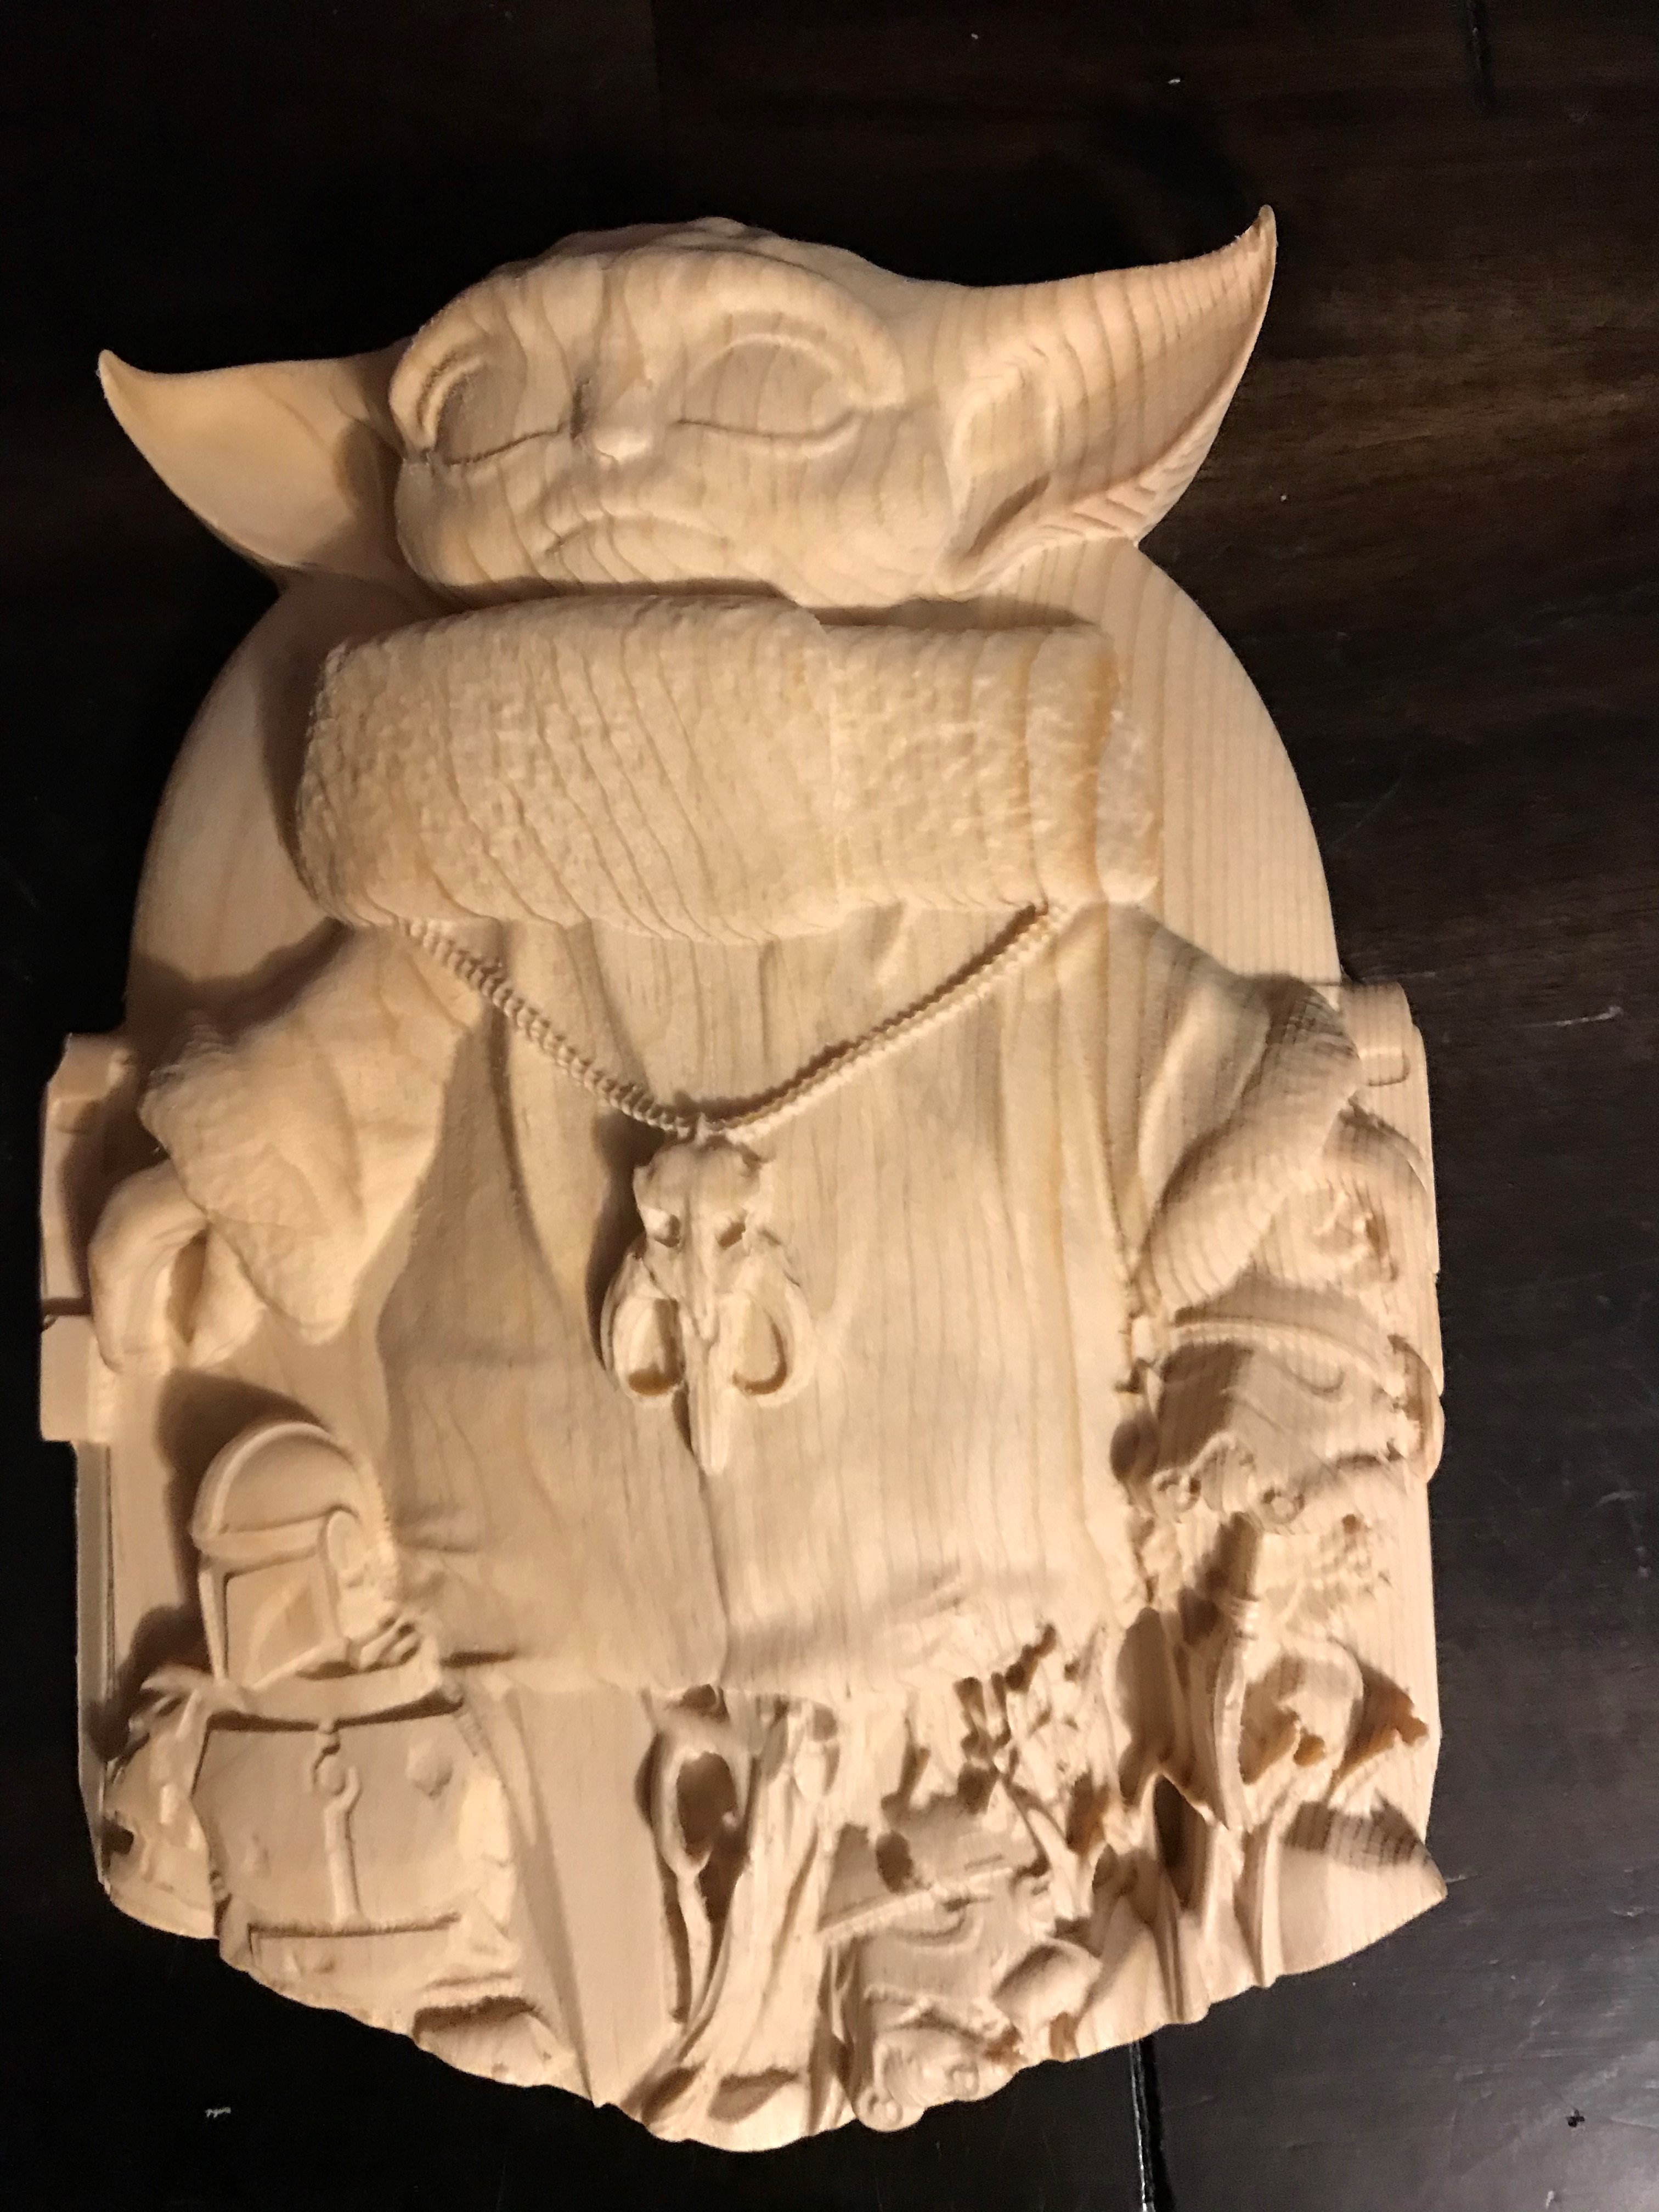
The Yoda is incredible from top to bottom, I am very impressed guys!
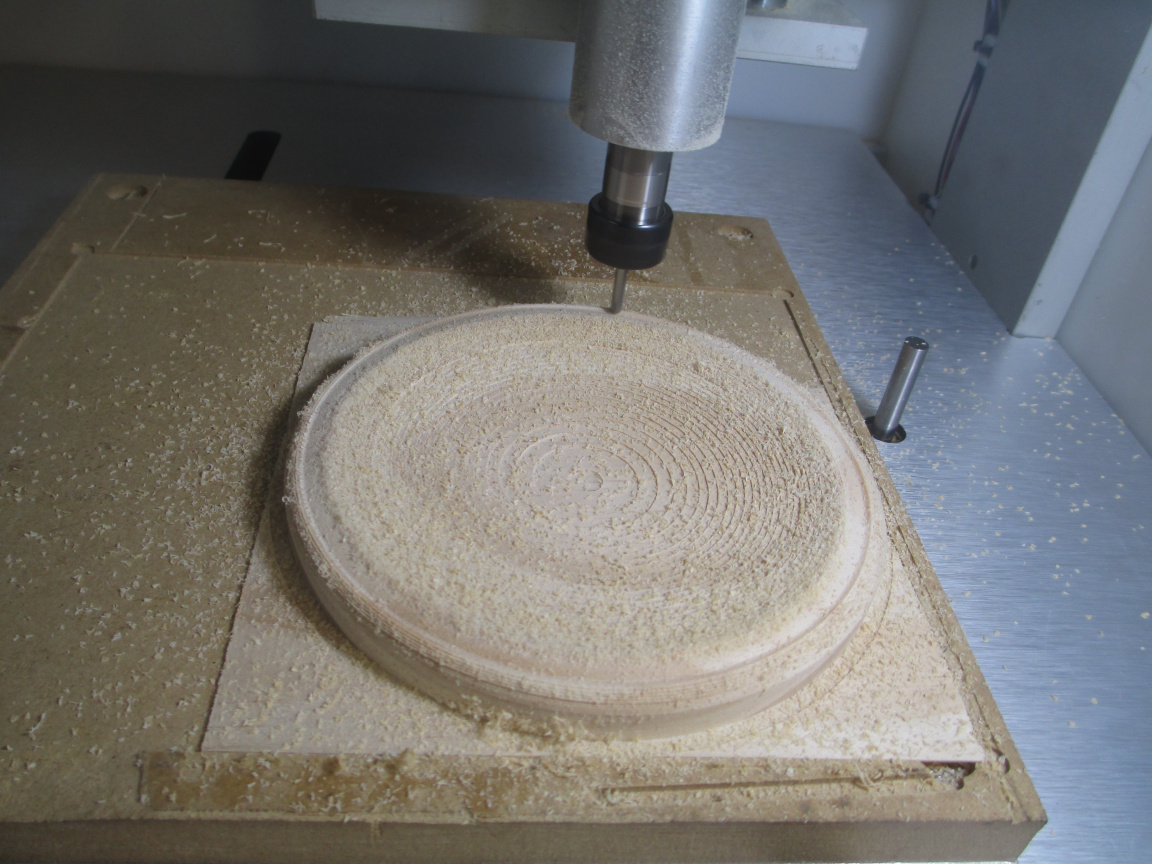
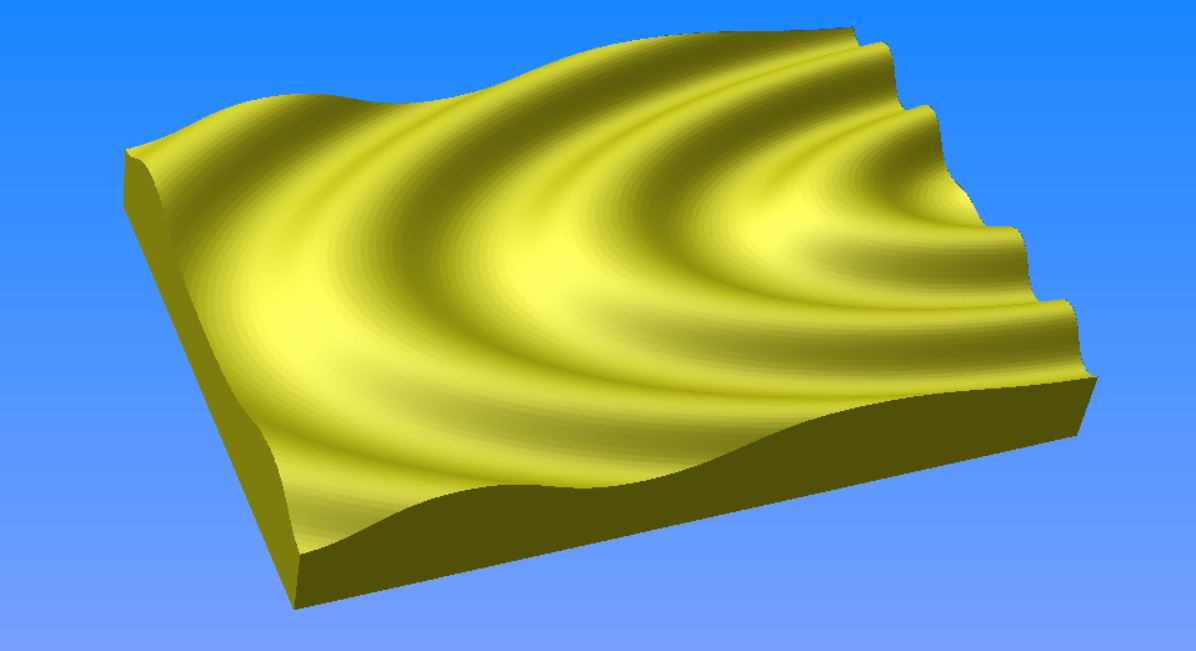
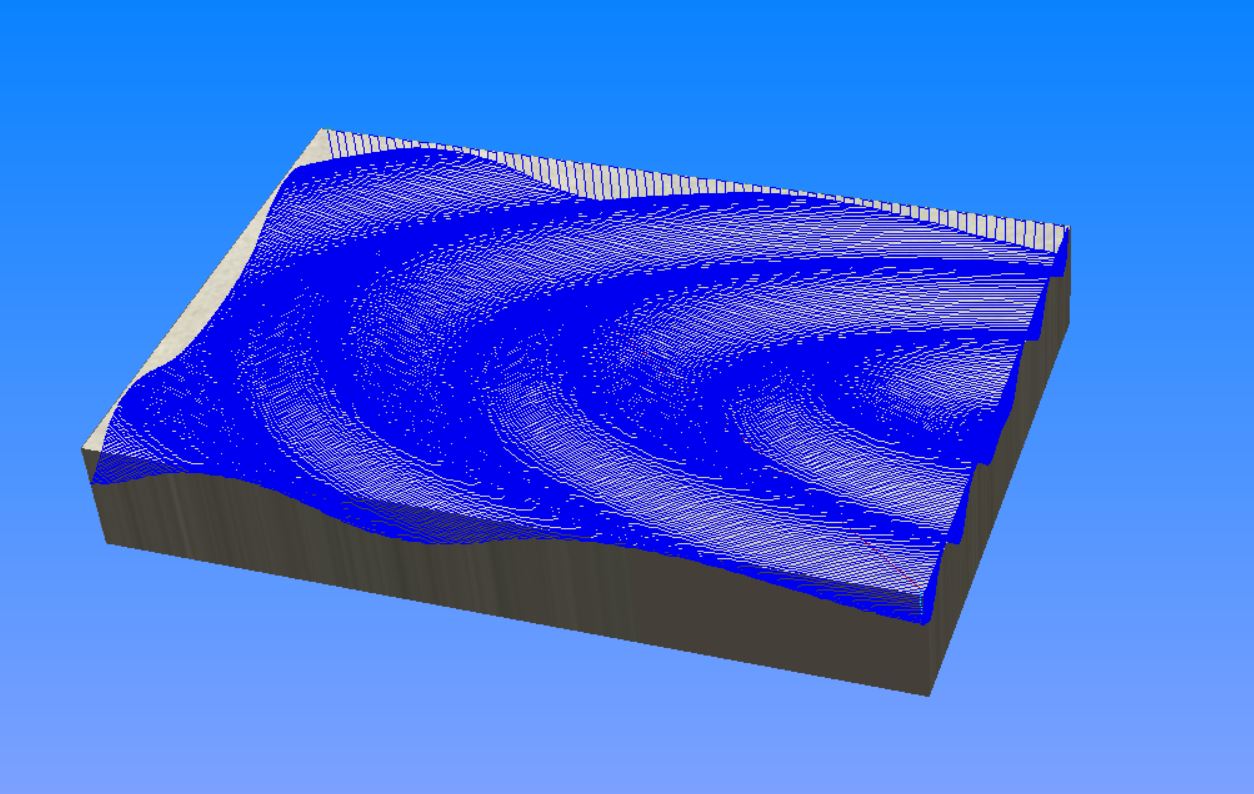
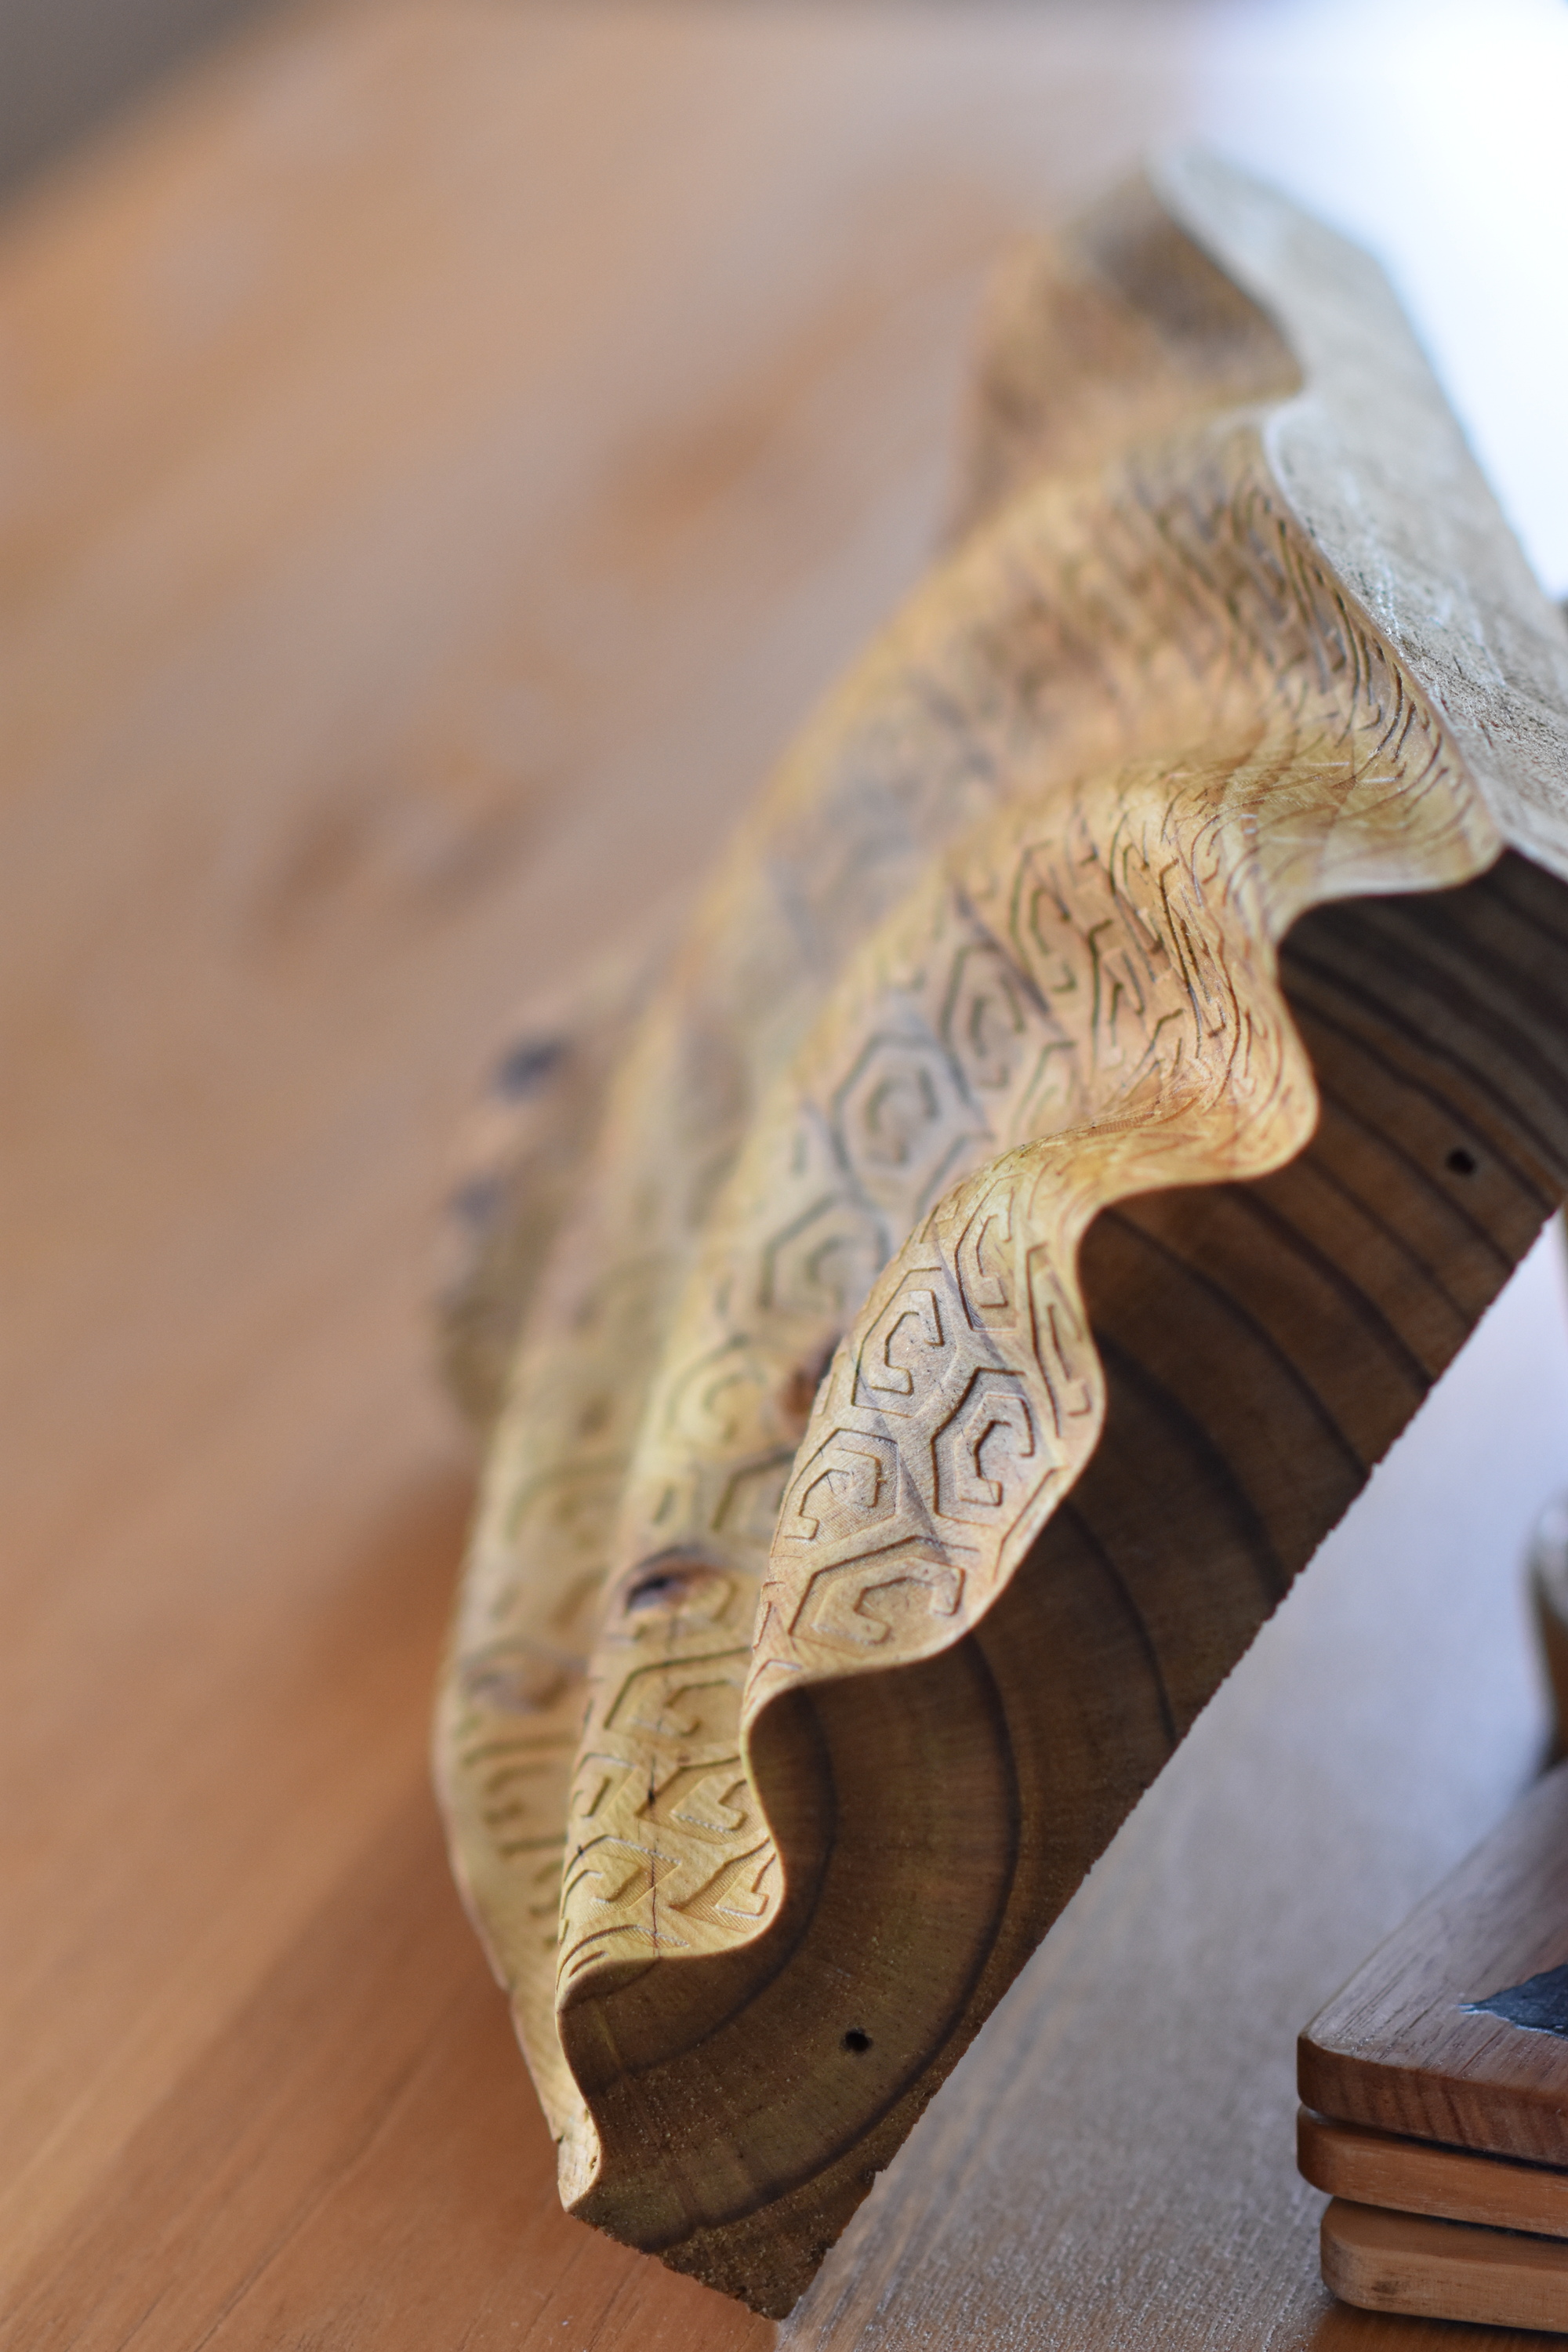
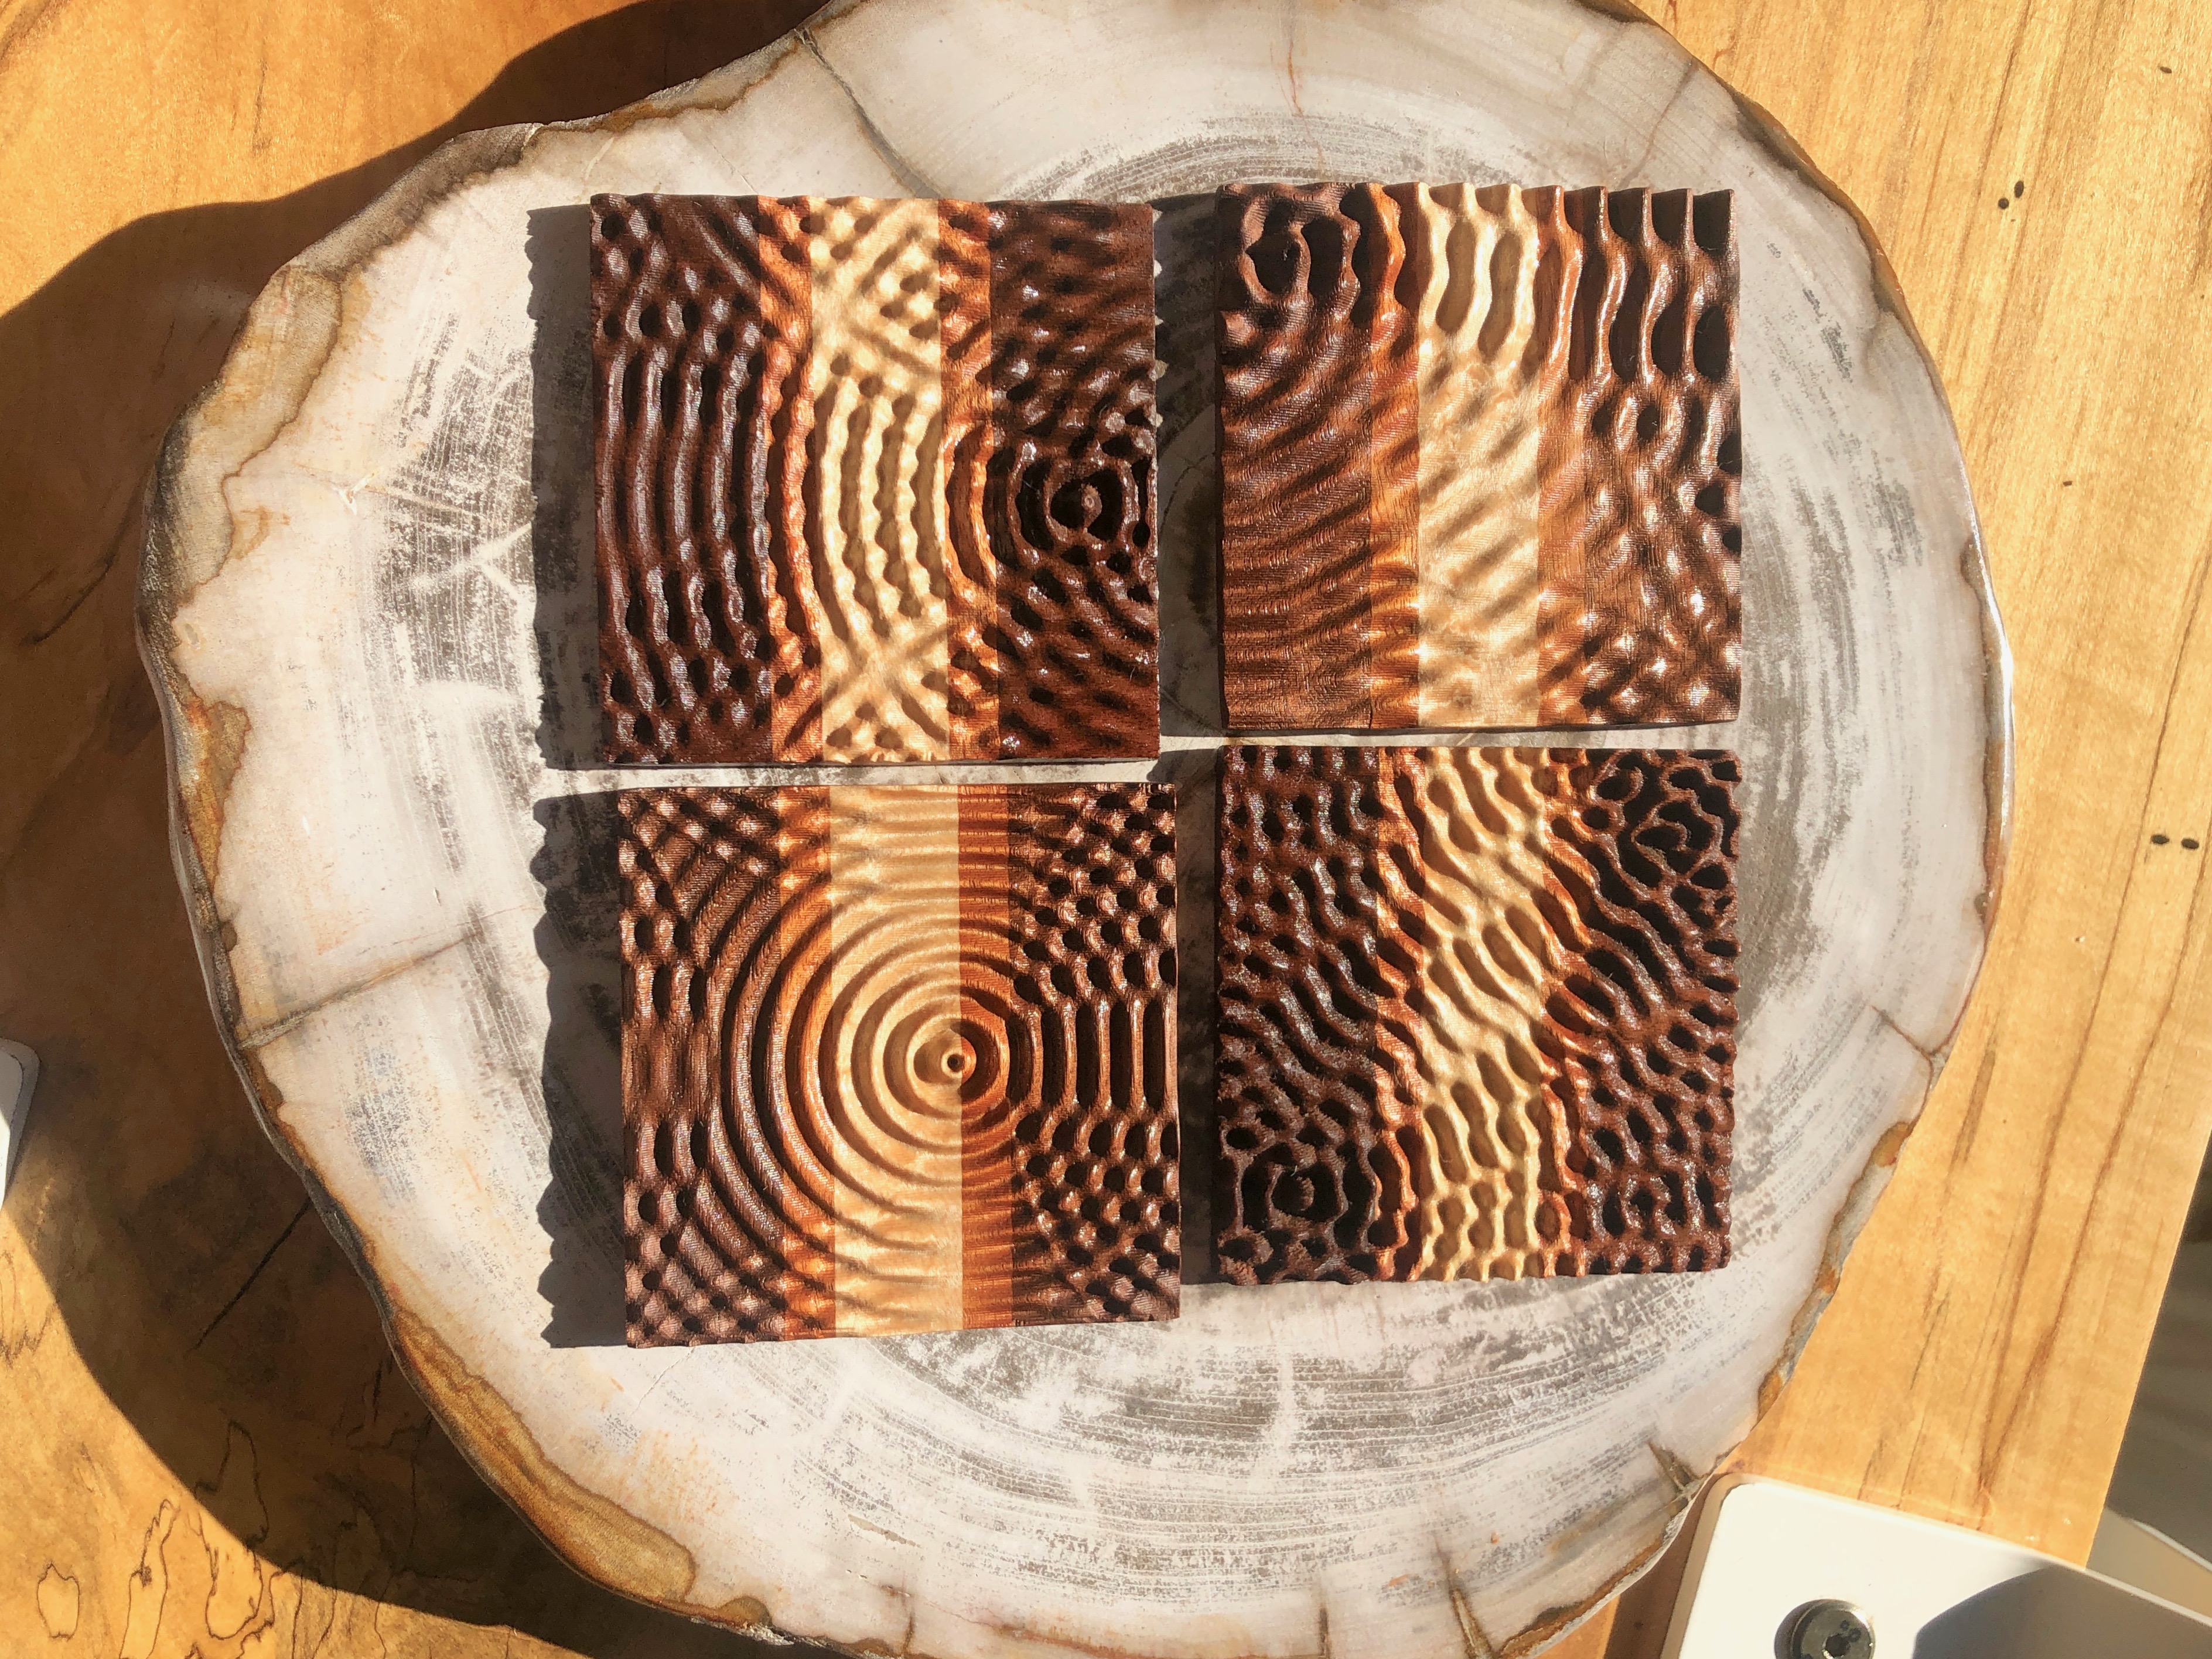
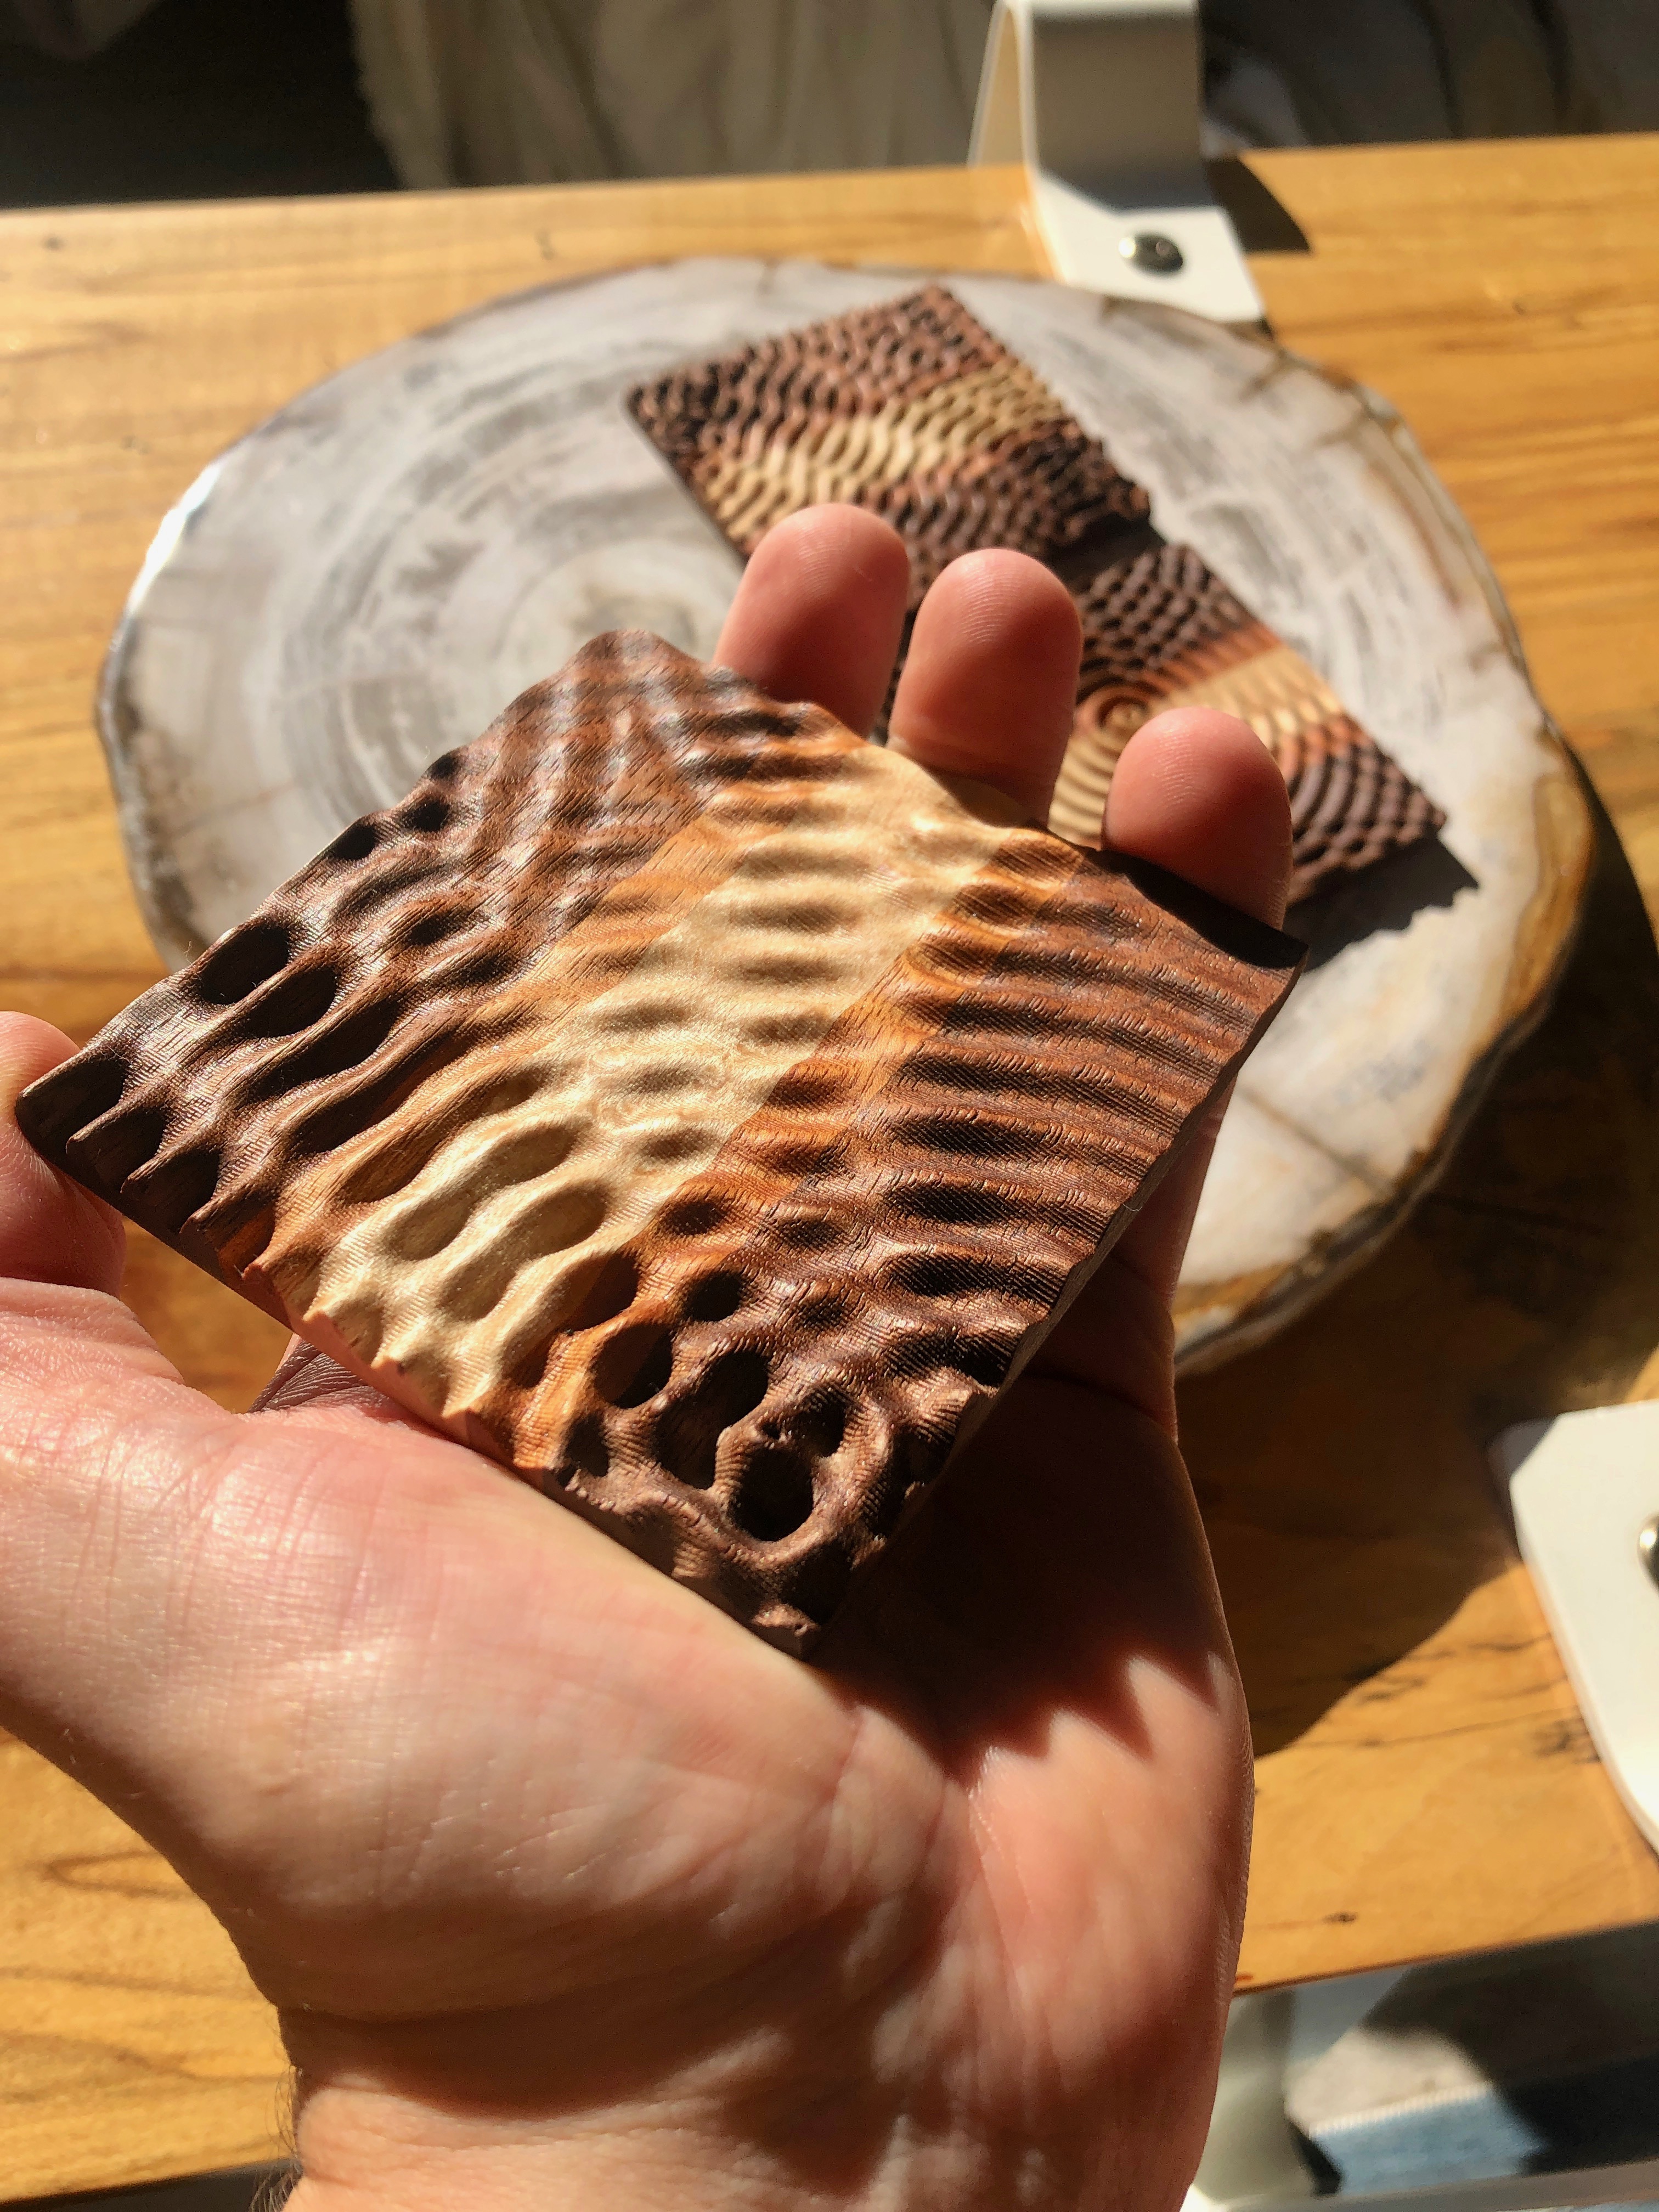
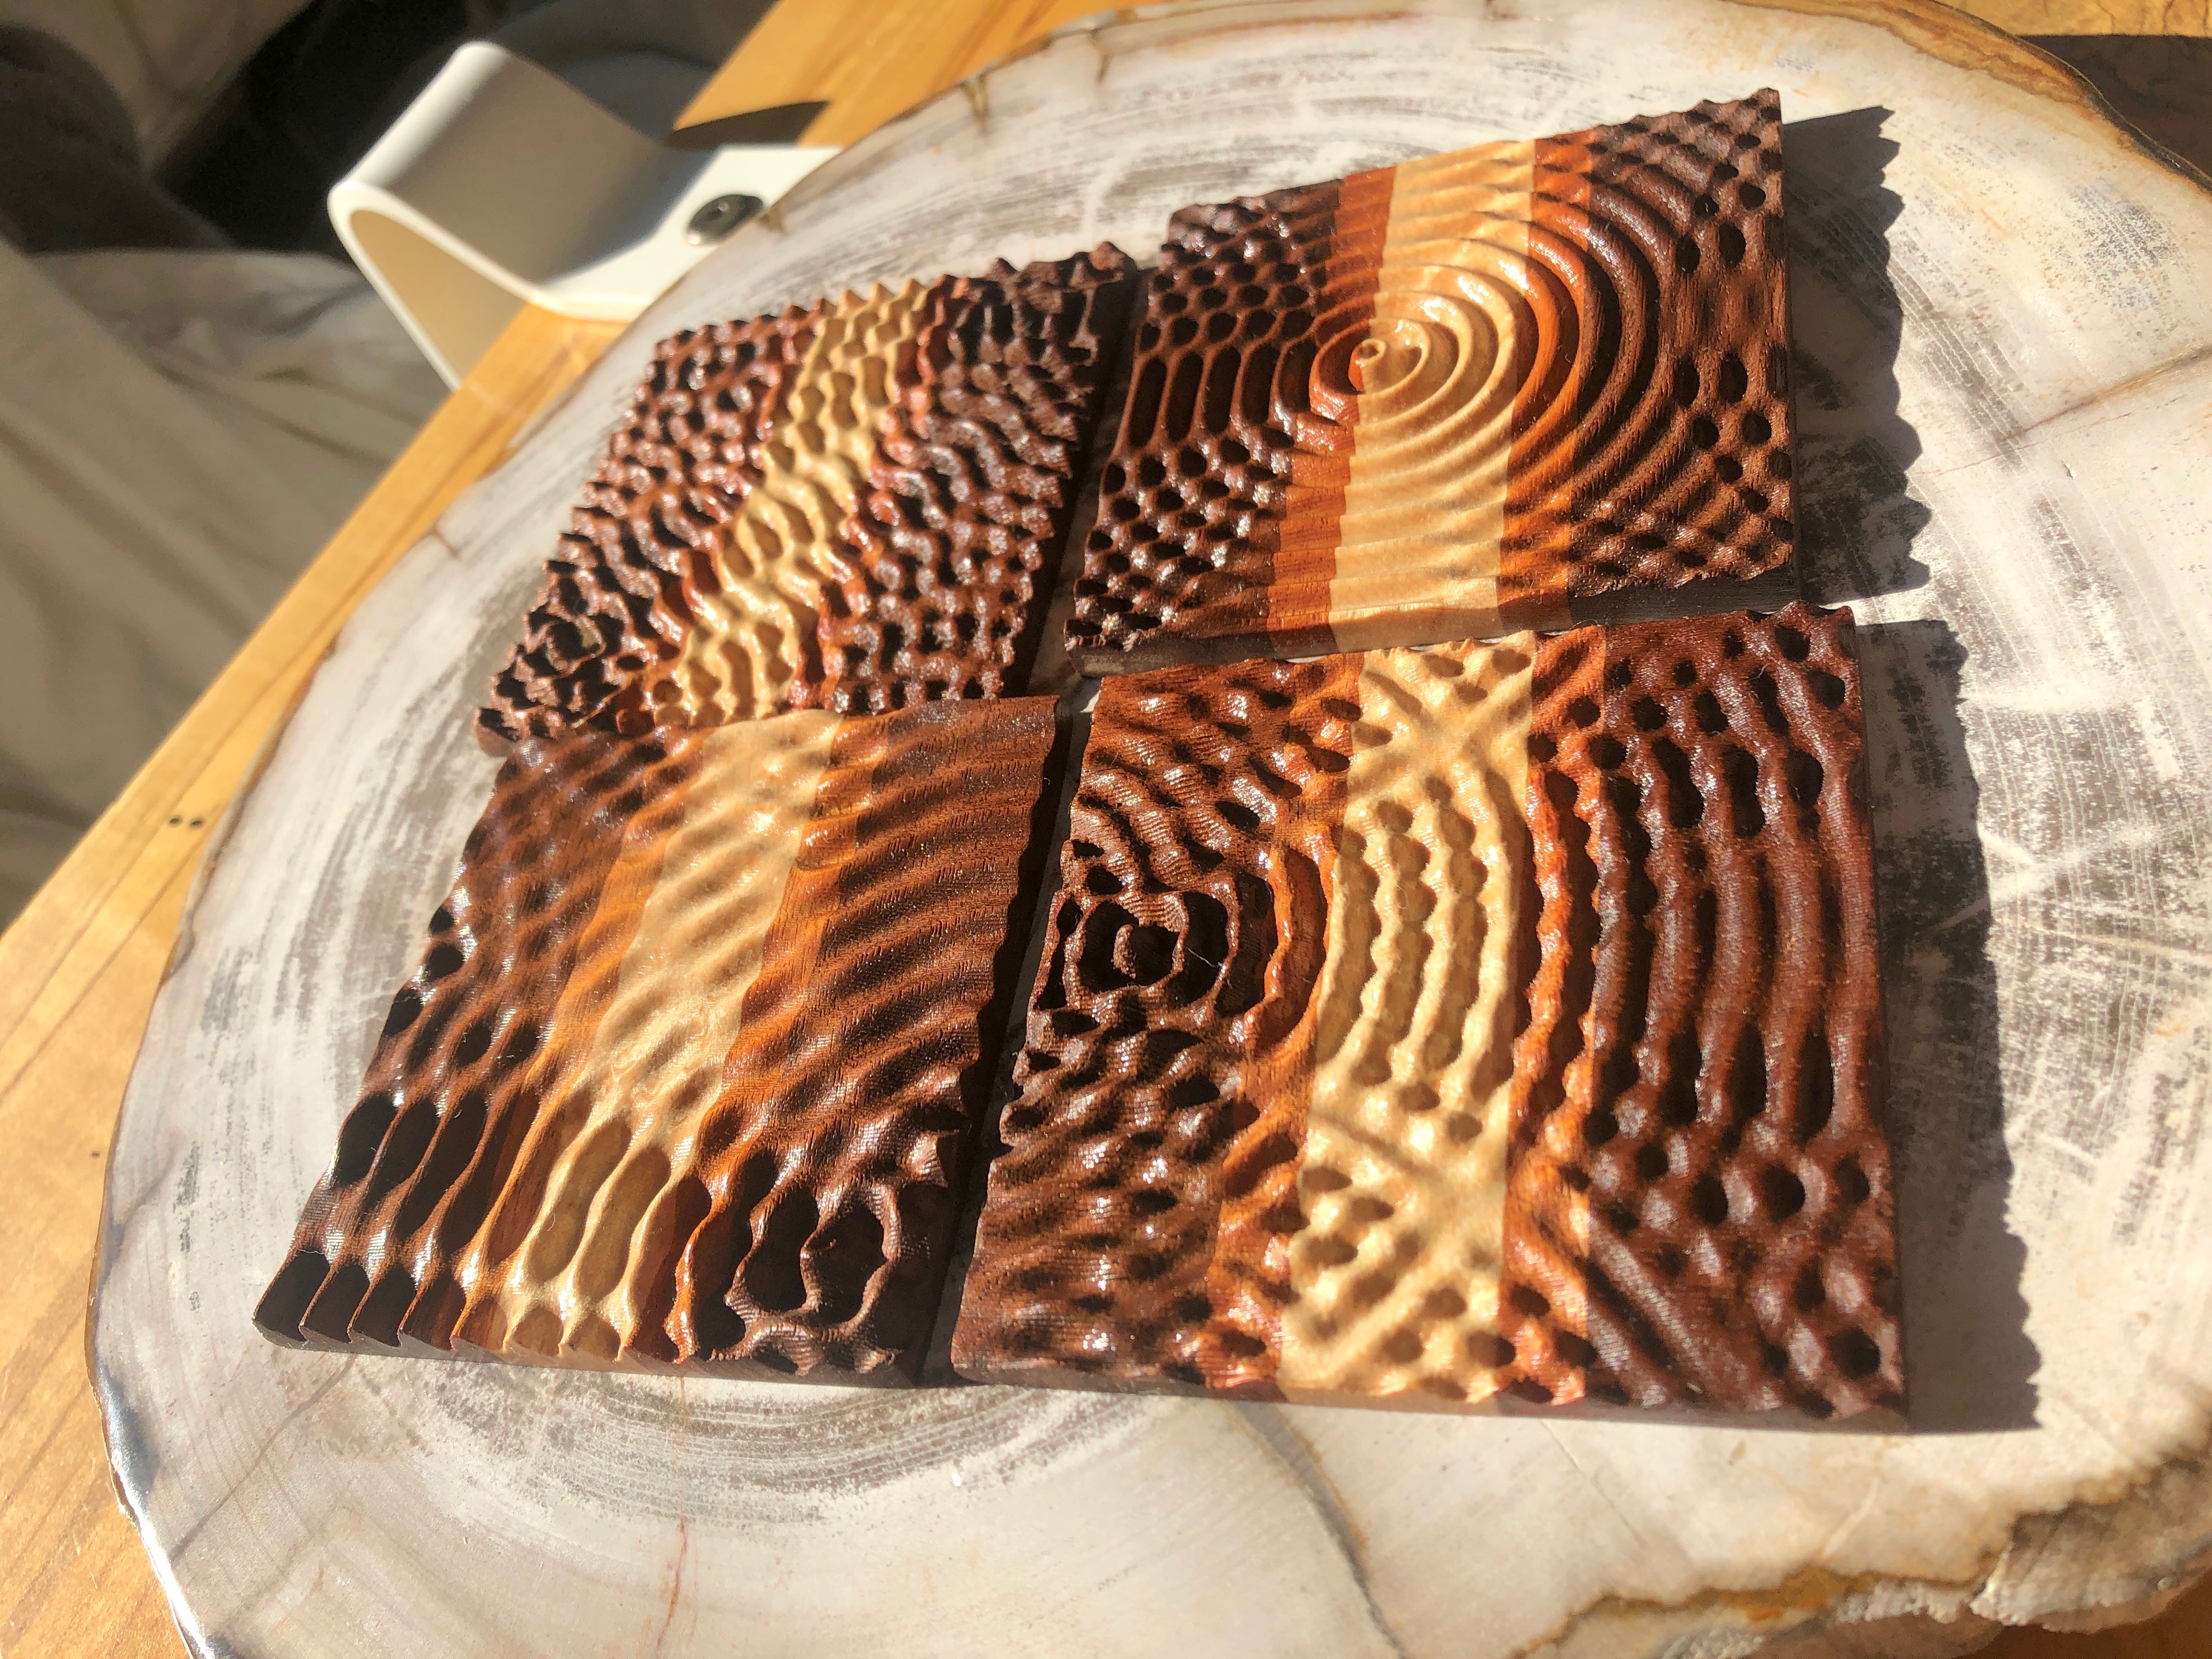
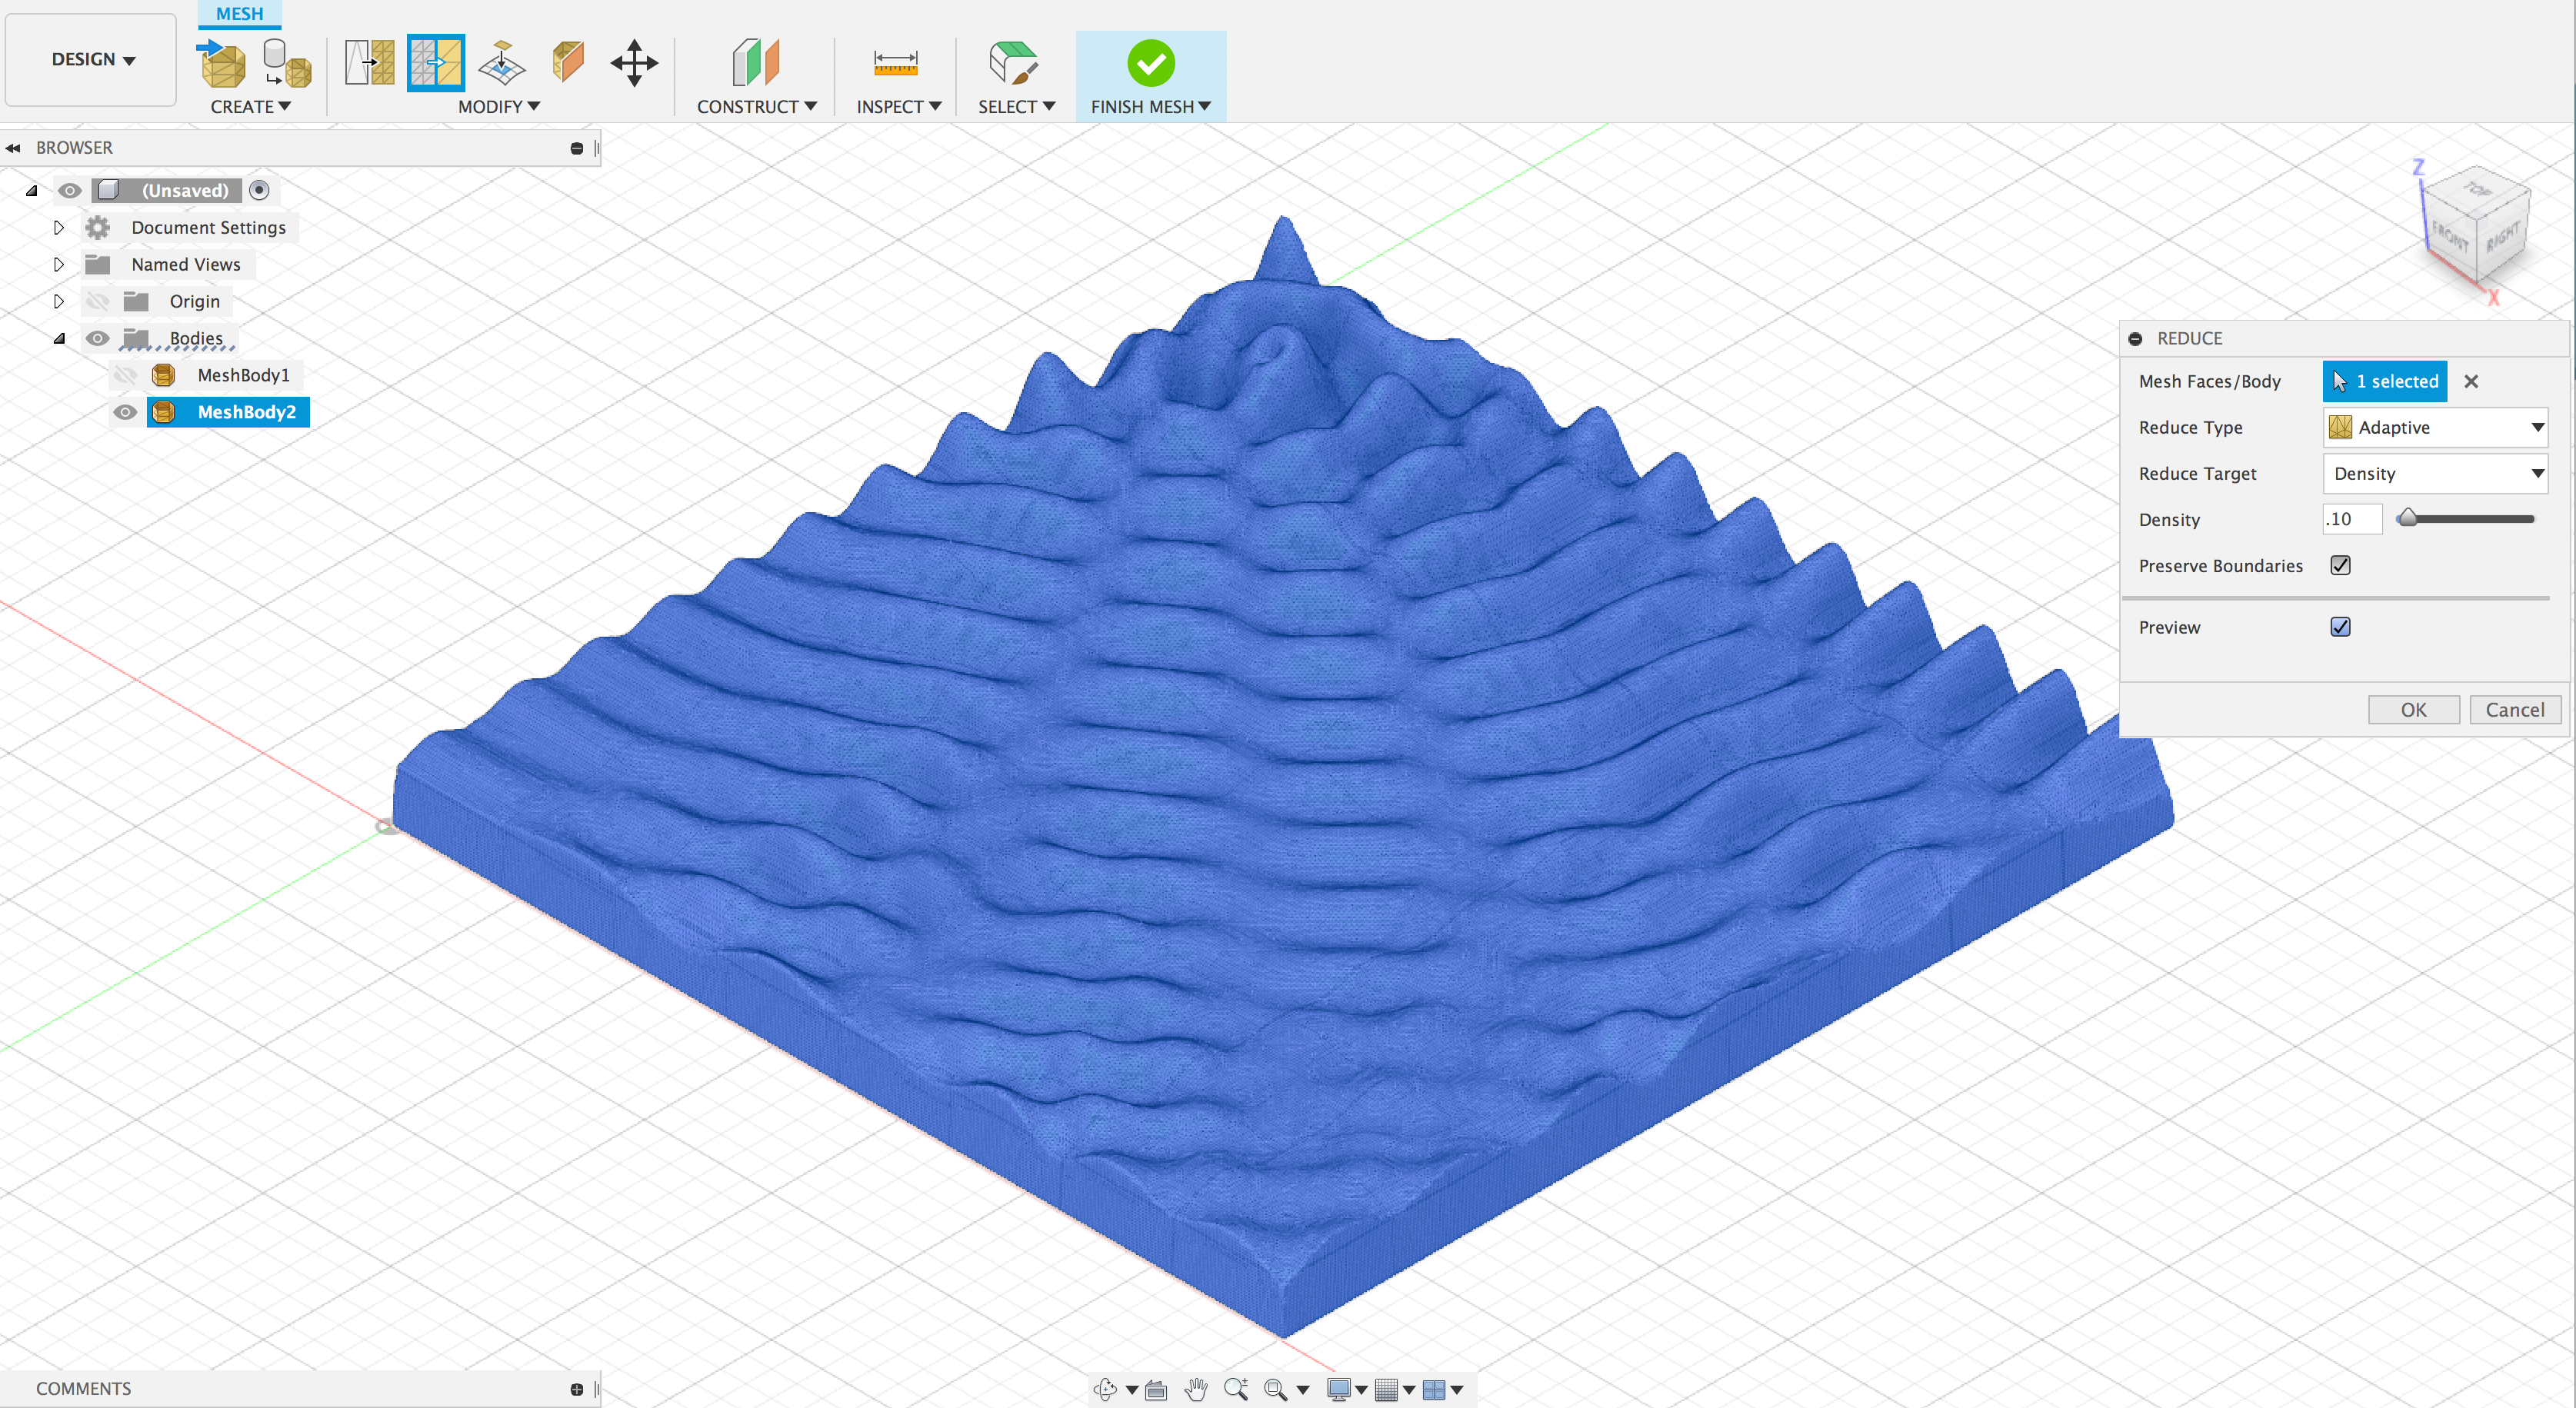
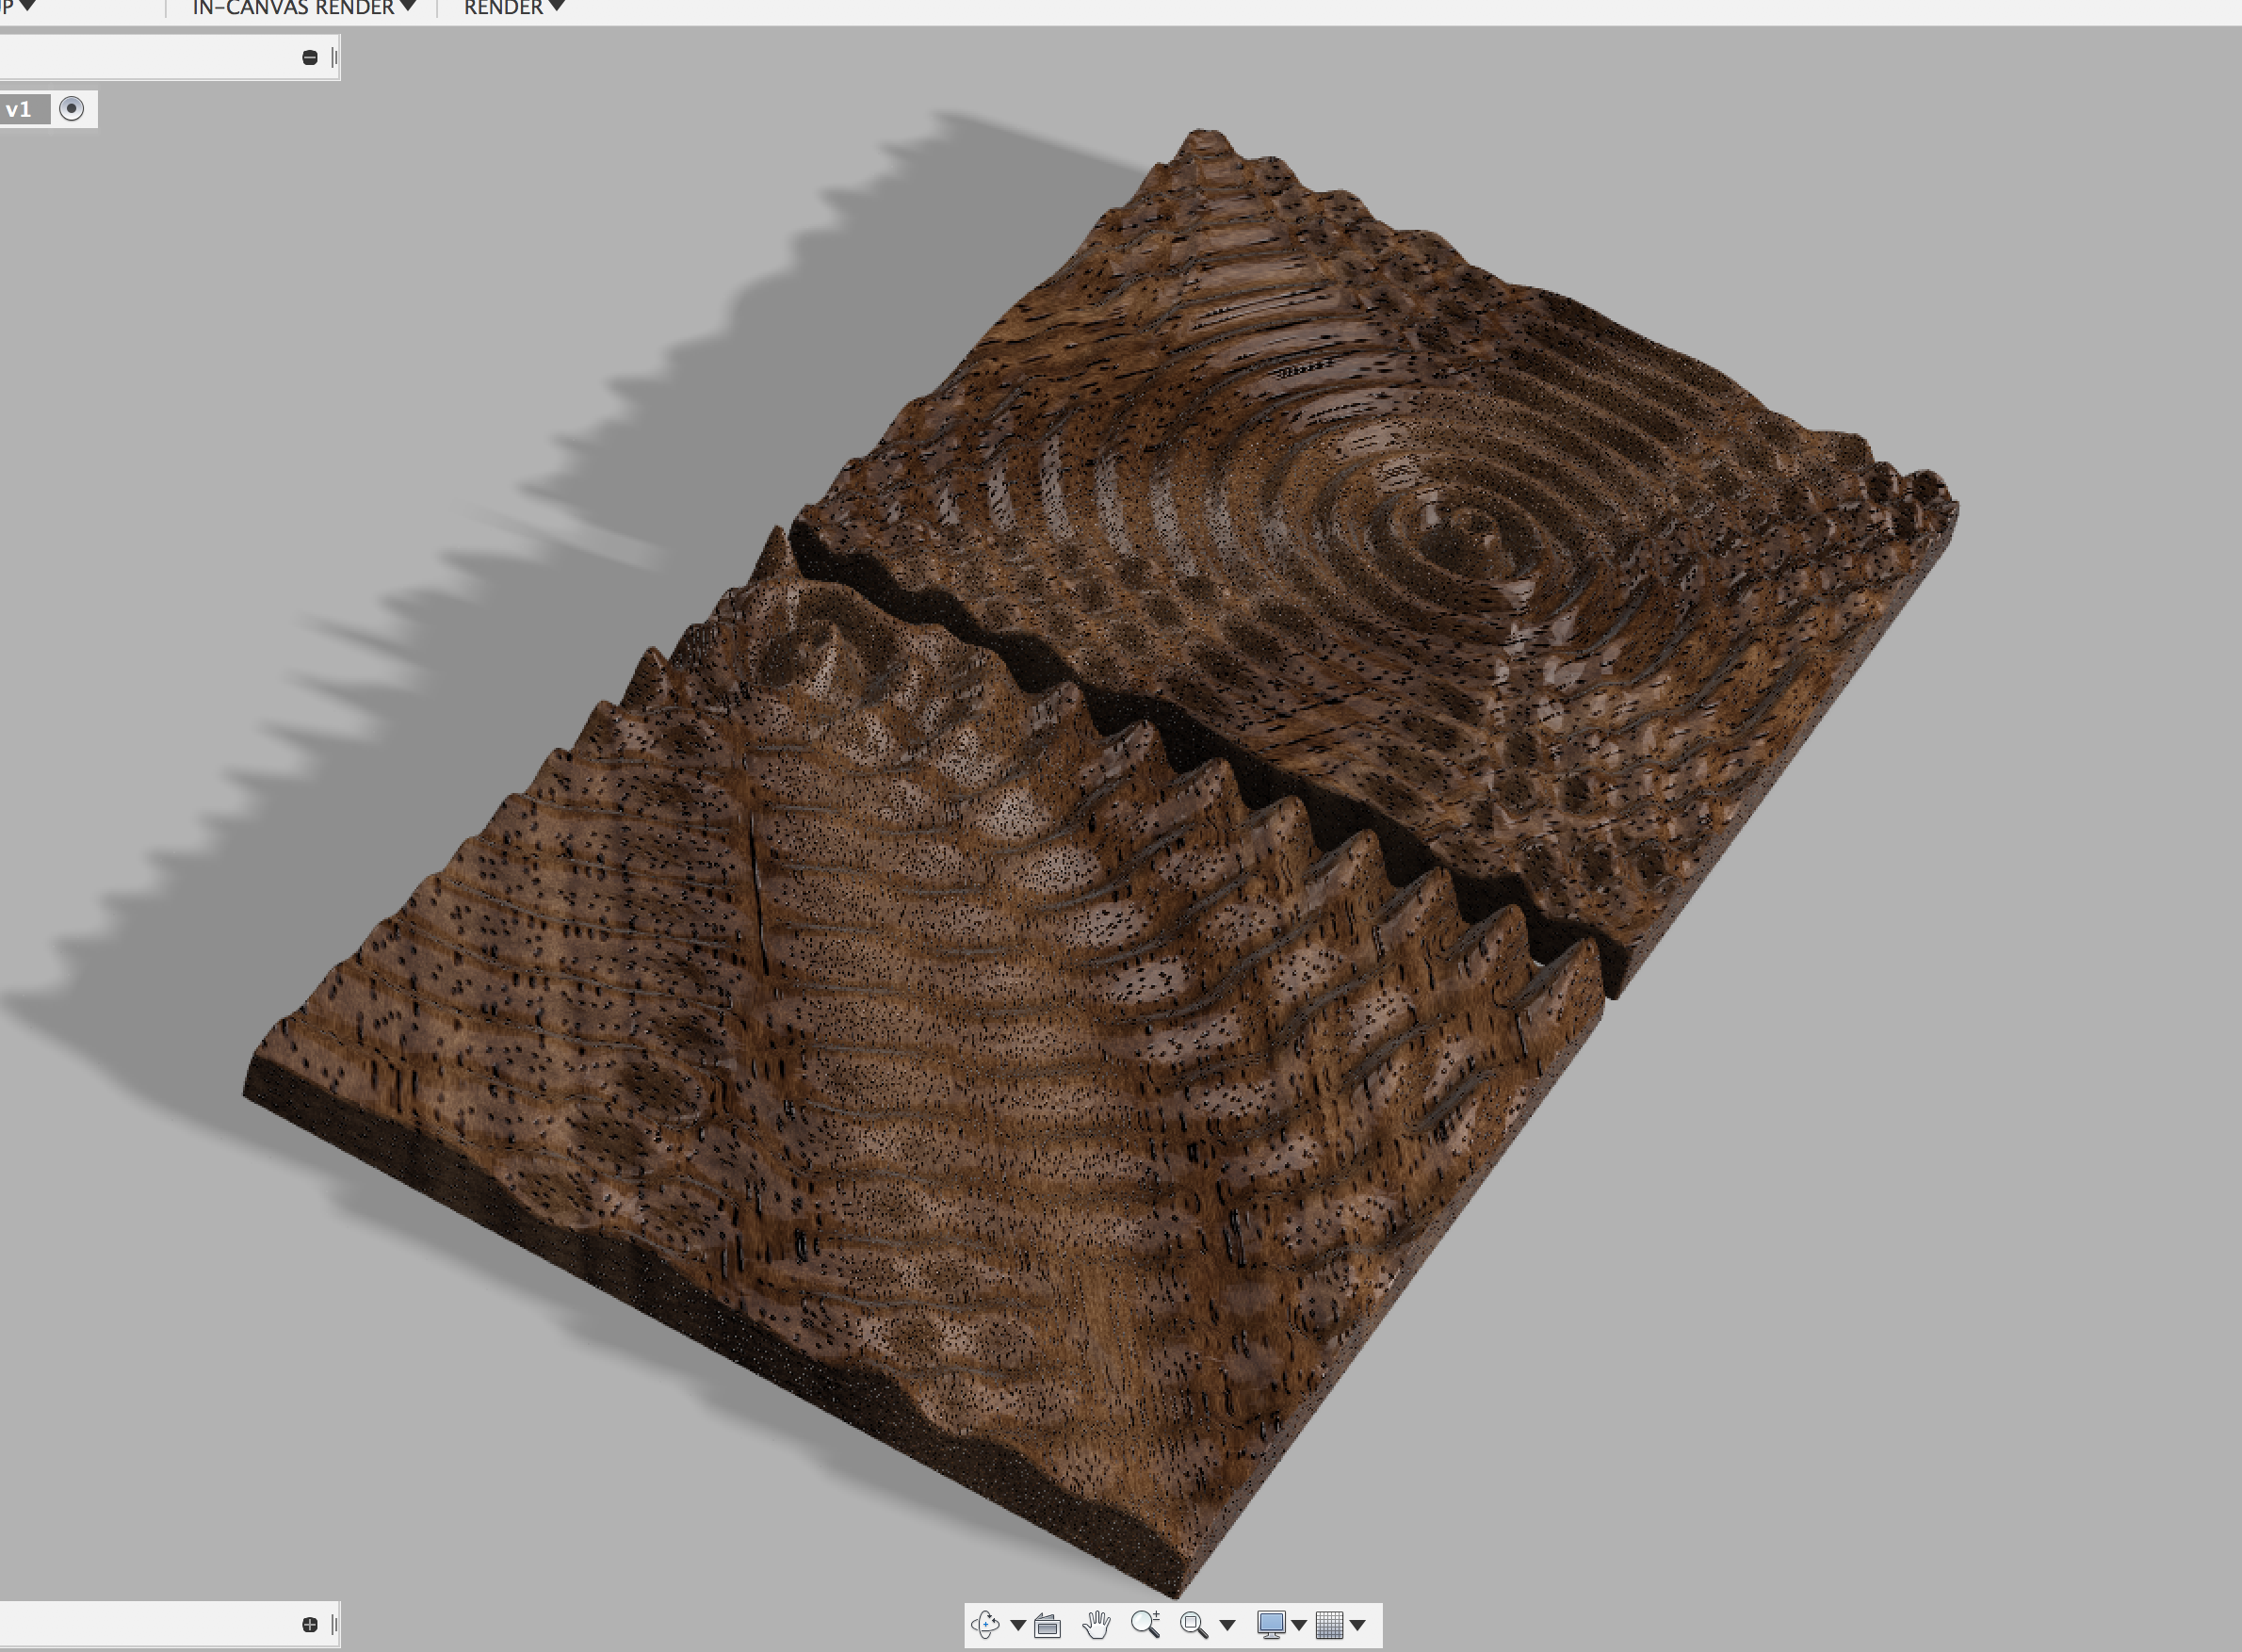
I had some leftover stock from my first coaster making project on my S3 and I been wanting to mill frozen fluid dynamics into some wood now for a while.
Finished Product:
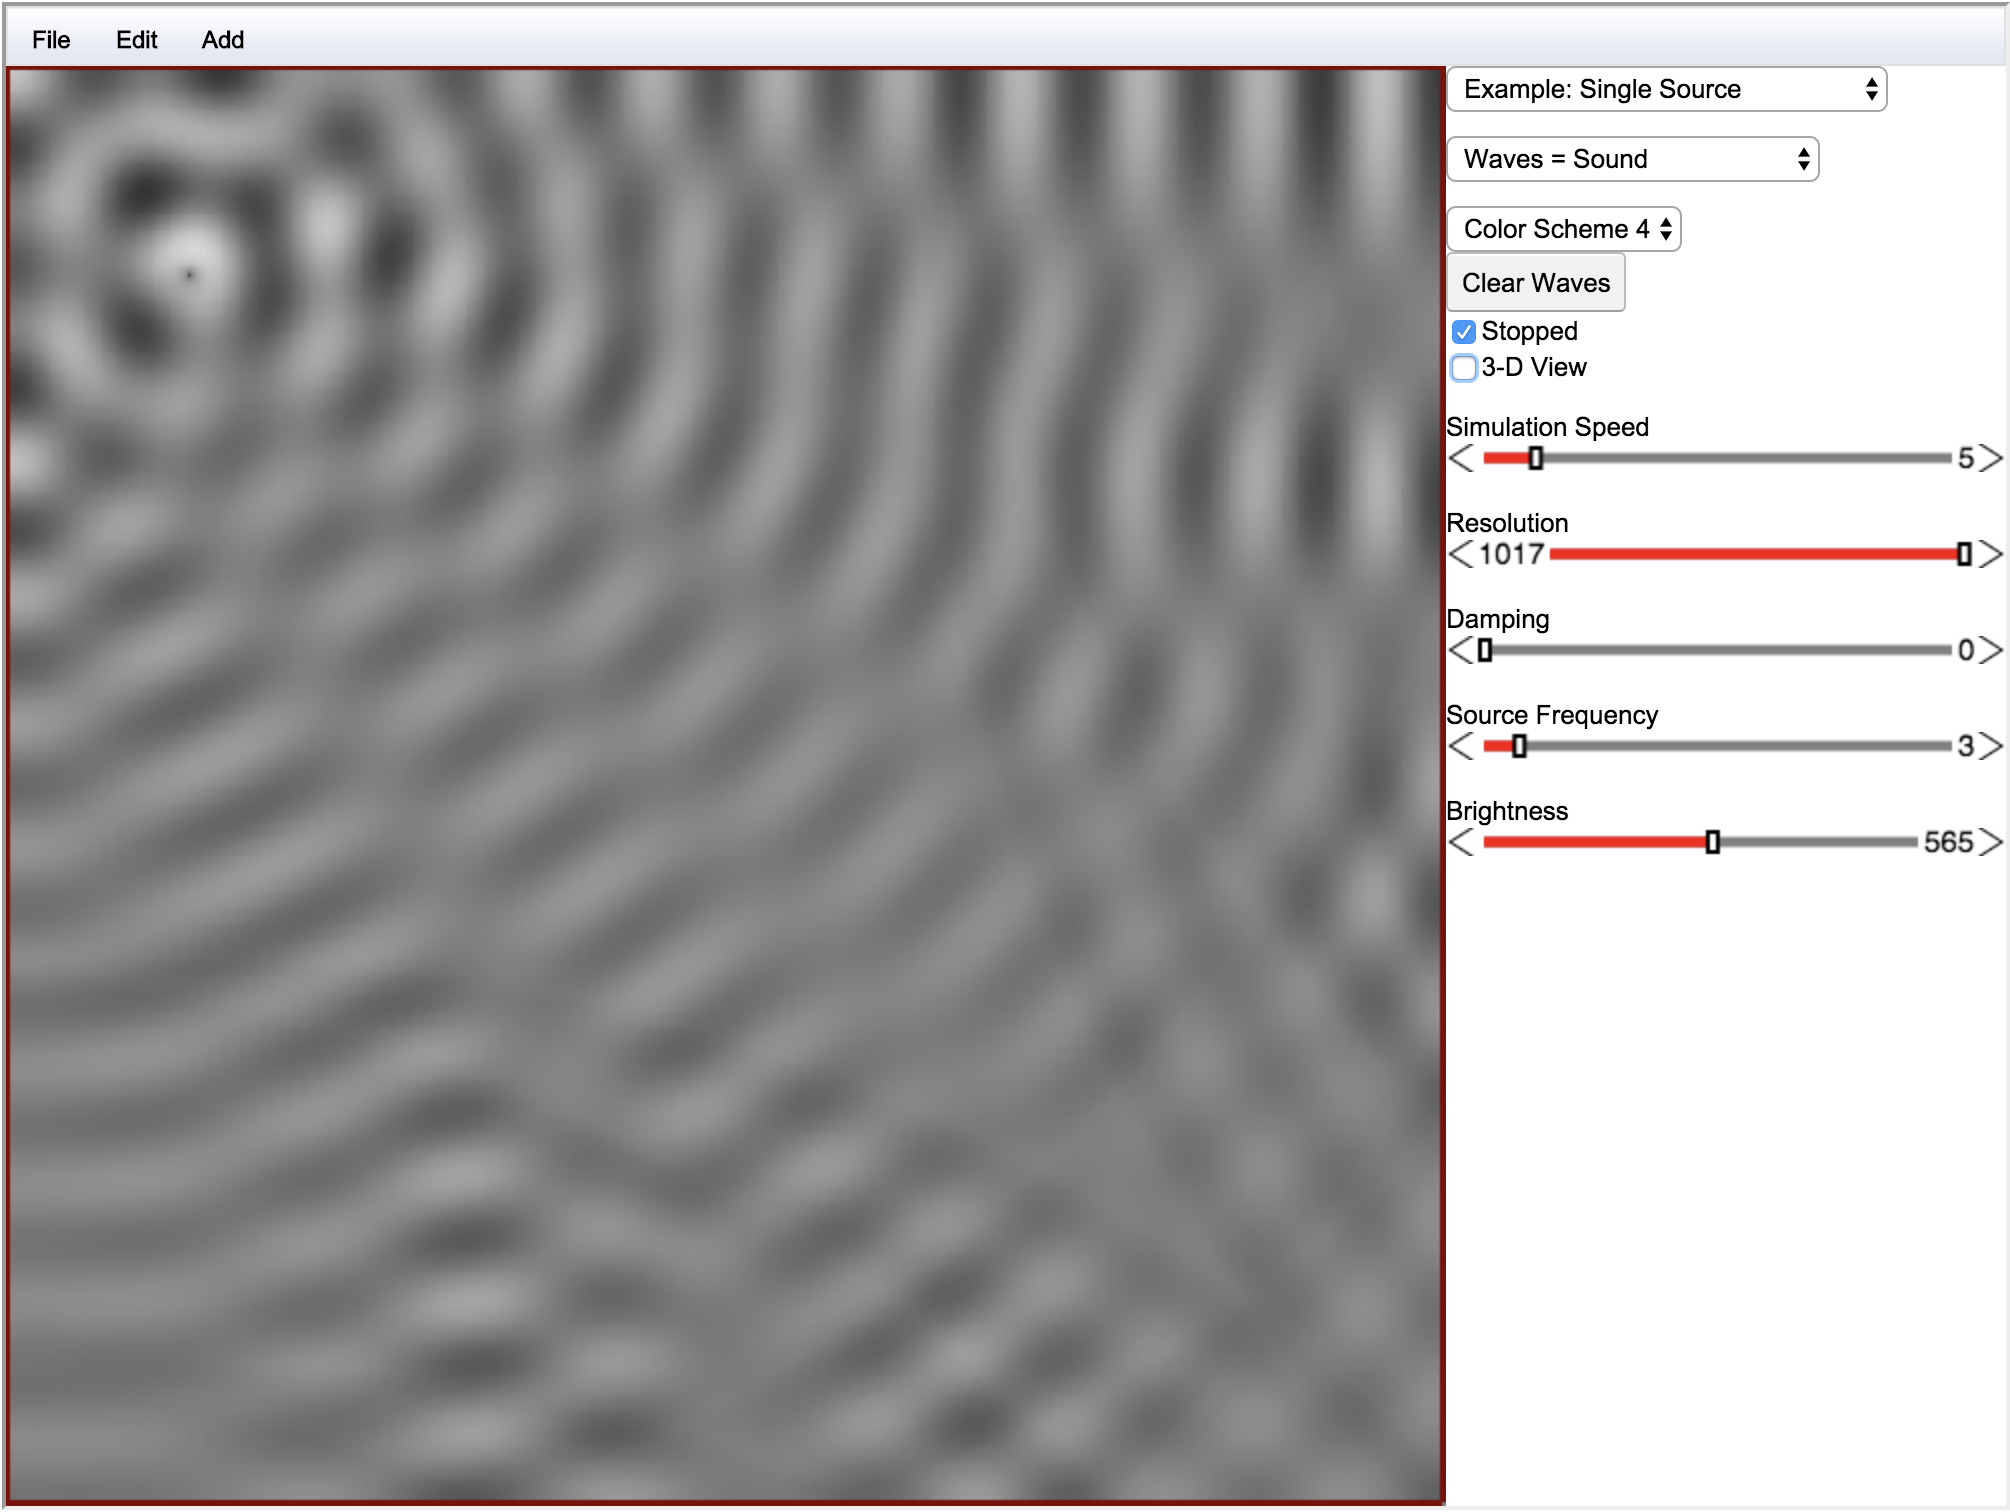
Using a Ripple Tank Generator online Here I modeled 4 different styles of single and multipoint waves contained inside box, then I froze the simulation at different points. Next, I exported these as 2D grayscale images and converted to an STL with the desired height of my stock.
I imported the STLs directly into Fusion360 then reduced the polygon counts and made compatible with my stock size.
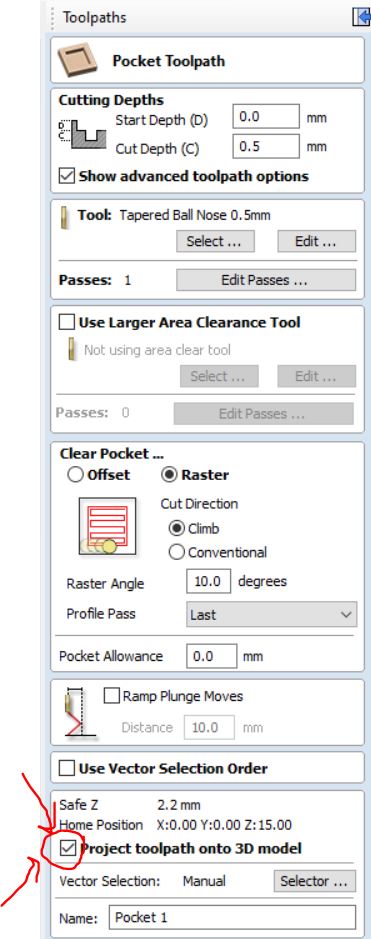
Next, I created toolpaths for a 1/8" ballnose adaptive clear, a 1/32nd parallel finishing pass, and a 2D contour, runtime was about 2.5hrs per 2qty coasters.
Repeated for my 2 other waveforms that’s how I got to my finished product. In hindsight, I should have modeled 4 points interacting within the Ripple Tank simulation then cut a single a STL in larger stock so that when the coasters are next to each-other they look like a SINGLE simulation cut into 1/4s (oh well, next time!).
Fusion File:
https://a360.co/2uU3vRN