The best soundproof CNC enclosure

Hi all! I need some general advice/input.

My parents have decided to let me (22 y/o engineering college student) put my nonexistent shapeoko in the loft. (I plan on getting the shapeoko 4 when it comes out).

I need to make sure my enclosure is as acoustically dead as possible to avoid my parents regretting their decision.

Here is what I’ve done to kill the sound.

First off, I have a table built out of 2x10’s already built with 3/4” birch ply table top which is glued to the table frame with silicone adhesive which will act as a dampening layer to prevent the transmission of vibrations.

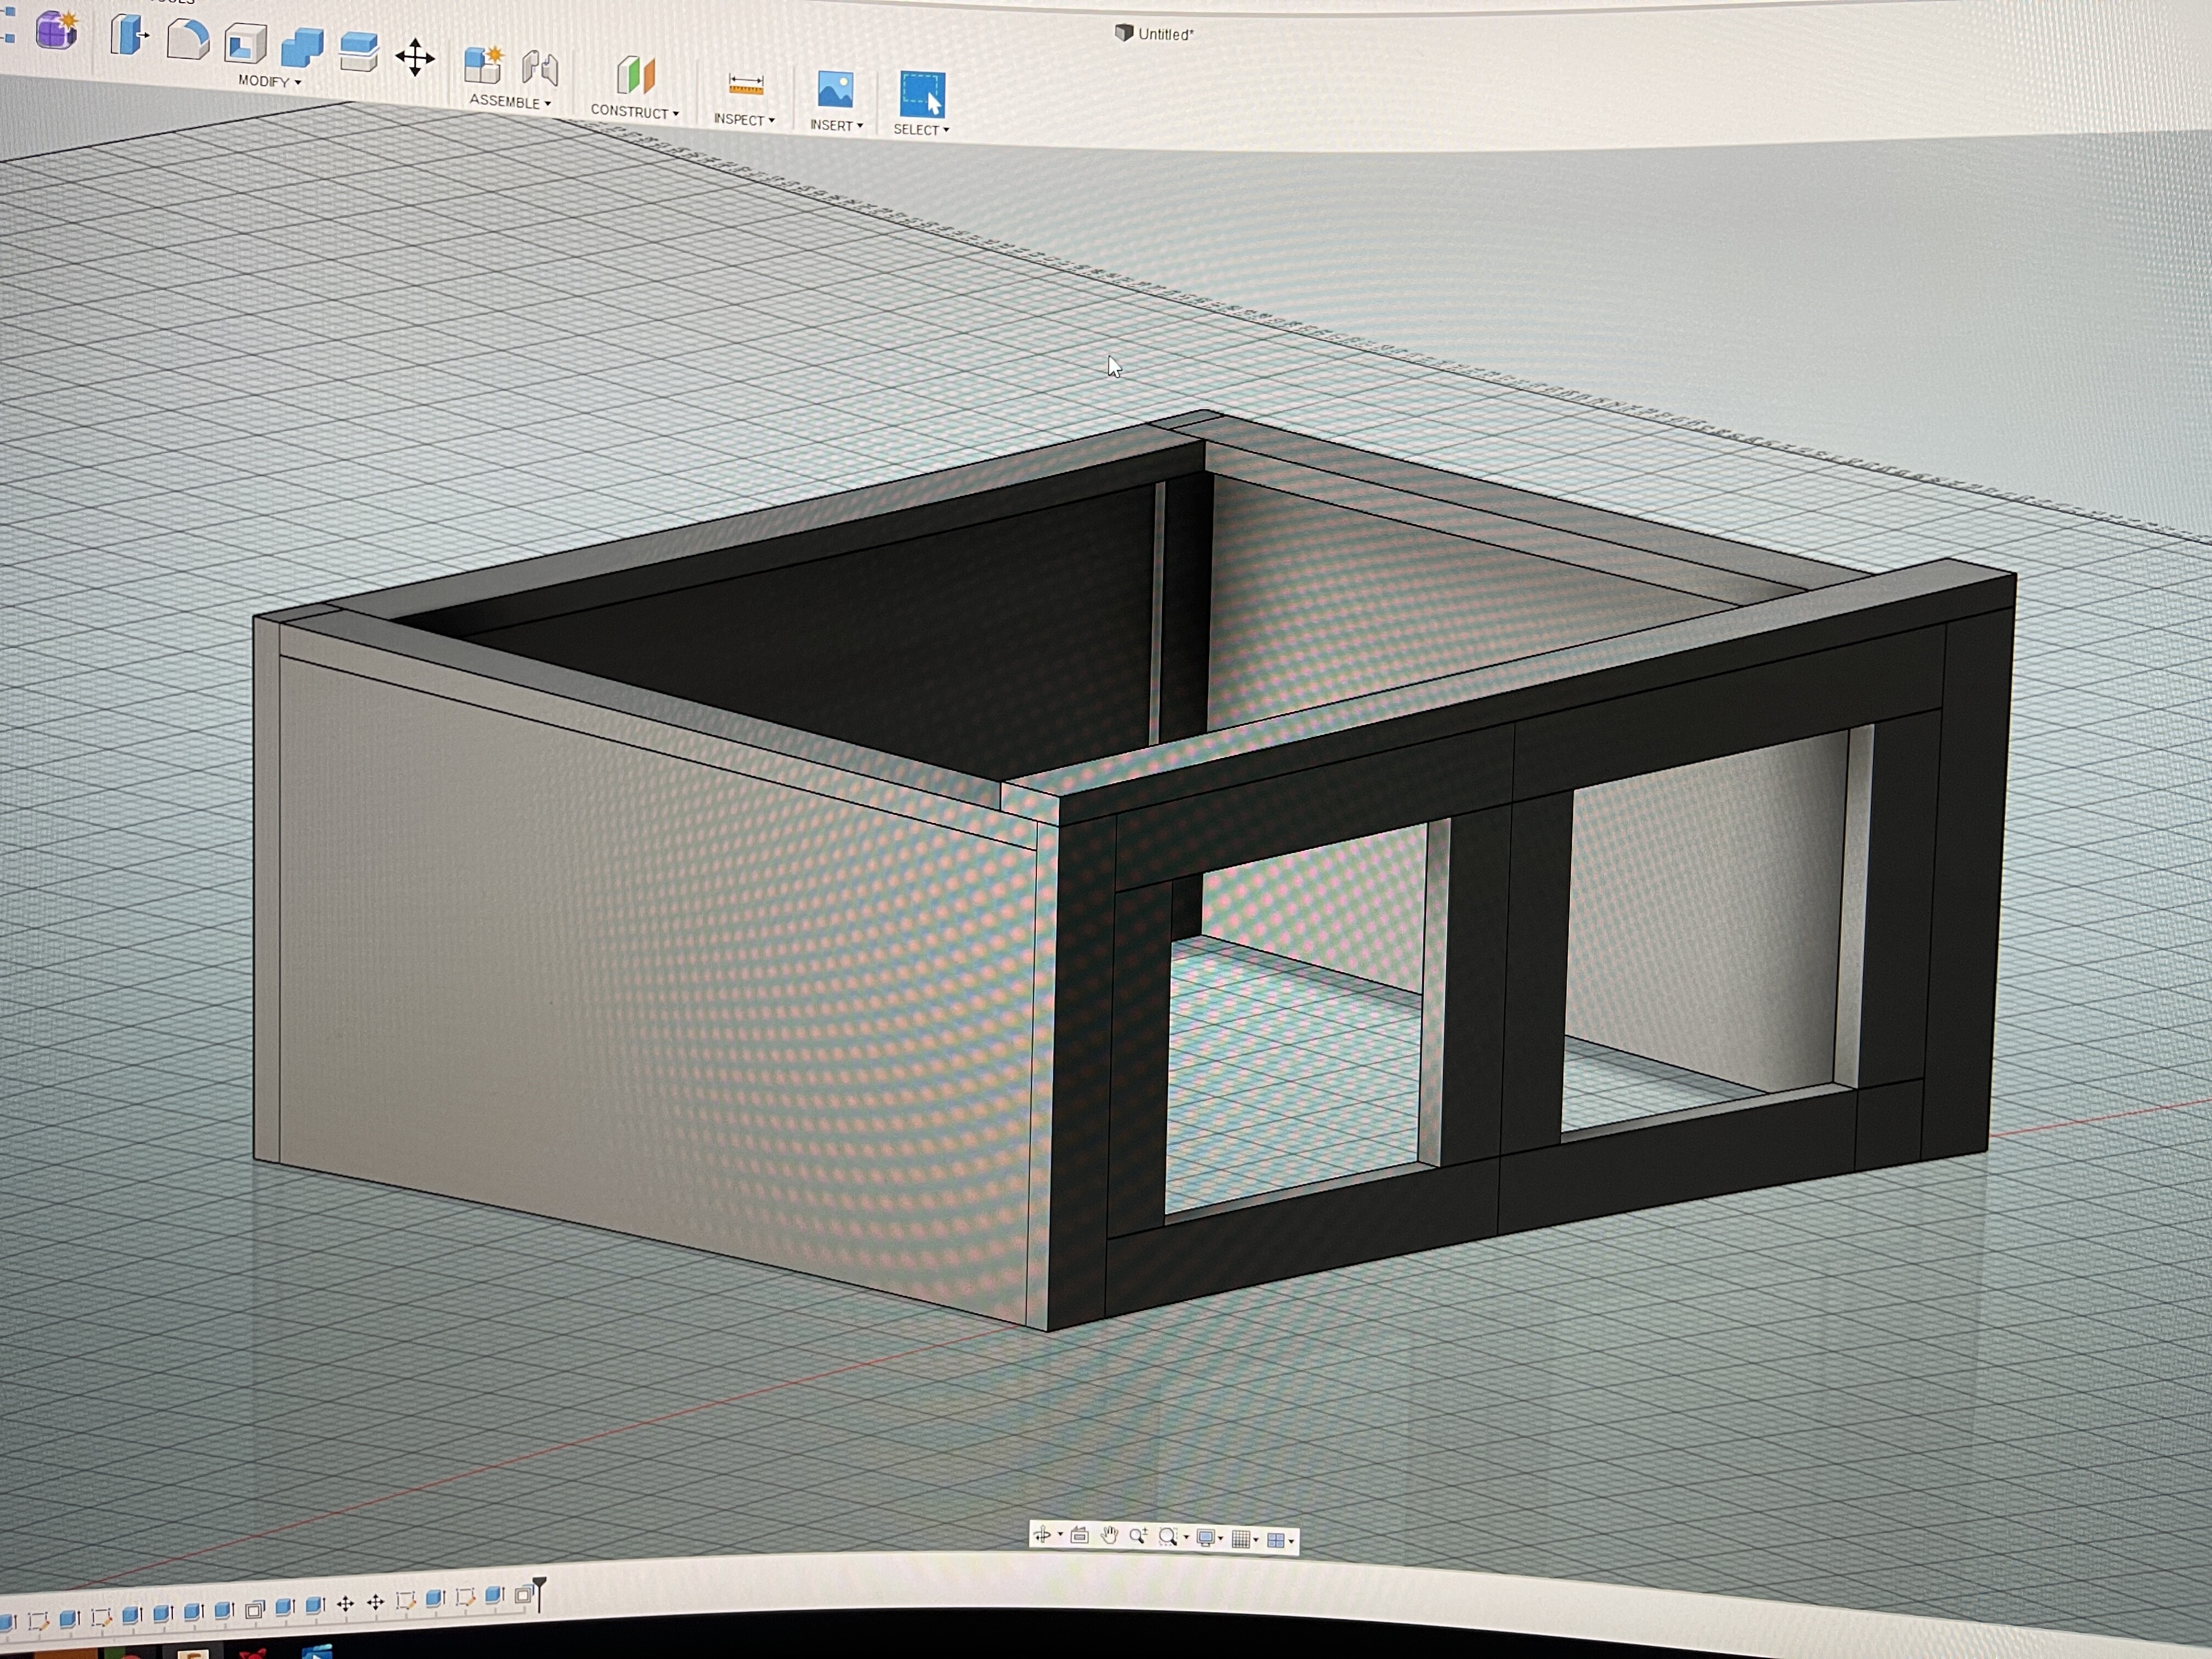
Next up I am working on designing a frame that is 51” deep and 62” wide and 24” tall.

The frame is designed so that 2’x4’ panels fit perfectly within the frame on the sides (the back panel will be made of two pieces of ply). Those panels will also have no screws attaching them to the frame and will instead be glued with a silicone adhesive.

Third, I will be putting two layers of an anti-slip mat under the machine to further reduce vibration transmissions.

I’m also using a 1.5kw water cooled spindle so no ridiculous router noise.

Right now I have three questions.

would it be worth it to double up on plywood layers and glue them together with a viscoelastic material? The viscoelastic stuff basically has lots of internal friction and when it vibrates it turns the vibrations to heat via friction. Adding this stuff can cut the time it takes for a vibration to decay in half!

How thick of windows do I need? And how many layers? I was thinking two layers of 0.25” thick extruded acrylic or maybe even three 3/16” layers. All of these of course will be glued using that silicone adhesive and will have a small gap between each panel. (0.25” to 0.5” gap).

Finally, would moving blankets be good to soundproof the enclosure? A guy on YouTube did a demonstration and had 3 layers over a thin plastic sheet enclosure and it seemed to make a big difference. I would use 5-6 layers per side and would add a little curtain rod in the frame to hang/drape them.

Thanks all!

2 Likes

One thing to consider for an enclosure is dust extraction. Additionally you need to have the air turn over inside the enclosure or you get a heat box. The dust collection needs a certain CFM to operate correctly and that means you need to get fresh air into the enclosure. Heat rises so you need a vent at the top and a vent at the bottom to get the hot air out and fresh air in. If you build an air tight enclosure where will the cfm for the dust collection come from. Now you can build some baffles for the air inlet and outlet to keep noise transmission down but you need air for dust collection and you need dust collection for the health of the Shapeoko. Machines without dust collection get the v-wheels very dirty and that leads to poor cut quality. You may need to add some fans to keep the air turning over in the enclosure and Amazon has some 120v fans that will be easy to power. They make 12 volt fans but you need a power supply. Since you already have 120v the 120v fans would be easiest to wire up and power. A shop vac will work as a dust collector but they make noise. You could enclose the shop vac but it also needs cooling and a place for the air to escape.

So consider the cooling and the dust collection for your enclosure.

1 Like

Hey @PerchPerkins35,

First of all thumbs up to your parents! :slight_smile:
There are lots of details that need to be taken care of if you want to achieve “apartment-friendly” noise level, but it has been done (and it seems to me you are on the right track). That is, if you don’t plan on cutting aluminium all day using aggressive settings, because that is never going to be silent.
Using a water-cooled spindle is a part of the answer as you figured out, next up is going for a “quiet” vaccuum, and finally the tricky part is managing the air flows.

I think the recent thread below is quite appropriate, you should read it and maybe @holgersindbaek can comment on whether his enclosure has worked well for him in a similar situation than yours:

Then if you need to go to the next level, you could design one of those “box in a box” designs, but I have only ever seen them done around Nomads, not Shapeokos (that’s twice the effort and air flow may become a headache)

1 Like

Mister, nothing wrong with your plan, but you’ll be broke, graduated and/or moved out before all of those plans happen. Jus’ sayin’. :smiley:

PS. Especially if you add dust collection! And twice as fast if you don’t! :smiley:

Hi all!

A few things to address.

Yes I absolutley will have dust collection! I’m planning on a $80-$120 shop vac and enclosing it in a 1.5” (two ply layer) of Baltic birch or MDF glued together with a viscoelastic material.

As for air flow, there will be negative pressure due to the s u c c of the shop vac. I will plan on having an inlet port on the floor of the enclosure. I’ll also have a nice little battery powered thermometer to monitor the temperature.

On top of all this, I also want to fill the gap between the dual pane acrylic windows with helium, as you can get as much as a 20db drop in SPL with an 8mm layer of helium! The only issue is helium likes to escape out of anything! Even silicone adhesive is no match for the tiny helium atoms. Leakage is impossible to stop. All I can do is reduce the helium leakage to a more tolerable level.

Here is a VERY insightful YouTube video with helium noise suppression experiments.

Helium vs Noise - YouTube

On top of this, I can very easily wire up a simple active noise cancellation system. Here is a video from the same person demonstrating pretty much exactly what I want to do.

Basically you Hooke up a small electret type mic to the inside of each wall, and feed the signal to an amp, then the amp drives a tactile transducer which cancels the vibrations.

It’s cheap. About $120 for the entire system. I can get a 5 pack of little mono amplifiers that produce 28W of power for $20 and 5 tactile transducers for $80-100. The microphones are also very cheap. About $15 for a 5 pack. It’s also really easy to adjust. The level of cancellation is pretty impressive!

1 Like

Do you know what kind of material you ~think~ you will be cutting most of the time?

If it is aluminum then you need to protect against those high pitched noises, and the sound from the router and/or dust collection is probably secondary (based on my experience). I have an original Nomad, and it sits in my office, nothing other than its stock box and I’ll cut aluminum on it while working on my computer just 4 feet away. I’ll have earplugs and/or headphones, but with my office door closed the high pitched noises don’t travel far (beyond my office door). Not saying you can’t hear it but the sound drops off pretty quickly. I let the chips just collect within the Nomad enclosure and use a shop vac to clean up at the end of the job.

If it is wood, the noise problem (at the source) is easier to solve, but this is where the dust collection problem gets harder to solve. It is my opinion that there is no such thing as “great” dust collection, all you can hope to accomplish is “good” dust collection. And for me, the dust collection is much louder than the actual router. I spent too much effort when I built my Shapeoko enclosure thinking about sound, and not enough thinking about dust.

If you are cutting MDF, less noise but an almost impossible dust collection problem. You will find MDF dust EVERYWHERE, you will curse it’s existence, you will swear to never use it again, and then something happens and you find yourself having to cut it again and the cycle repeats itself.

If it is cutting plastic, very little cutting “noise”. Harder dust/mess collection to dial in, but the mess will be contained to a smaller area, doesn’t drift in the air.

– Side Note –
Christmas of 2014 is when I purchased the Carbide 3D Nomad (serial number 102) for my high-school aged kid. You are going to have SOOOO much fun with this, enjoy every minute. Be sure to keep logs and photos of every project, and if possible start making things for friends and family. I learn something new every project.

Designing and building a CNC enclosure for the Shapeoko took me months… but that was intentional, it was fun. Even a year later I find myself having fun on weekends finding ways to tweak and further improve things. It’s almost as fun as the CNC projects themselves. So enjoy this entire journey.

3 Likes

A couple thoughts from someone who had to get the machine pretty quite in order to reach the appropriate wife approval score:

That shop vac is a significant noise maker. Save yourself some trouble and get an inexpensive harbor freight dust collector or something better. I got this one after running a shop vac in a sound deadening enclosure for about 6 months:

It has worked great for me and is much quieter and the tone is less shrill even without an enclosure.

While I think the helium idea is cool, it sounds to me like something that will require more work to create and maintain than it will be worth. A couple pieces of acrylic with an air gap between will work pretty well if you limit the size of your window. I used a usb boroscope/endoscope camera attached to my dust boot to compensate for a small window. If you are just looking for a cool engineering challenge to work on and this is just an excuse to try it, go for it.

The same principles that are used to limit sound transmission between apartments apply here. A high density-low density-high density material sandwich will work great. I used 3/4" MDF-2" of insulation-3/4" MDF.

Having a baffle on the enclosure air intake with a soft porous material on the inner walls will help significantly. You could also put an enclosure with a baffle around your cheap dust collector to further reduce the noise.

Be sure to have enough space around the machine to allow for maintenance and troubleshooting.

Depending on how the room is and whether you would be allowed, consider using some sort of weather stripping on the door into the room to limit how much sound escapes.

Unrelated to sound but related to having it inside your house:

Be sure to have a fire extinguisher in the room. Consider getting one of those extinguisher ball things that burst on contact with fire. Wood and plastics can start fires with the right combination of unfortunate events.

No dust collection is perfect. With wood, you will always find a layer of dust accumulating everywhere in the room. With plastics, static will cause you to find chips on everything that enters the room. With aluminum, avoid mixing chips with carpet. They are very difficult to separate.

2 Likes

:rofl:
Looks like someone has been there, done that…

2 Likes

Nick, it all sounds great, but do yourself and your folks a favor and build all of this into a workshop in the backyard; on the ground; out of the home. Please, take your folks to someone’s shop that does this kind of work. If you dare. :smiley:

Watch out for the over-engineering bug. It infects you with designs that you regret after actually using them. Helium-filled windows? Simple active noise cancellation system?

In two well thought out posts, you haven’t mentioned what you intend to build in this space, despite two requests. :smiley: That tells me a story. Generally speaking the art / product / solution comes before the shiny new gadgets! :smiley: It isn’t much different than buying a new car for work, but the only way to get to work is via commuter train.

It’s amazing how easy/quick everything sounds on YouTube and on paper, but in execution it takes forever and keeps costing you more money than you planned (in frequent visits to eBay/hardware stores/etc)

I wish I had the opportunity to visit someone else’s enclosure before I started building my tabletop and enclosure. Hopefully then they could have advised me in person on all the over engineering I was doing. (FYI/ people did advise me in the forums that I was overthinking elements of my design, but at the time, I couldn’t see past how simple my design looked on fusion360)

Don’t know where you are located, but more than happy to physically walk you through the enclosure if you are in Chicago or via zoom if you live somewhere else (just DM me).

The other thing is. You probably don’t need it to be whisper quiet. What you need is to absorb the high pitch sounds and some of the vibration, as the attic room will absorb noise in its own right. I say this from experience, as my bedroom is on top of my garage and I don’t hear anything from my bedroom. Fyi - my garage insulation is almost non existent.

Btw - secretly I’m hoping you execute your design as you stated as it would be the coolest thing ever.

2 Likes

As ever, these sorts of projects are a mixture of need and want. The ‘want’ things are always the nicest :slight_smile:

Just recently I finally purchased a nice headset with ANC (Active Noise Cancellation) but never imagined it in a CNC enclosure. Personally for me this is not an option as I’m planning on a future dust collection system but would definitely be interested in hearing about outcome if Nick goes that route.

I plead the 5th…

1 Like

Wow I’m getting lots of chatter about this!

I should also mention I’m president of engineering club at my local college and I’ve already reached out and discussed the feasibility of this with multiple people and the electronics of isn’t that hard. We’re actually doing robotics kits at home right now so I’m familiar with wiring things up. It’s looking like it’s gonna cost $150 on the higher end. I’m just not sure how much wattage i need I’m thinking 20W should be good.

The helium filled window gap isn’t as hard to maintain as it sounds.

All I need to do is install two valves. One at the top, and one at the bottom of the window. You just open both and pump the helium in from the top and it rises so it basically pushes the air out the bottom valve. Once it’s full you just close the valves.

One thing to consider is the fact that helium atoms are tiny and they will diffuse through just about anything. I wanted to use silicone adhesive but helium can pass through silicone very easily.

Thankfully 3M makes a Nitrile Glue. As far as gaskets go, nitrile gaskets have the lowest permeability to helium. So I will have to use nitrile glue to seal the windows. This should require recharging at most, once a month. All I have to do is buy two helium filled balloons and use those to recharge it. Not really much of a nuisance to me and if I can possibly get 20db of suppression than that is definitely worth it! I’m sure I’ll get at least 10db of attenuation.

As for what I’m making with the machine…

I have a mentor in the audio industry and he is designing so nice horn loaded systems for me to make and sell. I’ll be making large wooden horns/ speaker cabinets.
I’m also making a 1400W Bluetooth speaker. (10” Dayton high output reference sub. And some morel woofers and tweeters for the left and right channel. I’ll be using Bang and Olufsen ICE Power Class D amps which are dirt cheap for how well engineered they are. I’ll have one 1000w amp for the sub and two 200W amps for the left and right channel. It’s going to be Absolutley stupid loud!

Also I do live in chicago! Little over One hour west in pingree grove (near Hampshire and Elgin) not sure how close you are @Intohouse

That’s all for tonight folks!

1 Like

Alrighty everyone I have some new updates and questions!

First off, I am beginning to experiment with active noise cancellation!
I ordered Two tactile transducers, one 2 Channel 50w amp, some mini electret-type microphone modules, Oxygen free copper wire (for audio and power lines), and a 5v power supply for the microphones. I already have a 24v DC supply for the amp. If all goes well with some tests, ill order two more transducers and one more amp for a total of 4 transducers and 2 amps. Total cost so far is $110 so adding the other two should bring the cost to $180. This is going to be awesome if this works!

Next up, I have a enclosure design in Fusion 360.

External dimensions of 62" wide, 51" deep, and 26.25" tall.
Internal Dimensions of 60.5" wide, 49.5" deep and 25.5" tall.

These dimensions include the 3/4" layer of plywood that makes up the sides which are also 2’ x 4’ so I can cut 4 of them from a 4’ x 8’ sheet of plywood. makes it super convenient.

The Shapeoko 4 has a footprint of 50" x 41" x 19"

This leaves me 5.25" of space on both sides of the enclosure, and 4.25" between the front and back walls from the machine NOT including more sound dampening.

Im thinking of trying a 2" thick layer of rigid foam and seeing how good it works with the active noise canceling. does this seem feasible? Should I make the enclosure wider to give me more space? Id like to possibly add another 3/4" ply layer if needed. the foam and second ply layer would reduce the space on the sides to 2.75 which is pretty dang tight. I could make the enclosure 3" wider and that would give me 4.25"

One if the design considerations regarding the active noise cancellation is how the wall should be constructed. There are two options and they go as follows…

option 1 is I can leave a 3/4" gap between the outer plywood wall and the 2" foam, and I would place the Microphone inside that gap which would then measure the sound waves that are making it through and send that to the amp, then to the transducer and cancel out the vibrations in the panel.

option 2 is to glue both the foam and ply together, and just put the mic on the inside of the enclosure and recess it into the foam.

I think option 2 would be better as the gap will let the rigid foam resonate very loudly. any input on this would be appreciated!

1 Like

Following with great interest. I just love it when someone goes overboard with a cool over-engineered idea, this will at the very least be an interesting read, and possibly more :+1:

3 Likes

Just make sure you have enough clearance vertically for dust extraction.

2 Likes

Good point, and I would like to propose the Laws of Enclosure Height:

Law #1: “Whatever height you design your enclosure to be, you will soon find yourself wishing you had built it taller”

Law #2: You may be aware of Law #1, but it will still catch you.

Law #3 : the ceiling is the limit.

And just yesterday evening, completing the build of my N-th enclosure, I came up with a new law:

Law #4: the enclosure is only large enough if you can sit cross-legged inside it where the machine will be, and not bump your head.

6 Likes

How well do you think this would work?


I found a flange that would fit around the intake of the dust filter and it would have a 4” hose which sucks air in from the dust cyclone. The vacuum hose that connects the dust cyclone to the dust boot would be 2.25” wide.

The Wen air filter operates at 300-400 cfm and with the restrictions of the 2.25” hose, dust deputy, and flange, I imagine I could still get 120-160 cfm which would be great.

This also creates a negative pressure inside the CNC so air will always want to rush in and not out.

I think the harbor freight dust collector and the web air filter have the same motor type and similar power range? Seems like it could work! What are your thoughts?

I would not use one of those air filter systems as a dust collector. I use them at work and while great for getting fine dust out of the air, they would quickly clog up if used as a dust collector. The filter would be much more difficult to clean than a dust bag.There really is nothing better than the right tool for the job. An inexpensive dust collector from harbor freight or somewhere else is really the best choice. Now if you want to reduce the dust that settles on everything in that room, use that air filter in addition to a dust collector. Also, don’t trust CFM numbers on anything in this price class. They are very likely exaggerated. That doesn’t make them useless, just manage your expectations.

3 Likes