Thanks man! This is something I think I can sell. I’m fortunate that my place of work is a distributor for Spyderco, and my boss has agreed to sell me knives at a few points above wholesale. Got a bit more experimenting to do to get everything 100%, but feel I’m close to a final product.
The two knives I used had scales that are screwed on. One started with plastic (probably Delrin) the other micarta. They are fastened on with Trox head screws. So I simply removed all the fasteners, I stripped one screw head in the process but was able to source replacements.
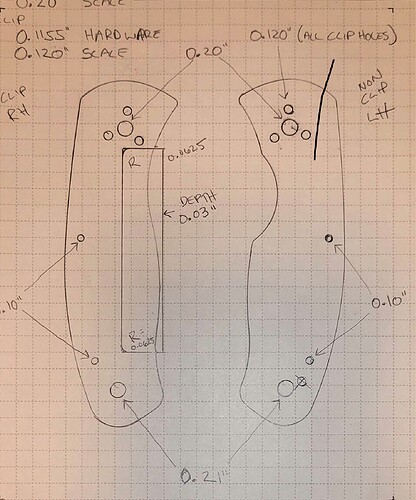
Once I had the scales off I placed them on graph paper and simply traced the outside with a very fine mechanical pencil. For the various fastener holes I would trace those too, but also measure them with my calipers and make notes of the hole ID and fastener OD.
At first I tried to scan the image but it came out slightly distorted. So I taped the graph paper to a flat surface and took a photo with my phone, slightly off angle. I then opened that image in photoshop and used the skew tool to get the image square, using the squares on the graph paper as a guide. Save that as a JPG.
Then I opened it in CC as a back ground image and scaled it until it fit within the work space. I even made a grid of boxes in CC the same size as the graph paper squares to be sure the scale was correct.
Then its just a matter of drawing with the curve tool for the outline and circle tool for the fastener holes and counter sinks. Once I have a “blank” scale in CC its off to the S5P for a test cut. On both knives I had to go back into CC to make some adjustments on hole placement and the overall outline. Now I have “blanks” for both the Para 2 and Persistence knives and can just add any pattern I want.
That Spyderco you have is not a great candidate for this as the scales are part of the knife body.
This is one of the background images I used:
