I want to use the S5Pro to clean up an end grain cutting board (post glue up) What bit should I be using?
If I use my S5 Pro for this I use my fly cutter with very, very light passes, especially with hard woods and this is the finishing pass (normally use the drum sander for finishing passes, much more efficient). I use a 5/16” or 8mm endmill to remove the first passes and most of the material.
I’m running version 1, 65mm spindle. You can use a standard 1/4” end mill as well. Just watch your depth of cut, a shorter overall bit length chatters less than a longer bit.
2 Likes
I think very important is the plunge rate for surface bits.
If I am too aggressive with my cutting depth the bits can get stuck. Always when they lower to cutting depth. Now I saw a video from Bryan Drapela who emphazised the need to use a ramp start with a very low angle, or alternatively very low plunge rate. When he in his video cuts sideways even with the large surfacing bit that cuts some mm(!) in cutting depth per pass.
It is worth some tries.
However so far I do the same as Tim: I use a 1/4inch roughing bit with 6mm cutting depth per pass to remove material, and then the 1…1.5 inch flatting bit for 1/3-1/2mm flattening depth: gives almost polished surface.
But that requires a tool change. Means time and manual work.
1 Like
There are some tips over here:

3 Likes
I haven’t bought them yet, but Haas CNC has some good pricing on their surfacing router bits. I have bought a fair amount of their CNC machining bits, and they are of good quality.
3 Likes
@ Redlander, I want to make sure I understood what you wrote. You said you use a drum sander for finishing passes which is much more efficient. I do have a drum sander but I wanted to try out the CNC to see if it reduces the time I spend on the drum sander. Should I just stick with a drum sander? I was also looking for feedback to see if it was worth the trouble to use CNC to flatten the material given that I will still have to sand anyway…
I suggest using a .25 EM and using a Raster Toolpath.
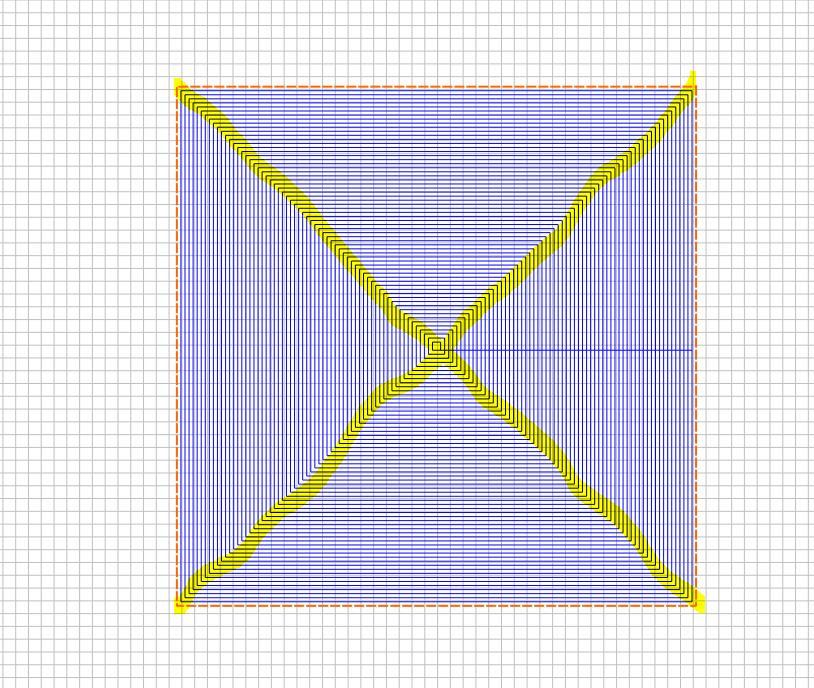
If you choose an offset toolpath on a square, you end up with an “X” on the board due to the corners. It’s very faint, but this will require a lot of additional sanding to remove.
If you use a McFly, then I suggest using a lead-in and doing a manual Toolpaths.
1st step is to measure your Board. Then, create a Line that is wider than the board by 1.25 times the size of the Bit. McFly is 1" in Diameter, so extend the Line 1.25" past each side of the Cutting Board.
Next, open the Array function, select the line. Assume a .5" offset, so take the length of the board in inches and multiply by 2. For mine, I used an 8x8 cutting board, so I set the number of Rows to 16 and the number of Columns to 1. Spacing is .5", select Group output and duplicate toolpath links. Now, Center the Array and set up your toolpaths.
Open the Toolpaths tab, select Contour Toolpath. Select the Array, Select the McFly Tool, set max depth to .02", No Offset, 20 degree Ramping. You should be good to go.

Manual Raster Toolpath

3 Likes
Yes, it is much faster for me to set the height and turn on the dust collector and drum sander to run final finishing passes on most everything I build (That will fit in thru it, 19-38 model & 1 25” model). The cnc is faster to get to desired thickness, but even taking light passes for finishing I still need to sand it. It takes time to set up the cnc, change bits etc. I keep files for standard sizes of material and just have to adjust the Z zero.
It’s up to you which you use, I do mot have a business to deal with how much time it takes me to complete projects.
1 Like
I just today finished surfacing one side of a 20 x 20 slab cookie end grain with my 5 pro and McFly. Works pretty good, but realizing that my spindle definitely needs tramming. VERY glad I surfaced my table flat as well. All that to say… just make sure your spindle is relatively square to your table.
I adjusted my toolpath to about a .6" stepover which worked fairly well and left only a minimal amount of “weirdness”. But that sped up the process significantly. I’ll sand the weirdness off with my random orbit sander.
Btw it is pine (which created other problems associated with pine pitch in my sweepy and vacuum system ![]() ).
).
2 Likes
I will use this on my finishing toolpath. Thanks!!
1 Like
For a bit more on making such toolpaths please see:
2 Likes
Sounds like a CNC sanding disc is worth a shot:
Enter the community challenge if you don’t want to build the tool yourself ![]()
Though to be honest, I imagine a 2” disc is a little small for what you get up to. Still an interesting idea.
2 Likes
The 2" disk will work if you want a smoother finish after the surfacing bit.
You can stepover 1 1/2", and you only want to take 0.002" - 0.004" at a time, so you can go pretty fast.
3 Likes
Just wanted to add here, that I found a bit from IDC Woodcraft for surfacing that I have been extremely impressed with. They sell it in 3/4, 1 & 1-1/2 inch diameter and it has been my goto for leveling boards for awhile now (I use the 1-1/2" on a 1/4" VFD). It leaves a smooth surface that requires very little sanding to remove the overlap marks.
2 Likes
This topic was automatically closed 30 days after the last reply. New replies are no longer allowed.