The other day@gmack asked about documenting the specifics of the Feedhold signal, and while there are already many posts on that topic, they are a bit scattered in various threads, so I figured I would try and tell the full Feedhold story here in case anyone is interested (and since I have been playing with this, so I might as well dump my notes)
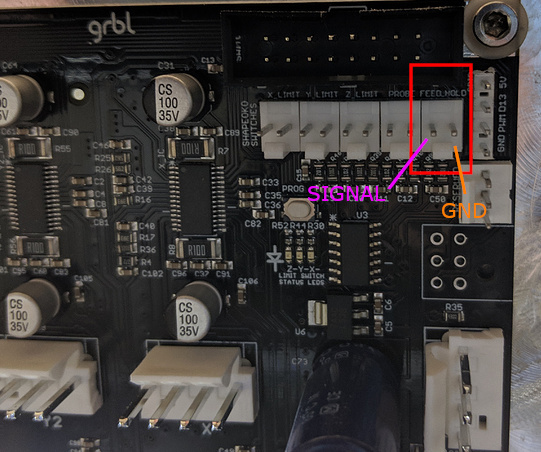
Let me steal a pic from another thread to illustrate where Feedhold signal pins are on a v2.4 controller:
the corresponding female connector is a .100" pitch 2-pin header from the Molex KK-series
As far as I know, this Feedhold pin header exists on all revisions of the Shapeoko controller (at least on 2.3, 2.4d, 2.4e which I guess covers 99% of the Shapeokos in use)
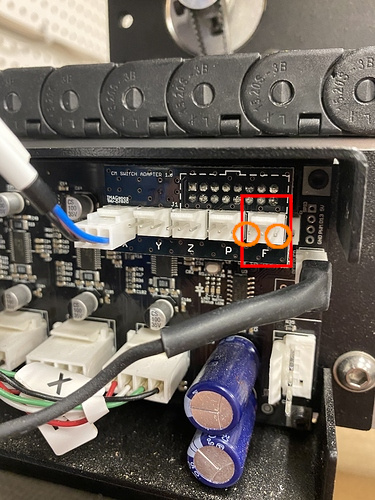
EDIT Aug2020: some folks now have a PCB riser board, for them the feedhold pins are the two OUTER pins of the “F” connector (left pin is signal, right pin is ground, and the middle pin is 5V so make sure to not use it or short it to the left/right pins):
Just like other switches, this is a NO (Normally Open) input, and shorting the two pins triggers the input. So one would typically wire a momentary switch to it.
Feedhold is a built-in functionality in GRBL: it is triggered either from activating a physical input (those pins on the Shapeoko controller in our case), or when sending the “!” character to GRBL
When feedhold is triggered, during a run, by default it would (only) stop motion.
The current Shapeoko firmware in the controller uses the vanilla GRBL 1.1 code (available here),
HOWEVER, a long time ago, Rob posted the GRBL configuration file used to build the Shapeoko firmware, and if one makes a comparison between GRBL 1.1 stock parameters and this Shapeoko specific config.h file, among a few other changes there are two lines that impact feedhold behavior:
// This option causes the feed hold input to act as a safety door switch. A safety door, when triggered,
// immediately forces a feed hold and then safely de-energizes the machine. Resuming is blocked until
// the safety door is re-engaged. When it is, Grbl will re-energize the machine and then resume on the
// previous tool path, as if nothing happened.
#define ENABLE_SAFETY_DOOR_INPUT_PIN

// Enables and configures parking motion methods upon a safety door state. Primarily for OEMs
// that desire this feature for their integrated machines. At the moment, Grbl assumes that
// the parking motion only involves one axis, although the parking implementation was written
// to be easily refactored for any number of motions on different axes by altering the parking
// source code. At this time, Grbl only supports parking one axis (typically the Z-axis) that
// moves in the positive direction upon retracting and negative direction upon restoring position.
// The motion executes with a slow pull-out retraction motion, power-down, and a fast park.
// Restoring to the resume position follows these set motions in reverse: fast restore to
// pull-out position, power-up with a time-out, and plunge back to the original position at the
// slower pull-out rate.
#define PARKING_ENABLE

// Enables a special set of M-code commands that enables and disables the parking motion.
// These are controlled by `M56`, `M56 P1`, or `M56 Px` to enable and `M56 P0` to disable.
#define ENABLE_PARKING_OVERRIDE_CONTROL   // Default disabled. Uncomment to enable
If you did not feel like reading that, here’s the TLDR: upon detecting feedhold, the controller will stop motion, memorize its current position, retract slowly, then stop the spindle (and now the router, if you have a BitRunner. It basically does an M5), then retract faster, almost up to the top of the Z axis (top - 5mm, just like when one starts a G-code file generated from Carbide Create)
This is a very long-winded way to explain what…Carbide Motion has been doing for ever: the “Pause” button trigs a feedhold.
In this excellent thread@ClayJar documented the effect of triggering feedhold at various other moments (but the only case I really care about is during a run).
After a feedhold is executed, GRBL waits for a special command to resume where it left. That’s part of the “safety” side of it (imagine if the machine could resume motion as soon as the feedhold is released…that would be both inconvenient and dangerous)
There is no dedicated physical signal available on the controller to do a “hardwired” resume. It is doable to reassign one of the existing signals to act as a feedhold resume, but it means rebuilding the GRBL source code, not for the faint of heart. @neilferreri also dropped a good tip recently if you consider doing that based on a 2.3 board: DON’T use the E-stop signal because of this
(EDITED) So what Carbide Motion does when you click “Start” after “Pause” is (most probably) sending the GRBL command character “~” to the controller to resume.
Upon receiving a Resume command, GRBL will reverse the feedhold sequence: it will move away from the parking position (Ztop-5mm), plunge back towards the material at a relatively fast rate, then when it gets near the Z position where feedhold happened, it will stop, turn the spindle back on (or router via BitRunner), and proceed to plunge slowly back to the original depth where it left of, and then it will continue the execution of the toolpath. Which is quite a nice feature!
(EDITED) If you are using Carbide Motion, there is therefore not much added value to wire the Feedhold input: the “Pause” and “Start” buttons are already managing that for you.
You may still want to have a robust backup/alternate way to tell the controller to halt: the wired Feedhold signal goes directly to GRBL, so it will work even in the event of a loss of USB communication between Carbide Motion and the controller, or if your PC freezes, or if your mouse is not within immediate reach, or anything of that sort.
If you do use a hardware feedhold switch, you will need to activate it a second time after the parking movement, for CM to re-enable the “Start” button, which can then be used for resuming the job (assuming the USB connection to the machine is still alive)
If you are using another G-code sender, you can resume by typing “~” in the G-code console.
Feedhold is arguably a weak safety feature : it relies on software to execute correctly to stop things, and unless you have a spindle or router+BitRunner, it will not remove power from the router. This has been debated multiples times here, but as far as I am concerned:
Feedhold is for the “wait, that does not look right, let me pause this job and think” moments.
An actual E-stop killswitch which removes power from EVERYTHING is for the OH S*** moments, when you need to act now and think later, and so be it if you mess up the current job.
Feel free to comment, provide additional info, point out my mistakes, and I’ll edit this post.
I imagine it has been discussed previously, but a quick forum search did not easily turn up the answer.
For the sake of curiosity, what particular connector interfaces with feed hold pins?
The individual housing link is dead, but the description provides enough information for a search if you use “Molex KK” in search terms. Enter preferred parameters.
So Carbide Motion knows when “Feed Hold” has been triggered, but it doesn’t provide a “Resume” button in the GUI? Is there a workaround (maybe GUI “Pause” then “Resume”?) Isn’t the timing critical part of the “Feed Hold” reaction handled at the PCB level? If so, isn’t there value to using it if it’s triggered by a spindle alarm? What voltage level is across the pins? Are they isolated from PCB ground?
I think it doesn’t know, because on a stock machine the feedhold input is not wired, so there is no reason for it to be triggered in the workflow.
Nope, that was my first try, it does accept the Pause, but since GRBL is already in feedhold state, I guess something in the answer does not please CM, and the resume button is not enabled. Which is perfectly normal, CM was not designed (and certainly not tested) to be robust against whatever evil tricksters like myself can do in their back
Yep, in theory the wired signal provide a more direct path (input electronics => arduino chip => GRBL software managing the associated interrupt to stop everything as a priority). But to be honest, when a person in involved, the difference in latency between clicking the Pause button, the USB message being sent, and GRBL stopping, and the “hardware” path is probably insignificant. It does take USB out of the equation though. And your case of wiring the output from a VFD/spindle to automatically feedhold the machine upon an alarm would probably be the one very interesting use of using the hardware input. But people who are likely to have such a setup are also likely to use something else than CM
I couldn’t say, the schematics are not public and I never reverse engineered that function. I would think they did not bother implementing an opto-isolated input, but I could be wrong.
But I guess if electrical isolation from VFD control signals is a concern, then the PWM would be the first thing to look into.
The GRBL controller may not notify the host on these events, it may need to be polled to determine this status, not really something you’d put in the “normal user” software either way, well, not unless your hardware team had gone and put a labelled pin header on the board, in which case you’ve got an incomplete feature implemented by the hardware team but missed by the software team…
One pin is a solid 0V and the other is sat at 5V, looks like a normal pull up resistor for a remote connection to pull to ground, doesn’t seem to be isolated, which is consistent with the whole bus of home switches etc.
Indeed, and after @quicky06 experiences I have to say I’m rather tempted to opto-isolate the PWM output before connecting it to my HY VFD. I will certainly be testing for any ground differentials before doing that.
In all fairness and since we’re going to the bottom of things in this thread, I think that feedhold hardware input is used (or used to be used) on Nomads to manage the door safety (the machine would park when the door is opened), which was apparently mandated by European regulatory reasons
I wasn’t really criticising, it’s just one of those facts of life when you have multiple teams on a product, where you have parts shared between multiple products then it becomes pretty much inevitable. A big chunk of your JIRA backlog ends up being “fix this thing the other team accidentally broke when they fixed…”.
I’ve been pretty impressed with the electronics and software engineering on the Carbide products, it’s good for a small company (and much better than most large companies, not mentioning any in particular)
Which of the two pins is the actual signal pin and is this pin getting tied to GND or 5V when the switch triggers? I want to be able to trigger a Feedhold from my spindle controller if it decides to stop the spindle.
Here (in the US) most probably would have said “getting to the bottom of things in this thread”, which is a good thing. Any chance for changes in CM someday to make it useful?
I think this is where we admit what we’re doing is in the unsupported area and take the option to use CNCjs or one of the other open source senders that Carbide enable us to use by using an open firmware.
That’s one of the things that tipped my choice toward a Shapeoko.
On the US version Nomad during cutting, activating the feedhold once will stop and retract, activate again and the “Start” button is enabled. If you keep it on until the retract move is done then release, the “Start” button is enabled for resume.
If the Shapeoko isn’t setup like this could it be as simple as a rewrite of CM?
Ide imagine a door switch for Shapeoko peeps would be appreciated. And with all the bitrunners out there it could be pretty useful.
I’ll edit the first post accordingly, this is so cool. I use a momentary switch, so it never crossed my mind to keep it held. And then I re-read your sentence and tested that triggering FH a second time…indeed re-enables the Start button…which allows one to resume.
And I’ll add that I started this thread thinking, this physical feedhold switch thing is mostly useful for CNCjs/UGS users, and won’t work nicely with CM, and now the conclusion is quite different: CM brings the added value of managing feedhold and resume with the same button, while with CNCjs or UGS one needs to either type “~” in the console (easy but not super convenient) or modify the GRBL code to use another input to resume (not always possible/easy)
This should have been obvious to me from the start, since the Nomad has (had?) that safety door thing.
I have wired the feedhold and a resume. It functions well while running a program, I need to tested it more to know if/how it will behave interrupting CM routines (probing, move to the predefined locations) although not the intended use case.
Great news on the second press or hold down of the feed hold button, the option of being able to resume from the PC is a nice bonus. I went right to the shop and verified both of these features work great.
Adding the feedhold could not be easier, polarity does not matter unless you also use the gnd terminal for the resume button. The resume does require soldering a wire to the A2 pin on the ATmega. I bought an IOTrelay just before the Bitrunner was announced and have it plugged into my vacuum’s tool port. The standby current draw of the relay does not turn on the vac so it cycles normally with the router. With the Bitsetter and automated spindle control (on/off) multi tool jobs are a breeze. I use the router’s power switch to ensure safety during bit changes, and could not be happier with the work-flow.
I would like if CM had hotkeys for Pause, Resume, and Stop so they could be easily mapped to a StreamDeck I use for jogging controls.
Below is a quick sketch of the control wiring NVR, E-stops, Vacuum, and IOTrelay. The NVR is one I had on hand it works but I’m not crazy about a 120VAC E-Stop circuit.