I tried it at first I did not get any taste just a bit of smell from it. Found out if you smoke the ice first got better results.
It seemed to be the fad early this summer. So I cut some out of white oak. Gave a few away and ended up selling about 10. I still have some sitting on the work bench though.
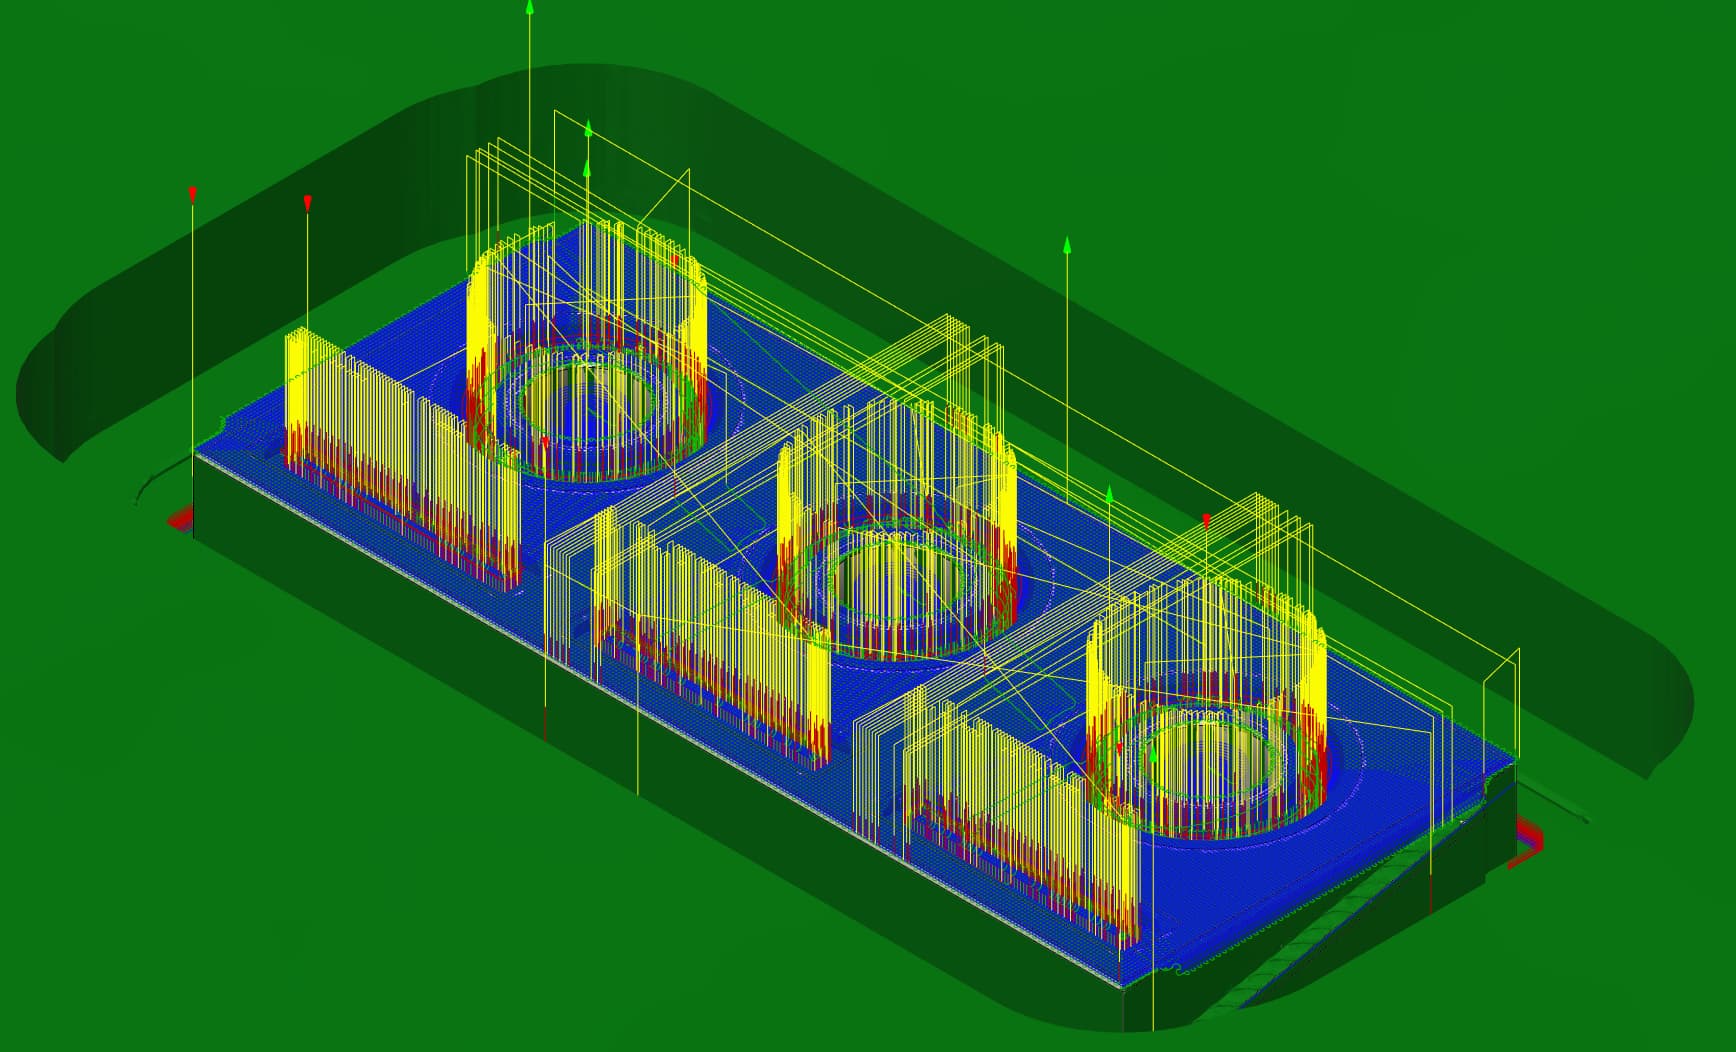
Boring (with same bit as ^) was 7 minutes as I was worried about clogging the bit so I kinda emulated drill pecking by doing one step down for each at a time
So in total about an hour and a half. With almost a half hour being rapid movements which I did not realize until just now lol. I wanted to reduce the amount of material removed so I limited the cutting to the model’s silhouette which probably is why there’s so many rapid movements.
What bit, font style and path type did you use.
I lost the center of a few small letters recently using a 30 degree bit that I thought would have worked ok.
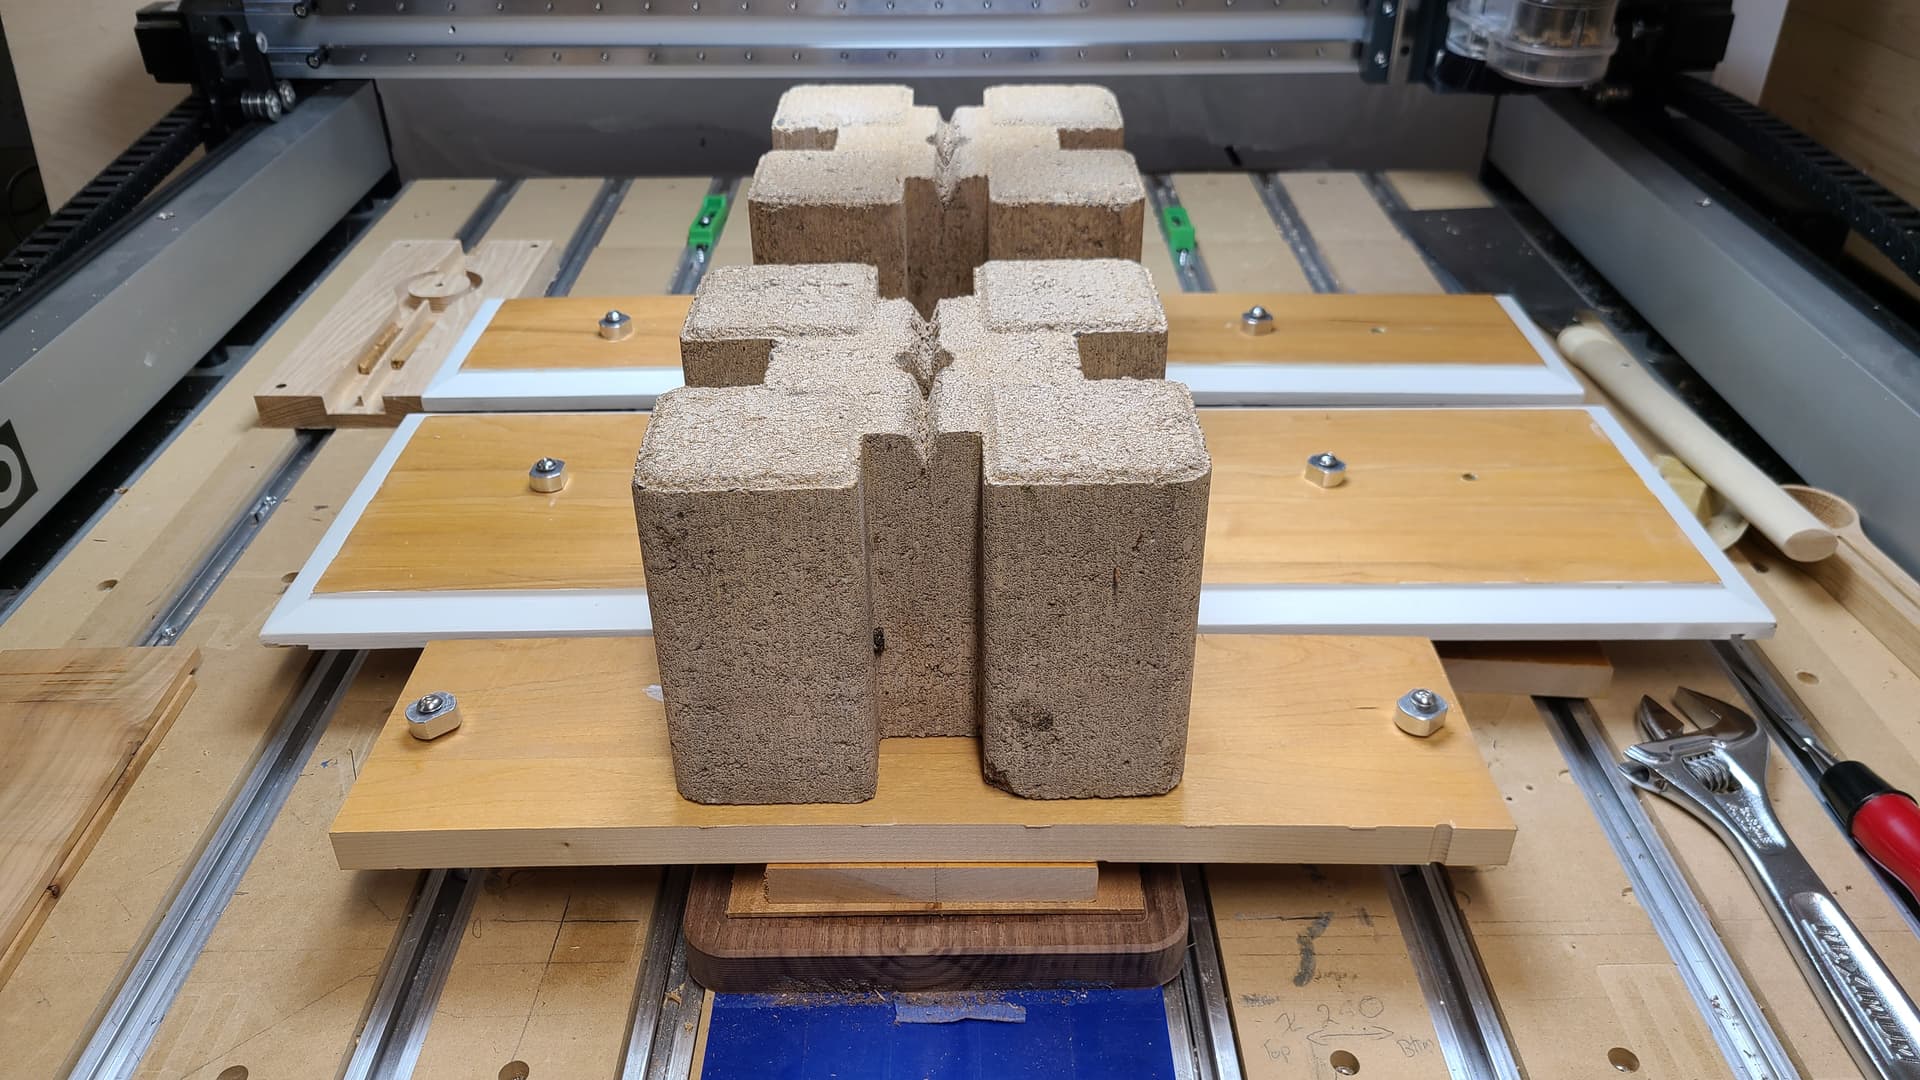
The current project is building a pantorouter from scratch for cutting a variety of woodworking joints.
It uses a Bosch router on one side of a wooden pantograph that copies the shapes from 2x sized wooden templates. Google “pantorouter” for the original - this is pretty extensively remixed from original plans purchased from Matthias Wandel, and incorporates some of the features of the metal commercial version. Lots of plywood and oak parts drawn in CC and run though CM on the 5 Pro 2x4. Joint routing templates drawn in Alire Atom 3D and rendered using MeshCam. Still a work in progress, but I’ve completed enough now to test alignment and cut some mortices and tenons with it.
There are a few other projects laying around in the background, including my Arduino jog box for CM by the Surface Pro.
End Mill is #302 Vee 60d, PR-12, FR-35, RPM-1800, D/P-0.08 with a Max Depth of 0.07, no offset.
Script is V Carve
Foo Figters, Let It Die and FF is Contour
(All done with #302 Vee 60d)
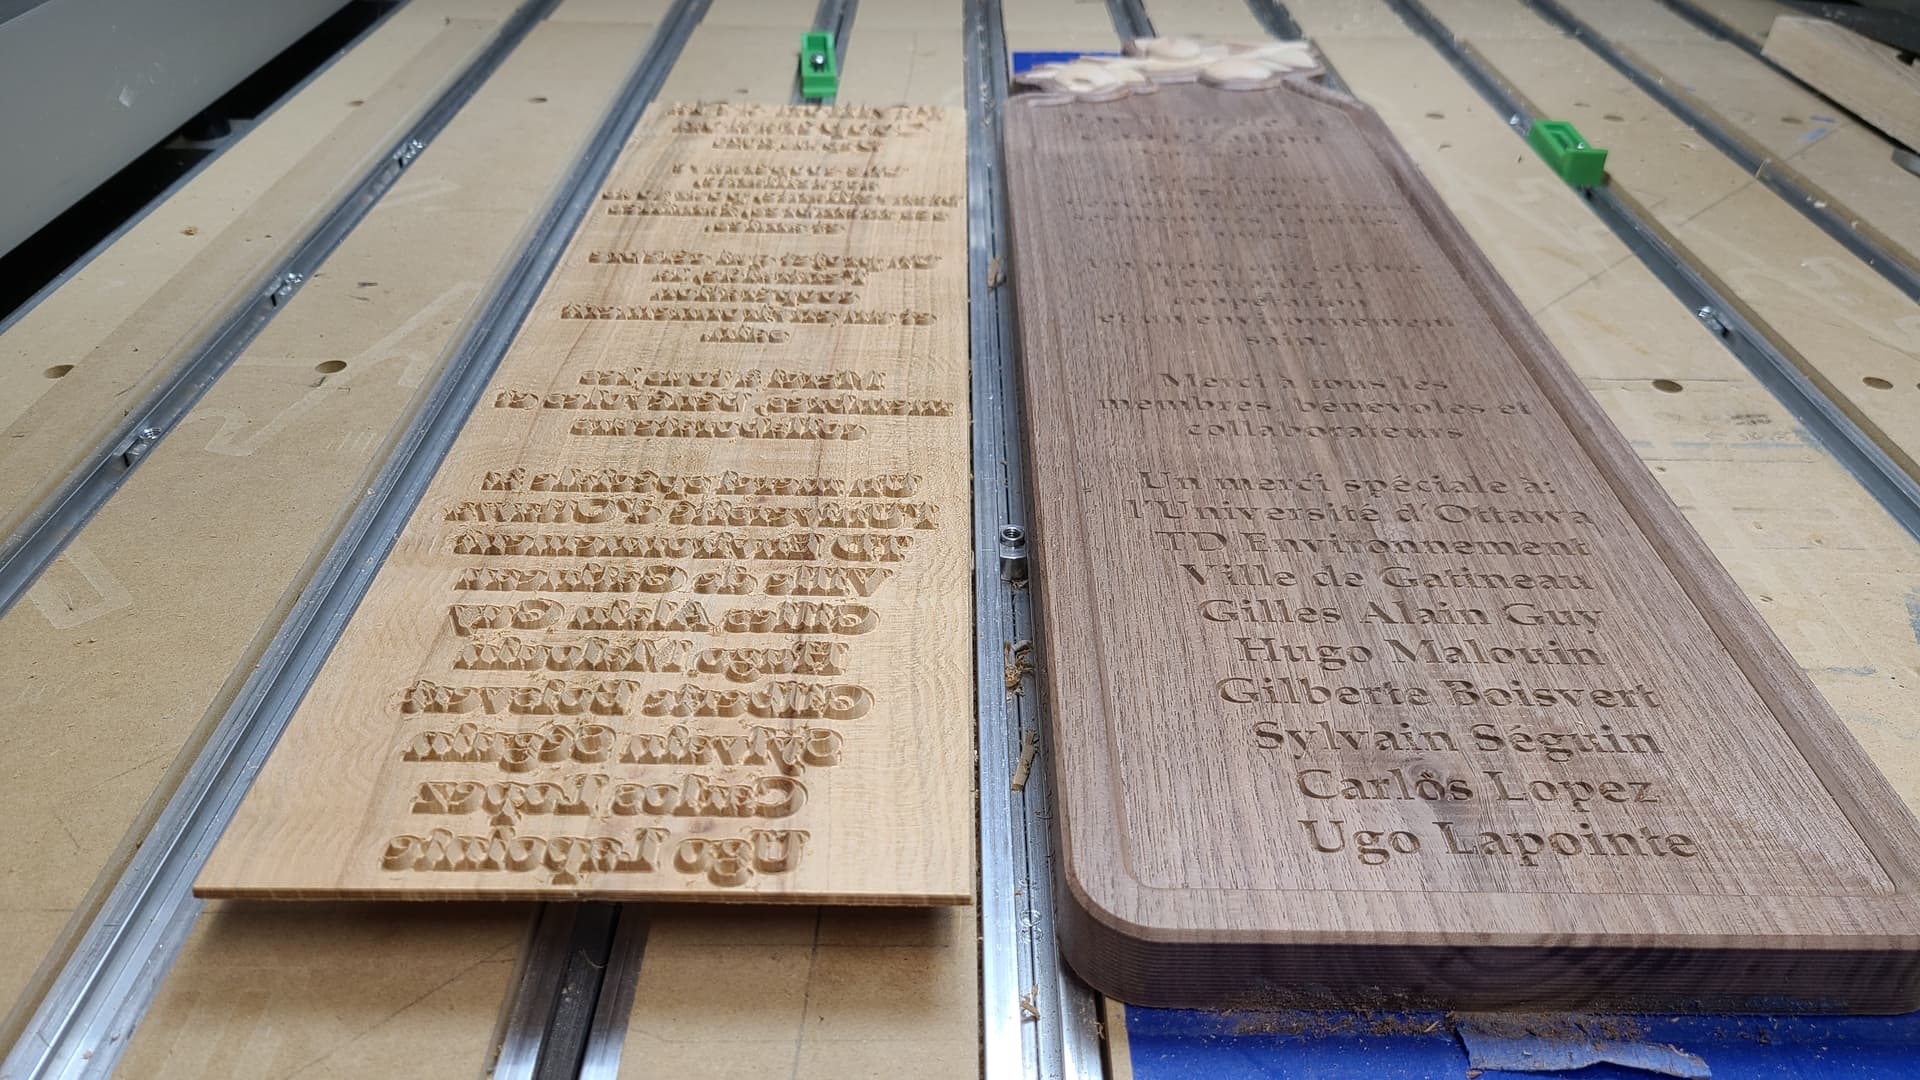
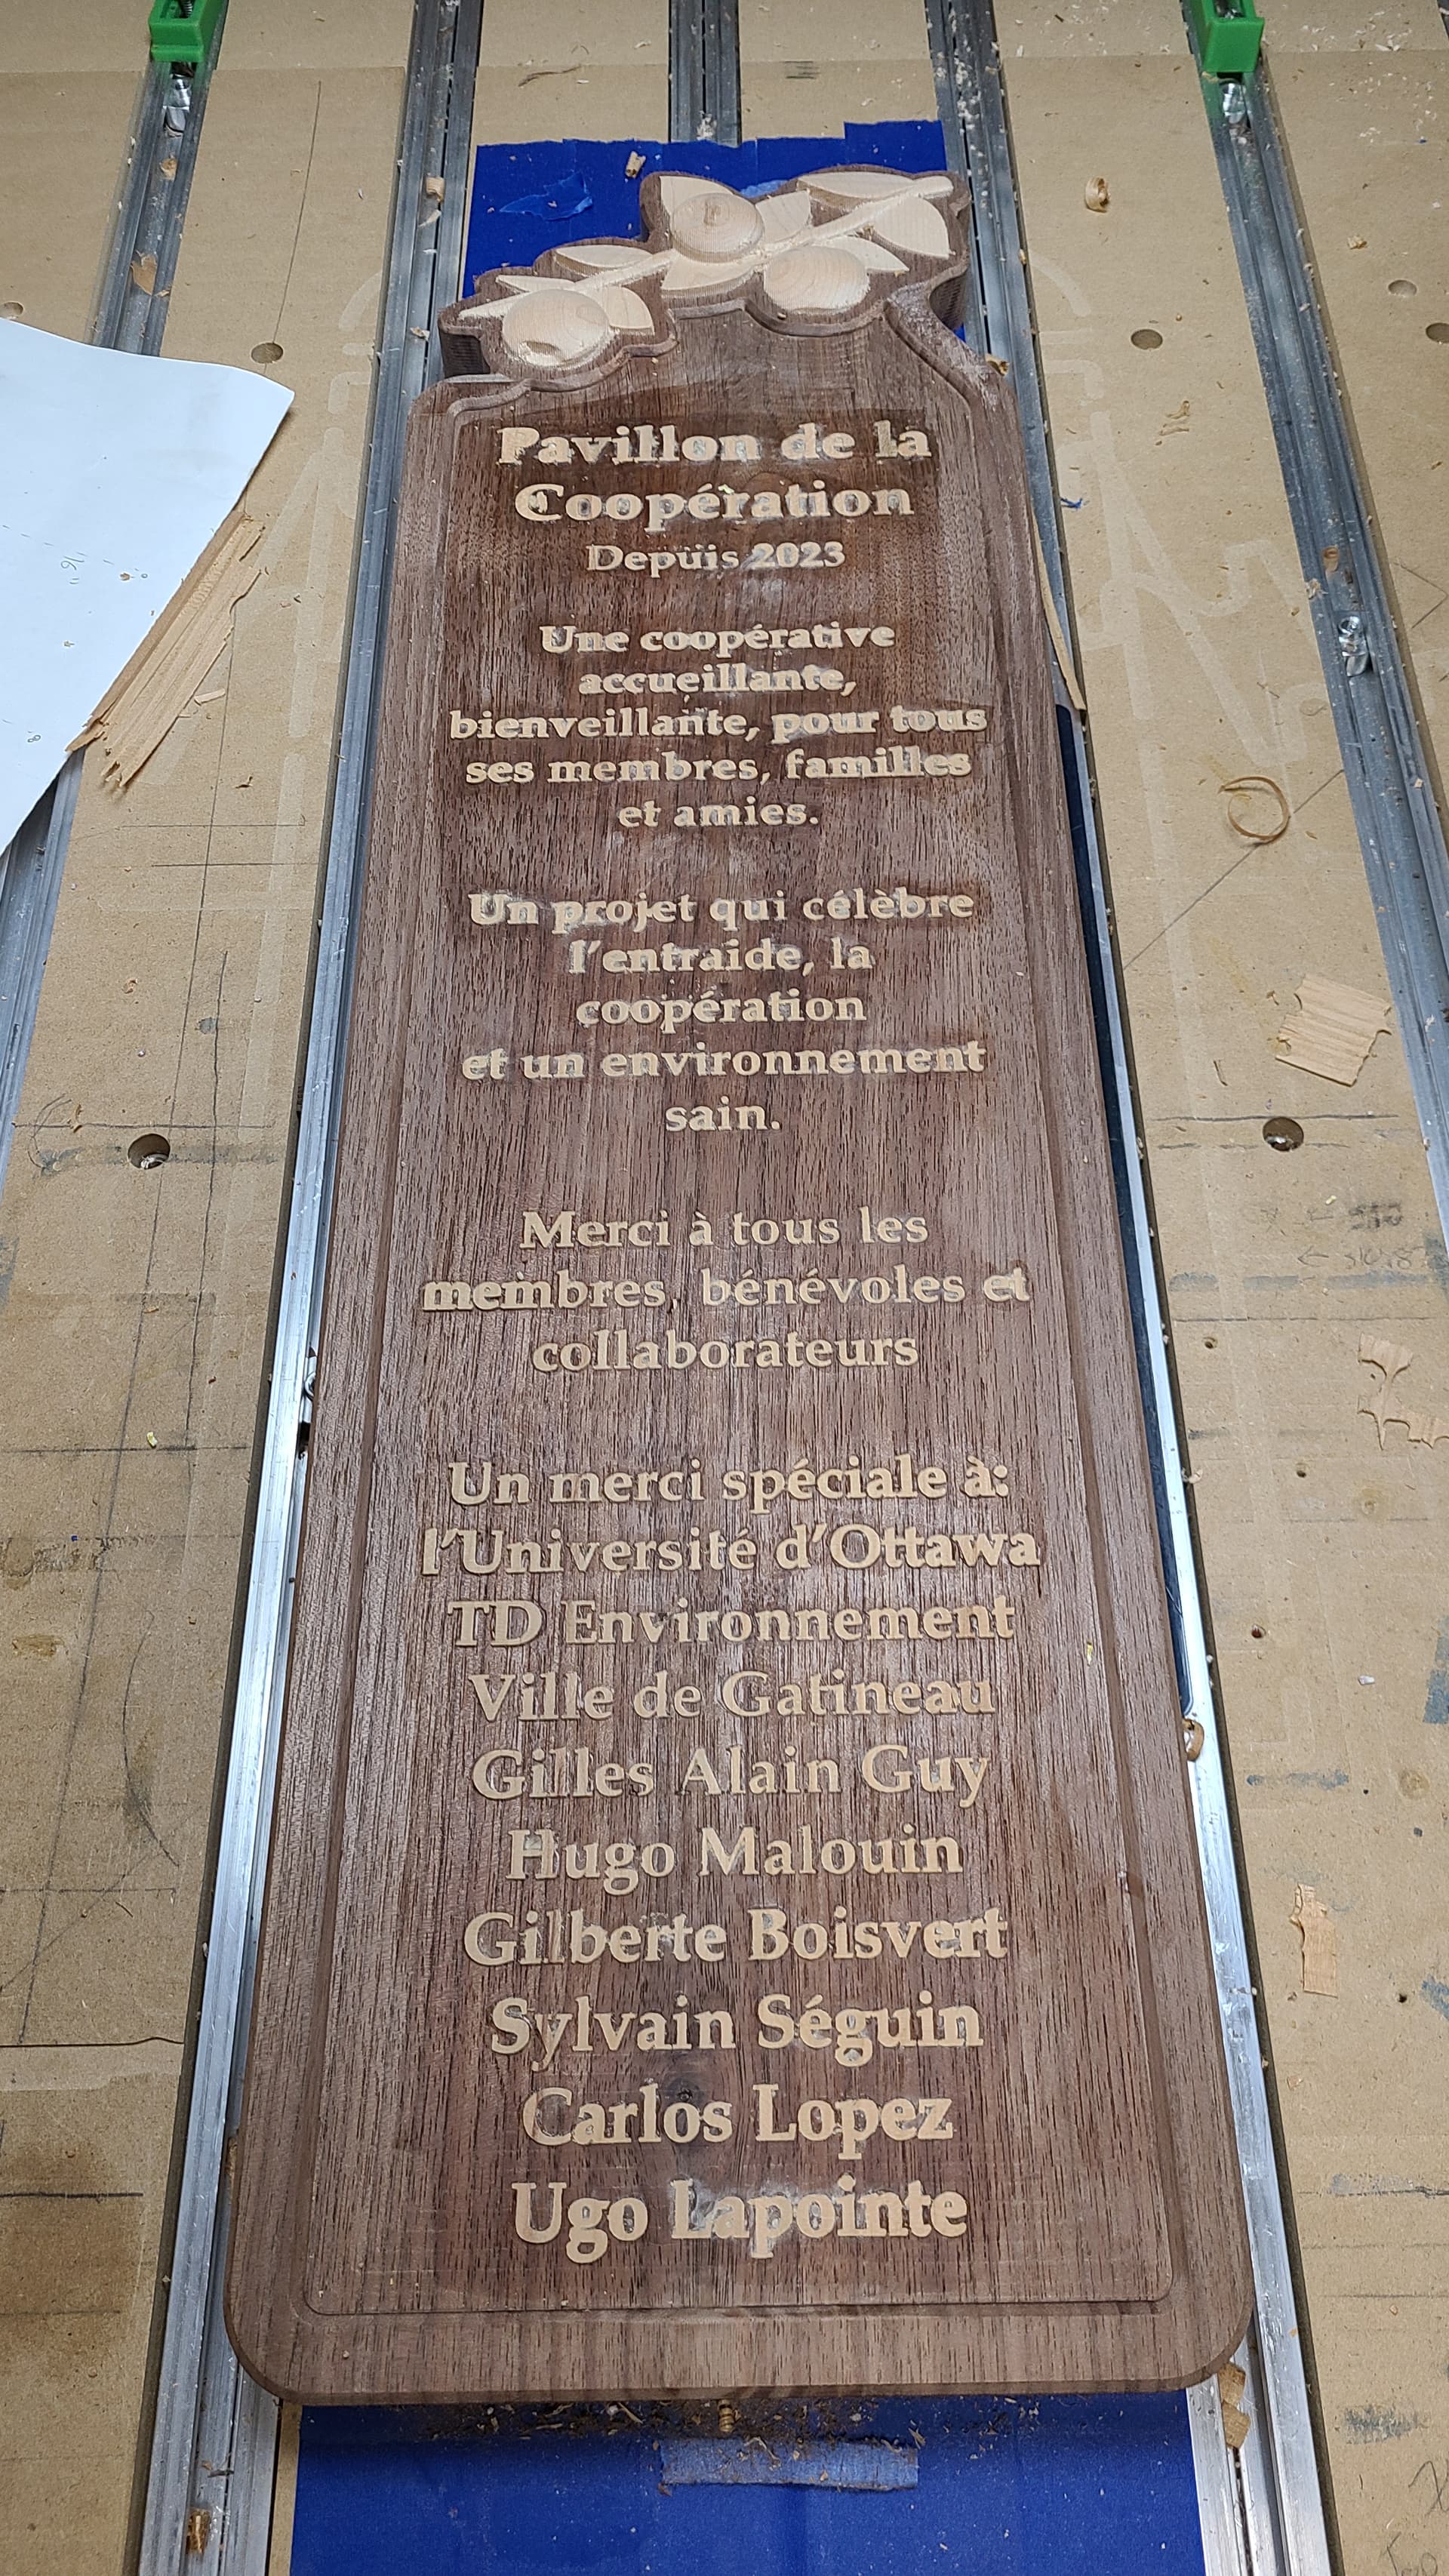
Each line written separately, which may seem painful but is definitely for the best in my opinion.
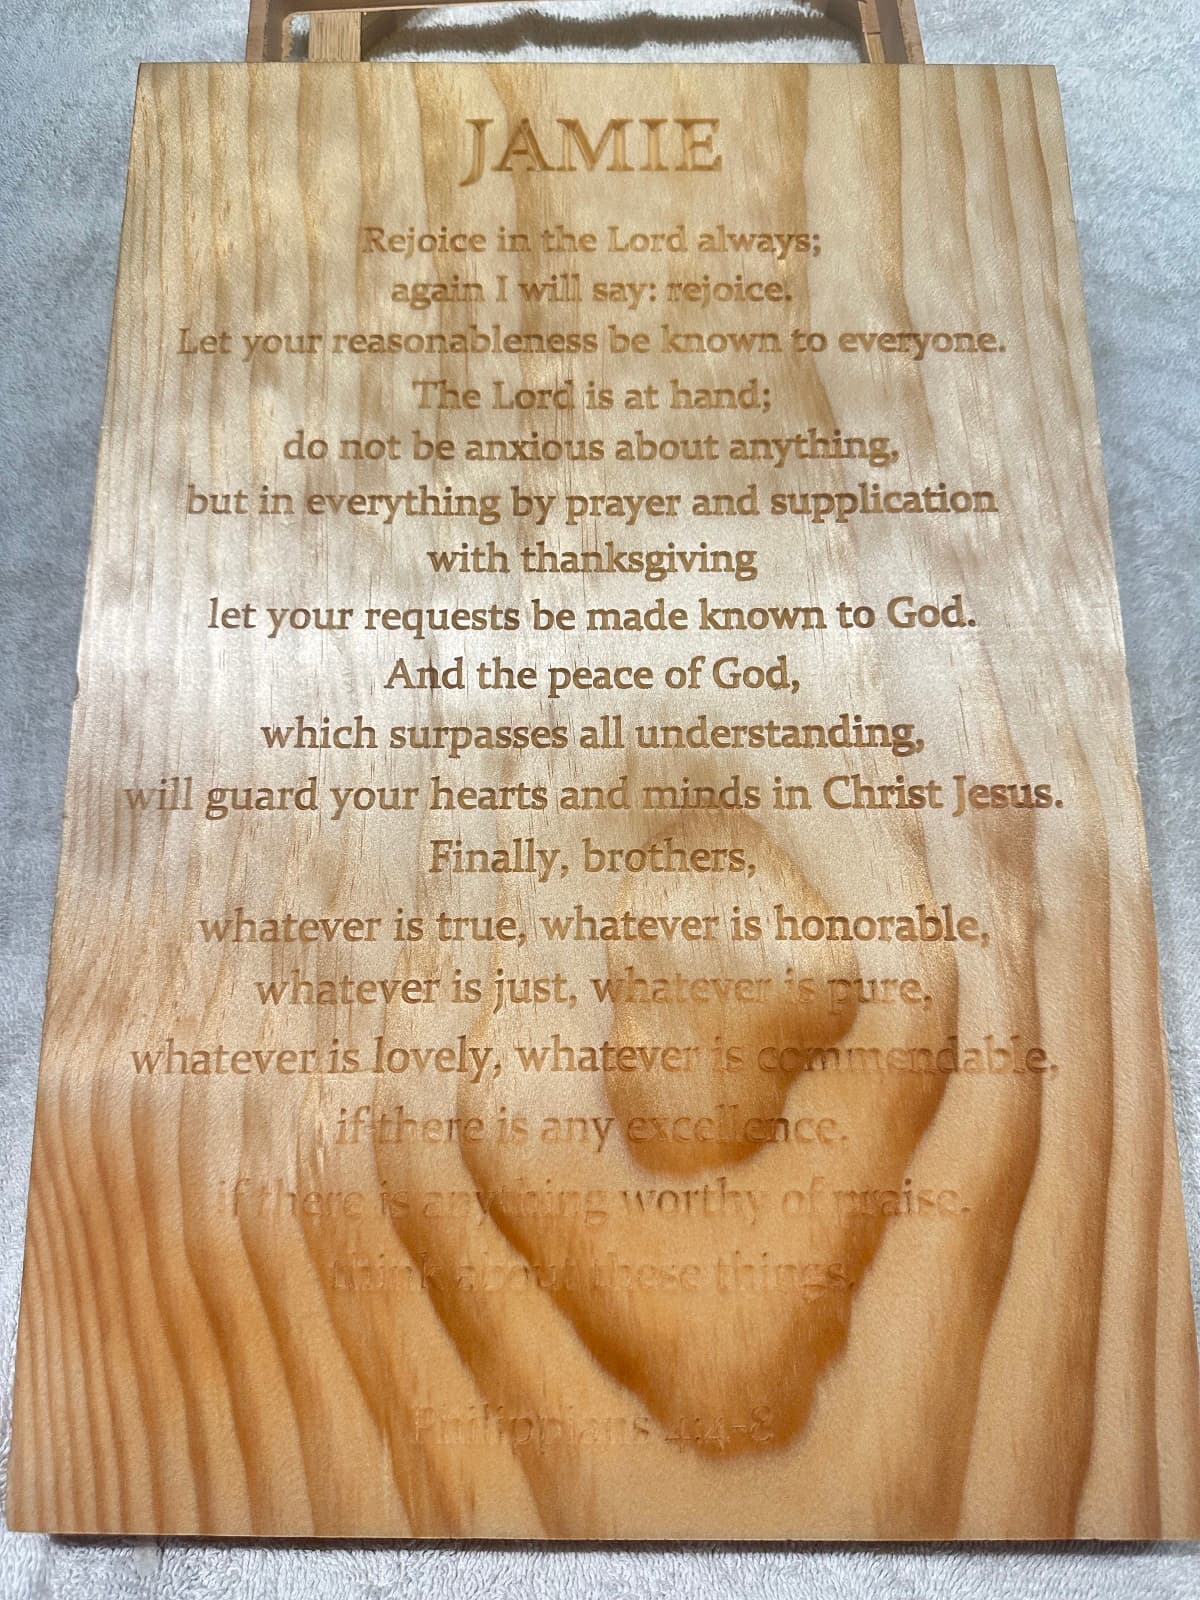
I had taken great care in plaining and sanding this fairly large 2.5" board 24x16. Flat is so important. My table is square and flat but the concrete floor it can wheel across does change slightly. This means i check table first for level. This current position im out 0.3d. Therefore my board must be at 0.3d to be flat in respect to the environment.
All went well minus the last verse on the bottom left. It scribbed in the air mostly. A small dip in the board. At the end of the project I reset zero to the specific troubled issue. Then disabled everything except that verse. Fingeres crossed while holding the E-Stop it worked!
Minwax 210B Golden Oak for finish
(The picture shows level at 0.0 but i shimmed it up for the picture. I didnt feel like explaining it to those who dont care haha). One of my favorite tools
There isn’t much you can’t cut on the 5 Pro, but it’s a question of time, both in drafting and in cutting.
The pantorouter will cut a full set of clean mortice and tenons for a table or chairs in a couple of minutes and can easily do so on angled pieces that are hard to secure on the CNC. Changing over to end-cut tenons on the front of the 5 Pro is possible but time-consuming.
It’s much like making long straight cuts on the CNC - it’s possible, but far quicker and easier on the table saw.
It’s also a fun challenge to build…
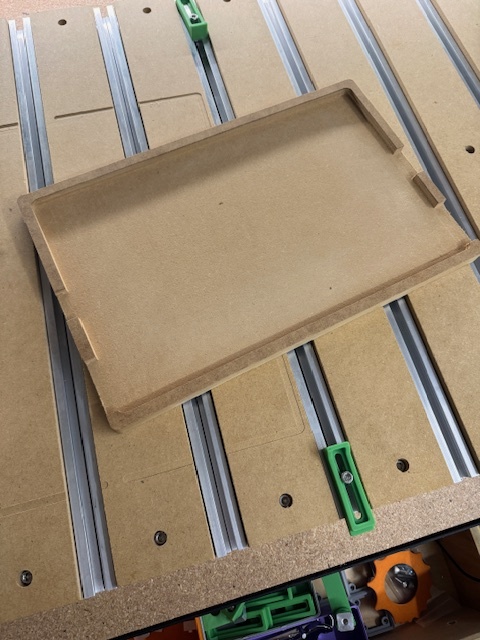
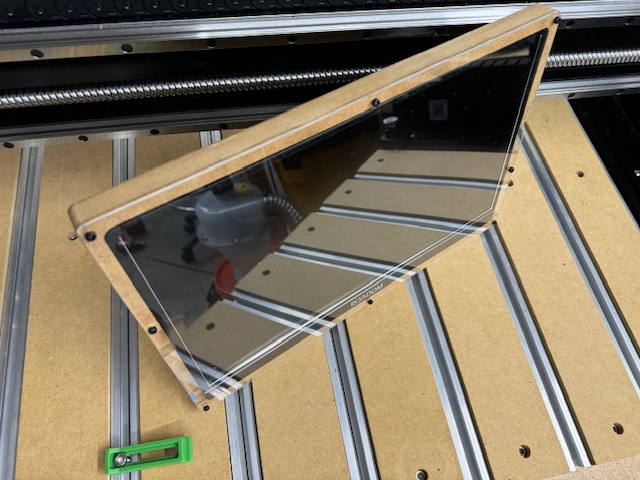
I got a cheap 15.6" portable monitor to connect to the Raspberry Pi running Carbide Motion but it didn’t have any mounting options. I modeled a base in Fusion with slots for the fans (or maybe they are speakers, I couldn’t tell) and IO ports and cut it out of a piece of MDF. Then I created a drawing for the acrylic screen cover and cut that out.
The Shapeoko worked flawlessly and the MDF part was simple. I haven’t worked with acrylic much and things fell off a bit there. I think the acrylic flexed a bit while cutting, and I still need to tram, but it left a half MM of material on an edge which was a pain to get off cleanly. Then I decided I wanted a couple more bolt holes than I originally cut out and foolishly used an automatic center punch near one edge of the acrylic and sent a chunk of acrylic into some unknown corner of the garage.
It was a fun, simple first project to start learning the workflow and I’m still happy with the results
I installed a new wastebord today after several years of surfacing my old one.
2 sheets of 19mm mdf, bottom one is bolted to the Aluminum plate, top one is glued on.
After they were in place I did a contour cut around the perimeter to square it up to my machine for easy alignment of stock, then I surfaced it with the McFly. Ready to go for new jobs
To keep your spoilboard in good shape try using bottom of material on through cuts. I replaced my SO3 XXL spoilboard in October 22 and except for a few operator errors it is in good shape. When I used the top of material I either cut through or left an onion skin. Since switching to the bottom of material for through cuts my spoilboard is near perfect. For projects that dont cut through I still use the top of material. I always measured my material very carefully but would still get cut through. Give it a try and see what you think.
Work in progress but cut out a text inlay plug tonight, not sure why but these text inlay’s are the most stressful to watch… Took me 2 hours to cut this out but the fine detail look pretty good, slowed it down to avoid chipout. I’ll say cherry cut way better then the roasted maple I used last time which was just brittle and prone to chipout. Dry fit locked into place with 1.5mm spacing between the flats of the sign and inlay backing material. Anyhow spread the glue, set the text inlay plug into place and clamped it down on the hybrid table. Tomorrow I’ll get to see if it’ll be a success or if I’m milling out 3mm of the sign and redoing the engraving with masking and paint… Fingers crossed!!!
EDIT: So I snuck out to the workshop this morning because I really wanted to see the result. Still have some sanding to knock down the text flush with the surface and I did notice a few characters that will need some repair work but I’ll scrape out some of the voids and fill with glue and sawdust from cutting the inlay plug. Also noticed that the characters that chipped out are closer to the center, I’m thinking the clamping using the hybrid table was my issue because I’m pretty sure the wood clamps bowed under pressure and had more clamping force on the edges then in the center of the sign. If I use this method again I’ll need to consider using a board with a flat side and on the other a curve to try and correct this. Ideally I’d be using a hydraulic press like my uncle had in his workshop but I don’t have the space for one of those. Anyone use the vacuum bags for this, I’ve seen people use them for veneers but thinking it may work for this and much easier to store away.
I am so jealous. I have been trying for over a week to get one inlay to work and all I get is firewood.
Maybe you have a different idea on how to make an inlay like this. Can you share the bits you used and the setting depths of both the pocket and the plug? I have review about 5-10 different people’s versions and none of them are working for me so maybe you are doing something different.
I’m beginning to believe that my 3XXL with the std. router just can’t do the job. Everything looks great in all my previews for CC, but the cutouts are just trash.
You might need to tune up but my SO3 XXL cuts great. If you have a Makita/C3D router power off the machine and router. Put a bit in the router and then pull back and forth on the collet/bit. If you feel movement maybe your router bearings are bad. If you dont feel any give then it would not be the bearings. If it does move it is very obvious and either a rebuild is in order or a replacement. Unfortunately the bearings in Makita/C3d routers go bad and cause inaccurate cuts because the spindle is bouncing around.
To tune up start by checking all your v-wheels. With the power off try to turn the v-wheels and it should move the gantry. If just the wheel turns then adjust the bottom wheels. Insert an allen wrench in and slightly loosen the bolt. Then with a wrench slightly turn the eccentrics. Hold the wrench on the eccentric and tighten up the bolt. Check again. There is tight and then too tight. Also before adjusting take a stiff nylon brush and clean the v-wheels to get any buggers off. Sometimes the v on the X and Y rails get dirty and I use a white 3m finishing pad to clean them off. The 3m finishing pad is like those scrubby things on the back of dish washing sponges.
After you get your v-wheels adjusted check your belt tension. There is no objective way to tell you how to adjust the belts but have the gantry all the way to the back and on the Y rails put your finger under the center of the belt on both sides and see if they feel about the same tension. You should be able to get your finger under the center of the belt. The X belt move the router to one end and repeat like the Y belts and it should feel about the same tension.
Lastly do a calibration test which you can find here on the forum. Basically you cut a particular size circle and square and then measure the output to see if it meets the design in CC. If the belts and v-wheels are in good shape then you can adjust the steps per MM in gbrl. The default steps are pretty accurate but each machine is slightly different.
Have you lubricated your Z-Plus and/or HDZ. There is a maintenance guide to give guidance on lubricating the bearing blocks.
I do a maintenance almost everyday before I start cutting anything. I have the std. CC router and the Z plus carriage.
The V-wheels are all tuned and will move in the X and Y direction without to much pressure but they are original with the machine (now about 3 years old) so maybe they need replaced…though they look good.
Bearings seem ok. No movement front to back with a bit in the router. Does have some upward slack, but has had that since I’ve owned the machine so I’d be surprised if that were a problem
Belts tensioned to hum as per instructions from C3D.
Test cuts with squares and circles come out fine.
Have not lubricated the bearing blocks so I guess that’s all that is left to try.
I can cut a circle and an inlay circle without any problem and have them fit. The problem comes as soon as I try to cut anything with any real design in it. Just seems to turn to trash, with the pocket just cutting out too much material to have any kind of small detail left and the plug leaving to much material to make the design worthless.
Ugh.
Having to go back to contours and pockets to get jobs done at this stage.